Skip to content
DisclaimerTerms Of UseGDPR PolicyCookie Policy

tastymomrecipes

  • Home
  • Drinks
  • Appetizers
  • Dinner
  • Dessert
  • About
  • Contact
  • Privacy Policy
DisclaimerTerms Of UseGDPR PolicyCookie Policy

Olivia

- 2 cups all-purpose flour - 1/3 cup granulated sugar - 1 tablespoon baking powder - 1/2 teaspoon salt - 1/2 cup unsalted butter, chilled and cut into small cubes - 1/2 cup dried cranberries - Zest of 1 large orange (about 1 tablespoon) - 1/2 cup heavy cream - 1 large egg - 1 teaspoon pure vanilla extract - Extra granulated sugar for sprinkling When making cranberry orange scones, fresh ingredients matter. Use high-quality butter for a rich taste. Look for unsalted butter to control the salt level. Choose dried cranberries that are plump and moist. They add great flavor and texture. Fresh oranges give the best zest. The zest adds bright, citrus notes. For the flour, use a good all-purpose brand. It helps create a light and tender scone. You can adjust the recipe for dietary needs. For a dairy-free version, use coconut cream instead of heavy cream. Replace butter with vegan butter or coconut oil. If you need gluten-free scones, try a gluten-free flour blend. This will still keep the scones light and fluffy. For a lower sugar option, you can cut the sugar in half. The cranberries will still add sweetness. - Preheat the Oven Start by preheating your oven to 400°F (200°C). This step is key for a nice rise. - Prepare Baking Sheet Line a baking sheet with parchment paper. This helps prevent the scones from sticking. In a large bowl, whisk together the dry ingredients. Combine 2 cups of all-purpose flour, 1/3 cup of granulated sugar, 1 tablespoon of baking powder, and 1/2 teaspoon of salt. Make sure they mix well to aerate. Next, add 1/2 cup of chilled, cubed unsalted butter. Use a pastry cutter, fork, or your fingers to work the butter into the flour until it looks like coarse crumbs. You should see small chunks of butter. This will make your scones flaky. Now, gently fold in 1/2 cup of dried cranberries and the zest of 1 large orange. The zest gives a fresh flavor that brightens the scones. In a separate bowl, whisk together 1/2 cup of heavy cream, 1 large egg, and 1 teaspoon of pure vanilla extract. Blend them until smooth. Slowly pour this wet mixture into the dry ingredients. Mix gently with a spatula until just combined. Do not overmix; the dough should be slightly sticky. Turn the dough onto a floured surface. Knead it gently about 5-6 times until it comes together. This keeps your scones tender. Shape the dough into a circle about 1-inch thick. Cut this circle into 8 equal wedges. Arrange the wedges on the prepared baking sheet, leaving space between them. For a nice finish, brush the tops with a bit of extra heavy cream. Sprinkle some sugar on top for added sweetness. Now, bake them in the preheated oven for 15 to 20 minutes. They should turn golden brown. A toothpick inserted in the center should come out clean. Once baked, let the scones cool on the sheet for a few minutes. Then, transfer them to a wire rack to cool completely. Enjoy your delicious cranberry orange scones! To get the right texture, start with cold butter. Cut the butter into small cubes. This keeps the butter cold and helps create flaky layers. When mixing, use a pastry cutter or your fingertips. You want the mixture to look like coarse crumbs, with some small bits of butter still visible. This step is key for light and fluffy scones. Mixing is where many go wrong. Once you add the wet ingredients, stir gently. Mix just until combined. The dough should be slightly sticky but not wet. Overmixing can lead to tough scones. Aim for a smooth dough with visible chunks of cranberries and zest. - Oven Placement: Place your baking sheet in the center of the oven. This helps ensure even cooking. Avoid placing it too close to the heating elements. - Baking Time and Temperature: Bake at 400°F (200°C) for 15-20 minutes. Keep an eye on them. They should turn golden brown. A toothpick inserted in the center should come out clean. If they brown too fast, cover them loosely with foil. This will help avoid burning while the insides cook fully. {{image_4}} You can change the flavor by adding nuts. Chopped walnuts or pecans work great. They add crunch and depth. If you want a fruity twist, try diced apples or fresh blueberries. Both will mix well with cranberries and orange. Think about adding spices for warmth. Cinnamon or nutmeg can boost flavor without overpowering. A pinch of cardamom also brings a unique taste. Experiment to find your favorite spice blend. If you want a healthier option, consider using honey or maple syrup. These natural sweeteners can replace granulated sugar. Adjust the amount slightly since they are sweeter than sugar. This change adds a richer flavor to the scones. A simple glaze can make your scones shine. Mix 1 cup of powdered sugar with 2 tablespoons of orange juice. Drizzle this over cooled scones for a sweet finish. You can add zest for extra flavor. Serve scones warm with clotted cream or butter. For a fresh twist, add a side of fruit preserves. You might also pair them with a cup of tea or coffee. These options make any gathering special. To keep your scones fresh, place them in an airtight container. This helps prevent them from drying out. If you have leftover scones, try to store them at room temperature. They will stay soft for a couple of days. If you want to keep them longer, refrigeration is an option, but it may change the texture. Freezing scones is an excellent way to enjoy them later. First, let the scones cool completely. Then, wrap each scone tightly in plastic wrap. Next, place them in a freezer-safe bag or container. They can last for up to three months in the freezer. When you're ready to enjoy, simply thaw them at room temperature. To bring back the fresh-baked taste, you can reheat your scones. Preheat your oven to 350°F (175°C). Place the scones on a baking sheet for about 5-10 minutes. This will warm them up nicely and restore some of their crispness. You could also microwave them for about 15-20 seconds, but avoid overheating to keep them soft. You can tell if scones are done by checking their color. They should be golden brown on top. Insert a toothpick into the center; if it comes out clean, they're ready. The edges should feel firm but not hard. Trust your nose too; the aroma will fill your kitchen when they're ready. Yes, you can make the dough ahead of time. After mixing, wrap it tightly in plastic wrap. Store it in the fridge for up to 24 hours. This can save you time on busy mornings. When you’re ready to bake, just cut the dough into wedges and follow the baking steps. Cranberry orange scones pair well with various toppings and drinks. Here are some ideas: - Pairing Suggestions - Clotted cream adds richness. - Honey brings natural sweetness. - A bit of butter enhances flavor. - Best Beverages to Accompany - Tea complements the scones nicely. - Coffee adds a nice kick. - Fresh orange juice is refreshing. In this blog post, we covered the essential ingredients needed to make delicious cranberry-orange scones. You learned how to choose the best ingredients, as well as useful substitutions for dietary needs. The step-by-step guide showed you how to mix, shape, and bake for perfect results. We also shared variations, storage tips, and answers to common questions. To sum up, making scones is simple and fun. With these tips, you'll create tasty treats that everyone will enjoy. Now, it's time to gather your ingredients and start baking!

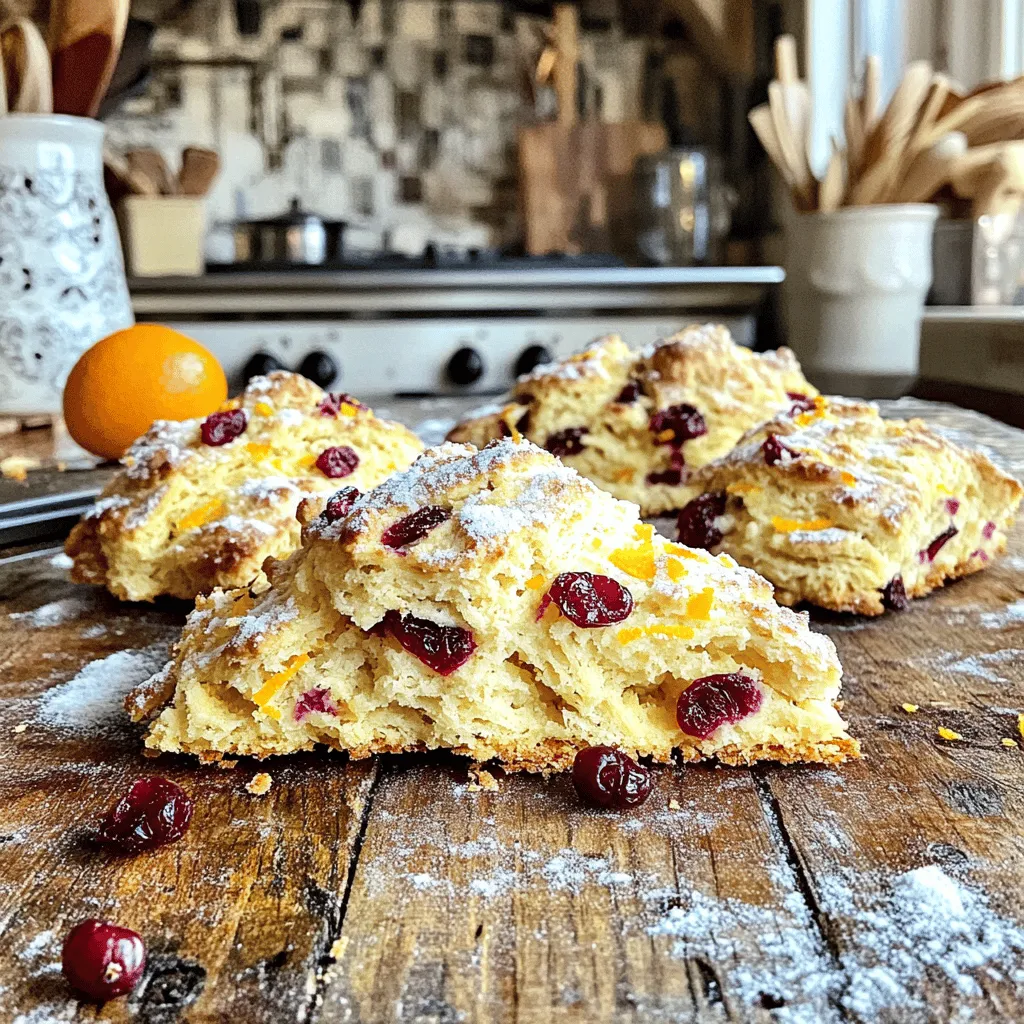
Cranberry Orange Scones Flavorful and Simple Treat

Welcome to a delightful journey of baking! Today, we’re making Cranberry Orange Scones, a treat that’s both flavorful and simple.

- 1 pound baby carrots or regular carrots - 3 tablespoons honey - 2 tablespoons olive oil - 1 teaspoon garlic powder - 1 teaspoon salt - ½ teaspoon black pepper - ½ teaspoon ground cinnamon - Fresh parsley for garnish (optional) - Air fryer - Mixing bowl - Spatula or tongs When making air fryer honey glazed carrots, I always start with fresh, quality ingredients. The baby carrots are my go-to because they are sweet and tender. If I use regular carrots, I peel and cut them into sticks about 2 to 3 inches long. This keeps them uniform for even cooking. The honey is the star of this dish. It adds a rich sweetness that pairs well with the natural flavor of the carrots. I mix the honey with olive oil to help the glaze stick. The garlic powder, salt, black pepper, and ground cinnamon add depth and a touch of spice. For equipment, I use an air fryer, which cooks the carrots quickly and gives them a lovely caramelized finish. A mixing bowl is essential for combining the glaze. I like using a spatula or tongs to coat the carrots well. This makes sure each piece gets that delicious honey glaze. Gathering these ingredients and tools makes the process easy and fun. You’ll enjoy every step of making this simple yet flavorful side dish! To start, you will need to prep your carrots. If you choose regular carrots, peel them first. Then, cut them into sticks that are about 2 to 3 inches long. This size helps them cook evenly. If you have baby carrots, you can skip this step. They are ready to use right out of the bag. Next, make the honey glaze. In a large mixing bowl, pour in 3 tablespoons of honey. Add 2 tablespoons of olive oil to the bowl. Then, sprinkle in 1 teaspoon of garlic powder, 1 teaspoon of salt, ½ teaspoon of black pepper, and ½ teaspoon of ground cinnamon. Stir everything well until it combines nicely. The glaze should be smooth and sticky. Now, it's time to coat the carrots. Place the prepared carrots into the bowl with the honey glaze. Use your hands or a spatula to toss the carrots. Make sure each piece gets a nice coating of the glaze. This is key for great flavor. After that, preheat your air fryer to 375°F (190°C). Preheating helps the carrots caramelize perfectly. Once the air fryer is preheated, arrange the glazed carrots in a single layer in the basket. If your air fryer is small, you may need to cook them in two batches. This prevents overcrowding and helps them cook evenly. Air fry the carrots for about 12 to 15 minutes. Shake the basket halfway through to ensure even cooking. After cooking, check your carrots for doneness. They should be tender and have a lightly caramelized surface. If you want them crispier, feel free to air fry for an extra 2 to 3 minutes. Keeping an eye on them is important to avoid burning. Carefully take the carrots out of the air fryer and place them on a serving dish. Drizzle any leftover honey glaze on top for an extra touch of sweetness. To finish, sprinkle chopped parsley over the carrots. This adds a nice color and flavor contrast. Enjoy your delicious air fryer honey glazed carrots! To get a perfect glaze, mix the honey and olive oil well. I like to use a bowl. This helps the honey coat each carrot evenly. Toss the carrots in the glaze until they shine. For a different taste, try maple syrup instead of honey. You can also use agave nectar for a vegan option. The size of your carrots matters. If you use baby carrots, they cook faster. Regular carrots cut into 2 to 3-inch pieces take longer. Keep an eye on them to avoid burning. Shake the basket halfway through cooking. This helps them cook evenly. If they look too dark, lower the time by a few minutes. Spice up your carrots by adding herbs. Fresh thyme or rosemary gives a nice touch. You can also sprinkle some chili flakes for heat. If you want to change the glaze, try balsamic vinegar. It adds a tangy flavor that balances the sweetness. Don't be afraid to play with flavors! {{image_4}} You can add a kick to your carrots by mixing in cayenne or chili powder. Start with a small pinch. You want just enough heat to balance the sweet honey glaze. The warmth will enhance the flavor without overpowering it. This twist is perfect for those who enjoy a little spice in their meals. Fresh herbs like thyme or rosemary can elevate your carrots. Simply chop a handful and toss them in with the glaze. Fresh herbs add a bright flavor, unlike dried herbs. If you only have dried herbs, use less. They are more potent. Try different herbs to create your signature taste. Want to add more colors and flavors? Combine carrots with other veggies. Bell peppers, zucchini, or even broccoli work well. The air fryer cooks them evenly and quickly. This way, you can enjoy a healthy mix of flavors and textures in one dish. Plus, it’s a great way to get more veggies on your plate! To store leftover honey glazed carrots, let them cool first. Place them in an airtight container. This keeps them fresh and tasty. You can store them in the fridge for up to 4 days. Make sure to label your container with the date. The best way to reheat these carrots is in the air fryer. Set it to 350°F (175°C) and heat for about 5 minutes. This keeps the carrots crisp. You can also use the microwave if you're in a hurry. Just heat them for 1 to 2 minutes. However, the texture may not be as good. You can freeze honey glazed carrots for long-term storage. First, let them cool completely. Then, place the carrots in a freezer-safe bag or container. Remove as much air as possible to avoid freezer burn. They can last up to 3 months in the freezer. When ready to eat, thaw them in the fridge overnight. Reheat in the air fryer for best results. To lower the sugar in air fryer honey glazed carrots, use less honey. You can replace some honey with unsweetened applesauce. This keeps the flavor but cuts the sugar. Another option is to use a sugar substitute like stevia. Always taste as you go for the best flavor. Yes, you can use other veggies! Bell peppers, zucchini, or sweet potatoes work well. Just cut them into similar sizes for even cooking. Adjust the cooking time if the vegetables are thicker or denser. For most veggies, set your air fryer to 375°F (190°C). This temperature works well for quick cooking and browning. For softer veggies like zucchini, you can try 350°F (175°C) to avoid overcooking. You can store cooked honey glazed carrots in the fridge for 3 to 5 days. Place them in an airtight container. This keeps them fresh and ready to enjoy later. Air fryer honey glazed carrots pair nicely with roasted chicken or grilled fish. They also complement rice dishes or quinoa bowls. For a full meal, serve them with a salad or some crusty bread. This blog post covered everything about making air fryer honey glazed carrots. You learned about the needed ingredients, equipment, and specific steps for cooking. We also shared tips for the best glaze and variations to suit your taste. In the end, these carrots are easy to prepare and fun to eat. Whether you enjoy them sweeter or spicier, they add flavor to any meal. Don't be afraid to experiment with your favorites. Enjoy cooking!

Air Fryer Honey Glazed Carrots Flavorful Simple Side

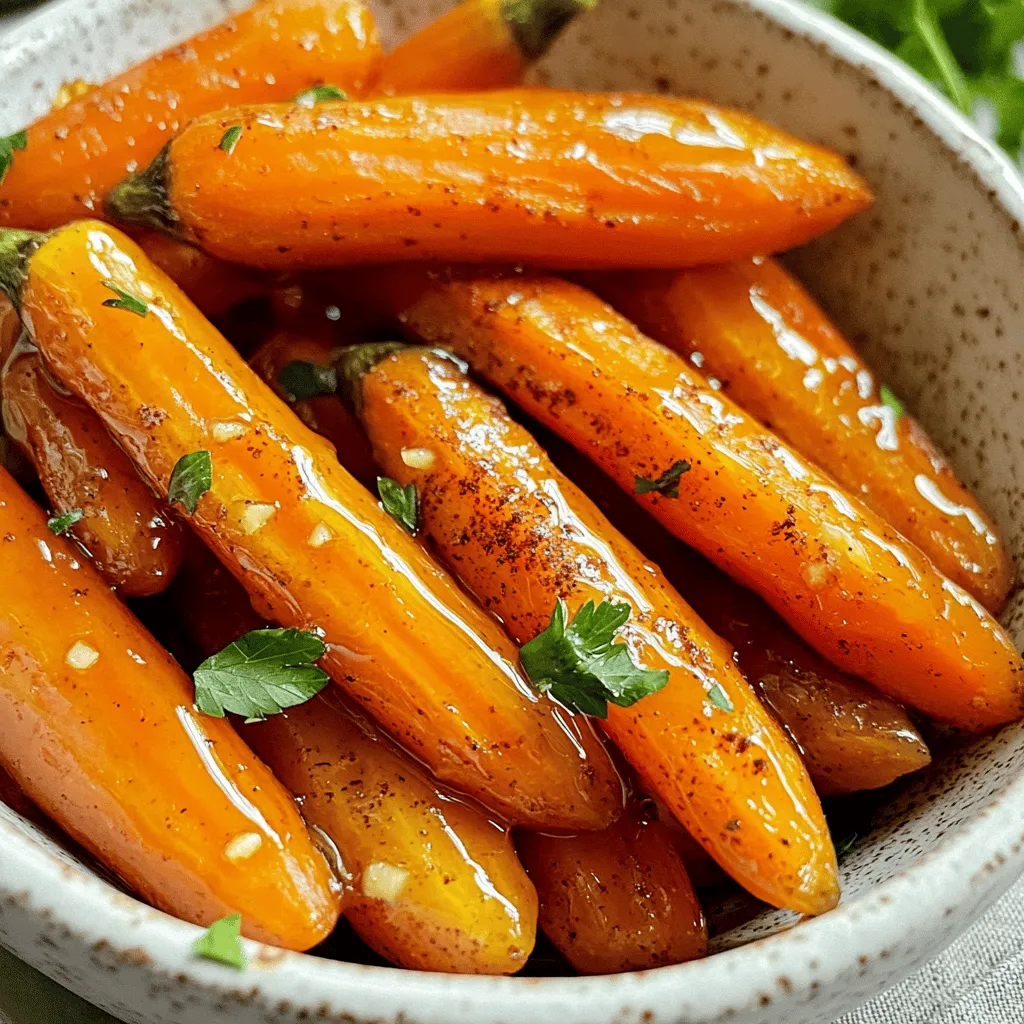
Are you ready to spice up your dinner table with a sweet twist? Air fryer honey glazed carrots are a

To make this dish, you need simple, fresh ingredients. Here’s what you will need: - 1 cup orzo pasta - 2 tablespoons olive oil - 1 small onion, finely diced - 3 cloves garlic, minced - 8 ounces fresh mushrooms, sliced (cremini or button varieties) - 4 cups fresh spinach leaves - 1 cup vegetable broth (preferably low sodium) - 1 cup heavy cream (or coconut cream for a dairy-free alternative) - 1 teaspoon dried thyme - 1 teaspoon garlic powder - Salt and freshly ground black pepper to taste - 1/4 cup grated Parmesan cheese (optional) - Fresh parsley, chopped, for garnish These ingredients blend well to create a creamy, rich flavor. The orzo serves as a wonderful base, soaking up all the tasty juices. Want to switch things up? Here are some optional ingredients you might consider: - Sun-dried tomatoes for a sweet tang - Peas for a pop of color and sweetness - Fresh herbs like basil or thyme for added flavor - Cooked chicken or shrimp for extra protein These additions can change the dish's taste and make it your own. Feel free to experiment! If you need to make swaps, here are some easy substitutions: - Use whole wheat orzo for a healthier option - Replace heavy cream with cashew cream for a vegan choice - Swap mushrooms for zucchini or bell peppers if you prefer - Use chicken broth instead of vegetable broth for a richer flavor These substitutions keep the dish tasty while catering to different diets. Enjoy making it your way! Start by boiling a large pot of salted water. Once it bubbles, add 1 cup of orzo pasta. Cook it until it is al dente, which usually takes about 8 to 10 minutes. After cooking, drain the orzo in a colander and set it aside. This step is key to a perfect texture. In the same pot, heat 2 tablespoons of olive oil over medium heat. When the oil shimmers, add 1 small diced onion. Sauté it for about 3 minutes until it becomes soft and clear. Next, add 3 minced garlic cloves and 8 ounces of sliced mushrooms. Cook this mix for 5 to 7 minutes. Stir it often until the mushrooms are tender and golden. Finally, toss in 4 cups of fresh spinach leaves. Stir for about 2 minutes until the spinach wilts and turns bright green. Now it is time to create the creamy sauce. Pour in 1 cup of vegetable broth, and let it simmer gently. Lower the heat and add 1 cup of heavy cream. Stir in 1 teaspoon of dried thyme, 1 teaspoon of garlic powder, and a pinch of salt and pepper. Let this mixture cook for another 2 to 3 minutes. This step allows all the flavors to blend beautifully. Gently fold the cooked orzo into the creamy mixture. Stir until everything combines well. If you want, add 1/4 cup of grated Parmesan cheese. Mix until the cheese melts and combines with the sauce. Taste the dish and adjust the seasoning as needed. Serve your creamy mushroom spinach orzo in shallow bowls. Top it with freshly chopped parsley and more Parmesan if you like. Enjoy this meal with some crusty bread for a perfect finish! Cooking orzo is simple. Here are key tips to ensure perfect results: - Use plenty of salted water: This adds flavor to the pasta. - Stir often: This prevents the orzo from sticking together. - Check for doneness: Aim for an al dente texture; it should be firm. - Reserve pasta water: This can help adjust sauce thickness later. To make your creamy mushroom spinach orzo shine, consider these tips: - Fresh herbs: Add basil or dill for a fresh touch. - Spices: Experiment with paprika or red pepper flakes for heat. - Umami boost: Use a splash of soy sauce or tamari for depth. - Cheese variety: Try feta or goat cheese for a tangy flavor. Serve your dish with style to impress: - Use shallow bowls: This makes the dish look inviting. - Garnish: Add fresh parsley on top for color. - Extra cheese: A light dusting of Parmesan adds elegance. - Pair with bread: A slice of crusty bread makes a great side. These tips will help you create a delicious and beautiful meal every time. {{image_4}} You can easily keep this dish vegetarian. The base of orzo, mushrooms, and spinach is already meat-free. Add more veggies like bell peppers or zucchini for extra color and taste. You might also try a different cheese, like feta, for a tangy twist. If you want a dairy-free option, swap the heavy cream for coconut cream. It adds a hint of sweetness and pairs well with the mushrooms. You can also use a dairy-free cheese to keep the creamy texture. Always check labels to ensure your choices are truly dairy-free. To boost the protein, consider adding cooked chicken, shrimp, or chickpeas. Cooked chicken adds heartiness, while shrimp cooks fast and gives a seafood flavor. Chickpeas are a great plant-based option. They soak up the sauce well and make the dish more filling. To keep your creamy mushroom spinach orzo fresh, place it in an airtight container. Make sure to let it cool down first. Store it in the fridge for up to three days. For best taste and texture, eat it within this time. When you’re ready to enjoy the leftovers, you can reheat the orzo in the microwave or on the stove. If using the microwave, heat for about one to two minutes. Stir halfway through to ensure even heating. On the stove, add a splash of vegetable broth or water to a pan. Heat over medium until warm, stirring often. This helps keep the dish creamy. You can freeze creamy mushroom spinach orzo if you want to save it for later. Place the cooled dish in a freezer-safe container. Label the container with the date. It can last up to three months in the freezer. When you're ready to eat it, thaw it overnight in the fridge. Reheat as mentioned above for the best results. I recommend using traditional orzo pasta. It has a nice texture and absorbs flavor well. You can also try whole wheat orzo for added nutrition. Just make sure to cook it until al dente for the best results. Yes, you can make it ahead of time. Cook the orzo and store it separately. Keep the creamy sauce in the fridge too. When you are ready to eat, simply combine them and heat until warm. To make it gluten-free, use gluten-free orzo. Many brands offer great options. Just follow the same cooking process. The flavor will still shine through with mushrooms and spinach. This dish pairs well with a simple salad or garlic bread. A crisp green salad adds freshness. You can also serve it with grilled chicken or roasted veggies for more protein. Absolutely! Creamy mushroom spinach orzo is great for meal prep. Divide it into containers for easy lunches or dinners. It stores well in the fridge and tastes even better the next day. This blog post covered all you need to know about creamy mushroom spinach orzo. We explored main and optional ingredients, including substitutes. I shared clear steps for cooking and serving. Tips for flavor and presentation will enhance your dish. You can also adapt this recipe for various diets. Finally, I gave storage and reheating advice. Enjoy making this easy and tasty meal!

Creamy Mushroom Spinach Orzo Flavorful Dinner Delight

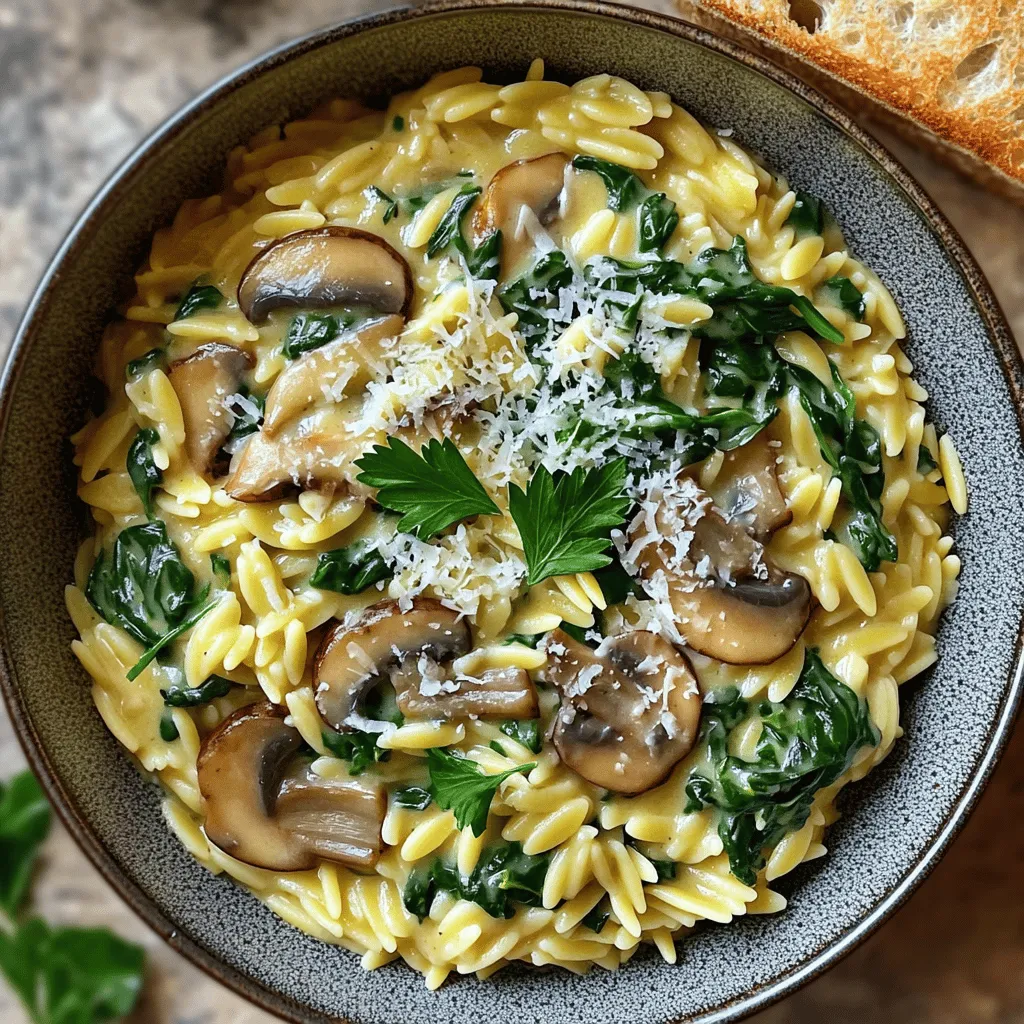
Are you ready to impress your family with a delicious dinner? My Creamy Mushroom Spinach Orzo strikes the perfect balance

For this tasty dish, you will need: - 1 pound baby carrots, peeled and trimmed - 2 tablespoons honey - 1 tablespoon extra virgin olive oil - 1 teaspoon sea salt - 1/2 teaspoon ground cinnamon - 1/4 teaspoon freshly ground black pepper - 2 tablespoons fresh parsley, finely chopped (for garnish) These ingredients create a lovely glaze. The honey adds sweetness, while the cinnamon gives warmth. The olive oil helps the glaze stick to the carrots. You can switch things up a bit. Here are some ideas: - Use maple syrup instead of honey for a different sweetness. - Add a splash of lemon juice for extra zing. - Try a pinch of cayenne pepper for heat. - Mix in some minced garlic for added flavor. These variations keep the dish fun and exciting. Feel free to get creative! To make this dish, gather these tools: - An air fryer - A large mixing bowl - A whisk for mixing - A cutting board and knife for prepping the carrots Having the right tools will make cooking easier. This way, you can focus on enjoying the process! Start by preheating your air fryer to 375°F (190°C). This step is key for cooking. It takes about 3-5 minutes. A hot air fryer helps the carrots cook evenly. In a big bowl, mix honey, olive oil, sea salt, cinnamon, and black pepper. Use a whisk to blend them well. You want a smooth glaze. This mix will coat the carrots later. Now, add your peeled and trimmed baby carrots to the bowl. Toss them gently in the honey glaze. Make sure each carrot gets a good coat. This adds flavor and makes them shine when cooked. Air frying carrots is quick and easy. Start by preheating your air fryer to 375°F (190°C). This step takes about 3-5 minutes. It helps the carrots cook evenly. After preheating, spread the honey-glazed carrots in the basket. Make sure they lie flat. This allows hot air to flow around them, giving you a nice, caramelized finish. Cook the carrots for 15-18 minutes. This timing helps achieve that perfect tender bite. While cooking, it’s important to shake the basket halfway through. This ensures the carrots brown evenly. When you shake it, the carrots will turn and catch more air. I recommend doing this around the 8-minute mark. If you forget, don’t worry! Just check them later. The goal is to make sure every side gets that tasty glaze. To check if the carrots are done, pierce one with a fork. If it glides in easily, they are ready. You want a soft texture with a slight bite. If they need more time, air fry for another 2-3 minutes. Keep an eye on them to avoid overcooking. Once they look golden and sticky, you’re set! Enjoy those beautiful, glazed carrots. {{image_4}} To get those shiny, glazed carrots, start with fresh baby carrots. Their natural sweetness shines through. Mix honey and olive oil well. This helps the glaze stick to each carrot. Toss them gently to coat. Don't rush this step; it makes a big difference! Air fry at 375°F (190°C) for the best results. Give the basket a shake halfway through cooking. This allows hot air to reach all sides. Aim for 15-18 minutes of cooking time. Check for that golden color and slight stickiness. That means they are done! If you want less sugar, try maple syrup or agave nectar. Both work great and add unique flavors. You can also use brown sugar for a richer taste. Experiment to find the sweetness you like best. Each sweetener brings a new twist to the dish! You can swap baby carrots for other veggies. Try using sliced bell peppers, zucchini, or asparagus. Each vegetable adds its own charm. Just make sure to cut them evenly. This helps them cook at the same time. Want to spice things up? Add a pinch of cayenne pepper or ginger for warmth. A dash of nutmeg can also enhance the sweetness of the honey. Experiment with herbs like thyme or rosemary for a fresh twist. Just remember, start with a little. You can always add more! If you're vegan, replace honey with maple syrup. Olive oil can be switched for coconut oil if you prefer that flavor. For a lower-sodium option, use a salt substitute or skip the salt. These changes keep the dish tasty and fit your needs. Store your leftover honey glazed carrots in an airtight container. Make sure the carrots cool to room temperature first. This keeps the flavors fresh. You can keep them in the fridge for up to three days. If you want to save them longer, freezing is a great choice. To reheat, you can use the air fryer. Heat it to 350°F (175°C). Place the carrots in the basket and cook for about 5-7 minutes. This method keeps the carrots warm and helps them regain some crispness. You can also use a microwave. Just place the carrots in a microwave-safe dish and cover them. Heat for about one minute, checking every 30 seconds. If you want to freeze the honey glazed carrots, first let them cool completely. Then, place them in a single layer on a baking sheet. Freeze them for about one hour. After they are frozen, transfer them to a freezer-safe bag. This method stops them from sticking together. When you're ready to eat, thaw them in the fridge overnight and reheat as mentioned above. Yes, you can use regular carrots. Just cut them into equal pieces. Aim for 1-inch chunks. This helps them cook evenly. Baby carrots are convenient, but regular ones work well too. They have a more intense flavor. To reduce sweetness, cut back on honey. Use only 1 tablespoon instead of 2. You can also add more salt. A pinch of salt balances the flavors. Try adding lemon juice for a tangy twist. The best air fryer temperature for veggies is 375°F (190°C). This temperature cooks them evenly. It helps them caramelize nicely without burning. Always preheat your air fryer for best results. You learned how to make air fryer honey glazed carrots. We covered the key ingredients, tools, and steps for cooking. You also found tips for perfect texture and ideas for variations. Remember, you can use different veggies and spices to make it unique. Store leftovers properly and follow reheating tips for the best taste. Enjoy your tasty carrots anytime!

Air Fryer Honey Glazed Carrots Flavorful Side Dish

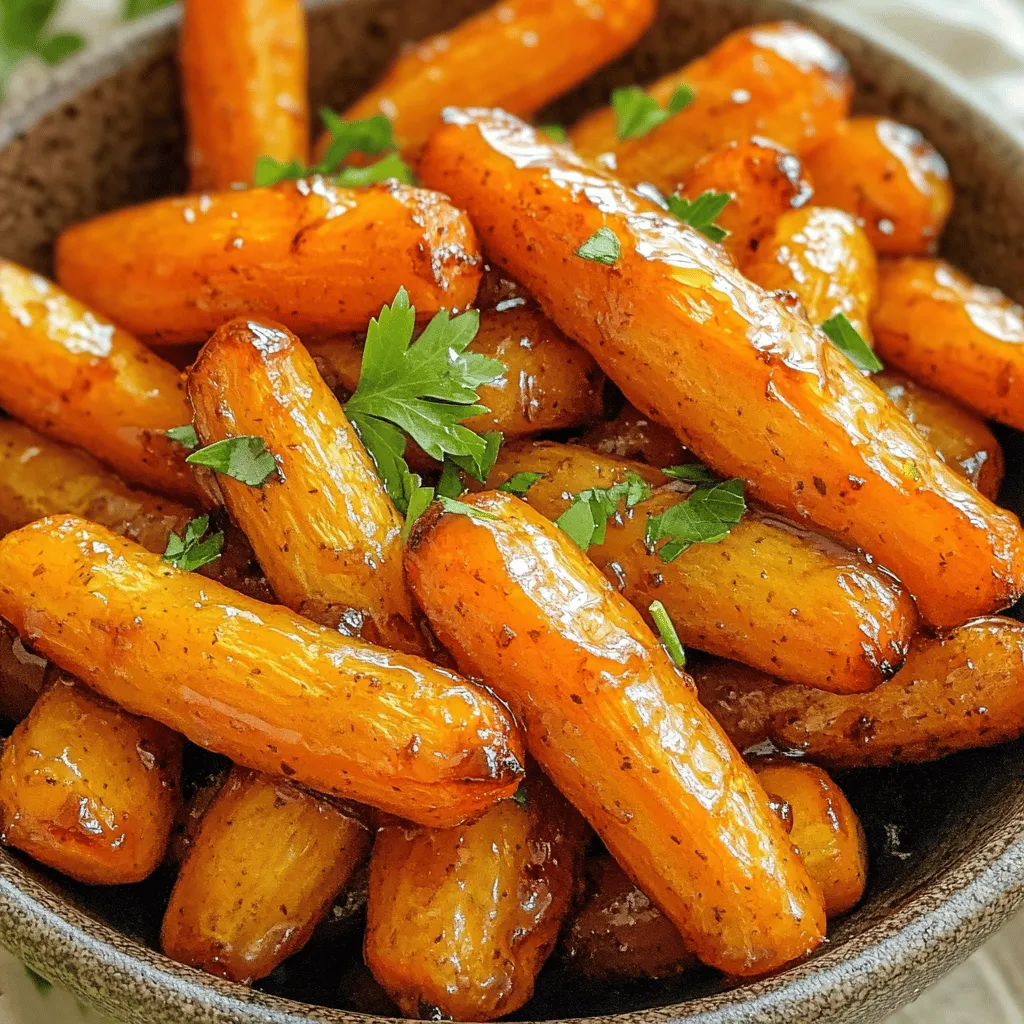
If you want a tasty side dish, try these Air Fryer Honey Glazed Carrots! They are sweet, savory, and so

- 1 cup orzo pasta - 2 cups vegetable broth - 1 tablespoon extra-virgin olive oil - 1 medium onion, finely chopped - 2 cloves garlic, minced - 8 oz (about 225g) mushrooms, sliced (cremini or button) - 2 cups fresh spinach, roughly chopped - 1/2 cup heavy cream (or coconut milk as a vegan alternative) - 1/4 cup grated Parmesan cheese (or nutritional yeast for a vegan option) - Salt and freshly ground black pepper to taste - 1 teaspoon dried thyme - Fresh parsley, chopped, for garnish I love using these fresh ingredients for my creamy mushroom spinach orzo. The orzo pasta provides a lovely texture. You can find it in most grocery stores. Vegetable broth adds depth and flavor, making the dish hearty. Olive oil enhances the taste and helps sauté the vegetables. Onions and garlic bring a sweet and savory aroma. I prefer finely chopping the onion to get a nice base. Mushrooms, whether cremini or button, give this dish a rich flavor. Fresh spinach adds color and nutrients, making the dish vibrant. For creaminess, I use heavy cream, but coconut milk works well for a vegan option. Parmesan cheese or nutritional yeast gives it a cheesy flavor. Seasoning with salt, black pepper, and thyme brings everything together. These ingredients create a comforting and satisfying meal. You can easily adjust them based on what you have at home. Enjoy the cooking process and the delicious results! 1. Cooking the orzo: Start by bringing 2 cups of vegetable broth to a simmer in a medium saucepan. Add 1 cup of orzo pasta to the broth. Cook it for 8-10 minutes or until it is al dente. Stir it occasionally to prevent sticking. If it starts to stick, add a splash of broth. 2. Sautéing the vegetables: While the orzo cooks, heat 1 tablespoon of olive oil in a large skillet. Add 1 finely chopped onion and sauté for 3-4 minutes until it turns translucent. Then, add 2 minced garlic cloves and 8 oz of sliced mushrooms. Cook for 5-7 minutes until the mushrooms are golden brown. 3. Combining ingredients: Add 2 cups of roughly chopped spinach to the skillet. Sauté until the spinach wilts, about 2-3 minutes. Season the mix with salt, pepper, and 1 teaspoon of dried thyme for extra flavor. - Instructions for each cooking phase: Once the orzo is cooked, drain any excess broth. Transfer the orzo to the skillet with the vegetables. Lower the heat and pour in 1/2 cup of heavy cream. Stir until everything is mixed well. Gradually add 1/4 cup of grated Parmesan cheese, mixing until it melts and the dish becomes creamy. Taste it and adjust seasonings as needed. - Tips for avoiding common mistakes: Avoid overcooking the orzo; it should remain firm. Stir the mushrooms enough to ensure they brown properly and release moisture. If your spinach is not wilting quickly, raise the heat slightly but keep an eye on it. - Plating techniques: Serve the orzo in shallow bowls. This lets the creamy sauce stand out. - Garnishes to elevate presentation: Add a sprinkle of fresh parsley on top for a pop of color. You can also use extra Parmesan or nutritional yeast for added flavor. Place a few whole spinach leaves or a slice of lemon on the side for a fresh touch. To make your orzo perfect, watch the timing. Cook it until it's al dente. This means it should have a slight bite. Stir often to stop it from sticking. If it seems dry, add a splash of broth. For flavor, use fresh herbs like thyme. They add a nice touch. You can also sprinkle a bit of lemon juice at the end. This adds brightness to the dish. One mistake is overcooking mushrooms. Cook them until they are golden, not mushy. Mushrooms should be soft but still hold their shape. Balancing flavors is key. Taste as you cook. If it’s too salty, add more spinach or cream. This helps mellow the saltiness. Want a quicker meal? Use pre-cooked orzo. You can also use frozen spinach. Just thaw and add it in. If you want to make it ahead, cook the orzo and veggies separately. Combine them just before serving. This keeps everything fresh and tasty. {{image_4}} - Gluten-free options: You can swap orzo with gluten-free pasta. Look for rice or quinoa pasta. These work well and keep the dish tasty and creamy. - Dairy-free alternatives: For a dairy-free version, use coconut milk instead of heavy cream. Nutritional yeast makes a great substitute for Parmesan cheese. This keeps the flavor while making it vegan. - Protein enhancements: Add cooked chicken or tofu for extra protein. Grilled chicken strips give a nice bite. Tofu can soak up all the great flavors of this dish. - Spice and herb variations: Feel free to play with spices! Add red pepper flakes for heat. Fresh basil or oregano can also bring a bright flavor twist. - Using seasonal vegetables: In spring, add asparagus or peas. In fall, try roasted squash or kale. This keeps your dish fresh and exciting with the seasons. - Adjusting for holidays or gatherings: For special occasions, you can top the orzo with crispy bacon bits or serve it as a side to roasted meats. This makes it festive and fun for gatherings. To keep your creamy mushroom spinach orzo fresh, follow these tips: - Refrigeration: Place the orzo in an airtight container. It stays fresh for 3 to 4 days in the fridge. Make sure it cools down before sealing. This prevents condensation, which can make it soggy. - Freezing: You can freeze the orzo for up to 3 months. Store it in freezer-safe containers or bags. When freezing, leave some space in the container. This allows the orzo to expand as it freezes. Reheating the orzo without drying it out is key. Here are some methods: - Stovetop: Heat a skillet over low heat. Add a splash of vegetable broth or water to the orzo. Stir gently until warmed through. This keeps it creamy and moist. - Microwave: Place the orzo in a microwave-safe dish. Add a tablespoon of broth or water. Cover with a lid or microwave-safe wrap. Heat in 30-second intervals, stirring in between to ensure even heating. How long will your creamy mushroom spinach orzo last? - In the fridge, it lasts about 3 to 4 days. After that, it may lose taste and texture. - In the freezer, it can last up to 3 months. Just remember to label your containers with the date. Signs of spoilage include: - Off smell or unusual color - Unpleasant texture - Mold growth If you notice any of these, it's best to toss the dish. Enjoy your creamy mushroom spinach orzo while it’s fresh! What can I use instead of orzo? You can use other pasta shapes like rice, quinoa, or even couscous. Each option gives a different texture. Just remember to adjust the cooking time based on what you choose. Can I make this dish vegan? Yes! Use coconut milk instead of heavy cream. For cheese, swap Parmesan with nutritional yeast. This keeps the creamy flavor while staying plant-based. How can I make it spicier? Add red pepper flakes or some chopped chili peppers. You can also stir in a bit of hot sauce for a kick. Adjust the amount based on your heat preference. - Calories: One serving has about 400 calories. - Fats: Contains around 15 grams of fat from cream and cheese. - Proteins: Offers 10 grams of protein per serving. Health benefits of the ingredients: Mushrooms are high in vitamins and minerals. Spinach is packed with iron and antioxidants. Using vegetable broth keeps it low in calories while adding flavor. What to pair with this dish? Serve it with a light salad or some crusty bread. A side of roasted vegetables complements the flavors well. Best wines or beverages to complement flavors: A crisp white wine, like Sauvignon Blanc, pairs nicely. If you prefer non-alcoholic options, try sparkling water with a slice of lemon. Both enhance the meal's fresh taste. This blog post covered a tasty creamy mushroom spinach orzo recipe. We explored the key ingredients, step-by-step instructions, and helpful tips to ensure success. I shared variations you can try and how to store your dish safely. Remember, cooking can be fun and rewarding. With these tips, you can make a delicious meal that suits your taste. Enjoy experimenting and sharing this dish with others! Your kitchen adventures can lead to great meals and lasting memories.

Creamy Mushroom Spinach Orzo Savory Dinner Delight

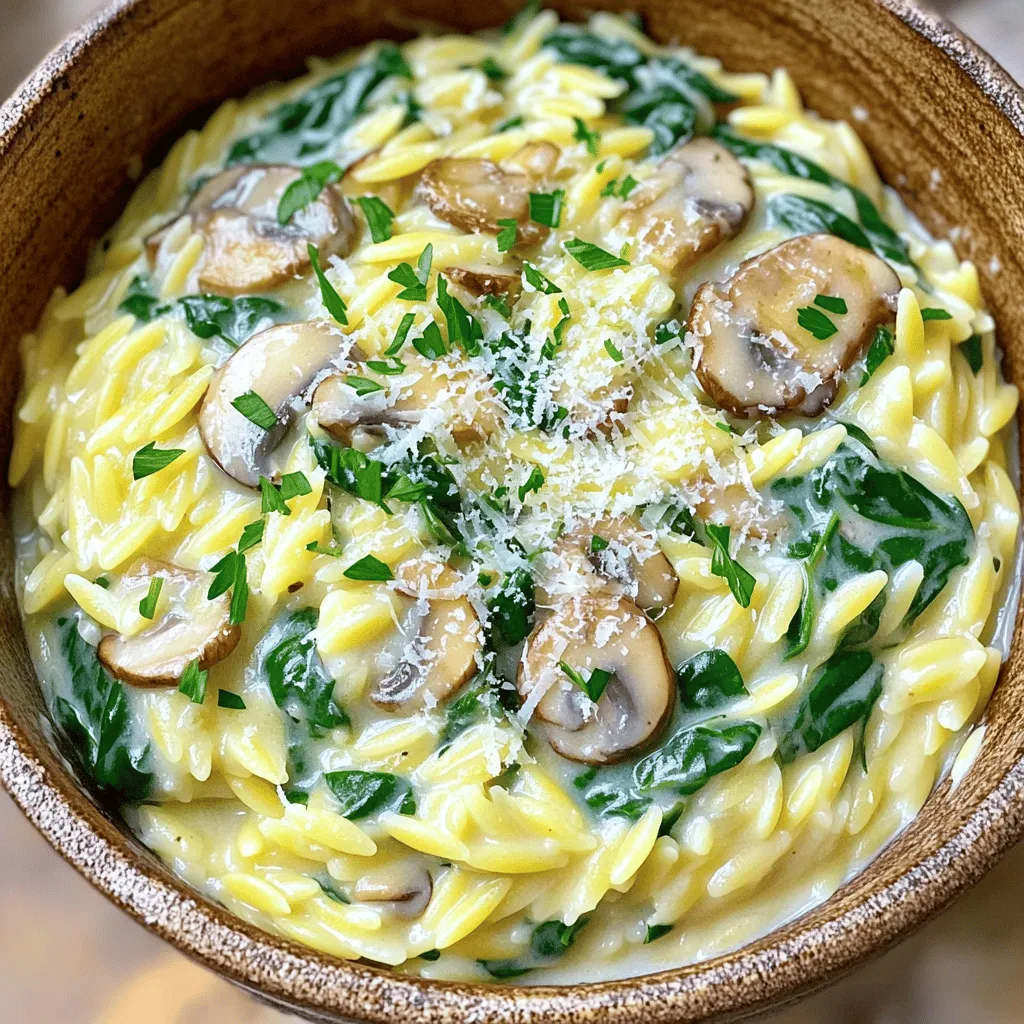
If you’re craving a comforting dish that’s both rich and light, let me introduce you to Creamy Mushroom Spinach Orzo.

To make crispy cheese balls, you need the following: - 2 cups shredded cheese (a blend of sharp cheddar and stretchy mozzarella) - 1 cup cream cheese, softened to room temperature - 1 cup panko breadcrumbs (for an extra crispy texture) - 2 tablespoons fresh parsley, finely chopped - 1 teaspoon garlic powder - 1 teaspoon onion powder - Salt and freshly ground black pepper to taste - 1 large egg, beaten until smooth - Vegetable oil, for frying Using good-quality cheese makes a big difference. The best cheese melts well and adds flavor. Sharp cheddar gives a nice tang, while mozzarella adds stretch. Cream cheese binds everything together, making the mix creamy. Fresh parsley brightens the taste and looks great too. Always choose fresh spices for better flavor. You can change some ingredients if needed. Use any cheese you like, such as gouda or pepper jack. If you want a lighter option, try using Greek yogurt instead of cream cheese. For a gluten-free version, swap panko for crushed cornflakes. Add spices like paprika or cayenne for a kick! {{ingredient_image_2}} To make the cheese mixture, grab a large mixing bowl. First, add 2 cups of shredded cheese. I like to use a mix of sharp cheddar and stretchy mozzarella for great taste. Next, add 1 cup of softened cream cheese. Mix these cheeses until they blend smoothly. Then, add 2 tablespoons of finely chopped parsley, 1 teaspoon of garlic powder, and 1 teaspoon of onion powder. Don’t forget to sprinkle in some salt and pepper to taste. Stir everything until it is well combined. Now it’s time to form the cheese balls. Take about one tablespoon of the cheese mixture in your hands. Roll it into a ball shape, making around 20 cheese balls. Once you have all your cheese balls ready, get a shallow dish and pour in 1 cup of panko breadcrumbs. Dip each cheese ball into 1 large beaten egg. Make sure it is fully coated. After that, roll it in the breadcrumbs. Press gently to help the crumbs stick well. For frying, heat some vegetable oil in a deep pan over medium heat. To check if the oil is ready, drop a small pinch of breadcrumbs into it. If it sizzles and rises, you are good to go! Carefully place the cheese balls in the hot oil, but do it in small batches. Fry them for about 3 to 4 minutes. Make sure to turn the balls so they brown evenly. You want them to be a nice golden brown color all over. When they are done, use a slotted spoon to lift them out and place them on a plate lined with paper towels to soak up extra oil. Enjoy these warm with your favorite dipping sauces! To get the best crunch, use panko breadcrumbs. They are lighter and crispier than regular ones. Make sure to fry in hot oil. If the oil is too cold, the cheese balls will soak up oil and become soggy. Always test the oil with a breadcrumb. It should sizzle and rise right away. Keep the cheese balls chilled before frying. This helps them hold their shape. If they fall apart, try adjusting the cheese blend. A firmer cheese like gouda or a bit more cream cheese can help. Also, roll them gently but firmly to make sure they stay intact. Serving crispy cheese balls with the right dips can enhance their flavor. I recommend marinara or ranch dressing. Both add a nice tangy kick. You can also try spicy ketchup or garlic aioli for something different. These dips will make your snack even more delightful! Pro Tips Chill the Mixture: Before rolling the cheese balls, refrigerate the cheese mixture for about 30 minutes. This helps the balls hold their shape during frying. Use a Thermometer: For perfectly fried cheese balls, use a kitchen thermometer to maintain the oil temperature around 350°F (175°C) for optimal crispiness. Experiment with Cheeses: Feel free to mix different types of cheese such as pepper jack or gouda for varied flavors and textures in your cheese balls. Serve with Variety: Pair your cheese balls with a range of dipping sauces like spicy sriracha or honey mustard for an exciting flavor experience. {{image_4}} You can change the taste of your crispy cheese balls easily. Add spices or herbs to make them unique. For a spicy kick, mix in some chopped jalapeños or cayenne pepper. If you love herbs, try adding fresh basil or oregano. You can even use a blend of Italian seasoning for a zesty touch. Each flavor brings a new life to these tasty bites! Not everyone eats dairy, but that’s okay! You can make vegan cheese balls too. Use plant-based cheese that melts well, like cashew or almond cheese. Instead of cream cheese, use a vegan cream cheese. It gives a creamy texture without the dairy. This way, everyone can enjoy crispy cheese balls! Frying gives crispy cheese balls a crunchy coat. But baking is a healthier choice if you prefer less oil. To bake, preheat your oven to 400°F (200°C). Place the coated cheese balls on a lined baking sheet. Bake for 15-20 minutes until they turn golden brown. You still get great flavor and texture! To keep leftover cheese balls fresh, place them in an airtight container. Line the bottom with paper towels to absorb moisture. This step helps maintain their crispiness. Store the container in the fridge for up to three days. When ready to enjoy again, you can reheat them. For long-term storage, freezing is a great option. First, place the cheese balls on a baking sheet in a single layer. Freeze them for about an hour until solid. Then, transfer the frozen cheese balls to a freezer bag. Remove as much air as possible before sealing. They can last in the freezer for up to three months. To reheat and keep the cheese balls crispy, preheat your oven to 375°F (190°C). Spread the cheese balls on a baking sheet lined with parchment paper. Heat them for about 10-12 minutes until warm and crispy. Avoid using a microwave, as it can make them soggy. Enjoy your crispy cheese balls just like the first day! Crispy cheese balls stay fresh for about 2 to 3 days in the fridge. After frying, let them cool down. Then, place them in an airtight container. This keeps them from drying out. For best taste, eat them soon after frying. Yes, you can make crispy cheese balls ahead of time. Prepare the cheese mixture and form the balls. Then, place them on a tray and freeze them for about an hour. Once firm, transfer them to a sealed bag. You can fry them later when you are ready to enjoy. Some great sauces to dip your crispy cheese balls in are: - Marinara sauce - Ranch dressing - Spicy aioli - Honey mustard - Barbecue sauce These sauces enhance the cheese balls and add extra flavor. Try them all to find your favorite! In this blog post, we explored the essential ingredients and their quality, the step-by-step process to create perfect cheese balls, and valuable tips for the best results. You learned about various flavor options and how to store leftovers properly. Remember, quality ingredients lead to better taste. Use these tips to impress your family or friends. Enjoy experimenting with flavors and find your favorite dipping sauce. Your next cheese ball creation is just around the corner!

Crispy Cheese Balls Delightful Snack Recipe Guide

Are you ready to elevate your snack game? Crispy Cheese Balls are the ultimate treat. They’re gooey inside, crunchy outside,

To make Garbage Bread Delight, gather your ingredients. This recipe is simple and fun. Here’s what you will need: - 1 pre-made or homemade pizza dough - 1 cup shredded mozzarella cheese - 1 cup assorted leftover vegetables (like bell peppers, spinach, or mushrooms), diced - 1/2 cup cooked meat (optional; choose from pepperoni, chicken, or sausage) - 1/4 cup black olives, sliced - 1/4 cup ricotta cheese - 2 tablespoons pesto sauce - 1 tablespoon olive oil - 1 teaspoon garlic powder - 1 teaspoon Italian seasoning - Salt and pepper to taste - 1 egg, beaten (for egg wash) Using leftovers makes this recipe great. You can mix and match your vegetables and meats. The key is to have fun! Each bite will surprise you with different flavors. The mozzarella cheese melts beautifully, while the pesto adds a nice touch. This dish is perfect for any occasion. Enjoy the cooking process and make it your own! {{ingredient_image_2}} 1. Preheating the oven: First, set your oven to 400°F (200°C). This makes sure your oven is hot and ready for baking. 2. Rolling out the pizza dough: Take your pizza dough and place it on a floured surface. Use a rolling pin to flatten it into a big rectangle. Aim for about 1/4-inch thick. This thickness helps the dough hold the filling. 3. Mixing of the filling ingredients: In a bowl, mix the following: - 1 cup of shredded mozzarella cheese - 1 cup of assorted leftover vegetables, diced (like bell peppers, spinach, or mushrooms) - 1/2 cup of cooked meat (like pepperoni, chicken, or sausage, if you want) - 1/4 cup of sliced black olives - 1/4 cup of ricotta cheese - 2 tablespoons of pesto sauce - 1 teaspoon of garlic powder - 1 teaspoon of Italian seasoning - Salt and pepper to taste Stir all these together well. Make sure everything is mixed evenly. 4. Spreading the filling and rolling the dough: Take the filling and spread it on the rolled-out dough. Leave about a 1-inch border around the edges. This helps keep the filling inside when you roll it. 5. Baking instructions: Start rolling the dough from one of the longer sides. Roll it away from you to make a log shape. Pinch the seams tightly to close it. Tuck the ends under to keep the filling safe. Place the log on a baking sheet lined with parchment paper. Brush the top with a beaten egg for a golden color when baked. 6. Baking: Place the baking sheet in the oven. Bake for 20-25 minutes. Check if it is golden brown and sounds hollow when tapped. This shows it is cooked through. 7. Cooling and serving: When baked, let your garbage bread cool for a few minutes. Then, slice it into thick pieces. Serve warm for the best taste. - Best practices for rolling and sealing: Start with a clean, floured surface. Roll the pizza dough into a rectangle about 1/4 inch thick. This thickness helps hold your filling. When you roll, start from one of the longer sides. Roll slowly and tightly, then pinch the seams well. Tuck the ends under to keep everything inside. - Achieving a golden crust with egg wash: Use a beaten egg wash on top of the rolled dough. This step is key for a golden, shiny finish. Brush gently to cover the surface. Avoid letting any egg wash drip down the sides. This keeps the crust crisp. - Serving suggestions for presentation: Slice the garbage bread into thick pieces. Arrange them on a rustic wooden board. For a pop of color, add fresh basil leaves on top. Serve with a small bowl of marinara sauce. This adds flavor and makes your dish look beautiful. Pro Tips Use Fresh Ingredients: For the best flavor, opt for fresh vegetables and herbs. They will enhance the overall taste and make the garbage bread more vibrant. Experiment with Fillings: Don’t hesitate to get creative with your filling! Use whatever leftovers you have on hand, such as cheeses, vegetables, or proteins, to make this dish uniquely yours. Adjust the Thickness: Roll the dough to your preferred thickness. A thinner roll will make for a crispier bread, while a thicker roll will yield a softer texture. Perfect the Egg Wash: For a beautifully golden finish, ensure you brush the dough evenly with the beaten egg before baking. This will create an appetizing appearance. {{image_4}} Garbage bread is a fun way to use leftovers. You can easily swap out ingredients to fit your taste. - Different cheese combinations: You can use cheddar, gouda, or feta cheese. Mixing cheeses adds depth to the flavor. - Creative vegetable mixes: Try using zucchini, carrots, or even kale. Get creative with what you have in your fridge. This dish loves variety! - Meatless or vegetarian versions: If you want a meatless option, just skip the meat. You can add more veggies or even some beans for protein. Mix and match these swaps to make your garbage bread unique. Let your taste guide you! To keep your garbage bread fresh, store it well. Here’s how: - Best methods for refrigeration: Wrap leftover garbage bread tightly in plastic wrap or foil. Place it in an airtight container. This keeps it fresh and prevents it from drying out. You can store it in the fridge for up to three days. - Reheating tips for optimal taste: To reheat, preheat your oven to 350°F (175°C). Place the slices on a baking sheet. Cover them with foil to keep them moist. Heat for about 10-15 minutes, or until warm. This method helps maintain the crispy crust. - Freezing for future meals: If you want to save it longer, freezing works great. Wrap each slice in plastic wrap, then in foil. Place them in a freezer-safe bag. You can freeze garbage bread for up to three months. When ready to eat, thaw in the fridge overnight. Reheat as mentioned above for the best taste. What can I use instead of pizza dough? If you don’t have pizza dough, you can use puff pastry or bread dough. Both options will give you a nice, flaky texture. You can even try crescent roll dough for a sweeter twist. Can I make it ahead of time? Yes, you can make garbage bread ahead of time. Assemble the bread, wrap it tightly, and store it in the fridge. It stays fresh for up to two days. Just remember to bake it before serving. How do I know when it's fully cooked? To check if your garbage bread is done, tap the top. If it sounds hollow, it’s ready. The bread should also turn a lovely golden brown color. Use a knife to cut into it if needed, but let it cool for a few minutes first. This blog post covered how to make delicious garbage bread. We discussed simple ingredients like dough, cheese, and veggies. You learned step-by-step instructions to roll, fill, and bake. I shared tips for a perfect finish and suggested fun ingredient swaps. We also talked about storing leftovers and answered common questions. Now, you have the tools to create your own garbage bread delight. Enjoy experimenting with flavors and share it with others!

Garbage Bread Delight Tasty and Simple Recipe

Are you ready to turn your leftovers into a tasty treat? Garbage Bread Delight is simple to make and perfect

For a tasty Blueberry Peach Crisp, you'll need these fresh ingredients: - 2 cups fresh blueberries - 2 cups fresh peaches - 1 tablespoon freshly squeezed lemon juice Fresh fruit brings out the best flavors in this dessert. The blueberries burst with juice, while the peaches add a sweet and soft touch. The lemon juice helps brighten all the flavors. Next, gather these crisp topping ingredients: - 1 cup rolled oats - 1/2 cup all-purpose flour - 1/2 cup packed brown sugar - 1/3 cup unsalted butter - 1 teaspoon ground cinnamon - 1/4 teaspoon salt - 1/2 cup chopped nuts The topping is where the magic happens! Rolled oats give it a hearty texture. Brown sugar adds sweetness, while cinnamon gives warmth. Nuts, like walnuts or pecans, bring crunch and flavor. For a special touch, consider serving with: - Vanilla ice cream Adding vanilla ice cream creates a delightful contrast. The warm crisp meets the cold ice cream for a perfect bite. Explore more ways to enjoy this crisp by checking the Full Recipe. Set your oven to 350°F (175°C). This step is key, as it ensures even baking. Toss the fresh blueberries and sliced peaches in a bowl. Add 1 tablespoon of freshly squeezed lemon juice. This juice brightens the fruit's flavor. After mixing, transfer the fruit to a greased 9x13-inch baking dish. Spread it out evenly. In a separate bowl, combine 1 cup of rolled oats, 1/2 cup of all-purpose flour, and 1/2 cup of packed brown sugar. Then, add 1/3 cup of melted unsalted butter, 1 teaspoon of ground cinnamon, and 1/4 teaspoon of salt. Mix until crumbly. Finally, stir in 1/2 cup of chopped nuts for added crunch. Now, evenly spread the oat topping over the fruit in the baking dish. Make sure to cover all the fruit. This helps everything bake well together. Place the dish in the oven and bake for 30-35 minutes. Keep an eye on it until the topping turns golden brown. You should see the fruit juices bubbling around the edges. Once done, remove the crisp from the oven. Let it cool for about 10-15 minutes before serving. This cooling time helps the juices settle. Enjoy your warm Blueberry Peach Crisp with a scoop of vanilla ice cream for extra delight. For the full recipe, refer to the recipe section. To make the best blueberry peach crisp, you need ripe, in-season blueberries and peaches. Fresh fruit gives your dish great flavor and texture. Look for blueberries that are plump and shiny. They should not have any wrinkles. For peaches, choose ones that are slightly soft when you press them gently. This means they are ripe and sweet. To get that crunchy topping, I recommend using old-fashioned rolled oats. They give your crisp a great texture. Quick oats can become mushy and lose that nice bite. Mix them well with flour, brown sugar, and melted butter. This will ensure every bite is satisfying and crisp. When serving your blueberry peach crisp, think about adding a scoop of vanilla ice cream or yogurt. This adds creaminess and complements the warm fruit. The cold ice cream contrasts nicely with the warm crisp. You can also drizzle some honey or sprinkle nuts on top for added flavor. For more ideas, check the Full Recipe for serving tips! {{image_4}} You can change the fruit for great new tastes. Try nectarines for a juicy twist. Strawberries also work well. Mixing in other berries adds fun flavors too. I love adding raspberries or blackberries. They bring a tartness that balances the sweetness. Each fruit adds its unique charm to the dish. Need a gluten-free option? Just swap regular flour with gluten-free flour. This keeps the crisp tasty for everyone. If you want a dairy-free dish, use coconut oil instead of butter. It melts in just right and adds a slight coconut flavor. Both options let you enjoy this treat without worry. Want to kick up the flavor? Add a splash of vanilla extract to the topping. Almond extract also makes a lovely addition. Both give the crisp a warm, inviting aroma. These simple changes can make your dessert even more special. For the full recipe, check out the Sweet Blueberry Peach Crisp 🫐 section above. To keep your Blueberry Peach Crisp fresh, store it in an airtight container. Place it in the refrigerator. This way, it stays tasty for up to three days. Just remember to let it cool completely before sealing it up. You can freeze Blueberry Peach Crisp before or after baking. If you freeze it before baking, wrap it tightly in plastic wrap and aluminum foil. This protects it from freezer burn. If you freeze it after baking, let it cool first. Then, store it in a freezer-safe container. It can last for up to three months. For the best taste and texture, reheat your crisp in the oven. Preheat your oven to 350°F (175°C). Place the crisp in an oven-safe dish and cover it with foil. Heat for about 15 minutes or until warm. This helps keep the topping nice and crispy. Enjoy your comforting treat warm! You can prepare Blueberry Peach Crisp in advance. Start by assembling the dish without baking it. Once you layer the fruit and topping in the baking dish, cover it well. Store it in the fridge for up to 24 hours. When you're ready to bake, just pop it in the oven. This saves time and lets the flavors blend. Yes, you can use frozen fruit for this recipe. Just make sure to adjust the baking time. Frozen blueberries or peaches may need an extra 5-10 minutes of baking. Check for the bubbly juices and golden topping. This way, you can enjoy the crisp even in off-seasons. I love serving Blueberry Peach Crisp warm. It tastes amazing with a scoop of vanilla ice cream on top. The warm crisp and cold ice cream create a delightful contrast. You can also add a sprinkle of cinnamon for extra flavor. It makes for a perfect dessert that everyone will enjoy! This article covered how to make a tasty Blueberry Peach Crisp. We explored the best ingredients, like fresh fruit and a crunchy topping. I shared step-by-step instructions to ensure your crisp turns out perfectly every time. With tips on selecting fruit and making variations, you can customize this dessert to fit your taste. Finally, I discussed storage methods to keep leftovers fresh. Now, it’s time to gather your ingredients and enjoy this simple, delicious treat!

Blueberry Peach Crisp Comforting and Simple Delight

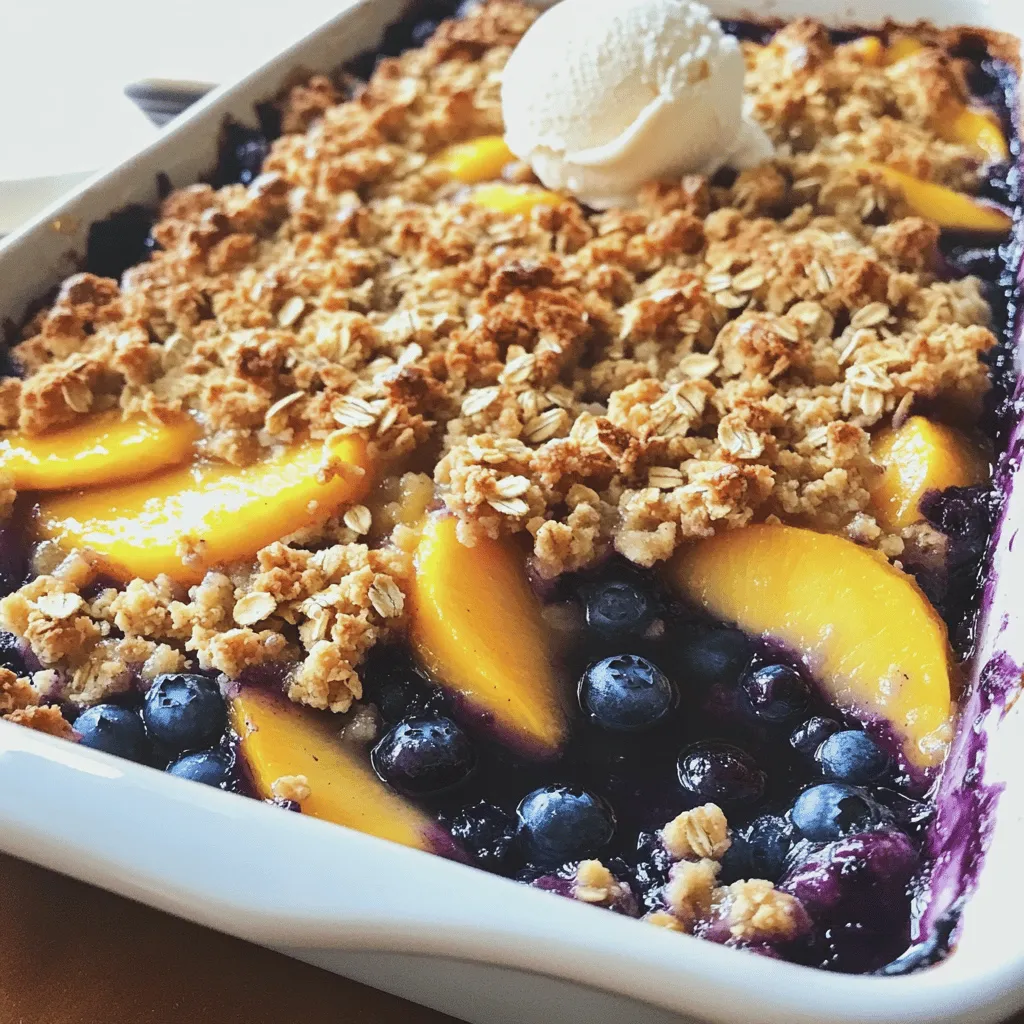
Craving a warm, fruity dessert that’s super easy to make? You’re in the right place! My Blueberry Peach Crisp combines

To make your Cinnamon Roll Overnight Oats, you will need: - 1 cup rolled oats - 1 cup unsweetened almond milk (or your preferred milk) - 1 tablespoon chia seeds - 1 tablespoon maple syrup (or honey) - 1 teaspoon ground cinnamon - 1/2 teaspoon vanilla extract - 1/4 cup Greek yogurt (optional, for added creaminess) - 2 tablespoons raisins or dried cranberries - Chopped nuts (such as walnuts or pecans) for garnish If you want to boost the creaminess and flavor, consider these: - Additional Greek yogurt for a richer texture - A dollop of nut butter for extra protein and taste - A pinch of nutmeg for a warm spice - Fresh fruit like banana or apple slices for sweetness - Coconut flakes for a tropical touch Each serving of these oats is packed with nutrients. Here’s a quick look at what you get: - Calories: 300 - Protein: 10g - Fat: 8g - Carbohydrates: 50g - Fiber: 8g - Sugar: 10g These oats are not just tasty; they also offer a nice balance of protein, fiber, and healthy fats. You can enjoy a filling breakfast that keeps you satisfied! For the full recipe, check out the details above. To make Cinnamon Roll Overnight Oats, start with a medium bowl or a jar. Add 1 cup of rolled oats, 1 cup of unsweetened almond milk, and 1 tablespoon of chia seeds. Next, mix in 1 tablespoon of maple syrup and 1 teaspoon of ground cinnamon. Then, add 1/2 teaspoon of vanilla extract. Stir until everything is well combined. If you want a creamy texture, fold in 1/4 cup of Greek yogurt. This step is optional but highly recommended for richness. Now, add 2 tablespoons of raisins or dried cranberries. Gently fold them into the mix. This adds sweetness and a chewy texture. Once everything is mixed well, cover the bowl or jar tightly. Place it in the fridge overnight, or for at least 4 hours. This soaking time helps the oats absorb the liquid and thicken. The perfect consistency for overnight oats is creamy but not too thick. If your oats seem too thick in the morning, don’t worry. Just add a splash of almond milk. Mix well until you reach your desired thickness. For a smoother texture, ensure the oats soak long enough. You can also try using a different milk type. Each milk can change the final texture slightly. When ready to eat, stir the oats well. You can serve them in bowls or keep them in jars for convenience. Top with chopped nuts, like walnuts or pecans. This adds a nice crunch! For extra flavor, sprinkle a dash of cinnamon on top. Enjoy your oats chilled or at room temperature. It’s a tasty way to start your day! Don't forget to check out the Full Recipe for more details. To make the best cinnamon roll overnight oats, start with high-quality rolled oats. They soak up liquid well and give you a great texture. Use unsweetened almond milk or your favorite milk for a creamy base. Don't skip the chia seeds; they add fiber and keep the oats thick. Mix all your ingredients well to ensure every bite is tasty. One common mistake is not letting the oats soak long enough. Aim for at least four hours, but overnight is best. Another mistake is using too much liquid. If you add too much milk, your oats can become soupy. Also, be careful with the spices. A little cinnamon goes a long way! Store your overnight oats in an airtight container. This keeps them fresh in the fridge for up to five days. If you want to make a big batch, divide them into jars. This makes it easy to grab one for breakfast. For the best taste, eat them within three days. Enjoy your cinnamon roll overnight oats chilled or at room temperature! {{image_4}} You can easily change the flavor of your oats. Here are some ideas: - Pumpkin Spice: Add 1/4 cup of pumpkin puree and a pinch of nutmeg. - Chocolate Chip: Mix in 2 tablespoons of mini chocolate chips for a sweet touch. - Apple Pie: Add diced apples and a little more cinnamon for a fruity twist. Each of these flavors brings a new taste and joy to your breakfast. You can make your oats fit your diet. For gluten-free oats, choose certified gluten-free rolled oats. To make them vegan, replace Greek yogurt with coconut yogurt. Use maple syrup instead of honey. These swaps let everyone enjoy this tasty meal. You can enjoy many toppings to make your oats special. Here are some fun options: - Fresh fruits: Sliced bananas or berries add freshness. - Nut butter: A spoonful of almond or peanut butter adds creaminess and protein. - Seeds: Sprinkle chia or hemp seeds for extra nutrition. Feel free to mix and match to create your perfect bowl. Check out the Full Recipe for more ideas! To store your leftover Cinnamon Roll Overnight Oats, use a jar or an airtight container. Make sure it seals tightly. This helps keep the oats fresh and tasty. If you have any toppings, like nuts or fruits, store them separately. This keeps them crunchy and fresh. Cinnamon Roll Overnight Oats can last in the fridge for up to five days. After that, the oats may become too soft or lose flavor. Always check for any sour smell or unusual color before eating. If it looks or smells off, it's better to toss it. You can freeze your Cinnamon Roll Overnight Oats if you want to save them for later. Just place them in a freezer-safe jar or container. They can last up to three months in the freezer. When you want to eat them, move the oats to the fridge overnight to thaw. In the morning, stir them well. If they seem too thick, add a splash of almond milk to get the right texture. Enjoy your easy breakfast delight! You can keep your Cinnamon Roll Overnight Oats in the fridge for up to five days. Each day, the oats may become softer, but they still taste great. Just make sure to store them in an airtight container. This will help keep them fresh and tasty. Yes, you can easily swap ingredients in this recipe. If you don’t have almond milk, use any milk you prefer. You can also use flax seeds instead of chia seeds. For sweeteners, honey or agave syrup works well. Feel free to customize to your taste! Overnight oats are packed with health benefits. They are rich in fiber, which helps with digestion. The oats can keep you feeling full longer, making them great for weight management. Additionally, they provide essential vitamins and minerals. The chia seeds add omega-3 fatty acids, good for heart health. If you use Greek yogurt, you also get a boost of protein. Each ingredient adds to the overall nutrition, making this breakfast both tasty and healthy. Cinnamon roll overnight oats are a tasty way to start your day. They are easy to make and full of flavor. This recipe takes just a few minutes to prepare. You can enjoy them cold or at room temperature. - 1 cup rolled oats - 1 cup unsweetened almond milk (or your preferred milk) - 1 tablespoon chia seeds - 1 tablespoon maple syrup (or honey) - 1 teaspoon ground cinnamon - 1/2 teaspoon vanilla extract - 1/4 cup Greek yogurt (optional, for added creaminess) - 2 tablespoons raisins or dried cranberries - Chopped nuts (such as walnuts or pecans) for garnish 1. In a bowl or jar, mix the oats, almond milk, chia seeds, maple syrup, ground cinnamon, and vanilla extract. Stir well until everything is mixed. 2. If you want it creamier, fold in the Greek yogurt now. Make sure it mixes evenly. 3. Add the raisins or dried cranberries and fold them in gently. 4. Cover the bowl or jar with a lid or plastic wrap. Place it in the fridge overnight or for at least four hours. This helps the oats soak up the liquid. 5. The next morning, take it out and stir it well. If it seems too thick, add a splash more almond milk and mix until it’s just right. 6. Serve in bowls or jars. Top with chopped nuts for crunch and a sprinkle of cinnamon for extra flavor. 7. Enjoy your cinnamon roll-inspired breakfast! This recipe makes two servings and is perfect for busy mornings. Just prep the night before, and you'll have a quick, healthy meal ready to go. Cinnamon Roll Overnight Oats is simple to make and delicious. We covered the full ingredient list, tips for perfect texture, and storage methods. I shared how to customize with flavors and dietary needs. Remember, small changes can make a big difference. Experiment with toppings and enjoy your oatmeal to the fullest. With this recipe, breakfast can be tasty and healthy. Enjoy a sweet start to your day, and make it yours!

Cinnamon Roll Overnight Oats Simple Breakfast Delight

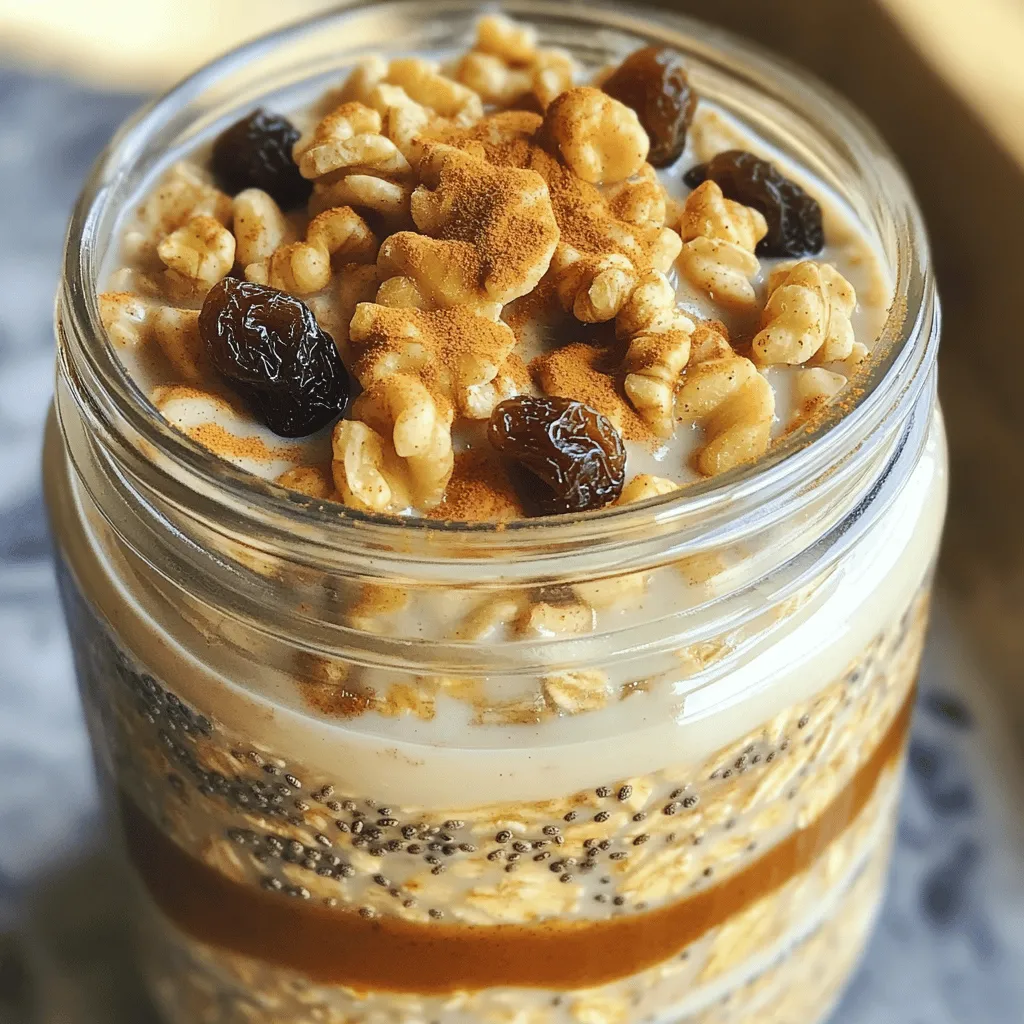
Start your day right with my Cinnamon Roll Overnight Oats! This simple breakfast delight combines sweet flavors with easy prep.

- 4 boneless, skinless chicken thighs - 1/4 cup honey - 1/4 cup Dijon mustard - 2 tablespoons olive oil - 2 cups baby carrots - 1 cup Brussels sprouts, halved - 1 red onion, cut into wedges - 1 tablespoon apple cider vinegar - 1 teaspoon garlic powder - 1 teaspoon paprika - Salt and pepper to taste To make Honey Mustard Sheet Pan Chicken, you need fresh and simple ingredients. First, gather your main components. The chicken thighs provide a juicy base. Honey and Dijon mustard blend to create a sweet and tangy sauce. Olive oil adds moisture. Next, let's talk about the veggies. Baby carrots add sweetness and crunch. Brussels sprouts bring a nutty flavor. The red onion adds depth and a bit of zing. This mix makes the dish colorful and tasty. For flavor, we use a few seasonings. Apple cider vinegar gives a tangy kick. Garlic powder adds warmth, while paprika brings a hint of smokiness. Salt and pepper help to enhance all the flavors. This combination of ingredients not only makes cooking easy but also ensures a meal full of great taste. {{ingredient_image_2}} First, preheat the oven to 425°F (220°C). This step is key for good cooking. While the oven heats, make the honey mustard marinade. In a small bowl, whisk together: - 1/4 cup honey - 1/4 cup Dijon mustard - 2 tablespoons olive oil - 1 tablespoon apple cider vinegar - 1 teaspoon garlic powder - 1 teaspoon paprika - Salt and pepper to taste Mix until smooth. This sauce will bring great flavor to our chicken and veggies. Next, it’s time to coat the chicken thighs. Place the 4 boneless, skinless chicken thighs in a large bowl. Pour half of the honey mustard mixture over the chicken. Use tongs to toss it well. Make sure every piece is covered in the sauce. Let the chicken marinate for at least 15 minutes. If you have more time, refrigerate it for up to an hour. This helps the flavors soak in. While the chicken marinates, prepare the veggies. In another bowl, combine: - 2 cups baby carrots - 1 cup Brussels sprouts, halved - 1 red onion, cut into wedges Drizzle the remaining honey mustard mixture over the veggies. Toss them well to coat. This adds a tasty twist to the dish. Now, it’s time to bake! On a large sheet pan, place the marinated chicken in the center. Spread them out for even cooking. Arrange the coated veggies around the chicken. Bake in your preheated oven for 25-30 minutes. Check the internal temperature of the chicken. It should reach 165°F (75°C). The veggies will become tender and slightly caramelized. Once the dish is done, remove the pan from the oven. Let the chicken rest for about 5 minutes. This helps the juices stay inside the meat. Before serving, garnish the dish with chopped fresh parsley. It adds a nice pop of color! To make sure your chicken and veggies cook evenly, spread them out on the sheet pan. This allows hot air to circulate all around them. Use a large sheet pan, about 18 by 13 inches, for best results. If your pan is small, the food may steam instead of roast. Use a meat thermometer to check the chicken. It should reach 165°F (75°C) to be safe to eat. When it comes to cooking tools, a good sheet pan is key. A sturdy whisk helps mix your marinade well. Tongs are great for tossing the chicken. A sharp knife makes cutting veggies easy. Marinating chicken is simple but important. The honey mustard mixture adds flavor and moisture. To marinate well, toss the chicken in the sauce, making sure it covers every piece. For the best taste, let it sit for at least 15 minutes. If you have more time, up to an hour in the fridge gives a deeper taste. For a great presentation, serve the dish right from the sheet pan. It looks rustic and inviting. If you want a fancier look, transfer the food to a large platter. Top it with fresh parsley for a pop of color. Pair this meal with crusty bread. It’s perfect for soaking up the honey mustard sauce. You can also serve a fresh salad on the side to balance the meal. Pro Tips Marination Time: Allowing the chicken to marinate for at least 30 minutes will enhance the flavor significantly. For the best results, marinate overnight in the refrigerator. Vegetable Variations: Feel free to customize the vegetables based on the seasons or your preferences. Sweet potatoes, zucchini, or bell peppers also work beautifully with this dish. Honey Substitutes: If you’re looking for a different flavor profile, try using maple syrup or agave nectar in place of honey for a unique twist. Sheet Pan Tips: To ensure even cooking, make sure the chicken and vegetables are spread out in a single layer on the sheet pan, avoiding overcrowding. {{image_4}} You can easily change the chicken in this recipe. Use chicken breasts if you prefer. They cook fast and stay juicy. Chicken thighs are also great for flavor and moisture. If you want something different, try tofu or pork. Tofu soaks up the honey mustard well. Pork can be sweet and savory, making it a tasty choice too. Feel free to switch up the veggies. Seasonal vegetables add variety and flavor. Think about using zucchini, bell peppers, or sweet potatoes. These options can change the taste and add color. Each type of vegetable brings its own unique flavor. Carrots and Brussels sprouts are great, but be bold and experiment! If you like some heat, add spices to your sauce. A pinch of cayenne or chili powder can give a nice kick. You can also change the sweetener. Use maple syrup or agave if you want. Each sweetener can change the sauce's flavor profile. Mixing it up can make your meal exciting and new! To store leftovers, let your dish cool down first. Place the chicken and veggies in an airtight container. This keeps them fresh and tasty. You can store them in the fridge for up to three days. This way, you can enjoy your meal again without losing flavor. If you want to freeze the dish, first let it cool completely. Then, wrap it tightly in plastic wrap or foil. You can also use a freezer-safe container. It will stay fresh for up to three months. For reheating, you can thaw it in the fridge overnight. Once thawed, bake it at 350°F (175°C) until heated through, about 20-25 minutes. This keeps your chicken juicy and the vegetables tender. Leftovers are great for quick meals. You can slice the chicken and add it to salads or wraps. The veggies work well in omelets or grain bowls. Mixing the flavors creates new dishes that are just as yummy. You can also use the honey mustard sauce as a dressing for your salads, adding that sweet and tangy taste to your meals. You can marinate chicken for at least 15 minutes. For better flavor, try marinating for one hour. If you have time, marinate it overnight in the fridge. This lets the sauce soak in well. Yes, you can make this dish in an air fryer. Cook the chicken and veggies at 375°F for about 20 minutes. Check that the chicken is cooked to 165°F. The air fryer gives a nice crisp finish. This chicken goes well with many sides. Try serving it with: - Rice - Quinoa - Crusty bread - Side salad - Steamed green beans These options complement the sweet and tangy flavors of the chicken. Yes, cutting the vegetables helps them cook evenly. Halving Brussels sprouts and cutting onions into wedges allows better heat distribution. You can leave carrots whole or cut them for faster cooking. Yes, you can use a different mustard. Yellow mustard will work, but Dijon adds a nice depth. Spicy brown mustard is another great option. Experiment to find your favorite flavor! This recipe for honey mustard sheet pan chicken is simple and tasty. You learned about the main ingredients, marinating the chicken, and cooking tips. The tips offered help you perfect your dish. You can even swap proteins or veggies to make it your own. Enjoy the easy leftovers and be creative with meals. Remember, a good meal brings joy to your table. Happy cooking!

Honey Mustard Sheet Pan Chicken Easy Family Dinner

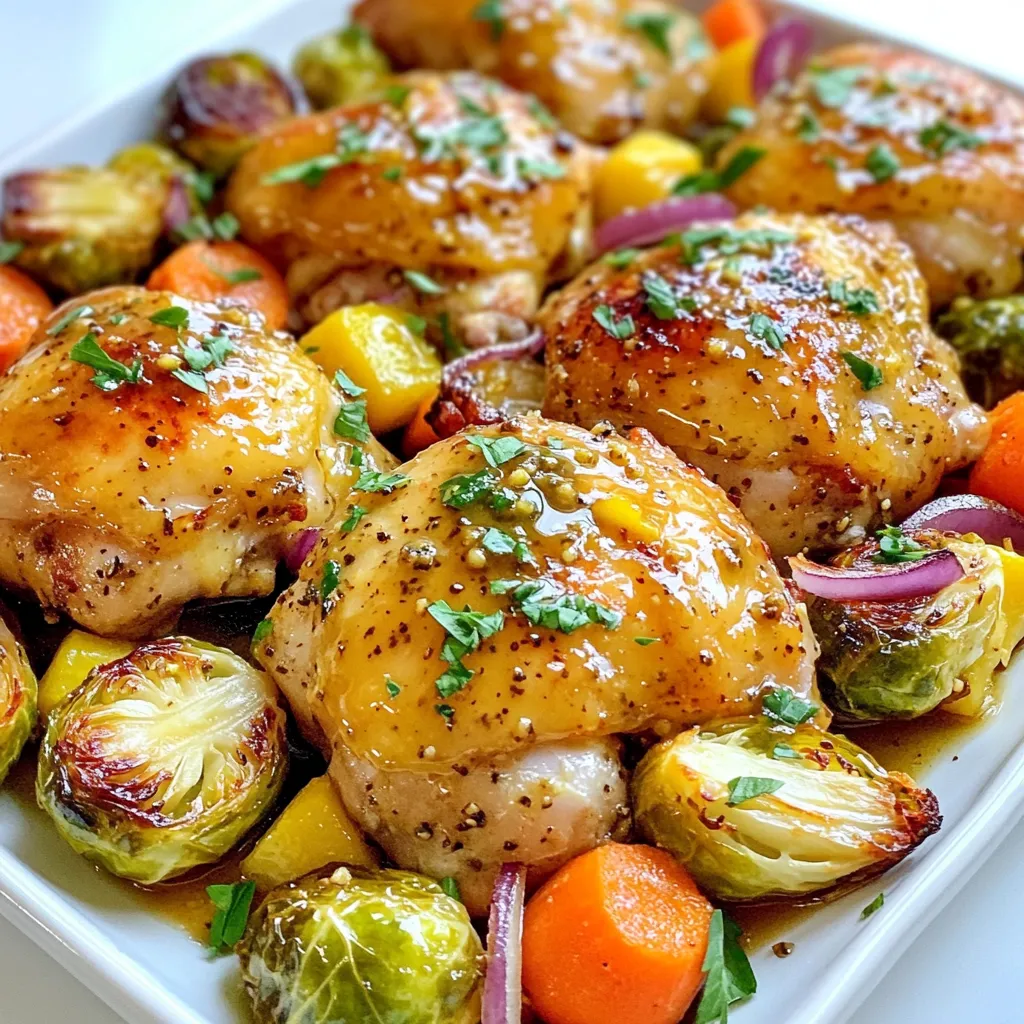
Looking for an easy family dinner that hits the spot? Try my Honey Mustard Sheet Pan Chicken! This simple, delicious

Older posts
Newer posts
← Previous Page1 … Page13 Page14 Page15 … Page75 Next →

dsad

© 2025 tastymomrecipes • Built with GeneratePress

Our Policies

  • Copyright Policy
  • Cookie Policy
  • GDPR Policy
  • Privacy Policy
  • Disclaimer
  • Terms Of Use

More Information

  • Home
  • About
  • Contact
  • Appetizers
  • Dessert
  • Dinner
  • Drinks
©2025, tastymomrecipes About Back To Top