Lemon Herb Couscous Salad Fresh and Flavorful Dish
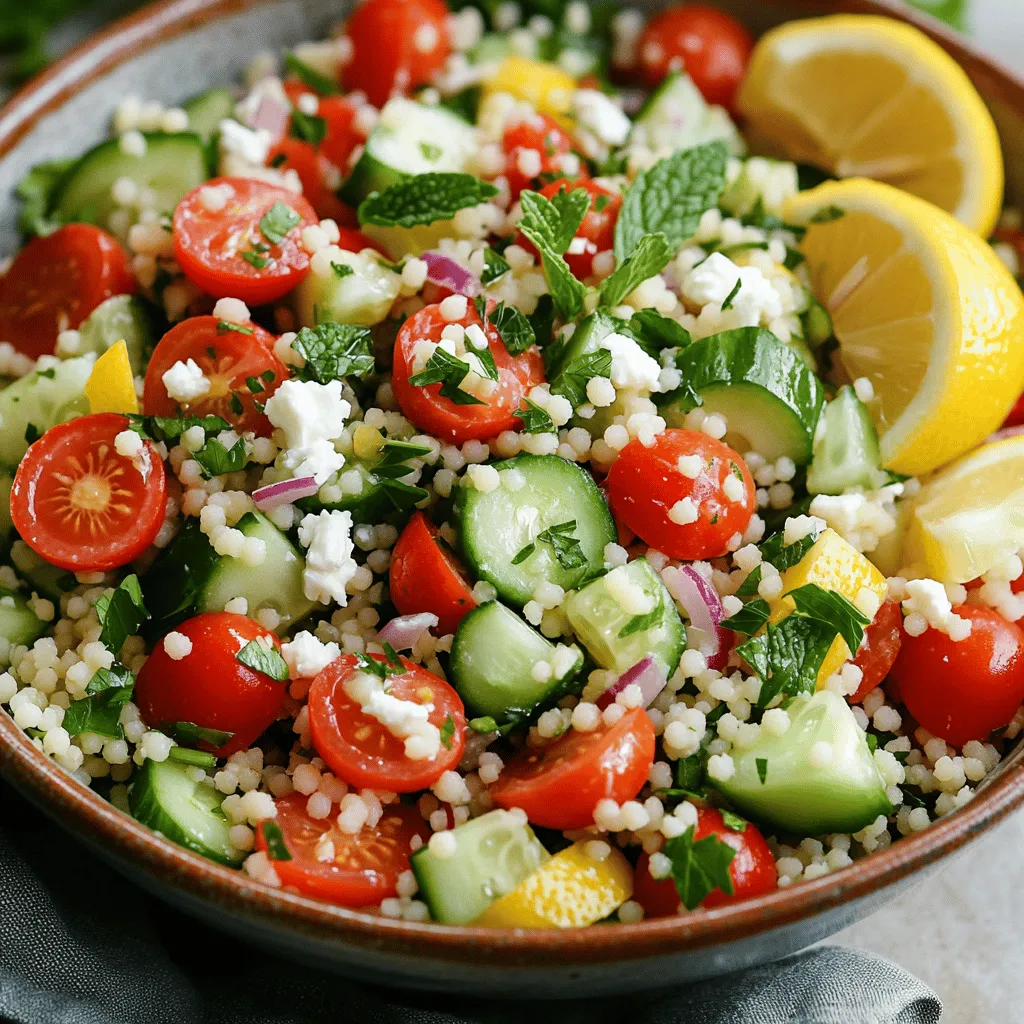
Looking for a fresh, flavorful dish that’s easy to make? My Lemon Herb Couscous Salad is just what you need!
Looking for a fresh, flavorful dish that’s easy to make? My Lemon Herb Couscous Salad is just what you need!
![- 1 pound ground turkey - 1/2 cup breadcrumbs - 1/4 cup grated Parmesan cheese - 1/4 cup minced fresh cilantro - 3 tablespoons sweet chili sauce - 2 cloves garlic, finely minced - 1 teaspoon fresh ginger, finely minced - Salt and pepper to taste - 1 tablespoon olive oil (for frying) - Extra sweet chili sauce (for serving) To make sweet chili turkey meatballs, start with fresh ground turkey. This is your base. Mix it with breadcrumbs to add texture. Grated Parmesan brings a nice cheesy flavor. Fresh cilantro brightens the dish. Next, add sweet chili sauce for a hint of sweetness and heat. Minced garlic and ginger add depth. Don't forget salt and pepper to enhance all these flavors. For cooking, use olive oil in your skillet. It helps create a nice golden crust. You will want extra sweet chili sauce for serving. This makes the meatballs even more delicious. Check the [Full Recipe] for complete details on how to bring it all together. - Prepare the Mixture Start by adding the ground turkey to a large bowl. Next, mix in the breadcrumbs, grated Parmesan cheese, minced cilantro, egg, sweet chili sauce, minced garlic, and minced ginger. Sprinkle in some salt and pepper. Now, use your hands or a fork to blend everything. Be careful not to overmix; it can make the meatballs tough. - Form the Meatballs Take about 2 tablespoons of the mixture. Roll it between your palms to create a smooth ball. Keep doing this until all the mixture is shaped into meatballs. You should have about 20 meatballs, depending on how big you prefer them. - Cook the Meatballs in Skillet Heat olive oil in a large skillet over medium heat. Once the oil is hot, add the meatballs in a single layer. You may need to cook them in batches to avoid crowding. Cook for about 5-7 minutes. Turn them gently with tongs until they are golden brown and cooked through. The internal temperature should reach 165°F (75°C). - Glaze the Meatballs with Sweet Chili Sauce After the meatballs are cooked, lower the heat. Drizzle extra sweet chili sauce over them in the skillet. Gently toss the meatballs with a spatula to coat them evenly. Heat them for one more minute, just until warm. - Serve and Garnish Carefully move the sweet chili turkey meatballs to a serving platter. Drizzle more sweet chili sauce on top. For a fresh touch, garnish with extra cilantro. This adds color and flavor. You can serve the meatballs with toothpicks for easy eating. Adding lime wedges on the side is a great idea for an extra zesty kick. For the full recipe, refer to the details above. - Avoid Overmixing: Mix your ingredients gently. Overmixing makes the meatballs tough. I prefer to use my hands. This way, I can feel the texture. - Use the Right Meatball Size: Aim for about 2 tablespoons per meatball. This size cooks evenly. It also makes them easy to eat. - Incorporating Herbs: Fresh herbs add life to the meatballs. I love using cilantro or parsley. You can also try basil or mint for a twist. - Adjusting Spice Levels: If you like heat, add more ginger or chili flakes. For a milder taste, reduce the amount of sweet chili sauce. Taste as you go! - Recommended Skillet Type: Use a non-stick skillet for easy cooking. It prevents sticking and helps with even browning. Cast iron works well too. - Using a Thermometer for Accuracy: Always check the internal temperature. Meatballs should reach 165°F (75°C). This ensures they are safe to eat and perfectly cooked. {{image_4}} Different Meat Options If you want to switch things up, try different meats. Ground chicken works well and keeps the meatballs light. You could also use lean ground beef for a richer flavor. If you prefer a plant-based option, use lentils or chickpeas. Just mash them well and adjust the other ingredients. Gluten-Free Breadcrumb Alternatives For those who are gluten-free, there are options. You can use crushed rice crackers or gluten-free bread crumbs. Oats ground into a fine flour also work nicely. These substitutes keep the meatballs moist and tasty. Adding Vegetables to the Mix Want to sneak in some veggies? Finely chop bell peppers, carrots, or zucchini. Adding them to the turkey mixture boosts nutrition and flavor. Just be sure to keep the pieces small so they blend well. Spicy Twist with Extra Ingredients If you like heat, add red pepper flakes or cayenne pepper. You can also mix in some chopped jalapeños. This gives the meatballs a nice kick and keeps things exciting. Serve with Alternative Sauces While sweet chili sauce is a favorite, you can try others. Teriyaki sauce adds a nice umami flavor. Soy sauce mixed with honey also works well. For a creamy option, a yogurt sauce with herbs could be delicious. Best Side Dishes to Complement Pair these meatballs with rice or quinoa for a filling meal. Steamed broccoli or a fresh salad makes a great side. For a fun twist, serve them in lettuce wraps for an easy, healthy bite. For the full recipe, check out the Sweet Chili Turkey Meatballs section above. To keep your sweet chili turkey meatballs fresh, store them in the fridge. Place the meatballs in an airtight container. This ensures they stay moist and tasty. You can also use plastic wrap or foil, but containers work best. If you want to save some for later, freezing is a great option. First, shape your uncooked meatballs and place them on a baking sheet. Make sure they are not touching. Freeze them for about two hours. Once frozen, transfer them to a freezer bag. This keeps them from sticking together. To reheat frozen meatballs, take them out and let them thaw in the fridge overnight. You can then cook them in a skillet or bake them. If cooking from frozen, add a few extra minutes to your cooking time. Leftover meatballs can last in the fridge for up to three days. If you freeze them, they can stay good for about three months. Check for any signs of spoilage. If you see discoloration or an off smell, it’s best to throw them away. Keeping track of your leftovers helps you enjoy them at their best! You can check the meatballs by using a meat thermometer. They are done when the inside reads 165°F (75°C). Look for a nice golden brown color on the outside. If the meatballs feel firm and are not pink inside, they are ready to eat. Yes, you can make these meatballs ahead of time. You can mix the ingredients and form the meatballs. Then, store them in the fridge for up to 24 hours. You can also freeze them for longer storage. Just thaw before cooking. Sweet chili turkey meatballs can be a healthy choice. Ground turkey is lean and high in protein. The added herbs and spices provide flavor without extra calories. However, watch the amount of sweet chili sauce. It can add sugar and calories. These meatballs pair well with rice or noodles. You can also serve them with a fresh salad. For a fun twist, use them as sliders in a bun. Add some lime wedges for an extra kick. Yes, you can bake sweet chili turkey meatballs. Preheat your oven to 400°F (200°C). Place the meatballs on a baking sheet and bake for about 20-25 minutes. This method is easier and can be less messy than frying. For the best flavor, drizzle some sweet chili sauce on top before baking. For the full recipe, check out the Sweet Chili Turkey Meatballs section. These sweet chili turkey meatballs are easy to make and full of flavor. We covered the ingredients, preparation steps, and tips to ensure perfect meatballs. You can explore variations and storage methods to suit your needs. Remember, you can adjust the spices and choose different sauces for your meals. Enjoy experimenting with this recipe in your kitchen. With these meatballs, dinner will be fun and tasty!](https://tastymomrecipes.com/wp-content/uploads/2025/07/baf3b223-a051-4e05-8b58-b33188b44f4c.webp)
Looking for a quick and tasty dinner? My Sweet Chili Turkey Meatballs recipe is just what you need! Packed with
![- 1 cup unsalted butter, at room temperature - 1 cup packed brown sugar - 1/2 cup granulated sugar - 2 large eggs - 1 teaspoon pure vanilla extract - 2 1/2 cups all-purpose flour - 1 teaspoon baking soda - 1/2 teaspoon salt - 1 cup semisweet chocolate chips - 1 cup mini marshmallows - 1 cup graham cracker crumbs When making S’mores stuffed cookies, the right ingredients make all the difference. The butter adds richness, while the sugars sweeten and help with texture. Eggs bind everything together, keeping the cookies soft and chewy. Using all-purpose flour gives the right structure. Baking soda helps the cookies rise. Salt balances the sweetness, enhancing the flavors. The semisweet chocolate chips and mini marshmallows provide that classic S’mores taste. Lastly, graham cracker crumbs add crunch and flavor. You can swap some ingredients based on your needs. For a gluten-free option, use gluten-free flour. If you want vegan cookies, try replacing the butter with coconut oil and the eggs with flaxseed meal or applesauce. Feel free to adjust the chocolate too! Dark chocolate or white chocolate can change the flavor. You can also use dairy-free chocolate chips or marshmallows if you prefer. To make these cookies, gather a few tools: - Mixing bowls - Measuring cups - Baking sheets - Parchment paper - Cookie scoop These tools help create the perfect texture and shape. Mixing bowls are great for combining ingredients, while measuring cups ensure accuracy. Parchment paper prevents sticking and makes cleanup easy. A cookie scoop helps you portion dough evenly, leading to uniform cookies. For the full recipe, check the details provided earlier. First, let's get the oven ready. Preheat your oven to 350°F (175°C). This step is key for even baking. While it heats, line your baking sheets with parchment paper. This keeps the cookies from sticking and makes cleanup easy. Next, grab a large bowl. Cream together 1 cup of unsalted butter, 1 cup of packed brown sugar, and 1/2 cup of granulated sugar. Use a mixer on medium speed until it’s smooth and fluffy. Now, add in 2 large eggs, one at a time. Mix well after each egg. Then, stir in 1 teaspoon of pure vanilla extract. In another bowl, mix together 2 1/2 cups of all-purpose flour, 1 teaspoon of baking soda, and 1/2 teaspoon of salt. Gradually add these dry ingredients to the wet mixture. Blend until just combined, but don’t overmix. Now comes the fun part! Fold in 1 cup of semisweet chocolate chips, 1 cup of mini marshmallows, and 1 cup of graham cracker crumbs. This will give your cookies that classic s'mores flavor. Make sure all the goodies are evenly mixed into the dough. To shape the cookies, use a cookie scoop or a tablespoon. Place a generous ball of dough on the prepared baking sheets, leaving space between them. For each cookie, take a small piece of dough and flatten it. Place some mini marshmallows and chocolate chips in the center. Cover it with another piece of dough and seal the edges. Make sure the filling is tucked inside. It's time to bake! Place the baking sheets in your preheated oven. Bake the cookies for about 10 to 12 minutes. Watch for the edges to turn golden brown while the center stays soft. This will give you a chewy texture. Once done, let them cool for about 5 minutes on the sheets. Then, transfer them to a wire rack to cool completely. Enjoy them warm for that gooey s'mores experience! For the full recipe, check out the recipe section above. To get soft and chewy cookies, follow these tips: - Use room temperature butter. This helps blend better with sugars. - Don’t overmix the dough. Mix until just combined for the best texture. - Chill the dough for at least 30 minutes. This helps cookies hold their shape. - Bake just until the edges turn golden. The centers should look slightly soft. Watch out for these common mistakes: - Overmixing the dough can make cookies tough. Mix gently. - Not measuring flour correctly leads to dry cookies. Use a kitchen scale for accuracy. - Forgetting to preheat the oven means uneven baking. Always check the temperature first. - Skipping the chilling step can cause flat cookies. Take the time to chill. Make your S'mores Stuffed Cookies extra special with these ideas: - Serve on a rustic wooden board for a fun look. - Add a small bowl of melted chocolate for dipping. - Pair with extra mini marshmallows for a tasty touch. - Enjoy them warm with a scoop of vanilla ice cream on top. For the full recipe, check out the [Full Recipe]. {{image_4}} You can make these cookies even more fun! Try adding some peanut butter for a rich twist. Just mix in 1/2 cup of creamy peanut butter when you cream the butter and sugars. This adds a nutty flavor that pairs well with chocolate. Mint chocolate is another great idea. Use mint chocolate chips instead of regular chocolate chips. The fresh mint taste gives a cool kick to the cookies. You can also add a few drops of peppermint extract for an extra boost. Coconut is an exciting option, too! Add 1/2 cup of sweetened shredded coconut to the dough. This will bring a tropical vibe to your treats. These add-ins make your S’mores stuffed cookies unique and delicious. You can change the flavors to match different seasons. In fall, try pumpkin spice! Just add 1 teaspoon of pumpkin spice to the dry ingredients. This will give your cookies a warm, cozy taste. For winter, you might want to try gingerbread flavors. Mix in some ground ginger and cinnamon to create a festive treat. In spring, you can add lemon zest for a bright, fresh flavor. Each season brings a chance to enjoy these cookies in a new way. If you want smaller treats, make mini S’mores cookies! Start by using a tablespoon of dough instead of a larger scoop. Flatten each ball slightly before adding the filling. Use just a couple of mini marshmallows and chocolate chips for the center. Seal the edges well, so nothing leaks out while baking. Bake them for 8-10 minutes instead of longer. These mini versions are perfect for sharing at parties or as a quick snack. Enjoy the fun of S’mores in a bite-sized treat! For the full recipe, check out the recipe section above. To keep your S'mores stuffed cookies fresh, store them at room temperature. Place them in an airtight container. This method helps keep the cookies soft and chewy. If you live in a humid area, consider using the fridge. You can stack them in a container with parchment paper between layers. This way, the cookies won’t stick together. You can freeze both unbaked dough and baked cookies. For unbaked dough, scoop the dough onto a baking sheet. Freeze the balls for about an hour. Once frozen, transfer them to a zip-top bag. They will keep for up to three months. For baked cookies, let them cool completely. Place them in an airtight container or zip-top bag. They can also last up to three months in the freezer. When stored properly, S'mores stuffed cookies can last about a week at room temperature. In the fridge, they may stay fresh for about two weeks. If you freeze them, expect them to taste great for three months. Always check for signs of freezer burn or off smells when defrosting. Enjoy the cookies at their best! For the full recipe, refer to the earlier section. Yes, you can make these cookies ahead of time. You can mix the dough and chill it in the fridge for up to three days. When you are ready to bake, just scoop and bake. If you want to freeze the dough, shape it into balls and freeze them. Bake directly from the freezer. Just add a couple of minutes to the baking time. This way, you can enjoy fresh cookies anytime! If your dough is too sticky, don’t worry! You can add a bit more flour, one tablespoon at a time, until the dough is easier to handle. Chilling the dough for 30 minutes can also help firm it up. Make sure to use a cookie scoop or spoon to portion the dough. Wetting your hands can help too! Definitely! You can use milk chocolate, dark chocolate, or even white chocolate. Each type of chocolate brings a different taste. Milk chocolate adds sweetness, while dark chocolate gives a richer flavor. Feel free to mix and match to find your favorite combo. Your S’mores Stuffed Cookies will still be delicious! Yes, you can make these cookies without eggs if you need a vegan option. You can replace each egg with a flax egg. To make a flax egg, mix one tablespoon of ground flaxseed with three tablespoons of water. Let it sit for a few minutes until it thickens. You can also use applesauce or mashed banana as an egg substitute. The best way to enjoy S’mores Stuffed Cookies is warm from the oven. You can serve them with extra toppings, like melted chocolate or more mini marshmallows. Try dipping them in chocolate for an extra treat! You can also pair them with a glass of milk or hot cocoa for a cozy snack. These S'mores Stuffed Cookies are easy to make and fun to enjoy. Using simple ingredients, you can create a tasty treat that will please everyone. Remember to experiment with substitutions and variations to find your perfect flavor. Store or freeze them as needed to keep them fresh. With these tips, you can avoid common mistakes and serve your cookies just right. Enjoy every bite of this gooey, chocolatey delight!](https://tastymomrecipes.com/wp-content/uploads/2025/07/5de25a1b-fb5b-4931-a354-e454fe1ff4bd.webp)
If you love the gooey goodness of s’mores, you’re in for a treat! S’mores Stuffed Cookies combine rich chocolate, marshmallows,

Looking for a fresh and tasty meal that’s also good for you? Teriyaki Salmon Bowls are the answer! These bowls
![- 1 French baguette, cut into 1/2-inch thick slices - 4 ripe tomatoes, finely diced - 2 cloves garlic, minced - 1/4 cup fresh basil leaves, roughly chopped - 3 tablespoons balsamic vinegar - 3 tablespoons extra virgin olive oil - Salt and freshly cracked black pepper to taste - Optional: 1/4 cup crumbled feta cheese Choosing ripe tomatoes Look for tomatoes that feel heavy for their size. They should be firm but have a slight give. A rich red color shows they are ripe and ready. This will give your bruschetta the best flavor. Selecting fresh basil Choose basil leaves that are vibrant green and have no brown spots. Fresh basil has a strong aroma. This means it will add a lot of flavor to your dish. Importance of quality olive oil Good olive oil can make a big difference. Look for extra virgin olive oil for the best taste. A high-quality oil adds depth and richness to your bruschetta. Use these tips to pick the best ingredients. The right choices will lead to a delicious and fresh Tomato Basil Bruschetta. For the complete details and steps, check out the Full Recipe. - Preheat the oven to 400°F (200°C). - Arrange baguette slices on a baking sheet. - Oil the bread for optimal crispiness. To start, I like to preheat the oven first. This ensures my bread becomes perfectly crispy. Once it’s ready, I lay the baguette slices flat on a baking sheet. Each slice should have some space around it. This helps them cook evenly. Next, I grab my olive oil. I use a brush to lightly coat the top of each slice. This little step makes a big difference in how crispy they become. - Combine diced tomatoes, garlic, and basil. - Add balsamic vinegar and seasonings. - Tips for marinating for enhanced flavor. While the bread bakes, I prepare the tomato topping. I dice the ripe tomatoes and mince garlic. Then, I chop fresh basil leaves. In a bowl, I mix these ingredients together. Next, I drizzle in balsamic vinegar and sprinkle salt and pepper. Mixing gently helps every bite burst with flavor. For the best taste, I let this mixture sit for about 10 minutes. This marinating time allows the flavors to blend nicely. - Toasting the baguette slices. - Spoon the tomato mixture on bread. - Optional toppings for variation. After about 5-7 minutes, I check the baguette slices. They should turn golden brown and be crispy. I take them out and let them cool slightly. Now comes the fun part! I spoon the tomato mixture onto each slice. I let some juices soak into the bread for extra flavor. If I want a twist, I sprinkle crumbled feta on top. This adds a nice tangy touch. Enjoy your fresh and flavorful tomato basil bruschetta! For more detailed instructions, check the Full Recipe. To get that perfect crispiness, bake the baguette for about 5-7 minutes. You want them golden brown and crunchy. Check them often to avoid burnt edges. If you see them darkening too fast, lower the heat or take them out a bit early. Tomato basil bruschetta shines at parties or family gatherings. It makes a great starter for any meal. Pair it with a chilled white wine or sparkling water. The fresh flavors match well with light drinks. For a stunning display, arrange the bruschetta on a large platter. Use whole basil leaves for color. Drizzle some balsamic glaze on top for extra flair. You can also serve it on a cutting board for a rustic look. {{image_4}} You can make tomato basil bruschetta even more exciting with different toppings. Adding cheese is a great start. Try mozzarella for a creamy, soft touch. Feta brings a tangy kick that complements the tomatoes well. You can also use goat cheese for a rich, earthy flavor. Adding other vegetables can enhance the dish too. Consider bell peppers for a sweet crunch or olives for a briny surprise. You can even add avocado for creaminess, making each bite unique. If you need gluten-free options, choose gluten-free baguettes. Many stores offer these now, so it’s easy to find one that tastes great. You can also use grilled polenta slices as a base. They bring a nice texture and flavor. For vegan modifications, skip the cheese or choose a plant-based alternative. Nutritional yeast can offer a cheesy flavor without dairy. Ensure the balsamic vinegar is vegan as some brands add honey. These small changes make the bruschetta fit various diets. To add more depth, try different spices or herbs. A pinch of red pepper flakes can add heat. Fresh oregano or thyme can give the bruschetta a Mediterranean flair. You can even mix in a touch of smoked paprika for an unexpected twist. Consider alternative dressing options too. Instead of balsamic vinegar, try a splash of lemon juice for brightness. A drizzle of pesto can also elevate the flavor profile. Experiment with these ideas to find your perfect bruschetta blend. For the full recipe, check out the complete guide to tomato basil bruschetta. To keep bruschetta fresh, store it carefully. First, separate the tomato mixture from the toasted bread. The bread gets soggy if left too long. Place the tomato mix in an airtight container. It can last for 2-3 days in the fridge. For the baguette, wrap it in foil or plastic wrap. This keeps it from drying out. You can eat leftovers cold or warm them a bit. Yes, you can freeze bruschetta! However, it’s best to freeze just the tomato mixture. Pour it into a freezer-safe bag and remove as much air as possible. This helps prevent freezer burn. When you're ready to use it, thaw the mixture in the fridge overnight. For the bread, you can freeze the unbaked baguette slices. Reheat them in the oven after thawing. They will taste fresh again! To reheat bruschetta, place the toasted bread back in the oven for a few minutes. This will crisp it up again. If you stored the tomato mixture, add it on top after reheating. The flavors may change slightly after storage. The bread may lose some crunch, but it will still taste great! Enjoy it as a quick snack or an appetizer. For the full recipe, check the link above! The best bread for bruschetta is a French baguette. It has a nice crust and soft center. You can also try ciabatta or Italian bread. These options hold toppings well and stay crispy. Choose bread that is a day or two old. Fresh bread can be too soft. Yes, you can prepare bruschetta ahead of time. Make the tomato topping and store it in the fridge. Toast the bread just before serving. This keeps the bread crispy and prevents it from going soggy. If you want to save time, you can slice and toast the bread ahead, too. Bruschetta lasts about 2 days in the fridge. The tomato topping can keep well, but the bread will get soggy. To maintain freshness, store the tomato mix and bread separately. If the topping starts to lose flavor, add fresh basil or a splash of balsamic vinegar. You can get creative with bruschetta toppings! Try adding different cheeses like mozzarella or goat cheese. You can mix in olives, peppers, or even avocados. For a spicy kick, add red pepper flakes. Use your favorite herbs to change the flavor. Bruschetta is best served warm. Toasted bread gives a nice crunch. The tomato topping can be at room temperature. This combination creates a tasty contrast. You can also serve it cold if you prefer a refreshing snack. For a complete guide to making Tomato Basil Bruschetta, check the [Full Recipe]. Bruschetta is simple to make and packs great flavors. You start with fresh bread and ripe tomatoes. Follow the steps to get crispy, tasty bites. Remember to choose quality ingredients for the best taste. Feel free to experiment with different toppings and storage methods. Whether for dinner or a party, bruschetta impresses everyone. Keep this guide handy, and enjoy making this classic dish. It’s easy, fun, and delicious!](https://tastymomrecipes.com/wp-content/uploads/2025/07/bc228b7b-860d-4001-9f3b-32f8d5f39145.webp)
Looking for a tasty snack that bursts with flavor? Tomato Basil Bruschetta is your answer! This easy recipe uses fresh

Are you ready to take your chicken tender game to the next level? In this post, I’ll show you how

Looking for a fun and tasty dessert? Try these Cheesecake Stuffed Strawberries! They mix sweet cream cheese with fresh strawberries,
![- 1 pound baby carrots (or regular carrots) - 3 tablespoons extra virgin olive oil - 3 cloves of garlic, finely minced - Zest of 1 large lemon - 2 tablespoons freshly squeezed lemon juice - 1 teaspoon honey (or maple syrup) - 1 teaspoon fresh thyme leaves (or dried thyme) - Salt and freshly ground black pepper, to taste - Fresh parsley for garnish The main ingredients for this recipe are simple yet effective. Baby carrots are sweet and tender. If you cannot find them, regular carrots work well too. Just peel and cut them into sticks. The olive oil adds richness, while minced garlic gives it a bold flavor. I love using fresh garlic; it makes a huge difference in taste. Next, we have the flavor enhancers. Lemon zest brightens the dish, giving it a fresh taste. Fresh lemon juice adds a tangy kick. Honey balances the acidity, making the dish even better. You can swap honey for maple syrup if you like. For seasoning, fresh thyme adds a lovely herbal note. Adjust salt and pepper to your liking. Finally, sprinkle chopped parsley on top for a pop of color and freshness. This combination of ingredients creates a flavorful side dish that pairs well with many meals. For the full recipe, check out the complete guide on how to make these delicious Lemon Garlic Roasted Carrots. - Preheat the oven to 400°F (200°C). - Line a baking sheet with parchment paper. To start, you must prepare your space. This simple step makes cleanup easier later. Preheating the oven ensures your carrots roast evenly. - Combine olive oil, garlic, lemon zest, lemon juice, honey, thyme, and seasonings. Next, we create the marinade. In a large bowl, mix together the olive oil, minced garlic, lemon zest, and fresh lemon juice. Add honey for sweetness and thyme for flavor. Sprinkle in salt and pepper to taste. Whisk it all together until smooth. This marinade is key to adding great taste to the carrots. - Coat the carrots with the marinade and arrange on the baking sheet. - Roast for 25-30 minutes, tossing halfway through. Now, it’s time to coat the carrots. Add the carrots to the bowl with the marinade. Toss them gently to make sure every carrot is covered. Spread them out on the baking sheet. Leave space between each carrot for even roasting. Place the baking sheet in the oven. Roast the carrots for 25 to 30 minutes. Remember to toss them halfway through. This helps them brown nicely and become tender. For the full recipe, refer to the beginning of the article. To boost the taste of your lemon garlic roasted carrots, try adding spices like cumin or paprika. Both spices add warmth and depth. Fresh herbs like rosemary or dill can also elevate the dish. They bring earthy and bright notes that work well with carrots. To balance sweetness and acidity, adjust the honey or maple syrup. If you find the dish too sweet, add a bit more lemon juice. This will brighten the flavors. The key is to taste as you go. You want a nice harmony of sweet and tangy. Avoid overcooking the carrots to keep their perfect texture. Aim for fork-tender but still crisp. Start checking at 25 minutes. If they are soft and caramelized, they are done. Using a meat thermometer can help too. Aim for a temperature around 190°F (88°C) for tender carrots. This ensures they are cooked just right. For serving, place the carrots in a beautiful dish. Drizzle any leftover marinade from the baking sheet on top. This adds flavor and a nice shine. Consider adding lemon wedges on the side. They make the dish look fresh and inviting. You can also pair the carrots with a protein like grilled chicken or fish. This creates a complete meal that is both colorful and tasty. For the full recipe, check out the [Full Recipe] section. {{image_4}} You can use regular carrots instead of baby carrots. Peel and cut them into sticks. This gives you more control over size. Make sure they are even for a nice roast. If you want a crunchy bite, try baby carrots. They are sweet and easy to handle. Feel free to add seasonal veggies to your dish. Think about parsnips or sweet potatoes in the fall. In spring, consider asparagus or radishes. These vegetables mix well with the lemon and garlic. You can also change the flavor by adding spices like cumin or paprika. This keeps things fresh and exciting. If you follow a vegan diet, swap honey for maple syrup. This small change keeps the sweetness. For those who avoid gluten, this recipe is already gluten-free. You can also reduce the oil for a lighter dish. If you have other dietary needs, just adjust the seasonings to fit your taste. Everyone can enjoy this recipe with a few tweaks. For the full recipe, check out the detailed steps above! To store leftover Lemon Garlic Roasted Carrots, let them cool completely first. Place them in an airtight container. This helps keep their flavor and texture. In the fridge, they last about 3 to 5 days. When you're ready to eat, just heat them up. If you want to freeze the roasted carrots, make sure they are cool. Place them in a freezer-safe bag or container. Try to remove as much air as possible to prevent freezer burn. They can stay good in the freezer for about 3 months. When reheating, let them thaw in the fridge overnight. Heat them in the oven at 350°F (175°C) until warmed, about 10-15 minutes. This keeps them tasty and not mushy. For the best storage, use glass or BPA-free plastic containers. These materials help keep the carrots fresh. Make sure they have tight-fitting lids. Label your containers with the date, so you know when to use them. This way, you can enjoy those delicious flavors whenever you want! For the full recipe of Lemon Garlic Roasted Carrots, check out the cooking section. To check if your carrots are tender, use a fork. Insert the fork into a carrot. If it goes in easily, they are done. Cooking time should be between 25 to 30 minutes. Toss the carrots halfway through cooking for even results. This helps them caramelize and become soft. Yes, you can prepare the carrots ahead of time. Toss them in the marinade and store them in the fridge for up to 24 hours. When ready to cook, spread them on a baking sheet. Roast as per the full recipe. For reheating, just warm them in the oven for about 10 minutes at 350°F (175°C). These carrots pair well with many dishes. Try serving them with grilled chicken or fish. They also go great with quinoa or rice. For a full meal, add a fresh salad. The bright flavors of the carrots enhance any meal. To add spice, try a pinch of red pepper flakes or cayenne. Mix them into the marinade. For more sweetness, add extra honey or a splash of maple syrup. You can also mix in some brown sugar for a caramelized effect. Adjust to your taste for a custom flavor! This blog post covered how to make Lemon Garlic Roasted Carrots. We discussed main ingredients and key steps, from preparation to roasting. I shared tips on flavor, cooking, and presentation. You can also explore variations to fit any diet. Lastly, I provided storage information to help you keep leftovers fresh. Roasting carrots enhances their flavor. They can make any meal shine. Enjoy this simple yet tasty dish. It’s easy, fun, and full of flavor!](https://tastymomrecipes.com/wp-content/uploads/2025/07/b2128ad0-99c5-4d5a-ba9d-f31fb2ddd179.webp)
Elevate your meal with Lemon Garlic Roasted Carrots, a flavorful side dish that’s easy to make! Bursting with zesty lemon

Are you ready for a meal that’s quick, tasty, and packed with flavor? This Sesame Ginger Ramen Salad is just

Get ready to enjoy the perfect holiday treat with my White Chocolate Cranberry Cookies! These delicious cookies mix buttery goodness,
