Honey Sriracha Brussels Sprouts Flavorful and Simple
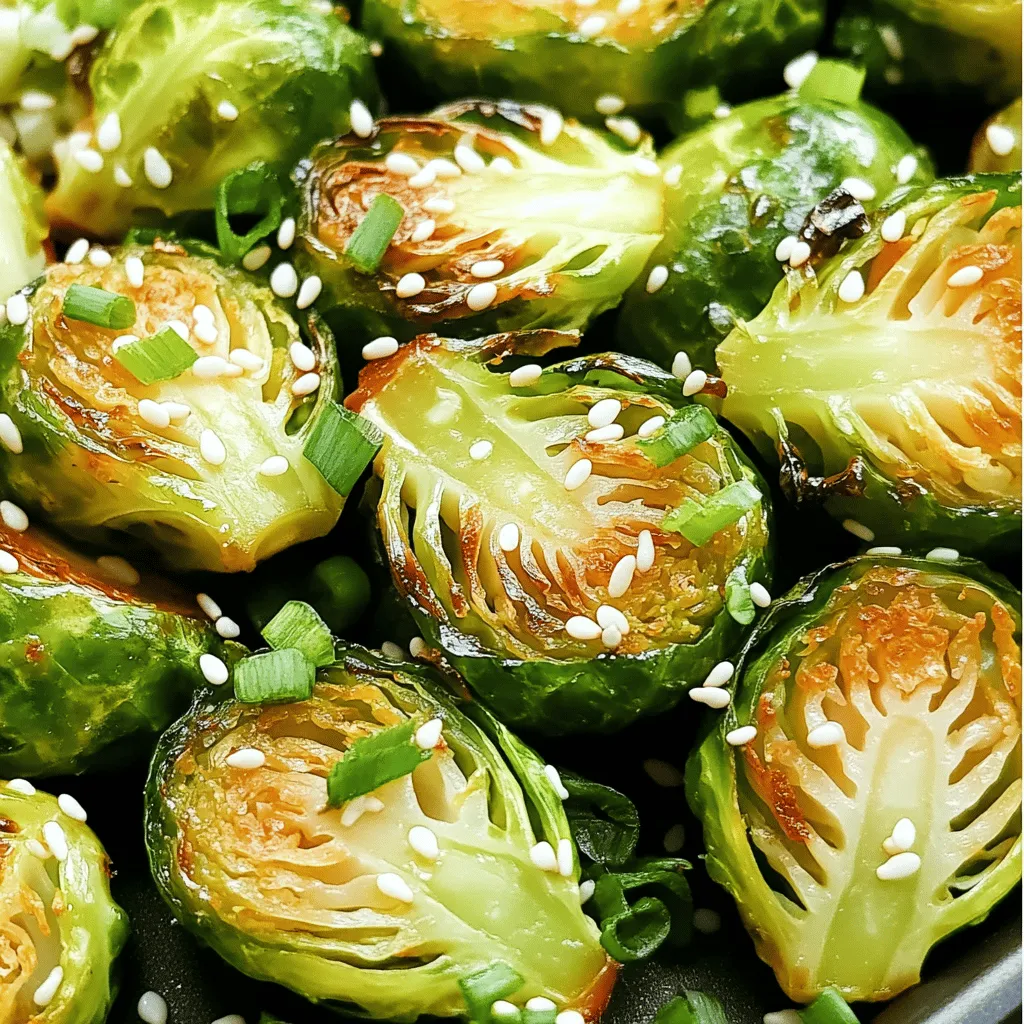
Craving a side dish that packs a punch? Look no further than Honey Sriracha Brussels Sprouts. These little green gems
Craving a side dish that packs a punch? Look no further than Honey Sriracha Brussels Sprouts. These little green gems
![- 1 lb ground beef (or lamb for a classic taste) - 1/2 cup breadcrumbs (fresh is best for moisture) - 1/2 cup feta cheese, crumbled - 2 cloves garlic, minced - 1 teaspoon dried oregano - 1 teaspoon ground cumin - 1/4 teaspoon red pepper flakes (for a kick) - Salt and black pepper to taste - 1/4 cup fresh parsley, finely chopped - 1 large egg (for binding) - 1/4 cup olive oil (for frying) In these meatballs, the ground beef or lamb serves as a rich base. The breadcrumbs help keep them tender, while the feta adds a creamy, tangy burst. Fresh garlic, oregano, and cumin bring warmth and depth to each bite. Adding red pepper flakes gives a hint of spice, and parsley brightens the flavor. The egg is crucial for binding all the ingredients. Olive oil is your best friend for frying, ensuring a golden, crispy exterior. When you mix these ingredients, aim for a balance of flavors. Each component plays a vital role in making this dish a savory delight. For the full recipe and to see the preparation steps, check out the [Full Recipe]. Start by gathering all your ingredients in a large mixing bowl. You will need ground beef or lamb, breadcrumbs, Parmesan cheese, egg, garlic, oregano, cumin, red pepper flakes, and salt and pepper. Mix these ingredients with your hands until they are well combined. Be careful not to overwork the meat. This can make your meatballs tough. Just mix until everything is evenly distributed. Next, gently fold in the crumbled feta cheese and finely chopped parsley. This step adds a burst of flavor to your meatballs. Make sure they are evenly mixed. You want a piece of feta in every bite for that rich, tangy flavor. Now, preheat a large skillet over medium heat. Add olive oil to the skillet and let it heat until it shimmers. While the oil heats, form your meat mixture into golf ball-sized meatballs, about 1.5 inches in diameter. This size helps them cook evenly. Once the oil is hot, carefully place the meatballs in the skillet. Make sure they have space around them. This helps them brown well. Cook the meatballs for about 5-6 minutes, turning them occasionally. After they are browned, reduce the heat to low, cover the skillet, and let them cook for another 10-12 minutes. Check that they reach an internal temperature of 160°F. Remove them from the skillet and let them rest for a few minutes before serving. Enjoy your delicious dish! For the full recipe, check out the details above. To make the best feta stuffed Greek meatballs, focus on size and texture. Aim for meatballs about the size of golf balls. This size cooks evenly and keeps them juicy. Use slightly damp hands when shaping them. This helps prevent sticking. After cooking, let them rest for a few minutes. Resting allows the juices to settle, making the meatballs more flavorful. One common mistake is overmixing the meat. Overworking the mixture can make the meatballs tough. Mix just until combined for a tender bite. Another error is not leaving enough space in the pan. Crowding the meatballs causes them to steam instead of brown. Give each meatball some room to cook properly. For a stunning presentation, serve the meatballs on a decorative platter. Drizzle a bit of olive oil over them for shine. Garnish with fresh parsley for a pop of color. Pair them with creamy tzatziki sauce and warm pita bread. This creates a lovely Greek meal experience. For the complete recipe, check the Full Recipe section. {{image_4}} You can change the protein in these meatballs. Use ground turkey or chicken for a lighter dish. They will still be tasty and work well with feta. If you want a meat-free option, try lentils. Cooked lentils give a nice texture and soak up flavors. You can mix them with breadcrumbs, spices, and feta for a hearty meal. Feel free to get creative with herbs and spices. Try adding fresh basil or mint to brighten the dish. You can also mix in smoked paprika for a deeper flavor. For cheese lovers, swap feta with goat cheese or ricotta. Each cheese adds its unique taste and creaminess to the meatballs. There are many fun ways to serve these meatballs. You can make a meatball sub by placing them in a soft roll with sauce. Top with fresh herbs or cheese for extra flavor. Another option is to integrate them into a Greek salad. Add mixed greens, cucumber, tomatoes, and olives for a colorful and healthy meal. For the complete recipe, check out the [Full Recipe]. To keep your feta stuffed Greek meatballs fresh, store them in the fridge. Place cooked meatballs in an airtight container. They will stay good for about three to four days. If you have uncooked meatballs, cover them tightly with plastic wrap or foil. They will last about one to two days in the fridge. Always label your containers with the date to track freshness. Freezing is a fantastic way to extend the life of your meatballs. For cooked meatballs, let them cool completely before freezing. Place them in a single layer on a baking sheet. Once frozen, transfer them to a freezer bag. This keeps them from sticking together. Cooked meatballs can last up to three months in the freezer. For uncooked meatballs, freeze them the same way. They will stay fresh for two to three months. Always thaw them in the fridge before cooking. To enjoy your meatballs again, follow these reheating tips. If they are frozen, allow them to thaw overnight in the fridge. To reheat, use a skillet over low heat. Add a splash of water or broth to keep them moist. Cover the skillet to trap steam. Heat them for about 8-10 minutes, turning occasionally. You can also use a microwave on medium power. Heat for 1-2 minutes, checking regularly to avoid overcooking. For the best experience, serve with fresh herbs or a squeeze of lemon. For the full recipe, check out the earlier sections. To check if your meatballs are done, use a meat thermometer. The internal temperature should reach 160°F. This ensures they are safe to eat. If you don’t have a thermometer, cut one open. The meat should be no longer pink inside. Yes, baking is a great option! Preheat your oven to 400°F. Place the meatballs on a baking sheet lined with parchment paper. Bake them for about 20-25 minutes. Turn them halfway through for even cooking. They will be just as tasty and a bit healthier! Greek meatballs go well with many sides! Try serving them with: - Tzatziki sauce - Pita bread - Greek salad - Roasted vegetables - Rice or couscous These dishes enhance the flavors of the meatballs and make a full meal. To make gluten-free meatballs, swap regular breadcrumbs for gluten-free ones. You can also use crushed gluten-free crackers or ground oats. These options will keep the meatballs moist and tasty without gluten. Enjoy your delicious dish without worry! For the complete recipe, check out the [Full Recipe]. We explored the key ingredients for Greek meatballs, like ground beef and feta. You learned how to mix the meat without overworking it and how to cook the meatballs to perfection. We also shared tips to avoid common mistakes and offered ways to serve these tasty bites. In conclusion, making Greek meatballs combines simple steps with great flavors. With practice, you can create delicious meatballs that impress. Keep this guide handy for your next cooking adventure!](https://tastymomrecipes.com/wp-content/uploads/2025/07/75f298c0-ae6e-4fe2-b6ef-941ed8380bd5.webp)
If you’re looking for a dish that bursts with flavor, you’re in for a treat! Feta stuffed Greek meatballs combine
![- 1 pound ground beef or Italian sausage - 1 medium onion, diced - 3 cloves garlic, minced - 1 can (28 ounces) crushed tomatoes - 1 can (15 ounces) tomato sauce - 8 lasagna noodles, broken into bite-sized pieces - 1 cup ricotta cheese - 1 cup shredded mozzarella cheese - 1/2 cup grated Parmesan cheese To start, you can choose between ground beef or Italian sausage. Both add a rich flavor to the soup. Next, you’ll need an onion and some garlic. These two ingredients create a great base for your soup. For the canned ingredients, crushed tomatoes and tomato sauce are key. They give the soup its hearty texture and deep taste. Lastly, breaking the lasagna noodles into pieces makes them easy to eat. - 4 cups beef or vegetable broth - 2 teaspoons Italian seasoning - 1 teaspoon red pepper flakes (optional) - Salt and freshly ground black pepper to taste For the broth, you can pick beef or vegetable. This choice changes the soup's flavor slightly. Italian seasoning gives that classic taste, while red pepper flakes add a little heat if you like spice. Remember to season with salt and pepper to bring out the flavors. - Fresh herbs (basil, parsley) - Rustic Italian bread for serving Fresh herbs like basil or parsley make a lovely garnish. They add color and freshness to your soup. Serving it with rustic Italian bread is a great idea too. It’s perfect for dipping and makes your meal feel complete. You can find the full recipe for making this delicious dish easily. To start, heat a large skillet over medium heat. Add 1 pound of ground beef or Italian sausage. Cook it until it turns brown. Use a spatula to break it into smaller pieces. Once the meat is fully cooked, drain any excess fat. Transfer the meat to the crockpot. Next, chop 1 medium onion and mince 3 cloves of garlic. Add the onion and garlic to the crockpot with the meat. Stir gently to mix everything together. Now it’s time to add the flavorful elements. Pour in 1 can of crushed tomatoes and 1 can of tomato sauce. Then, add 4 cups of beef or vegetable broth. Sprinkle in 2 teaspoons of Italian seasoning. If you enjoy some heat, add 1 teaspoon of red pepper flakes. Season with salt and freshly ground black pepper to taste. Mix it all well to combine the ingredients evenly. Cover the crockpot with its lid. Set it to cook on low for 6-8 hours or on high for 3-4 hours. Cooking on low allows the flavors to meld nicely. If you’re short on time, high heat works well too. About 30 minutes before serving, add 8 broken lasagna noodles to the pot. Stir gently to ensure they are submerged in the broth. In a small bowl, mix 1 cup of ricotta cheese with a pinch of salt and pepper. When the noodles are tender, ladle the soup into bowls. Top each bowl with a dollop of the ricotta mixture. Sprinkle each serving with shredded mozzarella and grated Parmesan cheese. Finally, add a touch of freshly chopped basil or parsley for that perfect finish. For the full recipe, check out the detailed instructions! To get the best flavor from your Crockpot Lasagna Soup, adjust the cooking time. Cooking on low for 6-8 hours allows flavors to blend well. If you need it done faster, high for 3-4 hours works too. Always taste your soup before serving. You might need to add more salt or pepper for that perfect balance. You can choose how thick or thin you want your soup. If you like it thicker, use less broth. For a thinner soup, add more broth. This way, you can match your personal taste. Remember, the lasagna noodles soak up some broth too, so keep that in mind. Prep time is just 15 minutes. To save time, chop your onion and garlic ahead of time. You can also brown the meat in batches if you have a lot. Using a crockpot is great because it cooks slowly and evenly. Just set it in the morning, and you will have a warm meal when you come home! {{image_4}} You can easily change the recipe to fit different diets. For a vegetarian option, swap the meat for lentils or mushrooms. Both add a lovely texture and flavor. If you prefer gluten-free, use gluten-free noodles. They work well in this soup and keep it hearty. Adding more vegetables can boost flavor. Try tossing in chopped carrots or spinach. They add color and nutrition. You can also experiment with different cheeses. Mix in provolone or gouda for a unique taste twist. Want to give your soup an exciting flair? Add spices like cumin or paprika for a Mexican twist. For a Mediterranean vibe, try adding herbs like oregano or thyme. You can even incorporate sauces like BBQ or Alfredo for a fun change. Each twist makes the soup feel new and fresh. To keep your Crockpot Lasagna Soup fresh, store it in an airtight container. Let the soup cool before sealing it. Place it in the fridge if you want to eat it within a few days. You can also freeze it for longer storage. Just put it in a freezer-safe container. Leave some space at the top because the soup will expand as it freezes. When you’re ready to enjoy your soup again, there are good ways to reheat it. Use the stove for the best flavor. Pour the soup into a pot and heat it over medium heat. Stir it often to prevent sticking. You can also use a microwave. Heat it in short bursts, stirring in between. Make sure it’s hot all the way through. Always check the soup for any signs of spoilage before reheating. In the fridge, your soup stays good for about 3 to 4 days. If you freeze it, it can last up to 3 months. When checking for spoilage, look for changes in color or smell. If it smells sour or looks slimy, it’s time to toss it. Always trust your senses when it comes to food safety. To make this soup vegetarian, swap the meat for lentils or mushrooms. Use vegetable broth instead of beef broth. You can also add more veggies like zucchini or spinach for extra flavor and nutrients. This way, you keep the taste rich and hearty. Yes, you can prepare this soup in advance. Cook the soup as usual, then cool it down before storing. Place it in an airtight container in the fridge for up to three days. To heat it, use the stove or microwave until warm. Here are some great sides to serve with your soup: - Italian bread for dipping - Green salad dressed with vinaigrette - Garlic bread for a cheesy touch These sides complement the soup and provide a complete meal. Cooking on low takes about 6-8 hours. If you use the high setting, it will take around 3-4 hours. For the best flavors, I recommend cooking it on low. This allows the ingredients to blend well. You can use fresh lasagna noodles! Just break them into smaller pieces and add them about 30 minutes before serving. Fresh noodles cook faster, so keep an eye on them. If they get too soft, the soup will lose some texture. For the best results, follow the [Full Recipe]. Crockpot lasagna soup combines rich flavors and simple steps for a cozy meal. You start with hearty ingredients like meats, cheeses, and veggies. By using broth and seasonings, the soup bursts with flavor. Adjust the recipe for your taste with fun toppings or variations. In the end, this dish is easy to make and delicious. Whether for a family dinner or leftovers, you’ll enjoy each bowl. With helpful storage tips, your meal can last and taste great. Dive into your creation and savor the warmth it brings.](https://tastymomrecipes.com/wp-content/uploads/2025/07/951c1c49-9a00-4639-8db8-031f3702c2c0.webp)
Warm, cheesy, and packed with flavor, my Crockpot Lasagna Soup is the ultimate family meal. Imagine walking into your home

If you love desserts that combine classic flavors, you’re in for a treat! Cinnamon Roll Apple Pie merges two favorites

Looking for a snack that’s both crunchy and packed with flavor? Ranch seasoned pretzels are your answer! These tasty bites
![To create these rich and fudgy hazelnut espresso brownies, gather the following ingredients: - 1 cup unsalted butter - 2 cups granulated sugar - 1 cup packed brown sugar - 4 large eggs - 1 tablespoon pure vanilla extract - 1 cup all-purpose flour - 1 cup unsweetened cocoa powder - 1 teaspoon baking powder - 1/2 teaspoon salt - 1 cup hazelnuts, chopped and toasted - 1 tablespoon espresso powder - 1 cup dark chocolate chips These ingredients work together to create a deep, chocolate flavor with a hint of coffee. The hazelnuts add a lovely crunch and nuttiness. Toasting the nuts enhances their flavor, making every bite extra special. When you mix the espresso powder into the batter, it boosts the chocolate taste. The sugars make the brownies sweet and chewy. Using dark chocolate chips adds rich chocolate notes that complement the espresso perfectly. If you want to explore more about making these brownies, check out the Full Recipe. - Preheat the oven to 350°F (175°C). - Grease a 9x13 inch baking pan with butter. - Melt 1 cup of unsalted butter in a medium saucepan over low heat. - Mix in 2 cups of granulated sugar and 1 cup of brown sugar until smooth. - Add 4 large eggs one at a time. Stir well after each egg. - Mix in 1 tablespoon of pure vanilla extract. - In a separate bowl, whisk together: - 1 cup of all-purpose flour - 1 cup of unsweetened cocoa powder - 1 teaspoon of baking powder - 1/2 teaspoon of salt - 1 cup of chopped and toasted hazelnuts - 1 tablespoon of espresso powder - Fold the dry ingredients into the wet mixture gently. - Be careful not to over-mix; keep it thick and fudgy. - Add 1 cup of dark chocolate chips and fold them in. - Pour the batter into the prepared pan and spread it evenly. - Bake for 25-30 minutes. - Test for doneness by inserting a toothpick in the center. It should have a few moist crumbs. - Let the brownies cool in the pan for about 10 minutes. - Transfer them to a wire rack to cool completely. - Once cool, cut them into squares or rectangles. Enjoy your rich and fudgy hazelnut espresso brownies! For the full recipe, check the earlier section. To get that rich, fudgy texture, avoid over-mixing the batter. When you mix the wet and dry ingredients, stop as soon as they come together. This helps keep the brownies moist and chewy. To check for doneness, insert a toothpick into the center. If it comes out with some moist crumbs, your brownies are ready. If it’s clean, they may be overcooked. You can boost the flavor by adding a pinch of cinnamon or a splash of almond extract. I also suggest using fresh espresso instead of cocoa powder. Fresh espresso gives a deeper coffee flavor and makes the brownies even more special. You can brew a shot and mix it in with the wet ingredients. For serving, place the brownies on a rustic wooden platter. A light dusting of powdered sugar adds elegance. You can also garnish with whole hazelnuts for a nice touch. Serve each brownie with a scoop of vanilla ice cream. It adds creaminess and contrasts the rich chocolate. For an extra treat, include a small cup of espresso on the side for dipping! {{image_4}} You can still enjoy these brownies without hazelnuts. Just leave them out entirely. Alternatively, you can swap hazelnuts for seeds like sunflower or pumpkin. Both options add a nice crunch and keep the brownies tasty. Make sure to use the same amount as the original nuts. This keeps the texture consistent. Want to make these brownies vegan? You can replace the eggs with flax eggs. Mix one tablespoon of flaxseed meal with two and a half tablespoons of water. Let it sit for a few minutes to thicken. For butter, use coconut oil or vegan butter. These swaps keep the fudgy texture you love. To achieve that rich, moist feel, don’t over-mix the batter. The final result will be just as delightful as the original. Looking to change things up? You can add different extracts to the batter. Almond, mint, or orange extracts work well. Just a teaspoon can add great flavor. You can also swirl in caramel or marshmallow before baking. This creates a fun visual and flavor surprise in each bite. Get creative and try different combos to make your brownies unique. For the full recipe, check the main article. To keep your brownies fresh, store them in an airtight container. Layer parchment paper between each brownie to prevent sticking. This helps maintain their rich and fudgy texture. Place the container in a cool, dry place. They can stay fresh for up to five days. If you want to add a little extra moisture, you can place a slice of bread in the container. Freezing brownies is easy and helps them last longer. First, let the brownies cool completely. Then, wrap each brownie in plastic wrap tightly. After that, place them in a freezer-safe bag or container. This keeps out air and prevents freezer burn. They can stay in the freezer for three months. To thaw, just take them out and leave them at room temperature for about an hour. If you're in a hurry, microwave them for about 10-15 seconds. This quick method helps maintain their fudgy texture. To reheat brownies, the oven is your best friend. Preheat it to 350°F (175°C). Place the brownies on a baking tray and cover them with foil. Heat them for about 10-15 minutes. This keeps them warm and gooey without drying them out. If you prefer the microwave, just heat a brownie for about 10 seconds. Check to see if it's warm enough. Be careful not to overheat, as this can make them tough. Enjoy your rich hazelnut espresso brownies just like they were fresh from the oven! Hazelnut espresso brownies stay fresh for about 3 to 5 days at room temperature. Store them in an airtight container to keep them soft and moist. If you want them to last longer, you can refrigerate them. They will stay good for up to a week in the fridge. Yes, you can substitute some ingredients. For example, you can use coconut oil instead of butter. You can also swap granulated sugar for brown sugar for a richer taste. If you want a gluten-free option, use almond flour instead of all-purpose flour. Just make sure to adjust the amounts as needed. If your brownies turn out dry, they might have baked too long. To fix this, you can add a little melted butter or a splash of milk to the batter the next time. Also, check them a few minutes before the suggested baking time. You want them to be soft and fudgy. Absolutely! You can use walnuts, pecans, or almonds in place of hazelnuts. Each nut adds a unique flavor and texture. Just make sure to chop them up and toast them for the best taste. To enhance the chocolate flavor, you can add more cocoa powder or use high-quality dark chocolate. You might also consider melting chocolate and mixing it into the batter for a richer taste. A splash of chocolate extract can also boost that chocolatey goodness! For the full recipe, check out [Full Recipe]. In this post, we explored a rich brownie recipe that blends hazelnuts and espresso. You learned how to combine ingredients, achieve that fudgy texture, and customize flavors. We also shared storage tips to keep your brownies fresh. Enjoy making these brownies for any occasion. They will surely impress friends and family. Happy baking!](https://tastymomrecipes.com/wp-content/uploads/2025/07/f0b0bece-b9e6-4817-966e-5a2f8087b93a.webp)
If you crave a rich, fudgy treat with a twist, you’re in the right spot. My Hazelnut Espresso Brownies mix
![To make Vegan Sweet Potato Black Bean Chili, gather these key items: - 2 medium sweet potatoes, peeled and diced into 1-inch cubes - 1 can (15 oz) black beans, thoroughly rinsed and drained - 1 can (15 oz) diced tomatoes, including all juices - 1 medium onion, finely chopped - 3 cloves garlic, minced - 1 bell pepper (any color), diced - 2 cups vegetable broth (low-sodium recommended) These ingredients bring a wonderful mix of flavors and textures. Sweet potatoes add creaminess. Black beans provide protein and fiber. Diced tomatoes bring acidity and sweetness. Onion, garlic, and bell pepper create a savory base. Spices enhance the taste of the chili. Here’s what you’ll need: - 2 tablespoons chili powder - 1 teaspoon ground cumin - 1/2 teaspoon smoked paprika - 1/4 teaspoon cayenne pepper (adjust based on desired spiciness) - Sea salt and freshly cracked pepper, to taste Chili powder gives warmth. Cumin adds earthiness. Smoked paprika lends a subtle smoky flavor. Cayenne pepper brings heat, so adjust to your liking. Salt and pepper enhance all the flavors. Garnishes make the dish special. You can add: - Fresh cilantro, roughly chopped, for garnish - Slices of ripe avocado, for serving Consider serving with warm cornbread or tortilla chips for a delightful crunch. These garnishes not only add flavor but also color and freshness to the dish. For the full recipe, check out the [Full Recipe]. 1. First, grab a large pot and heat the olive oil over medium heat. This will get the pot ready for the veggies. 2. Add the chopped onion and diced bell pepper. Sauté them for about 5-7 minutes. Stir occasionally, so they become soft and clear. 3. Next, add the minced garlic. Cook it for 1-2 minutes. You want it to smell nice without burning. 1. Now, it’s time to mix in the sweet potatoes. Add them to the pot along with the spices: chili powder, cumin, smoked paprika, and cayenne pepper. 2. Sprinkle in a good pinch of sea salt and black pepper. Stir everything well. You want the sweet potatoes to get a nice coat of spices. 3. Pour in the vegetable broth. Then, add the diced tomatoes with their juices and the black beans. Mix all the ingredients thoroughly. 1. Bring the mixture to a gentle simmer. Then, cover the pot and let it cook for about 25-30 minutes. Stir it occasionally to keep it from sticking. 2. After the cook time, check the sweet potatoes. They should be soft when you poke them with a fork. 3. Taste the chili and adjust the seasoning if needed. You can add more salt, pepper, or chili powder to make it just right. 4. Once you adjust the seasoning, take the pot off the heat. Let the chili sit for a few minutes to let the flavors blend together. Now you're ready to serve your Vegan Sweet Potato Black Bean Chili! For the full recipe, check out the detailed guide. Balancing Spices to Taste Start with the right amount of spices. I suggest using two tablespoons of chili powder. You can add more if you prefer a stronger flavor. For a smoky kick, use smoked paprika. If you like heat, sprinkle in cayenne pepper. Always taste your chili as it cooks. Adjust the spices based on what you enjoy. Letting the Chili Rest for Enhanced Flavor After cooking, let the chili sit for a few minutes. This rest time helps the flavors blend. The longer it rests, the better it tastes. You can even make it a day ahead. Reheating the chili will only improve its flavor. Best Pot for Cooking Chili A heavy-bottomed pot works best for chili. It helps distribute heat evenly. A Dutch oven is perfect for this. It can handle high heat and retains warmth well. Tools for Easy Prep Use a sharp knife for chopping vegetables. A good cutting board is also needed. This makes prep quick and easy. Consider a sturdy spoon for stirring the chili as it cooks. Ideal Pairings and Accompaniments Serve the chili with warm cornbread or tortilla chips. Both add a nice crunch. You can also pair it with a simple salad. This adds freshness to your meal. Presentation Ideas for Serving Serve chili in deep bowls to keep it warm. Top with fresh cilantro and avocado slices. This not only looks great but also adds flavor. Enjoy the vibrant colors on your plate! For the full recipe, check out the earlier section. {{image_4}} You can easily change the beans in this chili. Pinto or kidney beans work well too. They add a nice texture and taste. If you're looking for more protein, try adding tofu or tempeh. Both options soak up flavors well and keep your dish hearty. Want to elevate your chili? Add more vegetables! Zucchini and carrots fit perfectly. They add color and nutrition. You can also play with herbs. Fresh thyme or oregano can bring a new twist to the classic flavor. Don’t be shy about experimenting! Thinking about spice? You can adjust the heat easily. Add more cayenne pepper for a kick. Or, if it’s too hot, add more sweet potatoes or beans to cool it down. For an extra spicy version, consider adding jalapeños or a dash of hot sauce. For the full recipe, check out the [Full Recipe]. To keep your Vegan Sweet Potato Black Bean Chili fresh, follow these tips: - Refrigeration Tips: Let the chili cool to room temperature. Once cooled, transfer it to an airtight container. Store it in the fridge for up to five days. This helps maintain the flavors and texture. - Freezing for Longer Storage: For longer storage, pour the chili into freezer-safe containers. Leave some space at the top for expansion. You can freeze it for up to three months. Label the containers with the date to keep track. When you're ready to enjoy your chili again, use these methods: - Best Methods for Reheating: The best way to reheat chili is on the stove. Pour it into a pot over medium heat. Stir occasionally until it’s hot. You can also use the microwave for quick heating. Just cover the bowl and heat it in short bursts. - Tips for Keeping the Chili Flavorful: Add a splash of vegetable broth or water if it’s too thick. Stir well to mix and maintain its rich taste. Taste and adjust seasoning if needed after reheating. Don't let those leftovers go to waste! Here are creative recipes using leftover chili: - Chili Stuffed Peppers: Hollow out bell peppers and fill them with the chili. Bake until the peppers are tender. - Chili Tacos: Use the chili as a filling for tacos. Top with fresh cilantro and avocado for extra flavor. - Chili Over Rice or Quinoa: Serve the chili over rice or quinoa for a hearty meal. Drizzle with lime juice for a zesty kick. Feel free to explore more in the Full Recipe, which offers a delicious way to enjoy this plant-based dish. This chili lasts about 4 to 5 days in the fridge. Store it in an airtight container to keep it fresh. It’s best to let the chili cool before sealing it. When reheating, heat it on the stove or in the microwave until it’s hot all the way through. If you want to keep it for longer, consider freezing it. Yes, you can make this chili in a slow cooker or Instant Pot. For a slow cooker, simply add all ingredients and cook on low for 6-8 hours. For an Instant Pot, use the sauté function for the onion, garlic, and bell pepper first. Then add the rest of the ingredients. Cook on high pressure for 10 minutes, then let it release naturally for about 10 minutes. Both methods will yield a tasty chili. Yes, this recipe is gluten-free. All the ingredients, like sweet potatoes and black beans, are naturally gluten-free. Just be sure to check the labels on your vegetable broth and any canned items. Some brands may add gluten-containing ingredients. This chili is packed with nutrients. Sweet potatoes are rich in vitamins A and C. Black beans provide protein and fiber, which are great for digestion. The spices add flavor and may have health benefits too. Overall, this dish is a hearty meal that supports a balanced diet. For more details about the recipe, check the Full Recipe. This blog post covered every step to make vegan sweet potato black bean chili. We started with key ingredients and spices, then moved to cooking techniques. I shared tips for flavor and storage, including reheating and using leftovers creatively. Remember, you can adjust the heat and ingredients to suit your taste. Enjoy experimenting with flavors and variations. This chili is not just easy to make; it's also nutritious and satisfying. Dive in and make a pot today!](https://tastymomrecipes.com/wp-content/uploads/2025/07/fd4b8d0f-1b5b-40b1-ae60-03d0142f09d9.webp)
Are you ready to warm up with a bowl of savory goodness? My Vegan Sweet Potato Black Bean Chili is

If you’re craving a bite of warm, cheesy goodness, you’re in the right place! These Cheesy Jalapeño Cornbread Muffins are
![- 1 lb large shrimp, peeled and deveined - 4 tablespoons unsalted butter, melted - 4 garlic cloves, finely minced - 1 teaspoon smoked paprika - 1 teaspoon Old Bay seasoning - 1 lemon, zested and juiced I love using large shrimp for this dish. They cook quickly and soak up the garlic butter. The butter adds richness, while garlic gives a bold flavor. Smoked paprika adds a nice touch of warmth. Old Bay seasoning gives it a unique taste, perfect for seafood lovers. - 2 cups broccoli florets - 1 red bell pepper, julienned - 1 cup cherry tomatoes, halved The vegetables in this recipe are key. Broccoli florets are nutritious and add crunch. Red bell pepper brings sweetness and color. Cherry tomatoes burst with juicy flavor and add freshness. Together, they make a colorful and tasty mix. - 2 tablespoons extra-virgin olive oil - Sea salt and freshly ground black pepper, to taste - Fresh parsley, finely chopped (for garnish) Olive oil helps the veggies roast well. Season with sea salt and black pepper for balance. Fresh parsley at the end brightens up the dish. You can find the full recipe by following the link. First, preheat your oven to 400°F (200°C). This high heat helps the shrimp cook fast. Line a large baking sheet with parchment paper. This makes cleanup easy. Next, mix your garlic butter sauce. In a medium bowl, whisk together the melted butter, minced garlic, smoked paprika, Old Bay seasoning, lemon zest, and lemon juice. This mix adds a rich flavor to the shrimp. Now, let’s prepare the veggies. In a large bowl, toss 2 cups of broccoli florets, 1 julienned red bell pepper, and 1 cup of halved cherry tomatoes in 2 tablespoons of olive oil. Add sea salt and freshly ground black pepper. Toss well until all the veggies are coated. Now, coat the shrimp. Add 1 pound of peeled and deveined shrimp to the bowl with the garlic butter mix. Toss gently until every shrimp is well-coated. This step ensures great flavor in each bite. Spread the seasoned veggies on one side of the baking sheet. Make sure they are in a single layer. This helps them cook evenly. On the other side, lay the shrimp in a single layer too. Bake everything in your preheated oven for 12 to 15 minutes. Keep an eye on them! The shrimp should turn pink and opaque, and the veggies should be tender with a slight char. Once done, take the baking sheet out of the oven. Sprinkle fresh parsley on top for a nice finish. Enjoy your savory sheet pan garlic butter shrimp delight! For the full recipe, check the earlier section. Make sure the shrimp and veggies cook evenly. Place them in a single layer on the sheet. This helps hot air reach every piece. For seasoning, taste as you go. You can add salt, pepper, or spices to suit your mouth. You can serve directly from the baking sheet. It adds a casual vibe. If you want a fancier look, use a platter. Don’t forget to add garnishes! Lemon wedges or fresh herbs like parsley make it pop. Prep your ingredients in advance. Chop veggies and clean shrimp the night before. This cuts down on cooking time. If you’re short on time, use pre-cut vegetables. They save you effort and speed up the process. For the full recipe, check out the Sheet Pan Garlic Butter Shrimp & Veggies 🦐. {{image_4}} You can swap out the shrimp for a mix of your favorite vegetables. Try using zucchini, asparagus, and bell peppers. Toss these veggies in the garlic butter sauce. This gives you a vibrant and tasty dish. You get all the flavor without the seafood. If you want a different protein, chicken thighs or tofu work well. Chicken thighs add a rich flavor. Just cut them into bite-size pieces and coat them in the garlic butter. For tofu, press it to remove water. Cut it into cubes and toss with the sauce. Both options keep the dish filling and satisfying. Feel free to get creative with the sauce. You can try different seasoning blends like Italian herbs or Cajun spices. For a twist, make a homemade sauce with soy sauce and ginger. This adds a new flavor profile to the dish. Just mix your chosen seasonings with the butter and garlic. It’s fun to experiment! For the full recipe, check [Full Recipe]. After cooking, you can store leftover sheet pan garlic butter shrimp in the fridge. Make sure to place it in an airtight container. This dish stays fresh for up to three days. The shrimp may lose some texture, but the flavor remains great. If you want to freeze leftovers, let the dish cool completely first. Then, place it in a freezer-safe bag or container. Try to remove as much air as possible. You can freeze the shrimp for up to three months. When ready to eat, thaw it overnight in the fridge. To reheat the shrimp, avoid using a microwave. Instead, preheat your oven to 350°F (175°C). Place the shrimp and veggies on a baking sheet. Heat for about 10 minutes or until warm. This method helps keep the shrimp tender and the veggies crisp. Enjoy your delicious meal again! If you want more details, check the Full Recipe. You can pair this dish with various sides. Here are some tasty options: - Rice: White or brown rice complements the shrimp and veggies well. - Quinoa: This adds a nutty flavor and extra protein. - Garlic Bread: Perfect for soaking up the garlic butter sauce. - Salad: A fresh green salad balances the meal nicely. These sides can enhance your meal and make it even more satisfying. Yes, you can use frozen shrimp! Just remember to thaw them first. Place the shrimp in cold water for about 15-20 minutes. Drain and pat them dry before using. Frozen shrimp can work well. They are often just as tasty as fresh shrimp. Perfectly cooked shrimp turn pink and opaque. They should curl slightly but not be tight. If they look firm and have a nice sheen, they are ready to eat. Cooking time is usually 12-15 minutes. Yes, you can prep this dish ahead! You can chop the veggies and mix the garlic butter sauce a few hours in advance. Just store them in the fridge. When you're ready to cook, combine everything and bake. This helps save time and makes dinner easy. This blog post covered a delicious Sheet Pan Garlic Butter Shrimp recipe. We discussed main ingredients, cooking steps, and helpful tips. You learned about variations for different diets and storage instructions. Remember, cooking is fun. Try different flavors and enjoy every bite. Your kitchen can be a place of creativity. Get cooking, and impress everyone with your skills!](https://tastymomrecipes.com/wp-content/uploads/2025/07/3aecf812-b1a9-45a9-a637-bebabec28321.webp)
Are you looking for a quick, delicious dinner idea? Look no further! In this blog post, I’ll share my savory
. Enjoy cooking! - Whisk together honey, soy sauce, garlic, and ginger. - Prepare vegetables and chicken. To start your honey garlic chicken stir fry, gather your ingredients. First, take a medium bowl. Add 2 tablespoons of honey, 3 tablespoons of soy sauce, 3 cloves of minced garlic, and 1 tablespoon of grated ginger. Whisk these together until smooth. This sauce will bring a sweet and savory flavor to your dish. Next, prepare your chicken and vegetables. Slice 500 grams of boneless chicken breast into thin pieces. For the veggies, slice 1 bell pepper into strips, wash and trim 1 cup of broccoli florets, and julienne 1 medium carrot. Get everything ready before cooking so you can move fast. - Heat oil and sauté chicken until golden. - Stir-fry vegetables until tender-crisp. - Combine chicken and sauce; heat through. Now, heat 2 tablespoons of vegetable oil in a large frying pan over medium-high heat. Once the oil is hot, carefully add the chicken. Season it with salt and pepper. Sauté the chicken for about 5-7 minutes, stirring often until it turns golden brown and is cooked through. Make sure to break up any pieces that stick together. After the chicken is ready, remove it from the pan and set it aside. In the same pan, toss in the broccoli, bell pepper, and carrot. Stir-fry these veggies for 3-4 minutes. You want them bright and tender-crisp. Toss them often for even cooking. Next, bring the chicken back to the pan. Pour the honey garlic sauce over everything. Stir well to coat the chicken and veggies. Cook for another 2-3 minutes to heat the sauce and mix all the flavors. - Drizzle with sesame oil. - Garnish with green onions and sesame seeds. For the last touch, drizzle 1 teaspoon of sesame oil over your stir fry. This adds a nice nutty flavor. Then, serve your honey garlic chicken stir fry hot. Garnish it with chopped green onions and a sprinkle of sesame seeds for extra crunch. This dish looks great and tastes even better! For the full recipe, check the details above. Enjoy your meal! To make your honey garlic chicken really stand out, marinating is key. Marinate your chicken in the honey garlic sauce for at least 30 minutes. This gives the chicken time to soak up all the yummy flavors. If you can wait longer, marinate for up to 2 hours in the fridge. Just remember not to go overboard. Too long can make the chicken mushy. Fresh ingredients make a big difference in taste. Always pick the best chicken you can find. Look for boneless, skinless chicken breast that is bright and firm. For honey, I like using raw honey as it adds depth to your dish. When it comes to soy sauce, Kikkoman or Tamari are great choices. They add a rich umami flavor that enhances the stir fry. Getting the heat just right is important. Start with medium-high heat to get a nice sear on the chicken. Stir-fry quickly to keep the chicken juicy. When you add the veggies, keep the heat high to avoid sogginess. Toss the veggies often, and don’t overcrowd the pan. This helps them stay crisp and colorful. {{image_4}} You can boost the color and nutrition of your dish. Add veggies like snap peas, zucchini, or mushrooms. They add great texture and flavor. Try seasonal vegetables too! In spring, use asparagus. In fall, consider adding pumpkin or squash. Fresh, colorful veggies make your stir fry even better. If you want to change the protein, try beef, shrimp, or tofu. For beef, slice it thinly and cook for about 3-5 minutes. Shrimp cooks quickly, needing just 2-3 minutes. Tofu will need a bit more time to get crispy. Adjust cooking times as needed to ensure your protein is cooked well. You can switch up the sauce for fun. Try teriyaki sauce for a sweeter twist. If you love heat, add sriracha or chili paste. This gives the dish a spicy kick! Mixing sauces can create new flavors. Experiment and find what you like best. For the full recipe, check the recipe section. To store leftover stir fry, let it cool first. Place it in an airtight container. This helps keep it fresh longer. Use glass or plastic containers for best results. Make sure to seal it tightly. You can store it in the fridge for up to three days. To reheat your stir fry, use a skillet over medium heat. This keeps the texture nice. Stir it often to heat evenly. If you want to keep the flavor, add a splash of water or soy sauce. This helps to revive the taste. Yes, you can freeze honey garlic chicken stir fry! First, let it cool completely. Then, pack it in freezer-safe bags or containers. Remove as much air as possible to prevent freezer burn. It can last up to three months in the freezer. To thaw, place it in the fridge overnight before reheating. Honey garlic chicken stir fry stays good in the fridge for about 3 to 4 days. To keep it fresh, store it in an airtight container. This helps it stay tasty and safe to eat. Yes, you can make the sauce ahead of time. Mix the honey, soy sauce, garlic, and ginger, then store it in the fridge. It will stay fresh for up to a week. This saves time when you are ready to cook. You can serve this stir fry with steamed rice or noodles. Both options soak up the sauce well. You can also add a side of salad or spring rolls for extra crunch and flavor. The recipe is not gluten-free because of the soy sauce. However, you can use gluten-free soy sauce or tamari as a substitute. This way, you can still enjoy the dish without gluten. To lower calories, use less honey and oil. You can also add more vegetables to make it filling. Choose lean cuts of chicken or swap it for tofu. This keeps the meal light yet satisfying. You now know how to make a tasty honey garlic chicken stir fry. We covered all the key steps, from selecting fresh ingredients to cooking techniques that preserve flavor. Remember, you can tweak this recipe with different veggies and proteins to fit your taste. Proper storage and reheating methods will help keep leftovers delicious. Enjoy experimenting with this dish, and share it with family and friends. Your cooking skills can shine with this simple but flavorful meal!](https://tastymomrecipes.com/wp-content/uploads/2025/07/6becaad5-eb3a-48c8-be62-9fdcce02a9ec.webp)
If you’re looking for a quick meal that bursts with flavor, try my Honey Garlic Chicken Stir Fry. This dish
