![To make Chewy Maple Pecan Blondies, gather these simple ingredients: - 1 cup unsalted butter, melted - 1 cup packed brown sugar - 1/2 cup granulated sugar - 1/4 cup pure maple syrup - 2 large eggs - 1 teaspoon vanilla extract - 2 cups all-purpose flour - 1 teaspoon baking powder - 1/2 teaspoon baking soda - 1/2 teaspoon salt - 1 cup pecans, roughly chopped - 1/2 cup white chocolate chips Each ingredient plays a key role in creating that rich, chewy texture. The melted butter adds moisture and depth. Brown sugar gives sweetness and a hint of caramel. Pure maple syrup brings a warm flavor that shines through. Eggs help bind the mix and keep it soft. The flour is the backbone of the recipe, while baking powder and baking soda create that nice lift. Salt balances sweetness and enhances all the flavors. Chopped pecans give crunch, and white chocolate chips add creamy sweetness. These ingredients come together to create a delicious treat that’s hard to resist. For the full recipe, follow the detailed steps I’ve shared. Start by preheating your oven to 350°F (175°C). Take a 9x13 inch baking pan and line it with parchment paper. Make sure to leave some overhanging edges. This helps you lift the blondies out later. In a big mixing bowl, add the melted butter, brown sugar, and granulated sugar. Whisk them together until smooth. This step is key for rich blondies. Now, pour in the pure maple syrup and mix well. Next, add the eggs one at a time. Whisk thoroughly after each egg. Finally, add the vanilla extract and give it one last stir. In another bowl, whisk together the all-purpose flour, baking powder, baking soda, and salt. Slowly add this mix into the wet ingredients. Fold gently until just combined. Be careful not to overmix. You want your blondies to stay chewy. Now, it’s time to add the fun stuff! Fold in the chopped pecans and white chocolate chips. Make sure they are evenly spread throughout the batter. This gives every bite a nice crunch and sweetness. Pour the batter into your lined baking pan. Use a spatula to spread it evenly. Place the pan in the oven and bake for 25 to 30 minutes. Check for doneness by inserting a toothpick in the center. It should come out with a few moist crumbs. Once done, let the blondies cool in the pan for about 10 minutes. Use the parchment paper to lift them out and transfer to a wire rack. Let them cool completely before cutting into squares. Enjoy your chewy maple pecan blondies! To get that perfect chewy texture, avoid overmixing the batter. When you add the flour mixture, mix just until you see no dry flour. This keeps the blondies soft. Letting them cool in the pan also helps. Don’t cut them too soon, or they may fall apart! Accurate measuring is key. Use a kitchen scale for precise amounts, especially for flour. If you use measuring cups, spoon the flour into the cup and level it off with a knife. This method avoids packing the flour down, which can make the blondies dense. You can boost the flavor with a few simple tweaks. Try adding a pinch of cinnamon or nutmeg to the dry mix for warmth. You can also swap out the white chocolate chips for dark chocolate for a richer taste. If you like, add a splash of bourbon to the batter for an adult twist! Feel free to check the Full Recipe for more details and tips. {{image_4}} If you want to make nut-free blondies, just leave out the pecans. You can replace them with seeds like sunflower or pumpkin. These seeds add a nice crunch and flavor without nuts. Your blondies will still taste great and be chewy. You can mix in different add-ins for fun flavors. Chocolate chips make everything sweeter. You can use dark, milk, or white chocolate chips. Dried fruits such as cranberries or cherries add a chewy texture and tartness. Try your favorite add-ins to make these blondies your own. To make gluten-free blondies, swap the all-purpose flour for a gluten-free blend. Look for a blend that works for baking. This will keep the texture chewy while avoiding gluten. Just keep an eye on the baking time, as it may change slightly. Enjoy the same rich, sweet taste without the gluten! You can store your chewy maple pecan blondies in an airtight container. Keep them at room temperature for up to three days. For longer freshness, place them in the fridge. They will last about a week in the fridge, but they might dry out a bit. To freeze blondies, first, let them cool completely. After cooling, wrap each piece in plastic wrap. Then, place them in a freezer-safe bag or container. They can stay frozen for up to three months. When you want one, just take it out and let it thaw at room temperature. To reheat, preheat your oven to 350°F (175°C). Place the blondies on a baking sheet. Heat them for about 5 to 10 minutes. If you want a softer treat, you can microwave one for about 10 to 15 seconds. This helps to revive their chewy texture. Enjoy your delicious blondies warm! You can tell your blondies are done by looking at the edges. They should be golden brown. Insert a toothpick into the center. If it comes out with a few moist crumbs, they are ready. If it comes out wet, they need more time. Keep an eye on them during the last few minutes of baking. Yes, you can use other nuts if you prefer. Walnuts or almonds work well. You can even skip the nuts for a nut-free version. Just make sure to keep the texture in mind. Nuts add crunch and flavor to your blondies. If you don't have maple syrup, try honey or agave syrup. Both will add sweetness and moisture. You can also use brown sugar mixed with a bit of water. This creates a similar texture and flavor. Adjust the amount based on your taste. These blondies can last for about a week at room temperature. Keep them in an airtight container. If you want them to last longer, store them in the fridge for up to two weeks. You can also freeze them for up to three months. Yes, you can make your blondies ahead of time. Bake them, then cool completely. Store them in an airtight container. You can also freeze them for later enjoyment. Just thaw them at room temperature before serving. For the full recipe, including detailed steps and tips, check out the [Full Recipe]. It has everything you need to make these chewy maple pecan blondies a success! In this blog post, we explored a delightful recipe for Chewy Maple Pecan Blondies. We covered essential ingredients, step-by-step instructions, and helpful tips for perfecting your bake. I shared some variations to suit different tastes and offered storage info for leftovers. Remember, baking is about fun and creativity. Enjoy experimenting with flavors. These blondies are sure to impress anyone who tries them. Happy baking!](https://tastymomrecipes.com/wp-content/uploads/2025/07/bcb7e366-4be5-4c8f-8c28-b537d14c4ef1.webp)
Chewy Maple Pecan Blondies Rich and Irresistible Treat
Are you ready to indulge in a treat that’s both rich and chewy? My Chewy Maple Pecan Blondies blend the
Are you ready to indulge in a treat that’s both rich and chewy? My Chewy Maple Pecan Blondies blend the
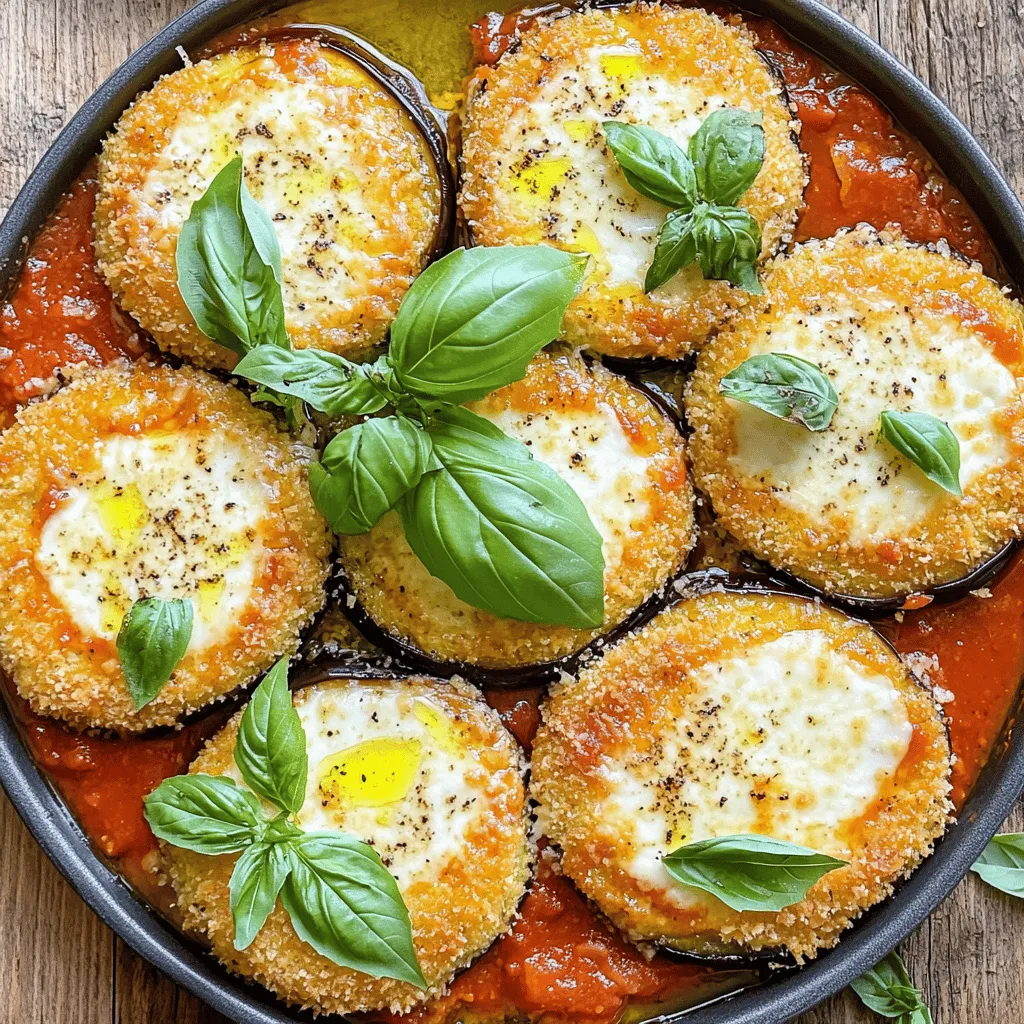
Craving a delicious meal that is both simple and satisfying? My Crispy Baked Eggplant Parmesan recipe checks all the boxes!
Craving a delicious meal that is both simple and satisfying? My Crispy Baked Eggplant Parmesan recipe checks all the boxes!
![To make No Bake Lemon Cheesecake Cups, gather these simple ingredients: - 1 cup graham cracker crumbs - 2 tablespoons granulated sugar - 1/4 cup unsalted butter, melted - 8 oz cream cheese, softened - 1/2 cup powdered sugar - 1/2 cup sour cream - 1/4 cup freshly squeezed lemon juice - Zest of 1 medium lemon - 1 teaspoon pure vanilla extract - Whipped cream for topping - Fresh lemon slices - Mint leaves for garnish If you don't have graham crackers, you can use digestive biscuits as a base. For a dairy-free option, substitute cream cheese with a vegan cream cheese. You can also replace sour cream with coconut yogurt for a lighter twist. If you want less sweetness, cut down on the powdered sugar. Adjust the lemon juice to fit your taste. To make your cheesecake cups pop, try adding fresh fruit like berries. You can also sprinkle crushed nuts on top for a nice crunch. Chocolate shavings or a drizzle of chocolate sauce can add a rich flavor. Get creative! Each garnish adds its own twist to the dish, making it fun and unique. For the complete recipe, refer to the [Full Recipe]. To make the crust, grab a medium bowl. Combine 1 cup of graham cracker crumbs, 2 tablespoons of sugar, and 1/4 cup of melted butter. Mix well until it feels like wet sand. This is key for a good base. Now, take about 2 tablespoons of this mixture. Press it firmly into the bottom of each cup. Use your fingers or the back of a spoon. Make sure the crust is compact. Set these cups aside for now. In a large bowl, put 8 ounces of softened cream cheese. Add 1/2 cup of powdered sugar. Use an electric mixer on medium speed to blend them together. Mix until it is smooth and creamy. Next, add in 1/2 cup of sour cream, 1/4 cup of freshly squeezed lemon juice, lemon zest, and 1 teaspoon of vanilla extract. Keep mixing for about 2-3 minutes. You want this to be fluffy and well blended. Now it’s time to fill the cups! Carefully spoon the lemon cheesecake mixture into each cup. Fill them about three-quarters full. Use a spatula to smooth the tops for a nice finish. Once done, cover the cups with plastic wrap. Place them in the fridge for at least 4 hours. If you have time, let them chill overnight for the best results. When serving, add whipped cream on top. A slice of lemon and a mint leaf will make them look great. Enjoy your no bake lemon cheesecake cups! For a full recipe, check out the details above. To get the creamiest texture, start with room-temperature cream cheese. Cold cream cheese clumps up and won't mix well. Beat the cream cheese until smooth before adding other ingredients. Mixing at medium speed helps incorporate air, making the filling light. This step is key for a fluffy cheesecake. Chill the cheesecake cups for at least four hours. This time lets the filling firm up. For the best results, let them sit overnight. Cover the cups well to prevent any odors from the fridge. If they feel too soft, they need more time in the fridge. When serving, top each cup with whipped cream. A fresh lemon slice adds a nice touch. Add a mint leaf for color and flavor. You can also sprinkle extra lemon zest on top for a pop of brightness. For a fun twist, try serving them in clear cups for a beautiful layered look. Enjoy your no bake lemon cheesecake cups! Check the Full Recipe for more details. {{image_4}} You can play with flavors in these cheesecake cups. Try adding fresh berries for a fruity twist. Strawberries or blueberries work great and add color. Just fold in about 1/2 cup of mashed berries into the filling. If you love chocolate, mix in melted chocolate or cocoa powder. This gives a rich, creamy taste. You can even layer the chocolate and lemon for a fun surprise! If you don’t have some ingredients, don’t worry! You can use crushed cookies instead of graham crackers. Oreo cookies make a tasty crust. For a lighter version, use Greek yogurt instead of sour cream. It keeps the texture smooth while cutting some fat. You can swap fresh lemon juice for lime juice for a different zing. To make this recipe gluten-free, just choose gluten-free graham crackers. They are easy to find and work well. For a vegan version, replace the cream cheese with a vegan cream cheese. Use coconut cream instead of sour cream for a rich texture. And don’t forget to use maple syrup or a vegan sweetener for the sugar. This way, everyone can enjoy these yummy treats! For the full recipe, check the recipe section above. To keep your no bake lemon cheesecake cups fresh, store them in the fridge. Use an airtight container to prevent them from absorbing smells. You can also cover the cups with plastic wrap. This keeps the cheesecake moist and tasty. These cheesecake cups last up to 4 days in the fridge. After that, the texture may change. Always check for signs of spoilage before eating. If they smell off or look strange, it's best to toss them. You can freeze these cheesecake cups for longer storage. Wrap each cup tightly with plastic wrap and then place them in a freezer-safe container. They can last for up to 2 months in the freezer. When ready to enjoy, thaw them in the fridge overnight before serving. This helps maintain their creamy texture. Yes, you can use low-fat cream cheese and sour cream. They will work fine. The taste might change a bit, but you will still enjoy it. You can also swap granulated sugar with a low-calorie sweetener. This keeps the flavor while cutting calories. You can tell if the cheesecake is set by checking the texture. After chilling for at least four hours, it should feel firm to the touch. If it jiggles, let it chill longer. For best results, chill overnight to ensure it sets well. If you don’t have graham crackers, try using cookies or crushed cereal. Shortbread cookies or digestive biscuits work great for a sweet crust. You can even use crushed pretzels for a salty crunch. Just mix them with melted butter and sugar, just like the recipe says. In this post, we explored how to make delicious cheesecake cups. We covered the key ingredients and measurements. You learned essential steps for preparation, mixing, and assembly. I shared tips for a creamy texture and perfect setting. You also found fun flavor variations and storage advice. Remember, these cups are easy to customize and great for sharing. Enjoy making and serving them however you like!](https://tastymomrecipes.com/wp-content/uploads/2025/07/ec27e51c-b36b-4a4e-a379-edec32db1ca6.webp)
If you crave a sweet treat that’s light and refreshing, you’ll love these No Bake Lemon Cheesecake Cups! They are
![- 1 cup orzo pasta - 2 cups vegetable broth - 1 cup sliced mushrooms (cremini or button) - 1 small onion, finely diced - 2 cloves garlic, minced - 1 cup fresh spinach, roughly chopped - ½ cup heavy cream or coconut cream (dairy-free option) - ¼ cup grated Parmesan cheese (optional) - 2 tablespoons olive oil - 1 teaspoon dried thyme - Salt and freshly cracked pepper - Fresh parsley for garnishing The ingredients in this One Pot Creamy Mushroom Orzo let you create a rich dish. Orzo pasta cooks quickly and soaks up flavors well. Mushrooms add a beautiful earthiness. I love using a mix of cremini and button mushrooms for depth. Fresh spinach brings a pop of color and nutrition. Using heavy cream makes the dish creamy and satisfying. If you need a lighter option, coconut cream works just as well. Add Parmesan cheese for an extra layer of flavor, but it’s optional. Olive oil helps to start the cooking process, while thyme adds an aromatic touch. Adjust salt and pepper to suit your taste. Each serving has about 340 calories. You’ll get around 12 grams of protein, 45 grams of carbohydrates, and 15 grams of fat. The dish is rich in vitamins from spinach and mushrooms. - Health benefits of key ingredients: - Mushrooms: Full of antioxidants and vitamins like B and D. - Spinach: Packed with iron and calcium, great for bones and blood. - Olive oil: Heart-healthy fat that can lower bad cholesterol. These ingredients work together to create a dish that is not just tasty but also nourishing. For the full recipe, check out the [Full Recipe]. 1. Heat olive oil in a large pot over medium heat. 2. Add finely diced onions and sauté for 3-4 minutes. They should become soft and clear. 3. Next, add minced garlic and sliced mushrooms. Cook this mix for 5-7 minutes. Stir often until mushrooms turn brown. This brings out their rich flavor. 1. Now, add 1 cup of orzo pasta, dried thyme, salt, and pepper. 2. Toast the orzo in the pot for 1-2 minutes. Stir constantly to enhance its nutty flavor. 3. Pour in 2 cups of vegetable broth and raise the heat to boil. 4. Once boiling, lower the heat. Cover the pot and let it simmer for 10-12 minutes. Stir occasionally to stop sticking. 1. When the orzo is tender, stir in ½ cup of heavy cream and 1 cup of chopped spinach. 2. If using, add ¼ cup of grated Parmesan cheese for extra creaminess. Mix well until the spinach wilts. 3. Taste and adjust the seasoning if needed. 4. Remove the pot from heat. Let it rest for a couple of minutes. This helps the dish thicken for serving. For the complete recipe, check out the Full Recipe. What if I overcook the orzo? If your orzo is mushy, don’t worry. You can save it. Drain the orzo. Then, spread it on a baking sheet. Cool it down to stop the cooking. You can also mix it with a bit of olive oil to help it separate. What if my sauce is too thick or too thin? If your sauce is too thick, add a splash of vegetable broth or water. Stir it in slowly until it reaches the right creaminess. For a thin sauce, let it simmer longer. This will help it thicken naturally. What herbs and spices can I use? To boost flavor, try adding fresh thyme or rosemary. You can also use a pinch of nutmeg for warmth. For a kick, red pepper flakes add a nice touch. Experiment to find your favorite mix! Can I add proteins like chicken or shrimp? Yes! Cook diced chicken or shrimp right after the onions. This adds great taste and makes the dish heartier. Just ensure they are fully cooked before adding the orzo. What should I pair with creamy mushroom orzo? This dish pairs well with a fresh salad or crusty bread. A simple green salad with lemon vinaigrette brightens the meal. You can also add a side of roasted vegetables for color and flavor. How can I present it like a restaurant dish? Serve the creamy mushroom orzo in deep bowls. Garnish with chopped parsley for color. A sprinkle of extra Parmesan or a drizzle of olive oil adds elegance. This makes your dinner feel special and looks inviting! {{image_4}} You can easily change this dish to fit different diets. For a vegan version, swap the heavy cream with coconut cream. Add nutritional yeast for a cheesy flavor without dairy. If you need gluten-free options, look for gluten-free orzo. There are many brands that make tasty alternatives. You can mix in various veggies to enhance flavor. Try adding peas or bell peppers for a pop of color and taste. If you like a kick, sprinkle in some red pepper flakes. This can really elevate the dish and give it some heat. Consider giving your orzo an ethnic twist. For a Mediterranean vibe, add sun-dried tomatoes and olives. You can also sprinkle in some feta cheese before serving. If you want an Asian flair, mix in soy sauce and a dash of sesame oil. These changes can transform the dish into something new and exciting. For the full recipe, check out the details above. To store One Pot Creamy Mushroom Orzo in the fridge, place it in an airtight container. Use it within three days for the best taste. When you’re ready to enjoy leftovers, reheat it on low heat in a pot. Add a splash of broth or cream to keep it creamy. Stir often until it warms up. If you want to freeze the dish, let it cool first. Then, place it in a freezer-safe container. It can last up to three months in the freezer. When you’re ready to eat, thaw it in the fridge overnight. After thawing, you might notice some texture changes. The orzo may become softer. Adding a bit of cream or broth while reheating can help revive its creaminess. In the fridge, One Pot Creamy Mushroom Orzo stays fresh for about three days. In the freezer, it remains good for up to three months. Always check for signs of spoilage before using leftovers. Enjoy your dish while it’s still at its best! You can make this dish ahead by cooking it fully and cooling it down. Store it in a sealed container in your fridge for up to three days. When ready to eat, reheat it on low heat. Add a splash of broth or cream to keep it creamy. This method saves time and gives you a tasty meal ready to go! Yes! You can use small pasta shapes like ditalini or acini di pepe. These shapes cook similarly and soak up the sauce well. You could even try rice or quinoa for a gluten-free option. Just adjust the cooking time based on the pasta you choose. To add more protein, consider grilled chicken, shrimp, or chickpeas. You can serve it with a side salad or garlic bread for extra fiber. Another option is to mix in some cooked sausage or tofu for a hearty twist. These additions will make your meal more satisfying and delicious! In this blog post, we covered how to make a creamy mushroom orzo dish. We talked about the key ingredients, step-by-step instructions, and tips for the best results. You learned how to adjust flavors and make dietary changes to suit your needs. Remember, cooking is about having fun and trying new things. Enjoy your creamy mushroom orzo, and don’t be afraid to experiment with this recipe. Each bite can be a different delight!](https://tastymomrecipes.com/wp-content/uploads/2025/07/e91522b0-511b-4cd0-8954-249bfdb23354.webp)
Looking for a quick, creamy, and delicious dinner? One Pot Creamy Mushroom Orzo is here to make your evening meal

Start your day right with my simple and tasty Breakfast Egg and Cheese Muffins! This quick recipe is packed with
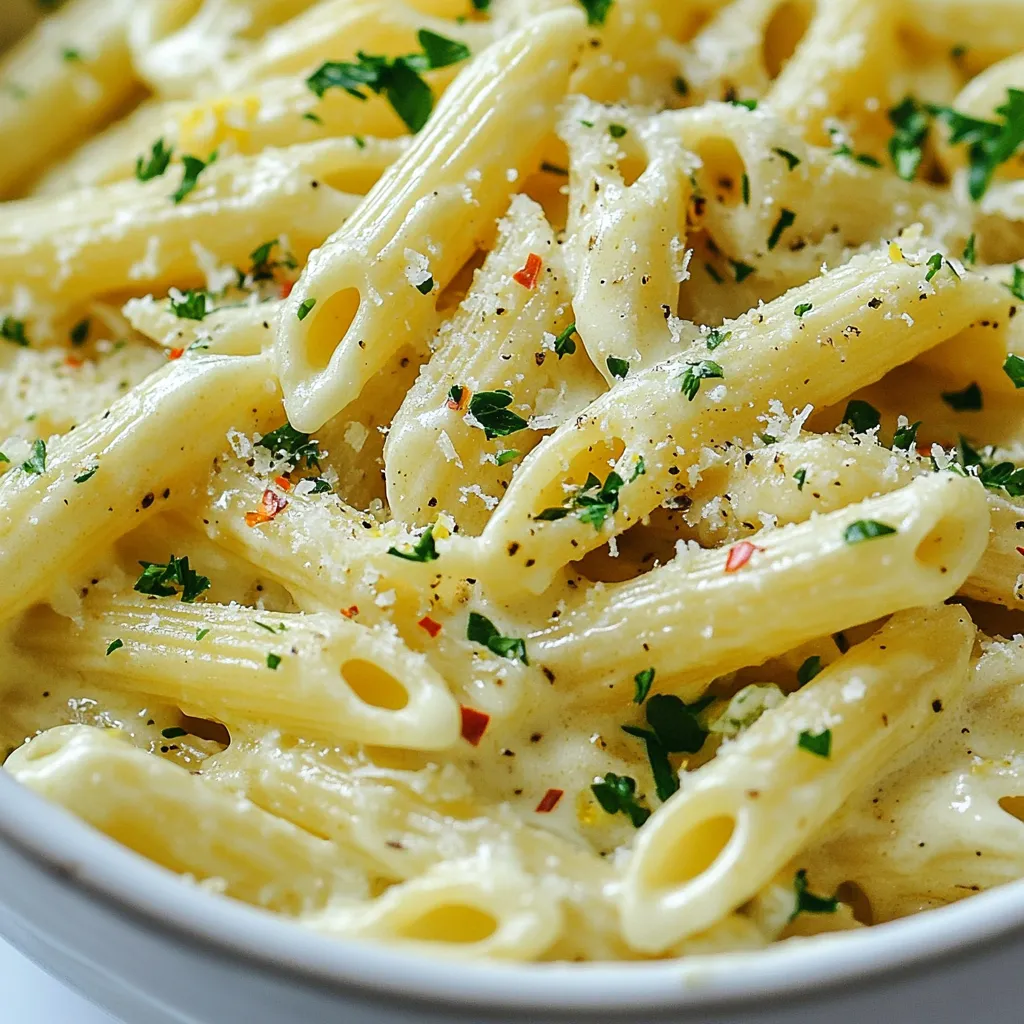
If you’re craving a rich and creamy pasta dish, Restaurant Style Garlic Penne is the answer. With simple ingredients like
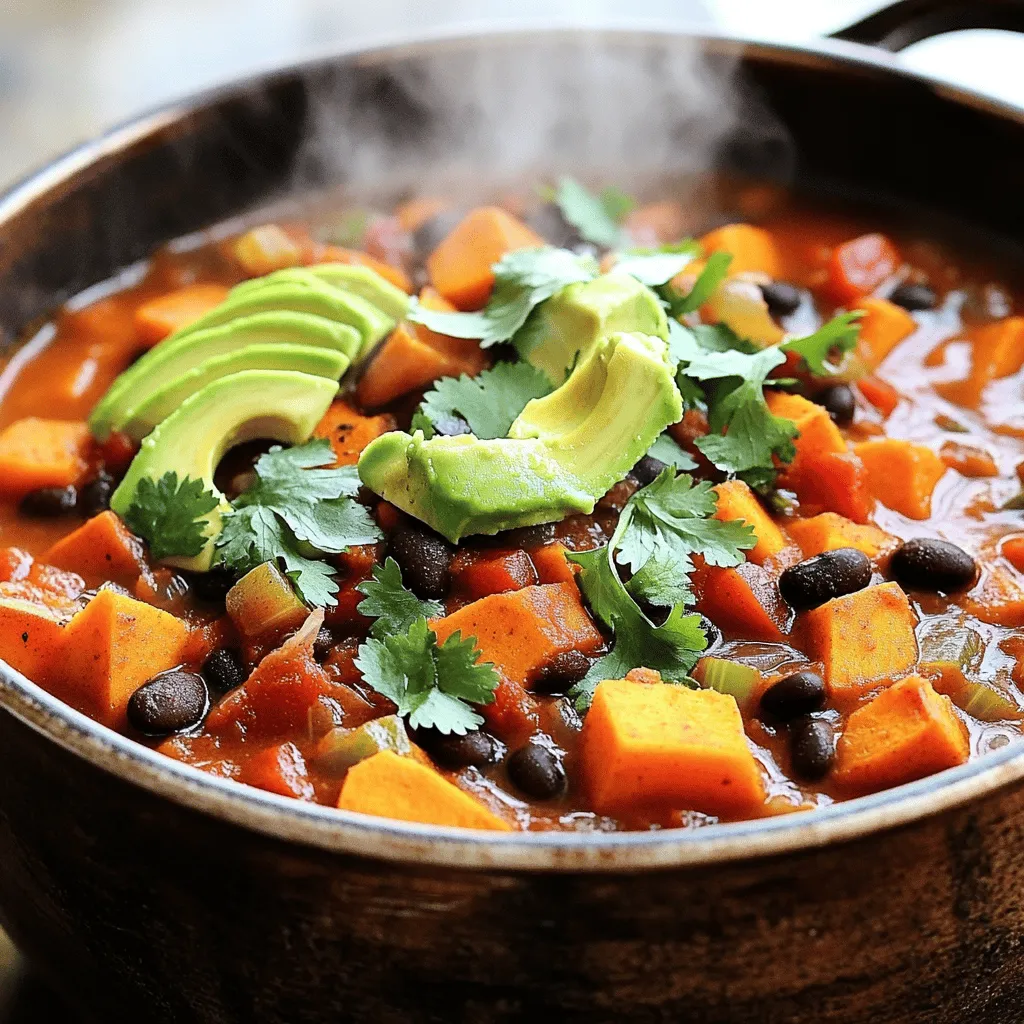
Are you craving a warm, hearty meal that’s both delicious and healthy? Look no further than this Vegan Sweet Potato
. Enjoy making these muffins with your favorite flavors! 1. First, preheat your oven to 375°F (190°C). This step is key for even baking. 2. Prepare your muffin tin. You can use paper liners or grease it with cooking spray. 3. In a large bowl, mix the cornmeal, flour, baking powder, salt, and black pepper. Whisk them well to break up any lumps. 4. In a separate bowl, whisk the buttermilk, melted butter, and beaten egg. Make sure this mixture is smooth and blended. 1. Gradually pour the wet mixture into the bowl with the dry ingredients. Stir gently just until they combine. 2. Be careful not to over-mix. This keeps your muffins light and fluffy. 3. Now, fold in the cheese, jalapeños, and corn. This adds flavor and texture to your muffins. 1. Using a spoon or ice cream scoop, fill each muffin cup about two-thirds full with batter. This allows them to rise properly. 2. Place the muffin tin in the oven and bake for 18-22 minutes. Check for doneness by inserting a toothpick into the center. It should come out clean. 3. When done, let the muffins cool in the tin for 5 minutes. Then, transfer them to a wire rack to cool fully before serving. For the full recipe, check the earlier section. Enjoy your warm, cheesy jalapeño cornbread muffins! To make the best Cheesy Jalapeño Cornbread Muffins, avoid over-mixing. When you mix the wet and dry ingredients, do it gently. Stir just until you see no dry spots. This keeps your muffins light and fluffy. If you mix too much, the muffins can become tough. Adjust the chili spice to fit your taste. If you want more heat, add more jalapeños. Start with a small amount, then taste the batter. You can always add more, but you can't take it out once it's in! Serve these muffins warm for the best taste. You can add flavored butter on top, like garlic or herb butter. This adds a nice touch and makes them even tastier. For a nice look, try garnishing with fresh cilantro or extra jalapeño slices. A sprinkle of cheese on top before baking also adds flavor and a great look. For the full recipe, check the section above! {{image_4}} You can make this recipe even more friendly for your diet. Try whole wheat flour instead of all-purpose flour. This change adds fiber and a nutty taste. If you're gluten-free, use a gluten-free flour blend. It works well and keeps the muffins soft. For buttermilk, you have options too. You can mix regular milk with a splash of vinegar. This creates a quick buttermilk substitute. If you need a dairy-free option, use almond or oat milk with lemon juice. This still gives the muffins a nice rise and flavor. Want to make these muffins even more exciting? You can add fresh herbs like cilantro or chives. This will give a fresh taste to each bite. Adding spices like cumin or smoked paprika can create a smoky flavor. Feel free to experiment and find your favorite mix. Cheese is another area where you can get creative. Swap sharp cheddar for pepper jack for a spicy kick. You can also try mozzarella for a milder, gooey texture. For toppings, consider adding crispy bacon bits or fresh corn on top before baking. This gives a crunchy texture that contrasts nicely with the soft muffins. For the full recipe, check out the detailed steps above. Enjoy creating your own unique twist on Cheesy Jalapeño Cornbread Muffins! To keep your Cheesy Jalapeño Cornbread Muffins fresh, store them in an airtight container. This helps keep them moist and tasty. You can place a piece of bread in the container to help maintain the softness. If you want to enjoy them later, keep them at room temperature for one to two days. To reheat the muffins, place them in the microwave for about 10-15 seconds. This warms them up without drying them out. If you prefer a crispier texture, pop them in the oven at 350°F (175°C) for 5-7 minutes. Freezing these muffins is simple and great for meal prep. First, let the muffins cool completely. Then, wrap each muffin in plastic wrap or foil. Place them in a freezer-safe bag or container. Make sure to remove as much air as possible to prevent freezer burn. To thaw, take a muffin out and leave it in the fridge overnight. You can also warm it directly from the freezer. Just microwave it for 30 seconds or bake at 350°F (175°C) for about 10 minutes. This way, you can enjoy your Cheesy Jalapeño Cornbread Muffins anytime! For the full recipe, check out the recipe section above. Can I make these muffins ahead of time? Yes, you can make these muffins ahead. Bake them and let them cool. Then, store them in an airtight container. They stay fresh for about three days. You can also freeze the muffins for up to three months. Just thaw and warm them when ready to eat. How do I adjust the spice level? To adjust the spice level, change the amount of jalapeños. Use fewer if you want less heat. You can also remove the seeds and ribs from the jalapeños. This will make them milder. For more spice, add a pinch of cayenne pepper or use fresh jalapeños instead of pickled ones. Can I substitute fresh jalapeños for pickled? Yes, you can use fresh jalapeños instead of pickled ones. Chop them finely and add them to the batter. Fresh jalapeños will give a different flavor. They will be spicier than pickled, so adjust the amount based on your taste. What if I don’t have buttermilk on hand? If you don’t have buttermilk, don’t worry! You can make your own. Mix one cup of regular milk with a splash of vinegar or lemon juice. Let it sit for five minutes. This creates a similar texture and taste to buttermilk. Can I make mini muffins instead? Absolutely! You can make mini muffins by using a mini muffin tin. Fill each cup about two-thirds full. Bake them for about 10-12 minutes. Check for doneness with a toothpick, just like with regular muffins. Mini muffins are great for parties and snacks! For the full recipe, check out the detailed instructions above. Cheesy Jalapeño Cornbread Muffins are simple to make and packed with flavor. You learned about key ingredients, easy steps, and expert tips to make them perfect. Remember to mix gently and check for doneness. Feel free to try variations or serve with fun toppings. These muffins store well and even freeze nicely. With these ideas, you can enjoy a tasty treat anytime. Make these muffins your own and share them with friends. Enjoy the joy they bring to your table!](https://tastymomrecipes.com/wp-content/uploads/2025/07/95e506a0-3426-4a48-bae0-c398838ba1b4.webp)
Are you ready to spice up your snack time? These Cheesy Jalapeño Cornbread Muffins pack a flavor punch that will
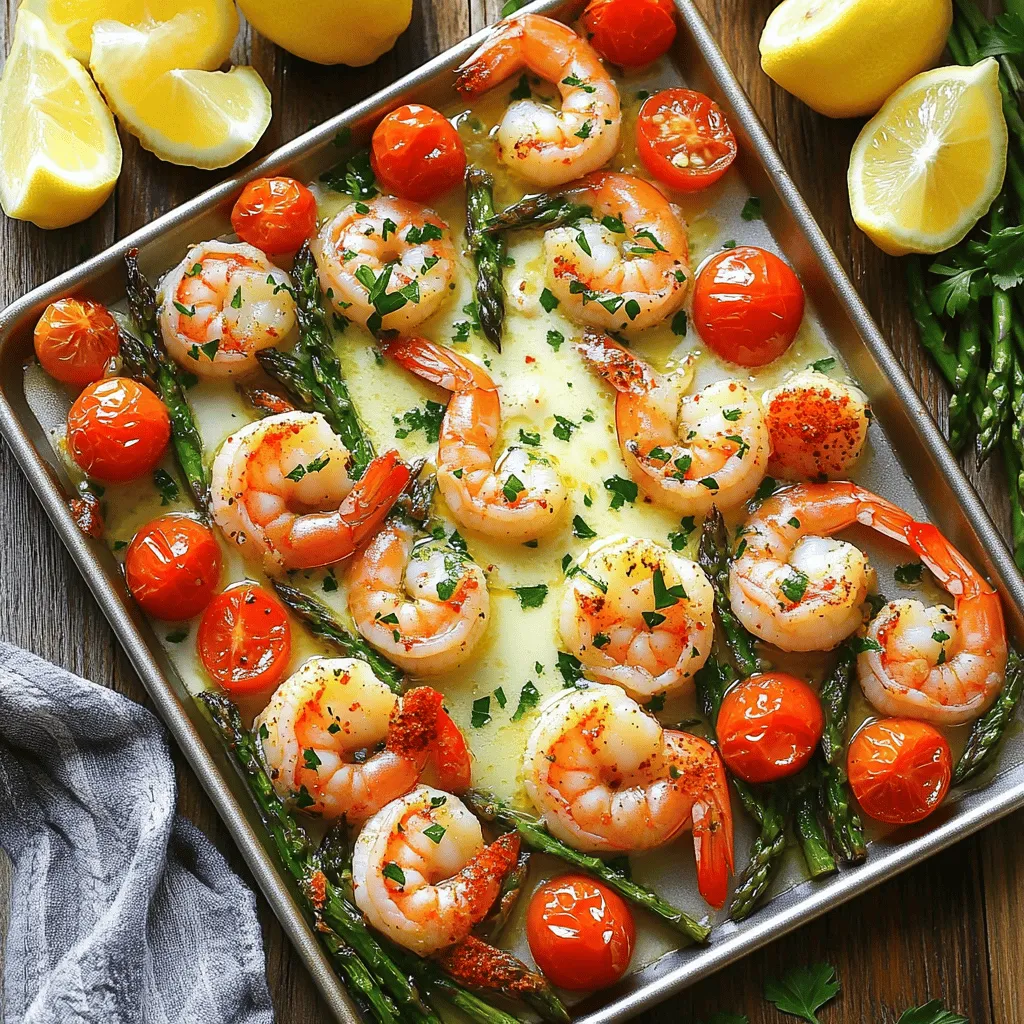
If you want a quick and tasty meal, look no further! My Sheet Pan Garlic Butter Shrimp recipe is speedy,
