Skip to content
DisclaimerTerms Of UseGDPR PolicyCookie Policy

tastymomrecipes

  • Home
  • Drinks
  • Appetizers
  • Dinner
  • Dessert
  • About
  • Contact
  • Privacy Policy
DisclaimerTerms Of UseGDPR PolicyCookie Policy

Olivia

- 2 cups boneless, skinless chicken breast - 1 cup broccoli florets - 1 bell pepper (red or yellow) - 1 cup snap peas - 3 cloves garlic - 1 inch piece of fresh ginger - 3 tablespoons honey - 4 tablespoons soy sauce - 2 tablespoons cornstarch - 2 tablespoons water - Vegetable oil - Salt and freshly cracked pepper - Sesame seeds and chopped green onions for garnish To make my honey garlic chicken stir fry, I start with fresh, vibrant ingredients. The chicken breast is the star of the dish. I prefer boneless and skinless cuts, as they cook quickly and stay tender. Next, I toss in broccoli florets. They add a nice crunch and bright color. Bell peppers, either red or yellow, bring sweetness and a pop of color. Snap peas add a crisp texture and a touch of sweetness. Garlic and ginger are key to the sauce's flavor. I mince the garlic finely and grate the ginger for maximum taste. For the sauce, I combine honey, soy sauce, cornstarch, and water. This mix gives the dish its sweet and savory flavor. The cornstarch helps thicken the sauce, making it stick to the chicken and veggies. I use vegetable oil for cooking, and I season everything with salt and pepper. For a finishing touch, I sprinkle sesame seeds and chopped green onions on top. These add flavor and make the dish look great. You can find the full recipe above, which guides you through each step and ensures a tasty meal in no time. - Combine honey, soy sauce, cornstarch, and water. - Whisk until smooth and set aside. Creating the sauce is simple. I mix honey and soy sauce for sweetness and saltiness. Then, I add cornstarch and water to thicken the sauce. Whisking makes it smooth and easy to pour later. - Heat oil in a skillet or wok. - Season chicken with salt and pepper. - Stir-fry until fully cooked and golden brown. For the chicken, I heat oil in my skillet over medium-high heat. The oil should shimmer for the best cooking. I season the chicken with a pinch of salt and pepper. Stir-frying takes about 5-7 minutes until the chicken turns golden brown and is cooked through. Once done, I take it out and set it aside. - Sauté garlic and ginger in the same skillet. - Add broccoli, bell pepper, and snap peas. - Stir-fry until vegetables are vibrant and crisp. In the same skillet, I add garlic and ginger. I sauté them for about 30 seconds until they smell great. Then, I toss in broccoli, bell pepper, and snap peas. I stir-fry the veggies for 3-5 minutes. This keeps them crisp and colorful, which makes the dish pop. - Return chicken to skillet. - Pour sauce over and cook to thicken. Next, I return the chicken to the skillet. I pour in the sauce and mix everything well. Cooking for another 2-3 minutes lets the sauce thicken and coat the chicken and veggies nicely. This step locks in the flavors, making each bite delicious. For the full recipe, you can check the previous section. - Ensure vegetables are chopped uniformly. This helps them cook evenly. - Don’t overcook the chicken to maintain tenderness. A few minutes is all you need. - Use fresh vegetables for optimal taste. They add crunch and color to your dish. - Adjust honey and soy sauce ratio based on preference. More honey for sweetness, more soy for saltiness. - Serve in a shallow bowl or on individual plates. This makes the dish look nice. - Garnish with sesame seeds and green onions. They add a pop of color and flavor. For the complete details, check out the Full Recipe. {{image_4}} You can switch the chicken in this dish. For a vegetarian option, use tofu. Tofu absorbs flavors well and adds a nice texture. If you prefer seafood, shrimp works great too. Shrimp cooks quickly and adds a sweet flavor. You can also try beef for a heartier dish. Thinly slice the beef to ensure quick cooking. Feel free to mix up the veggies. Adding bell peppers in red, yellow, or green can brighten your dish. Each color brings its own flavor and crunch. Baby corn or bok choy are also great choices. They add a fun texture and a unique taste. Experiment with whatever you have on hand for a fresh twist. You can spice up the sauce easily. Adding chili flakes gives it a nice kick. If you enjoy a zesty taste, try adding lemon juice. This adds brightness and balances the sweetness. You can also mix in some fresh herbs like cilantro for extra flavor. Don’t be afraid to get creative with your sauce! For the full recipe, check out the Honey Garlic Chicken Stir Fry section above. Store leftovers in an airtight container. This keeps them fresh and safe. Consume within 3-4 days for best quality. The flavors stay nice and bright, making your next meal easy and tasty. Freeze your stir fry in a freezer-safe container. This option is great for meal prep. It’s best consumed within 2 months after freezing. Label your container with the date for easy tracking. Reheat on the stovetop for the best texture. This method warms the dish evenly. Add a splash of water to maintain moisture. This keeps your stir fry juicy and delicious, just like when you first made it! Yes, but fresh vegetables are best when cooked just before serving. If you prep the chicken and sauce earlier, it can save time. Just keep them in the fridge. Cook the veggies right before you need them for the best taste. Serve with steamed rice or noodles for a complete meal. The rice soaks up the sauce well and makes each bite tasty. Noodles also work great and add a fun twist. Use gluten-free soy sauce for a gluten-free option. Many brands offer this soy sauce. Just check the label before buying. This way, you can enjoy the dish without worrying about gluten. Add red pepper flakes or a splash of sriracha to the sauce. Start with a little and taste. You can always add more if you like heat. This adds a nice kick to the sweet and savory flavors. Ensure the chicken is thinly sliced for even cooking and tenderness. Thin strips cook faster and stay juicy. This helps you avoid dry pieces in your stir fry. This blog post shares a tasty honey garlic chicken stir fry recipe. You learned about key ingredients like chicken, vegetables, and a simple sauce. I offered step-by-step instructions for cooking and tips to enhance flavor. You can also try some variations for your next meal. Eating healthy does not need to be hard or boring. With a few fresh ingredients, you can create a dish that’s fun and full of flavor. Enjoy cooking this dish and make it your own!

Honey Garlic Chicken Stir Fry Quick and Tasty Meal

Looking for a quick, tasty meal? Honey Garlic Chicken Stir Fry is your answer! In just 30 minutes, you can

Creating chewy maple pecan blondies starts with the right ingredients. Here’s what you need: - 1 cup unsalted butter, melted - 1 cup packed brown sugar - 1/2 cup granulated sugar - 2 large eggs - 1/4 cup pure maple syrup - 2 teaspoons vanilla extract - 2 cups all-purpose flour - 1 teaspoon baking powder - 1/2 teaspoon baking soda - 1/4 teaspoon salt - 1 cup pecans, roughly chopped - 1/2 cup white chocolate chips (optional) These key ingredients work together to create a rich, sweet flavor with a chewy texture. Measuring ingredients accurately is vital for great blondies. Here are some tips: - Use packed brown sugar. This adds moisture and a deeper flavor. - Melt the butter until it’s just liquid. Too hot butter can cook the eggs. - Make sure your eggs are at room temperature. This helps with mixing. - Sift the dry ingredients. This adds air and keeps the blondies light. Following these measurement tips will help you get the best results. Want to take your blondies up a notch? Here are some fun add-ins: - Chocolate Chips: Use dark or semi-sweet chocolate for extra richness. - Dried Fruit: Add cranberries or cherries for a fruity twist. - Spices: A pinch of cinnamon or nutmeg can give warmth. - Coconut Flakes: These add a chewy texture and tropical taste. Feel free to mix and match these add-ins to make your blondies unique. For the full recipe, check out the details above. To start, preheat your oven to 350°F (175°C). Next, grab a 9x13 inch baking pan. Lightly grease it or line it with parchment paper. This helps the blondies come out easily after baking. In a large mixing bowl, pour in 1 cup of melted unsalted butter. Add 1 cup of packed brown sugar and 1/2 cup of granulated sugar. Whisk them together until smooth. Next, crack in 2 large eggs one at a time. Mix well after each egg. Then, stir in 1/4 cup of pure maple syrup and 2 teaspoons of vanilla extract until everything blends well. In a separate bowl, sift together 2 cups of all-purpose flour, 1 teaspoon of baking powder, 1/2 teaspoon of baking soda, and 1/4 teaspoon of salt. Gradually add this dry mix to the wet ingredients. Use a gentle folding motion to combine until just mixed. Do not overmix. This keeps the blondies soft and chewy. Pour the thick batter into your prepared baking pan. Use a spatula to spread it out evenly. Bake in your preheated oven for 25-30 minutes. The edges should turn a beautiful golden brown. Check for doneness with a toothpick; it should come out with a few moist crumbs. After baking, let the blondies cool in the pan for about 10-15 minutes. Then, carefully move them to a wire rack to cool completely. This step is key for a chewy texture. Once cool, use a sharp knife to cut them into squares. For a lovely presentation, dust the blondies with powdered sugar. Place them on a rustic wooden board. You can garnish with whole pecans for style. Drizzle some extra maple syrup on top for added flavor. Enjoy your chewy maple pecan blondies! For the complete recipe, you can refer back to the [Full Recipe]. To get that perfect chewy texture in your maple pecan blondies, use melted butter. This helps create a soft and moist base. Also, do not overmix the batter. Overmixing can lead to tough blondies. Mix just until the dry ingredients are combined. Lastly, let the blondies cool completely before cutting. This cooling time lets them firm up and enhances the chewiness. One common mistake is not measuring the flour correctly. Too much flour will make your blondies dry. Always spoon flour into your measuring cup and level it off. Another mistake is baking for too long. Check them a few minutes early. If a toothpick comes out with moist crumbs, they are ready. Lastly, don’t skip the maple syrup. It adds flavor and moisture, making the blondies delightful. To boost the maple flavor, use high-quality pure maple syrup. The better the syrup, the richer the taste. You can also add a teaspoon of maple extract for extra depth. Consider toasting the pecans before mixing them in. Toasting adds a nutty aroma that pairs well with maple. Finally, drizzle some maple syrup on top before serving. This will give an inviting look and enhance the flavor. For more information, check the Full Recipe. {{image_4}} If you want to skip the nuts, it’s easy! Just leave out the pecans. You can replace them with more white chocolate chips or even dried fruits. This change keeps the blondies soft and tasty. You won’t lose any of the yummy flavors. Feel free to get creative! You can add different mix-ins for fun flavors. Here are some ideas: - Chocolate Chips: Swap pecans for semi-sweet or dark chocolate chips. - Dried Fruit: Add cranberries, raisins, or chopped dates for sweetness. - Coconut Flakes: Mix in unsweetened coconut for a tropical twist. Each mix-in adds a unique flavor and texture. It’s all about what you love! Want to make these blondies gluten-free? It’s simple! Use a gluten-free flour blend instead of all-purpose flour. Look for one that works well for baking. This change keeps the blondies soft and chewy, just like the original. You still get that amazing maple flavor! For the full recipe, check out the Chewy Maple Pecan Blondies. To keep your chewy maple pecan blondies fresh, store them in an airtight container. This keeps moisture in and prevents them from drying out. You can layer them with parchment paper to avoid sticking. Keep them at room temperature for about three days. If you want them to last longer, refrigerate them. Just remember to let them come back to room temperature before enjoying. Freezing blondies is a great way to save some for later. After they cool completely, cut them into squares. Place the squares in a single layer on a baking sheet. Freeze them for about an hour. Once firm, transfer the squares to a freezer-safe bag. Make sure to remove as much air as possible to prevent freezer burn. They can stay good for up to three months. If stored properly, blondies can stay fresh for about three days at room temperature. In the fridge, they can last up to a week. When frozen, they remain delicious for three months. Always check for any signs of spoilage before eating. Enjoying them fresh really enhances their unique flavor and chewy texture! For the full recipe, check out the complete guide. The secret to chewy blondies lies in the mixing. You want to mix the wet ingredients until smooth but not overmix the dry ingredients. This keeps the blondies tender and soft. Using brown sugar adds moisture, while melted butter helps create that chewy texture. You should also avoid baking them too long. Yes, you can substitute some ingredients. If you don’t have unsalted butter, you can use salted butter. For the sugars, you can use all brown sugar or a mix of brown and white sugar. If you need a nut-free version, just leave out the pecans. You can also swap maple syrup with honey or agave syrup for sweetness. To check if your blondies are done, look for golden edges. Insert a toothpick into the center; it should come out with a few moist crumbs. If it comes out wet, they need more time. Baking too long can dry them out, so keep a close eye on them. To reheat blondies, place them in the microwave for about 10-15 seconds. This warms them up nicely without drying them out. You can also warm them in the oven at 350°F (175°C) for about 5-10 minutes. Enjoy them warm for that delightful chewy experience! For the complete recipe, check out the Full Recipe. To make perfect chewy maple pecan blondies, follow the steps outlined. Start with key ingredients, measure carefully, and mix wet and dry components well. Remember to bake and cool properly for the best texture. Avoid common mistakes and consider fun variations for flavor. Store them right to keep them fresh. With these tips, you can enjoy great blondies anytime. Happy baking!

Chewy Maple Pecan Blondies Irresistible Dessert Treat

Are you ready to bake a delicious treat that will wow your friends and family? These Chewy Maple Pecan Blondies

To make crispy baked eggplant parmesan, gather these simple ingredients: - 2 medium eggplants, cut into 1/2-inch thick rounds - 1 teaspoon salt - 2 cups whole wheat breadcrumbs - 1/2 cup freshly grated Parmesan cheese - 1 teaspoon garlic powder - 1 teaspoon dried oregano - 1 teaspoon dried basil - 1/2 teaspoon black pepper - 3 large eggs - 2 cups marinara sauce - 2 cups shredded mozzarella cheese - Fresh basil leaves for garnish These ingredients come together to create a dish that is both tasty and healthy. The eggplants provide a soft base, while the breadcrumbs give a satisfying crunch. The cheese adds a rich flavor, and the marinara sauce brings it all together. You can find the full recipe online for detailed steps on how to prepare this delicious dish. 1. Preheat the oven and prepare baking sheets: Start by preheating your oven to 425°F (220°C). This ensures even cooking. Line two baking sheets with parchment paper. This helps keep the eggplant from sticking. 2. Cutting and salting the eggplants: Take two medium eggplants and slice them into 1/2-inch thick rounds. Lay the slices in a colander and sprinkle them with 1 teaspoon of salt. The salt draws out moisture and reduces bitterness. Let them sit for about 30 minutes. 3. Rinsing and drying the eggplants: After 30 minutes, rinse the eggplant slices under cold water. This removes the salt. Pat them dry with paper towels to get rid of excess moisture. Dry slices will crisp up better during baking. 1. Mixing the breadcrumb mixture: In a shallow bowl, combine 2 cups of whole wheat breadcrumbs, 1/2 cup of freshly grated Parmesan cheese, 1 teaspoon garlic powder, 1 teaspoon dried oregano, 1 teaspoon dried basil, and 1/2 teaspoon black pepper. Mix well for even flavor. 2. Preparing the eggs for dipping: In another bowl, crack 3 large eggs. Whisk them until the yolks and whites blend together. This will help the breadcrumbs stick to the eggplant. 3. Coating the eggplant slices with the mixture: Take each eggplant slice and dip it into the egg mixture. Let the excess egg drip off. Then, coat with the breadcrumb mixture. Press gently so the crumbs stick well to the eggplant. 1. Arranging the breaded slices on baking sheets: Place the breaded eggplant slices in a single layer on the prepared baking sheets. For extra crispiness, lightly spray or drizzle olive oil over the tops. 2. First baking session and flipping the slices: Bake the slices in the preheated oven for 25-30 minutes. At the halfway point, flip each slice to ensure even browning. They should turn golden and crispy. 3. Layering in the baking dish and final baking: In a baking dish, spread a thin layer of marinara sauce on the bottom. Layer half of the crispy eggplant slices on top, followed by half of the remaining marinara and half of the shredded mozzarella cheese. Repeat with the rest. Return the dish to the oven and bake for another 20-25 minutes until the cheese is melted and bubbly. For the full Recipe, check the details above. To get that perfect crisp on your eggplant, salting is key. Salting helps draw out extra moisture from the eggplants. This step is simple but very important. Here’s how to do it: - Slice the eggplants into 1/2-inch thick rounds. - Sprinkle them with salt and let them sit in a colander for about 30 minutes. - Rinse them under cold water and pat them dry with paper towels. This process reduces bitterness and gives you a better texture. When it comes to olive oil, use it wisely. A light spray or drizzle of olive oil adds flavor and helps the breading crisp up. It also gives the dish a lovely golden color. You want just enough to coat the slices lightly. Too much oil will make them soggy. Presentation is important for any dish, especially one as beautiful as eggplant Parmesan. Serve it on a large white platter or divide it onto individual plates. For an extra touch, drizzle some marinara sauce around the base. This adds color and makes it look fancy. Pair your eggplant Parmesan with a fresh side salad or some garlic bread. A light, crisp salad balances the rich flavors of the dish. You can use mixed greens, cherry tomatoes, and a simple vinaigrette. This meal is sure to impress your guests! For the full experience, check out the Full Recipe. {{image_4}} You can use many types of cheese in your eggplant parmesan. For a stronger flavor, try aged provolone or gouda. They melt well and add a nice twist. If you want a lighter dish, use part-skim mozzarella. For those who prefer vegan options, there are great dairy-free cheeses. Look for brands that melt well. Nutritional yeast is another option. It gives a cheesy flavor without dairy. You can sprinkle it between layers for extra taste. Adding other veggies can make your dish more colorful and nutritious. Zucchini works well. Slice it thin and layer it with the eggplant. Spinach is another great choice. Just sauté it lightly before adding. It adds flavor and a pop of green. When adding vegetables, think about balancing flavors. If you use sweet veggies, like bell peppers, pair them with something savory. This will keep the dish exciting and well-rounded. Experimenting with sauces can change your eggplant parmesan game. Homemade marinara is a classic choice. You can control the spices and flavors. Store-bought marinara saves time, but check for quality ingredients. You might also enjoy pesto or Alfredo sauce. Pesto adds a fresh, herby flavor, while Alfredo brings creaminess. Just spread them between layers or drizzle on top before serving. Each option creates a unique dish that surprises your guests. For the full recipe, check out the details in the previous sections. Enjoy your cooking! To store leftovers of your Crispy Baked Eggplant Parmesan, first let it cool to room temperature. Place it in an airtight container. This helps keep it fresh. I recommend using glass containers for better heat retention. You can store it in the fridge for up to three days. You can freeze this dish before or after baking. If you freeze it before baking, assemble the layers in a freezer-safe dish. Cover it tightly with plastic wrap and then aluminum foil. This prevents freezer burn. If you freeze it after baking, let it cool completely first. Then, wrap it well and store it for up to three months. To reheat, thaw it overnight in the fridge. Then bake it at 350°F (175°C) for about 25 minutes. If frozen, add about 15 extra minutes. This method keeps the eggplant crispy and delicious. Enjoy your meal again! For the full recipe, check out the Crispy Baked Eggplant Parmesan. Can I make this ahead of time? Yes, you can prepare this dish ahead of time. Cook the eggplant and layer it with sauce and cheese. Cover and store it in the fridge. When ready, just bake it until hot. How do I make the dish gluten-free? To make this dish gluten-free, use gluten-free breadcrumbs. You can find them in most stores. Ensure that your marinara sauce is also gluten-free. What to do if the eggplant is too bitter? If your eggplant tastes bitter, sprinkle more salt on the slices. Let them sit longer in the colander. Rinse and dry them before cooking. How many calories per serving? This dish has about 350 calories per serving. The exact amount may vary based on ingredients used. Is this recipe suitable for vegetarian/vegan diets? Yes, this recipe is vegetarian. To make it vegan, replace eggs with a flax egg and use dairy-free cheese. Can I replace the breadcrumbs? Yes, you can use crushed cornflakes or panko for a different crunch. Both will work well in this recipe. Alternatives for Parmesan cheese? You can use nutritional yeast for a vegan option. It adds a cheesy flavor without dairy. This blog post explored a tasty eggplant dish. We covered ingredients, step-by-step instructions, and helpful tips. You learned how to achieve the perfect crisp, serve beautifully, and try fun variations. I also shared storage tips to keep your leftovers fresh. Now, go ahead and create your own delicious version. With these ideas, you’ll impress everyone at the table. Enjoy cooking and experimenting with flavors!

Crispy Baked Eggplant Parmesan Delicious and Easy Meal

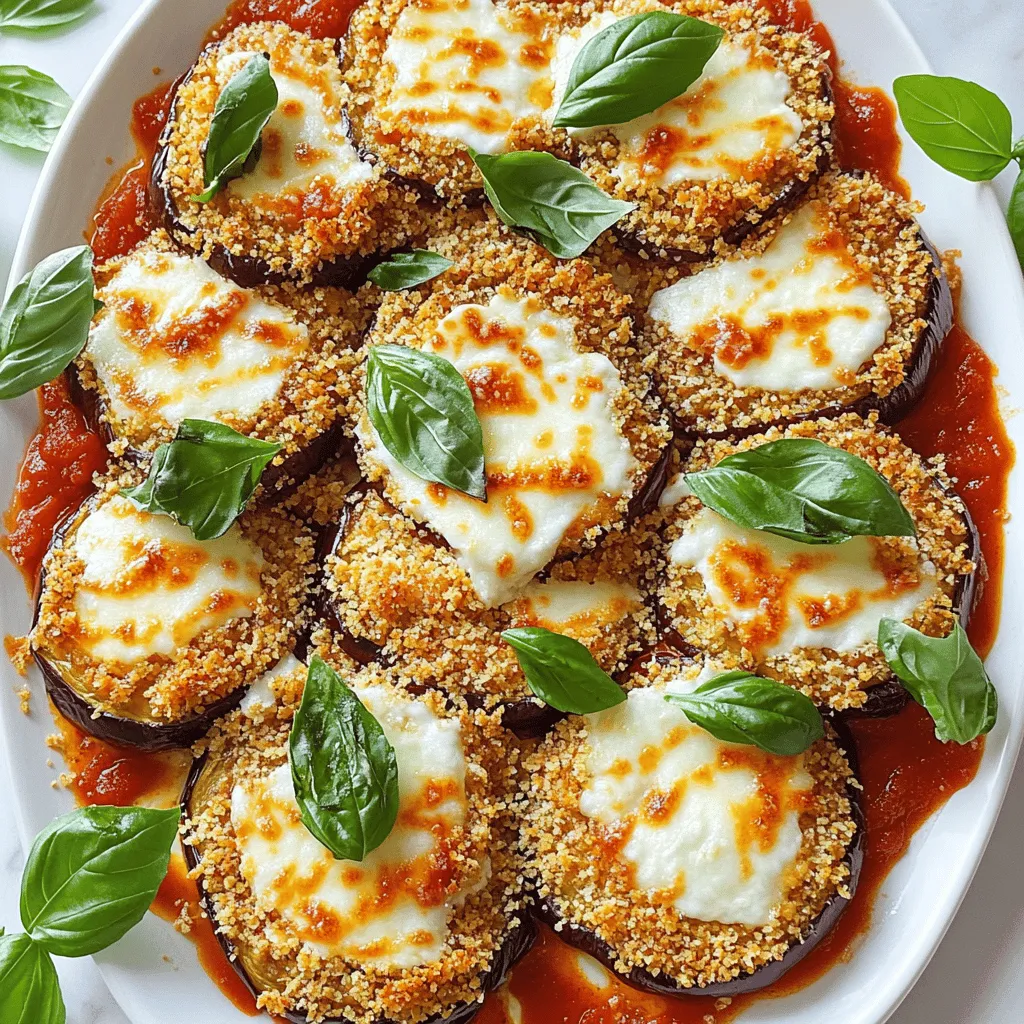
Are you ready to indulge in a deliciously crispy baked eggplant parmesan? This easy meal is perfect for dinner lovers

For the No Bake Lemon Cheesecake Cups, you need fresh and quality ingredients. Here’s what you will need: - 1 cup graham cracker crumbs - 2 tablespoons granulated sugar - 1/4 cup unsalted butter, melted - 8 oz cream cheese, softened to room temperature - 1 cup powdered sugar - 1/2 cup sour cream - 1/4 cup freshly squeezed lemon juice - Zest of 1 lemon - 1 teaspoon pure vanilla extract Each ingredient plays a key role. The graham cracker crumbs and butter create a tasty base. The cream cheese gives the cups their creamy texture. Use full-fat cream cheese for the best taste. Fresh lemon juice and zest add a bright, zesty flavor that lifts the dessert. You can customize these cheesecake cups with fun toppings. Here are some ideas: - Whipped cream - Fresh berries (strawberries, blueberries, or raspberries) - Chocolate drizzle - Extra lemon zest or lemon slices Feel free to switch things up. You can use Greek yogurt instead of sour cream for a tangy twist. If you want a sweeter option, drizzle some honey or chocolate sauce on top. These little changes can make your cheesecake cups even more special! Start with a medium-sized mixing bowl. Combine 1 cup of graham cracker crumbs with 2 tablespoons of granulated sugar. Pour in 1/4 cup of melted unsalted butter. Use a fork or your fingers to mix these until they look like wet sand. This mixture holds everything together. Next, take small cups or mason jars. Divide the graham cracker mix evenly among them. Use the back of a spoon to press down firmly. This step is key for an even crust that won’t crumble when you dig in. Now, it’s time for the filling. In a large mixing bowl, beat 8 oz of softened cream cheese with an electric mixer. Mix until smooth and creamy. This should take about 2 minutes. Gradually add 1 cup of powdered sugar. Mix well after each addition. You want a silky texture. To get that perfect creaminess, blend in 1/2 cup of sour cream, 1/4 cup of fresh lemon juice, and the zest of 1 lemon. Don’t forget the 1 teaspoon of pure vanilla extract. Keep mixing until everything is well combined and fluffy. Spoon the creamy filling into each cup, layering it over the crust. Make sure to distribute it evenly to each cup. This ensures every bite has that creamy lemon goodness. Cover the cups with plastic wrap and place them in the fridge. Chill for at least 4 hours. This cooling time helps the filling set. You want a firm texture that holds its shape when served. For the full recipe, check out the earlier sections. To get the best cream cheese texture, start with softened cream cheese. Cold cream cheese can create lumps. Beat it with a mixer until smooth. If you see lumps, keep mixing. Gradually add powdered sugar to blend well. This step helps maintain a creamy texture. Want even more lemon flavor? Add extra lemon zest. This boosts the freshness and taste. You can also mix in a splash of lemon extract. For a twist, try adding a bit of crushed fruit. Fresh berries or a hint of lavender can create unique flavors. Serve your cheesecake cups in clear glass cups. This shows off the layers and colors. A decorative platter makes it look fancy. You can also add fresh berries around the cups. Sprigs of mint add a nice touch. For the best look, use matching dishware. For the full recipe, check out the details above. {{image_4}} You can change the taste of these cheesecake cups by using other citrus fruits. Lime and orange work well and add a fun twist. You can also mix in chocolate. A little dark chocolate drizzle can give it a rich layer of flavor. If you want something different, try adding vanilla or almond extracts for extra depth. To make a lighter version, consider using Greek yogurt instead of sour cream. It adds creaminess while cutting down on calories. You can also switch the crust to gluten-free options. Use almond flour or gluten-free graham crackers. This way, more people can enjoy the dessert without worry. Pair these cheesecake cups with a cup of herbal tea. The lightness of the tea complements the rich cheesecake. At parties, serve them in mason jars for a cute look. You can even add small spoons for easy eating. Add fresh fruit or mint leaves on top for color and flavor. This makes them attractive and tasty! For the full recipe, check out the steps to create these delightful treats. Store your lemon cheesecake cups in the fridge. Use an airtight container to keep them fresh. They stay good for up to five days. The cool air helps keep the filling creamy and tasty. You can freeze these cheesecake cups for longer storage. Wrap each cup tightly in plastic wrap, then place them in a freezer-safe bag. They can last up to three months in the freezer. When you're ready to eat, thaw them in the fridge overnight. This keeps the texture nice. Before serving, check the texture. If they seem too firm, let them sit at room temperature for about 10 minutes. This helps soften them slightly. They should still taste delicious after storage! Enjoy your zesty treat! For the full recipe, check back at the beginning! Yes, you can make these a day ahead. Just prepare the cheesecake cups and chill them overnight. This gives the flavors time to blend. Plus, it ensures they are nicely set when you serve. If you want a dairy-free or vegan option, use cashew cream or coconut cream. These give a nice texture. Silken tofu is another option, which blends smoothly for a creamy filling. Check if the filling feels firm to the touch. You can also gently shake the cup. If it jiggles slightly, it needs more time to chill. Properly set cheesecake cups will hold their shape well. Yes, you can easily make larger servings. Just increase the ingredient amounts. Use bigger cups or bowls for the filling. Adjust the chilling time as needed. Larger cups may take longer to set. This blog post covered a delightful creamy dessert. You learned about key ingredients and how to mix them for the best texture. We also explored various toppings and fun flavor twists. The tips and tricks will help you achieve the perfect finish and presentation. Remember, this dessert can be prepped in advance and stored easily. With these techniques and ideas, you can impress family and friends. Enjoy making this treat your own!

No Bake Lemon Cheesecake Cups Simple and Delicious

Craving a refreshing dessert that’s easy and delicious? You’re in the right place! These No Bake Lemon Cheesecake Cups are

To create a tasty One Pot Creamy Mushroom Orzo, you'll need these key ingredients: - 1 cup orzo pasta - 2 tablespoons olive oil - 1 medium onion, finely chopped - 3 cloves garlic, minced - 8 oz (about 225g) cremini mushrooms, sliced - 4 cups vegetable broth - 1 teaspoon dried thyme - 1 teaspoon dried basil - ½ cup heavy cream - ¼ cup grated Parmesan cheese - Salt and pepper to taste - Fresh parsley, chopped (for garnish) These ingredients blend together to make a rich, creamy dish that feels comforting. You can add or switch out some ingredients based on your taste: - Use other mushrooms like shiitake or button for different flavors. - Swap heavy cream with coconut cream for a dairy-free option. - Choose nutritional yeast instead of Parmesan for a vegan dish. - Add spinach or peas for extra color and nutrients. Feel free to mix and match to make this dish your own. When preparing your ingredients, remember these tips: - Chop your onion and garlic finely for even cooking. - Slice mushrooms evenly to ensure they cook at the same rate. - Measure out your broth before you start cooking, so it’s ready when needed. - If you want a thicker sauce, use less broth. For a thinner sauce, add more. Having everything ready makes cooking smooth and fun. For the full recipe, check out the details above. Enjoy your cooking! 1. Heat olive oil in a large pot over medium heat. Wait until it shimmers. 2. Add finely chopped onion. Sauté for 3-4 minutes until soft and clear. 3. Stir in minced garlic and sliced cremini mushrooms. Cook for 5-6 minutes. 4. Mix in orzo pasta, making sure it blends well with onions and mushrooms. 5. Pour in vegetable broth and add dried thyme and basil. Bring to a boil. 6. Lower the heat, cover the pot, and let it simmer for 10-12 minutes. 7. Stir occasionally until orzo is al dente and most liquid is gone. 8. Remove from heat and mix in heavy cream and Parmesan cheese. 9. Season with salt and pepper to taste. Add more broth if too thick. 10. Serve hot, garnished with fresh parsley for added flavor. - Use a big pot to give orzo room to cook evenly. - Stir often to prevent sticking. - Keep an eye on the liquid. If it runs low, add more broth. - Test the orzo a minute or two before the time is up. - Prep all ingredients before starting to cook. - Measure out the orzo and broth ahead of time. - While the onions cook, slice mushrooms and mince garlic. - This way, you save time and keep things moving smoothly. For the complete recipe, check out the [Full Recipe]. One common mistake is overcooking the orzo. This can make it mushy. To prevent this, always check the cooking time. Keep an eye on your pot. Stir often to keep it from sticking. Another mistake is not adding enough liquid. Orzo absorbs a lot of broth. If it looks dry, add more broth as needed. Herbs and spices can change your dish. I love using dried thyme and basil for warmth. For a fresh twist, try adding parsley at the end. You can also experiment with a pinch of red pepper flakes for heat. A squeeze of lemon juice right before serving can brighten the dish. Don’t forget to taste as you go! You can make this dish healthier with small swaps. Use whole grain orzo for more fiber. If you want a lighter dish, replace heavy cream with almond milk. You can also add more vegetables. Try spinach or peas for added nutrition. For protein, consider adding cooked chicken or chickpeas for a boost. Check the [Full Recipe] for more ideas on ingredient adjustments. {{image_4}} If you want to make this dish vegetarian, simply skip the meat. The base of sautéed mushrooms, onions, and garlic is full of flavor. For a vegan option, replace heavy cream with coconut cream or cashew cream. Nutritional yeast gives a cheesy taste without dairy. You can also add more vegetables for extra nutrients. Spinach or kale works great here. Adding protein can make this meal more filling. If you love chicken, cook diced pieces in the pot first. Then, add onions and follow the steps. For a smoky flavor, use sausage instead. Cook it with onions until it’s browned. Tofu is a great meat substitute. Press and cube it, then sauté with the mushrooms. All these options fit well into the creamy mix. Feel free to get creative with your add-ins. Broccoli, peas, or bell peppers can brighten the dish. Just chop them small and add them when you add the orzo. For cheese lovers, try different types of cheese. Goat cheese or feta can add a tangy flavor. You can also mix in some cooked spinach or sun-dried tomatoes for extra taste. Explore combinations that excite your palate! To keep your One Pot Creamy Mushroom Orzo fresh, you should store it in an airtight container. Let it cool down to room temperature before sealing. This helps prevent condensation, which can make the dish soggy. Store it in the fridge for up to three days. If you want to keep it longer, freezing is a great option. When you're ready to enjoy your leftovers, gently reheat your orzo on the stove. Add a splash of vegetable broth or water to keep it creamy. Stir it often over low heat until it's warm. You can also use the microwave; just cover the dish with a damp paper towel. Heat in short bursts, stirring in between to avoid hot spots. If you want to freeze your One Pot Creamy Mushroom Orzo, use a freezer-safe container. Make sure to leave some space for expansion. It can last in the freezer for up to three months. When you’re ready to eat it, thaw it in the fridge overnight. Reheat it slowly on the stove, adding a little broth if needed. This way, your dish stays delicious and creamy. Check out the Full Recipe for more details! Yes, you can use other types of pasta! I suggest using small shapes like ditalini or shells. These shapes will cook well and absorb flavors nicely. Just keep an eye on the cooking time, as different pastas require different times. If you want a lighter option, use half-and-half or milk. For a dairy-free choice, try coconut cream or cashew cream. Both will add creaminess without dairy. You might notice a slight change in flavor, but it will still be tasty. To make this dish gluten-free, use gluten-free orzo. Many brands offer great substitutes. Always check the label to ensure it meets your needs. Cooking times may vary slightly, so check the pasta as it cooks. Absolutely! This dish stores well in the fridge. Just make sure to cool it down before putting it in containers. When you're ready to eat, reheat it gently on the stove or in the microwave. Add a splash of broth if it looks dry. For the full recipe, check out the details above! This blog post covered how to make One Pot Creamy Mushroom Orzo. We discussed essential and optional ingredients, preparation tips, and how to cook orzo perfectly. You also learned common mistakes to avoid and ways to enhance flavor. In summary, cooking this dish is simple and fun. With a few easy tweaks, you can adapt it to fit your diet. I hope you feel inspired to create your own version of this tasty meal!

One Pot Creamy Mushroom Orzo Delicious Dinner Recipe

Welcome to my kitchen! Today, we’re diving into a comfort food classic: One Pot Creamy Mushroom Orzo. This dish is

- 6 large eggs - 1/2 cup shredded cheddar cheese - 1/4 cup milk - 1/2 teaspoon garlic powder - 1/2 teaspoon onion powder - Salt and pepper to taste - 1 cup diced vegetables (bell peppers, spinach, and tomatoes) - 4 whole wheat English muffins, halved - 2 tablespoons olive oil or cooking spray - Optional toppings: avocado slices, hot sauce, or fresh herbs To make savory breakfast egg and cheese muffins, gather these key ingredients. Fresh eggs provide protein and structure. Shredded cheddar cheese adds a rich, creamy flavor. Milk combines with the eggs, making the mixture smooth. Garlic and onion powders enhance the taste without being overpowering. You can adjust the salt and pepper to fit your taste. For veggies, I love using bell peppers, spinach, and tomatoes. These add color and nutrition. Whole wheat English muffins serve as a hearty base. Olive oil or cooking spray helps with easy release from the muffin tin. Feel free to customize toppings like creamy avocado slices or a drizzle of hot sauce for extra zing. This recipe is easy to adapt to your preferences. You can find the full recipe at the beginning of this section. 1. Preheat your oven to 350°F (175°C). This step helps cook the muffins evenly. 2. Grease a muffin tin with olive oil or cooking spray. This ensures your muffins pop out easily later. 1. In a large mixing bowl, crack 6 large eggs. 2. Add 1/4 cup milk, 1/2 teaspoon garlic powder, 1/2 teaspoon onion powder, and a pinch of salt and pepper. 3. Whisk everything together until it looks smooth. This mix is your egg base. 1. Gently fold in 1/2 cup shredded cheddar cheese and 1 cup diced vegetables. Bell peppers, spinach, or tomatoes work great here. 2. Carefully pour the egg mixture into the muffin tin. Fill each cup about 3/4 full so the muffins can rise. 3. Next, take 4 whole wheat English muffins. Halve them and toast them until golden. This step adds a nice crunch. 4. Once toasted, place each muffin half on a plate. Drizzle the egg mixture over each half. Make sure to get a good amount on all. Now, you’re ready to bake! For the complete recipe, including all steps, check out the Full Recipe. - Ensure eggs are fully set before removing from oven. This step keeps the muffins from being runny. You can check by gently shaking the muffin tin. If they jiggle, they need more time. - Use cooking spray for easy removal. A well-greased muffin tin helps your muffins pop out without tearing. I always coat the tin generously to avoid any sticky mess. - These muffins are best served warm with toppings. Try adding creamy avocado or a drizzle of hot sauce for extra flavor. - Pair your muffins with fresh fruits or a light salad for balance. The sweetness of fruit complements the savory muffins nicely. You could even add a simple fruit salad on the side for a colorful plate. For the full recipe, check out [Full Recipe]. {{image_4}} You can make your breakfast muffins more exciting with different veggies. Consider adding zucchini, mushrooms, or asparagus. Zucchini adds moisture and a mild taste. Mushrooms bring a rich flavor and texture. Asparagus offers a fresh crunch. Just chop them small and mix them in. This way, you can enjoy a variety of flavors and colors in every bite. Cheese makes everything better. You can swap out cheddar for feta, mozzarella, or pepper jack. Feta gives a tangy twist. Mozzarella melts beautifully and adds creaminess. Pepper jack adds a spicy kick. Choose the cheese that fits your taste. It’s fun to try new flavors, so don’t hesitate to experiment! Adding protein is a great way to boost your muffins. You can cook bacon, sausage, or turkey to mix in. Bacon adds a savory crunch. Sausage brings a hearty flavor. Turkey is a lean option that still tastes great. Cook the meat first, chop it up, and fold it into the egg mixture. This will make your muffins more filling and delicious. For the full recipe, check out the Breakfast Egg and Cheese Muffins section. To store leftovers, let the muffins cool completely. Place them in an airtight container. You can also wrap each muffin in plastic wrap for extra protection. Store the container in the fridge. These muffins will stay fresh for up to four days. If you want to freeze muffins, follow these steps. First, let them cool completely. Wrap each muffin tightly in plastic wrap. Then place the wrapped muffins in a freezer-safe bag or container. They can last up to three months in the freezer. To reheat, take out a muffin and unwrap it. Microwave for 30 seconds or until warm. You can also reheat them in the oven at 350°F for about 10 minutes. To keep muffins fresh, follow these best practices. Always store them in a cool, dry place. Avoid exposing them to moisture. If you see any signs of mold, throw them away. You can also slice them to check for freshness before using. Yes, you can prep these muffins ahead of time. Make the egg mix and fill the muffin tin. Cover it and store it in the fridge for up to 24 hours. When you are ready, bake them straight from the fridge. This helps you save time in the morning. If you have leftovers, store them in the fridge. To reheat, pop them in the microwave for about 30 seconds. They will taste fresh and warm. If you want to replace eggs, you can use chia seeds or silken tofu. For chia seeds, mix 1 tablespoon with 2.5 tablespoons of water. Let it sit for 5 minutes to thicken. This will act like one egg. Silken tofu is another option. Blend 1/4 cup of silken tofu until smooth. It will keep your muffins moist while adding protein. Yes, you can make these muffins gluten-free. Use gluten-free English muffins instead of whole wheat ones. Check the label to ensure they are certified gluten-free. You can also add gluten-free flour to your egg mix if you want a thicker texture. This way, everyone can enjoy these tasty muffins! These muffins are easy to make and full of flavor. You learned how to mix eggs, cheese, and vegetables. With fun variations, you can customize them to your taste. Store leftovers in the fridge or freeze for later. These muffins are perfect for meal prep and quick breakfasts. Enjoy them warm with tasty toppings. You can adapt this recipe to fit your needs and preferences. Keep experimenting to find your favorite mix. Simple and delicious meals make cooking fun and rewarding.

Savory Breakfast Egg and Cheese Muffins Recipe

Start your day off right with these savory Breakfast Egg and Cheese Muffins! Packed with protein and veggies, they make

To make a Pickle Ranch Wedge Salad, you will need simple, fresh ingredients. Here’s the list: - Iceberg lettuce - Dill pickles - Ranch dressing - Cherry tomatoes - Red onion - Blue cheese or feta - Fresh dill - Seasoning - Optional toppings Each of these ingredients adds a special touch. Iceberg lettuce gives a nice crunch. Dill pickles bring a tangy kick. The ranch dressing adds creaminess. Cherry tomatoes add sweetness. Red onion gives a sharp bite. Blue cheese or feta provides a rich flavor. Fresh dill adds brightness. Seasoning ties the flavors together. You can also add fried onions for extra crunch. When you gather your ingredients, make sure they are fresh. This salad shines with quality items. Use ripe tomatoes and crisp lettuce for the best taste. You can find the Full Recipe for more details. First, you need to cut the iceberg lettuce. Use a sharp knife to slice the head into quarters. Each wedge will be a perfect base for your toppings. Next, arrange the wedges on serving plates. This makes for a fun presentation and is sure to impress your guests. Now, grab a medium-sized mixing bowl. Combine the diced dill pickles, cherry tomatoes, and red onion. Stir the ingredients gently to mix them well. Then, add the crumbled blue cheese. This cheese adds a rich flavor that pairs nicely with the pickles. Now drizzle ranch dressing over this mixture. Add salt and pepper to taste. Mix everything until the ranch coats the veggies and cheese evenly. It's time to build your salad. Take a generous spoonful of the mixture and layer it on each lettuce wedge. This colorful topping looks great against the crisp lettuce. For extra crunch, sprinkle crispy fried onions on top. This adds a delightful texture that everyone loves. Finally, garnish each wedge with a sprinkle of fresh dill. This step adds a pop of color and freshness to each plate. Enjoy making this Pickle Ranch Wedge Salad! For the complete recipe, refer to the Full Recipe. To make your Pickle Ranch Wedge Salad shine, get your dressing ratio right. You want a good mix that coats everything nicely. Start with ¾ cup of ranch dressing. This amount works well for four wedges. If you like more dressing, feel free to add a bit more. Just remember, you can always add more, but you can’t take it out. If you want to make your own ranch dressing, it's simple! Mix buttermilk, mayonnaise, garlic powder, onion powder, and some dill. This fresh dressing hits just right! For extra flavor and crunch, think about adding toppings. Crispy fried onions add a nice bite. You can also toss in some crispy bacon bits for a savory touch. If you want a fresh taste, add sliced radishes or even avocado. Herbs can make a big difference too. Fresh chives or parsley can brighten up the dish. Don't forget black pepper for a little kick! When serving, think about how you want it to look. You can arrange the wedges on a big platter for a fun look. This way, everyone can serve themselves. If you prefer a fancy touch, put each wedge on its own plate. It makes each serving feel special. To make it pop, garnish with fresh herbs. A sprinkle of dill or chives adds color and taste. Serve lemon wedges on the side for a zesty twist. {{image_4}} You can swap blue cheese for feta cheese. Feta gives a milder taste. For a twist, try goat cheese. It adds a creamy texture and tang. You can also use cheddar for a sharper flavor. Cheese choice can change the whole taste of the salad. To make the salad heartier, add grilled chicken or crispy bacon. Both options bring great flavor and crunch. If you want a vegetarian choice, try chickpeas or black beans. They add protein and a nice texture without meat. You can customize your salad with seasonal veggies. In spring, add radishes for a peppery kick. In summer, fresh corn or bell peppers add sweetness. You can also switch up the dressings. Try a yogurt-based dressing for a lighter option. This keeps the salad fresh and exciting. To keep your Pickle Ranch Wedge Salad fresh, store it in an airtight container. This helps prevent wilting. If you have leftover dressing, keep it separate. This keeps the lettuce crunchy. When you reheat, avoid the salad. Instead, enjoy it cold. You cannot freeze the whole salad. Freezing will ruin the texture. However, you can freeze some ingredients. For example, freeze diced pickles or the ranch dressing. Store components separately in freezer bags. This helps keep flavors fresh. The salad will last about three days in the fridge. Check for wilting or slimy leaves. If you see these signs, it’s best to toss it out. Keep an eye on the toppings as well. They may spoil faster than the lettuce. Enjoy your salad while it’s fresh for the best taste. For the complete recipe, check the Full Recipe section. To make the Pickle Ranch Wedge Salad vegan, you can swap out the dairy. Use a plant-based ranch dressing instead of regular ranch. For the cheese, try using vegan feta or omit it altogether. These swaps keep the salad tasty and fresh. Pair this salad with simple sides. Grilled corn on the cob works well. Roasted potatoes also add flavor. A light soup, like tomato or cucumber, is a great choice too. These sides make for a balanced meal. Yes, you can prep this salad early. Wash and cut the lettuce and store it in the fridge. Mix the pickles, tomatoes, and onions in a bowl. Keep them covered in the fridge. Add the dressing and toppings just before serving to keep it fresh. The Pickle Ranch Wedge Salad comes from classic American cuisine. Wedge salads became popular in steakhouses in the mid-20th century. They often feature fresh ingredients and bold flavors. This salad combines the traditional wedge with zesty pickles, adding a fun twist. Making ranch dressing is easy! Combine these ingredients: - 1 cup sour cream - ½ cup mayonnaise - 1 tablespoon lemon juice - 1 teaspoon garlic powder - 1 teaspoon onion powder - Salt and pepper to taste Mix well and let it chill for at least 30 minutes. This homemade ranch adds a fresh touch to your salad. Check out the Full Recipe for more details! This blog post covered how to create a delicious Pickle Ranch Wedge Salad. We looked at the ingredients, the step-by-step instructions, and tips to improve flavor and presentation. You learned about various cheese options and how to add protein. We even discussed how to store your salad and answered common questions. Now, you have everything you need to impress with this fresh dish. Enjoy experimenting with flavors and toppings to make it your own!

Pickle Ranch Wedge Salad Crunchy and Flavorful Delight

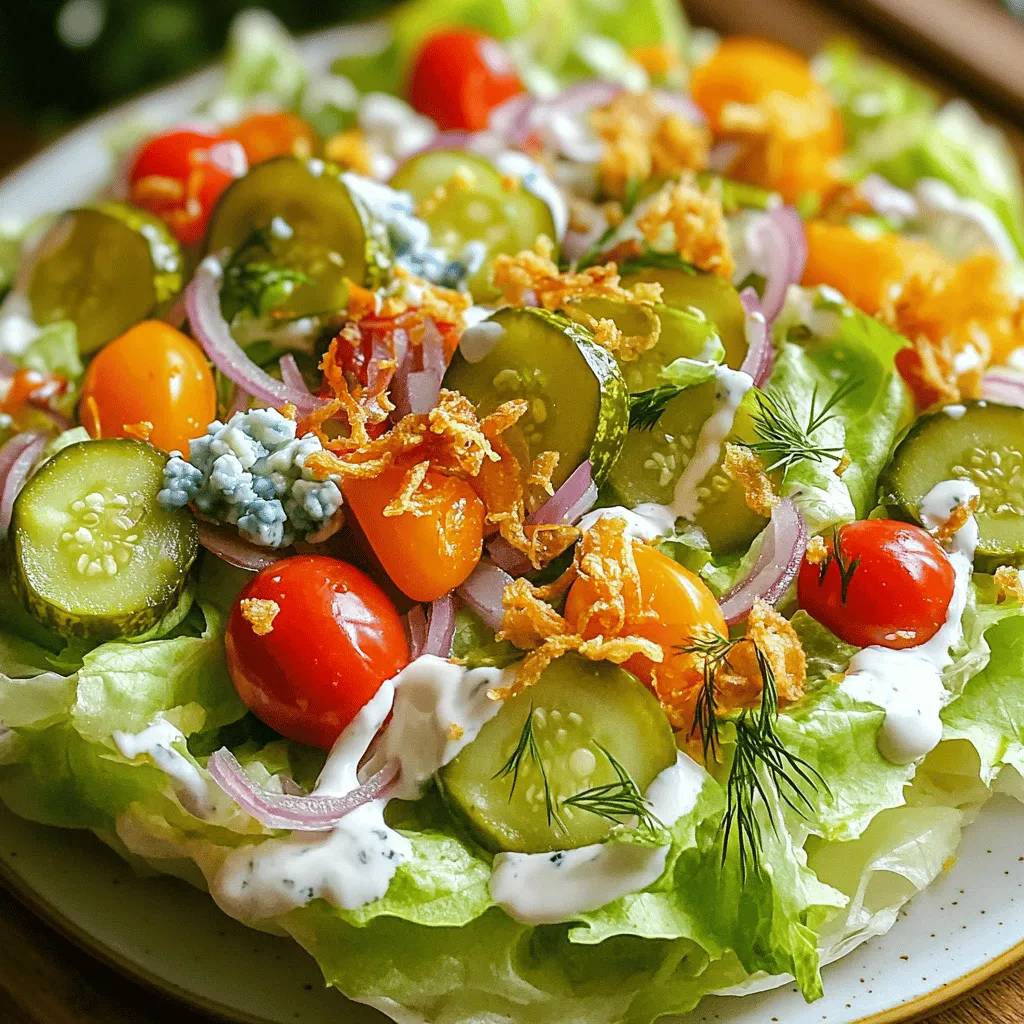
If you crave a salad bursting with crunch and flavor, you’re in for a treat! The Pickle Ranch Wedge Salad

Here is what you need for the Cherry Coconut Oat Bars: - 1 ½ cups rolled oats - 1 cup pitted cherries, chopped (fresh or frozen) - 1 cup shredded unsweetened coconut - ½ cup almond butter (or your preferred nut butter) - ½ cup honey or maple syrup - 1 teaspoon vanilla extract - ½ teaspoon ground cinnamon - ½ teaspoon salt - ¼ cup chopped almonds or walnuts (optional) These ingredients come together to create a tasty and healthy snack. The oats provide fiber, while cherries add a burst of flavor. Coconut brings a tropical twist, and nut butter offers healthy fats. You can easily swap some ingredients based on your taste or diet. For example: - Use peanut butter instead of almond butter for a different nutty flavor. - Maple syrup can replace honey if you want a vegan option. - You can use dried fruits like raisins or cranberries instead of cherries. - If you're nut-free, try sunflower seed butter. These substitutions keep the bars delicious while meeting your needs. These bars pack a punch of nutrition. Each bar contains: - Approximately 150 calories - 5 grams of protein - 7 grams of healthy fats - 3 grams of fiber They are perfect for a quick snack or a post-workout boost. With whole ingredients, you get energy without empty calories. These bars are a smart choice for any time of day. For the full recipe, refer to the initial section. First, preheat your oven to 350°F (175°C). Grab an 8x8-inch baking dish and line it with parchment paper. Leave some paper hanging over the edges. This will help lift out the bars later. Next, in a large bowl, mix the rolled oats, chopped cherries, shredded coconut, and the optional chopped nuts. Add the ground cinnamon and salt. Make sure you mix these dry ingredients well, so the flavors blend nicely. Now it’s time to make the wet mixture. Take a small microwave-safe bowl and warm the almond butter and honey (or maple syrup) in the microwave for 15-20 seconds. This makes them easier to mix. Stir in the vanilla extract once warmed. Pour this mixture over the dry ingredients in the large bowl. Use a spatula or wooden spoon to mix them together until you get a sticky texture. Transfer the sticky mix into the baking dish. Press it down firmly and evenly with your spatula or hands. This step helps the bars hold together. Bake in your preheated oven for 20-25 minutes. Look for golden brown edges and a set center. After baking, take the dish out and let it cool for about 10 minutes. Use the parchment paper to lift the bars out of the dish. Place them on a wire rack to cool completely. Once cool, cut them into 12 bars. For a nice touch, wrap each bar in parchment paper for easy snacking. You can also sprinkle extra shredded coconut on top for a pretty finish. Enjoy your Cherry Coconut Oat Bars! For the complete recipe, check out the Full Recipe. To get the best texture for your Cherry Coconut Oat Bars, focus on mixing. Use rolled oats, as they hold moisture well. Make sure to combine the wet and dry ingredients well. This helps the bars stick together. Press the mixture firmly into your baking dish. A compact layer ensures a chewy, not crumbly, bar. Bake them until the edges turn golden brown. This gives a crispy outside while keeping the inside soft. Want to boost the flavor? Try adding a pinch of salt to your mixture. It will enhance the natural sweetness of the cherries and coconut. You can also mix in some vanilla or almond extract for a richer taste. If you enjoy a hint of spice, add extra cinnamon or a dash of nutmeg. For a tropical twist, consider adding a bit of lime zest. These small changes can make a big difference. One common mistake is not measuring your ingredients properly. Too much dry or wet mix can change the texture. Another pitfall is overbaking the bars. Keep an eye on them to prevent a dry outcome. If you skip the parchment paper, you might struggle to lift out the bars. This can lead to broken pieces. Lastly, let the bars cool completely before cutting. This helps them hold their shape better. For more details, check out the Full Recipe. {{image_4}} You can make these cherry coconut oat bars even better. Add-ins can boost flavor and nutrition. Here are some great options: - Dried fruits: Add raisins, cranberries, or apricots for a sweet twist. - Seeds: Chia seeds or flaxseeds add healthy fats and fiber. - Chocolate chips: Stir in dark chocolate chips for a rich taste. You can mix and match these add-ins to fit your taste. If you want to change the flavor, swap out some ingredients. Here are some fun ideas: - Fruits: Use blueberries, raspberries, or apples instead of cherries. - Nut butters: Try peanut butter or cashew butter for a different nutty hint. - Sweeteners: Use agave syrup or brown sugar instead of honey. These swaps keep your bars fresh and interesting. You can adjust the recipe for special diets. Here are some easy changes: - Gluten-free: Use certified gluten-free oats to make them safe for gluten-free diets. - Vegan: Replace honey with maple syrup or agave syrup. - Nut-free: Use sunflower seed butter instead of nut butter. These modifications let everyone enjoy the bars. Check out the Full Recipe for more details on how to create your perfect cherry coconut oat bars. To keep your Cherry Coconut Oat Bars fresh, store them in an airtight container. You can place parchment paper between layers to prevent sticking. This method keeps them soft and chewy. If you prefer, you can wrap each bar in plastic wrap for easy grab-and-go snacks. When stored properly, these bars last about one week at room temperature. If you put them in the fridge, they can last up to two weeks. Always check for any changes in smell or texture before enjoying them. To freeze your Cherry Coconut Oat Bars, wrap each bar in plastic wrap. Then, place them in a freezer-safe bag or container. They can last up to three months in the freezer. When you're ready to eat, let them thaw in the fridge or at room temperature. This way, you can enjoy a tasty snack anytime! For the full recipe, check out the instructions mentioned earlier. Yes, you can use other fruits. Blueberries or diced apples work well. Raspberries add a nice tart flavor too. Feel free to mix and match. Each fruit will change the taste slightly. I love using seasonal fruits for variety. Experimenting can lead to fun new flavors. To make these bars vegan, swap honey for maple syrup. Use a nut or seed butter that is vegan-friendly. Almond butter is a great choice. Check labels to ensure there are no animal products. These changes keep the bars tasty and plant-based. You still get the chewy texture everyone loves. After baking, let the bars cool for about 10 minutes. Use the parchment paper to lift them out. Place them on a cutting board. Use a sharp knife to slice. Make smooth, even cuts to avoid crumbling. Cutting while still slightly warm helps too. Enjoy your perfect, neat bars! For the Full Recipe, check the detailed instructions above. In this blog post, we explored the essential ingredients for your recipe. We discussed substitutions, the nutritional value, and easy preparation steps. You learned about achieving the right texture and flavor. Variations allowed for creativity, and we highlighted proper storage methods. By following these tips, you can make delicious bars that suit your tastes and needs. Now you're ready to bake confidently, knowing how to avoid common mistakes. Enjoy your baking adventure!

Cherry Coconut Oat Bars Tasty and Healthy Snack

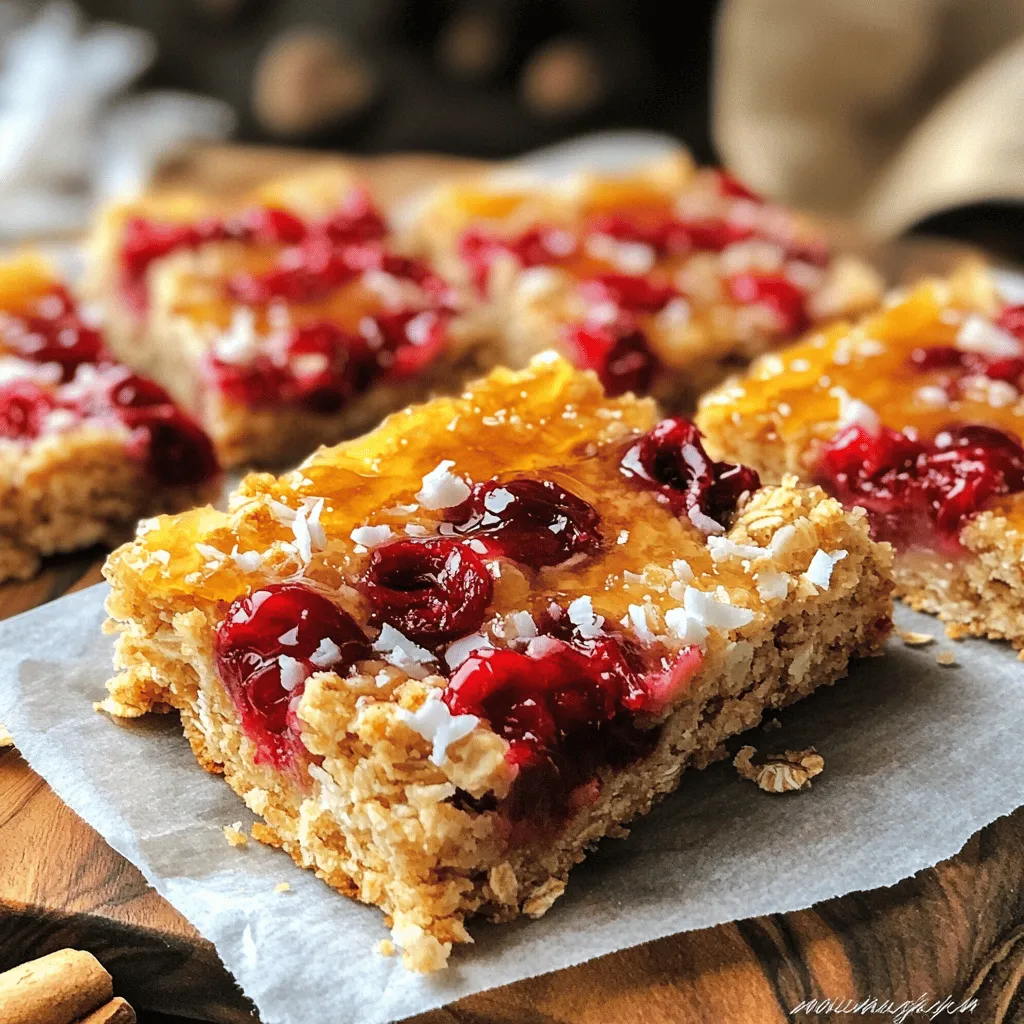
If you’re looking for a tasty and healthy snack, look no further! These Cherry Coconut Oat Bars are packed with

To make tasty Pickle Ranch Chicken Wraps, you need: - 2 cups cooked chicken breast, shredded - 1/2 cup dill pickles, finely chopped - 1/2 cup ranch dressing - 1 cup lettuce, chopped (romaine or iceberg) - 1/2 cup cherry tomatoes, halved - 1/2 red onion, thinly sliced - 4 large flour tortillas - 1/2 cup shredded cheddar cheese - Salt and pepper to taste These main ingredients bring a mix of flavors. The chicken is tender and healthy. The dill pickles add crunch and tang. Ranch dressing ties everything together with its creamy taste. You can add some extra ingredients to boost the flavor: - Fresh dill or parsley for garnish - Avocado slices for creaminess - Bacon bits for crunch and saltiness These optional ingredients can personalize your wraps. Fresh herbs add a pop of green and taste. Avocado makes the wrap rich and smooth. Bacon bits give a savory kick. For the best wraps, choose from these tortilla types: - Large flour tortillas - Whole wheat tortillas for added fiber - Spinach tortillas for a colorful twist Each type of tortilla has its own taste and texture. Flour tortillas are soft and easy to fold. Whole wheat adds a nutty flavor. Spinach tortillas look great and add nutrients. You can find the Full Recipe for these Pickle Ranch Chicken Wraps in the previous sections. First, I take a large bowl. I add 2 cups of cooked, shredded chicken. Next, I chop 1/2 cup of dill pickles into small pieces. I mix these with the chicken. Then, I pour in 1/2 cup of ranch dressing. I stir it well. I want the chicken and pickles to be evenly coated. After that, I add 1 cup of chopped lettuce, 1/2 cup of halved cherry tomatoes, and 1/2 of a thinly sliced red onion. I fold these into the mixture gently. It should stay crunchy, not mushy. Finally, I season with a little salt and pepper for taste. I lay out 4 large flour tortillas on my clean counter. I divide the chicken mixture evenly among the tortillas. I place the filling right in the center. Next, I sprinkle 1/2 cup of shredded cheddar cheese over the chicken. This adds great flavor. To wrap, I fold the sides of the tortilla inward. Then, I roll the bottom of the tortilla up tightly. This keeps the filling secure. I repeat this step for all the tortillas. For the best wrap, make sure to fill the tortillas just right. If you overload them, they may burst. Keep the filling centered. When folding, be firm but not rough. This helps keep everything inside. After rolling, make sure the ends are tucked in well. For a nice touch, cut the wraps in half at an angle. This makes them look great on a plate. If you like, add fresh dill or parsley on top. This gives a pop of color and flavor. Enjoy these wraps with extra ranch dressing on the side for dipping. To boost the flavor of your Pickle Ranch Chicken Wraps, use salt and pepper wisely. Start with a small amount. Taste the mixture and adjust as needed. For extra zing, add garlic powder or onion powder. These spices blend well with ranch dressing. If you like heat, consider a pinch of cayenne pepper or some hot sauce. This can make your wraps more exciting. Fresh ingredients are key to great taste. Choose crisp lettuce and ripe cherry tomatoes. Look for pickles that are crunchy and flavorful. When using chicken, ensure it is freshly cooked or properly stored. Shred it just before mixing for the best texture. Keep your tortillas in a sealed bag to avoid drying out. Fresh ingredients make your wraps look and taste better. How you serve your wraps can impress your guests. Slice each wrap in half at an angle. This shows off the colorful filling inside. Arrange them neatly on a platter. For a fun touch, add a small bowl of ranch dressing for dipping. Place some whole pickles on the side for color. You can sprinkle fresh dill or parsley on top for a pop of green. A great presentation makes every meal feel special. {{image_4}} To make your wraps spicy, simply add jalapeños. You can use fresh slices or pickled ones. Mix them into the chicken and pickle blend. This adds a nice heat that balances with the ranch dressing. If you want more kick, try adding hot sauce to the ranch. This twist gives your wraps a fun, zesty flavor. If you prefer a vegetarian wrap, swap chicken for chickpeas. Use one can of chickpeas, rinsed and mashed. Combine them with pickles, ranch, and veggies. You can also add avocado for creaminess. This version keeps the flavors intact while being meat-free. It’s equally tasty and packed with protein. For gluten-free wraps, use corn tortillas instead of flour. They hold up well and taste great. If you need a dairy-free option, choose a vegan ranch. There are many brands available that fit this need. You can also skip the cheese or replace it with a dairy-free alternative. These small swaps let everyone enjoy this meal without worry. To store leftover wraps, place them in an airtight container. This keeps them fresh. You can also wrap them in plastic wrap. Make sure to seal them tightly. Store the wraps in the fridge for up to three days. If you plan to eat them later, you can add a piece of parchment paper to prevent sticking. For meal prep, freeze the wraps before adding toppings. Wrap each one in plastic wrap. Then, place them in a freezer-safe bag. This helps keep them fresh longer. You can freeze them for up to three months. When you want to eat them, just thaw them in the fridge overnight. To reheat wraps, use the microwave or oven. If using a microwave, place the wrap on a plate. Cover it with a damp paper towel to keep it moist. Heat for about 30 seconds, checking for warmth. If using an oven, wrap the wraps in foil. Heat at 350°F (175°C) for about 10-15 minutes. Always check the center to ensure it's hot. Enjoy your delicious Pickle Ranch Chicken Wraps! For the Full Recipe, check earlier in the article. The best way to cook chicken for these wraps is to use cooked chicken breast. You can grill, bake, or boil the chicken. If you have leftover chicken, that works great too. Make sure the chicken is shredded into small pieces. This helps it mix well with other ingredients. Yes, you can make these wraps ahead of time. Prepare the chicken mixture and store it in the fridge. Just wrap the tortillas when you are ready to eat. This keeps the tortillas fresh and prevents them from getting soggy. These wraps pair well with many sides. You can serve them with carrot sticks, chips, or a simple salad. A bowl of extra ranch dressing is great for dipping too. Fresh fruit can add a nice touch as well. These wraps stay fresh for about two days in the fridge. Make sure to wrap them tightly in plastic wrap or foil. If you keep the chicken mixture separate, it can last a bit longer. You can find the Full Recipe in the main article. It lists all the steps and ingredients you need to make these delicious wraps. In this post, we explored how to make delicious Pickle Ranch Chicken Wraps. We covered the main ingredients, the optional ones for added taste, and the tortilla types to use. I shared step-by-step instructions and useful tips for the best wraps. You can also try variations and learn how to store leftovers safely. These wraps are easy and fun to make. Enjoy experimenting with flavors and finding your favorite twist. Great wraps await you!

Pickle Ranch Chicken Wraps Flavorful Easy Meal Recipe

Looking for an easy, flavorful meal? You’ve found it! My Pickle Ranch Chicken Wraps quick recipe packs a punch with

To make Cherry Chocolate Fudge Bites, you need a few simple ingredients. Each one adds a unique taste and texture to the fudge. Here’s what you’ll need: - 1 cup dark chocolate chips - 1/2 cup sweetened condensed milk - 1/4 teaspoon vanilla extract - 1/2 cup dried cherries, finely chopped - 1/4 cup walnuts, chopped (optional) - 1/4 teaspoon sea salt - Extra cocoa powder or shredded coconut for dusting The dark chocolate chips bring rich flavors. Sweetened condensed milk gives the fudge a creamy base. Vanilla extract adds warmth and depth. Dried cherries provide a sweet and tangy burst. Walnuts add crunch, but they are optional. Sea salt enhances the overall taste. Finally, the cocoa powder or shredded coconut gives a lovely finish. Using quality ingredients makes a big difference. When you pick fresh cherries and good chocolate, your fudge will shine. This recipe is simple, yet it creates a treat that impresses. You can find the full recipe in the main article. Start by taking a small square baking dish, about 8x8 inches. Line it with parchment paper. This step makes it easy to lift out the fudge once it's set. Make sure the paper covers the bottom and sides well. In a medium saucepan, add the dark chocolate chips and sweetened condensed milk. Place the saucepan on low heat. Stir the mixture slowly. Keep stirring until the chocolate is completely melted. This usually takes about 5 to 7 minutes. The goal is a smooth and glossy mixture. Once the chocolate is melted, take the saucepan off the heat. Add the vanilla extract to the chocolate. Next, mix in the finely chopped dried cherries. If you like, you can also add walnuts at this stage. Stir everything together until it's well combined. Now, pour the chocolate mixture into the prepared baking dish. Use a spatula to spread it evenly. Make sure the mixture reaches all corners of the dish. This ensures each bite is full of flavor. Lightly sprinkle sea salt over the top of the fudge. Take the back of the spatula and gently press the salt into the fudge. This step enhances the flavor and adds a nice touch. Let the fudge cool at room temperature for about 30 minutes. After that, place the dish in the refrigerator. Chill it for at least 2 hours or until it’s firm. Once set, lift the fudge out using the edges of the parchment paper. Place it on a cutting board and cut it into bite-sized squares. For a special touch, dust the fudge bites with cocoa powder or shredded coconut before serving. This recipe is a delightful treat that you can share with family and friends. For the complete recipe, check the Full Recipe. To get a smooth chocolate mixture, keep the heat low. High heat can cause the chocolate to seize. Stir the chocolate and sweetened condensed milk well. This helps the ingredients blend nicely. Stir continuously until the mixture is glossy. If it feels grainy, you may need to melt it a bit longer. Let your fudge cool at room temperature first. This step takes about 30 minutes. After that, move it to the fridge. Chill the fudge for at least 2 hours. This helps it set firm. If you want faster results, you can use the freezer. Just check it every 15 minutes to avoid freezing. For a lovely finish, dust the fudge with cocoa powder or shredded coconut. This adds a nice touch. You can cut the fudge into fun shapes too. Use cookie cutters for stars or hearts. Place the bites on a pretty plate to impress your guests. For a pop of color, add fresh cherries on top. These simple tricks make your dessert even more special. For the complete recipe, check out the Full Recipe section. {{image_4}} You can add nuts to your fudge for a crunchy twist. Chopped walnuts pair well with the smooth chocolate. Simply mix in 1/4 cup of walnuts when blending the chocolate and cherries. You can also try pecans or almonds for different flavors. Nuts not only add texture but also boost the nutrition of your treats. Want to mix it up? You can add caramel or peppermint to your fudge. For caramel, swirl in a few tablespoons after melting the chocolate. This creates a sweet layer that contrasts with the chocolate. For peppermint, add a few drops of peppermint extract to the chocolate. This gives a fresh, minty flavor that’s perfect for the holidays. To make this recipe vegan, swap the sweetened condensed milk for a plant-based version. You can use coconut cream or almond milk mixed with a thickener, like cornstarch. Also, choose dairy-free chocolate chips to keep it vegan. These simple swaps let everyone enjoy these tasty bites without dairy. For the full recipe, check out the Cherry Chocolate Fudge Bites section. Store your Cherry Chocolate Fudge Bites in an airtight container. This keeps them fresh and tasty. You can layer them with parchment paper to avoid sticking. Make sure the container is clean and dry before adding the fudge. This helps prevent moisture that can ruin your treats. Refrigeration is great for short-term storage. Place the fudge in the fridge if you plan to eat it within a week. For longer storage, freezing is your best bet. Wrap the fudge tightly in plastic wrap, then place it in a freezer-safe bag. This way, it stays fresh for months. When stored properly, Cherry Chocolate Fudge Bites last about a week in the fridge. If frozen, they can last up to three months. Just remember to thaw them in the fridge before enjoying again. This keeps the texture nice and smooth. For the best taste, eat them within a month of freezing. For the full recipe, check the details above. To make Cherry Chocolate Fudge Bites, follow these steps: 1. Line an 8x8 inch baking dish with parchment paper. 2. In a saucepan, melt 1 cup of dark chocolate chips with 1/2 cup of sweetened condensed milk over low heat. Stir until smooth. 3. Remove from heat and mix in 1/4 teaspoon of vanilla extract, 1/2 cup of finely chopped dried cherries, and optional 1/4 cup of chopped walnuts. 4. Pour the mixture into the baking dish, spreading it evenly. 5. Sprinkle with 1/4 teaspoon of sea salt and press it in gently. 6. Cool at room temperature for 30 minutes, then chill in the fridge for at least 2 hours. 7. Once set, lift the fudge out and cut it into bite-sized pieces. For the full recipe, check the section above. Yes, you can use milk chocolate instead of dark chocolate. Milk chocolate gives a sweeter and creamier taste. It will change the flavor slightly, but it will still be delicious. Just make sure to adjust the sweetness of the recipe if needed. You can find ready-made Cherry Chocolate Fudge Bites at specialty chocolate shops or gourmet stores. Some bakeries might also sell them. Always check local shops or online stores. They often have unique treats and flavors too. Yes, you can freeze Cherry Chocolate Fudge Bites. First, let them cool completely. Then, place them in an airtight container or wrap them tightly in plastic wrap. They can last up to three months in the freezer. When you're ready to enjoy them, simply thaw them in the fridge or at room temperature. In this blog post, we explored how to make Cherry Chocolate Fudge Bites. We covered the key ingredients, step-by-step instructions, and helpful tips. You learned about various flavors and textures, along with storage ideas to keep your treats fresh. Cherry Chocolate Fudge Bites are tasty and fun to make. Try different add-ins to customize your fudge. Enjoy sharing these treats with friends and family; they will love them!

Cherry Chocolate Fudge Bites Irresistible Dessert Treat

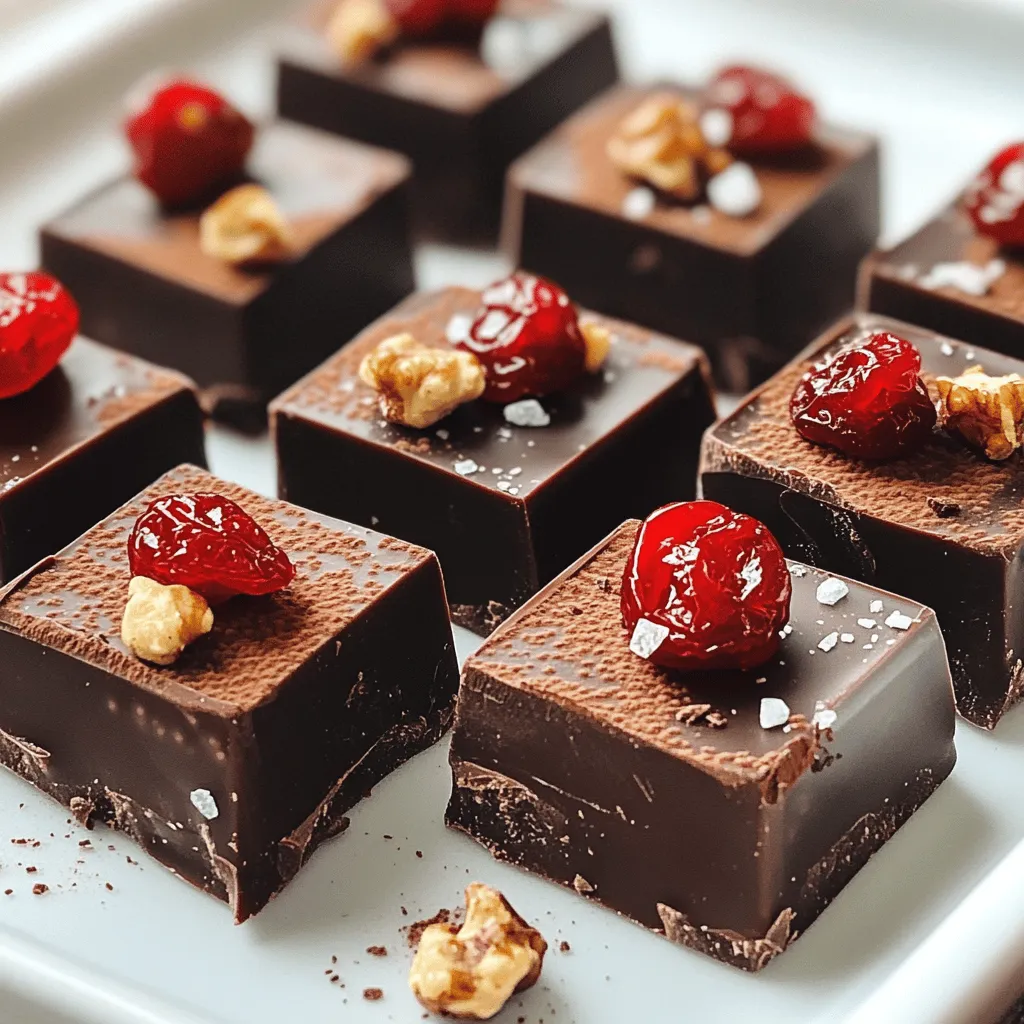
Are you ready to indulge in a sweet treat that combines rich chocolate with juicy cherries? My Cherry Chocolate Fudge

Older posts
Newer posts
← Previous Page1 … Page21 Page22 Page23 … Page75 Next →

dsad

© 2025 tastymomrecipes • Built with GeneratePress

Our Policies

  • Copyright Policy
  • Cookie Policy
  • GDPR Policy
  • Privacy Policy
  • Disclaimer
  • Terms Of Use

More Information

  • Home
  • About
  • Contact
  • Appetizers
  • Dessert
  • Dinner
  • Drinks
©2025, tastymomrecipes About Back To Top