Skip to content
DisclaimerTerms Of UseGDPR PolicyCookie Policy

tastymomrecipes

  • Home
  • Drinks
  • Appetizers
  • Dinner
  • Dessert
  • About
  • Contact
  • Privacy Policy
DisclaimerTerms Of UseGDPR PolicyCookie Policy

Olivia

- 1 lb (450g) chicken breast, cut into thin strips - 2 tablespoons honey - 3 cloves garlic, finely minced - 1 inch fresh ginger, grated The chicken breast is the star of this dish. It cooks quickly and absorbs flavors well. Honey adds sweetness, while garlic and ginger give a warm and spicy touch. This combination creates a tasty base for our stir fry. - 1 bell pepper (choose red or yellow), sliced into thin strips - 1 cup broccoli florets, fresh or frozen - 1 medium carrot, julienned or cut into thin matchsticks Adding colorful veggies makes your dish vibrant and healthy. Bell pepper brings crunch and sweetness. Broccoli adds texture and nutrients, while carrots provide a lovely color and flavor. These vegetables cook fast, keeping their freshness. - 3 tablespoons low-sodium soy sauce - 2 tablespoons vegetable oil (divided) - 1 tablespoon sesame seeds (optional, for garnish) Soy sauce gives that umami taste we all love. Oil helps cook the chicken and veggies evenly. Sesame seeds add a nutty crunch on top, making the dish look fancy. You can find the full recipe in the section above for all the details. To start, mix the honey, low-sodium soy sauce, garlic, and ginger in a bowl. Stir well until smooth. This sauce brings all the flavors together. Set it aside for later. Next, heat 1 tablespoon of vegetable oil in a large skillet over medium-high heat. Once hot, add the sliced chicken. Season it with salt and pepper. Cook the chicken for about 5-7 minutes until it turns golden brown and is fully cooked. Remove it from the skillet and place it on a plate. In the same skillet, pour in the remaining tablespoon of vegetable oil. Add the sliced bell pepper, broccoli, and carrot. Stir-fry these veggies for 3-4 minutes. You want them to be tender but still crisp. This keeps the dish fresh and bright. Now, return the cooked chicken to the skillet. Pour the honey garlic sauce over everything. Toss well to coat all the ingredients evenly. Cook for another 2-3 minutes. This allows the sauce to thicken and flavors to meld. Remove the skillet from heat. If you like, sprinkle some sesame seeds on top for crunch. Serve this stir fry over fluffy jasmine rice. Enjoy your delicious creation! For the complete recipe, check out the [Full Recipe]. When picking chicken, freshness is key. Look for bright pink meat. The skin should be smooth and moist, with no dark spots. I recommend using chicken breast for this dish. It cooks fast and stays tender. Avoid frozen chicken if possible. Fresh chicken gives the best flavor and texture. The sauce is the heart of this dish. Honey adds sweetness, while soy sauce gives a salty kick. If you like it sweeter, add more honey. For a saltier taste, increase the soy sauce. Taste before cooking to find your perfect mix. You can also add more garlic or ginger for extra flavor. Stir-frying is quick and easy. Heat your pan well before adding oil. This prevents sticking and helps cook the chicken evenly. Keep the chicken in a single layer for best results. Stir often to ensure even cooking. Add vegetables in batches if your pan is crowded. This keeps them crispy and colorful. Enjoy your meal right after cooking for the best taste! {{image_4}} You can change the vegetables in this stir fry based on the season. Try using snap peas, carrots, or bok choy. Fresh zucchini or mushrooms also work well. Each vegetable adds a unique taste and texture. For a colorful plate, mix and match your favorites. You can even use frozen vegetables if fresh ones are not available. This keeps the meal easy and quick. If you want a different protein, try tofu, shrimp, or beef. For tofu, use firm or extra-firm and cut it into cubes. Marinate it in the honey garlic sauce for extra flavor. Shrimp cooks fast and adds a nice twist. For beef, choose flank steak, cut into thin strips. Each protein brings a different taste and keeps the meal exciting. If you enjoy a kick, add chili flakes or fresh chili peppers. You can also try adding ginger or garlic powder for more depth. A dash of sesame oil can enhance the flavor too. If you like more heat, consider sriracha or a spicy sauce. This gives the dish a delightful twist and makes it your own. To store leftovers, let the honey garlic chicken cool first. Then, place it in an airtight container. Make sure to cover the chicken and veggies well. This keeps the dish fresh and tasty. You can store it in the fridge for up to three days. When you're ready to eat, just reheat it on the stove or in the microwave. If you want to save this dish for later, freezing works well. To freeze, let the stir fry cool completely. Transfer it to a freezer-safe container or bag. Remove as much air as possible. This helps prevent freezer burn. You can freeze the honey garlic chicken for up to three months. To reheat, thaw it in the fridge overnight and warm it on the stove. Add a splash of water or broth to keep it moist. Honey garlic chicken stir fry stays good for about three days in the fridge. If frozen, it can last up to three months. Always check for any off smells or changes in texture before eating. Enjoy your leftovers safely! Yes, you can make this dish ahead of time. Cook the chicken and veggies, then store them in an airtight container. You can also prepare the sauce in advance. When you want to eat, just reheat everything in a skillet. Add a splash of water if it seems dry. Heat until hot, and enjoy your meal! This stir fry goes well with many sides. Here are a few ideas: - Steamed jasmine rice - Fried rice with peas and carrots - Noodles tossed with sesame oil - A fresh cucumber salad - Simple stir-fried greens, like bok choy These sides complement the flavors of the honey garlic chicken well. Yes, you can easily make this sauce gluten-free. Instead of soy sauce, use tamari or coconut aminos. Both options taste great and keep the dish delicious. Just follow the same steps in the recipe to mix it in. Enjoy your meal without worry! For the full recipe, check out the detailed instructions above. The Honey Garlic Chicken Stir Fry combines simple ingredients for a delicious meal. You learned about the main ingredients like chicken, honey, and garlic. We covered cooking techniques to keep your veggies crisp and tips to enhance flavor. You can explore variations with different veggies or proteins for a unique twist. Finally, proper storage can keep your leftovers fresh. Enjoy making this dish your own, knowing it will taste great every time.

Honey Garlic Chicken Stir Fry Flavorful Weeknight Meal

Are you ready for a quick and tasty weeknight dinner? Honey Garlic Chicken Stir Fry is the answer. With sweet

For this easy summer dish, gather these simple ingredients: - 8 oz. whole wheat or gluten-free pasta (fusilli or bowtie shapes work best) - 2 cups fresh baby spinach, thoroughly rinsed and gently dried - 2 cups fresh strawberries, hulled and sliced into thin rounds - 1/2 cup crumbled feta cheese, preferably from a block for better texture - 1/4 cup sliced almonds, toasted until golden for enhanced flavor - 1/4 cup red onion, finely sliced for a mild sharpness - 1/4 cup extra-virgin olive oil for a rich dressing - 2 tablespoons balsamic vinegar for a tangy sweetness - 1 tablespoon honey or maple syrup for a vegan option - Salt and freshly cracked black pepper to taste You can swap ingredients based on your taste or dietary needs. Here are some ideas: - Use quinoa or chickpea pasta instead of regular pasta for added protein. - Swap feta cheese for goat cheese or omit it for a dairy-free option. - Replace almonds with walnuts or pecans if you prefer a different nut flavor. - Try spinach with kale or mixed greens to change the greens in the salad. - Substitute honey with agave syrup for a vegan-friendly sweetener. Understanding the nutrition can help you make informed choices. Here’s a breakdown: - Whole wheat pasta: High in fiber, offers energy and keeps you full. - Baby spinach: Low in calories, rich in vitamins A and C, and iron. - Strawberries: Packed with antioxidants and vitamin C, good for skin health. - Feta cheese: Provides calcium and protein but is higher in sodium. - Sliced almonds: Healthy fats and protein, great for heart health. - Red onion: Contains quercetin, which has anti-inflammatory effects. - Extra-virgin olive oil: Full of healthy fats and supports heart health. - Balsamic vinegar: Low in calories, adds flavor without extra fat. - Honey or maple syrup: Natural sweeteners that offer some nutrients. - Salt and pepper: Used to enhance flavor, but use in moderation. This information helps you know what’s in your food. For the complete recipe, check the Full Recipe section. To make this salad, follow these easy steps. First, gather all your ingredients. Make sure everything is fresh and ready before you start cooking. This helps keep the process smooth and fun! Start by filling a large pot with water. Add a big pinch of salt for flavor. Bring the water to a rolling boil. Once it boils, add the pasta. I recommend using whole wheat or gluten-free fusilli or bowtie shapes. Cook the pasta as per the package instructions until it is al dente. When it's done, drain the pasta. Rinse it with cold water to stop the cooking. Let it drain well before mixing it into the salad. For the dressing, grab a small mixing bowl. Combine extra-virgin olive oil, balsamic vinegar, honey, salt, and pepper. Use a whisk to mix everything well. This makes the dressing smooth and creamy. Taste it and adjust the salt or honey if you like. This dressing adds a delightful tang to your salad. Check out the [Full Recipe] for exact measurements and more details! Start with the pasta. Make sure it is cool before adding the other items. This keeps the spinach fresh. Add the spinach next. It will wilt if you mix it in too early. Next, gently toss in the strawberries, feta, and almonds. Use a big spoon or tongs to mix. This helps keep the strawberries and feta intact. Finally, drizzle the dressing over the top. Toss again until everything is coated. For a stunning look, use a big white platter. This makes the colors pop. Arrange the salad in the center, leaving space around the edges. Add extra strawberries and feta on top for style. Whole spinach leaves can add a fresh touch. You can also serve salad in clear bowls. This way, everyone can see the vibrant mix of colors. To avoid a soggy salad, use fresh ingredients. Wait to dress the salad until just before serving. If you have leftovers, store the dressing separately. This keeps everything crisp. You can also add the spinach last. It will stay fresher longer this way. Lastly, try not to overmix. Gentle tossing helps keep the salad intact. {{image_4}} You can easily add protein to your salad. Chicken, shrimp, or tofu can boost flavor and nutrition. For chicken, use grilled or shredded pieces. Shrimp can be sautéed with garlic for extra taste. Tofu should be firm and cubed. Marinate it with soy sauce for a savory touch. Mix your chosen protein into the salad after tossing the pasta and veggies. This change makes the dish hearty and filling. If you want a vegan dressing, switch honey for maple syrup. This keeps the sweetness but aligns with plant-based diets. You can also add more herbs, like basil or cilantro, to enhance the flavor. These additions bring freshness and aroma to the dressing. Simply mix them into the olive oil and vinegar blend. This small tweak keeps the salad vibrant and satisfying without losing taste. You can swap ingredients based on the season to keep it fun. In spring, try adding peas or fresh herbs like dill. In summer, consider ripe peaches or blueberries instead of strawberries. In fall, roasted butternut squash can add sweetness. In winter, try using pomegranate seeds for a burst of color and flavor. These swaps can create a new experience each time you make the salad. It keeps your meals exciting and full of joy. To keep your salad fresh, store it in an airtight container. This helps prevent the salad from wilting. Make sure to separate the dressing if possible. This keeps the spinach and pasta from getting soggy. Use a container that fits snugly to minimize air exposure. You don’t need to reheat this salad, as it tastes best cold. If you want to refresh it, simply add a bit more dressing. Toss the salad gently to mix the new dressing, and serve right away. You can also add fresh strawberries or spinach to liven it up. The salad stays fresh in the fridge for about 3 days. The pasta and spinach may lose their crunch over time. Strawberries can become mushy as they sit. To enjoy the best flavor and texture, eat the salad within the first two days. For more detailed instructions, refer to the Full Recipe. Yes, you can make this salad ahead of time. I recommend preparing it a few hours before serving. This way, the flavors blend together nicely. However, add the dressing just before serving. This keeps the greens fresh and crisp. I suggest using whole wheat or gluten-free pasta. Fusilli or bowtie shapes work best. Their curves hold the dressing and flavors well. They add a fun texture to the salad too. Absolutely! This salad is great for meal prep. It stores well in the fridge and stays tasty for a few days. Just remember to keep the dressing separate until you're ready to eat. This helps maintain the salad's crunch. If you want a change, try using lemon juice or apple cider vinegar. Both add a nice tang. You can also use a creamy dressing like ranch or poppy seed if you prefer. Just make sure it complements the salad's flavors. You can find the full recipe for Strawberry Spinach Pasta Salad in the main article. It includes detailed steps and tips to create this refreshing dish. Enjoy making it! This post detailed how to make a tasty Strawberry Spinach Pasta Salad. We covered ingredients, step-by-step cooking, and helpful tips. You learned about substitutions, storage, and variations to keep it fresh. Remember, salad is flexible. Feel free to mix and match ingredients to your taste. Enjoy your salad, and share it with friends for a delightful meal. Happy cooking!

Strawberry Spinach Pasta Salad Easy Summer Delight

Looking for a refreshing dish that screams summer? I have just the recipe for you: Strawberry Spinach Pasta Salad! This

For a classic Caprese salad, you need three main fresh ingredients: - Ripe tomatoes - Fresh mozzarella cheese - Fresh basil leaves Ripe tomatoes are best for this dish. They should be juicy and flavorful. Choose tomatoes that are firm yet slightly soft to the touch. Fresh mozzarella cheese adds creaminess and a mild taste. Look for mozzarella that is soft and moist. Fresh basil leaves bring a bright flavor and aroma. They should be vibrant green and not wilted. To enhance the salad, use these additional seasonings: - Extra-virgin olive oil - Balsamic glaze - Salt and pepper Extra-virgin olive oil adds richness. It also helps blend the flavors. Balsamic glaze gives a sweet and tangy kick. Use a good quality glaze for the best taste. Salt and pepper are key for balance. A sprinkle of each brings out the natural flavors of the ingredients. You can add these optional ingredients for a twist: - Avocado - Pesto - Cucumber Avocado brings creaminess and healthy fats. Pesto adds a herby depth and extra flavor. Cucumber adds a refreshing crunch. Feel free to mix and match these options based on your taste. For the full recipe, check out the section above. To make a classic Caprese salad, you need to start with a large, flat platter. Arrange the sliced tomatoes in a circle. Each slice should sit close but not touch. Next, add the sliced mozzarella cheese on top of the tomatoes. Alternate the slices slightly for a nice look. Now, it’s time to add the fresh basil leaves. Tuck them between the layers of tomatoes and mozzarella. This step adds great aroma and flavor. Once you have your layers ready, it’s time for the olive oil. Take three tablespoons of extra-virgin olive oil and drizzle it evenly over the entire salad. This enhances all the flavors. Next, swirl two tablespoons of balsamic glaze on top. This gives a sweet and tangy touch. Finally, sprinkle salt and freshly cracked black pepper over the salad. This is key to bringing out the best taste. For the best serving experience, let the salad sit for about five minutes. This allows the flavors to blend. Serve the Caprese on a large white platter. The colors pop against the white background. For a nice touch, add a few whole basil leaves on top. If you want to pair this salad, consider serving it with crusty bread or a light white wine. This can enhance the meal and make it even more enjoyable. For the full recipe, check out the details above. Choosing ripe tomatoes Pick tomatoes that are bright and firm. They should feel heavy for their size. Look for tomatoes with smooth skin and a rich color. A good tomato will smell sweet and earthy. Avoid any with bruises or dark spots. Ripe tomatoes make the salad shine. Picking mozzarella quality Always choose fresh mozzarella. Look for cheese packed in water or whey. It should feel soft and creamy. Avoid pre-shredded cheese; it lacks flavor. Fresh mozzarella brings a wonderful texture. It melts in your mouth and pairs perfectly with tomatoes. Platter suggestions Use a large, white platter for serving. The white color makes the salad pop. Arrange the tomatoes and cheese in a circle. This creates a beautiful display. You can also stack them in layers for a fun look. Make sure to leave space for basil. Garnishing techniques Garnish with whole basil leaves on top. This adds color and fragrance. Drizzle a little extra olive oil around the edges. It gives a nice shine to the dish. You can also sprinkle some salt on the top for a finishing touch. Additional herbs Basil is classic, but you can try others too. Fresh oregano can add a new twist. Chopped parsley gives a fresh taste. Experiment with flavors to keep it interesting. Just remember to balance them well. Infused olive oils Consider using flavored olive oils. Garlic or chili-infused oils can add depth. These oils enhance the dish without overpowering it. They also provide a unique twist to your classic Caprese salad. {{image_4}} Caprese salad is simple but so fun to change up. Here are some classic and seasonal ideas to try. Caprese Salad with Avocado Adding creamy avocado makes the salad richer. Slice ripe avocado and layer it with the tomato and mozzarella. The buttery taste pairs well with fresh basil and olive oil. Caprese Salad with Balsamic Reduction Drizzling balsamic reduction adds sweetness. To make this, simmer balsamic vinegar until it thickens. Then, drizzle it over the salad for a tangy twist. Summer Caprese with Peaches In summer, swap tomatoes for juicy peaches. The sweet flavor of peaches brightens the dish. Layer peach slices with mozzarella and basil for a fresh taste. Winter Caprese with Roasted Veggies For winter, use roasted veggies like bell peppers or zucchini. Roasting brings out their sweetness. Combine with mozzarella and fresh herbs for a cozy salad. Vegan mozzarella options If you want a dairy-free version, use vegan mozzarella. There are many brands that melt well. They keep the same creamy texture. Low-sodium seasonings For a healthier choice, use low-sodium salt or herbs. This way, you can enjoy the flavors without too much salt. By exploring these variations, you can enjoy the classic Caprese salad in new and exciting ways! Try the Full Recipe for the basic version, and then let your creativity shine! To keep your Caprese salad fresh, store it in the fridge. Use an airtight container. This helps maintain the flavors and textures. - Place leftovers in a container. - Cover it tightly to avoid air exposure. - Consume within two days for best taste. If you have leftover ingredients, store them separately. This way, the tomatoes and mozzarella stay fresh longer. Freezing Caprese salad isn't ideal. The tomatoes and mozzarella can become mushy. However, you can prep some ingredients for later use. - Slice and freeze tomatoes for sauces. - Mozzarella can be shredded and frozen. - Basil can be blended with oil and frozen in ice cube trays. This allows you to enjoy some flavors later. Just remember to use them in cooked dishes for best results. Fresh ingredients have different shelf lives. Here’s a quick guide: - Tomatoes: Last about 5 to 7 days at room temp, up to 2 weeks in the fridge. - Mozzarella: Keep it sealed; lasts about 5 days after opening. - Basil: Fresh leaves usually last about 1 week in the fridge. Watch for signs of spoilage. Tomatoes may become mushy or wrinkled. Mozzarella might smell sour or become slimy. Basil turns dark and wilts. For the full recipe, check back on our detailed steps to enjoy this vibrant dish! Caprese Salad comes from Italy. It hails from the island of Capri. This salad is simple yet full of flavor. It showcases fresh ingredients like tomatoes, mozzarella, and basil. The colors of the salad mirror the Italian flag. This dish has roots dating back to the early 20th century. Locals made it to celebrate summer's bounty. It quickly gained fame and is now loved worldwide. Yes, you can prepare Caprese Salad ahead of time. This makes it a great choice for gatherings. To do this, slice the tomatoes and mozzarella in advance. Keep them in separate containers to stay fresh. Add the basil leaves just before serving. If you want to make a dress, mix olive oil and balsamic glaze. Drizzle this on right before serving. This helps keep the salad looking vibrant and delicious. When it comes to mozzarella, freshness is key. Look for mozzarella labeled as "fresh" or "di bufala." This type is made from water buffalo milk and is creamier. The cheese should feel soft and moist. It should have a mild, milky flavor. Avoid mozzarella that is overly dry or rubbery. You want a cheese that will melt in your mouth when you take a bite. This enhances the experience of your Caprese Salad. For the full recipe, check out the previous sections. This blog post walks through making a delicious Caprese salad. You learned about fresh ingredients like ripe tomatoes and basil. We explored step-by-step instructions for assembling and serving the salad. Tips on selecting the best ingredients and enhancing flavors were shared too. In the end, enjoy the process of creating your Caprese salad. Feel free to try variations and make it your own. Fresh ingredients and simple steps lead to great taste every time. Enjoy and share your salad with loved ones!

Classic Caprese Salad Bold and Flavorful Delight

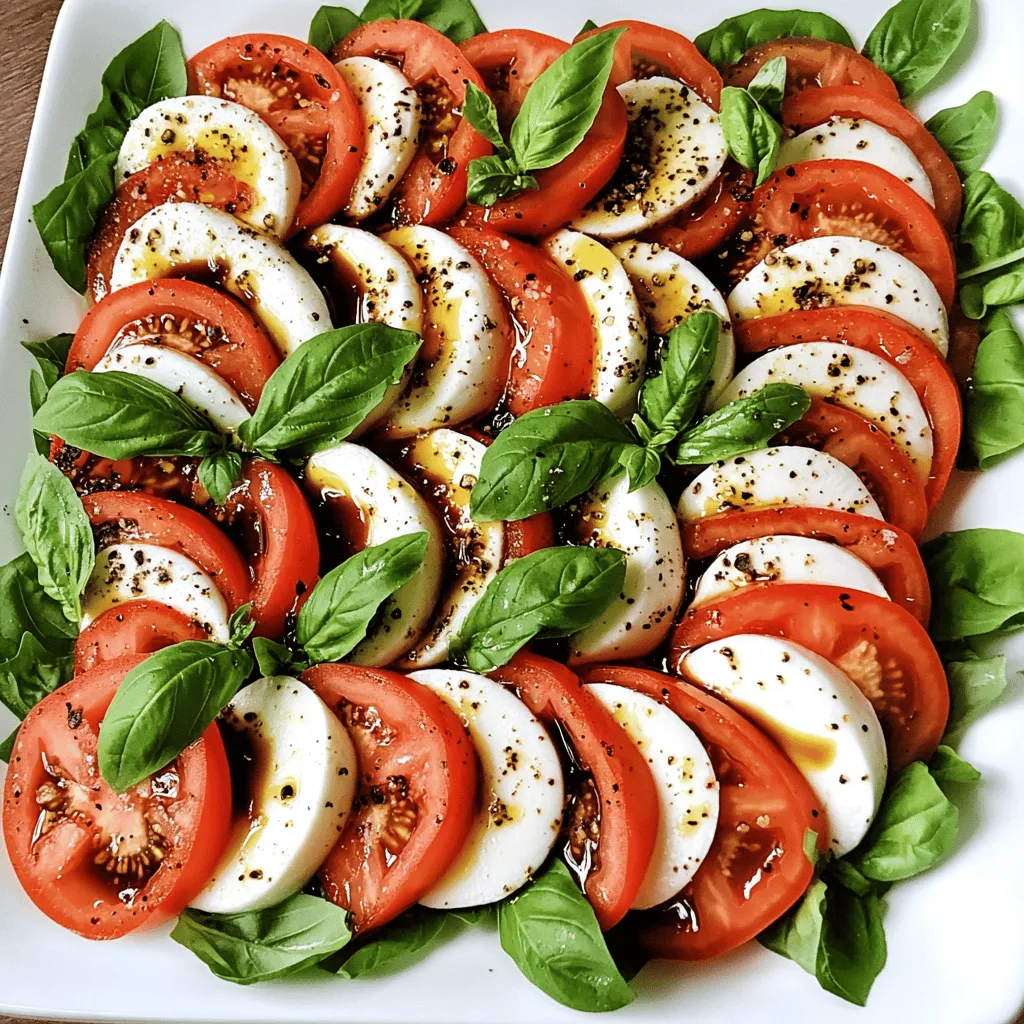
Are you ready to enjoy a burst of summer flavors with a Classic Caprese Salad? This vibrant dish features juicy

- 1 cup unsalted butter (2 sticks) - 1 cup semi-sweet chocolate chips - 1 cup granulated sugar - 1 cup packed brown sugar - 4 large eggs - 1 teaspoon pure vanilla extract - 1 cup all-purpose flour - 1/2 cup unsweetened cocoa powder - 1 teaspoon fine sea salt - 1 cup caramel sauce (store-bought or homemade) - Flaky sea salt for garnish Gathering your ingredients is the first step to making these fudgy salted caramel brownies. You want fresh items for the best taste. Butter and Chocolate: Using unsalted butter helps you control the salt. Semi-sweet chocolate chips give a rich flavor. Sugars: Granulated and brown sugars add sweetness and moisture. Brown sugar makes the brownies chewier. Eggs: They bind the ingredients. Four large eggs make the brownies rich and fudgy. Vanilla: Pure vanilla extract adds depth to the flavor. Dry Ingredients: The flour and cocoa powder create the brownie base. Sea salt balances the sweetness. Caramel Sauce: This is key for that gooey, sweet filling. You can use store-bought or make your own. Flaky Sea Salt: This garnish enhances the caramel flavor. It adds a tasty crunch on top. - Dark chocolate chips - Nuts (such as pecans or walnuts) - Peanut butter Adding dark chocolate chips gives a deep flavor. Nuts add crunch and texture. Peanut butter can bring a nutty twist. Feel free to mix and match these options! For the full recipe, check the section above. - Preheat to 350°F (175°C) - Grease and line a 9x13 inch baking pan Start by preheating your oven to 350°F (175°C). This step is key for even baking. While the oven heats, prepare your pan. Grease it lightly with butter or cooking spray. Then, line it with parchment paper. Leave some paper hanging over the edges. This makes it easier to lift the brownies out later. - Melt butter and chocolate together - Mix in sugars, eggs, and vanilla In a heavy saucepan, melt the unsalted butter with the semi-sweet chocolate chips over low heat. Stir continuously until smooth and melted. Remove it from the heat and let it cool for about 5 minutes. In a large bowl, mix the cooled chocolate mixture with granulated sugar and brown sugar. Stir until well blended. Add 4 large eggs, one at a time, mixing well after each. Finally, stir in 1 teaspoon of pure vanilla extract. - Whisk together flour, cocoa powder, and salt - Layering the batter and caramel in the pan In another bowl, whisk together 1 cup of all-purpose flour, 1/2 cup of cocoa powder, and 1 teaspoon of fine sea salt. Gradually add this dry mix to your wet ingredients. Stir gently until just combined. Be careful not to overmix. Pour half of the brownie batter into the prepared pan and spread it out evenly. Next, drizzle half of the caramel sauce over the batter. Pour the remaining brownie batter on top, smoothing it out. Drizzle the rest of the caramel sauce over the top and use a knife to swirl it gently. - Bake for 25-30 minutes and check doneness Place your pan in the preheated oven. Bake for 25-30 minutes. To check if they are done, insert a toothpick into the center. It should come out with some moist crumbs, not wet batter. Avoid overbaking. This ensures a fudgy texture. - Cool and sprinkle with flaky sea salt - Cut into squares for serving Once baked, remove the pan from the oven. Let the brownies cool in the pan on a wire rack for at least 20 minutes. Before cutting, sprinkle the top with flaky sea salt. This adds a nice contrast to the sweet caramel. Carefully lift the brownies out of the pan using the parchment paper. Cut into squares and enjoy this rich, fudgy treat! For the full recipe, check out the earlier section. To get that perfect fudgy texture, avoid overmixing the batter. Mix just until the flour is combined. A few lumps are fine. This keeps the brownies rich and gooey. Bake them for 25 to 30 minutes. Check with a toothpick; it should come out with moist crumbs, not wet batter. This small step makes a big difference! Want to change up the flavor? Adding a teaspoon of espresso powder gives the taste a nice boost. You can also swap ingredients based on your needs. For a gluten-free version, use almond flour instead of all-purpose flour. If you need it vegan, try flax eggs in place of regular eggs. These small changes can make your brownies shine! When serving, use a nice platter to show off your brownies. Cut them into neat squares for a clean look. You can also sprinkle some flaky sea salt on top for that fancy touch. For a creative garnish, try adding fresh berries or a drizzle of chocolate sauce. These little details make your brownies look as good as they taste! Do not forget to check the Full Recipe for more details on making these delightful treats! {{image_4}} You can change up the flavor of your fudgy salted caramel brownies in fun ways. One option is to make fudgy salted caramel peanut butter brownies. Just swirl in some creamy peanut butter with the caramel. It gives a rich, nutty taste that pairs well with chocolate. Another fun twist is to create a mint chocolate chip version. Add a few drops of peppermint extract to the batter. Then, mix in some mint chocolate chips before baking. This gives your brownies a fresh taste that is perfect for special occasions. If you have dietary needs, don't worry! You can still enjoy these brownies. For a gluten-free option, use almond flour instead of regular flour. It keeps the brownies moist and adds a nice flavor. If you prefer vegan brownies, you can use flax eggs instead of regular eggs. To make one flax egg, mix one tablespoon of ground flaxseed with three tablespoons of water. Let it sit for a few minutes until it thickens. This works great in the recipe! You can also switch up your brownies for the seasons. For fall, add some pumpkin puree to your batter. This gives your brownies a cozy, warm flavor that is great for chilly days. In summer, why not incorporate fresh berries? Blueberries or raspberries can add a burst of flavor and a pop of color. Simply fold them into the batter before baking, and enjoy a refreshing treat. For the full recipe, check out the details above! To keep your fudgy salted caramel brownies fresh, store them in an airtight container. This helps maintain their chewy texture. If you plan to eat them within a few days, room temperature is fine. For longer storage, you can refrigerate or freeze them. When refrigerating, make sure they are well-wrapped to avoid drying out. Freezing works well too! Just wrap them tightly in plastic wrap and then in foil. How long will brownies last at room temperature? They can stay fresh for about 3 to 4 days if stored properly. Signs that brownies are no longer fresh include a dry texture or a hard crust. If they smell off or have visible mold, it's best to toss them. The best methods for reheating brownies include using the microwave or the oven. For the microwave, heat for about 10 to 15 seconds. This gives a warm, gooey center. If using the oven, preheat to 350°F (175°C) and place brownies in for about 5 minutes. Enjoying brownies warmed with ice cream makes for a delicious treat. The cold ice cream pairs perfectly with the warm, fudgy brownie! Fudgy brownies have a rich and dense texture. The key ingredients that help create this texture are: - Butter: Using more butter adds fat, which helps keep brownies moist. - Chocolate: Melted chocolate contributes to a fudgier texture than cocoa powder alone. - Eggs: The right amount of eggs adds moisture and richness. - Less flour: Using less flour than in cake recipes keeps them dense. These ingredients work together to create that delicious, fudgy bite. Yes, you can use cocoa powder instead of melted chocolate. If you choose this route, follow these tips: - Use 1/3 cup of cocoa powder for every ounce of chocolate. - Add 2 tablespoons of fat (like oil or butter) to replace the chocolate's fat. - The result will be a slightly different flavor and texture but still tasty. The toothpick test is a great way to check if brownies are done. Here’s how to do it: - Insert a toothpick into the center of the brownies. - If it comes out with moist crumbs, they’re ready! - If it comes out with wet batter, they need more time. Be careful not to overbake, or you’ll lose that fudgy texture! Yes, you can prepare these brownies ahead of time. Here are some suggestions: - Baking: Make and bake them up to two days in advance. - Storing: Keep them in an airtight container at room temperature. - Freezing: You can freeze baked brownies for up to three months. Just wrap them well. This makes it easy for gatherings or special occasions! If you don’t have caramel sauce, you can use these alternatives: - Chocolate sauce: Adds a rich chocolate flavor. - Nut butter: Peanut or almond butter gives a creamy twist. - Fruit preserves: Raspberry or strawberry preserves can add sweetness and a fruity touch. Each option will change the flavor, but they can be just as delicious! For the complete deliciousness of the fudgy salted caramel brownies, check out the Full Recipe. In this post, we explored how to make rich, fudgy brownies with caramel. You learned about the key ingredients, step-by-step instructions, and helpful tips to enhance flavor and texture. Now, you can enjoy these brownies at any time by experimenting with various flavors and dietary needs. Whether you prefer classic or creative variations, these brownies are sure to please. Remember, quality ingredients and proper baking techniques are key for the best results. Happy baking!

Fudgy Salted Caramel Brownies Irresistible Recipe Guide

Get ready to fall in love with fudgy salted caramel brownies! This easy recipe combines rich chocolate, gooey caramel, and

- 1 medium head of cauliflower, cut into bite-sized florets - 8 small corn tortillas - 1 cup red cabbage, finely shredded - 1 tablespoon extra-virgin olive oil - Spices: smoked paprika, ground cumin, garlic powder, onion powder - Optional: vegan sour cream or plant-based yogurt for garnishing - 1 ripe avocado, sliced into thin pieces - 1/4 cup fresh cilantro, chopped - 1 lime, cut into wedges for serving Gathering the right ingredients is key to making these vegan cauliflower tacos. You want a medium head of cauliflower, which you’ll chop into bite-sized pieces. This will help it roast evenly. The corn tortillas are a must for a tasty base. Red cabbage adds a nice crunch and color. For seasoning, I recommend using extra-virgin olive oil. It helps the spices stick to the cauliflower. Spices like smoked paprika, ground cumin, garlic powder, and onion powder will bring out the flavors. If you want a creamy touch, vegan sour cream or plant-based yogurt works well on top. Don't forget the extras! Sliced avocado gives a creamy texture. Fresh cilantro brightens the dish. Lime wedges add a zesty kick that ties everything together. You can find the complete recipe for these tacos [Full Recipe]. - Preheat your oven to 425°F (220°C). This heat gives the cauliflower a nice crunch. - In a large bowl, toss the cauliflower with olive oil and spices. Use smoked paprika, ground cumin, garlic powder, and onion powder. Add salt and pepper to taste. Mix until the florets are well-coated. - Spread the seasoned cauliflower on a baking sheet. Make sure they are in a single layer for even roasting. - Roast the cauliflower for 25-30 minutes. Flip the florets halfway through to ensure they brown nicely. They should be tender and golden. - While the cauliflower roasts, warm the corn tortillas in a non-stick pan. Heat each side for about 30 seconds until soft. - Once the cauliflower is done, take it out of the oven. Fill each warm tortilla with roasted cauliflower, shredded cabbage, and avocado slices. - Top the tacos with fresh cilantro. Serve with lime wedges for an extra kick. For creaminess, drizzle with vegan sour cream or yogurt if you like. For the full recipe, check out the detailed instructions above. To make your cauliflower crispy, use high heat. Roasting at 425°F (220°C) helps it brown nicely. This gives you a crunchy texture that contrasts well with the soft fillings. Season the cauliflower generously. Use salt, pepper, and spices like smoked paprika and cumin. This adds flavor and makes each bite exciting. Warm your tortillas carefully. Heat them in a non-stick pan over medium heat. This method avoids tearing. Heat each side for about 30 seconds until soft. If you want softer tortillas, try wrapping them in a damp cloth and microwaving them for about 15 seconds. This adds moisture and makes them easier to fold. Garnish your tacos for extra flavor. Fresh cilantro, lime wedges, and avocado slices make great toppings. They add color and taste. For a beautiful presentation, serve your tacos on a rustic wooden platter. Add extra lime wedges and cilantro sprigs around the tacos. This makes your dish look appealing and ready to enjoy. For the full recipe, check out Zesty Vegan Cauliflower Tacos. {{image_4}} You can switch up the filling with other veggies. Try mushrooms, bell peppers, or zucchini. These add unique flavors and textures. Beans or lentils are great protein sources too. Black beans, pinto beans, or lentils work well. They boost nutrition and make the tacos hearty. Want some heat? Add jalapeños or drizzle hot sauce on top. This will spice things up! You can also experiment with different spices. Chili powder adds warmth, while oregano brings a fresh taste. Don't be afraid to mix and match spices to find your favorite blend. Taco bowls are a fun twist on classic tacos. Just layer roasted cauliflower, cabbage, and toppings in a bowl. This makes it easy to eat! For toppings, think beyond the basics. Try pickled onions, corn salsa, or fresh mango. These add pops of flavor and color to your meal. To keep your vegan cauliflower tacos fresh, use airtight containers. Glass or plastic containers both work well. Place the tacos in the fridge. You can safely store them for up to three days. After that, the flavors may fade, and the texture may change. When reheating roasted cauliflower, use the oven or a skillet. The oven helps keep the crispiness. Preheat the oven to 350°F (175°C) and warm for about 10 minutes. If you use a skillet, heat it over medium heat for a few minutes. To keep tortillas fresh, wrap them in foil while reheating. This step prevents them from drying out. You can prepare the ingredients ahead of time. Cut the cauliflower and store it in the fridge. You can also mix the spices in advance. This way, when you are ready to cook, everything is ready to go. For quick weekday meals, roast a big batch of cauliflower. Use it in tacos, salads, or grain bowls throughout the week. This method saves time and boosts your meals' flavor! Check out the Full Recipe for detailed instructions and cooking times. To make your tacos crispy, focus on roasting. Start by preheating your oven to 425°F (220°C). This high heat helps the cauliflower brown well. Toss the cauliflower with olive oil and spices. Use enough oil to coat each piece lightly. Spread the cauliflower in a single layer. Flipping halfway through roasting ensures even crispiness. Aim for 25-30 minutes of roasting time. You can use frozen cauliflower, but there are pros and cons. Frozen cauliflower is convenient and saves time. It is pre-cut and ready to use. However, it may release more water than fresh. This extra moisture can make the tacos soggy. If using frozen, make sure to thaw and drain it well. Vegan cauliflower tacos are packed with nutrients. Cauliflower is low in calories and high in fiber. It also contains vitamin C and antioxidants. Red cabbage adds more fiber and vitamins. Avocado brings healthy fats and potassium. Together, these ingredients create a balanced meal. To make vegan cauliflower tacos gluten-free, choose corn tortillas. They are naturally gluten-free and work well. Look for brands that clearly state they are gluten-free. You can also use lettuce leaves as a wrap. This option is low in carbs and fresh. Yes, you can freeze the roasted cauliflower. Allow it to cool completely before freezing. Use an airtight container or freezer bag to store it. It can last for up to three months. When ready to use, thaw it in the fridge overnight. Reheat it in the oven for best results. Serve your tacos with fresh sides for a complete meal. A simple green salad pairs well. You can also serve black beans for added protein. Consider guacamole or salsa for extra flavor. Lime wedges enhance the freshness of the dish. Check the Full Recipe for more ideas! In this post, we explored how to make vegan cauliflower tacos. We looked at key ingredients like cauliflower, tortillas, and seasonings. I shared step-by-step instructions, tips for perfecting your tacos, and variations to suit your taste. These tacos are easy, fun, and full of flavor. Enjoy making them for yourself or sharing with friends. You’ll find that they can fit any meal plan. Experiment and discover your favorite combinations. Happy cooking!

Vegan Cauliflower Tacos Flavorful and Healthy Meal

Are you ready to spice up your Taco Tuesday with a healthy twist? My Vegan Cauliflower Tacos are not just

- 1 cup coconut milk (canned or carton) - 1/4 cup chia seeds - 2 tablespoons honey or maple syrup - 1 ripe mango, diced - 1/4 teaspoon vanilla extract - Pinch of salt - Toasted coconut flakes for garnish - Fresh mint leaves for garnish (optional) What are the health benefits of chia seeds? Chia seeds are tiny but powerful. They are full of fiber, protein, and omega-3 fatty acids. These seeds help with digestion and can keep you feeling full. They also support heart health and can lower cholesterol. What are the advantages of coconut milk in recipes? Coconut milk adds a rich and creamy texture. It is dairy-free and works well for those with lactose intolerance. It is also high in healthy fats, giving you energy and helping to absorb vitamins. What are the differences between honey and maple syrup as sweeteners? Honey is sweeter and has a unique flavor. It has antioxidants and can boost your immune system. Maple syrup, on the other hand, has a lower glycemic index. It is less sweet but adds a nice depth of flavor. You can choose based on your taste preference or diet needs. For the full recipe, check out the entire guide on how to make Mango Coconut Chia Pudding. Start by gathering your ingredients. In a medium bowl, mix the coconut milk, honey or maple syrup, vanilla extract, and a pinch of salt. Use a whisk to blend these ingredients well. You want a smooth and creamy texture, so whisk until there are no lumps. This step is key for the pudding's overall consistency. Next, it’s time to add the chia seeds. Gradually sprinkle them into the coconut milk mixture while stirring continuously. This helps to avoid clumping. Use a gentle mixing motion to ensure even distribution. The seeds will soak up the liquid and thicken the pudding, giving it that lovely creamy texture. Once the chia seeds are mixed in, cover the bowl with plastic wrap or transfer the mixture to a mason jar. Place it in the refrigerator. Chill for at least 4 hours, but overnight is best. This time allows the chia seeds to expand and create a thick pudding. After chilling, check the consistency by stirring. If it’s too thick, add a splash of coconut milk. To serve, use clear glass bowls for a stunning look. Spoon the chia pudding into the bowls, then layer it with diced mango. You can alternate layers or simply top the pudding with mango. For a final touch, sprinkle toasted coconut flakes on top. If you like, add fresh mint leaves for color and freshness. This makes your dessert not just tasty but also pretty! For the full recipe, check out the complete guide. To avoid clumping of chia seeds, sprinkle them slowly into the coconut milk. Stir as you add them, which helps them spread out. This method keeps the seeds from sticking together. If you notice clumps, stir the pudding well after chilling. You want it smooth and creamy. To adjust the thickness of the pudding, change the chia seeds or coconut milk amount. More chia seeds make a thicker pudding, while more milk makes it thinner. Experiment a bit to find your favorite texture. You can add spices to give your pudding a unique twist. Try a pinch of cinnamon or nutmeg for warmth. These spices work well with mango and coconut. You can also mix in a little ginger for a spicy kick. For sweetness, taste your pudding after mixing. You might want it sweeter or less sweet. Adjust the honey or maple syrup to your liking. Start with less and add more until it tastes just right. Mango pairs beautifully with many fruits. Consider adding berries for color and flavor. Slices of kiwi also look great and add a tart taste. Pineapple is another tasty option, giving a tropical vibe. When it comes to drinks, coconut water or iced tea works well. These beverages keep the tropical theme alive. For a fun twist, try a light sparkling water with lime. It refreshes and cleanses the palate. For the full recipe, check the earlier section! {{image_4}} You can switch the coconut milk for almond or soy milk. Both options work well and add unique flavors. If you want to try different sweeteners, consider agave or stevia. These can make your pudding lighter or sweeter, based on your taste. For a tropical twist, add diced pineapple or passion fruit to your pudding. These fruits enhance the fresh taste and add a pop of color. If you love chocolate, mix in cocoa powder for a rich, creamy dessert. This change gives a fun new twist to the classic recipe. This recipe is vegan-friendly, thanks to the coconut milk and natural sweeteners. You can enjoy this treat without any animal products. Plus, it is gluten-free, making it safe for those with gluten sensitivities. These adjustments keep the pudding delicious and suitable for various diets. For the full recipe, check out the Mango Coconut Chia Pudding. Store your mango coconut chia pudding in the fridge. Use a sealed container to keep it fresh. It stays good for about 5 days in the fridge. Make sure to check for any changes in smell or texture before eating. If you notice anything off, it’s best to throw it away. You can freeze your pudding if you want to save some for later. Use an airtight container to avoid freezer burn. When you’re ready to eat, let it thaw in the fridge overnight. Expect some changes in texture after freezing. The pudding may become a bit grainy, but it will still taste great. Just stir it well before serving. For the full recipe, check out the earlier section. Mango Coconut Chia Pudding can last up to five days in the fridge. To keep it fresh, store it in a sealed container. Always check for any off smells or changes in texture before eating. Yes, you can make this pudding a day or two ahead. Chia pudding tastes better after sitting, as the flavors meld. Just remember to cover it well and keep it chilled in the fridge. Absolutely! Frozen mango works well in this recipe. Just thaw the mango before adding it to the pudding. This can help save time and still give you that sweet, fruity flavor. Serve the pudding in clear glass bowls to show off the beautiful layers. Top it with diced mango and toasted coconut flakes for a lovely look. You can also add fresh mint leaves for a touch of green. You can use regular milk, but it will change the flavor. Coconut milk gives a creamy, tropical taste. If you want a similar flavor, consider using almond milk or oat milk for a good match. This article covered how to make Mango Coconut Chia Pudding. We looked at ingredients, health benefits, and preparation steps. I shared tips for perfect texture and flavor, plus serving ideas and variations. You can customize it to fit your taste and diet. Remember, this pudding is easy and fun to make. So, get creative and enjoy your delicious treat. It's a great way to eat healthy while having fun in the kitchen.

Mango Coconut Chia Pudding Delightful Sweet Treat

Are you craving a sweet and healthy treat? Look no further! Mango Coconut Chia Pudding is simple to make and

To make a hearty chicken pot pie, you will need these fresh ingredients: - 2 cups cooked chicken, diced into bite-sized pieces - 1 cup frozen peas and carrots mix (thawed) - 1 cup potatoes, peeled and diced into small cubes - 1/2 cup onion, finely diced - 1/2 cup celery, finely diced - 1 cup low-sodium chicken broth - 1 cup whole milk - 1/3 cup unsalted butter - 1/3 cup all-purpose flour - 1 teaspoon garlic powder - 1 teaspoon dried thyme - Salt and freshly ground black pepper, to taste - 1 package (2 crusts) refrigerated pie crusts - 1 large egg, beaten (for egg wash) This classic dish is rich in protein and vitamins. One serving contains about: - Calories: 400 - Protein: 20g - Carbohydrates: 30g - Fat: 22g - Fiber: 2g It packs a comforting blend of flavors and nutrients. You can adjust this recipe based on what you have. Here are some options: - Swap cooked chicken for turkey or tofu for a lighter dish. - Use fresh vegetables if you prefer them over frozen. - For a dairy-free option, use almond milk and vegan butter. - If you want a gluten-free version, replace all-purpose flour with a gluten-free blend. Feel free to mix and match based on your taste! For the complete recipe, check out the Full Recipe link. Start by preheating your oven to 425°F (220°C). This step is key for a crispy crust. Next, melt unsalted butter in a large saucepan over medium heat. Once it bubbles, add finely diced onion and celery. Cook for about 3-4 minutes until they soften. Now, sprinkle in all-purpose flour, garlic powder, dried thyme, salt, and pepper. Stir this mix for one minute until it turns golden. Gradually pour in low-sodium chicken broth and whole milk. Stir constantly as it thickens into a creamy sauce. Let it simmer gently for a minute. Then, toss in diced cooked chicken, thawed peas and carrots, and diced potatoes. Mix everything well, then remove the pan from heat. Your filling is now ready, and it smells amazing! Roll out one pie crust and fit it into a 9-inch pie plate. Let the edges hang over the sides. Pour your hearty chicken filling into the crust, spreading it evenly. Unroll the second crust and place it on top. Crimp the edges with your fingers or a fork to seal it well. Don’t forget to cut several small slits in the top crust. This allows steam to escape while baking. To make it shine, brush the top crust with a beaten egg. This gives it a lovely golden color when baked. Place your pie in the preheated oven. Bake for 30-35 minutes or until the crust is golden brown and the filling bubbles. If the edges brown too fast, cover them with aluminum foil. After baking, remove the pie from the oven. Let it cool for about 10 minutes. This helps the filling set up nicely. Now, your classic chicken pot pie is ready to serve! For the full recipe and more tips, check the [Full Recipe]. A flaky, tender crust makes your pot pie shine. Here are some tips to make it great: - Use chilled ingredients. Cold butter helps create a flaky texture. - Don’t overwork the dough. Mix until just combined. - Roll it out on a floured surface. This keeps it from sticking. - Let the crust rest. This relaxes the gluten and prevents shrinkage. Avoiding some common pitfalls can lead to a better pie: - Skipping the egg wash. A simple egg wash gives it a beautiful shine. - Not venting the top crust. Small slits allow steam to escape and prevent sogginess. - Overfilling the pie. Too much filling can cause spills and a messy presentation. - Baking at the wrong temperature. Ensure your oven is preheated to 425°F (220°C) for even cooking. The filling should be creamy but not runny. Here’s how to get it just right: - Use a roux. This mixture of flour and butter thickens the sauce. - Gradually add broth and milk while stirring. This helps prevent lumps. - Cook until thickened. The mixture should coat the back of a spoon. - Adjust seasoning. Taste and add salt and pepper as needed. For the complete cooking method, check the Full Recipe. {{image_4}} You can make a great vegetarian version of chicken pot pie. Use a mix of hearty vegetables like mushrooms, carrots, and potatoes. Replace the chicken broth with vegetable broth for a rich flavor. You can also add plant-based protein. Tofu or chickpeas work well to give it a nice texture. This way, you keep the comforting feel, even without meat. Get creative with your pot pie by adding unique ingredients. Sauté mushrooms for an earthy taste. Fresh herbs like rosemary or dill can add a bright note. You can even toss in some spinach for a pop of color. Try using sweet potatoes instead of regular potatoes for a sweeter twist. Think about adding cheese for creaminess. A bit of cheddar or parmesan can elevate the dish. For a gluten-free option, swap out the regular pie crust. Use a gluten-free pie crust made from almond flour or rice flour. Check the labels on your broth and other ingredients to ensure they are gluten-free. You can also thicken the filling with cornstarch instead of flour. This way, you can enjoy a hearty meal without gluten. It’s just as tasty! To view the complete recipe, check out the Full Recipe link. After you enjoy your chicken pot pie, store leftovers right away. Let the pie cool at room temperature for about one hour. Then, cover it tightly with plastic wrap or aluminum foil. You can also place it in an airtight container. This keeps the pie fresh for up to three days in the fridge. When you are ready to eat your leftovers, preheat your oven to 350°F (175°C). Place the pie in a baking dish. Cover it with aluminum foil to keep it moist. Heat for about 20 to 30 minutes. If you want a crispy crust, remove the foil for the last 10 minutes. If you want to store your chicken pot pie for longer, freezing is a great option. Before freezing, make sure the pie is completely cool. Wrap it tightly in plastic wrap, then in aluminum foil. This prevents freezer burn. You can freeze it for up to three months. To bake from frozen, just remove the wrapping and bake it at 425°F (220°C) for about 50 to 60 minutes. Check that the filling is hot and bubbly before serving. For the full recipe, refer to the Hearty Chicken Pot Pie section above. Yes, you can make Classic Chicken Pot Pie ahead of time. Prepare your filling and pie crust separately. Store the filling in the fridge for up to two days. You can also freeze the filling for longer storage. When you are ready to bake, assemble the pie and follow the baking instructions. This method saves time and ensures a fresh meal. Classic Chicken Pot Pie pairs well with many sides. Here are some great options: - Simple green salad with a light vinaigrette - Steamed vegetables like broccoli or green beans - Garlic bread or crusty rolls for dipping - Mashed potatoes for a hearty meal These sides balance the rich flavors of the pot pie and add variety to your meal. Check your pot pie after 30 minutes of baking. The crust should be golden brown, and the filling should be bubbling. Insert a knife into the center. If it comes out hot, your pie is ready. Let it cool for about 10 minutes before serving. This helps the filling set and makes it easier to slice. Enjoy your hearty and comforting dish! Classic chicken pot pie is a favorite for many. We explored the key ingredients, tasty variations, and storage tips. You can customize your pie and avoid common mistakes to make it perfect every time. Remember, cooking can be fun. Enjoy your time with the process and your food. Try new flavors or substitutions in your next pot pie. Your kitchen adventure is just beginning!

Classic Chicken Pot Pie Hearty and Comforting Dish

Are you ready to dive into the world of comfort food? Classic Chicken Pot Pie is a dish that warms

- 1 cup pumpkin puree (canned or homemade) - 1/2 cup packed brown sugar - 1/4 cup granulated sugar - 1/2 cup vegetable oil (or melted coconut oil) - 2 large eggs, at room temperature - 1 teaspoon pure vanilla extract - 1 1/2 cups all-purpose flour - 1 teaspoon baking powder - 1/2 teaspoon baking soda - 1 teaspoon ground cinnamon - 1/2 teaspoon ground nutmeg - 1/4 teaspoon salt - 1/2 cup semi-sweet or dark chocolate chips In this recipe, we focus on simple, wholesome ingredients. Pumpkin puree gives moisture and flavor. Brown sugar adds a rich taste, while granulated sugar provides sweetness. Vegetable oil keeps the muffins soft and tender. Next, we use two large eggs, which help the muffins rise. The vanilla extract adds a nice touch. For the dry mix, we have all-purpose flour, baking powder, and baking soda. These help in making the muffins fluffy. The spices, like cinnamon and nutmeg, give that warm, cozy flavor. Finally, the chocolate chips are the stars. They add sweetness and richness. You can use semi-sweet or dark chocolate, depending on your taste. This recipe yields 12 muffins, perfect for sharing or enjoying throughout the week. Now that you know what you need, you can easily gather your ingredients and get started on making these delightful pumpkin chocolate chip muffins! For the full recipe, check the detailed instructions above. - Preheat your oven to 350°F (175°C). - In a large mixing bowl, combine the pumpkin puree, brown sugar, granulated sugar, vegetable oil, eggs, and vanilla extract. Mix well until it is smooth. - In another bowl, whisk the flour, baking powder, baking soda, ground cinnamon, ground nutmeg, and salt until blended. - Gradually fold the dry mixture into the wet one. Use a spatula and mix gently. - Carefully mix in the chocolate chips. Be sure they spread evenly through the batter. - Fill each muffin cup about two-thirds full with batter. This gives them room to rise. - Bake for 18-20 minutes. To check if they are done, insert a toothpick in the center of a muffin. It should come out clean or with a few crumbs. To make your muffins fluffy, follow these steps: - Measure flour correctly: Scoop flour lightly into your measuring cup, then level it off. - Avoid overmixing: Mix until just combined. A few lumps are okay. - Use room temperature eggs: This helps the batter mix better and rise nicely. It’s key to have your ingredients at the right temperature. Cold eggs or butter can lead to dense muffins. Always take them out ahead of time. Serve your pumpkin chocolate chip muffins warm for the best taste. They pair well with a cup of coffee or tea. You can top them to enhance flavor and looks. Here are some great ideas: - Powdered sugar: Lightly dust the tops for a sweet finish. - Melted chocolate: Drizzle over the muffins for a rich treat. - Chopped nuts: Sprinkle some on top for crunch and flavor. For the full recipe, check out the complete instructions above. These tips will help you create delightful muffins every time! {{image_4}} For those who need gluten-free options, you can use almond flour or a gluten-free blend instead of all-purpose flour. Both choices keep the muffins light and fluffy. Just make sure to check the labels to avoid any hidden gluten. If you're looking for vegan substitutions, you can replace eggs with flax eggs. To make a flax egg, mix one tablespoon of ground flaxseed with three tablespoons of water. Let it sit for a few minutes until it thickens. This swap keeps your muffins moist and delicious. You can get creative with flavor by adding nuts or dried fruits. Chopped walnuts or pecans add a nice crunch. Dried cranberries or raisins bring a sweet and chewy texture. Mix them in with the chocolate chips for a fun twist. Using different types of chocolate is another way to change things up. Try dark chocolate for a richer taste, or use white chocolate for a sweeter muffin. You can even mix different types of chocolate to create a unique flavor blend. For the full recipe, check out the detailed instructions earlier in this article. To keep your pumpkin chocolate chip muffins fresh, store them in an airtight container. This will help retain their moisture and softness. You can leave them on the counter for up to three days. If you want to keep them longer, you can refrigerate them. Just remember that refrigeration may make them a bit dry. To freeze your muffins, first let them cool completely. Then, wrap each muffin tightly in plastic wrap. Place the wrapped muffins in a freezer bag or container. They can last up to three months in the freezer. When you're ready to enjoy a muffin, take it out and let it sit at room temperature. You can also defrost it in the microwave for about 15-20 seconds. This will warm it up nicely. Enjoy the deliciousness whenever you crave it! For the full recipe, check out the instructions above! Yes, you can use fresh pumpkin. Just cook it, mash it, and strain it. Make sure it is smooth. This will give your muffins a great taste. These muffins last about 3 days at room temperature. Store them in an airtight container. If you want them to last longer, freeze them. Yes, you can make the batter ahead. Store it in the fridge for up to 24 hours. Just remember to stir it gently before baking. You can use applesauce or mashed bananas as an egg substitute. Use 1/4 cup for each egg. This will keep your muffins moist and tasty. To prevent sinking, do not overmix the batter. Mix until just combined. Also, make sure your baking powder is fresh. This will help your muffins rise nicely. For the full recipe, check out the complete details above! These pumpkin chocolate chip muffins are easy to make and delicious. We covered the key ingredients and simple steps needed to bake them. I shared tips for perfect fluffiness and tasty serving ideas. Plus, you learned about variations to meet different dietary needs. With proper storage, your muffins can stay fresh longer. Enjoy your baking journey and share these muffins with friends and family!

Pumpkin Chocolate Chip Muffins Simple and Tasty Treat

Are you ready to bake the perfect fall treat? Pumpkin chocolate chip muffins are easy to make and packed with

To create delicious spicy tuna sushi bowls, gather these ingredients: - 1 cup sushi rice - 1 ¼ cups water - 1 tablespoon rice vinegar - 1 teaspoon sugar - ½ teaspoon salt - 8 oz sushi-grade tuna, diced - 2 tablespoons sriracha (more to taste) - 1 tablespoon mayonnaise (preferably Kewpie) - 1 ripe avocado, sliced - 1 small cucumber, julienned - 1 carrot, shredded - 2 tablespoons sesame seeds (toasted) - 2 green onions, finely chopped - Pickled ginger (for serving) - Seaweed sheets (optional) These ingredients blend to create the perfect balance of flavors. Choosing the right ingredients is key for great sushi bowls. Here are some tips: - Sushi Rice: Look for short-grain sushi rice. It sticks well and gives the right texture. - Tuna: Always use sushi-grade tuna. It should be fresh and bright in color. - Sriracha: Adjust the amount based on your spice level. Taste as you mix. - Mayonnaise: Kewpie mayonnaise adds a creaminess that regular mayo lacks. - Vegetables: Select ripe avocados and fresh vegetables for the best taste. These tips ensure you use the freshest and highest-quality ingredients. Each serving of spicy tuna sushi bowls offers a satisfying mix of nutrients: - Calories: 500 - Protein: 30g - Carbohydrates: 60g - Fat: 15g - Fiber: 5g This dish provides a balanced meal filled with protein and healthy fats. Enjoy your culinary journey with this Full Recipe! Rinse the sushi rice under cold water. Use a fine-mesh strainer. Swirl the rice gently until clear water runs out. This step removes excess starch, leading to fluffier rice. After rinsing, drain the rice well. In a medium saucepan, combine your rinsed rice with 1 ¼ cups of water. Bring this mixture to a boil over medium heat. Once boiling, lower the heat to a simmer. Cover the saucepan and let it cook for 18 minutes. Do not lift the lid during cooking. After 18 minutes, remove the pan from heat. Let it rest for 10 minutes while still covered. Next, prepare the sushi seasoning. In a small bowl, mix rice vinegar, sugar, and salt until dissolved. Once the rice has rested, transfer it to a large bowl. Drizzle the vinegar mixture over the warm rice. Use a wooden spatula to gently fold the rice. Avoid mashing the grains. Cover the rice with a clean kitchen towel to cool it to room temperature. In another bowl, add 8 oz of diced sushi-grade tuna. Pour in 2 tablespoons of sriracha and 1 tablespoon of mayonnaise. Mix until the tuna is well coated. You can add more sriracha if you want more heat. This spicy tuna mix is key to the flavor of the bowls. Now, it’s time to build your sushi bowls. Start by dividing the seasoned sushi rice into two serving bowls. Create a nice bed for the toppings. Spoon the spicy tuna mixture generously over the rice. Next, add slices of avocado, julienned cucumber, and shredded carrots on top. This adds color and texture. Finish with a sprinkle of toasted sesame seeds and chopped green onions. These toppings enhance both flavor and visual appeal. Serve your bowls with pickled ginger on the side. This adds a refreshing contrast. If you like, add strips of seaweed for extra crunch. Enjoy your spicy tuna sushi bowls! For a full recipe, check out the details above. To make your spicy tuna sushi bowls pop, focus on fresh ingredients. Fresh sushi-grade tuna makes a big difference in flavor. Use ripe avocados for creaminess. Toasted sesame seeds add a nice crunch. Also, mix different textures. The creamy avocado, crunchy cucumber, and soft tuna all work together well. Don’t forget the pickled ginger; it cleanses your palate and adds zing. Avoid overcooking the sushi rice. This can make it mushy and sticky. Rinse the rice well until the water runs clear. This step removes excess starch. Be careful when mixing the sushi seasoning into the rice. You want to fold it gently to keep the grains intact. Lastly, don’t skip the resting time after cooking the rice. This helps the rice become fluffy. You can easily customize your bowls. Want more heat? Add extra sriracha or a dash of chili oil. If you prefer milder flavors, reduce the sriracha. You can also swap the tuna for salmon or shrimp. For a vegetarian option, use tofu or tempeh. Add seasonal veggies like radishes or bell peppers for variety. The possibilities are endless, so feel free to experiment! For the complete preparation guide, see the Full Recipe. {{image_4}} If you want to switch things up, try different proteins. Salmon works great and adds a rich flavor. You can also use cooked shrimp, crab, or even tofu for a twist. These options give you tasty choices while keeping the dish fresh. For a vegetarian or vegan version, swap the tuna for marinated tofu or tempeh. You can also use chickpeas for a protein boost. Add extra veggies like bell peppers or radishes for crunch. Mix in avocado and a soy sauce dressing for a creamy touch. These changes keep the bowl filling and flavorful. Using seasonal vegetables can enhance your sushi bowls. In spring, try snap peas or asparagus. In summer, add ripe tomatoes or zucchini. Fall brings sweet butternut squash and kale. In winter, use hearty root vegetables like turnips or beets. Fresh seasonal produce makes each bowl unique and delicious. To store leftovers, place any uneaten spicy tuna sushi bowls in airtight containers. Cover them tightly to keep air out. The sushi rice will dry out if not stored properly. You can keep the bowls in the fridge for up to two days. However, the tuna is best when fresh. Reheating sushi bowls can be tricky. I recommend only reheating the rice. To do this, add a splash of water to the rice and cover it. Use the microwave in short bursts, stirring in between. This keeps the rice moist. Avoid reheating the tuna. It tastes best fresh and loses texture when reheated. Freezing sushi bowls is not ideal. The rice can become mushy, and the tuna loses flavor and texture. If you must freeze, store the rice and tuna separately. Use freezer-safe bags for the rice and a container for the tuna. You can freeze for up to one month. When ready to eat, thaw in the fridge overnight. Then, reheat the rice as mentioned above. Enjoy your meal fresh for the best taste! For the full recipe, refer to the earlier sections. The best type of tuna for sushi bowls is sushi-grade tuna. This means it is fresh and safe to eat raw. Look for yellowfin or bluefin tuna. They are both tasty and have a nice texture. Always ask your fishmonger for the freshest option available. Yes, you can make spicy tuna sushi bowls ahead of time. Cook the rice and prepare the spicy tuna mixture. Store them separately in the fridge. Assemble the bowls just before serving to keep everything fresh and tasty. To adjust the spiciness of your sushi bowls, change the amount of sriracha. Start with two tablespoons, then taste. If you like it spicier, add more sriracha. You can also mix in a bit of wasabi for extra heat. Enjoy finding your perfect balance! This blog covered how to make spicy tuna sushi bowls. We discussed essential ingredients and quality tips. I shared step-by-step instructions for rice, tuna, and assembly. You learned tricks to enhance flavor and avoid mistakes. We also explored various protein options and how to store your bowls. Making these sushi bowls at home can be fun and rewarding. Use the tips to create your best version. Enjoy your delicious bowls!

Spicy Tuna Sushi Bowls Flavorful and Easy Recipe

Looking to spice up your meal routine? My Spicy Tuna Sushi Bowls are here to help! This easy recipe is

- 1 medium head of cauliflower, processed into rice-sized pieces - 2 large eggs, lightly whisked - 1 cup mixed vegetables (carrots, peas, and bell peppers) - 2 tablespoons extra virgin olive oil - 2 tablespoons soy sauce or tamari - 1 teaspoon toasted sesame oil - 3 cloves garlic, minced - 1 tablespoon fresh ginger, minced (optional) - 3 green onions, finely sliced (keep white and green parts separate) In this recipe, the main components are key for a great taste. Cauliflower serves as a low-carb base. Eggs add protein and creaminess. Mixed vegetables bring color and nutrients. For seasonings, extra virgin olive oil is my go-to for cooking. It’s light and tasty. Soy sauce or tamari gives that savory umami flavor. Toasted sesame oil adds a rich touch at the end. Garlic is a must for flavor. It gives your dish a warm, cozy feel. If you like, add ginger for an extra zing. Finally, green onions provide a fresh crunch. Use the white parts in cooking and the green parts as a garnish. This list makes your cauliflower fried rice tasty and fun. Check out the Full Recipe for all the steps! Cutting and Processing Start by cutting your cauliflower into small florets. This makes it easier to process. Use a box grater or a food processor. If using a food processor, use the grater attachment. Process until the cauliflower looks like rice. Set it aside for later. Size Consideration Make sure the pieces are small and even. This helps them cook quickly and evenly. You want each bite to have the right texture. If the pieces are too big, they won’t mix well with the other ingredients. Heating the Oil Grab a large skillet or wok. Add two tablespoons of extra virgin olive oil. Heat the oil over medium heat until it shimmers. This means your oil is hot enough to start cooking. Sautéing the Aromatics Now add three cloves of minced garlic to the oil. If you like, you can add fresh ginger too. Sauté the garlic for about 30 seconds. It should smell great but be careful not to burn it. Scrambling Eggs Push the garlic to one side of the pan. Pour in two lightly whisked eggs into the empty space. Gently scramble the eggs until they set. Mix them with the garlic after they are cooked. Adding Mixed Vegetables Next, toss in one cup of mixed vegetables. Carrots, peas, and bell peppers work well. Stir everything together for about 2-3 minutes. You want the veggies to soften but still be crunchy. Incorporating Cauliflower Finally, fold in your processed cauliflower. Make sure it mixes well with the eggs and veggies. This is where it all comes together. Let it cook for an additional 3-5 minutes. The cauliflower should be tender yet slightly crunchy. Add soy sauce and sesame oil for flavor. Don’t forget to add salt and pepper to taste. For the full recipe, check out the Fluffy Cauliflower Fried Rice. Enjoy your cooking adventure! Keeping Cauliflower Crunchy To keep cauliflower crunchy, do not overcook it. Stir-fry for just 3-5 minutes. This way, the cauliflower will stay crisp and not mushy. After adding it to the pan, mix it gently with other ingredients. This helps retain its texture. Perfectly Scrambled Eggs For fluffy scrambled eggs, use a non-stick skillet. Coat it lightly with olive oil. Cook on medium heat and stir gently. Remove them from the pan when they are just set. They will finish cooking with the residual heat. Recommended Seasonings Soy sauce or tamari brings umami and depth. Use about 2 tablespoons for great flavor. Toasted sesame oil adds a rich taste. A teaspoon is perfect for this dish. You can also add salt and pepper to taste. Supplementary Ingredients Feel free to add minced ginger for a zesty kick. Fresh garlic adds a nice aroma and flavor. You can also mix in extra vegetables like bell peppers or peas for more color and taste. Serving Ideas Serve your cauliflower fried rice in a large bowl. This makes it look inviting and colorful. You can also portion it onto plates for individual servings. Garnishing Tips Garnish with sliced green onions. They add a fresh look and taste. A sprinkle of sesame seeds on top gives a nice crunch and finish. For a pop of color, consider adding a few cilantro leaves. Enjoy making this dish with these handy tips! If you want the full recipe, check out the Full Recipe. {{image_4}} Vegan Cauliflower Fried Rice To make a vegan version, skip the eggs. Instead, add a bit of tofu for protein. Press the tofu first to remove water. Crumble it and sauté it with the garlic. This adds a nice texture and flavor. You can also switch to nutritional yeast for a cheesy taste. Low-Carb Considerations Cauliflower fried rice is already low in carbs. It’s a great choice if you watch your carb intake. For even lower carbs, avoid adding peas or carrots. Stick with green onions, bell peppers, and broccoli. This keeps the dish light and fresh. Different Vegetables Feel free to change the vegetables. You can use zucchini, mushrooms, or spinach. Just chop them into small pieces to mix well. Each veggie brings its own taste and color to the dish. This helps keep it exciting and fun. Protein Options For protein, try shrimp, chicken, or beef. Cook these before adding them to the fried rice. If you prefer plant-based options, use edamame or chickpeas. They add protein and fiber, making your meal heartier. Spicy Additions Want some heat? Add red pepper flakes or sriracha. You can mix them in while cooking. This gives the dish a kick and warms it up. Adjust the amount based on how spicy you like it. Alternative Sauces Soy sauce is classic, but you can try other sauces. Coconut aminos offers a sweet, mild flavor. For a tangy twist, use lemon juice or lime juice. These options can brighten the dish and make it pop. For the full recipe, check out the Fluffy Cauliflower Fried Rice recipe above. To keep your cauliflower fried rice fresh, store it in an airtight container. Make sure it cools to room temperature before sealing. This helps prevent moisture buildup. You can enjoy your leftovers for up to four days. When reheating, use a skillet over medium heat. Add a splash of water or oil to keep it moist. Stir frequently for even heating. You can also use a microwave; just cover your bowl to trap steam. Heat in short bursts, stirring in between. If you want to freeze your cauliflower fried rice, it’s easy. First, let it cool completely. Then, scoop it into freezer bags. Remove as much air as you can before sealing. This prevents freezer burn. You can store it this way for about three months. To thaw, place the bag in the fridge overnight. If you need it fast, you can use the microwave. Just set it to defrost, then heat until warm. This keeps the texture nice. In the fridge, your cauliflower fried rice lasts about four days. Always check for signs of spoilage. If it has an off smell or a change in color, it’s best not to eat it. Look for mold or a slimy texture. These are clear signs that it’s gone bad. Trust your senses; if something seems off, throw it away. Always prioritize your health and safety when it comes to food. You can use broccoli or riced zucchini. Both options give a nice texture. If you want a different taste, try using quinoa. It cooks fast and adds protein. Start with a medium head of cauliflower. Cut it into small florets. Use a box grater or food processor to chop them into rice-sized pieces. Make sure they look like grains of rice. This will help them cook evenly. Yes, cauliflower fried rice is often healthier. - Nutritional benefits comparison: Cauliflower has more fiber and vitamins. It is lower in carbs than white rice. - Caloric differences vs. traditional fried rice: Cauliflower fried rice has about 50 calories per cup. Regular fried rice can have around 200 calories per cup. Absolutely! Chicken, shrimp, or tofu all work well. - Recommendations for protein options: Use cooked chicken or shrimp for a quick meal. For tofu, choose firm or extra-firm. - Cooking times for added proteins: If you add meat, cook it before the vegetables. This usually takes about 5-7 minutes. For tofu, cook it until it’s golden brown, about 3-5 minutes. You can easily make this dish gluten-free. - Using tamari: Tamari is a great gluten-free soy sauce. It has a rich flavor. - Other gluten-free soy sauce alternatives: Look for coconut aminos or other gluten-free sauces. They taste good and keep the dish flavorful. For the full recipe, check out the Fluffy Cauliflower Fried Rice. This blog post covered making delicious cauliflower fried rice. We explored each ingredient, focusing on cauliflower, eggs, and mixed veggies. We discussed essential seasonings like olive oil and soy sauce to enhance flavor. You learned step-by-step instructions on preparation and cooking techniques. I shared tips to achieve the right texture and ideas for presenting your dish. Variations and storage tips help you customize this recipe. General questions gave you even more knowledge. Now, you can make this dish with confidence and enjoy every bite.

Cauliflower Fried Rice Flavorful and Easy Recipe

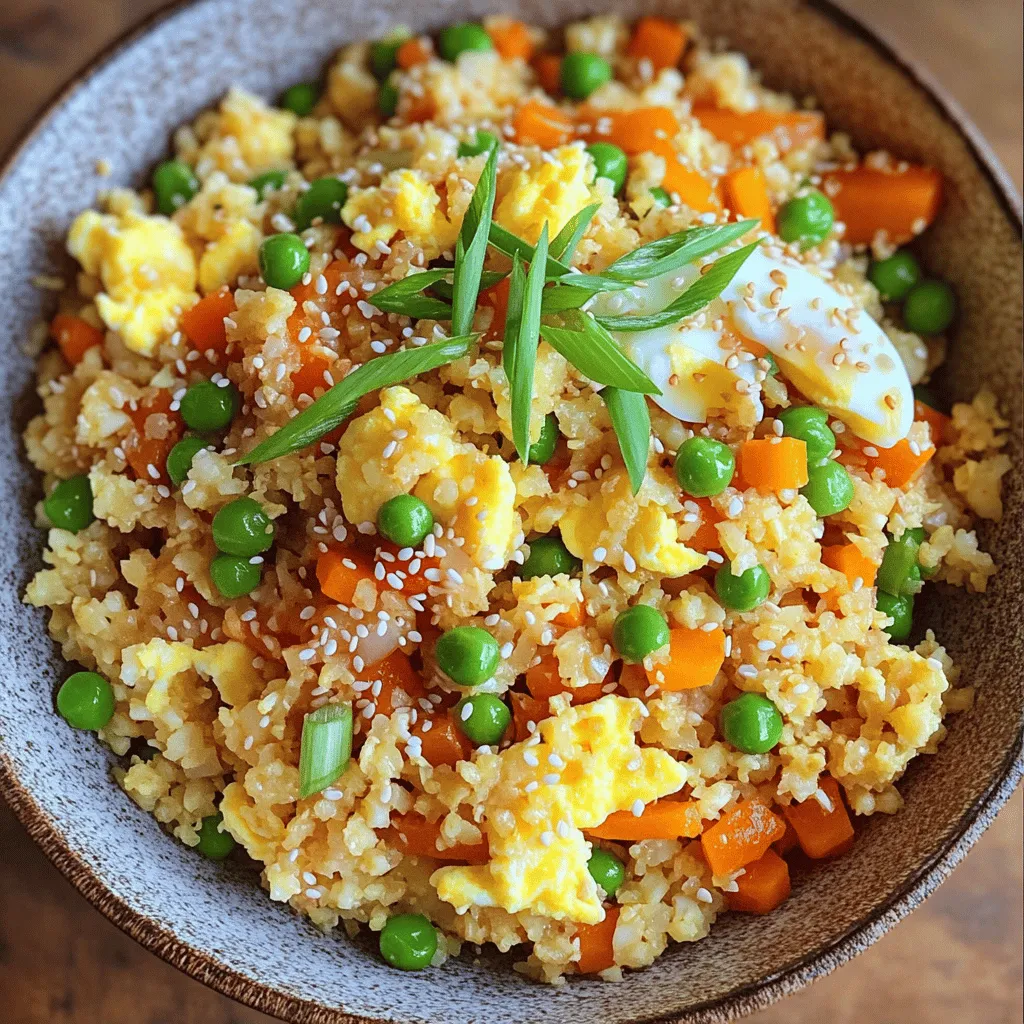
Ready to transform your meals? Cauliflower Fried Rice is the answer! This dish is quick, tasty, and a perfect way

Older posts
Newer posts
← Previous Page1 … Page22 Page23 Page24 … Page60 Next →

dsad

© 2025 tastymomrecipes • Built with GeneratePress

Our Policies

  • Copyright Policy
  • Cookie Policy
  • GDPR Policy
  • Privacy Policy
  • Disclaimer
  • Terms Of Use

More Information

  • Home
  • About
  • Contact
  • Appetizers
  • Dessert
  • Dinner
  • Drinks
©2025, tastymomrecipes About Back To Top