Skip to content
DisclaimerTerms Of UseGDPR PolicyCookie Policy

tastymomrecipes

  • Home
  • Drinks
  • Appetizers
  • Dinner
  • Dessert
  • About
  • Contact
  • Privacy Policy
DisclaimerTerms Of UseGDPR PolicyCookie Policy

Olivia

- 1 can (15 oz) chickpeas, drained and rinsed - 1 ripe avocado, peeled and pitted - 1 tablespoon freshly squeezed lemon juice - 1 tablespoon creamy tahini - 1 small red onion, finely chopped - 1 small cucumber, diced into small cubes - 1/4 cup fresh cilantro, finely chopped - Salt and freshly cracked black pepper to taste - 4 slices of whole-grain bread - Crisp lettuce leaves for garnish The avocado brings healthy fats to the mix, while chickpeas add protein and fiber. A serving has about 300 calories. This meal is full of vitamins and minerals, making it great for your health. Each bite is not only tasty but also good for you. Enjoy the crunch from the cucumber and the zest from the lemon juice. This sandwich is a perfect balance of flavors. For the full recipe, check out the details above! Start by mashing the chickpeas and avocado together in a medium-sized bowl. Use a fork to create a chunky yet creamy texture. You want some whole chickpeas to keep the crunch. Next, add one tablespoon of freshly squeezed lemon juice and one tablespoon of creamy tahini. This mix adds a bright flavor and a nice creaminess. Stir all the ingredients well until they blend into a cohesive mixture. Now, it's time to boost the flavor. Mix in a small red onion, finely chopped, and a small cucumber, diced into tiny cubes. These veggies add freshness and crunch. Then, fold in a quarter cup of fresh cilantro, finely chopped. It gives a herbaceous note that brightens the whole salad. Finally, season your mix with salt and freshly cracked black pepper to taste. This step makes a big difference, so adjust it to your liking. Take four slices of whole-grain bread and toast them until golden brown. This adds texture and helps the bread hold up to the filling. Once toasted, spread a generous amount of the avocado chickpea salad on two slices. Make sure to cover it evenly for the best flavor. Garnish each sandwich with crisp lettuce leaves for extra crunch. Place the remaining two slices of bread on top. For a nice touch, cut each sandwich in half diagonally. They are now ready to serve! If you want to prepare ahead, you can refrigerate the sandwiches for up to an hour before serving. Check out the full recipe for more details. To get the right chunkiness for your salad, mash the chickpeas and avocado gently. You want some whole chickpeas to keep that nice bite. If you mash too much, it becomes a paste. A few lumps make it fun and tasty! To boost the flavor, consider adding a pinch of garlic powder or smoked paprika. These spices add depth. You can also try different types of bread. Whole-grain bread is great, but you can use sourdough or rye for a twist. For sides, serve your sandwich with crunchy carrot sticks or fresh fruit. They add color and nutrition to your meal. A side salad with a light dressing pairs well too. It makes for a well-rounded lunch. {{image_4}} You can easily make this recipe vegan and gluten-free. Use gluten-free bread for the sandwiches. Instead of tahini, try hummus or a nut butter. These swaps keep flavor while catering to dietary needs. Feel free to add more crunch or flavor. Dice bell peppers or shredded carrots into the mix. For a protein boost, consider adding diced tofu or cooked quinoa. You can also explore flavors from around the world, like adding jalapeños for a spicy kick or curry powder for a hint of warmth. Using fresh, seasonal produce makes this salad even better. In spring, add peas or radishes for a crisp bite. In summer, diced tomatoes or zucchini work great. In fall, roasted sweet potatoes or apples bring a sweet touch. Adjust the recipe to enjoy the best of each season! For the full recipe, check out the details above! To keep the salad fresh, store it in an airtight container. This helps maintain moisture and flavor. The salad lasts in the fridge for about 3 days. After that, the ingredients may start to lose texture and taste. You can prepare the sandwiches in advance. Just assemble them without the bread. Store the salad in one container and the bread in another. Ensure you use quality storage containers to keep everything fresh. You can freeze the salad, but it may change texture. To freeze, place it in a freezer-safe container. When ready to eat, thaw it in the fridge overnight. Refresh the salad by adding a bit of lemon juice or olive oil before serving. For more details, check out the Full Recipe. Avocados are full of healthy fats. They help keep your heart strong. They also have fiber, which aids digestion. Chickpeas are rich in protein and fiber. They support muscle growth and help you feel full. Together, they make a power-packed meal. This salad is not just tasty but also good for you. You can add more protein or complex carbs. Try adding cooked quinoa or grilled chicken. These options boost the meal's heartiness. You might also add nuts for crunch and extra protein. This way, your sandwich will keep you satisfied for longer. Yes, you can! If you have a sesame allergy, use hummus instead. Greek yogurt is another great option. It adds creaminess without tahini. You can even use sunflower seed butter for a nut-free choice. These swaps keep the dish tasty and safe. Absolutely! Kids may enjoy this sandwich with some tweaks. You can mash the avocado and chickpeas smoother. Adding a hint of honey can make it sweeter. Use fun cookie cutters to shape the sandwiches. This makes eating more fun for little ones. In summary, avocado chickpea salad sandwiches are easy to make and healthy. You can mix chickpeas, avocado, lemon juice, and tahini, add fresh veggies, and create a tasty sandwich. Feel free to explore variations and flavor tips to suit your taste. Proper storage will keep your leftovers fresh and delicious. This dish is not just for adults; kids will enjoy it too. Enjoy your healthy meals and get creative with this recipe!

Avocado Chickpea Salad Sandwiches Simple Yet Tasty

Are you looking for a healthy and easy lunch? Look no further! My Avocado Chickpea Salad Sandwiches will satisfy your

- 1 can (15 oz) chickpeas, drained and thoroughly rinsed - 1 tablespoon extra virgin olive oil - 1 teaspoon ground cumin - 1 teaspoon smoked paprika - ½ teaspoon garlic powder - ½ teaspoon onion powder - Salt and black pepper to taste - 8 small corn or flour tortillas Chickpeas are the star of this dish. They provide a hearty texture and protein. I love using canned chickpeas for quick prep. Just drain and rinse them well. The spices really make them pop. Ground cumin adds warmth, while smoked paprika brings a nice depth. The garlic and onion powders give that classic savory flavor. Tortillas are essential for these tacos. You can use small corn or flour ones. I prefer corn for a bit of crunch. You can warm them up in a dry skillet. This makes them more pliable and tasty. - 1 ripe avocado, sliced into thin wedges - 1 cup shredded cabbage (choose either green or purple for color contrast) - ½ cup fresh cilantro leaves, chopped coarsely - ½ cup salsa or pico de gallo, for topping - Lime wedges, for serving Toppings add freshness and flavor to your tacos. Avocado gives a creamy texture that pairs well with the crispy chickpeas. Shredded cabbage adds a nice crunch and color. I love using fresh cilantro for its bright taste. Salsa or pico de gallo brings zest, and lime wedges add a burst of acidity. - High in Protein - Rich in Fiber - Essential Vitamins and Minerals Chickpeas are not just tasty; they are also really good for you. They are high in protein, making them a great meat alternative. They are rich in fiber, which helps digestion and keeps you full longer. Plus, they contain essential vitamins and minerals like iron and magnesium. This makes crispy chickpea tacos a smart choice for a meal. For the full recipe, you can find it [here](#). 1. Preheating the oven Begin by preheating your oven to 425°F (220°C). A hot oven makes the chickpeas crispy. 2. Seasoning the chickpeas In a medium bowl, mix the drained and rinsed chickpeas with olive oil, ground cumin, smoked paprika, garlic powder, onion powder, salt, and black pepper. Make sure each chickpea is well coated in the spices. This adds great flavor. 1. Spreading on the baking sheet Spread the seasoned chickpeas in a single layer on a lined baking sheet. This helps them roast evenly. 2. Timing for optimal crispiness Roast the chickpeas for 20-25 minutes. After 10-12 minutes, shake the pan gently. This ensures they cook evenly and become crispy. 1. Warming the tortillas Use a dry skillet over medium heat. Warm each tortilla for about 30 seconds on both sides. This makes them soft and easy to fold. 2. Layering ingredients for best flavor To assemble, lay a tortilla flat on a plate. Add a spoonful of crispy chickpeas in the center. Top with avocado slices, shredded cabbage, and fresh cilantro. Finally, drizzle with salsa or pico de gallo and squeeze fresh lime juice on top. Enjoy your tasty creation! For the full recipe, check out the Crispy Chickpea Tacos . To get chickpeas that are crispy, set your oven to 425°F (220°C). This heat helps them roast well. Roast the chickpeas for 20-25 minutes. Halfway through, give the pan a gentle shake. This move helps them cook evenly. To avoid sogginess, make sure to drain and rinse the chickpeas well. Dry them with a towel before adding oil and spices. Keep your tortillas warm by wrapping them in a clean towel after warming. This step prevents them from becoming dry or tough. You can warm them in a dry skillet for 30 seconds on each side. If you want a different method, try using a microwave. Just cover them with a damp paper towel and heat for about 20 seconds. Mix up the spices for unique flavors. Try adding chili powder or cayenne for heat. You can also add some lime zest for brightness. For toppings, I love using sliced radishes for crunch or pickled onions for tanginess. A dollop of Greek yogurt can add creaminess, too. Check out the Full Recipe for more ideas! {{image_4}} You can easily adapt these tacos to fit different diets. For vegans, use chickpeas as your only protein. They are rich in nutrients and taste great. If you want to try something new, you can mix the chickpeas with black beans or lentils. These options add more texture and flavor. For meat lovers, you can customize your tacos with grilled chicken or shrimp. Just season them as you would the chickpeas. This way, everyone at your table can enjoy a tasty meal. Tacos are fun because you can add many toppings. Besides avocado, try sliced radishes or diced tomatoes. You can also use grilled zucchini or bell peppers for extra crunch. If you love spicy food, add jalapeños or hot sauce. For sides, consider serving your tacos with a refreshing salad or corn on the cob. A bowl of black beans or rice can also make a nice complement. These sides balance the meal and make it more filling. Want to add a twist to your taco night? Think about using flavors from around the world. For example, you can mix in some curry powder with the chickpeas for an Indian vibe. A drizzle of tahini can give your tacos a Middle Eastern flair. You can also create fusion tacos. Try adding kimchi for a Korean kick or using chipotle sauce for a smoky taste. The possibilities are endless! Mix and match flavors to keep taco night exciting. For the full recipe, check out the Crispy Chickpea Tacos section. Enjoy creating your unique versions! To keep your crispy chickpeas fresh, store them in an airtight container. This helps maintain their crunch. Make sure they are completely cool before sealing. If you refrigerate them, use them within three days for best taste. To reheat, spread the chickpeas on a baking tray. Heat them in an oven at 400°F (200°C) for about five to ten minutes. This method revives their crispiness. Avoid microwaving as it can make them soggy. Assembled tacos do not store well. If you have leftover tacos, separate the ingredients. Keep the crispy chickpeas, tortillas, and toppings in separate containers. This keeps everything fresh and tasty. Do not stack them, as this can make the tortillas soggy. To reheat, warm the tortillas in a dry skillet. For the chickpeas, use the oven method mentioned earlier. Reassemble the tacos right before eating for the best flavor and texture. Yes, you can freeze cooked chickpeas. Place them in a freezer-safe bag. Remove as much air as possible and seal. They can last up to three months in the freezer. However, do not freeze assembled tacos. Freezing can ruin the texture of the tortillas. If you want to enjoy them later, prepare the chickpeas and store them separately. When you’re ready to eat, thaw the chickpeas in the fridge overnight. Then, reheat and assemble your tacos fresh. For the full recipe, check out the earlier sections. Yes, you can use canned chickpeas. They save time and are easy to use. Canned chickpeas are already cooked, so you just need to drain and rinse them. Cooking your own chickpeas offers more control over texture. They can be softer or firmer based on cooking time. Both options are tasty and healthy. Toppings make these tacos shine! Here are some popular choices: - Sliced avocado for creaminess - Shredded cabbage for crunch - Fresh cilantro for brightness - Salsa or pico de gallo for zest Feel free to mix and match! Add hot sauce if you like heat. Crispy chickpeas taste best right after roasting. They stay crispy for about 30 minutes. If you store them, use an airtight container. They may soften over time. To enjoy them crispy later, reheat in the oven for about 5-10 minutes. Yes, this recipe is gluten-free if you use corn tortillas. You can also choose gluten-free flour tortillas. Check labels to be sure. Enjoy the delicious flavors without worry! Crispy chickpea tacos are easy and fun to make. Start with chickpeas, add spices, and warm tortillas. Layer toppings like avocado and salsa for flavor. Chickpeas offer protein and fiber for health. Use my tips for perfect crispy chickpeas. You can customize these tacos with different toppings or spices. Store leftovers properly to keep them tasty. Enjoy these tacos with friends or family for a hearty meal. Get creative with flavors and make it your own!

Crispy Chickpea Tacos Perfect for Your Next Meal

Looking for a tasty, healthy meal? Try my crispy chickpea tacos! Packed with protein and fiber, these tacos are a

- 1 lb Brussels sprouts, trimmed and halved - 2 tablespoons extra virgin olive oil - 1/4 teaspoon sea salt - 1/4 teaspoon freshly ground black pepper - 2 tablespoons balsamic vinegar - 1 tablespoon honey (or maple syrup for a vegan alternative) - 1/2 teaspoon garlic powder - 1/4 cup walnuts, coarsely chopped (optional) - 1/4 cup feta cheese, crumbled (optional) Each ingredient plays a key role in the dish's flavor. The Brussels sprouts provide a base. Olive oil adds richness. Salt and pepper enhance the taste. Balsamic vinegar gives a sweet and tangy note. Honey or maple syrup balances the acidity. Garlic powder adds depth. Walnuts and feta offer texture and extra flavor. You can swap Brussels sprouts for broccoli or cauliflower. Olive oil can change to avocado oil for a different taste. Use coconut sugar instead of honey for a vegan option. If you cannot find feta, try goat cheese or leave it out. Feel free to mix in other nuts like almonds or pecans for variety. For a quick balsamic glaze, buy a pre-made version from the store. For the full recipe, see the section above. Start by gathering your ingredients. You will need: - 1 lb Brussels sprouts, trimmed and halved - 2 tablespoons extra virgin olive oil - 1/4 teaspoon sea salt - 1/4 teaspoon freshly ground black pepper - 2 tablespoons balsamic vinegar - 1 tablespoon honey (or maple syrup for a vegan alternative) - 1/2 teaspoon garlic powder - 1/4 cup walnuts, coarsely chopped (optional) - 1/4 cup feta cheese, crumbled (optional) First, preheat your oven to 400°F (200°C). This heat helps the sprouts roast well. In a large bowl, mix the halved Brussels sprouts with olive oil, sea salt, black pepper, and garlic powder. Toss them well so each piece gets coated. Next, arrange the sprouts on a baking sheet. Make sure they face cut sides down. This helps them brown nicely. Roast the Brussels sprouts in your hot oven for 20-25 minutes. You want them tender and golden. Look for crispy edges that give a nice crunch. Halfway through, give them a shake. This helps them roast evenly. While the sprouts roast, prepare the balsamic glaze. In a small saucepan, mix the balsamic vinegar and honey over medium heat. Stir gently as it heats. Once it simmers, lower the heat and let it cook for about 5 minutes. Keep an eye on it, stirring often, until it thickens a bit. When it’s ready, take it off the heat. When the Brussels sprouts are done, drizzle the balsamic glaze all over them. Toss gently to coat each sprout with the glaze. If you like, top with walnuts and feta cheese for extra flavor. Serve these tasty Brussels sprouts hot and enjoy their delicious mix of sweet and tangy! For the complete recipe, check the Full Recipe. To get the best Brussels sprouts, start with fresh ones. Trim and halve each sprout. This helps them cook evenly. Use a large bowl to mix the sprouts with olive oil, salt, and pepper. Make sure every piece is coated well. Lay them cut-side down on the baking sheet. This way, they get crispy on the edges. Roast them at 400°F for 20-25 minutes. Check for a golden color and soft texture. For a great glaze, combine balsamic vinegar and honey in a saucepan. Heat it on medium until it simmers. Stir it gently to mix well. Let it simmer for about five minutes. Watch for it to thicken slightly. This will bring out the sweet and tangy flavors. Once the sprouts are done, drizzle this glaze over them. Toss them gently to coat. It adds a delicious layer to your dish. Serve your roasted Brussels sprouts right away for the best taste. They pair well with many meals. Consider serving them alongside roasted chicken or grilled fish. For a hearty dish, add sautéed quinoa or rice. You can also sprinkle chopped walnuts and feta cheese on top. This adds texture and flavor. Enjoy these Brussels sprouts as a side or a healthy snack. For more details on making this dish, check the Full Recipe. {{image_4}} You can play with flavors in many ways. Add spices like paprika or cumin for warmth. A pinch of cayenne pepper can bring heat. For a fresh twist, sprinkle lemon zest before serving. Each choice changes the taste and makes it fun. If you want a vegan option, use maple syrup instead of honey. It adds a nice sweetness. You can also try agave nectar. Both options create a similar flavor in the glaze. They keep the dish plant-based and delicious. Toppings can make your Brussels sprouts pop. Try adding chopped pecans for crunch. Toasted almonds also work well. Crumbled blue cheese gives a strong taste that many love. You could even mix in dried cranberries for a sweet touch. Each addition makes the dish unique and exciting. For the full recipe, check the details above. To store leftover Brussels sprouts, let them cool first. Place them in an airtight container. This keeps them fresh for up to three days in the fridge. If you want to keep them longer, freezing is a great option. When ready to eat, preheat your oven to 350°F (175°C). Spread the Brussels sprouts on a baking sheet. Heat them for about 10-15 minutes. This makes them warm and crispy again. You can also use a microwave, but they may not stay as crispy. To freeze, place the cooled Brussels sprouts in a freezer-safe bag. Remove as much air as you can. You can freeze them for up to three months. When ready to use, thaw them overnight in the fridge before reheating. Enjoy your savory flavors any time! For the full recipe, check out the complete guide. Roasted Brussels sprouts can last up to four days in the fridge. To keep them fresh, place them in an airtight container. You can enjoy them cold or warm them up. If you have leftovers, try adding them to salads or sandwiches for a tasty twist. Yes, you can use frozen Brussels sprouts. However, they often have more water than fresh ones. This can make them less crispy. To get good results, thaw them first and pat them dry. Then, follow the roasting steps as usual from the Full Recipe. If you need a substitute for balsamic vinegar, try red wine vinegar or apple cider vinegar. To mimic the sweetness, add a bit of honey or maple syrup. This mix gives a similar tangy flavor. You can also use soy sauce for a different taste profile. We covered key ingredients for your dish, including measurements and substitutions. I shared step-by-step roasting methods and how to make a balsamic glaze. I also included tips for perfect roasting and tasty serving ideas. You can explore variations with different seasonings and toppings. Lastly, I provided storage tips and answers to common questions. Try these techniques to impress your guests or treat yourself!

Roasted Brussels Sprouts with Balsamic Glaze Delight

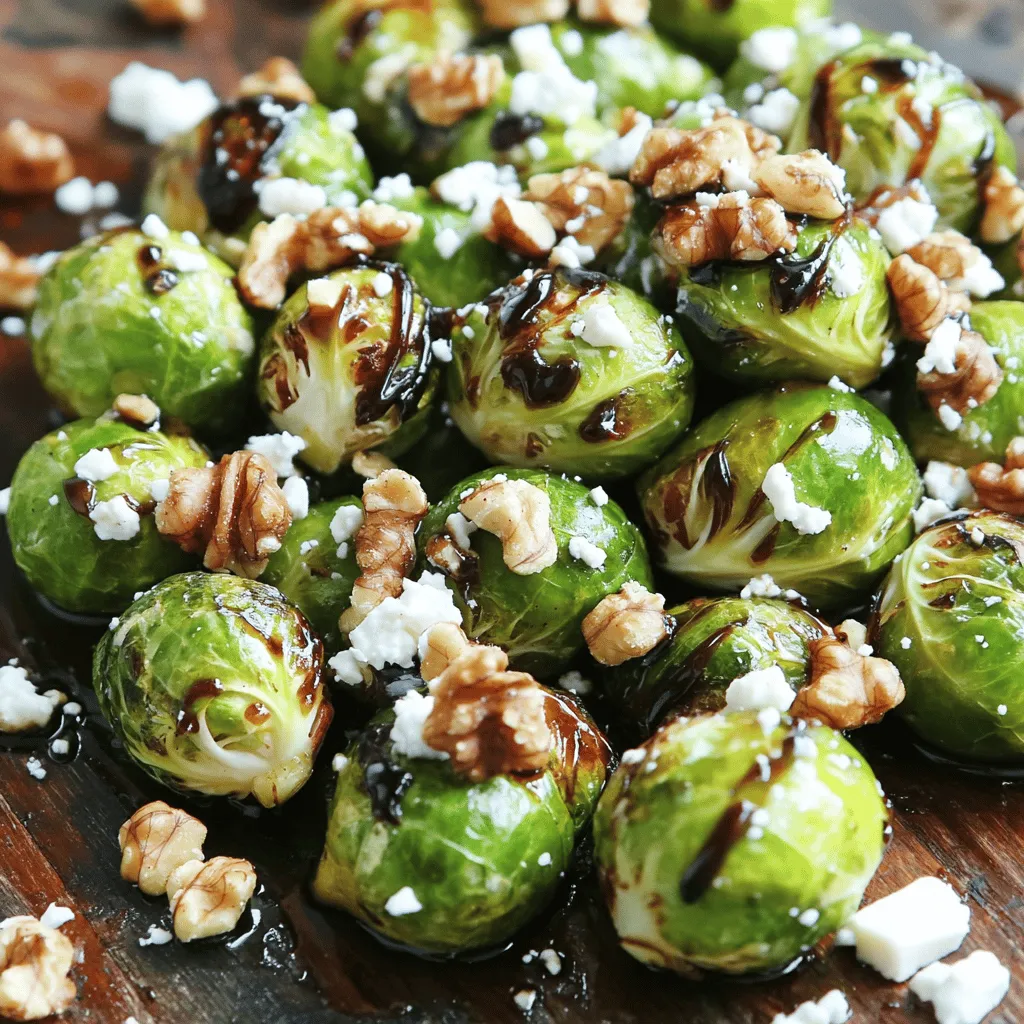
If you’re looking for a tasty side dish that packs a flavor punch, you’ll love these Roasted Brussels Sprouts with

To make this tasty dip, you need: - 1 cup canned chickpeas, drained and rinsed - 4 cloves roasted garlic - 3 tablespoons tahini - 2 tablespoons freshly squeezed lemon juice - 2 tablespoons extra virgin olive oil, plus more for drizzling - 1/2 teaspoon ground cumin - Salt to taste - Water, as needed for desired texture For added flair and flavor, consider these garnishes: - Fresh parsley, chopped - Smoked paprika You will need a few tools to whip up this hummus: - A powerful food processor - A mixing bowl - A sharp knife - Aluminum foil for roasting garlic - A shallow serving bowl for presentation Gather these ingredients and tools before you start. This way, you can focus on creating your amazing roasted garlic hummus. For the full recipe, refer to the earlier section. To start, preheat your oven to 400°F (200°C). Take a whole head of garlic and slice off the top. This exposes the cloves. Drizzle the garlic with a good amount of olive oil. Wrap it in aluminum foil. Place the wrapped garlic in the oven and roast for 30-35 minutes. The cloves should become soft and smell great. Let it cool a bit, then squeeze the soft, caramelized cloves into a bowl. In a powerful food processor, combine the drained chickpeas, roasted garlic, tahini, lemon juice, olive oil, ground cumin, and salt. Pulse the mixture until it turns smooth. You may need to scrape down the sides to mix evenly. The goal is a silky texture that is easy to spread. Taste your hummus. If it’s too thick, add water slowly, one tablespoon at a time. Blend after each addition until you reach the creaminess you want. If the flavor needs a boost, add more salt or a splash of lemon juice. Blend again to mix any changes. Enjoy the deliciousness of your roasted garlic hummus! For the complete recipe, check out the Full Recipe section. To make your hummus creamy, use a powerful food processor. Start with well-drained chickpeas for a smooth base. Add roasted garlic to bring rich flavor. If your hummus is too thick, add cold water slowly. Blend and check the texture until it feels just right. You want it silky, not chunky. Taste is key! After blending, give your hummus a taste. You might want more salt or lemon juice. A pinch of cayenne can add a nice kick. Fresh herbs like cilantro or basil can brighten the flavor. Experiment until you find a balance that you love. Store leftover hummus in an airtight container. It keeps well in the fridge for about a week. If it thickens, add a bit of water when you serve it again. For reheating, gently warm it in the microwave. Always add a drizzle of olive oil before serving for freshness. For a complete guide, check out the Full Recipe. {{image_4}} To spice things up, you can easily add heat to your roasted garlic hummus. Start by adding fresh jalapeños or red pepper flakes to the mix. You can also blend in a teaspoon of harissa for a North African twist. This will give your hummus a nice kick without losing its creamy texture. Adjust the spice to your taste, and enjoy the warmth it brings! Herbs can elevate your hummus to new heights. Try adding fresh basil, cilantro, or dill to the mix. Each herb will give your hummus a unique flavor profile. A sprinkle of fresh chives or thyme can also add a nice touch. Blend these herbs in at the end for a fresh burst of flavor. This way, you keep the vibrant green color and enjoy the aroma. If you want to switch things up, consider using different beans. White beans or black beans can create a new taste. Instead of tahini, you can use Greek yogurt for a creamy texture and tang. For a nut-free option, sunflower seed butter works well too. You can also replace lemon juice with lime juice for a zesty twist. The key is to experiment and find what you love! For the full recipe, check out the instructions on how to make this delicious dip. Hummus is not just a tasty dip; it is also packed with health benefits. This creamy delight is full of nutrients that support your body. Let's explore why hummus, especially roasted garlic hummus, is a smart choice. Roasted garlic hummus is rich in protein and fiber. A serving typically contains: - 1 cup canned chickpeas, drained and rinsed - 4 cloves roasted garlic - 3 tablespoons tahini - 2 tablespoons lemon juice - 2 tablespoons extra virgin olive oil These ingredients provide essential vitamins and minerals. The fiber helps with digestion, while the protein keeps you full. Healthy fats from olive oil support heart health. Chickpeas are a fantastic food choice. They are high in protein and fiber. This helps you feel satisfied longer. Plus, they are low in fat. Eating chickpeas may also lower your risk of heart disease. They contain vitamins like B6 and folate, which support energy and mood. Roasted garlic adds a unique flavor and many health perks. It has antioxidants that help fight disease. Roasting makes garlic sweeter and milder, making it easy to enjoy. It may also boost your immune system and lower blood pressure. Plus, roasted garlic gives your hummus a rich, savory taste that everyone loves. For the full recipe, check out the Roasted Garlic Hummus section. It's an easy way to make a healthy and flavorful dip. To make roasted garlic hummus, first, roast garlic by cutting off the top of a head and drizzling it with olive oil. Wrap it in foil and bake at 400°F for 30-35 minutes. After it cools, squeeze the soft cloves into a bowl. In a food processor, add 1 cup of chickpeas, the roasted garlic, 3 tablespoons of tahini, 2 tablespoons of lemon juice, and 2 tablespoons of olive oil. Blend until smooth. If it’s too thick, add water slowly. Taste for salt and lemon juice. Transfer it to a bowl and garnish. For the full recipe, check the detailed instructions above. You can use raw garlic, but the flavor changes. Raw garlic tastes sharp and spicy. Roasted garlic is sweet and creamy. If you choose raw garlic, use less. Start with one clove and taste. Adjust as needed. The taste will be different, so I recommend sticking to roasted garlic for the best hummus. Roasted garlic hummus pairs well with many foods. Here are some great options: - Warm pita bread - Crisp veggie sticks (carrots, cucumbers, bell peppers) - Whole-grain crackers - Grilled chicken or shrimp - Stuffed grape leaves These choices add color and crunch. They make your hummus dish more fun and tasty. Enjoy experimenting with different pairings! Roasted garlic hummus is simple to make and tasty. You learned about key ingredients and how to prepare them. I shared tips for perfecting your hummus and exploring fun variations. Plus, we discussed health benefits that come with this dish. Enjoy making your own hummus, and don't be afraid to try new flavors. Each batch is a chance to learn and create. Happy cooking!

Roasted Garlic Hummus Flavorful and Healthy Dip

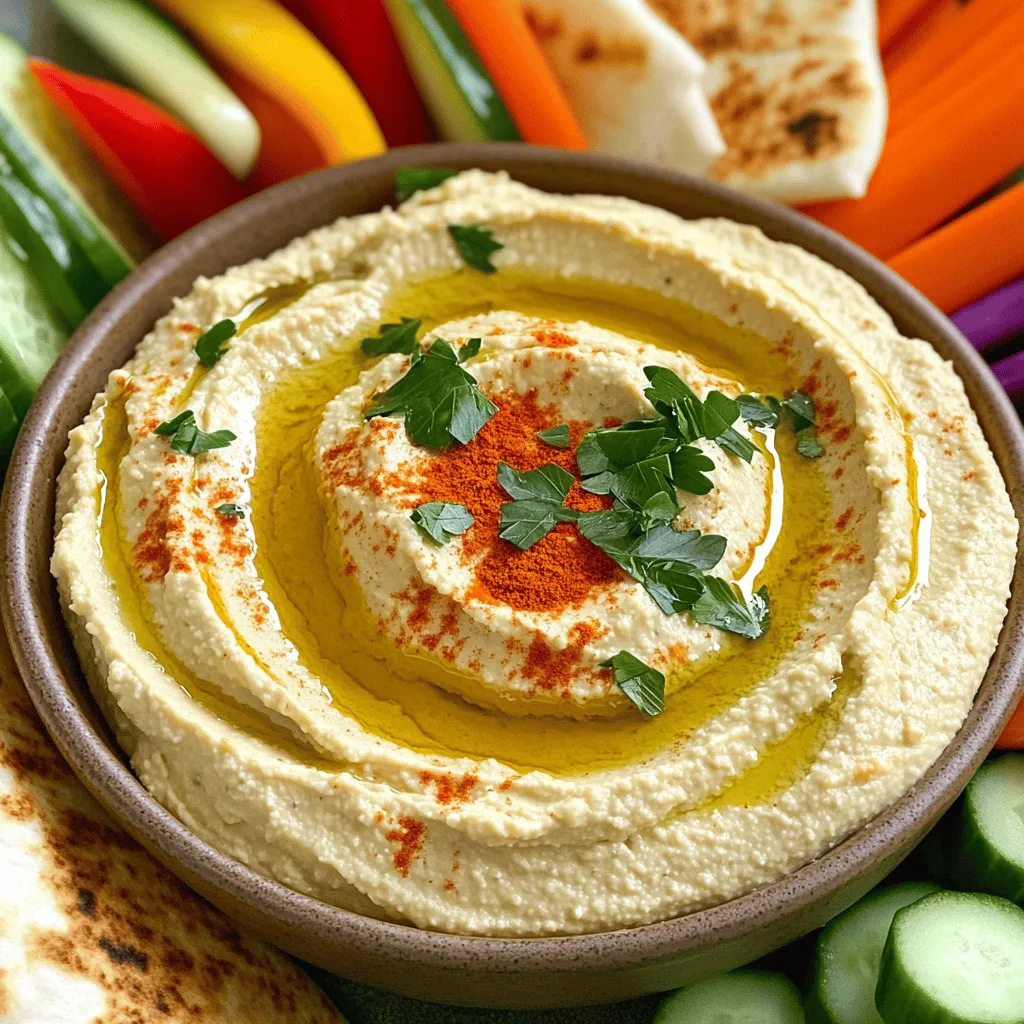
If you’re looking for a dip that’s as tasty as it is healthy, you’ve found it! Roasted garlic hummus brings

For my pumpkin spice energy bites, I like to use these simple ingredients: - 1 cup rolled oats - 1/2 cup pumpkin puree - 1/4 cup almond butter (or peanut butter for a different flavor) - 1/4 cup honey or maple syrup - 1/2 teaspoon ground cinnamon - 1/2 teaspoon ground ginger - 1/4 teaspoon ground nutmeg - 1/4 teaspoon salt - 1/4 cup mini chocolate chips (optional) - 1/4 cup chopped nuts (optional) These ingredients work together to create a tasty, healthy snack. The oats give you energy. The pumpkin adds vitamins and flavor. Nut butters provide healthy fats, while honey or maple syrup sweetens the bites naturally. You can play with the recipe to suit your taste. Here are some ideas: - Add 1/4 cup of dried fruit like cranberries or raisins for a chewy texture. - Swap the almond butter for cashew butter for a different nutty flavor. - Use sunflower seed butter if you want a nut-free option. These changes keep the bites fun and exciting. When picking ingredients, freshness matters. Always choose rolled oats that are whole and not stale. Look for pumpkin puree with no added sugar. For nut butters, select brands with only nuts and salt. If you buy honey, choose raw honey for the best flavor and health benefits. For maple syrup, look for pure syrup instead of flavored syrups. These tips ensure your energy bites taste great and stay healthy. If you want the full recipe, just refer back to the earlier section. To make Pumpkin Spice Energy Bites, gather all your ingredients first. You will need rolled oats, pumpkin puree, almond butter, honey or maple syrup, and spices. Make sure you have a large mixing bowl ready. This setup helps you stay organized and makes the process smoother. Start by adding the rolled oats, pumpkin puree, almond butter, and honey or maple syrup into the mixing bowl. Use a strong spoon or spatula to mix everything well. You want a smooth, even blend. Next, sprinkle in the ground cinnamon, ginger, nutmeg, and salt. Stir again until the spices blend perfectly. If you like a sweet touch, fold in mini chocolate chips and chopped nuts for added flavor and crunch. Once mixed, use your hands to scoop out about a tablespoon of the mixture. Roll it into small balls about one inch wide. Place the bites on a baking sheet lined with parchment paper. Make sure they are spaced apart. Then, pop the baking sheet into the fridge for at least 30 minutes. This will help the bites firm up. After chilling, move the energy bites to an airtight container. They will stay fresh in the fridge for up to a week. For longer storage, you can freeze them as well. Enjoy your healthy snack! To make your energy bites perfect, focus on the mix. Use rolled oats for a chewy base. Add pumpkin puree for moisture and flavor. Almond butter gives a creamy touch. If the mix feels too wet, add more oats. If it’s too dry, add a splash of pumpkin puree or nut butter. This balance is key. Keep your energy bites fresh by storing them in an airtight container. Place them in the fridge for a week. For longer storage, freeze them. When you want a bite, just take one out and let it thaw. This way, they stay tasty and ready to enjoy. You can change the sweetness to fit your taste. Use honey or maple syrup. Start with 1/4 cup, then taste. If you want it sweeter, add a bit more. You can also mix in mini chocolate chips for extra sweetness. This lets you create a flavor that feels just right for you. Try these tips to make your pumpkin spice energy bites the best they can be! To see the full process, check out the Full Recipe. {{image_4}} You can switch up the flavors in your energy bites. Try adding dried fruits like cranberries or apricots. These fruits add sweetness and a chewy texture. You can also mix in seeds like chia or flaxseeds for crunch. If you love coconut, shredded coconut can bring a tropical twist. Each change will make your bites unique and fun. While almond butter is the star here, other nut butters work well too. Peanut butter gives a classic taste and pairs great with pumpkin. Cashew butter adds a creamy touch. Sunflower seed butter is perfect for those with nut allergies. Each nut butter brings its own flavor, so feel free to experiment. Boost the nutrition of your energy bites by adding superfoods. Consider mixing in a scoop of protein powder for extra energy. Chia seeds are rich in omega-3s and fiber, making them a great addition. You can also use cacao nibs for a chocolatey flavor without added sugar. These superfoods make your bites not just tasty but also healthy. If you want to try making these bites, check out the Full Recipe for all the details! To keep your pumpkin spice energy bites fresh, store them in an airtight container. This helps prevent them from drying out or absorbing any strong smells from the fridge. It’s best to place a layer of parchment paper between layers if stacking them. Always make sure to seal the container tightly after each use. This way, your tasty snacks stay moist and flavorful. You can also freeze these energy bites for longer storage. After you form the bites, lay them on a baking sheet lined with parchment paper. Place the baking sheet in the freezer for about one hour. Once they are firm, transfer them to a freezer-safe bag or container. This method prevents them from sticking together. When you want to enjoy a bite, simply take it out and let it thaw for a few minutes. When stored in the fridge, these energy bites last about one week. If you freeze them, they can stay good for up to three months. Keep track of the date you made them. This will help you know when it’s time to enjoy or toss them. Proper storage is key to enjoying these delicious snacks for as long as possible. You can find the full recipe for making these delightful bites above. Pumpkin spice is more than just a tasty flavor. It has many health benefits. The spices in pumpkin spice, like cinnamon and ginger, can help with digestion. They also add anti-inflammatory properties. Cinnamon can lower blood sugar levels, while ginger may ease nausea. Plus, pumpkin is rich in vitamins A and C. These vitamins help keep our immune system strong. So, when you enjoy pumpkin spice energy bites, you’re not just treating your taste buds; you’re helping your body too. Yes, you can easily make these energy bites vegan! Simply replace honey with maple syrup. Both sweeteners work well, but maple syrup is plant-based. Also, ensure your nut butter is vegan. Most almond and peanut butters are vegan-friendly. This way, you keep all the great flavors and make it suitable for a vegan diet. You still get all the health benefits without losing taste. You can find pre-made pumpkin spice energy bites at many stores. Look in health food shops or the snack aisle in regular grocery stores. Some brands sell them online too. Check places like Amazon or specialty health websites. If you want to save time, buying pre-made bites can be a good option. However, making them at home, like in the full recipe, gives you control over the ingredients and taste. In this article, we explored how to make pumpkin spice energy bites. We covered the key ingredients, step-by-step instructions, and helpful tips. You can vary the flavor and choose your nut butter. We also discussed perfecting the texture and storage methods for freshness. Pumpkin spice energy bites are fun, tasty, and easy to make. Try them out today!

Pumpkin Spice Energy Bites Healthy Snack Option

Are you looking for a tasty and healthy snack? Pumpkin Spice Energy Bites are perfect for you! Packed with wholesome

- 4 fresh tilapia fillets - 1 cup finely grated Parmesan cheese - 1/2 cup panko breadcrumbs - 1 teaspoon garlic powder - 1 teaspoon dried Italian herbs - 1/2 teaspoon smoked paprika - Kosher salt and freshly ground black pepper - 2 large eggs, beaten - 2 tablespoons extra-virgin olive oil - Lemon wedges For this recipe, fresh tilapia fillets are key. They provide a mild taste and a tender texture. The Parmesan and panko mix gives a crunchy, golden crust. The garlic powder and herbs add a burst of flavor, while smoked paprika introduces a hint of warmth. Don't forget the lemon wedges! They brighten the dish when squeezed over the fish. You can spice things up with different herbs and spices. Consider adding: - A pinch of cayenne for heat - Fresh parsley for a pop of color - A squeeze of lime instead of lemon For side accompaniments, try serving the tilapia with: - Steamed seasonal vegetables - A fresh green salad - Roasted potatoes for a hearty touch Feel free to mix and match these optional ingredients to suit your taste or occasion. This flexibility makes the dish fun and unique. For the full recipe, check the detailed instructions on how to prepare this delightful meal! To start, preheat your oven to 400°F (200°C). This temperature helps the fish cook evenly and gives a nice crust. While the oven heats, line a baking sheet with parchment paper. This step makes cleanup easy and keeps the fish from sticking. In a shallow dish, mix these ingredients: - 1 cup finely grated Parmesan cheese - 1/2 cup panko breadcrumbs - 1 teaspoon garlic powder - 1 teaspoon dried Italian herbs - 1/2 teaspoon smoked paprika - Kosher salt and freshly ground black pepper, to taste Stir until everything combines well. In another bowl, beat 2 large eggs. Dip each tilapia fillet in the eggs first. Let excess egg drip off. Then, press the fillet into the cheese mixture. Make sure both sides are well coated for a tasty crunch. Place the coated fillets on the lined baking sheet. Drizzle a tablespoon of extra-virgin olive oil over each fillet. This oil keeps the fish moist while baking. Bake the tilapia for 15-20 minutes. Watch for a golden brown crust and ensure the fish flakes easily with a fork. This is when it’s done. Remove the baking sheet and let the tilapia rest for a few minutes before serving. This helps keep the fish juicy. For a great coating, start with dry fish. Pat your tilapia fillets with paper towels. This helps the coating stick well. Use a shallow dish for the cheese mix. Spread the grated Parmesan and breadcrumbs evenly. When coating, press down gently. This ensures an even layer. To avoid clumping, mix the cheese and breadcrumbs with a fork. You want a smooth blend. You can boost flavors with herbs and spices. Add fresh parsley or dill to the cheese mix. A squeeze of lemon juice can brighten the dish. Always choose high-quality Parmesan cheese. The flavor of fresh cheese is much better. Grate it yourself for a richer taste. Try adding a pinch of cayenne for a little heat. Pair your tilapia with sides like rice or quinoa. Steamed broccoli or green beans also work great. A fresh salad adds a nice crunch. For a drink, try a crisp white wine. Sauvignon Blanc or Pinot Grigio are perfect matches. They enhance the fish's flavor without overpowering it. Enjoy your meal with a zesty lemon wedge. Squeezing lemon over the fish adds a refreshing touch. For the full recipe, check out the details above. {{image_4}} You can use other fish if you don't have tilapia. Some great options include: - Cod - Haddock - Catfish - Sole These fish can also take on the Parmesan crust well. Just adjust cooking times as needed. For thicker fish, you may need a few extra minutes in the oven. You can try air frying for a quick and crispy dish. Preheat your air fryer to 400°F (200°C) and cook the fillets for about 10-12 minutes. Check for a golden crust. Grilling is another fun way to cook this dish. Preheat your grill to medium-high. Lightly oil the grates to prevent sticking. Cook the fillets for about 4-5 minutes per side. Watch closely, as fish cooks fast on the grill. Making this dish gluten-free is easy. Use gluten-free breadcrumbs instead of panko. You won’t lose the crunch! For a dairy-free version, try using nutritional yeast instead of Parmesan cheese. It adds a cheesy flavor without the dairy. Adjust the seasoning to keep it tasty and flavorful. Explore these variations to keep your meals exciting! For the full recipe, check out the details. To keep your leftover tilapia fresh, follow these best practices: - Refrigeration: Place the tilapia in an airtight container. This prevents air from drying it out. - Maximum Storage Time: Consume the leftovers within 3 days. This keeps the fish tasting great and safe to eat. When reheating, you want that crispy crust to stay intact. Here are my recommended methods: - Oven Method: Preheat your oven to 350°F (175°C). Place the tilapia on a baking sheet and warm it for about 10 minutes. This method helps keep the crust crunchy. - Skillet Method: Heat a non-stick skillet over medium heat. Add a little oil, then cook the tilapia for about 3-4 minutes on each side. This way, it stays moist and crisp. Tips for Avoiding Dryness: Always monitor the reheating time. Overheating can dry out the fish. If it feels dry, consider adding a splash of broth or a bit of olive oil before reheating. Enjoy your tasty leftovers! For the complete recipe, check out the Full Recipe section! To know if your tilapia is cooked, look for a few signs. The fish should be opaque and flake easily with a fork. You can also use a food thermometer. The internal temperature should reach 145°F (63°C). This ensures it is safe to eat. Checking these indicators helps prevent undercooking or overcooking. Yes, you can prepare the Parmesan crust in advance. Mix the cheese and breadcrumbs, then store it in an airtight container. This keeps it fresh for a few days. You can also freeze the mixture for longer storage. Just remember to thaw it before using. This makes dinner prep quicker on busy nights. There are many sides that pair well. Here are some ideas: - Steamed broccoli or green beans - A fresh garden salad - Roasted potatoes or sweet potatoes - Quinoa or rice for a filling option You can change sides based on the season. For summer, a light salad works well. In winter, roasted veggies add warmth. Choose sides that you love and that balance the meal. Enjoy your tasty Parmesan crusted tilapia with your favorite sides for a complete meal! This article covered how to make delicious Parmesan crusted tilapia. We discussed essential and optional ingredients, along with easy step-by-step instructions. I shared tips for perfecting the dish and suggested variations for different diets and cooking methods. Don’t forget to try different sides that elevate your meal. With these methods, you can enjoy a tasty dish that suits your taste. Whether you make it tonight or later, this recipe is sure to impress!

Parmesan Crusted Tilapia Simple and Tasty Recipe

If you’re looking for a quick and tasty dinner, Parmesan Crusted Tilapia is the way to go. This simple recipe

For this recipe, you need 2 cups of fresh strawberries. Make sure they are ripe and sweet. Rinse them well, hull, and halve them. Fresh berries give the best taste and texture. Use 1/4 cup of honey or maple syrup. Both sweeteners add natural sweetness. Honey gives a floral note, while maple syrup adds a rich flavor. Choose what you like best. You will need 2 tablespoons of chia seeds. These tiny seeds are special! They absorb water and expand, making the jam thick and creamy. They also add healthy fiber and omega-3s. Add 1 tablespoon of fresh lemon juice. This brightens the flavor of the jam. It balances the sweetness and adds a tangy twist. Fresh juice is always better than bottled. You might want a pinch of salt. It enhances all the flavors. If you like it sweeter, feel free to add more honey or maple syrup. It's all about your taste! For the full recipe, check out the instructions to create your own strawberry chia seed jam! To start, wash 2 cups of fresh strawberries. Remove the green tops and cut each berry in half. This helps them cook down faster. Place the halved strawberries in a medium saucepan. Set the saucepan over medium heat. Add 1/4 cup of honey or maple syrup to the strawberries. Stir gently to coat them well. Cook for about 5-7 minutes. You want the strawberries to break down and bubble a bit. Once the strawberries are soft, take the pan off the heat. Use a fork or potato masher to mash them lightly. You want a chunky jam, so don't overdo it! Next, mix in 2 tablespoons of chia seeds, 1 tablespoon of fresh lemon juice, and a pinch of salt. Stir everything together well. Let the jam sit at room temperature for 10-15 minutes. During this time, the chia seeds will absorb the liquid and thicken the jam. Stir it a few times to keep it smooth. After it thickens, taste it. You can adjust the sweetness if needed. If you want it smoother, blend it briefly. When your jam is ready, transfer it to a clean, sterilized jar. Let it cool completely before sealing it with a lid. Store your strawberry chia seed jam in the fridge. It will stay fresh for up to two weeks. Enjoy it on toast, pancakes, or in yogurt bowls! For the full recipe, check the earlier section. To get the right texture for your jam, start by mashing the strawberries lightly. You want some small chunks for a nice feel. If you like it smoother, blend it briefly. The chia seeds help thicken it as they soak up the juice. After letting it sit for 10-15 minutes, check if it feels thick enough. If not, give it a little more time. Adjusting sweetness is simple. After mixing in the chia seeds, taste the jam. If you like it sweeter, add a little more honey or maple syrup. Remember, the flavor can change as it cools. So, do a final taste check before storing. A pinch of salt also helps balance the sweetness. After making your jam, store it in a clean jar. Let it cool fully before sealing. This helps avoid condensation, which can spoil the jam. Keep it in the fridge, where it stays fresh for about two weeks. If you want to keep it longer, consider freezing it in smaller portions. This way, you can enjoy it anytime! {{image_4}} You can easily swap strawberries for other berries. Blueberries, raspberries, or blackberries work great. Each berry brings its own flavor. Blueberries add sweetness, while raspberries offer a tart kick. Just use the same method from the full recipe. Adjust the sweetness if needed, as each berry has a different taste. Spices can enhance the flavor of your jam. Adding a teaspoon of vanilla makes your jam taste rich and warm. If you enjoy a hint of warmth, sprinkle in some cinnamon. Just a pinch can give your jam a cozy feel. Experiment with spices to find your favorite mix. If you prefer a sugar-free jam, you can use ripe bananas or applesauce. These natural sweeteners keep your jam delicious without added sugar. You can also try stevia or erythritol for a low-calorie option. Just remember to taste as you go. You want to find that perfect balance of flavor! To keep your strawberry chia seed jam fresh, store it in a clean jar with a tight lid. Place the jar in the fridge right after it cools. The cool temperature helps maintain the jam's flavor and texture. Always use a clean spoon when serving. This prevents bacteria from spoiling your jam. If you want to store your jam for a longer time, freezing is a great choice. Pour the jam into an airtight container or freezer-safe bag. Leave some space at the top, as the jam will expand when frozen. Label the container with the date so you remember when you made it. You can freeze it for up to six months! When stored in the fridge, your jam will last for about two weeks. If you freeze it, you can enjoy it for up to six months. Always check for any off smells or strange colors before using. If everything looks and smells good, you can enjoy that delicious strawberry chia seed jam anytime! Chia seed jam is a healthy spread made with fruit and chia seeds. Chia seeds absorb liquid and create a thick texture. This jam is simple to make and full of flavor. You can customize it with your favorite fruits, like strawberries. Strawberry chia seed jam lasts about two weeks in the fridge. Store it in a clean jar with a tight lid. Always check for any changes in smell or color before using it. Yes, you can use frozen strawberries! Just thaw them first before cooking. They may release more juice, so you might need to adjust the cooking time. The jam will still taste great and be just as healthy. Chia seeds are tiny but mighty! They are rich in fiber, protein, and omega-3 fatty acids. These nutrients can help with digestion and heart health. Chia seeds also provide energy and keep you feeling full longer. To adjust sweetness, try adding a ripe banana or a splash of vanilla extract. You can also mix in a bit of unsweetened applesauce. These options add natural sweetness without extra sugar. This blog post covered making delicious chia seed jam with fresh strawberries. I shared ingredients, step-by-step instructions, tips for the best texture, and variations for extra flavor. You learned the best storage methods to keep your jam fresh. This recipe is simple and healthy, with many ways to customize it. I hope you feel inspired to make your own jam! Enjoy the sweet taste and health benefits chia seeds offer.

Strawberry Chia Seed Jam Easy and Healthy Recipe

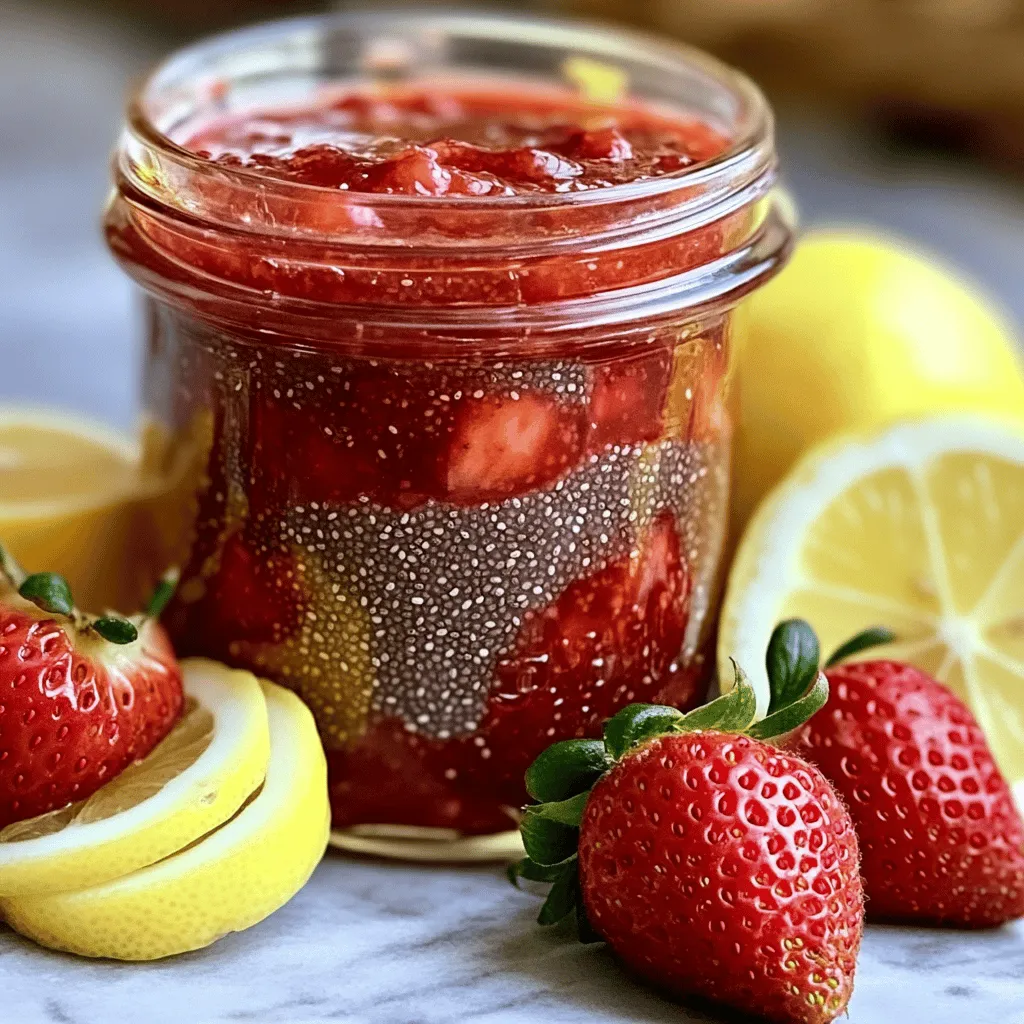
Are you ready to make a delicious and healthy treat? Strawberry Chia Seed Jam is not only easy to make,

- 1 can (15 oz) chickpeas, thoroughly drained and rinsed - 1 cup quinoa, rinsed and drained - 2 cups vegetable broth (or water) - 1 ripe avocado, elegantly sliced - 1 cup cherry tomatoes, halved for a burst of flavor - 1 fresh cucumber, diced into bite-sized pieces - 1 cup baby spinach or a mix of colorful greens - 1 medium carrot, finely grated for a crunchy texture - 2 tablespoons tahini, for a rich, nutty flavor - 2 tablespoons fresh lemon juice, for brightness - 1 tablespoon extra virgin olive oil - 1 teaspoon garlic powder, to enhance the taste - Salt and black pepper, to taste - Fresh parsley or cilantro, chopped, for garnish The chickpeas are a great source of protein. They add a nice texture too. Quinoa is packed with nutrients and is gluten-free. Fresh vegetables bring color and crunch. The dressing ties all the flavors together. I love using tahini for its creamy and nutty taste. - Protein options like grilled chicken or tofu - Additional toppings such as seeds or nuts You can boost the protein with grilled chicken or tofu. Seeds like pumpkin or sunflower add a nice crunch. Nuts can also give extra flavor and texture. These add-ins make the bowl even more filling. - Medium saucepan - Non-stick skillet - Serving bowls You need a medium saucepan for cooking quinoa. A non-stick skillet is great for sautéing chickpeas. Finally, serving bowls will showcase your beautiful Buddha bowl. Using the right tools makes cooking easier and more fun. Start by rinsing the quinoa. This step helps remove its bitter coating. In a medium saucepan, combine the rinsed quinoa and vegetable broth. Bring this mixture to a boil. Once boiling, lower the heat to a gentle simmer. Cover the pot and let it cook for about 15 minutes. You will know it’s done when the liquid is absorbed. Fluff the quinoa with a fork and set it aside to cool. While the quinoa cooks, heat a non-stick skillet over medium heat. Add the drained chickpeas into the skillet. Season them with garlic powder, salt, and pepper. Sauté the chickpeas for around 5 to 7 minutes. Stir them occasionally until they turn golden and slightly crispy. This adds a nice texture and flavor. In a small bowl, combine tahini, lemon juice, and olive oil. Whisk these ingredients together until smooth. If the dressing is thick, add a few teaspoons of water. This will help make it pourable. Adjust the consistency to your liking. To build your Buddha bowl, start with a generous scoop of quinoa at the bottom. Next, layer on a vibrant heap of spinach or mixed greens. Add the sautéed chickpeas, followed by sliced avocado, halved cherry tomatoes, diced cucumber, and grated carrot. Arrange the toppings nicely to create an inviting look. Gently pour the tahini dressing over your Buddha bowl. Allow it to cascade over the toppings for more flavor. Finally, sprinkle chopped fresh parsley or cilantro on top. This adds a pop of color and flavor to your dish. For the [Full Recipe], refer back to the ingredient list at the start. Enjoy creating this nourishing meal! To make perfect quinoa, rinse it well before cooking. This removes bitter flavors and helps it cook evenly. In a medium saucepan, combine one cup of rinsed quinoa with two cups of vegetable broth or water. Bring it to a boil, then lower the heat and cover. Let it simmer for about 15 minutes until all the liquid is absorbed. Fluff the quinoa with a fork when done. It should be light and fluffy. For crispy chickpeas, start with a can of chickpeas. Drain and rinse them thoroughly. Dry them well with a towel. Heat a non-stick skillet over medium heat and add the chickpeas. Season them with garlic powder, salt, and black pepper. Sauté for about 5 to 7 minutes. Stir them often until they turn golden brown and crispy. This gives them a great texture in your bowl. To arrange toppings for a vibrant look, use different colors and shapes. Place a scoop of quinoa in the bowl first. Add a layer of fresh greens like spinach. Then, arrange your chickpeas, avocado slices, cherry tomatoes, cucumber, and grated carrot on top. Keep each topping in its section for a beautiful display. For the best bowl styles, use wide, shallow bowls. This allows the bright colors of the fresh ingredients to shine. A wide bowl also makes it easier to see all the delicious layers you created. To add extra flavor, consider using spices and herbs. A sprinkle of smoked paprika, cumin, or chili powder can enhance the taste of your chickpeas. Fresh herbs like parsley or cilantro add a burst of freshness, too. For homemade dressings, try mixing tahini, lemon juice, and olive oil. Whisk them together until smooth. If it’s too thick, add a little water to get the right consistency. This dressing brings a rich, nutty flavor to your bowl. You can also try balsamic vinaigrette or a yogurt-based dressing for different tastes. Feel free to explore the [Full Recipe] for more details on creating this nourishing dish! {{image_4}} You can switch up the grain in your Buddha bowl. Quinoa is great, but other grains work too. Brown rice is a popular choice. It has a nice chewy texture and adds fiber. Farro is another fun option. This grain has a nutty flavor and is very satisfying. If you want to make this dish vegan, consider adding more plant-based proteins. You can use lentils or black beans instead of chickpeas. They are packed with protein and taste great. Add nuts or seeds for extra crunch. Pumpkin seeds or sliced almonds can add a nice touch. Seasonal veggies can make your bowl even better. In summer, use fresh corn or bell peppers for sweetness. In winter, try roasted squash or Brussels sprouts for warmth. You can mix and match to keep things fresh and exciting. Each season brings new flavors to explore. To keep your Buddha bowl fresh, store leftovers in the fridge. Use airtight containers. Glass or plastic containers work well. Make sure to cool the food before sealing. This helps prevent moisture build-up. You can freeze parts of the Buddha bowl. Freeze quinoa and chickpeas separately. Use freezer-safe bags or containers. Label them with the date. To thaw, move them to the fridge overnight. Reheat on the stove or in the microwave. Add a splash of water for moisture. Chickpeas and quinoa last about 3-5 days in the fridge. Fresh veggies, like cucumber and avocado, last only 1-2 days. Check for signs of spoilage. If anything looks slimy or smells off, toss it. Always trust your senses when it comes to food! Yes, you can make this Buddha bowl ahead. Cook the quinoa and chickpeas. Store them in separate containers. Keep the fresh veggies and dressing separate too. This way, everything stays fresh. When ready to eat, just assemble your bowl. If you need a substitute for tahini, try peanut butter or sunflower seed butter. You can also use yogurt for a creamy touch. Just mix with lemon juice and olive oil. Adjust the flavors to fit your taste. To make crispy chickpeas, dry them well after rinsing. Heat your pan before adding them. Cook on medium heat and stir often. Let them cook until they turn golden brown. This will give you the perfect crunch. Yes, this recipe is gluten-free. Quinoa is a great choice for those avoiding gluten. Just make sure all other ingredients, like dressings, are gluten-free too. This way, everyone can enjoy the meal. You can add many toppings to your Buddha bowl. Try roasted sweet potatoes or beets for sweetness. Nuts and seeds give a nice crunch. You might also like olives or feta cheese for added flavor. Get creative with what you love! You can find the full recipe for the Chickpea Bliss Buddha Bowl in the article above. It includes all the steps and tips for making this delicious dish. Enjoy cooking! We've covered how to make a tasty chickpea Buddha bowl. You learned about essential ingredients like chickpeas, quinoa, and fresh veggies. I shared tips for cooking, assembling, and storing your bowl. You can customize it with proteins, toppings, and different grains. In summary, this dish is healthy, fun, and easy to make. Enjoy your creation and experiment with new flavors! Cooking at home can be satisfying and delicious. Don't hesitate to make this bowl your own.

Easy Chickpea Buddha Bowl Nourishing and Simple Meal

Looking for a quick and healthy meal? The Easy Chickpea Buddha Bowl is your answer! In this simple recipe, you’ll

To make Sweet and Spicy Korean Chicken, you need the following ingredients: - 1.5 lbs chicken thighs, boneless and skinless - 1/4 cup cornstarch - 1 tablespoon vegetable oil - 2 cloves garlic, minced - 1 tablespoon ginger, minced - 1/4 cup soy sauce - 2 tablespoons gochujang (Korean chili paste) - 2 tablespoons honey or maple syrup - 1 tablespoon rice vinegar - 1 tablespoon sesame oil - 1 green onion, thinly sliced (for garnish) - 1 tablespoon sesame seeds (for garnish) Each ingredient adds a special touch to the dish. The chicken thighs stay juicy and flavorful. The cornstarch gives a crispy coating. Garlic and ginger add depth to the sauce. Gochujang brings heat and sweetness. Honey or maple syrup helps balance those flavors. Rice vinegar adds a tangy note. Sesame oil adds a rich finish. Green onions and sesame seeds make the dish look pretty. This blend of flavors and textures creates a delightful meal. For the full recipe, check out the details above. - Coating with Cornstarch Toss the chicken pieces in cornstarch. This step helps create a crispy outside. Make sure each piece is fully coated. - Importance of Even Coating An even coating is key. It ensures all pieces cook the same and get crispy. - Heating the Oil Heat vegetable oil in a large skillet. Use medium-high heat. Wait until the oil is hot but not smoking. - Cooking Time and Techniques Add the chicken in a single layer. Cook for 5-7 minutes, turning often. Look for a golden brown color on all sides. - Ingredients and Method After cooking the chicken, lower the heat. Add minced garlic and ginger to the pan. Sauté for 1 minute until fragrant. Pour in soy sauce, gochujang, honey, rice vinegar, and sesame oil. Stir well and let it simmer for 2-3 minutes until it thickens. - Importance of Sautéing the Aromatics Sautéing garlic and ginger first brings out their flavors. This step enhances the overall taste of your dish. - Techniques for Even Coating Return the cooked chicken to the skillet. Gently toss it with the sauce. Make sure every piece is coated well. - Cooking Until Well-Coated Cook for an extra 2 minutes. This allows the chicken to soak up the sauce's flavors. - Final Garnish Suggestions Remove the skillet from heat. Transfer the chicken to a serving platter. Garnish with sliced green onions and sesame seeds. - Serving Recommendations Serve the dish hot over steamed rice. You can also enjoy it with fresh lettuce leaves for wrapping. For the full recipe, check out the complete guide. Cornstarch is key to crispy chicken. It helps form a crunchy crust. When you coat each piece well, it fries perfectly. You want a light, even layer. Cooking in batches also helps. If you crowd the pan, the chicken will steam instead of fry. Fry in small groups for that golden crunch. Sweetness and spice need balance. Start by adding the gochujang slowly. Taste as you go. You can add more honey if it’s too spicy. If it’s too sweet, add a bit more soy sauce. Mixing the sauce ingredients well is crucial. Make sure everything blends before pouring it over the chicken. Plating should be fun and colorful. Use a large white plate to make the colors pop. After you add the chicken, sprinkle sesame seeds on top. This adds a nice crunch and looks great. Thinly sliced green onions also add a vibrant touch. They give a fresh flavor and bright color. Serve the chicken over steamed rice or lettuce wraps for a tasty twist. {{image_4}} You can swap chicken for tofu or cauliflower in this recipe. Tofu absorbs flavors well and adds a nice texture. If using tofu, choose firm or extra-firm types. Cut them into bite-sized cubes before coating. For cauliflower, cut it into florets. Both options provide a tasty twist. When cooking tofu or cauliflower, adjust the cooking times. Tofu needs about 5-6 minutes per side to get a nice brown color. Cauliflower takes about 7-10 minutes to cook, depending on the size of the florets. Make sure to stir often to avoid burning. If you want a milder dish, reduce the gochujang. You can start with one tablespoon instead of two. This still gives you some flavor without too much heat. Adding a bit of honey can also help balance the spice. For those who crave more heat, try adding extra gochujang or a sprinkle of red pepper flakes. You can also serve sliced fresh peppers on the side for an extra kick. This way, everyone can customize their plate. Rice pairs perfectly with Sweet and Spicy Korean Chicken. You can use white rice, brown rice, or fragrant jasmine rice. Each option adds a unique flavor and texture to the dish. Consider adding vegetable sides for a complete meal. Steamed broccoli, sautéed bok choy, or cucumber salad all complement the chicken well. These sides add color, crunch, and extra nutrition. For a fun twist, serve the chicken with lettuce leaves. This creates a fun wrap that everyone can enjoy. For the full recipe, check out the Sweet and Spicy Korean Chicken details. After enjoying your Sweet and Spicy Korean Chicken, store any leftovers safely. Place the chicken in an airtight container. This keeps moisture in and prevents it from drying out. Make sure your container seals well. You can store it in the fridge for up to three days. Use glass or BPA-free plastic containers. These materials help keep your food fresh. Glass containers are easy to clean and safe for reheating. If you plan to freeze the chicken, ensure your container is freezer-safe. To enjoy your chicken again, reheat it carefully. The best method is using a skillet. Heat it over medium heat and add a splash of water or broth. This keeps the chicken moist. Stir occasionally until heated through. You can also use the microwave. Place the chicken in a microwave-safe dish. Cover it with a damp paper towel to keep moisture. Heat in short bursts of 30 seconds, stirring in between. Avoid reheating the chicken at high heat for too long. This can make it dry and tough. Aim for just enough time to warm it. This keeps the tasty sauce intact. If you want to store the chicken for longer, freezing is a good choice. Place the cooled chicken in a freezer-safe container. Make sure to leave some space for expansion. You can freeze it for up to three months. Label your container with the date. This helps you keep track of how long it’s been stored. Consider dividing the chicken into meal-sized portions. This makes it easy to thaw just what you need. To thaw, move the chicken to the fridge overnight. This method is slow, but it keeps the chicken safe. If you need it faster, you can use the microwave. Choose the defrost setting and check often to avoid cooking the edges. Gochujang is a Korean chili paste. It has a sweet and spicy flavor. It adds depth to many dishes. Made from red chili powder, fermented soybeans, and salt, it brings a unique taste. You can find gochujang in many grocery stores. It is key in this sweet and spicy Korean chicken recipe. Yes, you can make this dish ahead of time. Prepare the chicken and sauce and store them separately. Keep them in airtight containers in the fridge. You can cook the chicken in the morning and heat it up later. This way, you save time during busy weeknights. This dish pairs well with many sides. Here are some ideas: - Steamed rice - Fried rice - Roasted vegetables - Cucumber salad - Kimchi These sides balance the flavors and make a complete meal. To make more servings, you can easily scale the ingredients. Just double or triple the amount you need. For example, use 3 lbs of chicken instead of 1.5 lbs. Adjust the sauces and seasonings similarly. Make sure to cook in batches if your pan is small. This recipe can be made gluten-free. Use gluten-free soy sauce instead of regular soy sauce. Check the gochujang label for gluten-free options. Many brands offer gluten-free chili paste. With these adjustments, you can enjoy this dish without worry. Yes, you can use chicken breasts. However, you need to adjust the cooking time. Chicken breasts cook faster than thighs. Cook them for about 4-6 minutes, checking for doneness. This way, you still get juicy and tender chicken in your dish. This blog post shared a tasty recipe for sweet and spicy Korean chicken. You learned about the key ingredients, step-by-step instructions, and tips for the best results. I emphasized making the chicken crispy and balancing flavors. We also looked at variations, storage options, and common questions. Try this dish at your next meal. It’s simple and fun to make! Enjoy the rich flavors and impress your friends and family. Don't forget to experiment with ingredient options based on your taste!

Sweet and Spicy Korean Chicken Easy Flavorful Dish

Are you ready to spice up your dinner routine? Sweet and Spicy Korean Chicken is the perfect blend of flavors

To make Caprese stuffed avocados, you need a few key items. Here’s what to gather: - 2 ripe avocados - 1 cup cherry tomatoes, halved - 1 cup fresh mozzarella balls, drained - ¼ cup fresh basil leaves, finely chopped - 2 tablespoons balsamic glaze - 1 tablespoon extra virgin olive oil - Salt and freshly cracked black pepper to taste These ingredients bring bright flavors and freshness to the dish. The creamy avocado pairs perfectly with the juicy tomatoes and soft mozzarella. While the main ingredients shine, you may want to add some extra flavor. Consider these options: - A pinch of garlic powder for warmth. - A squeeze of lemon juice for brightness. - A dash of red pepper flakes for heat. These seasonings can elevate your avocado dish and add a personal touch to your recipe. You’ll need a few simple tools to make this dish. Here’s what I recommend: - A sharp knife for slicing avocados and tomatoes. - A mixing bowl for combining the filling. - A spoon for scooping out avocado flesh. - A spatula for mixing and folding ingredients. Having these tools on hand will make your cooking process smooth and enjoyable. Now you’re ready to create a vibrant Caprese stuffed avocado dish! For the complete recipe, check out the Full Recipe. Start with two ripe avocados. Cut each avocado in half from top to bottom. Twist gently to separate the halves. Use a spoon to remove the pit carefully. Scoop out a bit of the flesh from the center of each half. This step gives you more room for the filling. Save the scooped-out avocado in a clean bowl. In a medium bowl, mix the halved cherry tomatoes and drained mozzarella balls. Add the chopped basil leaves for freshness. Then, include the reserved avocado flesh. Pour in the extra virgin olive oil, and sprinkle some salt and black pepper. Use a spatula to mix everything together gently. Make sure all the ingredients are well combined. Now, it's time to fill the avocados. Take a spoon and fill each avocado half with the Caprese mixture. Heap the mixture slightly to make it look nice. Each bite should be full of flavor and color. For the full recipe, you can refer to the section above. To make Caprese stuffed avocados, pick ripe fruit. A ripe avocado feels slightly soft when you press it gently. If it feels too hard, it is not ready. If it feels very soft, it may be overripe. Look for dark green or black skin. The color shows it is ripe and ready to eat. To boost flavor, use simple seasonings. Salt and pepper help bring out the taste. You can also add garlic powder or crushed red pepper for more zest. A squeeze of fresh lemon juice brightens the dish. It adds a nice tang that balances the creaminess of the avocado. You can even try different herbs, like oregano or thyme, to change the flavor. Make your dish look beautiful. Start by placing the stuffed avocados on a bright plate. Drizzle balsamic glaze over them for a stunning touch. You can sprinkle some extra chopped basil on top for a pop of color. Serve with a side of crusty bread for a complete meal. This makes the meal inviting and fun to eat. For the full recipe, don’t forget to check out the instructions above! {{image_4}} You can easily make Caprese stuffed avocados vegetarian. Instead of mozzarella, try using feta cheese. Feta adds a nice salty flavor. You can also swap in grilled veggies. Zucchini or bell peppers work well. They add color and taste, making your dish fun and fresh. Want to boost your meal? Add proteins like grilled chicken or shrimp. Just chop them into small pieces. Mix them into the Caprese filling. This adds more heartiness to your dish. You can enjoy a filling meal while keeping it tasty. Flavored oils can change the taste of your stuffed avocados. Try using garlic-infused olive oil for a rich flavor. You can also drizzle some chili oil for a spicy kick. Experiment with different dressings too. A tangy lemon vinaigrette can brighten the dish. For a sweet twist, use a lemon-basil dressing. Each variation makes your meal unique and exciting. For more ideas, check the Full Recipe. When you want to store Caprese stuffed avocados, keep them fresh and tasty. First, place them in an airtight container. This helps prevent browning and keeps them safe from air. If you have leftovers, cover them tightly with plastic wrap. You can also add lemon juice to the avocado flesh to slow down browning. This simple trick works well! You can keep stuffed avocados in the fridge for about one day. After this time, the avocados may brown and lose their taste. It’s best to eat them fresh. If you need to make them ahead of time, prepare the filling separately. Then, stuff the avocados just before serving. You should not reheat Caprese stuffed avocados. They taste best fresh and cold. However, if you want to warm the filling, do so gently in a pan. Just make sure not to cook the avocados. This will help you keep their creamy texture. Enjoy your Caprese stuffed avocados cold for the best flavor! Yes, you can prepare the Caprese filling ahead of time. Store it in the fridge. Cut the avocados just before serving. This keeps them fresh and green. If you mix the filling too early, the avocado may brown. To slow browning, add lemon juice to the filling. You can use feta cheese or goat cheese instead of mozzarella. Both add a nice tangy flavor. If you want a dairy-free option, try using a vegan cheese that melts well. You can also use diced avocado if you prefer a creamier texture. Yes, you can make a low-calorie version of Caprese stuffed avocados. Use less cheese or skip it entirely. Add more tomatoes and basil to keep it flavorful. You might also use a balsamic vinegar instead of glaze to cut down on sugar. For full details, check the Full Recipe for variations. Caprese stuffed avocados blend fresh flavors and textures. We explored key ingredients and seasonings, plus the right tools. I shared simple steps for preparing, mixing, and stuffing. Tips helped you pick ripe avocados and present them nicely. You learned ways to make this dish unique and how to store leftovers. In the end, these stuffed avocados are tasty and fun to make. Enjoy experimenting with your own twists!

Caprese Stuffed Avocados Flavorful and Fresh Delight

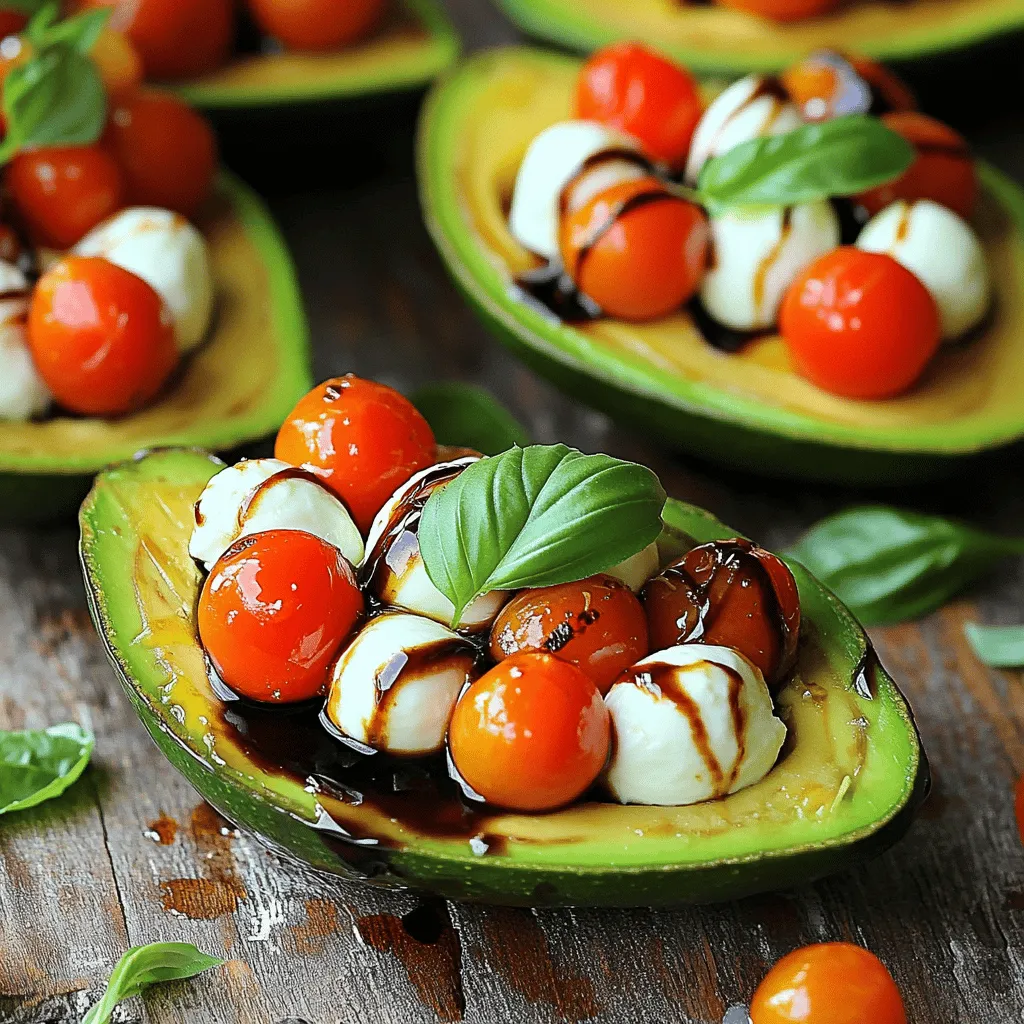
Looking for a fresh and tasty treat? Try Caprese stuffed avocados! This colorful dish combines creamy avocados with ripe tomatoes,

Older posts
Newer posts
← Previous Page1 … Page27 Page28 Page29 … Page68 Next →

dsad

© 2025 tastymomrecipes • Built with GeneratePress

Our Policies

  • Copyright Policy
  • Cookie Policy
  • GDPR Policy
  • Privacy Policy
  • Disclaimer
  • Terms Of Use

More Information

  • Home
  • About
  • Contact
  • Appetizers
  • Dessert
  • Dinner
  • Drinks
©2025, tastymomrecipes About Back To Top