Skip to content
DisclaimerTerms Of UseGDPR PolicyCookie Policy

tastymomrecipes

  • Home
  • Drinks
  • Appetizers
  • Dinner
  • Dessert
  • About
  • Contact
  • Privacy Policy
DisclaimerTerms Of UseGDPR PolicyCookie Policy

Olivia

- 4 boneless, skinless chicken thighs - 3 tablespoons extra-virgin olive oil - 4 tablespoons freshly squeezed lemon juice - 4 cloves garlic, finely minced - 1 teaspoon smoked paprika - 1 teaspoon dried oregano - Sea salt and freshly ground black pepper, to taste - 2 cups broccoli florets, washed and trimmed - 1 cup cherry tomatoes, halved - 1 cup cooked quinoa (or option for brown rice) The main stars of this dish are the chicken thighs. They stay juicy and tender. The olive oil and lemon juice add great flavor. Fresh garlic gives it a nice kick. For seasonings, smoked paprika and oregano bring depth. They create a warm, rich taste. Don't forget the sea salt and black pepper. They enhance every bite. For the veggies, I love broccoli florets. They add a nice crunch. Cherry tomatoes burst with flavor when roasted. Pair these with quinoa or brown rice for a healthy base. This combination makes a bright and colorful meal. - Preheat the Oven Start by preheating your oven to 425°F (220°C). This step is key for even cooking. - Prepare the Marinade In a small bowl, mix together 3 tablespoons of olive oil, 4 tablespoons of lemon juice, and 4 minced garlic cloves. Add 1 teaspoon of smoked paprika, 1 teaspoon of dried oregano, and a pinch of sea salt and black pepper. Whisk until smooth. - Coat the Chicken Thighs Place 4 boneless, skinless chicken thighs in a large bowl or a zip-top bag. Pour half of the marinade over the chicken. Make sure each piece is well coated. - Marinate Duration Allow the chicken to marinate for at least 20 minutes at room temperature. This helps the chicken soak up all the great flavors. - Arrange Ingredients on the Baking Sheet Line a large baking sheet with parchment paper. After marinating, place the chicken in the center. In a separate bowl, toss 2 cups of broccoli florets and 1 cup of halved cherry tomatoes with the remaining marinade. Spread these around the chicken on the sheet. - Bake Until Done Bake everything for 25-30 minutes. Check that the chicken reaches an internal temperature of 165°F (75°C) and that the veggies are tender and slightly caramelized. Importance of Marinating Marinating the chicken is key. It helps the meat soak up all those zesty flavors. I suggest marinating for at least 20 minutes. If you have time, go longer! Overnight marinating boosts the taste even more. Use the marinade to coat the chicken well. This gives the chicken a bright, tangy flavor that shines through. Checking for Doneness It's important to check if the chicken is done. The safe internal temperature is 165°F (75°C). Use a meat thermometer for accuracy. You can also cut into the chicken. The meat should be no longer pink inside. Juices should run clear. This ensures the chicken is safe and tasty. Achieving Perfectly Roasted Vegetables To get the best veggies, cut them evenly. This helps them roast at the same rate. Spread them out on the pan without crowding. Crowded veggies steam instead of roast. Look for a slight char on the edges. This adds flavor and texture. Remember, the goal is tender veggies with a bit of caramelization. Ideal Bowl Assembly As you build your bowls, start with the grain base. Quinoa or brown rice both work well. Then, layer on the sliced chicken. Next, add the roasted broccoli and tomatoes. This creates a colorful and balanced meal. Finish with fresh parsley for a pop of color and taste. Lemon wedges are also great for that extra zing. Pairing Options with Sides You can serve these bowls with various sides. A simple green salad pairs well. You could also try a tangy slaw for crunch. For a heartier option, add some crusty bread. This makes the meal more filling. Enjoy mixing and matching to find your favorite combos! {{image_4}} You can change the proteins in this dish to suit your taste. - Chicken Breasts vs. Thighs Chicken thighs give a juicier bite. Breasts are leaner but can dry out. Both work well with the lemon garlic flavors. Choose what you like best! - Vegetarian Alternatives If you want a meatless option, try tofu or tempeh. Marinate them just like chicken. This adds great flavor and keeps the dish filling. The base of your bowl can change the dish a lot. - Brown Rice vs. Quinoa Brown rice has a nutty flavor and chewy texture. Quinoa is light and fluffy. Both are healthy choices. You can also mix them for a fun twist. - Other Grain Options Try farro, barley, or couscous for a different taste. Each grain brings its own flavor and texture. Feel free to experiment with what you have on hand! Using seasonal veggies makes this bowl fresh and colorful. - Suggestions for Seasonal Veggies In spring, use asparagus or snap peas. Summer is great for zucchini or bell peppers. In fall, add sweet potatoes or brussels sprouts. You can even mix these veggies in! - Mixing in Other Ingredients Add nuts or seeds for crunch. Feta cheese or olives can boost flavor. Be creative and make this bowl your own! For short-term storage, keep your Lemon Garlic Chicken Bowls in the fridge. Use an airtight container to keep them fresh. They last up to three days this way. Make sure to let the dish cool before sealing it. This helps keep the flavors intact. If you want to store your bowls for later, freezing is a great option. Place the chicken and veggies in a freezer-safe container. You can also use freezer bags. Label the bags with the date. They can stay fresh for up to three months in the freezer. When it's time to eat, reheating is easy. For best results, use an oven or microwave. If using an oven, preheat it to 350°F (175°C). Place the chicken and veggies on a baking sheet. Heat for about 10-15 minutes until warm. In the microwave, use a microwave-safe dish. Heat in short bursts, checking often. This helps avoid overcooking. Enjoy your meal warm and tasty! You can make this dish gluten-free by ensuring the grains are safe. Use quinoa or gluten-free rice. Check all labels for hidden gluten. The other ingredients are naturally gluten-free. You can use chicken breasts if you prefer. They cook faster and are leaner. You can also try tofu for a vegetarian twist. Just ensure it is firm to hold up during cooking. Yes, you can prep this dish ahead of time. Marinate the chicken and chop the veggies a day before. Store them in the fridge until you are ready to bake. This saves time on busy days. Store leftovers in an airtight container. Keep them in the fridge for up to three days. For longer storage, freeze in a freezer-safe container. Just ensure it cools down before sealing. Bake the chicken for 25-30 minutes at 425°F (220°C). Use a meat thermometer to check the internal temperature. It should reach 165°F (75°C) for safe eating. This blog post covered a delicious Lemon Garlic Chicken Bowl recipe. You learned about the main ingredients, from chicken thighs to veggies. I shared step-by-step instructions to make cooking easy. Tips on marinating and checking doneness will boost your flavors. You can also explore variations for proteins and grains. Don't forget the storage info to keep your meals fresh. With these insights, you can enjoy tasty meals at home. Cooking can be simple and fun with the right know-how. Get in the kitchen and try it out!

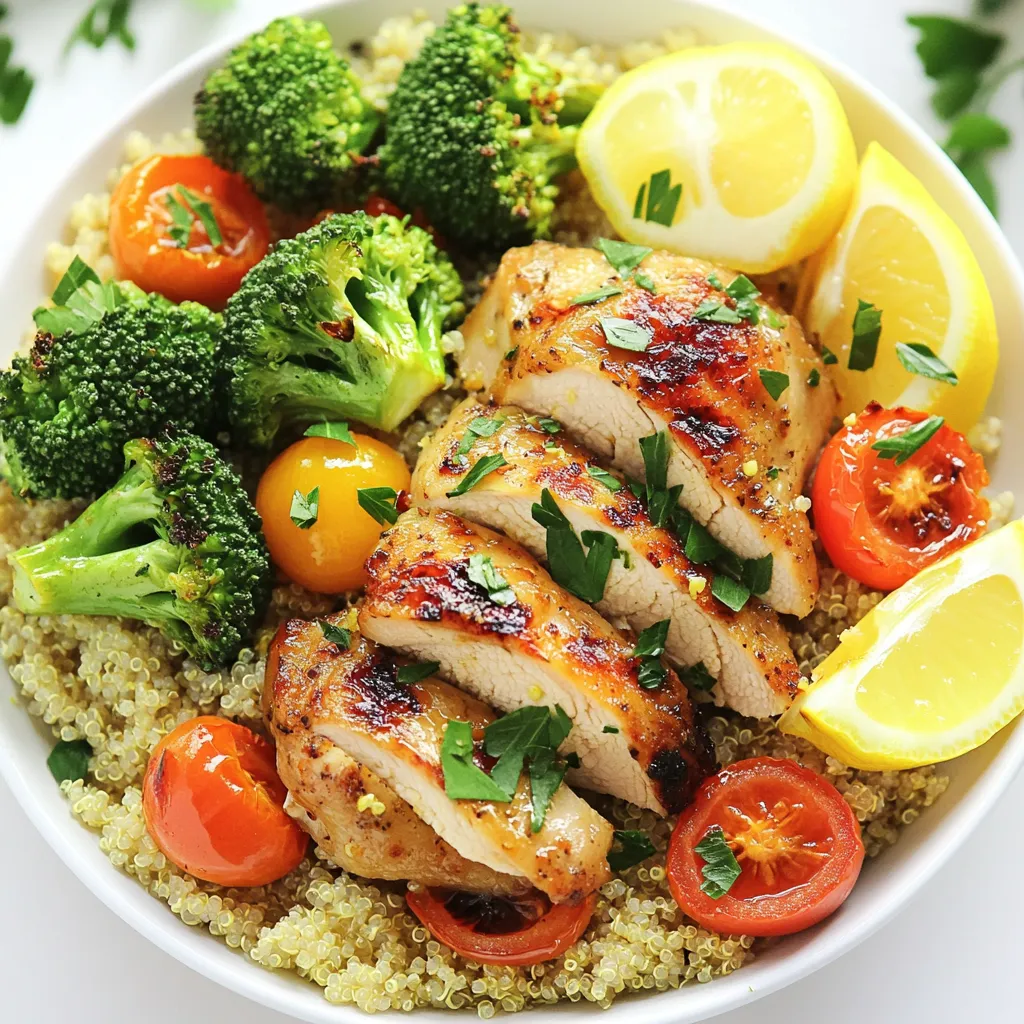
Lemon Garlic Chicken Bowls Sheet Pan Delightful Meal

Looking for a quick and tasty dinner? This Lemon Garlic Chicken Bowls Sheet Pan meal is your perfect solution! With

- 1 cup pumpkin puree (canned or roasted) - 3 large eggs, lightly beaten - 1/3 cup vegetable oil (can use canola oil) - 1/2 cup granulated sugar, divided - 1/2 cup packed brown sugar - 1 cup all-purpose flour - 1/2 cup whole wheat flour - 1 teaspoon baking soda - 1 teaspoon baking powder - 1 teaspoon ground cinnamon - 1/2 teaspoon ground nutmeg - 1/2 teaspoon ground ginger - 1/4 teaspoon salt - 1 teaspoon vanilla extract - 1/2 cup cream cheese, softened - 1/4 cup granulated sugar (from the divided sugar) - 1/4 cup chopped pecans or walnuts I love using pumpkin puree for this loaf. It gives a rich flavor and moisture. You can use canned pumpkin for ease or roast a fresh one for a unique taste. The cream cheese swirl adds a soft, tangy touch that pairs well with the sweet pumpkin. If you want a little crunch, add some nuts. It makes each bite delightful. First, preheat your oven to 350°F (175°C). Grease a 9x5 inch loaf pan well. You can also use parchment paper for easy removal later. In a medium bowl, beat 1/2 cup of cream cheese with 1/4 cup of granulated sugar. Use a hand mixer or whisk until it's smooth and creamy. Set this mixture aside for later. In a large bowl, mix together 1 cup of pumpkin puree, 1/4 cup of granulated sugar, 1/2 cup of brown sugar, 3 eggs, 1/3 cup of vegetable oil, and 1 teaspoon of vanilla extract. Stir until everything is blended and smooth. In another bowl, whisk together 1 cup of all-purpose flour, 1/2 cup of whole wheat flour, 1 teaspoon of baking soda, 1 teaspoon of baking powder, 1 teaspoon of ground cinnamon, 1/2 teaspoon of ground nutmeg, 1/2 teaspoon of ground ginger, and 1/4 teaspoon of salt. Make sure it's fully combined. Gradually add the dry mix to the wet pumpkin mix. Use a spatula to fold gently. Be careful not to overmix, as this can make the loaf too dense. If you want some crunch, you can fold in 1/4 cup of chopped nuts. Pour half of the pumpkin batter into the loaf pan. Spread it evenly. Then, drop spoonfuls of the cream cheese mixture on top. Pour the rest of the pumpkin batter over this layer, smoothing it if needed. Take a knife or skewer and gently swirl it through the batter. This creates a marbled look with the cream cheese. Be careful not to mix it in completely. Place the loaf pan in your preheated oven. Bake for 50-60 minutes. Check if it's done by inserting a toothpick in the center. It should come out clean or with a few moist crumbs. Let the loaf cool in the pan for about 10 minutes. After that, gently move it to a wire rack to cool completely. Once cooled, slice and serve it warm or at room temperature. You can dust it with powdered sugar for a nice touch. A dollop of whipped cream on the side makes it even better! To get a soft and fluffy loaf, avoid overmixing the batter. Mix it just until you see no dry flour. This keeps the loaf light and airy. Using room temperature cream cheese helps blend smoothly, which adds to the texture. If you want a richer flavor, add more spices like cinnamon or nutmeg. Store any leftover loaf in an airtight container. This keeps it fresh for up to three days. If you want to keep it longer, wrap it tightly in plastic wrap and freeze. It can last up to three months in the freezer. When ready to eat, just thaw it overnight in the fridge. Serve slices warm or at room temperature. For a special touch, dust powdered sugar on top. You can also add a dollop of whipped cream for a creamy finish. This loaf pairs well with a cup of coffee or tea. Enjoy it as a tasty breakfast or a sweet afternoon snack! {{image_4}} You can easily make this loaf gluten-free. Just swap the all-purpose flour with a gluten-free blend. Look for blends that work well in baking. Check the label for the right cup-to-cup ratio. This way, you keep the texture light and fluffy. Want to change the taste? Add spices like cardamom or allspice for a unique twist. A dash of vanilla bean paste can enhance the flavors, too. You can also mix in chocolate chips for a rich touch. Or, use maple extract instead of vanilla for a cozy fall flavor. If you need a nut-free loaf, simply leave out the nuts. The loaf will still be moist and tasty. You can add seeds like pumpkin or sunflower seeds instead. This gives a nice crunch without using nuts. Enjoy creating your own version! To keep your loaf fresh, wrap it tightly in plastic wrap. You can also use aluminum foil. Store it at room temperature for up to three days. If it lasts longer, move it to the fridge. This keeps it moist and safe. If you want to save it for later, freezing works well. First, wrap the cooled loaf in plastic wrap. Then, put it in a freezer bag or container. It can stay frozen for up to three months. When ready to eat, just thaw it in the fridge overnight. To enjoy your loaf warm, slice it and place it on a baking sheet. Heat it in a 350°F oven for about 10-15 minutes. You can also use a microwave for a quick warm-up. Just heat it for 15-20 seconds per slice. Enjoy your delicious Pumpkin Cream Cheese Swirl Loaf! Yes, you can use fresh pumpkin. Just roast and puree it first. This gives a richer taste, but make sure it's smooth. You can use Greek yogurt or mascarpone cheese. Both give a creamy texture and taste great in the loaf. The loaf lasts about 3-5 days when stored in an airtight container. You can keep it in the fridge for longer freshness. Absolutely! You can divide the batter into mini loaf pans. Bake for about 25-30 minutes. Keep an eye on them to prevent overbaking. If your loaf is dense, you may have overmixed the batter. Be gentle when folding in the dry ingredients. Overmixing can lead to a heavy texture. We explored the key ingredients for a tasty pumpkin cream cheese swirl loaf. You learned how to prepare the batter and swirl, along with helpful baking tips. Remember, you can customize the recipe with gluten-free or nut-free options. Proper storage keeps your loaf fresh longer. Enjoy this delicious treat with family and friends! Your baking journey will be fun and rewarding. Dive in and bake something great today!

Pumpkin Cream Cheese Swirl Loaf Easy and Tasty Recipe

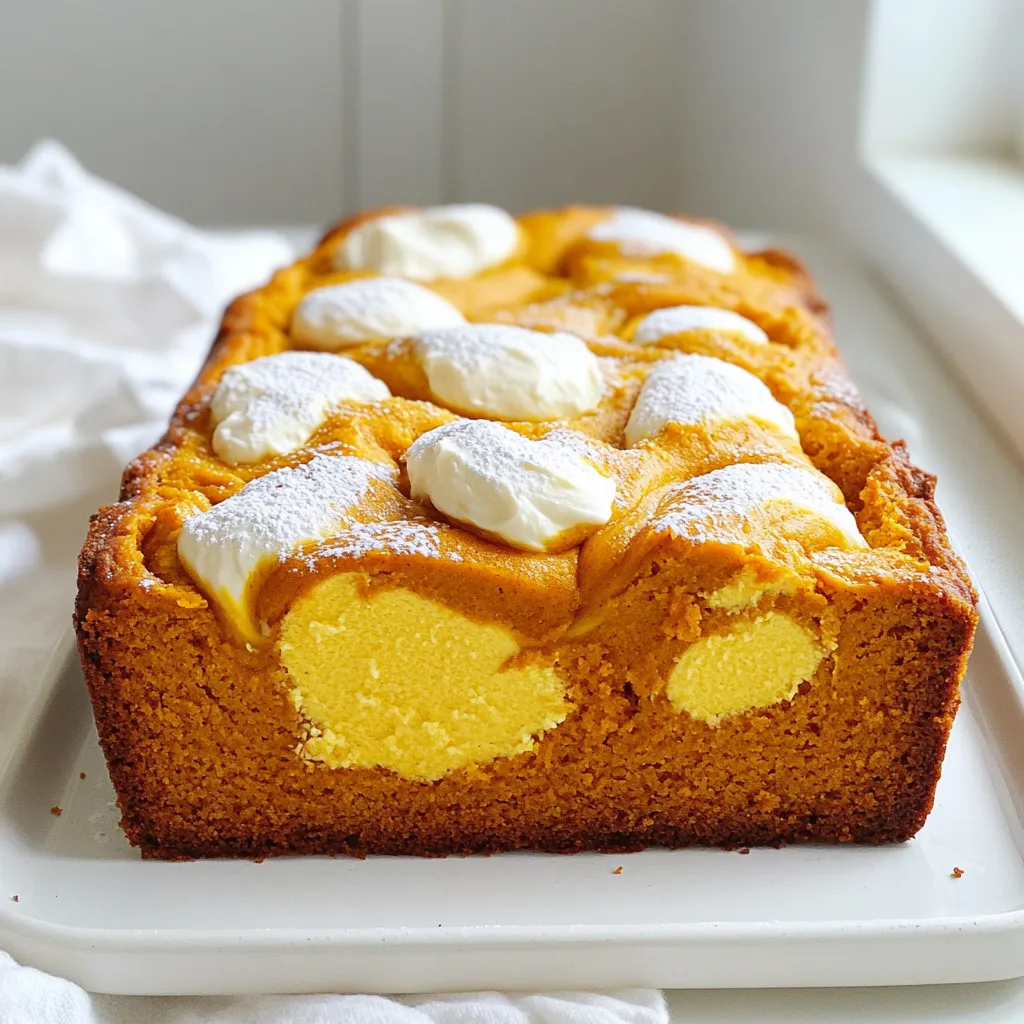
If you love the warm, cozy flavors of fall, get ready for this Pumpkin Cream Cheese Swirl Loaf! This easy

To make the Cottage Cheese Brownie Batter Dip, you'll need: - 1 cup low-fat cottage cheese - 1/2 cup unsweetened cocoa powder - 1/4 cup honey or maple syrup (to taste) - 1/4 cup almond butter or peanut butter - 1 teaspoon pure vanilla extract - 1/2 teaspoon salt - 1/2 cup chocolate chips (dark or semi-sweet) If you lack any ingredients, don't worry! Here are some easy swaps: - Use Greek yogurt instead of cottage cheese for a creamier dip. - Swap honey for agave or a sugar-free sweetener. - Try sunflower seed butter if you have nut allergies. - Use milk chocolate chips for a sweeter touch. This dip pairs perfectly with various dippers. You can try: - Apple slices for a crisp and juicy bite. - Graham crackers for a sweet crunch. - Pretzels for a salty contrast. - Celery sticks for a fresh, crunchy option. These dippers make the dip even more fun to eat! Enjoy experimenting with your favorites. Start by gathering your ingredients. You will need 1 cup of low-fat cottage cheese, 1/2 cup of unsweetened cocoa powder, and 1/4 cup of honey or maple syrup. Don't forget 1/4 cup of almond butter or peanut butter, 1 teaspoon of pure vanilla extract, and 1/2 teaspoon of salt. Lastly, grab 1/2 cup of chocolate chips for that extra sweet touch. Now, place all your ingredients into a food processor or a high-powered blender. Blend on high speed until the mix becomes smooth and creamy. This may take a few moments. Pause once in a while to scrape down the sides. This helps to mix everything evenly. When the dip reaches that silky texture, gently fold in the chocolate chips. This way, the chips stay whole and add fun bites of chocolate. Next, scoop the dip into a pretty serving bowl. Use a spatula to smooth the top for a nice finish. If you want, drizzle some honey on top and sprinkle more chocolate chips for a sweet garnish. Finally, serve your dip with dippers like apple slices, graham crackers, pretzels, or celery sticks. Arrange them around the bowl to make it look tempting. Enjoy! To get that perfect creamy dip, blend the cottage cheese well. Use a food processor or blender. Blend until it is smooth. Stop to scrape the sides so all the bits mix well. If it’s too thick, add a splash of milk. For a thicker dip, lessen the cocoa powder. Adjusting these small parts makes a big difference in texture. If you have any dip left, store it in a sealed container. Keep it in the fridge for up to three days. Make sure to cover it well. To enjoy it again, stir it before serving. It may thicken in the fridge. If it does, add a bit of milk to bring it back to life. You can switch up the flavors easily. Try adding a splash of espresso for a coffee twist. A few drops of mint extract can also add freshness. For a fruity kick, mix in some pureed berries. These small changes can make the dip new and exciting. Experiment with your favorite flavors! {{image_4}} You can make this dip even lighter. Swap low-fat cottage cheese for non-fat cottage cheese. Use a low-calorie sweetener instead of honey or maple syrup. This keeps the sweet taste but cuts calories. You can also use almond or cashew butter for a nutty twist that’s lower in fat. Add fun flavors to your dip! Try mixing in a teaspoon of mint extract. This gives your dip a fresh, cool taste. You can also add a shot of espresso. It adds a rich coffee flavor that pairs well with chocolate. Just start with a small amount, then adjust to your taste. You can easily make this dip vegan. Replace cottage cheese with silken tofu for a creamy base. Use maple syrup for sweetness. Choose almond or sunflower seed butter for added flavor. This way, everyone can enjoy this tasty dip, no matter their diet. To keep your dip fresh, place it in an airtight container. Seal it tightly to prevent air from getting in. Store it in the fridge. This keeps it cool and tasty. Make sure to enjoy it within a few days for the best flavor. You can freeze this dip for later use. First, spoon it into a freezer-safe container. Leave some space at the top for expansion. Seal it well and label it with the date. When you want to eat it, thaw it in the fridge overnight. Stir it well before serving. Cottage Cheese Brownie Batter Dip lasts about 3 to 5 days in the fridge. If you notice any changes in smell or texture, it’s best to toss it. Always check for freshness before enjoying. Enjoy your dip while it's still creamy and delicious! Yes, you can use cream cheese or Greek yogurt. These options will change the flavor and texture. Cream cheese will make the dip richer, while Greek yogurt adds a tangy taste. Both still blend well and keep it creamy. The dip will last about three to five days in the fridge. Store it in an airtight container to keep it fresh. If you notice any change in smell or texture, it’s best to toss it out. You can use carob powder for a caffeine-free option. Another choice is to use dark chocolate melted into the dip. Just be sure to adjust the sweetness since chocolate can be sweeter than cocoa powder. In this post, we explored how to make a delicious cottage cheese brownie batter dip. We covered all the key ingredients and their substitutes, along with perfect dippers to enhance your snack. You learned step-by-step instructions for preparation, blending, and serving. I also shared tips for achieving the right consistency and creative flavor variations. Finally, we discussed how to store your dip safely. Enjoy experimenting with this easy recipe that can please anyone's taste. You now have all the tools to make this treat your own.

Cottage Cheese Brownie Batter Dip Creamy Delight

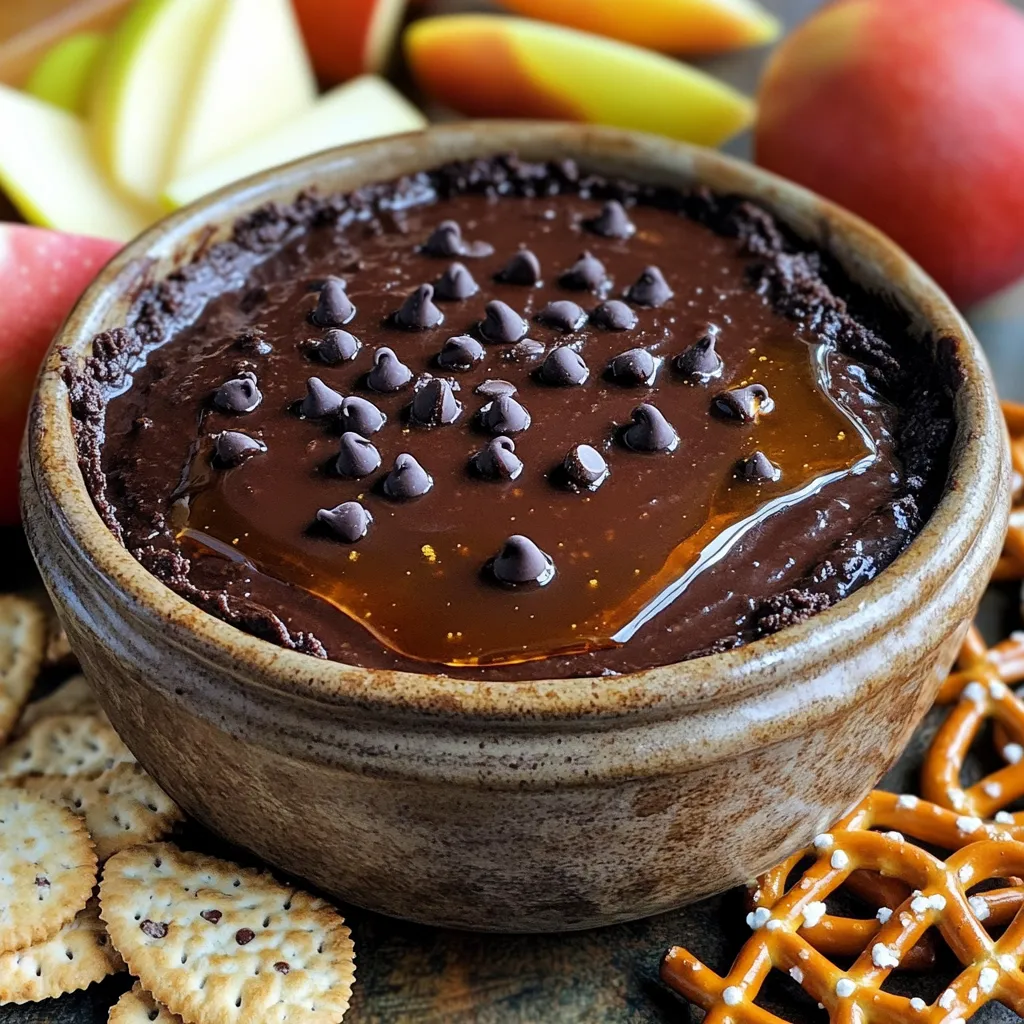
Craving a rich treat that won’t ruin your diet? Try my Cottage Cheese Brownie Batter Dip! This creamy delight combines

- 12 oz (340 g) pasta (penne or fusilli recommended) - 2 large red bell peppers, roasted and peeled - 1 small onion, finely diced - 3 cloves garlic, minced - 1 cup vegetable broth - 1 cup heavy cream or coconut cream - 1 teaspoon smoked paprika - 1/2 teaspoon red pepper flakes - Salt and black pepper, to taste - 1/2 cup freshly grated Parmesan cheese or nutritional yeast - Fresh basil leaves, for garnish - Toasted pine nuts for crunch - Extra garlic for more flavor - Spinach or kale for added greens - Fresh lemon juice for brightness - Grilled chicken or shrimp for protein - Gluten-Free: Use gluten-free pasta. - Vegan: Substitute heavy cream with coconut cream and use nutritional yeast instead of cheese. To start, we need to roast two large red bell peppers. You can do this over an open flame or in the oven. Roast them until the skin is charred and blistered. After roasting, put the peppers in a bowl and cover it with plastic wrap. Let them steam for about ten minutes. This makes peeling easier. Once they’ve cooled, peel off the skin and remove the seeds. Now, your roasted peppers are ready! Next, we’ll blend the sauce. In a blender, combine the roasted peppers with three minced garlic cloves, one teaspoon of smoked paprika, half a teaspoon of red pepper flakes, and one cup of vegetable broth. Blend everything until it’s smooth and creamy. This sauce will bring a rich flavor to our pasta! Now, let’s sauté the aromatics. In a large pot, add a drizzle of olive oil over medium heat. Once hot, toss in one finely diced small onion. Sauté for about five minutes. You want the onion to be translucent and fragrant. This step adds depth to our dish. Next, pour the blended red pepper sauce into the pot with the sautéed onions. Add one cup of heavy cream or coconut cream, depending on your choice. Stir well to combine everything. Increase the heat slightly and bring the mixture to a gentle simmer. This will help meld all the flavors together. It’s time to cook the pasta! Add twelve ounces of your chosen pasta directly into the simmering sauce. Make sure the pasta is fully submerged. Cook according to the package instructions, stirring occasionally. If it starts to stick, add a splash of water. Cook for about 10-12 minutes, or until the pasta is al dente. Once the pasta is cooked to your liking, remove the pot from heat. Stir in half a cup of grated Parmesan cheese or nutritional yeast for a vegan option. Season with salt and black pepper to taste. Use tongs to twirl the pasta into bowls. For the finishing touch, garnish with freshly torn basil leaves and an extra sprinkle of cheese if you'd like. Enjoy your delicious one-pot creamy roasted red pepper pasta! To get the best flavor from your red peppers, roast them well. You can do this over an open flame or in your oven. Roast until the skin is charred and blistered. This will add a smoky taste. After roasting, cover the peppers for about 10 minutes. This helps steam them, making peeling easy. Once they cool, peel off the skin and remove the seeds. For this dish, I suggest using penne or fusilli pasta. These shapes hold the sauce well. You can use other types too, like farfalle or rigatoni. Just make sure to check the cooking time on the package. The pasta should cook to al dente for the best texture. If you like heat, add more red pepper flakes. Start with ½ teaspoon and taste as you go. For milder flavor, use less or skip them. The smoked paprika adds warmth without too much heat. This balance lets everyone enjoy the dish. Garnishes can elevate your meal. Fresh basil leaves add color and aroma. Grated Parmesan cheese gives a salty kick. You can even toast some pine nuts for crunch. A drizzle of olive oil on top makes it look fancy. These small touches make a big difference! {{image_4}} You can make this dish vegan by using coconut cream instead of heavy cream. Start by replacing the cream in the recipe with one cup of coconut cream. This switch keeps the dish rich and creamy while adding a subtle coconut flavor. You can enhance the taste by using nutritional yeast instead of Parmesan cheese. It delivers a cheesy taste with fewer calories. This vegan twist makes it perfect for everyone. Want to make it heartier? Add protein! Cooked chicken or shrimp works great in this pasta. If you choose chicken, use grilled or rotisserie for ease. For shrimp, sauté them in the pot before adding the sauce. This way, they soak up the flavors. Both options make the dish more filling and satisfying. Add more veggies for color and nutrition. Spinach is an easy choice; toss it in during the last few minutes of cooking. It wilts quickly and adds a pop of green. Mushrooms also work well. Sauté them with the onions for extra flavor. You can mix and match your favorite vegetables. This way, you create a unique dish each time! To store leftovers, let the pasta cool down. Then, transfer it to an airtight container. You can keep it in the fridge for up to three days. Make sure to seal the container tightly to keep the pasta fresh. If you notice any sauce separating, just give it a gentle stir before serving again. When you're ready to enjoy your leftovers, use a stovetop or microwave. If using the stovetop, warm it in a pot over low heat. Add a splash of water or broth to help it heat evenly. Stir often until it’s hot. In the microwave, heat in 30-second bursts. Stir after each burst to prevent hot spots. If you want to freeze the pasta, use a freezer-safe container. Make sure to leave some space at the top for expansion. It can last up to three months in the freezer. To thaw, move it to the fridge overnight. Reheat it in a pot or microwave, adding a bit of liquid if needed. Yes, you can use jarred roasted red peppers. They save time and still taste great. Just drain and rinse them before blending with the other sauce ingredients. You can use coconut cream as a dairy-free option. It gives a rich taste. You can also try cashew cream or a mix of milk and cornstarch for a lighter option. This dish takes about 30 minutes to cook. You will spend 10 minutes prepping and 20 minutes cooking. It is quick and perfect for busy nights. Yes, this recipe works well for meal prep. It stores nicely in the fridge. You can divide it into portions and reheat it whenever you need a quick meal. You can make this recipe ahead of time. Just store it in the fridge. It tastes even better the next day, as the flavors meld together. This blog post shared key ingredients and step-by-step instructions for your dish. We discussed tips for perfect roasting and how to adjust flavors. You learned about vegan options and protein add-ins for variety. Storing leftovers properly was also covered. Remember that cooking can be fun and flexible. Feel free to customize your meals to suit your taste. Use this recipe as a base, and enjoy every bite!

One-Pot Creamy Roasted Red Pepper Pasta Delight

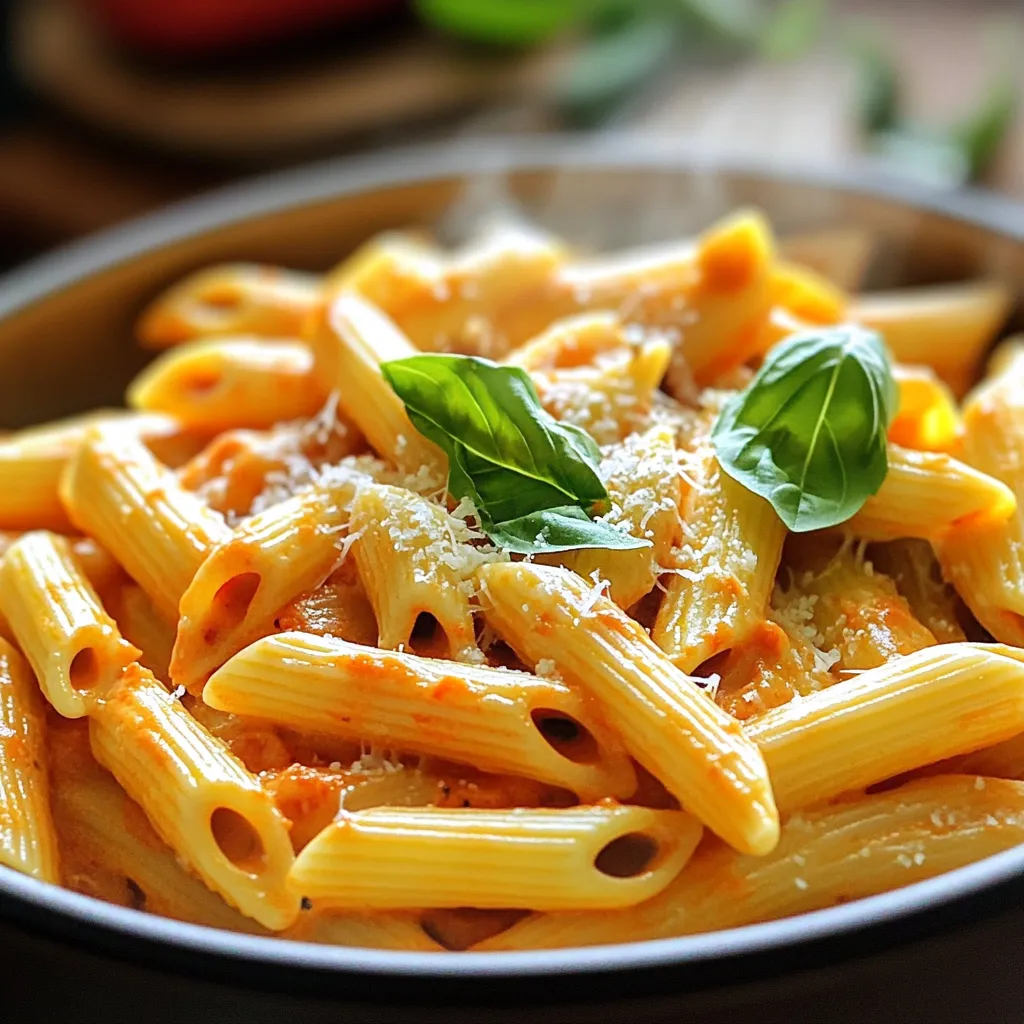
Looking for a quick and tasty dish? My One-Pot Creamy Roasted Red Pepper Pasta Delight is the answer! This recipe

- 1 lb boneless, skinless chicken breasts, diced - 1 tablespoon extra virgin olive oil - 1 medium onion, finely chopped - 2 cloves garlic, minced - 2 cans (15 oz each) white beans, drained and rinsed - 1 can (4 oz) diced green chilies, with juices - 2 cups low-sodium chicken broth - 1 cup corn (fresh, canned, or frozen) - 1 cup sour cream or Greek yogurt - 1 cup shredded Monterey Jack cheese, plus extra for garnish These main ingredients form the heart of your stovetop white chicken chili. The chicken adds protein, while the beans provide fiber. The green chilies give a mild heat, and the corn adds sweetness. Sour cream or Greek yogurt brings creaminess, making the dish cozy and filling. - 1 teaspoon ground cumin - 1 teaspoon chili powder - ½ teaspoon smoked paprika - Salt and freshly ground black pepper to taste Spices and seasonings are crucial for flavor in this chili. Ground cumin adds warmth, while chili powder gives a nice kick. Smoked paprika adds depth and a hint of smokiness. Adjust the salt and pepper to match your taste, enhancing the overall dish. - Fresh cilantro, chopped - Lime wedges - Tortilla chips Garnishes elevate your chili. Fresh cilantro adds brightness, and lime wedges give a zesty touch. Serve with tortilla chips for a crunchy contrast. This makes your meal fun and interactive. You can dip the chips into the chili, adding an enjoyable texture. {{ingredient_image_2}} - Start by chopping 1 pound of chicken breasts into small pieces. - Season the chicken with salt, pepper, cumin, chili powder, and smoked paprika. - Next, finely chop 1 medium onion and mince 2 cloves of garlic. - Heat 1 tablespoon of olive oil in a large pot over medium heat. - Add the chopped onion and cook for about 5 minutes. Stir until soft. - Mix in the minced garlic and cook for 1-2 minutes. Keep stirring to avoid burning. - Then, add the seasoned chicken to the pot. Cook for 5-7 minutes, stirring often. - Ensure the chicken is browned and no longer pink. - Pour in 2 cups of low-sodium chicken broth. - Add 2 cans of drained white beans and 1 can of diced green chilies. - Stir in 1 cup of corn, then mix everything well. - Bring the mixture to a gentle simmer over medium heat. - Let the chili simmer uncovered for 15 minutes. This helps blend all the flavors. - Remove the pot from heat, then stir in 1 cup of sour cream and 1 cup of cheese. - Mix until the chili is creamy. If it’s too thick, add a bit more broth. - Taste the chili and adjust salt and pepper as needed. - Serve hot, garnished with cilantro and extra cheese. Add lime wedges for zest! - To ensure the chicken is fully cooked, cut it into small pieces. This helps it cook faster and evenly. Always check that the chicken is no longer pink in the center. - If you want a thicker chili, let it simmer longer. For a thinner chili, just add a bit more chicken broth. Stir well to mix everything together. - To add more heat, try adding extra chili powder or even some cayenne pepper. Start with a small amount and taste as you go. - Fresh ingredients make a big difference. Use fresh garlic and onions for a stronger flavor. Fresh cilantro adds brightness at the end. - Pair Stovetop White Chicken Chili with warm tortilla chips or crusty bread. This makes for a filling and fun meal. - For garnishing, sprinkle extra cheese and chopped cilantro on top. A squeeze of lime juice also brightens the dish and adds a zesty kick. Pro Tips Perfectly Season Your Chicken: Before cooking, season the diced chicken with salt and pepper to enhance its flavor. This simple step ensures your chicken is flavorful throughout the dish. Customize Your Spice Level: If you prefer a spicier chili, add more diced green chilies or a pinch of cayenne pepper. Adjust the spices to suit your taste for the perfect heat. Use Fresh Ingredients: Whenever possible, opt for fresh corn and herbs. Fresh ingredients not only improve the flavor but also the overall appearance of the dish. Let It Simmer: Allowing the chili to simmer for a longer time can deepen the flavors. If time permits, let it cook for 20-30 minutes for an even more delicious result. {{image_4}} You can change this recipe to fit your diet. If you want less fat, use turkey instead of chicken. It cooks well and tastes great. For a plant-based option, try using tofu or chickpeas. Both add protein and flavor. If you're dairy-free, replace sour cream with cashew cream. It blends smoothly and adds a nice texture. You can mix it up by adding different veggies. Bell peppers, zucchini, or spinach add color and nutrients. You can also swap out beans. Black beans or pinto beans can work nicely. For a kick, add spices like cayenne pepper or jalapeños. These can give your chili a fun twist. Think about how you want to serve your chili. You can use it as a dip. Just pour it into a bowl and serve with chips. It also works great as a topping. Try it on baked potatoes or nachos for a tasty meal. If you're prepping meals, store some chili in small containers. This makes it easy to grab for lunch or dinner later. To store leftovers, let the chili cool first. Then, transfer it to an airtight container. This keeps the chili fresh and safe. Store it in the fridge for up to three days. If you want to enjoy it longer, freezing is a great option. You can freeze Stovetop White Chicken Chili for up to three months. To freeze, place it in a freezer-safe container. Leave some space at the top for expansion. When ready to eat, thaw it overnight in the fridge. Reheat on the stove over low heat. You may need to add a splash of broth to get the right texture again. Make this chili ahead of time for easy meals. You can cook it and store it in portions. This helps when you want a quick lunch or dinner. Reheat only what you need, so the rest stays fresh. This chili also tastes great the next day! How long does it take to cook Stovetop White Chicken Chili? It takes about 35 minutes to cook this chili. You spend 10 minutes prepping and 25 minutes cooking. This quick meal fits perfectly into a busy schedule. Can I make this chili ahead of time? Yes, you can make this chili ahead of time. It tastes great when you reheat it. Just store it in the fridge for up to three days. What can I substitute for sour cream? You can use Greek yogurt in place of sour cream. It adds creaminess and a bit of tang. You can also skip it for a lighter version. Is it possible to make this chili spicy? Absolutely! You can add diced jalapeños or a splash of hot sauce. Adjust the spices to your taste for a spicy kick. What side dishes go well with white chicken chili? Serve it with tortilla chips, cornbread, or a fresh salad. These sides balance the rich flavors of the chili nicely. Can I serve this chili in tortillas or burritos? Yes! This chili works well in tortillas or burritos. Just scoop it in and enjoy a delicious, hearty meal. In this blog post, we explored making Stovetop White Chicken Chili. We discussed essential ingredients like chicken, beans, and spices. I shared step-by-step instructions for cooking, combining flavors, and finishing your dish. You learned about helpful tips, serving suggestions, and possible variations for dietary needs. By storing leftovers correctly, you can enjoy this meal later. I hope you feel ready to create your own delicious chili. Enjoy the flavors and warmth of your dish!

Stovetop White Chicken Chili Flavorful and Quick Meal

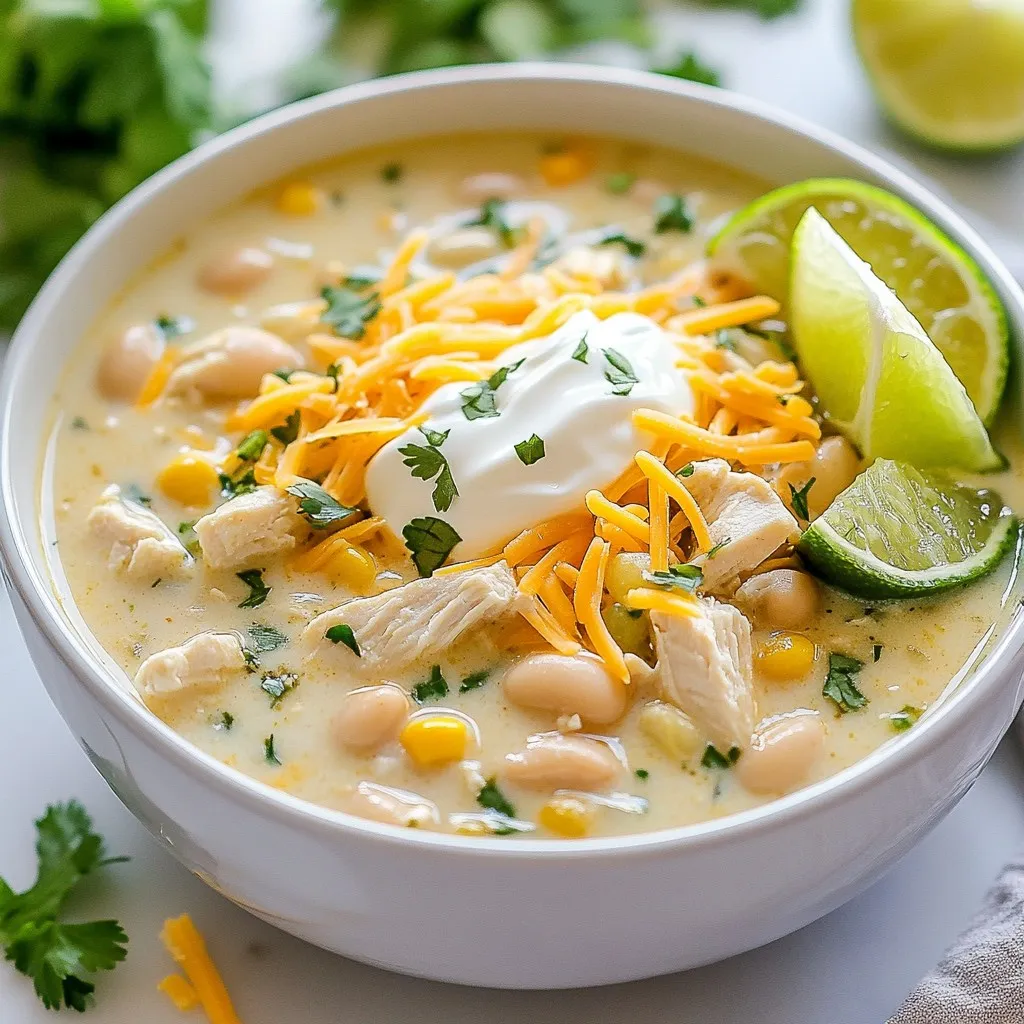
Looking for a quick and tasty meal? You’ll love this Stovetop White Chicken Chili! It’s packed with flavor and ready

- 2 cups cooked shredded chicken - 1/2 cup buffalo sauce - 1 cup shredded cheddar cheese - 1/2 cup cream cheese - 1/2 teaspoon garlic powder - 1/2 teaspoon onion powder - 8 small flour tortillas - Olive oil spray - Fresh cilantro, finely chopped - Sour cream or ranch dressing Start with the main ingredients. You need cooked shredded chicken. I love using rotisserie chicken for this. Next, grab buffalo sauce. You can pick your favorite heat level. Then, add cheddar cheese for creaminess. Cream cheese also makes the filling rich and smooth. Don't forget about seasoning. Garlic powder and onion powder add depth. You’ll also need small flour tortillas. They hold everything together well. A light spray of olive oil gives the taquitos a crispy finish. For garnish, fresh cilantro adds a pop of color and flavor. Pair the taquitos with sour cream or ranch dressing for dipping. This combo makes each bite even better. Enjoy the balance of spice and coolness! To start, grab a large mixing bowl. In this bowl, combine the following ingredients: - 2 cups cooked shredded chicken - 1/2 cup buffalo sauce - 1 cup shredded cheddar cheese - 1/2 cup cream cheese - 1/2 teaspoon garlic powder - 1/2 teaspoon onion powder Mix these ingredients well. Make sure the chicken is coated with the buffalo sauce. This will give your taquitos a bold flavor. Now, take your small flour tortillas. Lay one tortilla flat on a clean surface. Spoon about 2-3 tablespoons of your chicken mixture into the lower third of the tortilla. Next, roll the tortilla tightly around the filling. Tuck the sides in as you roll. This helps keep the filling inside. Repeat this with all the tortillas until you have a nice stack of rolled taquitos. Preheat your air fryer to 375°F (190°C). This step is key for cooking the taquitos evenly. Once it's hot, lightly spray the taquitos with olive oil. This gives them a nice crispy finish. Place the taquitos in the air fryer basket in a single layer. Make sure they don’t touch. If needed, cook in batches. Air fry the taquitos for 10-12 minutes. Flip them halfway through to ensure they cook evenly. When they are golden brown and crispy, carefully take them out. Let them cool for a few minutes. This will prevent burns when you take a bite. To make your taquitos super crispy, follow these tips: - Spray your taquitos with olive oil all over. This helps them brown nicely. - Preheat the air fryer to 375°F (190°C). A hot fryer cooks better. - Don’t overcrowd the basket. Space them out to let hot air move. - Flip the taquitos halfway through cooking. This helps them crisp on both sides. For a great presentation, try these ideas: - Arrange the taquitos on a large platter. This makes them easy to grab. - Place a small bowl of sour cream or ranch in the center. It looks nice and is perfect for dipping. - Add fresh cilantro leaves around the platter. This adds color and makes it appealing. If you need gluten-free or dairy-free options, here are some swaps: - Use corn tortillas instead of flour for gluten-free taquitos. - Swap cream cheese with a dairy-free version, like cashew cream. - Choose a dairy-free cheese to keep it all dairy-free. - Adjust the buffalo sauce to your taste. Use a milder sauce for less heat. {{image_4}} You can easily change the heat of your taquitos by picking different buffalo sauces. If you like it hot, choose a spicy sauce. If you prefer a milder taste, opt for a mild version. Taste the sauce before mixing and adjust it to your liking. This way, everyone can enjoy the dish, no matter their heat preference. While I love the classic buffalo chicken filling, you can get creative here. Try adding finely chopped vegetables like bell peppers or spinach. You can also swap the chicken for beef or shredded pork. Even beans for a vegetarian option work well. Mixing in different proteins or veggies adds a unique twist to each bite. Serving your taquitos with the right dips can elevate their flavor. Sour cream or ranch dressing are classic choices. You can also try blue cheese dressing for a bold taste. Pairing with sides like a fresh salad or crispy veggies makes the meal complete. For a fun twist, serve them with a fruit salsa for a sweet contrast. Each dip or side can change the whole experience! To keep your taquitos fresh, store them in an airtight container. Place parchment paper between layers to avoid sticking. Refrigerate them if you plan to eat within three days. For longer storage, freeze them. Wrap each taquito in plastic wrap, then place them in a freezer bag. To reheat and keep the taquitos crispy, preheat your air fryer to 375°F (190°C). Place the taquitos in the basket without overcrowding. Heat for about 5-7 minutes. This will restore their crunch. You can also use an oven. Bake at 350°F (175°C) for about 10-15 minutes. In the fridge, taquitos last about 3 days. In the freezer, they can last up to 2 months. Always check for any signs of spoilage before eating. If they smell off or look strange, it's best to toss them. Yes, you can use raw chicken. Start by cooking it first. Place the raw chicken in a pot. Cover it with water or broth. Bring it to a boil, then simmer for 15-20 minutes. Once cooked, shred the chicken using two forks. Mix it with the buffalo sauce and other ingredients as before. To make your taquitos crisp, follow these tips: - Preheat your air fryer. This ensures even cooking. - Spray the taquitos with olive oil. This helps them brown nicely. - Do not overcrowd the air fryer. Cook in batches for best results. - Flip halfway through cooking. This gives both sides a chance to crisp up. Buffalo chicken taquitos pair well with many sides and dips. Here are some great options: - Sour cream or ranch dressing for dipping. - Celery sticks for a crunchy side. - A fresh salad to balance the heat. - Guacamole for a creamy contrast. In this blog post, I detailed how to make Buffalo Chicken Taquitos. We covered the key ingredients, like cooked chicken, buffalo sauce, and cheese. I also shared instructions for preparing the filling, rolling the taquitos, and cooking them in an air fryer. These tasty snacks can be adjusted to fit your taste. You can try different fillings and sides. Store leftovers properly to keep them fresh. Enjoy your cooking adventure and impress your friends with these easy taquitos!

Air Fryer Buffalo Chicken Taquitos Fast and Flavorful

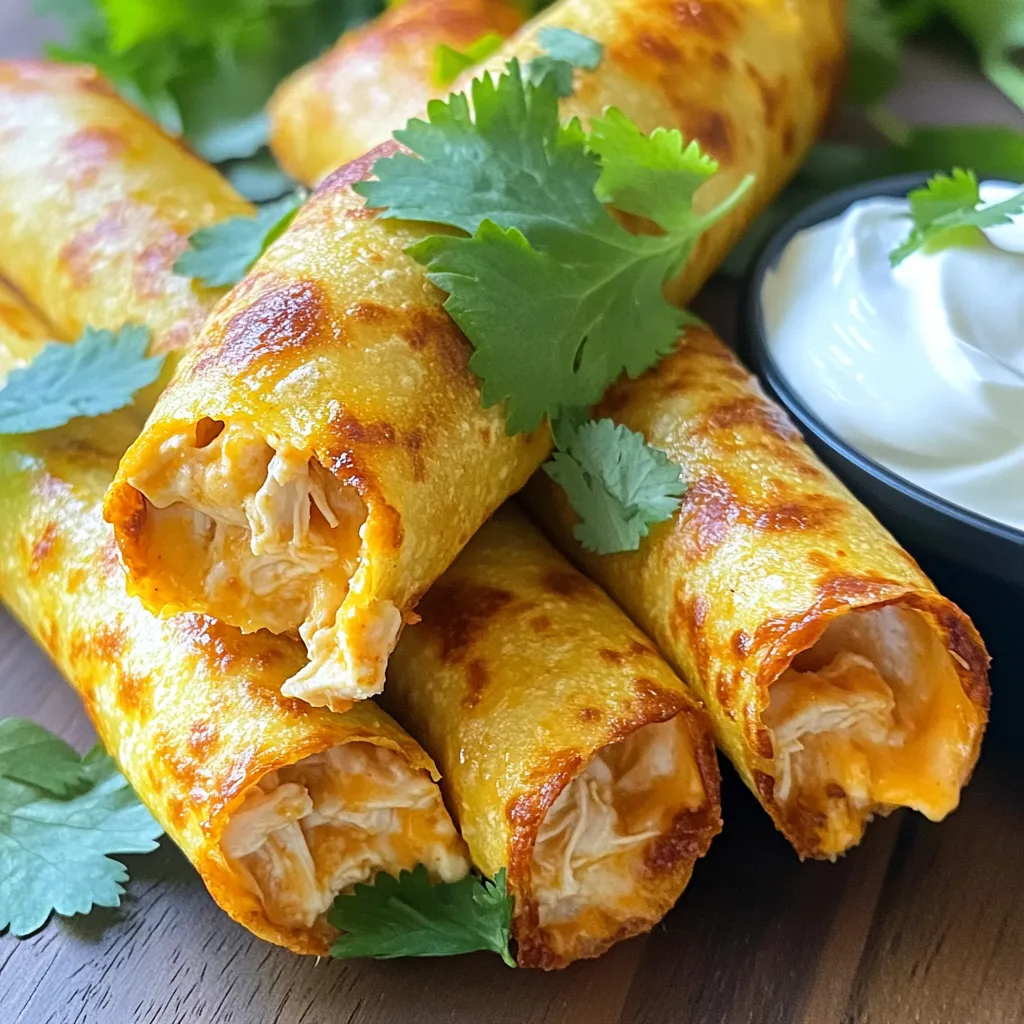
Are you ready to spice up your snack game? In this article, I’ll show you how to make quick and

To make creamy spinach ricotta stuffed shells, gather these ingredients: - 20 large pasta shells - 2 cups ricotta cheese - 1 cup cooked spinach, finely chopped - 1 cup mozzarella cheese, shredded - 1/2 cup grated Parmesan cheese - 1 large egg - 2 cloves garlic, finely minced - 1 teaspoon onion powder - 1/2 teaspoon salt - 1/4 teaspoon black pepper - 1/4 teaspoon ground nutmeg - 2 cups marinara sauce (store-bought or homemade) - Fresh basil leaves, for garnish You can swap some ingredients for a twist. Try these options: - Use cottage cheese instead of ricotta for a lighter filling. - Swap frozen spinach for fresh spinach; just squeeze out extra water. - Replace mozzarella with provolone for a sharper flavor. - Add a pinch of crushed red pepper for a spicy kick. To make this dish, you will need: - A large pot for boiling pasta - A mixing bowl for the filling - A teaspoon or piping bag for stuffing shells - A 9x13 inch baking dish for assembly - Aluminum foil to cover the dish while baking - An oven for cooking These tools make the process smooth and fun! With the right ingredients and tools, you set yourself up for a delicious meal that impresses. Set your oven to 375°F (190°C). This helps the dish bake evenly and perfectly. Boil a large pot of salted water. Add the pasta shells and cook until al dente. This usually takes about 10-12 minutes. Once cooked, drain the shells and let them cool slightly. This makes them easy to handle later. In a big bowl, mix together the ricotta cheese, chopped spinach, half of the mozzarella, and half of the Parmesan. Add the egg, minced garlic, onion powder, salt, black pepper, and nutmeg. Stir until everything is smooth and creamy. This filling brings great flavor to the shells. Take a teaspoon or a piping bag. Fill each shell with the creamy filling. Don’t overfill them; just a nice mound will do. This keeps the filling inside while baking. Pour a thin layer of marinara sauce in a 9x13 inch baking dish. Place the stuffed shells seam-side up in the dish. Cover the shells with the rest of the marinara sauce. Make sure they are fully coated for great flavor. Sprinkle the remaining mozzarella and Parmesan cheese on top of the sauced shells. This will create a nice, cheesy crust as they bake. Cover the dish with foil. This stops the cheese from browning too fast. Bake for 25 minutes. Then, take off the foil and bake for another 10-15 minutes. You want the cheese to bubble and turn golden brown. After baking, let the dish cool for about 5 minutes. This helps it set. Garnish with fresh basil leaves for a pop of color and flavor. Enjoy your creamy spinach ricotta stuffed shells! To cook pasta shells, boil salted water in a big pot. Add the shells and stir gently. Cook until they are al dente, which means they should still have a slight bite. Drain the shells carefully and let them cool for a bit. This step is key; if you overcook, they may break. To make the filling super tasty, use fresh spinach. Cook it first and chop it finely. Mix the spinach with ricotta, mozzarella, Parmesan, garlic, and spices. Each ingredient adds depth. A touch of nutmeg gives warmth, while onion powder boosts the flavor. Make sure to mix until creamy and smooth. Serve the stuffed shells on plates, drizzled with extra marinara. Add a sprinkle of cheese on top for a nice finish. A sprig of fresh basil not only looks nice but adds bright flavor. This simple touch makes the dish feel gourmet and special. Your guests will love the effort! {{image_4}} To make a meat lovers version, add cooked ground meat. Ground beef or sausage works well. Mix the meat into the ricotta filling before stuffing the shells. This adds richness and flavor. You can also layer some meat in the marinara sauce. This gives every bite a hearty taste. For a vegetarian twist, add different vegetables to the filling. Roasted red peppers or artichokes add great flavor. You can also mix in some sautéed mushrooms. These ingredients boost the taste and texture. You can try adding spices like red pepper flakes for a hint of heat. If you need a gluten-free option, use gluten-free pasta shells. They cook similarly to regular shells. Be sure to check the cooking time on the package. You can also use a mix of ricotta and gluten-free breadcrumbs for a thicker filling. This keeps the dish tasty and safe for gluten-free diets. After enjoying your creamy spinach ricotta stuffed shells, store any leftovers in an airtight container. Place them in the fridge within two hours of cooking. They will stay fresh for about three to four days. If you want to keep them longer, consider freezing them. To reheat, you can use the oven or microwave. For the oven, preheat it to 350°F (175°C). Place the shells in a baking dish and cover with foil. Bake for about 20 minutes or until heated through. If using a microwave, place a serving on a microwave-safe plate. Heat for about 2-3 minutes, checking to ensure it warms evenly. To freeze the dish, prepare it as usual but do not bake it. Once you stuff the shells and assemble them with sauce and cheese, cover the dish tightly with plastic wrap and foil. You can freeze it for up to three months. When ready to enjoy, thaw it in the fridge overnight and bake as directed. This way, you can enjoy a homemade meal anytime! Yes, you can use different cheeses! Try using feta for a tangy twist. Goat cheese also works well for a creamy texture. You can mix and match cheeses based on your taste. To make this dish ahead, prepare the stuffed shells and assemble them in the baking dish. Cover it well and store it in the fridge. Bake it the next day, adding a few extra minutes to the cooking time. These stuffed shells pair well with a simple side salad. A garlic bread or crusty bread is great, too. You can also serve a light vegetable dish, like steamed broccoli or roasted asparagus. Your dish is ready when the cheese is bubbly and golden brown. If you insert a knife into the center, it should feel hot. Let it rest for five minutes before serving to let the flavors settle. This blog post covered everything you need for creamy spinach ricotta stuffed shells. We looked at key ingredients, cooking steps, and handy tips. You learned about variations and how to store leftovers. With the right tools and careful prep, you can delight everyone with this dish. Enjoy making it and try adding your own twist. Cooking should be fun, so make it yours!

Creamy Spinach Ricotta Stuffed Shells Savory Delight

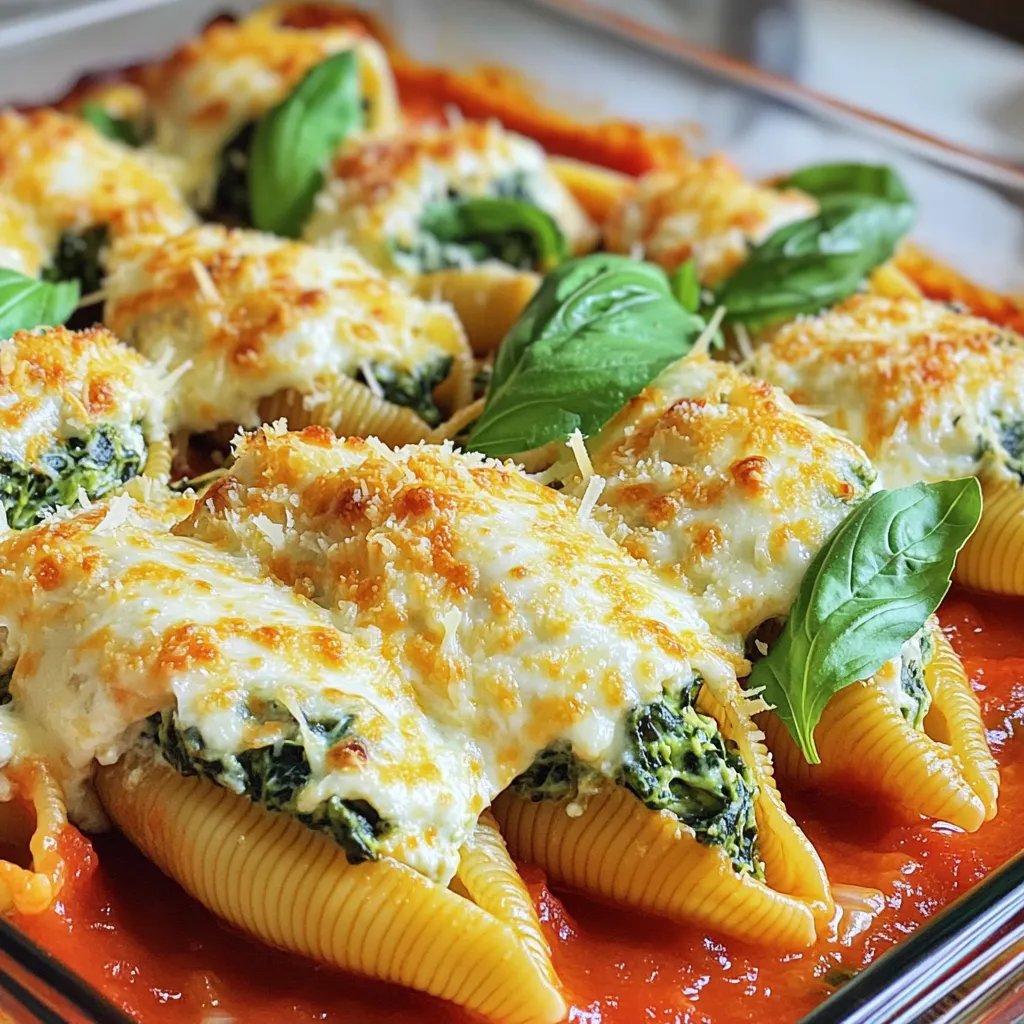
Are you ready for a creamy, dreamy dinner? Creamy Spinach Ricotta Stuffed Shells are sure to impress. With rich cheese

- 1.5 lbs boneless, skinless chicken breasts - 1 (15 oz) can black beans, drained and rinsed - 1 (15 oz) can corn, drained - 1 (10 oz) can diced tomatoes with green chilies - 1 medium onion, finely chopped - 2 cloves garlic, minced - 2 cups chicken broth - 1 tablespoon chili powder - 1 teaspoon ground cumin - 1 teaspoon smoked paprika - 1/2 teaspoon sea salt - 1/4 teaspoon freshly ground black pepper - 1/4 cup fresh cilantro, roughly chopped - 1 cup shredded cheese (cheddar or Monterey Jack) - Tortilla chips and lime wedges for serving I love using fresh ingredients when I cook. The chicken breasts form the heart of this soup. They cook well in the slow cooker and make a tasty base. I always choose boneless and skinless for ease. The black beans and corn add great texture and flavor. They also boost the soup’s nutrition. The diced tomatoes with green chilies bring a kick to each bite. The onion and garlic offer a savory blend that fills the kitchen with aroma. Chicken broth is essential for depth. I prefer low-sodium broth to control the saltiness. The spices are key to flavor. Chili powder, cumin, and smoked paprika create warmth. Sea salt and black pepper finish the seasoning perfectly. Don’t forget the fresh cilantro! It brightens the dish. The shredded cheese melts beautifully on top. Finally, tortilla chips add crunch and lime wedges give a zesty twist. - Slow cooker - Measuring cups and spoons - Cutting board and knife Using the right tools makes cooking easier. A slow cooker is a must for this recipe. It cooks the chicken low and slow, making it tender. Measuring cups and spoons help you get the amounts right. A good cutting board and knife make prep fun and safe. With these ingredients and tools, you’re ready to create a flavorful delight! Start by layering the chicken breasts in the slow cooker. This forms a solid base for your soup. Make sure the chicken is evenly spread out. This helps it cook well and soak up all the flavors. Next, mix in the chopped onion and minced garlic. These will add a nice depth to your soup. After that, add the black beans, drained corn, and diced tomatoes. Stir gently so everything is mixed well. This is where the magic begins! Now, pour the chicken broth over the mixture. This is vital as it helps the soup come together. Sprinkle the chili powder, ground cumin, smoked paprika, sea salt, and black pepper on top. These spices bring that rich, bold flavor. Set your slow cooker on low for 6-8 hours or high for 3-4 hours. The chicken should be tender and easy to shred. Once the cooking time is up, remove the chicken breasts from the slow cooker. Use two forks to shred the chicken into bite-sized pieces. Return it to the pot and stir well. Add the freshly chopped cilantro and half of the cheese. Mix until everything combines nicely. To serve, ladle the hot soup into bowls. Top with the remaining cheese and a handful of crispy tortilla chips. Finish with a squeeze of fresh lime juice. This adds a zesty kick that brightens the dish! To get the best flavor in your soup, balance the seasoning. Use the right amount of chili powder, cumin, and smoked paprika. Start with one tablespoon of chili powder. Adjust it based on your taste. The spices will bring warmth and depth to the soup. Make sure the chicken is cooked just right. Place it at the bottom of your slow cooker. Cook it on low for 6-8 hours or high for 3-4 hours. This way, it cooks slowly and stays tender. After cooking, shred the chicken with two forks. It should break apart easily. For a lovely presentation, use colorful bowls. Add a sprinkle of fresh cilantro on top. Place lime wedges on the side. This makes it fun for guests to add their own zing. Pair the soup with tortilla chips for a crunchy side. You could also serve it with a light salad. A fresh green salad complements the soup well. Toppings make the soup even better. Add shredded cheese on top for creaminess. You can use cheddar or Monterey Jack. For extra spice, consider adding jalapeños or hot sauce. If you like it mild, keep it simple. Squeeze lime juice over the soup before serving. It adds a fresh burst of flavor and brightness. {{image_4}} You can change the chicken to make it easier for you. For quick meals, use rotisserie chicken. Just shred it and add it in when you mix the soup. If you prefer a vegan or vegetarian option, swap the chicken for beans. Try using extra black beans or even chickpeas to keep it hearty. Adjust the spice levels to fit your taste. If you like it hot, add more chili powder or a dash of cayenne pepper. For a mild version, cut back on the spices. You can also add different vegetables. Try bell peppers, zucchini, or spinach for added nutrition. Beans are great too! Add pinto or kidney beans for extra texture. You can transform this soup into a casserole. Just pour the soup into a baking dish after cooking. Top it with more cheese and bake until the cheese melts. If you want to be creative, use the soup as a base. It works well with rice, quinoa, or even as a sauce for nachos. To store your Slow Cooker Chicken Enchilada Soup safely, let it cool first. Use airtight containers for storage. This helps to keep the soup fresh and tasty. Place the soup in the fridge if you plan to eat it soon. It will last for about 3 to 4 days. For longer storage, consider freezing it. When you’re ready to enjoy leftovers, reheating is key. The best way to warm the soup is on the stove over low heat. This method helps retain the flavors. Stir often to prevent sticking. If the soup seems thick, add a little chicken broth or water. This will refresh the soup and keep it creamy. Can the soup be frozen? Yes, it can! Freezing is a great way to save extra soup. Portion it into smaller containers for easy servings. When you need it, thaw the soup in the fridge overnight. Reheat it on the stove or in the microwave. Just remember to stir well and check the taste. You might want to add a bit of fresh lime juice or cilantro before serving for a boost of flavor. How long does it take to cook in the slow cooker? You can cook this soup for 6-8 hours on low or 3-4 hours on high. The chicken should be tender and easily shredded. Can I make this soup in advance? Yes, you can prepare this soup a day before. Store it in the fridge, then reheat it when you’re ready to serve. What can I do if the soup is too thick? If the soup is too thick, add a little more chicken broth. Stir well until you reach your desired consistency. How do I make it spicier? To add spice, mix in some diced jalapeños or a dash of hot sauce. You can also increase the chili powder for more heat. Can I substitute chicken broth with vegetable broth? Yes, you can use vegetable broth instead of chicken broth. This change keeps the soup tasty and is great for vegetarians. What cheese is best for topping? Cheddar and Monterey Jack cheese both work well. They melt nicely and add a rich flavor to the soup. Is this recipe gluten-free? This recipe is gluten-free as long as your broth and canned goods are labeled as such. Always check the labels to be sure. Nutritional information per serving Each serving has about 320 calories. It includes protein from the chicken, fiber from beans, and healthy fats from cheese. How to make it dairy-free or low-carb For a dairy-free option, use dairy-free cheese or skip the cheese altogether. For low-carb, omit the corn and use less broth to thicken the soup. This blog explored a tasty slow cooker chicken enchilada soup. We covered the ingredients, cooking steps, and tips for the perfect dish. You learned about storage and variations to keep it fresh and fun. Now you're ready to create your own version. With simple steps and options for everyone, your soup will please all your guests. Enjoy the process, and let your creativity shine in the kitchen!

Slow Cooker Chicken Enchilada Soup Flavorful Delight

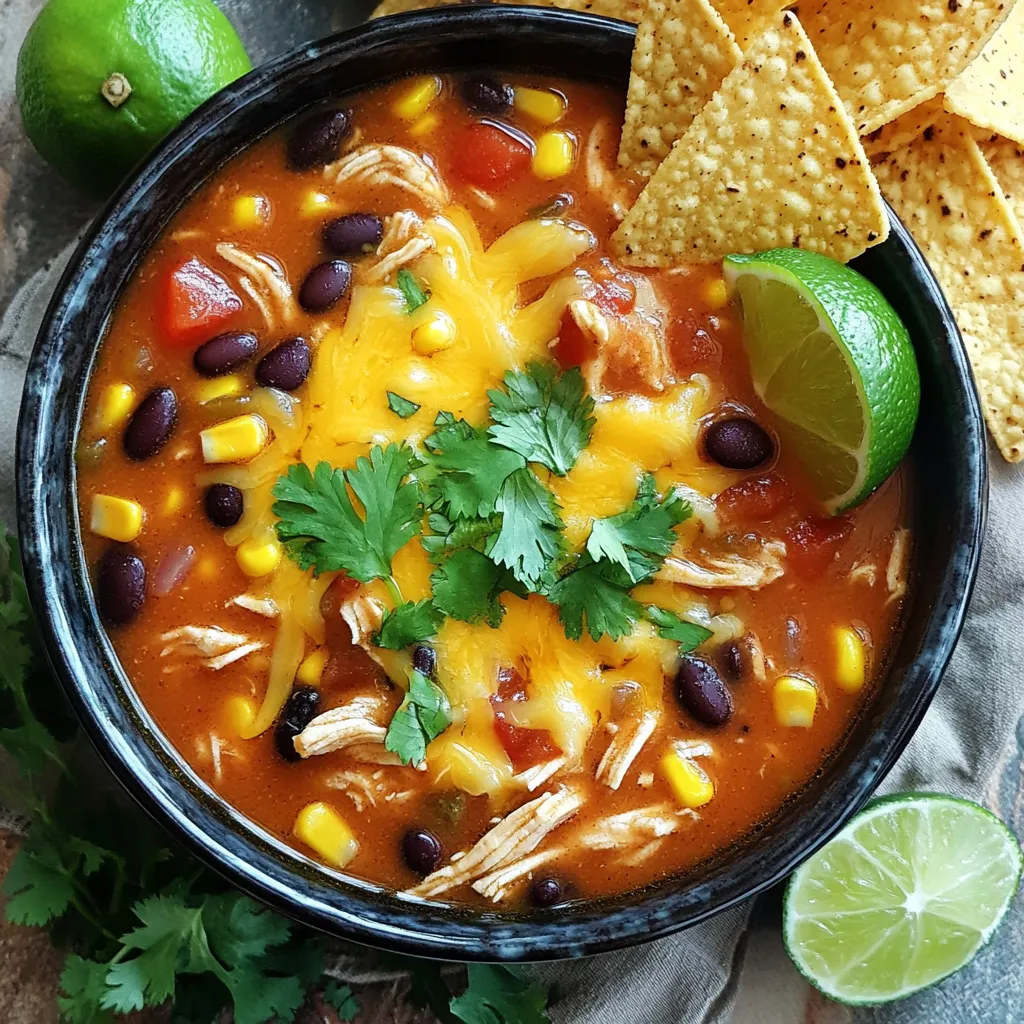
Do you crave a warm, hearty meal that’s easy to make? Our Slow Cooker Chicken Enchilada Soup is a flavorful

- 1 lb large shrimp, peeled and deveined - 1 bunch of asparagus, trimmed - 4 cloves garlic, finely minced - 2 lemons (for zest, juice, and slices) - 3 tablespoons extra virgin olive oil - 1 teaspoon sweet paprika - ½ teaspoon red pepper flakes - Salt and fresh black pepper - Fresh parsley, for garnish When I prepare Lemon Garlic Shrimp & Asparagus, I focus on fresh, simple ingredients. The star of this dish is the shrimp. I love using large shrimp, as they hold up well to baking. Shrimp adds a sweet and savory flavor. Next, the asparagus gives a nice crunch. Trim the ends so they cook evenly. Fresh garlic is a must for depth of flavor. I use four cloves, minced finely. For added zest, I use two lemons. One provides juice and zest, while the other is sliced to top the dish. Olive oil helps everything blend together, while sweet paprika adds a hint of warmth. I like a touch of heat, so I add red pepper flakes, but you can adjust this to your liking. Lastly, don't forget salt and fresh black pepper. They balance the flavors. I top it all off with fresh parsley for a pop of color. This dish is bright, fresh, and so easy to make. It’s perfect for any night of the week! - Preheat oven to 400°F (200°C). - Line baking sheet with parchment paper. - Combine shrimp and asparagus in a bowl. - Add garlic, olive oil, lemon zest, juice, paprika, and red pepper flakes. Start by tossing the shrimp and asparagus in the bowl. This mix makes the dish vibrant. The garlic brings a strong flavor. The olive oil adds richness. Zest the lemon to get a bright taste. Then squeeze its juice in. The paprika gives a sweet touch, while red pepper flakes add heat. Adjust the spice to your liking. - Spread the mixture on the baking sheet. - Place lemon slices on top. Spread the shrimp and asparagus evenly on the sheet. Leave space between them for even cooking. The lemon slices on top add flavor and look great. - Bake for 10-12 minutes until shrimp are pink and asparagus is tender. Place the baking sheet in the oven. Bake for 10 to 12 minutes. The shrimp will change color to pink. The asparagus will be tender yet crisp. - Sprinkle with chopped parsley before serving. When done, take the sheet out. A sprinkle of fresh parsley brightens the dish. It adds color and a fresh taste. Your dish is now ready to impress! - Choosing fresh shrimp: Look for shrimp that smell like the ocean, not fishy. They should be firm and shiny. The shells should be clean and free of black spots. Larger shrimp often offer better texture and flavor for this dish. - Choosing fresh asparagus: Select asparagus that is bright green and firm. The tips should be closed and compact. Avoid any that are limp or have brown spots. Fresh asparagus adds a nice crunch and flavor to the dish. - Importance of fresh garlic and lemons: Fresh garlic gives a strong and bold taste. Use whole cloves and mince them just before cooking. Fresh lemons add zest and juice that brighten the dish. Avoid bottled lemon juice for the best flavor. - Ensuring even cooking: Spread the shrimp and asparagus in a single layer on the pan. This helps them cook evenly. Avoid overcrowding, as this can lead to steaming instead of roasting. - Tips for avoiding overcooked shrimp: Keep an eye on the shrimp while they bake. They cook quickly and turn pink when done. Bake them for 10-12 minutes, but check at 8 minutes. Remove them from the oven as soon as they are opaque. - Serving directly on the sheet pan: This gives a rustic feel and makes cleanup easy. It also allows everyone to help themselves right from the pan. - Using a serving platter: For a fancier presentation, transfer the shrimp and asparagus to a large platter. This adds elegance to the table. - Adding lemon wedges: Place lemon wedges around the dish. This not only looks nice but lets guests add more lemon if they want. It adds a splash of color and extra flavor. {{image_4}} You can boost this dish by adding more veggies. Bell peppers add a sweet crunch. Snap peas give a nice snap and bright color. You can even try broccoli or zucchini. Just remember to cut them into similar sizes. This way, they cook evenly with the shrimp and asparagus. Want more heat? You can change the red pepper flakes. For a mild taste, use just a pinch. If you love spice, add more flakes or use crushed red pepper. You can also try fresh jalapeños for a different kick. Adjust according to your own taste. If shrimp isn’t your thing, you can swap in chicken or tofu. For chicken, use boneless pieces cut into bite-sized chunks. Cook it a bit longer to ensure it's safe to eat. For tofu, choose firm tofu and press it to remove extra water. Cut it into cubes and treat it just like the shrimp. This keeps your meal healthy and tasty. To store leftover shrimp and asparagus, place them in an airtight container. Make sure they cool down to room temperature first. Refrigerate them for up to three days. This helps keep the flavors fresh. If you want to keep them longer, consider freezing instead. To reheat the shrimp and asparagus, use the oven. Preheat it to 350°F (175°C). Place the leftovers on a baking sheet. Cover them loosely with foil to keep them moist. Heat for about 10 minutes. You can also use a microwave if you’re short on time. Just heat in short bursts to avoid overcooking. Yes, you can freeze this dish! To freeze, let it cool completely. Place it in a freezer-safe container or bag. Remove as much air as possible to prevent freezer burn. It can last for up to three months in the freezer. To defrost, transfer it to the fridge overnight. Reheat as mentioned above to enjoy your meal again. Yes, you can use frozen shrimp for this recipe. The main benefit is convenience. Frozen shrimp are often pre-cleaned and ready to cook. When using frozen shrimp, thaw them first. You can thaw them by placing them in cold water for about 15 minutes. After thawing, pat them dry to remove excess moisture. This helps achieve a better texture when cooking. You can tell that shrimp are cooked by their color and shape. Perfectly cooked shrimp turn pink and curl slightly. They should look opaque, not translucent. When you see these signs, they are ready to eat. Overcooked shrimp become rubbery, so watch them closely while baking. This dish pairs well with several sides. Here are some ideas: - Rice: White, brown, or jasmine rice complements the flavors well. - Quinoa: A healthy, nutty option for a filling side. - Salad: A simple green salad adds freshness. - Bread: Crusty bread is perfect for soaking up the juices. Yes, this recipe is gluten-free. The main ingredients, shrimp and asparagus, contain no gluten. The olive oil, garlic, and other spices also do not have gluten. If you choose to serve it with rice or quinoa, those are also gluten-free options. Always check labels for any packaged ingredients to ensure they are gluten-free. This blog post covered a tasty lemon garlic shrimp and asparagus dish. We discussed main ingredients, like shrimp, asparagus, and fresh garlic. You learned step-by-step baking methods and tips for the best flavors. I shared variations for extra veggies and protein options. Lastly, we looked at storing leftovers and reheating them perfectly. This dish is fun to make and is great for any meal. You can enjoy fresh flavors and quick prep, making this recipe a winner. Happy cooking!

Lemon Garlic Shrimp & Asparagus Sheet-Pan Delight

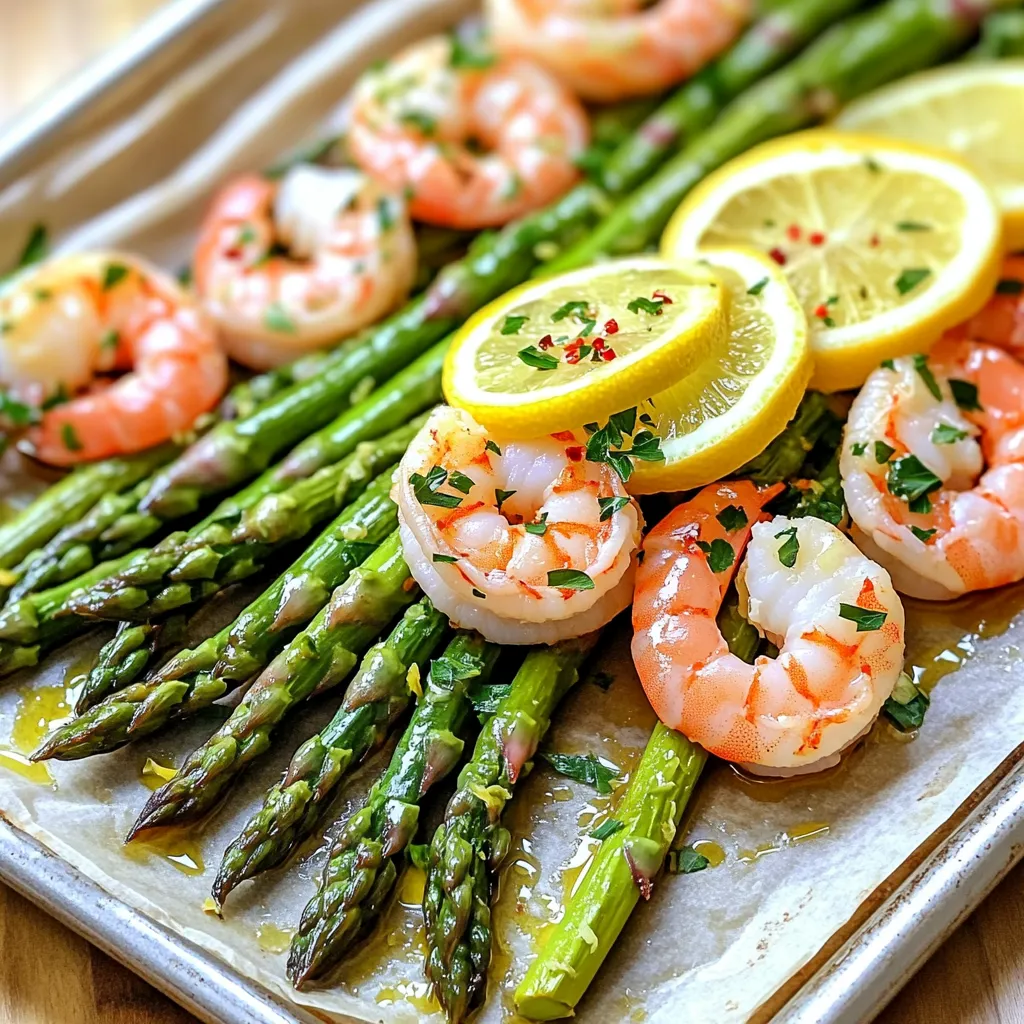
Want a quick, tasty meal? Look no further! My Lemon Garlic Shrimp & Asparagus Sheet-Pan Delight is simple and delicious.

To make delicious Strawberry Oatmeal Bars, you need simple, fresh ingredients. Here’s the complete list: - 2 cups rolled oats - 1 cup whole wheat flour - 1/2 cup packed brown sugar - 1/2 cup unsalted butter, melted - 1/4 cup honey or maple syrup - 1/2 teaspoon pure vanilla extract - 1/2 teaspoon baking soda - 1/2 teaspoon salt - 2 cups fresh strawberries, hulled and sliced - 1 tablespoon fresh lemon juice - 1 teaspoon cornstarch These ingredients work together to create a tasty treat. The rolled oats give a chewy texture. Whole wheat flour adds a nutty flavor. Brown sugar provides sweetness and moisture. Butter and honey (or maple syrup) keep the bars rich and soft. The strawberries bring a burst of freshness. The lemon juice brightens the flavor. Cornstarch helps thicken the filling, making it perfect. You can easily find all these items at your local store. Gather these ingredients, and get ready to bake! {{ingredient_image_2}} - Preheat Oven First, preheat your oven to 350°F (175°C). This step is key for even baking. - Prepare the Base Mixture In a large bowl, mix 2 cups of rolled oats, 1 cup of whole wheat flour, and 1/2 cup of packed brown sugar. Add 1/2 cup of melted unsalted butter, 1/4 cup of honey or maple syrup, 1/2 teaspoon of pure vanilla extract, 1/2 teaspoon of baking soda, and 1/2 teaspoon of salt. Stir until everything blends well and looks crumbly. - Create the Crust Set aside 1 cup of your oat mix for the topping. Firmly press the rest into the bottom of a greased or lined 9x9 inch baking pan. This forms a solid base for your bars. - Prepare the Strawberry Filling In another bowl, toss 2 cups of sliced strawberries with 1 tablespoon of fresh lemon juice and 1 teaspoon of cornstarch. This mixture adds flavor and helps thicken the filling. - Assemble the Bars Spread the strawberry mixture evenly over the crust in your baking pan. - Add Topping Sprinkle the reserved oat mixture over the strawberries. This will give your bars a nice crumble texture on top. - Bake the Bars Place the pan in your preheated oven and bake for 25-30 minutes. Look for a golden top and bubbling strawberries. - Cool and Slice After baking, take the pan out and let it cool for 10-15 minutes. This makes it easier to cut. - Final Cooling Tips For the best texture, cool the bars completely in the pan. If you used parchment paper, lift them out gently. Otherwise, you can cut them right in the pan. Perfecting the Bake Time Baking time is key for these bars. Check them at 25 minutes. The top should be golden brown. If it looks pale, give it a few more minutes. Watch for the strawberries bubbling; this shows they are ready. Ensuring Even Baking To ensure even baking, rotate your pan halfway through. This helps the heat spread better. If you notice one side is browning faster, turn the pan for balance. Ingredient Substitutions You can swap whole wheat flour for almond or oat flour. Use coconut oil instead of butter for a dairy-free option. For sweetness, try agave syrup in place of honey or maple syrup. Flavor Enhancements Add spices like cinnamon or nutmeg for warmth. You can mix in nuts or seeds for extra crunch. A touch of orange zest brightens the flavor too. Serving Suggestions Cut the bars into neat squares. Serve them on a rustic wooden board for a homey feel. Pair them with yogurt or ice cream for a treat. Garnishing Ideas Dust the bars with powdered sugar for a sweet touch. Drizzle honey or a simple glaze on top for extra flair. Fresh mint leaves add a pop of color and freshness. Pro Tips Use Fresh Strawberries: For the best flavor and texture, always opt for fresh strawberries that are in season. This will ensure your bars are bursting with juicy goodness. Adjust Sweetness: Depending on the sweetness of your strawberries, you may want to adjust the amount of brown sugar or honey. Taste the strawberry mixture before assembling the bars. Make Ahead: These bars can be made ahead of time and stored in an airtight container in the fridge for up to a week. They also freeze well for longer storage. Experiment with Flavors: Feel free to add spices like cinnamon or nutmeg to the oat mixture for an extra flavor boost. You can also substitute other fruits like blueberries or raspberries. {{image_4}} You can easily change the taste of your strawberry oatmeal bars. Here are two fun ideas: - Mixed Berry Oatmeal Bars: Swap strawberries for a mix of berries like blueberries and raspberries. This adds a burst of flavor and a nice color. - Chocolate Chip Strawberry Bars: Add chocolate chips to the strawberry mixture. The sweet chocolate pairs well with the tart strawberries. You can adjust this recipe for different diets. Here are some options: - Gluten-Free Options: Use gluten-free oats and flour. This keeps the bars tasty and safe for those with gluten issues. - Vegan Adaptations: Replace butter with coconut oil and honey with maple syrup. This makes the bars vegan while keeping them delicious. How you serve these bars can make them even better. Consider these ideas: - Pairings with Ice Cream: Serve warm bars with a scoop of vanilla ice cream. The warm and cold mix is amazing! - Breakfast or Snack Ideas: Enjoy these bars as a quick breakfast or a snack. They are easy to grab and taste great any time of day. - Room Temperature Storage: You can store the bars at room temperature. Place them in an airtight container. Keep them in a cool, dry place away from sunlight. They will stay fresh for up to three days. - Refrigeration Tips: If you want to keep them longer, refrigerate the bars. This helps to keep them fresh for up to a week. Make sure to wrap them well or place them in a sealed container. - How to Freeze the Bars: To freeze, first let the bars cool completely. Cut them into squares. Wrap each square in plastic wrap. Then, place them in a freezer-safe bag or container. They can last up to three months in the freezer. - Thawing Tips: To thaw, simply take the bars out of the freezer. Let them sit at room temperature for about 30 minutes. You can also warm them in the microwave for a few seconds if you want a cozy treat. - Duration for Freshness: The bars are best when eaten fresh. At room temperature, they last for about three days. In the fridge, they can stay good for a week. - Signs of Spoilage: Look out for any mold or an off smell. If the bars feel dry or hard, they may not taste great. Always check before enjoying your treats! How do I know when the bars are done baking? You can tell the bars are done when the top turns golden brown and the strawberries bubble up. A toothpick test is also helpful. Insert it in the center; if it comes out clean, they are ready. Can I use frozen strawberries for this recipe? Yes, you can use frozen strawberries. Just thaw them first and drain any excess juice. This keeps the bars from being too soggy. What can I substitute for honey or maple syrup? You can use agave syrup or brown rice syrup as a substitute. Both will work well in this recipe. Are Strawberry Oatmeal Bars gluten-free? No, these bars are not gluten-free due to the whole wheat flour. You can use gluten-free oats and flour for a gluten-free version. How long can I store leftovers? You can store leftovers in an airtight container for up to five days. Just keep them in a cool, dry place to maintain freshness. Can these bars be made ahead of time? Absolutely! You can make these bars a day or two in advance. They taste great even after sitting for a bit. You now have a clear guide to making delicious Strawberry Oatmeal Bars. We covered all the steps, from mixing the base to choosing toppings. You learned how to customize and store them, ensuring freshness and flavor. Try different variations for fun new twists. Enjoy these bars as a tasty snack or a sweet treat. With simple ingredients and easy steps, you can make these at home. Happy baking!

Strawberry Oatmeal Bars Easy and Tasty Treat

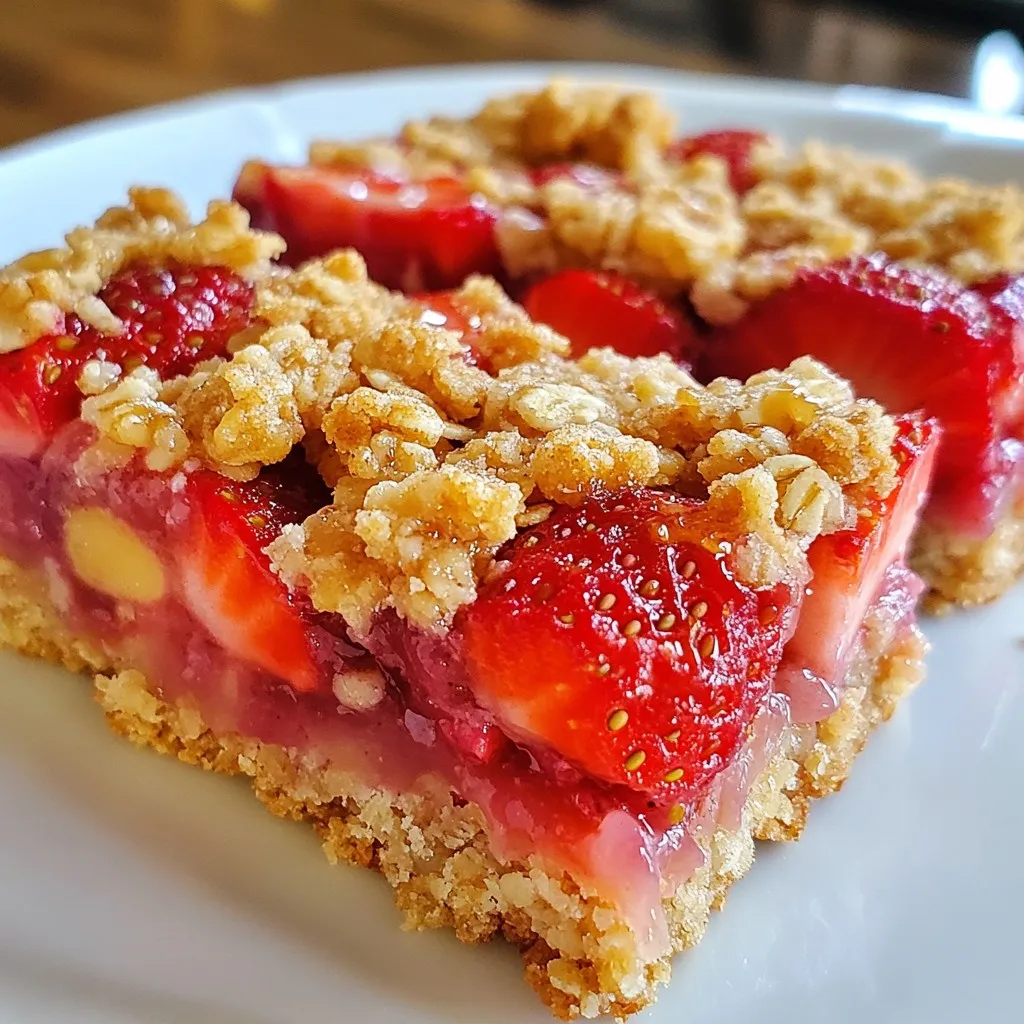
Welcome to your new favorite snack: Strawberry Oatmeal Bars! These easy, tasty treats combine wholesome oats and fresh strawberries, making

Older posts
Newer posts
← Previous Page1 Page2 Page3 Page4 … Page75 Next →

dsad

© 2025 tastymomrecipes • Built with GeneratePress

Our Policies

  • Copyright Policy
  • Cookie Policy
  • GDPR Policy
  • Privacy Policy
  • Disclaimer
  • Terms Of Use

More Information

  • Home
  • About
  • Contact
  • Appetizers
  • Dessert
  • Dinner
  • Drinks
©2025, tastymomrecipes About Back To Top