![- 1 block firm tofu, pressed and cut into cubes - 2 tablespoons sriracha sauce - 1 tablespoon soy sauce - 1 tablespoon sesame oil - 1 cup cooked quinoa - 1 cup broccoli florets - 1 red bell pepper, thinly sliced - 1 carrot, peeled and julienned - 2 green onions, thinly sliced - 1 tablespoon sesame seeds - Fresh cilantro, for garnish - Salt and freshly ground black pepper, to taste When I make spicy sriracha tofu bowls, I love the mix of flavors and colors. The tofu is the star. I use firm tofu because it holds its shape well and gets crispy. Pressing it helps remove excess water, so it absorbs the marinade better. The marinade combines sriracha, soy sauce, and sesame oil. This mix gives the tofu a spicy, savory kick. For the base, I choose quinoa. It adds protein and fiber. I cook it before adding it to the bowls. The cooked quinoa pairs well with the crunchy veggies. I like using broccoli, red bell pepper, and julienned carrot. They add fresh colors and textures to the dish. Green onions and sesame seeds make great toppings. They bring extra crunch and flavor. I often finish with fresh cilantro. It adds a bright taste and looks nice on the bowl. For seasoning, I always use salt and freshly ground black pepper to taste. This simple seasoning enhances the dish's natural flavors. You can find the full recipe in the section above. First, grab a medium bowl. Combine sriracha, soy sauce, and sesame oil. This blend gives the tofu a nice kick. Cut your firm tofu into cubes. Toss the tofu in the marinade until every piece is coated. Let it sit for at least 15 minutes. This time allows the tofu to soak up all the flavors. Next, heat a large skillet over medium heat. Add a splash of water or vegetable broth. This will help steam the veggies. Toss in the broccoli florets, sliced red bell pepper, and julienned carrot. Sauté these for about 5-7 minutes. Stir them often until they are tender-crisp. Season with salt and pepper. This enhances their natural sweetness and flavor. Now, heat a non-stick skillet over medium-high heat. Add your marinated tofu cubes to the hot skillet. Spread them out evenly for the best crispiness. Cook for about 8-10 minutes. Remember to turn the tofu occasionally. You want it golden brown and crispy on all sides. Once everything is cooked, it's time to assemble the bowls. Start with a generous scoop of cooked quinoa at the bottom. Then layer on the sautéed vegetables. Finally, add the crispy tofu on top. This creates a colorful and inviting dish. To finish, sprinkle sesame seeds and sliced green onions over the bowls. This adds crunch and flavor. Don't forget to add fresh cilantro for a pop of color and taste. Serve these bowls warm for a delicious meal experience. For the full recipe, check the section above. To get that perfect tofu crispiness, start by pressing the tofu. Wrap the tofu in a clean towel and place a heavy pan on top. This squeezes out excess water. Let it sit for at least 15 minutes. This step is key for great texture. Next, cut the pressed tofu into cubes. For best results, cook the tofu in a hot, non-stick skillet over medium-high heat. This helps achieve an even golden color. Aim for a cooking time of about 8-10 minutes. Flip the cubes often to ensure they crisp up nicely on all sides. Want to boost the flavor? Consider adding spices like garlic powder or smoked paprika. These add depth and richness. You can also mix in some fresh ginger for a zesty kick. Adjusting the sriracha level is easy. Start with the recipe's amount, then taste. If you like more heat, add extra sriracha bit by bit. This way, you can find your perfect balance. Storing marinated tofu is simple. Just keep it in an airtight container in the fridge. It can last up to three days. This makes it easy to grab for quick meals. When reheating leftovers, use a skillet on medium heat. This helps keep the tofu crisp. You can also add a splash of water to create steam, keeping the veggies tender. Enjoy your tasty meal, even on busy days! {{image_4}} You can swap tofu for other proteins. Tempeh works great. It has a firm texture and a nutty taste. Chickpeas are another nice choice. They add creaminess and protein to your bowl. You can also add edamame or lentils for a nutrient boost. Edamame gives a nice crunch, while lentils add heartiness. Each option keeps the meal filling and tasty. Feel free to play with your veggies. Snap peas or zucchini can add freshness. They cook quickly and taste great. If you choose different vegetables, adjust your cooking times. Softer veggies may need less time. Keep an eye on them so they don't get mushy. This way, you'll enjoy the best flavors and textures. Not a fan of spicy? Use milder sauces like sweet chili sauce. You can also try making your own sriracha. Just blend red peppers, garlic, and vinegar for a custom kick. This way, you can control the heat level. Experiment to find what suits your taste buds best. There’s no wrong way to spice things up! For the complete recipe, check out the [Full Recipe]. To keep your Spicy Sriracha Tofu Bowls fresh, use airtight containers. Glass or BPA-free plastic containers work well. Store them in the fridge for up to four days. This way, you can enjoy the flavors later without losing quality. When reheating, use a microwave or stovetop. For the microwave, heat in short bursts. Stir to ensure even warmth. If using the stove, add a splash of water to the tofu and quinoa. This keeps them moist. You might want to add a little extra sriracha to refresh the flavors. You can freeze the tofu and quinoa separately. Place them in freezer bags and remove as much air as possible. The veggies do not freeze well, so only freeze the tofu and quinoa. To thaw, move them to the fridge overnight. Reheat on the stove or in the microwave. Add fresh herbs or a splash of soy sauce to brighten up the dish. I recommend marinating the tofu for at least 15 minutes. This gives the tofu time to soak up the flavors of the marinade. If you have more time, you can marinate it for up to an hour. This extra time will enhance the taste even more. Yes, you can easily make this recipe gluten-free. Simply replace the soy sauce with tamari. Tamari is a gluten-free alternative that tastes similar. Always check labels to ensure other ingredients are gluten-free as well. You can serve Spicy Sriracha Tofu Bowls with a variety of side dishes. Some great options include: - Steamed edamame - Mixed green salad - Roasted sweet potatoes - Pickled vegetables These sides add more flavor and nutrients to your meal. Absolutely! Spicy Sriracha Tofu Bowls work well for meal prep. You can store the tofu, quinoa, and veggies in separate containers. This keeps everything fresh. When you’re ready to eat, just reheat and enjoy. To boost protein without meat, consider these options: - Add edamame or chickpeas to the bowl. - Mix in hemp seeds or sunflower seeds. - Serve with a dollop of Greek yogurt on top. These additions will make your meal even more filling. For the full recipe, check out the Spicy Sriracha Tofu Bowls section. This blog covered how to make tasty Spicy Sriracha Tofu Bowls. We detailed key ingredients, step-by-step cooking, and tips for great flavor. You learned to marinate tofu, sauté fresh veggies, and assemble a nourishing meal. Customizing with different proteins or veggies keeps the dish exciting. Remember, meal prep makes life easier, and leftovers can be delicious. Enjoy exploring your kitchen and making this dish your own!](https://tastymomrecipes.com/wp-content/uploads/2025/07/b693df76-3185-43f6-8808-c514dc1afdf8.webp)
Spicy Sriracha Tofu Bowls Flavorful and Nutritious Meal
Looking for a meal that’s both tasty and healthy? Try my Spicy Sriracha Tofu Bowls! Packed with fresh veggies, crunchy
Looking for a meal that’s both tasty and healthy? Try my Spicy Sriracha Tofu Bowls! Packed with fresh veggies, crunchy

Are you ready to impress your taste buds with a delightful dish? This Creamy Lemon Garlic Pasta is not only

Are you ready to enjoy a sweet treat that looks and tastes amazing? I know I am! Chocolate covered strawberry

Looking for a dish that’s both healthy and bursting with flavor? This Roasted Vegetable Quinoa Salad is your answer! Packed

Looking for a tasty and healthy treat? Fresh Strawberry Yogurt Bark is your answer! This delightful snack is easy to

If you’re looking for a quick, healthy dinner option, try my Baked Garlic Lemon Tilapia. This dish is flavorful yet
![To make these delicious No-Bake Snickers Bars, you will need: - 1 cup graham cracker crumbs - 1/2 cup unsweetened cocoa powder - 1/2 cup creamy peanut butter - 1/3 cup honey or maple syrup - 1 cup salted peanuts, roughly chopped - 1 cup chocolate chips (milk or dark chocolate) - 1/4 cup heavy cream or coconut cream - A pinch of sea salt for finishing These ingredients come together to create a rich and satisfying treat. If you want to switch things up, here are some easy swaps: - Use almond butter instead of peanut butter for a nutty twist. - Try agave syrup if you prefer a different sweetener. - Coconut cream can replace heavy cream for a dairy-free option. These substitutions keep the flavor while catering to your taste or dietary needs. Selecting the right ingredients makes a big difference. Here are tips for two key components: - Chocolate Chips: Look for high-quality chocolate chips. Choose brands that have a rich flavor. Dark chocolate adds depth, while milk chocolate is sweeter. - Salted Peanuts: Fresh, crunchy peanuts enhance the texture. Buy whole peanuts and chop them yourself for a fresher taste. Investing in good ingredients leads to a more delicious No-Bake Snickers Bar. For the full recipe, check out the complete guide! To make No-Bake Snickers Bars, follow these simple steps: 1. Prepare the Base: In a medium bowl, mix the graham cracker crumbs and cocoa powder. This step sets the base flavor. 2. Mix the Peanut Butter: In a separate bowl, blend the creamy peanut butter and honey (or maple syrup). Stir until smooth. 3. Combine Mixtures: Add the peanut butter mix into the graham cracker blend. Stir until you form a thick dough. 4. Press into Pan: Line a 9x9 inch dish with parchment paper. Press the mixture firmly into the bottom to create a base layer. 5. Add Peanuts: Sprinkle the chopped salted peanuts over the crust. Press them down gently to stick. 6. Melt the Chocolate: In a microwave-safe bowl, mix the chocolate chips with heavy cream. Heat in 30-second bursts, stirring until melted. 7. Pour Chocolate Layer: Pour the melted chocolate over the peanut layer. Spread it evenly with a spatula. 8. Chill: Place the dish in the fridge. Chill for at least 2 hours until the chocolate sets. 9. Serve: Once firm, lift the bars out using the parchment paper. Cut into squares and sprinkle with sea salt. - Mixing: Make sure not to leave dry spots in your base mix. Stir well. - Peanut Butter: Use room temperature peanut butter for easy mixing. - Pressing: Press firmly to avoid a crumbly base. - Peanuts: Use fresh salted peanuts for the best crunch. - Melting Chocolate: Stir often to prevent burning. Stop as soon as it’s smooth. - Chilling: Don’t skip the chill time; it helps the bars set properly. - Consider showing images of each step, like mixing the base, pressing it into the pan, and pouring the chocolate. - A video clip demonstrating the melting chocolate process can be helpful. - Before and after photos of the bars can inspire your readers and show the final result. These steps ensure a tasty, easy-to-make treat that everyone will love. Check the Full Recipe for more details! To create a thick and cohesive dough, mix the graham cracker crumbs and cocoa powder well. Use a large bowl to give yourself enough space. When blending the peanut butter and honey, make sure they are creamy and smooth. If your dough feels too dry, add a bit more peanut butter or honey. If it’s too wet, a little extra graham cracker crumbs can help. Press the mixture firmly into your pan for best results. These No-Bake Snickers Bars shine at parties! Cut them into squares or rectangles for easy serving. You can arrange them on a colorful plate or tiered stand. For a fun twist, try adding a sprinkle of sea salt or some chopped nuts on top. You could even serve them with fresh fruit or a scoop of ice cream for an extra treat. You can reduce sugar by using less honey or maple syrup. Consider swapping in natural nut butters for added nutrients. You can also use dark chocolate chips for a less sweet option. Adding a few tablespoons of ground flaxseed or chia seeds can boost fiber without changing the taste much. These simple changes help make your No-Bake Snickers Bars a bit healthier. Check out the Full Recipe to see how easy it is! {{image_4}} You can easily boost the flavor of your No-Bake Snickers Bars. Try adding a splash of vanilla extract to the base mix. This small change adds a warm, sweet note. Another idea is to drizzle some sea salt caramel over the chocolate layer. This adds a rich and salty twist that pairs well with the sweetness. Get creative with your toppings! Instead of just salted peanuts, consider using crushed pretzels for a salty crunch. You could also try chopped almonds or walnuts. Each nut adds its unique flavor and texture, making your bars even more interesting. If you love coconut, sprinkle some shredded coconut on top to give it a tropical flair. Need a gluten-free option? Swap the graham cracker crumbs for gluten-free ones. You can also use almond butter instead of peanut butter for a nut-free version. For a vegan treat, replace honey with maple syrup and use dairy-free chocolate chips. These simple swaps let everyone enjoy these tasty bars without missing out! For the full recipe, check out the [Full Recipe]. To keep your No-Bake Snickers Bars fresh, store them in an airtight container. Place parchment paper between layers to prevent sticking. This method helps maintain their texture and taste. Keep them in the fridge for the best results. They will stay fresh and tasty this way. If you want to freeze these bars, follow these steps: 1. Cut the bars into squares. 2. Place them in a single layer on a baking sheet. 3. Freeze for about 1 hour until solid. 4. Transfer the squares into an airtight container or freezer bag. 5. Label the container with the date. This way, you can track how long they've been in the freezer. When you're ready to enjoy, take them out and let them sit at room temperature for about 10-15 minutes. This will help them soften a bit for the best taste. In the fridge, your No-Bake Snickers Bars can last up to one week. If you freeze them, they can stay good for about three months. Remember to check for any freezer burn if they are stored for a long time. Enjoy these treats fresh for the best flavor! Yes, you can make these bars ahead of time. They taste great after sitting in the fridge. I recommend making them up to three days in advance. Just keep them covered in the fridge. This way, the flavors blend nicely. You can enjoy them fresh when you want a sweet treat! If you need a substitute for chocolate chips, there are a few great options. You can use chopped dark chocolate, carob chips, or even white chocolate. Each option will give a different taste, but they will still work well. If you want a healthier choice, try using cacao nibs. They add a nice crunch and are less sweet. To make these bars more chocolatey, you can add more cocoa powder to the mixture. A tablespoon or two will do! You can also drizzle extra melted chocolate on top after chilling. Another fun idea is to mix in chocolate chunks with the peanuts. This will give you a rich chocolate taste in every bite! You learned about the key ingredients for No-Bake Snickers Bars, how to prepare them, and tips for success. Quality ingredients, like premium chocolate chips, enhance flavor. You also discovered fun variations, healthier options, and how to store them for freshness. Remember, making these bars is easy and customizable. With a little creativity, you can impress your friends and family. Enjoy your homemade treats, and happy cooking!](https://tastymomrecipes.com/wp-content/uploads/2025/07/b60a581f-a010-4e84-b813-93eaeac26f89.webp)
Craving a sweet treat that’s both easy to make and bursting with flavor? Look no further! In this post, I’ll
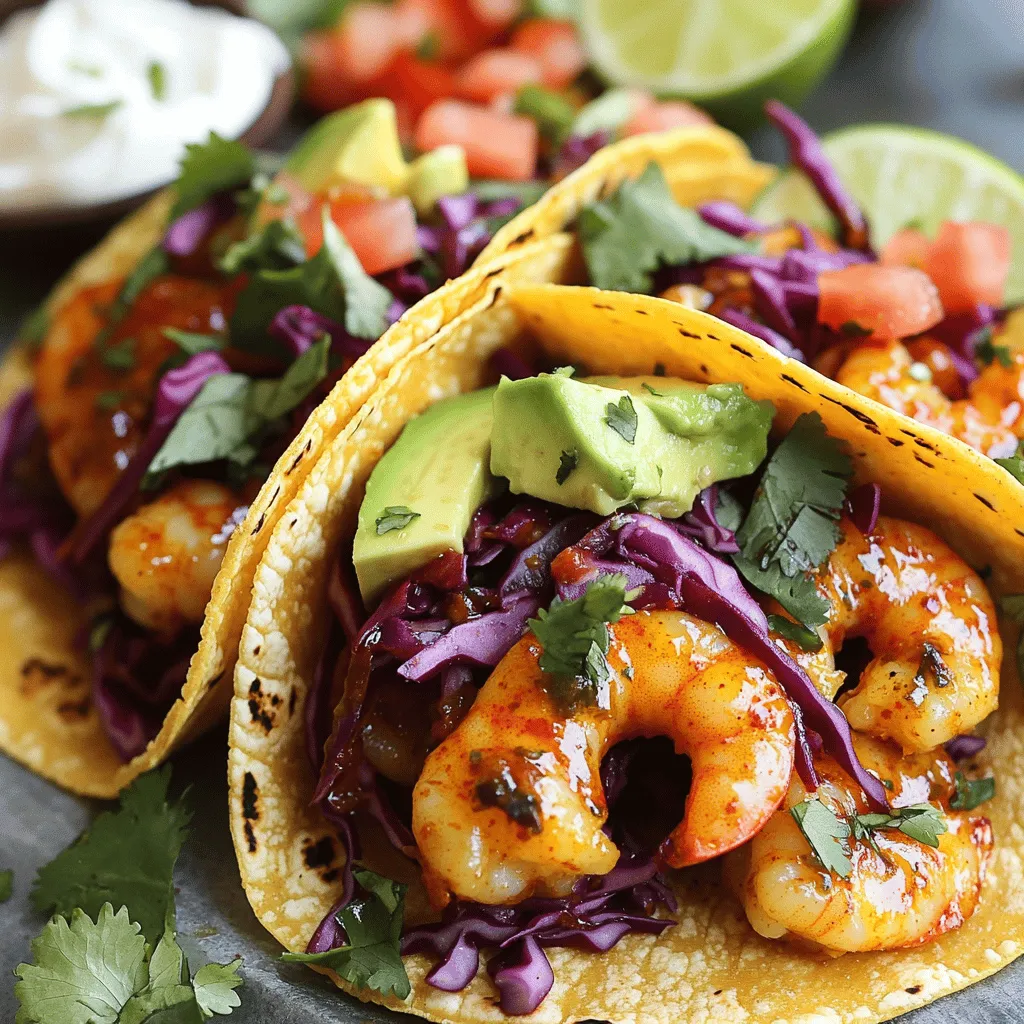
If you’re craving a fresh and zesty meal, Chili Lime Shrimp Tacos are an excellent choice. In this post, I’ll
![- 1 block (14 oz) firm tofu, drained and pressed - 3 tablespoons honey - 2 tablespoons soy sauce - 1 tablespoon sriracha - 4 cloves garlic, finely minced - 1 tablespoon fresh ginger, finely grated - 2 tablespoons sesame oil - 1 teaspoon cornstarch (optional) When preparing spicy honey garlic tofu, you need simple yet flavorful ingredients. Each ingredient plays a key role in creating that sweet and spicy taste. Tofu is the star. It brings a nice texture and absorbs flavors well. You want firm tofu for this dish. It holds its shape while cooking. Honey gives a natural sweetness. Soy sauce adds a salty umami kick. Sriracha provides heat, which you can adjust to your liking. Garlic and ginger work together to create a fragrant base. They add depth and warmth to the sauce. The sesame oil adds a nutty flavor that enhances the dish. If you want a thicker sauce, cornstarch is optional. It helps the sauce cling to the tofu. - 1 tablespoon sesame seeds - Fresh green onions, finely chopped - Cooked rice or quinoa Garnishes add a nice touch to your dish. Sesame seeds give a bit of crunch. Green onions add a fresh bite. Serve the spicy honey garlic tofu over cooked rice or quinoa. This allows the grains to soak up the sauce. To make it even more appealing, arrange the tofu artfully. A wedge of lime on the side adds color and a zesty flavor. For the full recipe, check out [Full Recipe]. Start by cutting your tofu into bite-sized cubes or triangles. I like to use a sharp knife for clean cuts. Take your time to make even pieces. Next, press the tofu to remove extra water. This step is key for a crispy finish. After pressing, pat the tofu dry with a paper towel. This will help achieve a crunchier texture when cooking. In a medium bowl, mix together the honey, soy sauce, sriracha, minced garlic, grated ginger, and sesame oil. Use a whisk to blend everything well until smooth. If you want a thicker sauce, add cornstarch to the mix. Stir until it dissolves completely. This sauce will give your tofu a sweet and spicy kick. Heat some sesame oil in a non-stick skillet over medium heat. Once the oil is hot, carefully add the tofu cubes. Let them cook without moving them for about 4-5 minutes. This allows the bottoms to turn golden and crispy. After that, gently flip each piece using a spatula. Cook for another 4-5 minutes until all sides are brown. Next, lower the heat and pour the honey garlic sauce over the tofu. Gently stir to coat each piece well. Let it cook for 2-3 minutes, allowing the sauce to thicken. It should cling to the tofu and create a nice glaze. Remove the skillet from heat and garnish with sesame seeds and chopped green onions. Serve your delicious spicy honey garlic tofu over cooked rice or quinoa. The grains soak up the tasty sauce, making every bite satisfying. For the full recipe, check out the earlier section. Enjoy your meal! Tofu needs pressing and drying. This step is key. Pressed tofu removes water. Less water means a crispier texture. After pressing, pat the tofu dry with a paper towel. This helps it fry better. For a crispy exterior, heat your pan well. Use enough sesame oil for frying. Cook the tofu without moving it too much. Let it brown well on each side. Do you like it spicy? You can change the heat! Sriracha adds great flavor. If you want less heat, use less sriracha. Start with a little, then taste. You can always add more later. For more heat, increase the sriracha. You control the spice! How you serve your dish matters. For a nice look, use shallow bowls. Arrange the tofu over rice or quinoa. This makes it colorful. Add a lime wedge on the side for extra zing. You can also sprinkle sesame seeds and green onions on top. These toppings add flavor and beauty. Serve it hot for the best taste. Try these ideas to impress your guests! For the full recipe, check out the Spicy Honey Garlic Tofu Delight. {{image_4}} You can swap honey for maple syrup or agave. These options are vegan-friendly. They give a similar sweet taste, but each has its own unique flavor. Maple syrup adds a rich, earthy note. Agave is milder and sweeter. Adjust the amount to suit your taste. Want more crunch? Add your favorite vegetables. Bell peppers, broccoli, or snap peas work great. Just toss them in while the tofu cooks. For extra texture, try adding nuts. Cashews or peanuts add a delightful crunch. They also give your dish a boost of healthy fats. To make this dish vegan, replace honey with maple syrup or agave. For gluten-free, use tamari instead of soy sauce. Always check labels to ensure all ingredients meet your needs. These small changes keep your meal tasty and fit your dietary preferences. Store leftover Spicy Honey Garlic Tofu in an airtight container. It keeps well in the fridge for up to four days. Make sure the tofu is cool before sealing. This helps preserve flavor and texture. For best results, keep the sauce separate if possible. This prevents the tofu from getting soggy and keeps it crispy. To reheat, use a skillet over medium heat. Add a splash of sesame oil to the pan. This helps regain some crispiness. Cook for about five minutes, stirring gently. You can also use a microwave. Heat on medium power for one to two minutes. If using a microwave, cover the tofu to keep it moist. Be careful not to overheat, or the texture may change. Freezing is an option, but it can change the texture. If you decide to freeze, cool the tofu completely first. Place it in a freezer-safe bag or container. Remove as much air as possible. This prevents freezer burn. Thaw in the fridge overnight when ready to eat. Reheat as mentioned above, but expect a softer texture. Enjoy your Spicy Honey Garlic Tofu even days later! For the full recipe, check out the details above. It takes about 15 minutes to prep and 10 minutes to cook. The total time is only 25 minutes. This means you can enjoy a great meal without waiting long. You can use soft tofu, but the texture will change. Soft tofu is creamier and may crumble during cooking. Firm tofu holds its shape better and gets crispy. If you choose soft tofu, be gentle when cooking. This dish pairs well with several sides. Here are some ideas: - Steamed broccoli - Sautéed spinach - Mixed vegetable stir-fry - Cooked rice or quinoa These sides balance flavors and add more nutrients to your meal. Enjoy exploring different combinations! This blog post covers your journey to making Spicy Honey Garlic Tofu. We’ve explored the key ingredients, step-by-step cooking instructions, and helpful tips to achieve perfect texture and flavor. You also learned how to adapt the recipe to your tastes and dietary needs. Now, you can confidently create a delicious dish that impresses. With a few simple steps, you can make a meal for you and your loved ones. Enjoy the process and the tasty results!](https://tastymomrecipes.com/wp-content/uploads/2025/06/d3f9fc7f-8778-40e5-8f8d-459363047e39.webp)
Are you ready to shake up your tofu game? My Spicy Honey Garlic Tofu recipe is bold, sweet, and packed
![To make your Sun-Dried Tomato Pesto Pasta, gather these items: - 200g pasta (choose from penne, fusilli, or spaghetti) - 1 cup sun-dried tomatoes (preferably in oil for extra flavor) - 1/2 cup fresh basil leaves, tightly packed - 1/4 cup pine nuts, lightly toasted for crunch - 2 cloves garlic, finely minced - 1/2 cup freshly grated Parmesan cheese - 1/4 cup extra virgin olive oil - Salt and freshly cracked black pepper, to taste - Extra fresh basil leaves for garnish - Pasta: Use 200g of your favorite type. - Sun-Dried Tomatoes: One cup gives rich taste. - Basil Leaves: Half a cup adds freshness. - Pine Nuts: A quarter cup provides a nice crunch. - Garlic: Two cloves bring strong flavor. - Parmesan Cheese: Half a cup for creaminess. - Olive Oil: A quarter cup helps blend everything. - Salt and Pepper: Use to taste for seasoning. To make this dish, you will need: - A large pot for boiling pasta - A food processor for the pesto - A strainer to drain the pasta - A large mixing bowl for combining pasta and pesto - Measuring cups and spoons for accuracy - A wooden spoon or spatula for mixing These ingredients and tools set you up for success. The blend of flavors will amaze you. You will enjoy how easy it is to create this dish. For the full recipe, refer to the beginning of the article. First, grab a large pot. Fill it with water and add some salt. Bring the water to a rolling boil. Once it bubbles, add 200g of your favorite pasta. You can use penne, fusilli, or spaghetti. Cook according to the package, usually about 8-10 minutes. Remember to check for al dente. Before draining, save 1/2 cup of the pasta water. This starchy water helps the pesto stick. Drain the pasta and set it aside. Next, take out your food processor. Add 1 cup of sun-dried tomatoes, 1/2 cup of fresh basil, and 1/4 cup of toasted pine nuts. Toss in 2 cloves of minced garlic and 1/2 cup of grated Parmesan cheese. Pulse this mixture until it is finely chopped. Scrape down the sides as needed. Now, with the processor running, slowly pour in 1/4 cup of extra virgin olive oil. Blend until the pesto is creamy and smooth. If it’s too thick, add some reserved pasta water, one tablespoon at a time, until it’s just right. In a large mixing bowl, add the hot, drained pasta. Pour the sun-dried tomato pesto over it. Toss the pasta and pesto together well, making sure every piece is coated. Taste it and add salt and freshly cracked black pepper to your liking. This is where the magic happens! You can find the full recipe for this dish at [Full Recipe]. To get the right pesto texture, start with sun-dried tomatoes packed in oil. This adds rich flavor. When you blend the pesto, use the food processor. Gradually add olive oil while blending. If it feels too thick, add a bit of reserved pasta water. This helps achieve the creaminess you want. Always taste as you go! Adjust salt and pepper for the best flavor. Cooking pasta correctly is key. Use a large pot with plenty of boiling, salted water. Add pasta and stir to prevent sticking. Check the package for cooking time. Aim for al dente, which means firm but not hard. Before draining, save some pasta water. This starchy water can help improve your pesto. Drain the pasta and mix it with the pesto right away for the best taste. Make your dish stand out! Serve the pasta in warm bowls. Add a drizzle of high-quality olive oil on top. Sprinkle with extra Parmesan and fresh basil for color. You can even add a pinch of crushed red pepper flakes for a kick. These details make your meal look gourmet! Enjoy showing off your beautiful sun-dried tomato pesto pasta. For more ideas, check the Full Recipe. {{image_4}} If you want to make this dish gluten-free, choose pasta made from rice or corn. You can find gluten-free penne, fusilli, or spaghetti at most stores. Cook it the same way as regular pasta. The flavor and texture will still shine through with sun-dried tomato pesto. To make this meal heartier, add protein. Grilled chicken, shrimp, or even chickpeas work great. For chicken, cut it into bite-sized pieces and sauté until cooked through. For shrimp, cook them until they turn pink. Mix the protein right into the pasta with the pesto for a filling dish. Adding veggies boosts flavor and nutrition. Try spinach, zucchini, or bell peppers. Sauté the vegetables in a bit of olive oil before mixing them into the pasta. You can also add roasted cherry tomatoes for a sweet burst. These add-ins make the dish colorful and tasty. For the complete recipe, check out the [Full Recipe]. Leftover sun-dried tomato pesto pasta can be stored easily. Place it in an airtight container. Make sure it cools down before sealing. This way, it stays fresh in the fridge for up to three days. If you pack it well, it won't dry out. To reheat your pasta, use a skillet for the best flavor. Heat a little olive oil over low heat. Add the pasta and stir gently. If it's dry, you can mix in some water or extra pesto. This helps bring back the creamy texture. You can also microwave it, but be careful not to overheat. Heat it in short bursts, stirring in between. If you want to save the pesto, freezing works great. Pour the pesto into ice cube trays for easy use. Once frozen, pop the cubes into a freezer bag. They can last for about three months. When you're ready to use them, just thaw the cubes in the fridge overnight or mix them into hot pasta directly. This keeps your meals quick and tasty! Sun-dried tomato pesto pasta is a simple dish that packs a lot of flavor. It features pasta tossed with a rich pesto made from sun-dried tomatoes, fresh basil, and nuts. The creamy texture comes from olive oil and Parmesan cheese. This meal is quick to make and perfect for any night. You can enjoy it hot or cold, making it a versatile choice for lunch or dinner. Yes, you can make sun-dried tomato pesto pasta vegan! To do this, replace the Parmesan cheese with nutritional yeast or a vegan cheese alternative. Use a plant-based pasta if you prefer. This keeps the dish full of flavor while meeting vegan needs. Just make sure to check all other ingredients for animal products. Sun-dried tomato pesto lasts about one week in the fridge. Store it in an airtight container to keep it fresh. If you want the pesto to last longer, consider freezing it in ice cube trays. This way, you can use just what you need later. Enjoy your sun-dried tomato pesto pasta using the full recipe for the best taste! This article shared all you need to know about sun-dried tomato pesto pasta. You learned the key ingredients and best tools, plus step-by-step cooking tips. I offered helpful advice on creating the perfect pesto and impressing your guests. You can try variations for gluten-free options, protein boosts, or extra veggies. Don't forget how to store leftovers for future meals. Embrace this dish; it's simple, tasty, and sure to please. Enjoy making this pasta!](https://tastymomrecipes.com/wp-content/uploads/2025/06/3611ec3f-a301-4fff-b23d-a49660103ed3.webp)
Looking for a fast and delicious meal? You’ll love this Sun-Dried Tomato Pesto Pasta! With bold flavors and simple steps,
