Skip to content
DisclaimerTerms Of UseGDPR PolicyCookie Policy

tastymomrecipes

  • Home
  • Drinks
  • Appetizers
  • Dinner
  • Dessert
  • About
  • Contact
  • Privacy Policy
DisclaimerTerms Of UseGDPR PolicyCookie Policy

Olivia

- 4 boneless, skinless chicken breasts - 1 cup fresh spinach, finely chopped - 1/2 cup feta cheese, crumbled - 1/4 cup cream cheese, softened to room temperature - 2 cloves garlic, minced - 1/2 teaspoon dried oregano - 1/2 teaspoon freshly ground black pepper - 1/4 teaspoon sea salt - 2 tablespoons olive oil - 1 tablespoon freshly squeezed lemon juice - Toothpicks or kitchen twine for securing - Sharp knife for slicing chicken - Mixing bowl for combining ingredients - Large, oven-safe skillet - Cooking thermometer for checking doneness To make this dish, gather all the ingredients first. I love using fresh spinach. It gives great flavor and nutrition. Feta cheese adds a nice, salty kick. Cream cheese helps bind everything together. You will need a sharp knife to cut the chicken. A mixing bowl makes it easy to combine the filling. A large, oven-safe skillet is perfect for cooking the chicken. Lastly, a cooking thermometer is handy for ensuring the chicken is safe to eat. You can find the full recipe [here](#Full Recipe). - Preheat the oven to 375°F (190°C). - In a mixing bowl, combine the fresh spinach, crumbled feta cheese, cream cheese, minced garlic, dried oregano, black pepper, and sea salt. Stir until well blended. - Place each chicken breast on a cutting board. Use a sharp knife to slice horizontally into each breast, creating pockets. Make sure not to cut all the way through. - Generously fill each pocket with the spinach and feta mixture. Use toothpicks or kitchen twine to secure the openings. - Heat olive oil in a large, oven-safe skillet over medium heat. Once hot, add the stuffed chicken breasts to the skillet. Sear for 3-4 minutes on each side until golden brown. - Drizzle freshly squeezed lemon juice over the chicken. Carefully transfer the skillet to the preheated oven. Bake for 20-25 minutes or until the chicken reaches an internal temperature of 165°F (74°C). This simple process makes delicious Spinach Feta Stuffed Chicken a breeze. You can find the Full Recipe to guide you through the whole cooking adventure. To make the best spinach feta stuffed chicken, focus on a few key tips: - Ensure chicken breasts are of even thickness for cooking. This step helps the chicken cook evenly. Use a meat mallet or rolling pin to pound them gently. - Use fresh ingredients for the best flavor. Fresh spinach and quality feta cheese make a big difference. They bring bright flavors that frozen ingredients can't match. - Allow the chicken to rest before serving for juiciness. After cooking, let the chicken sit for a few minutes. This helps the juices redistribute, keeping the meat moist and tender. You can easily change this dish to suit your taste: - Substitute spinach with kale or Swiss chard. Both greens work well and add unique flavors and textures. - Experiment with different cheeses like goat cheese or mozzarella. Goat cheese gives a tangy twist, while mozzarella adds a creamy stretch. - Add herbs like dill or parsley for an enhanced flavor profile. Fresh herbs can brighten your dish and offer extra depth. These tips will help you create a delicious meal. For more details, check the Full Recipe. {{image_4}} To keep your spinach feta stuffed chicken fresh, store any leftovers in airtight containers. This helps lock in moisture and flavor. Make sure to cool the chicken to room temperature first. For best quality, eat leftovers within three to four days. This ensures you enjoy the taste and safety of your meal. When reheating chicken, avoid drying it out. The best method is to use the oven. Set it to 350°F (175°C) and place the chicken in a baking dish. Cover it with foil to keep moisture in. Heat for about 15-20 minutes or until warm. You can also use a microwave, but be careful not to overcook it. Serve the reheated chicken with a side of rice or sautéed vegetables. This makes for a complete and delicious meal. For the full recipe, click here. When serving your spinach feta stuffed chicken, think about what will taste great with it. Here are some of my top picks: - Sautéed Vegetables: Colorful veggies like bell peppers, carrots, and zucchini add crunch and flavor. Sauté them in olive oil for a quick side. - Fluffy Rice: White or brown rice makes a nice base. You can add herbs or lemon zest to make it pop. - Ideal Sauces: A drizzle of balsamic reduction adds sweetness. A light lemon sauce can also brighten the dish. Plating your dish can elevate the experience. Here are some tips to make your meal shine: - Elegant Plating: Place the stuffed chicken on a bed of sautéed vegetables or rice. A drizzle of sauce around the plate adds a gourmet touch. - Garnishing: Fresh herbs like parsley or basil on top give color and a fresh taste. You can also add lemon wedges for an extra pop. - Vibrant Table Setting: Use colorful plates and napkins. Add some candles or flowers to make your dining area feel special. These ideas will help you create a meal that looks as good as it tastes. For the full recipe, check out the [Full Recipe]. Enjoy! What can I use instead of cream cheese? You can use sour cream or ricotta cheese in place of cream cheese. Both options add creaminess and flavor. Can I make this recipe in advance? Yes, you can prepare the stuffed chicken ahead of time. Just stuff and secure the chicken, then cover and store it in the fridge. Bake it when you're ready. What is the best way to check if the chicken is fully cooked? Use a meat thermometer to check the chicken’s internal temperature. It should reach 165°F (74°C) for safe eating. Can I freeze Spinach Feta Stuffed Chicken? Yes, you can freeze the stuffed chicken. Wrap it tightly in plastic wrap and foil before freezing. Thaw in the fridge before cooking. How to make the chicken more flavorful? You can marinate the chicken in lemon juice and herbs before stuffing. This adds great taste. What type of chicken works best for this recipe? Boneless, skinless chicken breasts work best. They are easy to stuff and cook evenly. Can I use frozen spinach instead of fresh? Yes, frozen spinach is a great substitute. Just thaw and drain it well before mixing it with the other ingredients. In this blog post, we covered how to make Spinach Feta Stuffed Chicken. We detailed the ingredients, tools, and cooking steps. You learned helpful tips for perfecting the dish and storing leftovers. Remember, fresh ingredients make the biggest difference in taste. Use your favorite herbs and cheeses to customize this meal. Don’t forget to serve it with nice sides for the best experience. Enjoy cooking and sharing this savory dish with others!

Spinach Feta Stuffed Chicken Tasty and Simple Recipe

Are you ready to impress at dinner time? Spinach Feta Stuffed Chicken combines fresh spinach, creamy feta, and juicy chicken

To make great nachos, gather these must-have items: - Tortilla chips - Shredded cheese (cheddar and Monterey Jack) - Black beans Starting with tortilla chips gives you that crunchy base. I love a mix of cheddar and Monterey Jack cheese for a rich flavor. Black beans add protein and a nice texture. Fresh toppings make nachos pop! Here’s what you need: - Cherry tomatoes - Jalapeño - Avocado Halved cherry tomatoes add sweetness. If you like heat, slice some jalapeños. Diced avocado brings creaminess to each bite. Add these for extra flavor: - Sour cream - Fresh cilantro - Lime juice Sour cream cools the heat from the jalapeños. Chopped cilantro adds brightness. A squeeze of lime juice enhances all the flavors. For the full recipe, check out the Cheesy Fiesta Sheet Pan Nachos. Enjoy your tasty dish! First, preheat your oven to 375°F (190°C). This heat gets the nachos crispy and delicious. Next, grab a large baking sheet. Line it with parchment paper. This helps with cleanup and keeps the nachos from sticking. Now it’s time to layer the nachos. Start by spreading tortilla chips on the baking sheet. Try to cover the sheet evenly. Don’t pile them too high, or they won’t crisp up. Once the chips are ready, it’s time to add toppings. Distribute black beans, corn, and halved cherry tomatoes over the chips. Make sure they are spread out for even flavor. If you like a little spice, add sliced jalapeños on top. Finally, sprinkle the shredded cheese generously over everything. This will create a gooey layer. Put the nachos in the oven and bake for 10-15 minutes. Keep an eye on them. You want the cheese to melt and bubble. It should start turning golden brown. After baking, take the nachos out and let them cool for a minute. This helps prevent burns and lets the cheese set. While they cool, prepare the avocado. Mix diced avocado with lime juice, salt, and pepper in a small bowl. This keeps the avocado fresh and tasty. Top the warm nachos with this seasoned avocado. Add dollops of sour cream and sprinkle with fresh cilantro for extra flavor. Serve right away while everything is warm and gooey. Enjoy your cheesy fiesta nachos with friends or family! For the complete recipe, check out [Full Recipe]. For a great cheese melt, I love using a mix of cheeses. Cheddar brings sharpness while Monterey Jack adds creaminess. This combo creates a rich taste. You can also try pepper jack for some heat. Baking is key for crispiness. Spread the chips in a single layer on the pan. This allows the heat to reach all chips. Bake at 375°F for about 10-15 minutes. Watch closely to avoid burning. You want the cheese to melt and bubble. Nachos are fun to share! Serve them with tasty dips like sour cream or guacamole. You can also add salsa or pico de gallo for extra flavor. For gatherings, plan your portions. A large sheet pan feeds four people well. But you can double the recipe for bigger groups. Everyone loves nachos, so you won't have leftovers! Make nachos your own! For a vegan version, skip the cheese and use plant-based options. Nutritional yeast can mimic cheese flavor. If you like it spicy, add more jalapeños or use spicy cheese. You can even sprinkle chili powder for a kick. Adjust the heat to fit your taste. For the full recipe, check out the Cheesy Fiesta Sheet Pan Nachos. {{image_4}} Want to make your nachos heartier? Add some protein! Seasoned ground beef or chicken works great here. Cook it with spices like cumin and chili powder for a tasty kick. If you prefer a meat-free option, try tofu or tempeh. Just cube them, season well, and sauté. Both give a nice texture and flavor. Change up the taste with different flavor profiles. For a Southwestern twist, add ingredients like black olives, corn, or even a drizzle of salsa. You can also go Mediterranean by using olives and feta cheese. The salty olives and creamy feta create a unique and tasty nacho experience. Nachos don’t have to be savory. For dessert nachos, use tortilla chips with sweet toppings. Try fresh fruits like bananas, strawberries, or apples. Drizzle some chocolate sauce or caramel over the top. This fun twist will surprise everyone and make a great ending to your meal. For more ideas, check out the Full Recipe and get creative with your nachos! To keep your nachos fresh, store them in the fridge. Use an airtight container. This will help keep them safe from air and moisture. For best results, avoid stacking the nachos. This keeps them from getting soggy. If you have toppings like avocado or tomatoes, store them separately. This way, they stay fresh longer. When reheating nachos, the oven works best. Preheat your oven to 350°F (175°C). Spread the nachos on a baking sheet and heat for about 10 minutes. This method keeps them crispy. If you must use the microwave, do so for a short time. Heat them in 30-second bursts. Watch closely to avoid sogginess. Fresh toppings like tomatoes and avocados last about 2-3 days in the fridge. For nachos, try to eat them within 1-2 days for the best taste. The chips may lose their crunch over time. Always check for any signs of spoilage before using. For the best taste, use the Full Recipe for your nachos right away! To make nachos extra crispy, layering is key. Start with a single layer of tortilla chips. If you pile them too high, they will steam and turn soggy. Spread your toppings evenly over the chips. This way, every chip gets its share of flavor. Bake them at 375°F for about 10-15 minutes. Keep an eye on the cheese. When it melts and bubbles, your nachos are ready. Let them cool for a minute before digging in. This helps them stay crispy. Yes, you can use homemade cheese sauce! It adds a rich flavor and smooth texture. To make a basic cheese sauce, melt butter in a pan. Whisk in flour until it forms a paste. Gradually add milk, stirring until thick. Then, add your favorite cheese. Cheddar works great! Pour the cheese sauce over the chips instead of shredded cheese. This will give you a creamy nacho experience. Get creative with your toppings! Here are some popular options: - Diced red or green onions for crunch - Sliced olives for a briny bite - Cooked ground beef or turkey for protein - Chopped bell peppers for a fresh taste - Fresh jalapeños for added heat - Pineapple for a sweet twist Mix and match to find your favorite combinations! Easy sheet pan nachos are a fun and tasty dish. We covered essential ingredients like tortilla chips, cheese, and beans. Fresh toppings and seasonings add flavor. I shared tips for baking and achieving perfect cheese melt. You can customize nachos to suit any diet or taste. In the end, nachos are versatile and easy to make. Enjoy experimenting with your favorite flavors and toppings. Your next gathering will be a hit with these nachos.

Easy Sheet Pan Nachos Quick and Delicious Dish

Craving a quick and tasty meal? Easy Sheet Pan Nachos are the answer! With just a few ingredients, you can

To make these tasty sweet chili chicken wraps, gather the following ingredients: - 2 chicken breasts, grilled and sliced - 1 large red bell pepper, sliced - 1 cup shredded carrots - 1 cucumber, julienned - 4 large tortillas (whole wheat or regular) - ½ cup sweet chili sauce - ¼ cup fresh cilantro, finely chopped - 1 tablespoon sesame oil - Salt and pepper to taste You can add more flavor and texture with these optional items: - ½ cup avocado slices Here’s what you need to prepare these wraps: - Medium skillet - Large mixing bowl - Spatula or spoon - Clean work surface - Skillet or sandwich press for toasting (optional) - Knife for slicing {{ingredient_image_2}} First, heat sesame oil in a medium skillet over medium heat. Add the sliced red bell pepper and shredded carrots. Sauté them for about 3-4 minutes. Stir occasionally. You want them slightly soft but still crisp. Season with a bit of salt and pepper. Once done, remove from heat and set aside. In a large mixing bowl, take your grilled chicken slices. Pour in the sweet chili sauce. Use a spatula to mix it well. Make sure every piece of chicken is coated. This sauce brings a sweet and spicy kick. Grab a tortilla and lay it flat on a clean surface. In the center, place a good amount of the sweet chili chicken. Next, add the sautéed veggies. Layer in the julienned cucumber and a sprinkle of fresh cilantro. If you like, add some avocado slices for creaminess. Now, fold the sides of the tortilla inward. Roll it from the bottom to the top. Make sure to enclose all the filling. For a crispy finish, toast the wraps. Preheat a skillet or sandwich press. Place each wrap in the hot pan. Cook them for about 2-3 minutes on each side. You want them golden brown and crispy. Once done, cut each wrap in half diagonally. Serve them warm with extra sweet chili sauce on the side for dipping. Enjoy! Grilling chicken breasts is easy if you follow a few steps. Start with room-temperature meat. This helps it cook evenly. Season both sides with salt and pepper. Preheat your grill to medium heat. Place the chicken on the grill and cook for about 6-7 minutes per side. Check the internal temperature; it should reach 165°F. Let it rest for a few minutes before slicing. This keeps the juices locked in. Choosing the right tortilla makes a big difference. Whole wheat tortillas add fiber and flavor. Regular flour tortillas are soft and easy to roll. You can also try corn tortillas for a gluten-free option. Pick large tortillas so you can fit in all the tasty fillings. Warm them up slightly before using. This makes them more flexible and less likely to tear. Garnishing your wraps can make them pop! Fresh cilantro adds a burst of color and flavor. Sliced avocado brings creaminess and richness. You can also add lime wedges for a zesty kick. If you like heat, sprinkle some chili flakes or sliced jalapeños on top. Serve the wraps on a platter with extra sweet chili sauce for dipping. This makes your meal look inviting and delicious! Pro Tips Use Fresh Ingredients: Fresh vegetables and herbs enhance the flavor and nutritional value of your wraps, so opt for the freshest produce available. Customize Your Sauce: If you prefer a spicier kick, add a splash of sriracha or chili flakes to the sweet chili sauce for an extra flavor boost. Wrap It Right: Ensure you don’t overfill your tortillas to make rolling easier and to prevent spills. A good rule of thumb is to use about 1/3 cup of filling per wrap. Meal Prep Friendly: Prepare the chicken and veggies in advance and assemble the wraps just before serving for a quick meal on busy days. {{image_4}} For a vegetarian twist, swap the chicken for grilled tofu. Cut the tofu into thick slices and marinate it in sweet chili sauce. This change keeps the flavor rich and tasty. You can also add more veggies like zucchini or mushrooms for extra crunch and nutrition. Just sauté them like you would with the bell pepper and carrots. If you love heat, try adding sliced jalapeños or a dash of hot sauce to the sweet chili sauce. You can also use spicy chili sauce instead of sweet chili sauce. This brings a fiery kick to your wraps. Adjust the amount based on your heat tolerance, and enjoy the flavor explosion! To make these wraps gluten-free, choose gluten-free tortillas. Many brands offer options that taste great. Ensure the sweet chili sauce is gluten-free too. You can easily find gluten-free versions in stores. This way, everyone can enjoy a delicious wrap without worry! After you enjoy your Sweet Chili Chicken Wraps, store any leftovers in an airtight container. Place them in the fridge. They stay fresh for up to three days. Make sure to keep the sauce separate if you want the wraps to stay crisp. To reheat, use a skillet over medium heat. Place the wrap in the skillet and cover it. Heat for about 2-3 minutes per side. This keeps the wrap crispy while warming the filling. You can also use a microwave, but it may soften the wrap. If you want to freeze the wraps, wrap them tightly in plastic wrap. Then, place them in a freezer-safe bag. They can last up to three months in the freezer. When ready to eat, thaw them in the fridge overnight. Reheat as described above for the best taste. You can use honey mixed with soy sauce as a sweet chili sauce substitute. Mix equal parts honey and soy sauce for a great flavor. You can also try sriracha with sugar if you want more heat. Both options give you a nice balance of sweet and spicy. These wraps can last up to three days in the fridge. Be sure to store them in an airtight container. This keeps them fresh and helps avoid sogginess. If you notice any wilting, it’s time to eat them! Yes, you can prep these wraps a day before serving. Just store the ingredients separately until you’re ready to eat. This keeps the wraps crisp and fresh. Assemble them shortly before serving for the best taste. Some great sides include fresh fruit, coleslaw, or a simple salad. You can also serve crunchy veggie sticks with dip. These sides add color and texture to your meal, making it even more enjoyable. You learned about making Sweet Chili Chicken Wraps in this blog. We covered essential ingredients, step-by-step instructions, and helpful tips. You now know variations and storage options, too. In the end, making these wraps is easy and fun. You can customize them to fit your taste. Enjoy sharing these tasty treats with friends and family!

Tasty Sweet Chili Chicken Wraps Quick and Easy Meal

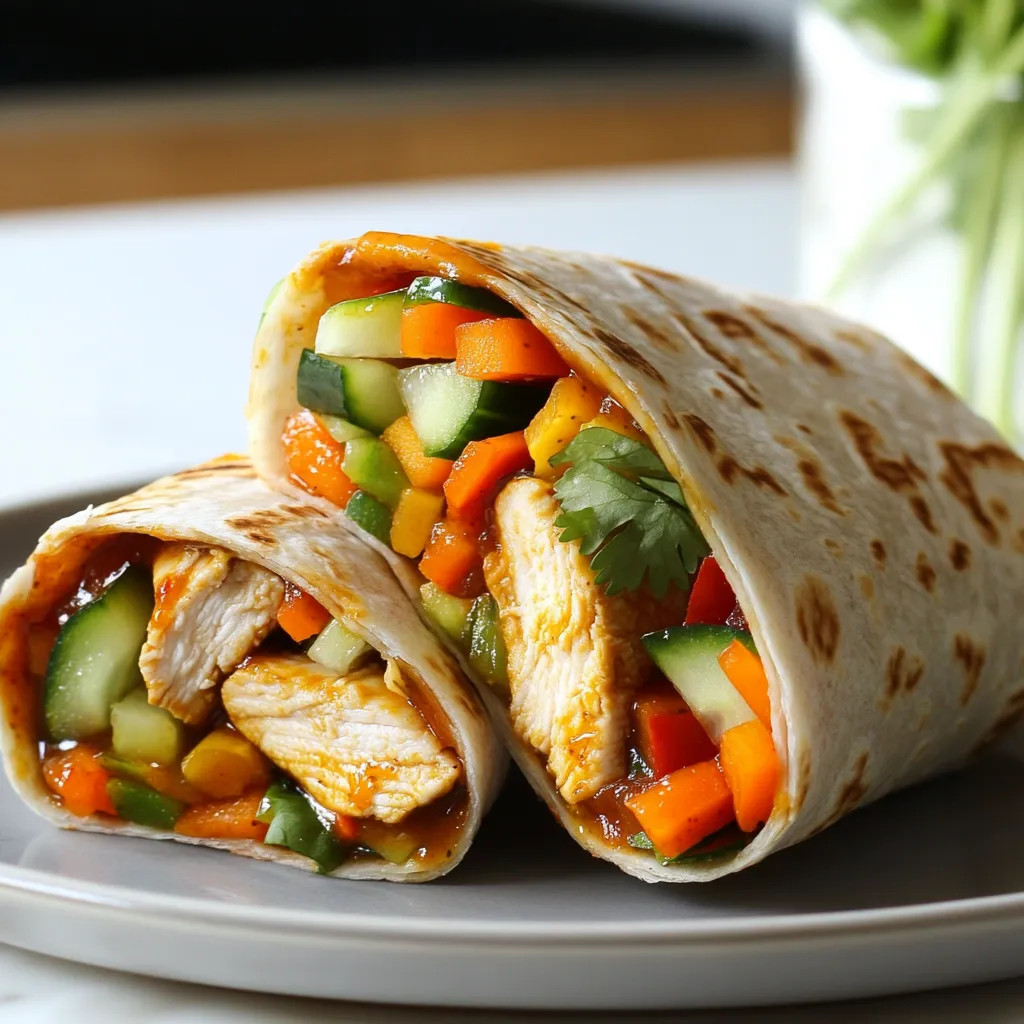
Looking for a quick meal that packs a punch? You’re in the right place! These Tasty Sweet Chili Chicken Wraps

- 1 pound large shrimp, peeled and deveined - 1 bunch asparagus, trimmed and cut into 2-inch pieces - 4 cloves garlic, finely minced - 2 tablespoons high-quality olive oil - 1 tablespoon freshly squeezed lemon juice - 1 teaspoon smoked paprika - Salt and freshly cracked pepper to taste - Fresh parsley, chopped - Lemon wedges for serving When I create One-Pan Garlic Shrimp and Asparagus, I focus on fresh, simple ingredients. The shrimp stand out with their sweet flavor and tender texture. The asparagus adds a nice crunch and a vibrant green color. Garlic brings depth and warmth to the dish. I love using high-quality olive oil. It enhances the flavor of both the shrimp and asparagus. The lemon juice adds a bright note, making each bite refreshing. Smoked paprika gives a subtle smoky taste that pairs well with the seafood. Adjust the salt and pepper to your preference for the perfect finish. For garnishing, fresh parsley adds a pop of color and herbal notes. Lemon wedges on the side boost the dish's bright flavors even more. This recipe is all about balance and simplicity, making it perfect for any meal. You can find the Full Recipe above to guide you through the cooking process. 1. Heat 2 tablespoons of olive oil in a large skillet over medium heat. 2. Add 4 cloves of finely minced garlic. Sauté for about 30 seconds. Keep stirring to avoid burning the garlic. 3. Once the garlic is fragrant, raise the heat to medium-high. 4. Carefully add 1 pound of peeled and deveined shrimp to the skillet. 5. Season the shrimp with 1 teaspoon of smoked paprika, salt, and freshly cracked pepper. 6. Cook the shrimp for 2-3 minutes on each side. They should turn pink and opaque. 1. Remove the shrimp and place them on a plate. 2. In the same skillet, add 1 bunch of trimmed asparagus cut into 2-inch pieces. 3. Sauté for about 4-5 minutes. The asparagus should be tender but still crisp. 4. Return the shrimp to the skillet. Mix in 1 tablespoon of freshly squeezed lemon juice. 1. Taste the dish and adjust the seasoning if needed. 2. Remove the skillet from heat. Garnish with fresh chopped parsley. 3. Serve hot and enjoy your vibrant One-Pan Garlic Shrimp and Asparagus! For the complete recipe, check out the Full Recipe. How to avoid overcooking shrimp To keep shrimp tender, cook them for just a few minutes. Watch for their color to change. When they turn pink and opaque, they are done. If you see them curling tightly, they might be overcooked. Always remove them from heat right away. Best practices for asparagus cooking Asparagus cooks quickly. Aim for a bright green color and a slight crunch. Sauté it for about 4-5 minutes. If you want extra flavor, try adding a splash of lemon juice while cooking. This brightens the taste and keeps it fresh. Alternatives for shrimp If you can't find shrimp, use chicken or scallops. Both options cook well in this dish. Cut chicken into bite-sized pieces and adjust cooking time. Scallops need only a few minutes to cook. Using different vegetables Feel free to mix in other veggies. Zucchini, bell peppers, or snap peas work great. Just be sure to cut them into similar sizes for even cooking. You can also add them based on how long they take to cook. Adding heat with chili flakes For a spicy kick, sprinkle in some chili flakes. Start with a pinch and taste as you go. This adds depth to the dish without overpowering it. Adjust based on your heat preference. Using different herbs for garnish While parsley is a classic, try basil or cilantro for a twist. Fresh herbs brighten the dish and add new layers of flavor. Just chop them finely before sprinkling on top. For a fun twist, mix herbs for a complex taste. For all the details, check the Full Recipe for One-Pan Garlic Shrimp and Asparagus. {{image_4}} Gluten-free adaptations This dish is naturally gluten-free. You do not need to change any key ingredients. Just make sure all your seasonings and oils are certified gluten-free. This keeps your meal tasty and safe for those with gluten sensitivities. Low-carb options If you want a low-carb version, skip any starchy sides like rice or pasta. Focus on the shrimp and asparagus. You can also add more non-starchy veggies, like bell peppers or zucchini, for added texture and taste without the carbs. Baking instead of pan-frying You can bake the shrimp and asparagus for an easier method. Preheat your oven to 400°F (200°C). Toss the shrimp and asparagus with olive oil, garlic, and seasonings. Spread them on a baking sheet and roast for about 12-15 minutes. This method gives you a different texture and keeps things simple. Grilling shrimp and asparagus Grilling adds a smoky flavor. Preheat your grill to medium heat. Thread shrimp and asparagus onto skewers. Brush with olive oil and sprinkle with seasonings. Grill for about 3-4 minutes on each side or until the shrimp turn pink. This method brings out a unique taste and makes for great summer meals. Citrus-infused variations For a zesty twist, add orange or lime juice along with lemon juice. You can also add zest from these fruits for an extra burst of flavor. This brightens the dish and pairs well with the shrimp and asparagus. Asian-inspired sauce modifications Try adding soy sauce, sesame oil, or ginger for an Asian twist. You can make a simple sauce by mixing soy sauce with garlic and a touch of honey. Toss this sauce with the shrimp and asparagus for an exciting flavor change. These variations are fun and can make your dish feel brand new. For the full experience, check out the Full Recipe to explore all the delicious details. To store leftovers, let the dish cool. Place it in an airtight container. Keep it in the fridge for up to three days. For freezing, use a freezer-safe bag. Remove as much air as you can. It will stay fresh for up to three months. Shrimp and asparagus can lose texture when frozen, so eat this dish fresh if you can. To reheat, use the stove or microwave. On the stove, heat a pan over low heat. Add a splash of water or broth to keep it moist. Stir gently until warm. In the microwave, use a microwave-safe dish. Cover it loosely with a lid. Heat for 1-2 minutes, checking often. This keeps the shrimp and asparagus from getting tough. You can keep this dish in the fridge for three days. After that, the shrimp may spoil. If you freeze it, use it within three months for the best flavor. Always check for any off smell or changes in color before eating. How long does it take to make One-Pan Garlic Shrimp and Asparagus? This dish takes about 15 minutes from start to finish. You will spend 10 minutes prepping and 5 minutes cooking. It’s quick and easy. Can I make this recipe ahead of time? Yes, you can prepare the shrimp and asparagus ahead. Cook them, then store in the fridge. Reheat when you’re ready to eat. What can I serve with this dish? You can serve it with rice, pasta, or a fresh salad. Garlic bread pairs nicely too. What to do if shrimp stick to the pan? If shrimp stick, ensure your pan is hot enough and well-oiled. If they still stick, gently slide a spatula under them. How to fix overcooked asparagus? If your asparagus is overcooked, add a splash of cold water. This can refresh them slightly. You can also add a squeeze of lemon for brightness. Can I serve it over rice or pasta? Yes, serving it over rice or pasta makes it a hearty meal. The flavors blend well with both. How to make it a meal prep dish? To meal prep, divide into containers after cooking. This makes for easy lunches or dinners. Just reheat before serving. For the full recipe, check the earlier section! This blog post covered a simple, tasty recipe for One-Pan Garlic Shrimp and Asparagus. You learned about the key ingredients, step-by-step instructions, and various tips to perfect the dish. You can customize it based on your diet or cooking method. Remember, this meal is quick to make and fun to share. With a few simple tweaks, you can create a dish that fits your taste. Enjoy your cooking adventure and try new ideas to elevate your meals!

One-Pan Garlic Shrimp and Asparagus Flavor Boost

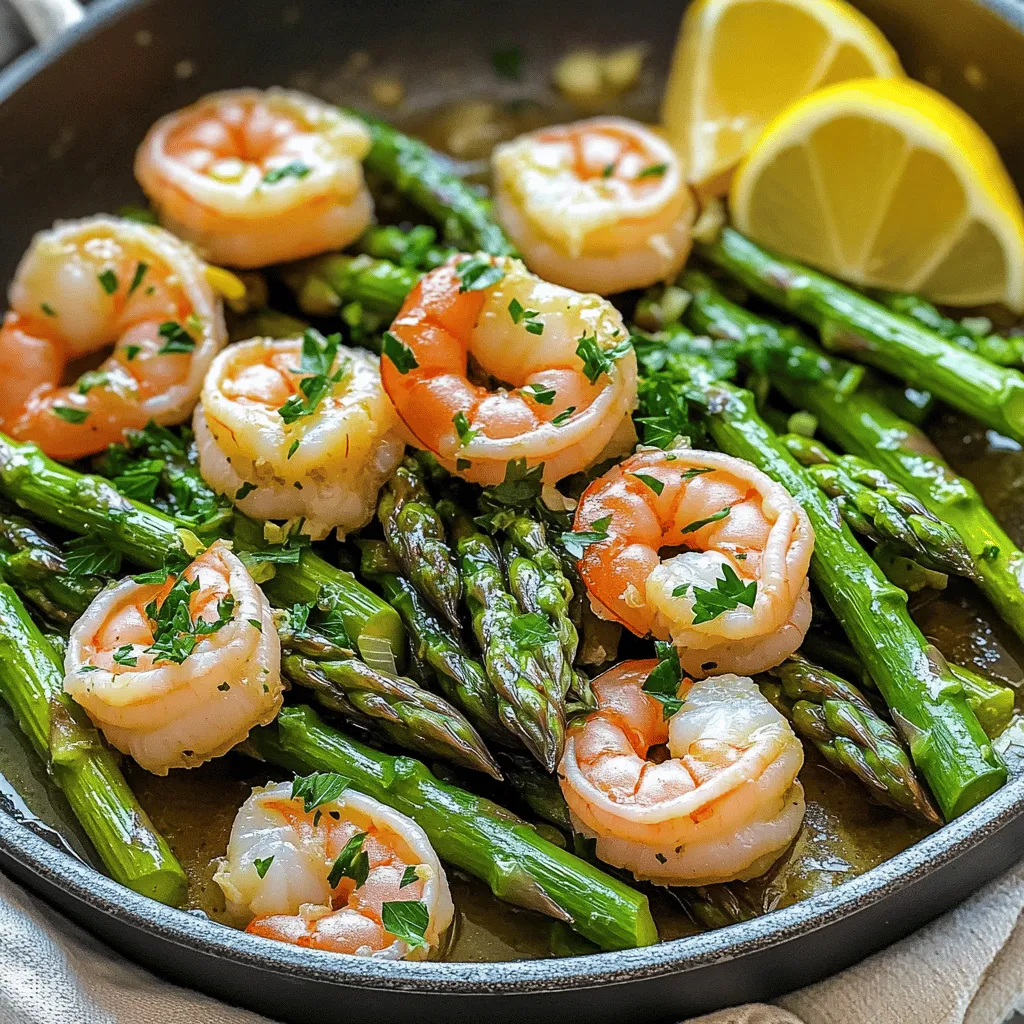
If you crave a quick, tasty meal, you’ll love my One-Pan Garlic Shrimp and Asparagus! This dish is fresh, flavorful,

Start by washing all the fruits under cold water. This keeps them clean and fresh. For strawberries, remove the green tops and cut them in half. Slice the kiwi into round pieces. Dice the watermelon into small cubes. Aim for uniform sizes to make your kabobs look great. It helps if each piece is about the same size. This way, they will cook evenly and look nice on the skewers. Next, grab a small bowl. Combine two tablespoons of honey with juice from one fresh lime. Use a whisk to mix them together. Whisk until the honey and lime juice blend well. This dressing adds a sweet and tangy flavor to your fruits. It will make each bite exciting and tasty. Make sure the dressing is smooth before using it. Now, it's time to assemble your kabobs. Use wooden or metal skewers. Start with a strawberry, followed by a pineapple chunk. Next, add a half grape, then a blueberry, a slice of kiwi, and finish with a watermelon cube. Keep this colorful order for a fun look. Leave a small space at both ends of the skewer for handling. Repeat this process until all the fruit is used. The kabobs should be bright and appealing. Drizzle the honey-lime dressing over the kabobs for extra flavor. You can also use a pastry brush for even coverage. For a nice touch, add fresh mint leaves on top. This makes the kabobs look fancy and tasty. Let them chill in the fridge for 10-15 minutes. This step makes them even more refreshing. For the full recipe, check the detailed instructions above. - Use bright colors for a fun look. - Mix fruits in a rainbow order: red, orange, yellow, green, blue, and purple. - Place kabobs on a large platter for easy access at parties. - Add mint leaves for a fresh touch and extra color. - Serve chilled for a refreshing treat. - Pair with yogurt for a creamy dip. - Offer alongside cheese or crackers for a snack platter. - Let kids help assemble the kabobs. - Encourage them to pick their favorite fruits. - Create fun shapes or patterns on the skewers. - Use cookie cutters to shape watermelon or kiwi. Try these tips to make your Rainbow Fruit Kabobs even more fun and delicious! For the full recipe, check out the details above. {{image_4}} Using fruits that are in season makes these kabobs taste fresher. When strawberries are out, try sweet peaches or juicy cherries. In fall, use apples and pears for a crisp bite. You can also mix it up by adding seasonal berries, like blackberries in summer. This keeps your kabobs bright and fun! You can boost the taste of your kabobs by adding spices. A sprinkle of cinnamon or a dash of nutmeg makes a sweet twist. You might also want to use a few drops of vanilla extract in the honey-lime dressing. This adds a nice depth of flavor. For a fun twist, sprinkle shredded coconut on top before serving. It gives texture and makes the kabobs more exciting! Make your kabobs fit any event by choosing a theme. For a birthday party, add colorful candy pieces between the fruit. At a holiday gathering, use red and green fruits like strawberries and kiwi. You can even combine these kabobs with savory elements like cheese or ham for a unique twist. This way, you get a blend of sweet and savory in one bite! After making your Rainbow Fruit Kabobs, chill them before serving. This step keeps the fruits fresh and tasty. Place the kabobs on a plate and cover them with plastic wrap. If you have leftovers, store them in an airtight container. This helps prevent them from drying out or absorbing other odors in the fridge. Rainbow Fruit Kabobs can last in the fridge for about 2 to 3 days. However, check them regularly. Look for signs of spoilage like brown spots or a mushy texture on the fruits. If you see any of these signs, it’s best to throw them away. Enjoy your delicious kabobs while they are fresh! You can prepare Rainbow Fruit Kabobs in advance. Start by washing and cutting the fruits. Store them in airtight containers in the fridge. This keeps them fresh and ready for assembly. Assemble the kabobs just before serving. This way, they stay colorful and crisp. If you need to prep even more, make the honey-lime dressing ahead. Whisk the honey and lime juice together and store it in a jar. When you’re ready, drizzle it over the kabobs for a fresh taste. The best fruits are those that are colorful and firm. Here are some great options: - Strawberries - Pineapple chunks - Green grapes - Blueberries - Ripe kiwi - Watermelon cubes These fruits not only look good but taste great together. You can mix and match based on your favorites or what’s in season. The key is to choose fruits that are easy to cut and thread onto skewers. Yes, you can! Skewers are great for savory kabobs too. You can use grilled chicken, beef, or veggies. Try these combinations: - Chicken and bell peppers - Shrimp and zucchini - Tofu and mushrooms For a fun twist, you can use fruit skewers with cheese or other snacks. This makes for a great appetizer or finger food at parties. Use metal or bamboo skewers for best results. In this blog post, we explored how to make vibrant Rainbow Fruit Kabobs. We covered fresh fruit choices, making the honey-lime dressing, and tips for assembly. I shared ideas for fun presentations and how to keep kids involved. You can swap fruits by season and try different themes. Remember to chill your kabobs and watch for spoilage signs. With these tips, you can create colorful, tasty treats for any occasion. Enjoy making these with family and friends!

Rainbow Fruit Kabobs Burst with Flavor and Color

Looking for a fun and tasty treat? Rainbow Fruit Kabobs are bursting with flavor and color! These easy-to-make skewers not

- 4 boneless, skinless chicken breasts - 1 cup finely grated Parmesan cheese - 1 cup breadcrumbs (Italian seasoned or panko) - 2 large eggs, whisked until frothy - 2 tablespoons fresh parsley, finely chopped - 1 teaspoon garlic powder - ½ teaspoon onion powder - ½ teaspoon smoked paprika - Salt and freshly ground black pepper to taste - 3 tablespoons extra virgin olive oil When making Baked Parmesan Crusted Chicken, the right ingredients matter. First, I use four boneless, skinless chicken breasts. They are easy to cook and stay juicy. The cheese plays a big role, so I use one cup of finely grated Parmesan cheese. It adds a rich flavor that I love. For the crunch, I choose one cup of breadcrumbs. You can pick Italian seasoned for more taste or panko for extra crunch. Both options work well, so choose your favorite. I also whisk two large eggs until frothy. This egg mixture helps the crumbs stick to the chicken. Next, I add seasoning to boost the flavor. I use two tablespoons of fresh parsley, finely chopped. It gives a nice color and a fresh taste. One teaspoon of garlic powder adds depth, while half a teaspoon of onion powder and smoked paprika enhance the dish further. I always season with salt and freshly ground black pepper to taste. Finally, I drizzle three tablespoons of extra virgin olive oil over the chicken. This oil helps create a crispy crust while baking. Each ingredient contributes to a tasty, easy meal that anyone can make. For a complete guide, refer to the Full Recipe. - Preheat your oven to 400°F (200°C). - Prepare a baking sheet with cooking spray or olive oil. - Combine Parmesan cheese, breadcrumbs, and seasonings in a bowl. - Whisk eggs until frothy. - Dredge chicken breasts in the egg mixture and breadcrumb mixture. - Arrange coated chicken on the baking sheet. - Drizzle with olive oil and bake for 25-30 minutes. - Check internal temperature reaches 165°F (75°C). I love how easy this recipe is! You start by preheating your oven. This step is key for that crispy crust. While the oven warms up, get your baking sheet ready. A little cooking spray or olive oil will keep the chicken from sticking. Next, grab a bowl and mix your Parmesan, breadcrumbs, and seasonings. This blend gives the chicken a great flavor. In another bowl, whisk the eggs until they are frothy. This will help the breadcrumbs stick to the chicken. Now, take your chicken breasts. First, dip them in the egg mixture, ensuring they are well-coated. Then, dredge them in the breadcrumb mix. Press gently to make sure the crumbs stick well. Place the coated chicken on your baking sheet. Drizzle some olive oil on top. This oil makes the crust golden and crunchy. Bake the chicken for 25-30 minutes. You want it to be golden brown and crispy. Use a meat thermometer to check that it reaches 165°F. This ensures the chicken is cooked through. This process not only keeps the chicken juicy but also gives it a nice crunch. Enjoy the delicious results of this Baked Parmesan Crusted Chicken. For the full recipe, check the details above! - Use panko breadcrumbs for extra crunch. They give a light and crispy finish. - Allow the chicken to rest after baking. This makes it juicy and flavorful. - Experiment with herbs and spices for variation. Try adding oregano or Italian seasoning for a twist. - Add grated lemon zest for brightness. It lifts the flavors and adds a fresh taste. - Prepare ingredients in advance for a quicker cook time. This makes your cooking process smooth and easy. - Batch-cook and freeze for convenient meal options. This way, you always have a tasty meal ready to go. For the complete details on this dish, check the Full Recipe. {{image_4}} You can switch up the cheese in this dish. Try using shredded mozzarella or cheddar cheese for a twist. Mixing different cheeses can also create a fun flavor. Combine Parmesan with any cheese you love for a unique taste. If you want a healthier option, swap breadcrumbs for ground almonds or oats. This change adds nutrition and flavor. You can also use skinless chicken thighs instead of breasts. They are juicy and rich in flavor, making your meal even better. Want to spice things up? Add crushed red pepper for a nice kick. Fresh herbs like thyme or basil can also boost flavor. These little changes make your dish stand out and keep it exciting. For the full recipe, check out the main section. To keep your Baked Parmesan Crusted Chicken fresh, store leftovers in an airtight container in the fridge. This method helps keep the chicken moist and flavorful. Use the leftovers within 3-4 days for the best quality. After that, the taste may not be as good, and the texture might change. If you want to save some for later, let the chicken cool completely before freezing. This helps maintain its quality. Wrap the chicken tightly in foil or use freezer bags. Make sure to remove as much air as possible. This prevents freezer burn. For the best taste and texture, reheat your chicken in the oven. Set the oven to 350°F (175°C) and warm until heated through. If you need a quick option, use a microwave. However, expect the coating to be softer. To enjoy the crispy texture again, an oven is your best bet. By following these tips, you can enjoy your delicious chicken even after the first meal! For the full recipe, check back above for all the details. It takes 25-30 minutes to bake at 400°F (200°C). This time is perfect for getting a crispy crust while keeping the chicken tender and juicy. Yes, you can prep and refrigerate the chicken before baking. This makes dinner easy on busy days. Just coat the chicken and store it in the fridge until you are ready to bake. No, but they add more flavor; you can use plain breadcrumbs instead. If you enjoy a bit of spice, try adding your own herbs to the plain breadcrumbs. Pair with roasted vegetables or a fresh green salad for a complete meal. These sides balance the rich taste of the chicken. You can also add some rice or pasta for a heartier dish. For the full recipe, check out the earlier section. This article covered a simple yet tasty recipe for Baked Parmesan Crusted Chicken. We explored the key ingredients, detailed step-by-step instructions, and offered tips for the perfect dish. You learned about delicious variations and storage methods to keep your meals fresh. Remember, cooking can be fun and easy. With these steps, you can impress yourself and others. Enjoy your cooking journey and make this chicken a staple in your kitchen!

Baked Parmesan Crusted Chicken Tasty and Easy Recipe

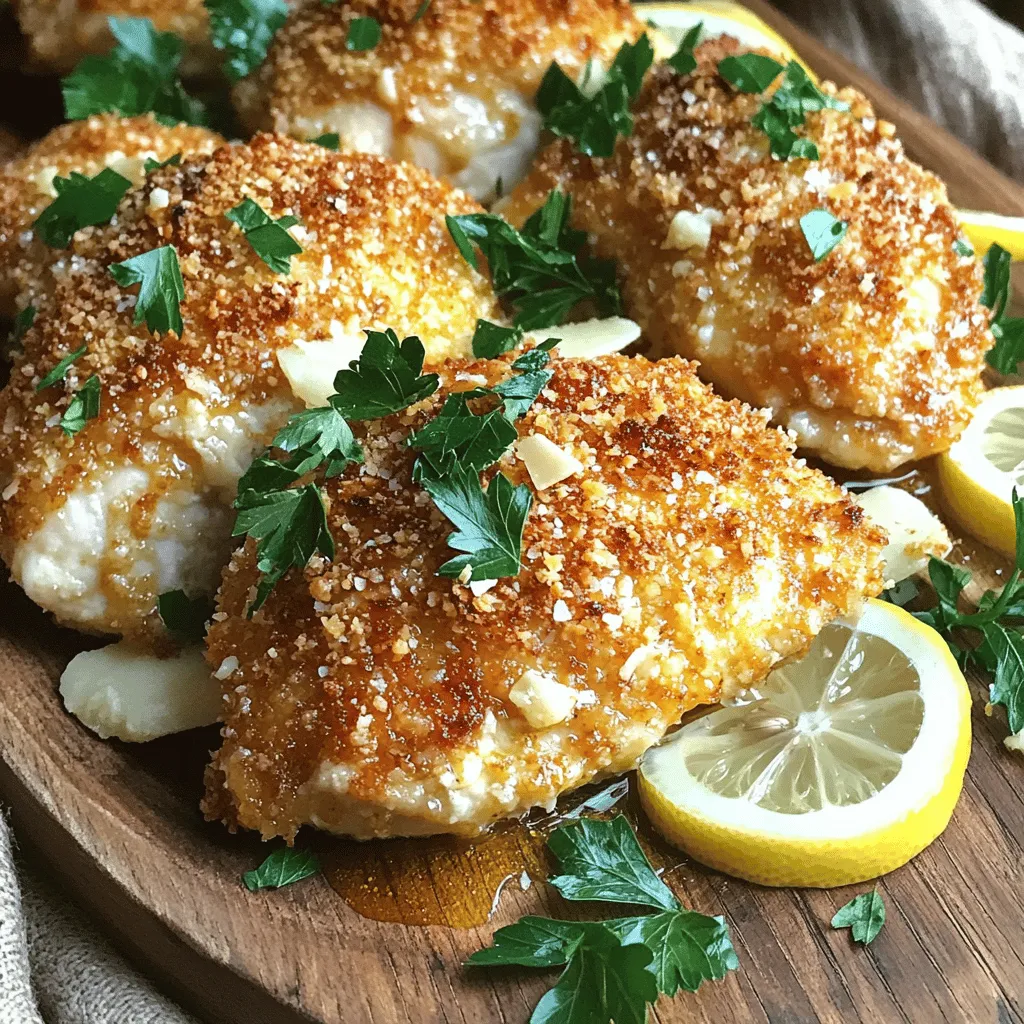
Looking for a simple and tasty dinner idea? Baked Parmesan Crusted Chicken is your answer! This easy recipe turns juicy

When making lemon ricotta pancakes, you need to gather a few key ingredients. Each one plays a part in making your pancakes fluffy and flavorful. Here’s the detailed list of ingredients you will use: - 1 cup ricotta cheese - 1 cup all-purpose flour - 1 tablespoon baking powder - 1/4 teaspoon salt - 1/4 cup granulated sugar - Zest of 1 lemon (approximately 1 tablespoon) - 1/2 cup milk (any variety) - 2 large eggs - 2 tablespoons fresh lemon juice - 1 teaspoon pure vanilla extract - Butter or cooking spray for frying - Fresh berries (such as blueberries or strawberries) and maple syrup for serving (optional) Each ingredient adds a unique flavor or texture. Ricotta gives the pancakes a rich creaminess. The flour forms the base and helps with structure. Baking powder makes them rise, while salt balances the sweetness. Granulated sugar adds a touch of sweetness and enhances the lemon flavor. Lemon zest is vital for that bright citrus kick. Fresh lemon juice brings tartness, and vanilla adds a lovely aroma. Milk keeps the batter moist, and butter or spray helps with cooking. Finally, fresh berries and syrup create a delicious topping to enjoy. For the full recipe, check out the Full Recipe section. In a large bowl, start by whisking together the ricotta cheese, milk, eggs, lemon juice, and vanilla extract. Mix until the texture is smooth and creamy. The ricotta adds a rich flavor and makes the pancakes fluffy. This step is key to a great start. In a separate bowl, sift together the all-purpose flour, baking powder, salt, granulated sugar, and lemon zest. Sifting removes lumps and helps the dry mix combine well. This step ensures your pancakes rise nicely. Now, take the dry mixture and gently fold it into the wet mixture. Use a spatula to combine them carefully. You want to mix until just combined. Don’t worry if a few lumps remain; they help keep the pancakes fluffy. Overmixing can make them tough. Preheat a non-stick skillet over medium heat. Lightly grease it with butter or cooking spray. For each pancake, pour about 1/4 cup of batter onto the skillet. Cook for 2-3 minutes. Watch for small bubbles on the surface. When they form, the edges will look set. Flip the pancakes and cook for another 2-3 minutes until golden brown. Repeat until all the batter is used. Serve the pancakes warm, topped with fresh berries and a drizzle of maple syrup. For a nice touch, stack the pancakes high on a plate. Sprinkle with powdered sugar and add fresh lemon wedges for color and flavor. Enjoy this delightful breakfast that’s both fluffy and flavorful! For the full recipe, check the details above. To make your pancakes fluffy, do not overmix the batter. If you stir too much, the pancakes can turn dense. When you mix the wet and dry ingredients, just fold until combined. It’s okay if some lumps remain. This keeps air in the batter and helps the pancakes rise. Setting the right heat on your skillet is key. Medium heat works best for cooking these pancakes. If the heat is too high, the outside will burn before the inside cooks. If it’s too low, the pancakes won’t brown nicely. You want a golden color on both sides. You can add spices or extracts for extra flavor. A pinch of cinnamon or a splash of almond extract can change the taste. You might try adding a bit of nutmeg for warmth. These small tweaks can make your pancakes even more delightful. For the full recipe, check the recipe section. {{image_4}} You can spice up your lemon ricotta pancakes in fun ways. One idea is to add chocolate chips. Just fold in a handful of mini chocolate chips into the batter. They melt slightly, making each bite a sweet surprise. Another option is to infuse your pancakes with herbs. Try adding finely chopped fresh basil. It gives a unique twist that pairs well with the lemon. You can also use mint for a refreshing taste. These flavors can elevate your breakfast and impress your guests. If you need gluten-free options, you can use alternative flours. Almond flour or oat flour works well in this recipe. Just swap the all-purpose flour with an equal amount of your chosen flour. This keeps the pancakes delicious and fluffy. For vegan adaptations, replace the eggs with flaxseed meal. Mix one tablespoon of flaxseed meal with three tablespoons of water. Let it sit for a few minutes to thicken. Use plant-based milk instead of regular milk. This way, everyone can enjoy these tasty pancakes. Explore the [Full Recipe] for all the details you need to make these variations! You can keep your lemon ricotta pancakes in the fridge for up to three days. Store them in an airtight container. This will help keep them fresh and moist. To prevent sticking, place parchment paper between layers if you stack them. For long-term storage, freeze your pancakes. Lay them flat on a baking sheet first. Once frozen, stack them in a freezer-safe bag or container. They will stay good for about two months. Label the bag with the date to keep track. When it's time to enjoy your pancakes again, reheating is simple. You can use the microwave, skillet, or oven. - Microwave: Heat for 20-30 seconds. Check if they are warm enough. - Skillet: Place on low heat for about 1-2 minutes per side. - Oven: Preheat to 350°F (175°C) and warm for 10 minutes. These methods will help keep your pancakes fluffy and tasty! To make Lemon Ricotta Pancakes from scratch, follow a simple process. Start by mixing the wet ingredients. In a large bowl, whisk together ricotta cheese, milk, eggs, lemon juice, and vanilla extract. This creates a smooth base. Next, sift together the dry ingredients in another bowl. Combine flour, baking powder, salt, sugar, and lemon zest. Gradually fold the dry mix into the wet mix. Be careful not to overmix; some lumps are okay. Preheat a skillet and grease it lightly. Pour 1/4 cup of batter for each pancake. Cook until bubbles form, then flip and cook until golden brown. This method ensures fluffy and flavorful pancakes. You can find the full recipe for detailed steps. Yes, you can use low-fat ricotta cheese in this recipe. Substituting low-fat ricotta can slightly change the texture. The pancakes may be less creamy but still tasty. They will remain fluffy and light. If you want a richer flavor, stick with full-fat ricotta. Experimenting with different types of ricotta can be fun. Just remember, the key is to find a balance between flavor and texture. To check if pancakes are done, look for a few signs. First, watch for small bubbles forming on the surface. This shows that the batter is cooking. Next, check the edges; they should look set and slightly dry. When you flip the pancake, it should be golden brown. Cook the other side until it looks similar. If you use a toothpick, it should come out clean when inserted into the middle. These tips help ensure perfectly cooked pancakes every time. You’ve learned how to make fluffy lemon ricotta pancakes. We covered the key ingredients and step-by-step instructions. I shared tips to achieve great texture and flavor. You can also make fun variations and store leftovers. Try these pancakes for breakfast or brunch. They’re tasty and easy to make. Cooking can be fun, so enjoy this recipe. Happy cooking!

Lemon Ricotta Pancakes Fluffy and Flavorful Breakfast

Start your morning right with my Lemon Ricotta Pancakes. They’re fluffy, rich, and full of zest! If you’re looking for

To make a Spicy Watermelon Margarita Mocktail, you need fresh, simple ingredients. Here is what you'll need: - 2 cups of seedless watermelon, cut into cubes - 1/4 cup of freshly squeezed lime juice (about 2 limes) - 1 tablespoon of agave syrup (for sweetness) - 1 jalapeño pepper, thinly sliced (remove seeds for less heat) - Sparkling water or club soda, for topping - Ice cubes, as needed - Lime wedges and watermelon slices, for garnish - Fresh mint leaves, for garnish These ingredients come together to create a refreshing drink. The watermelon adds sweetness, while lime gives a tangy kick. The jalapeño adds spice, making this drink unique. You can enhance your mocktail with extra flavors. Here are some optional additions: - Fresh basil or cilantro for a herbaceous note - A splash of orange juice for a citrus boost - Coconut water for a tropical twist - A sprinkle of sea salt to balance the sweetness Feel free to mix in any extras you like. Each will create a different flavor profile and make your drink special. To prepare this mocktail, you’ll need some simple tools: - Blender for mixing the watermelon and lime juice - Fine sieve or cheesecloth to strain the mixture - Pitcher for combining ingredients - Glasses for serving - Ice scoop for adding cubes Having the right equipment makes the process smooth. Each tool plays an important role in creating your drink. To start, grab 2 cups of seedless watermelon. Cut it into small cubes. Next, squeeze 1/4 cup of fresh lime juice. This usually comes from about 2 limes. Place the watermelon cubes and lime juice into a blender. Blend it on high until it is smooth. This will give you a bright and tasty mix. Now, take a large pitcher. Strain the blended mix through a fine sieve or cheesecloth. This helps to remove any pulp, making the drink smooth. Pour the liquid back into the pitcher. Add 1 tablespoon of agave syrup for a touch of sweetness. Then, add 1 thinly sliced jalapeño, seeds removed if you want less heat. Stir well to mix it all together. Let it sit for about 10 minutes. This allows the jalapeño to add its spicy kick. If you like, you can take the jalapeño out sooner for less spice. Take some glasses and fill each halfway with ice cubes. Pour the watermelon-lime juice mixture in until it is two-thirds full. Now, top each glass with sparkling water or club soda. Fill it to the brim and stir gently. This blends the flavors without losing the bubbles. For a nice touch, garnish with a lime wedge, a watermelon slice, and a sprig of fresh mint. This drink not only tastes great but looks stunning too. Enjoy your refreshing Spicy Watermelon Margarita Mocktail! For the full recipe, check the details above. Choosing the right watermelon is key. Look for watermelons that feel heavy for their size. This means they are juicy. Check for a uniform shape and a creamy yellow spot. This spot shows where the watermelon rested on the ground and ripened. A good watermelon should have a dull skin and a firm feel. If it sounds hollow when you tap it, that’s a good sign! You can change the spice and sweetness to match your taste. For less spice, remove the jalapeño seeds and use less of the slices. If you want more heat, let the jalapeño infuse longer. You can also add more slices if you like it hot. For sweetness, start with the one tablespoon of agave syrup. Taste and add more if you need a sweeter drink. This way, you create a balance that suits your palate. Making your mocktail look great adds to the fun! Use tall, clear glasses to show off the vibrant pink color. Add ice first, then pour in the drink, leaving some space at the top. Garnish with lime wedges, watermelon slices, and fresh mint leaves for a bright touch. You can even rim the glasses with salt or sugar for extra flair. For a party, place all garnishes on a platter so guests can decorate their drinks. This makes each drink feel special! {{image_4}} You can change the flavor of your Spicy Watermelon Margarita Mocktail by adding fruits. Try mixing in fresh strawberries or mango. These fruits add sweetness and a fun twist. You can also use pineapple for a tropical vibe. Just blend your chosen fruit with the watermelon for a new taste. The key is to keep the balance between sweet and spicy. If you want to swap out agave syrup, you have options. Honey works well as a natural sweetener. You can also use maple syrup for a unique flavor. If you prefer a sugar-free option, try stevia or monk fruit. Each sweetener will change the taste slightly, so taste as you go. You can also mix in different sodas like ginger ale for a spicy kick. For a creamy twist, add Greek yogurt to your mocktail. This change boosts the protein content. Start with a small amount, about 1/4 cup, and blend it with the watermelon. The yogurt makes the drink rich and filling. It also adds a smooth texture that is refreshing. Just remember to adjust the sweetness to balance the yogurt's tang. For the complete recipe, check the Full Recipe section. If you have any Spicy Watermelon Margarita Mocktail left over, store it in the fridge. Use an airtight container to keep it fresh. This drink tastes best when cold, so chill it well before serving again. You can also keep the mocktail in a glass jar with a tight lid. This helps keep the flavors locked in. To keep your ingredients fresh, follow these tips: - Watermelon: Store it whole in a cool place. If cut, wrap it tightly in plastic wrap and refrigerate. - Lime Juice: Fresh juice lasts best in a sealed jar in the fridge. Use it within a week. - Agave Syrup: Keep it in a cool, dry place. It will last a long time. - Jalapeño: Store it in the fridge. Use it within a week for the best flavor. The mocktail will stay fresh in the fridge for up to three days. If you want to freeze it, pour the mixture into ice cube trays. This way, you can enjoy it later. Just thaw the cubes and mix them with sparkling water when you're ready to sip. However, avoid freezing the garnishes like mint or lime. They don’t hold up well in the freezer. For the full recipe, check out the complete guide on making this refreshing delight! Yes, you can prepare the watermelon-lime juice ahead of time. Just blend the watermelon and lime juice, then strain it. Store the liquid in the fridge for up to two days. When ready to serve, add jalapeño slices and mix with ice and sparkling water. This keeps it fresh and tasty. For a non-alcoholic twist, try using flavored sparkling water or non-alcoholic tequila. You can also use a mix of lime juice and agave syrup for a sweet base. These options give you the same fun flavors without alcohol. To make your mocktail spicier, leave the jalapeño slices in the mix longer. You can also add a pinch of cayenne pepper or use a spicier pepper. Start with small amounts and taste as you go. This way, you can find the perfect heat level for your drink. You now have all the key steps to make a spicy watermelon margarita mocktail. We covered key ingredients, tasty options, and the right tools for great results. You learned how to blend flavors, add heat, and make your drink look festive. Don't forget the tips for selecting the best watermelon and adjusting spice levels. Try the fun variations and enjoy this refreshing drink. Practice these methods, and impress your friends with your skills! Enjoy your mocktail and keep experimenting!

Spicy Watermelon Margarita Mocktail Refreshing Delight

Craving a cool drink that packs a punch? The Spicy Watermelon Margarita Mocktail is your answer! I’ll guide you in

- 1 cup all-purpose flour - 1/4 cup coconut sugar - 1/2 tablespoon baking powder - 1/4 teaspoon salt - 1/2 cup almond milk (or preferred plant-based milk) - 2 tablespoons melted coconut oil - 1 teaspoon vanilla extract - Filling Ingredients: - 3 tablespoons brown sugar - 1 tablespoon ground cinnamon - 2 tablespoons chopped pecans or walnuts (optional) - Drizzle: - 1 tablespoon maple syrup Gather these ingredients to make vegan cinnamon roll bites. Start with all-purpose flour, which gives these bites their structure. Coconut sugar adds a hint of caramel flavor and sweetness. Baking powder helps them rise, while salt enhances all flavors. Almond milk or any plant-based milk keeps it vegan and moist. Melted coconut oil ensures a rich taste, and vanilla extract brings warmth. For the filling, mix brown sugar with ground cinnamon for that classic taste. Chopped nuts add crunch but are optional. The drizzle of maple syrup at the end provides a sweet finish. You can find the complete recipe [Full Recipe]. - Preheat the oven to 350°F (175°C). - Prepare the baking sheet with parchment paper. - In a large bowl, mix the dry ingredients: flour, coconut sugar, baking powder, and salt. - In another bowl, mix the wet ingredients: almond milk, melted coconut oil, and vanilla extract. - Slowly pour the wet mix into the dry mix. Stir gently until combined. - Roll the dough out on a floured surface. Aim for a rectangle about 1/4 inch thick. - To make the filling, mix brown sugar, ground cinnamon, and nuts. Sprinkle this on the dough. - Start rolling the dough tightly from one edge to the other. - Slice the rolled dough into bite-sized pieces, about 1-2 inches thick. - Place the sliced pieces on the prepared baking sheet, leaving space between them. - Bake for 15-20 minutes until golden brown and puffy. - Drizzle warm bites with maple syrup for a sweet finish. For the full recipe, check out the ingredients and instructions above. Enjoy your baking! To get the best texture in your vegan cinnamon roll bites, avoid overmixing the dough. Mix just until everything is combined. This keeps the bites soft and fluffy. Ensure even rolling of the dough. Roll it out to about 1/4 inch thick, so all bites cook evenly. Uneven rolling can lead to some parts being hard and others soft. You can enhance flavor by experimenting with different types of nuts. Try using walnuts, pecans, or even almonds. Each nut adds a unique crunch and taste. Adjust sweetness by adding more or less brown sugar. Tasting as you go helps you find the right balance for your palate. For presentation, arrange the cinnamon roll bites artfully on a serving platter. Dust them lightly with powdered sugar for a beautiful touch. You can also garnish with extra chopped nuts. Serve them warm for the best taste experience. These bites are great for brunch, snacks, or dessert! {{image_4}} You can make these vegan cinnamon roll bites gluten-free! Use 1 cup of gluten-free all-purpose flour instead of regular flour. This swap keeps the texture nice. You might also try almond flour or oat flour for a unique twist. Each flour brings its own flavor, so choose what you like best. Want to change things up? You can add cocoa powder to the dough for a chocolate twist. Just mix in 2 tablespoons of cocoa powder with the dry ingredients. For a bright touch, incorporate citrus zest. Lemon or orange zest adds a fresh flavor that pairs well with cinnamon. Consider adding healthy ingredients for extra flavor and nutrition. Dried fruits like raisins or cranberries can add sweetness. Chia seeds or flax seeds are great for added fiber. Toss in about 1/4 cup of your choice to the dough before baking. These add-ins not only boost nutrition but also make each bite even more delightful. For the complete recipe, check the Full Recipe. Let your cinnamon roll bites cool for 10 minutes on a wire rack. This step helps them firm up and keeps them from getting soggy. Once they cool, you can store them in containers. I recommend using airtight containers to keep them fresh. You can also use a glass jar if you want to see those cute bites. You can keep your cinnamon roll bites at room temperature for about three days. Just make sure they are in a cool, dry place. If you need to store them longer, freezing is a great option. To freeze, place the bites in a single layer on a baking sheet. Once frozen, transfer them to a freezer-safe bag. They will stay fresh for up to three months. When you're ready to enjoy, just thaw them overnight in the fridge. Yes, you can use other types of milk. Soy milk, oat milk, or coconut milk all work well. Each option adds a unique flavor. Almond milk is popular, but feel free to choose your favorite. Just ensure it’s unsweetened to control the sugar. To add more richness, try a frosting or glaze. A simple icing made with powdered sugar and plant-based milk is great. You can also use vegan cream cheese for a tangy touch. Drizzle it on top after baking for a sweet finish. Reheat leftover bites in the oven for the best texture. Preheat the oven to 350°F (175°C). Place the bites on a baking sheet and warm them for about 5 to 10 minutes. This keeps them soft and fluffy. Yes, making the dough ahead is easy. Prepare the dough and wrap it tightly in plastic. Store it in the fridge for up to 24 hours. When ready, roll it out and bake as directed. This saves time on busy mornings or special events. Absolutely! If you want nut-free bites, simply leave out the chopped nuts. You can replace them with seeds like sunflower or pumpkin seeds. This keeps the bites crunchy without using nuts. We covered how to make delicious cinnamon roll bites using simple ingredients. You learned the steps for dough preparation, filling, and baking. Keep in mind tips for texture and flavor to enhance your bites. Feel free to experiment with variations like gluten-free options or fun flavors. Store them properly to enjoy later. With easy adjustments and a little creativity, you can enjoy a tasty treat any time!

Vegan Cinnamon Roll Bites Perfect for Any Occasion

If you love sweet treats, you’ll adore these Vegan Cinnamon Roll Bites! They are soft, warm, and perfect for any

- Extra-virgin olive oil - Boneless, skinless chicken breasts - Onions, garlic, and bell peppers To start, you need a few key ingredients for your Easy Chicken Enchilada Skillet. First, grab some extra-virgin olive oil. This will help cook the chicken and veggies nicely. Next, you want boneless, skinless chicken breasts. Cut them into 1-inch cubes for even cooking. Don’t forget onions, garlic, and bell peppers. These add great flavor and color to your dish. - Black beans and corn - Enchilada sauce - Shredded cheese Now, let’s add some flavor boosters. I recommend using black beans and corn. They not only taste great but also add texture. Next, you need enchilada sauce. This is the heart of the dish. It gives that classic taste we all love. Lastly, grab some shredded cheese. I suggest sharp cheddar or a Mexican blend for a flavorful kick. - Ground cumin and smoked paprika - Salt and pepper - Fresh cilantro and avocado for serving Seasoning is key to making your skillet shine. Ground cumin and smoked paprika are must-haves. They bring warmth and depth to the dish. Remember to add salt and pepper to taste. For a finish, fresh cilantro gives a bright note. Slices of avocado on the side are optional but so delicious. For the full cooking process, check out the Full Recipe. - Heat the olive oil: Pour 2 tablespoons of olive oil into a large skillet. Set the heat to medium. Wait until the oil is hot but not smoking. - Cook the cubed chicken: Add 1 pound of cubed chicken to the skillet. Season it with salt, pepper, cumin, and paprika. Cook for about 5-7 minutes. Stir often until the chicken turns golden brown and is cooked through. - Add diced onion, garlic, and bell pepper: Toss in 1 medium diced onion, 2 minced garlic cloves, and 1 chopped bell pepper. - Cook until soft: Sauté the mix for around 3-4 minutes. You want the onion to be clear and the veggies to be soft. - Incorporate beans, corn, and enchilada sauce: Stir in 1 can of black beans, 1 cup of corn, and 1 can of enchilada sauce. - Let ingredients simmer: Mix everything well. Reduce the heat and let the skillet simmer for 5 minutes. This helps the flavors mix. - Melt the cheese: Sprinkle 1 cup of shredded cheese on top. Cover the skillet and lower the heat. Let it cook for 2-3 minutes to melt the cheese. - Garnish and serve: Once the cheese is melted, remove from heat. Top with fresh cilantro leaves. Serve hot with avocado slices on the side. Enjoy your delicious meal! - Use pre-cooked chicken for faster preparation. This saves time and effort. - Customize spice levels to your preference. Add more heat with jalapeños or less with mild sauce. - Serve directly from the skillet. It looks inviting and keeps the dish warm. - Add sides like tortillas or rice. This makes for a complete and satisfying meal. - Use a large, heavy skillet. A cast-iron skillet works great for even cooking. - Essential kitchen gadgets include a sharp knife for cutting chicken and a sturdy spatula for stirring. Try these tips to make your Easy Chicken Enchilada Skillet a hit every time! For the full recipe, check out the link above. {{image_4}} You can easily make this dish vegetarian. Just skip the chicken. Instead, use zucchini or mushrooms. These veggies add great flavor and texture. Slice them up and cook them the same way as the chicken. They will soak up all the tasty spices and sauce. Always feel free to mix and match your favorite vegetables. Want to change the flavor? Try using different enchilada sauces. You can pick spicy, mild, or even green sauce. Each type brings a new taste to your skillet. You can also add beans or other veggies. Corn or diced tomatoes work well here. This keeps the dish fresh and exciting every time you make it! For a fun twist, make it taco-inspired. Swap out the cumin and paprika for taco seasoning. This adds a whole new layer of flavor. You can also include other taco favorites, like diced jalapeños or olives. This version is a crowd-pleaser and is perfect for taco night. So many options exist for this Easy Chicken Enchilada Skillet. You can personalize it to fit your taste! Explore all these variations to find your favorite. Check out the Full Recipe for more details. To keep your chicken enchilada skillet fresh, store it in an airtight container. Let it cool first. Place it in the fridge. It can last up to three days. If you want to keep it longer, consider freezing it. You can reheat your skillet in two ways: the skillet or the microwave. For the skillet, warm it on low heat. Stir occasionally to heat evenly. This keeps the texture nice. The microwave is quicker. Heat it in 30-second bursts. Stir between each burst to avoid hot spots. This helps keep the flavor strong. Yes, you can freeze your enchilada skillet! First, let it cool completely. Then, spoon it into a freezer-safe container. Label it with the date. When you’re ready to eat it, move it to the fridge overnight to thaw. You can also use the microwave to defrost. Once thawed, reheat it in your skillet for the best results. To make chicken enchiladas from scratch, you need to prepare tortillas, filling, and sauce. The key difference between the skillet method and the traditional recipe is that the skillet combines all steps in one pan. This saves time and effort. In the traditional method, you roll the filling in tortillas and bake them. The skillet version allows the flavors to meld quickly and is less messy. Yes, you can use frozen chicken! Just be sure to thaw it fully before cooking. This helps the chicken cook evenly. If you need to cook it from frozen, add a few extra minutes to the cooking time. Cut the chicken into smaller pieces to help it cook faster. For the best melting quality, I recommend using sharp cheddar or a Mexican cheese blend. These cheeses melt well and add great flavor. You can also use Monterey Jack for a mild taste. Experiment with different cheeses to find your favorite! Yes, you can make this dish dairy-free! Use dairy-free cheese alternatives that melt well, like cashew cheese or almond-based cheese. For creaminess, consider adding avocado or a dairy-free sour cream. This way, you still enjoy a rich flavor without dairy. The chicken enchilada skillet is simple, delicious, and quick to make. We covered essential ingredients, like chicken, veggies, and cheese. Cooking steps are easy to follow, ensuring a tasty meal. Don’t forget tips for customization and storage. You can adapt this dish for your taste and needs. Enjoy this recipe with family or friends. It’s perfect for anyone wanting a satisfying meal in under an hour. Trust me; once you try it, you'll want it again!

Easy Chicken Enchilada Skillet Delightful One-Pan Meal

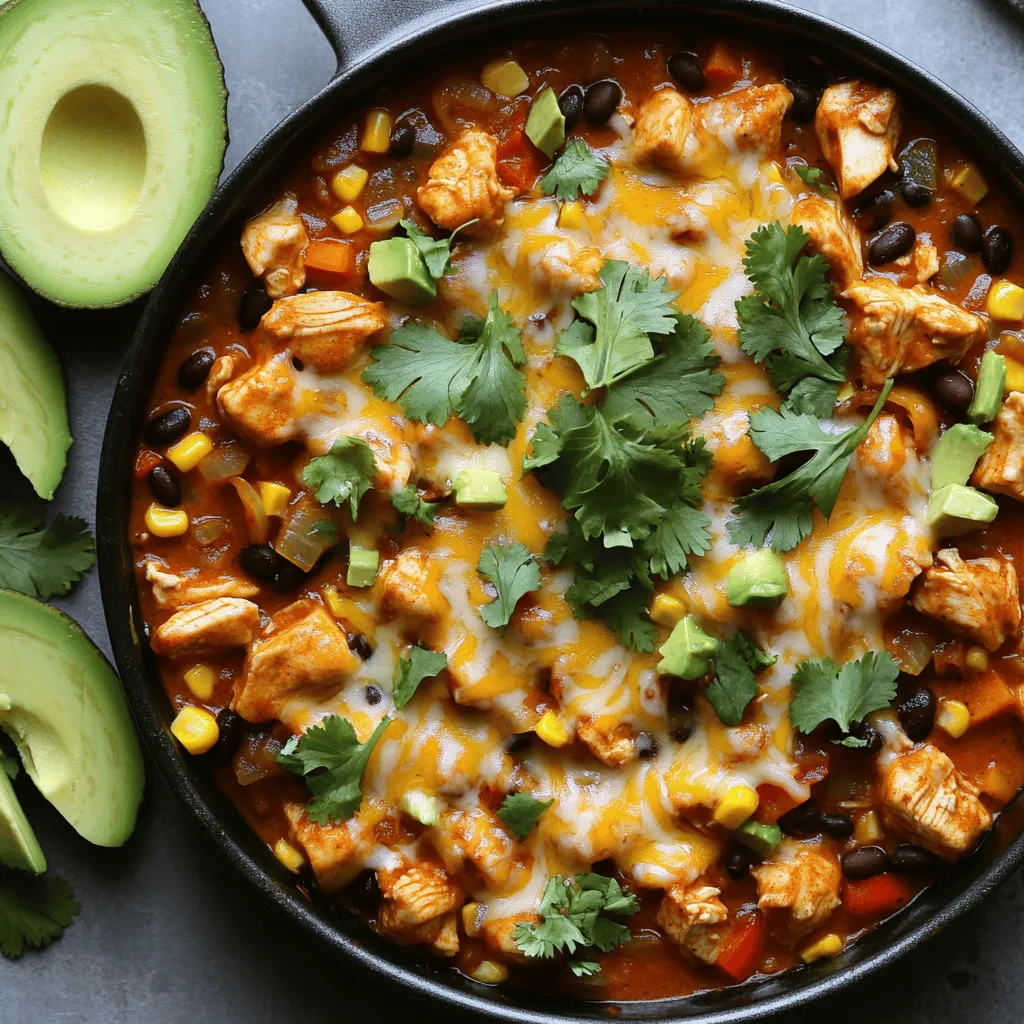
Craving a tasty dinner that’s quick and easy? Let me introduce you to my Easy Chicken Enchilada Skillet! This delightful

Older posts
Newer posts
← Previous Page1 … Page32 Page33 Page34 … Page68 Next →

dsad

© 2025 tastymomrecipes • Built with GeneratePress

Our Policies

  • Copyright Policy
  • Cookie Policy
  • GDPR Policy
  • Privacy Policy
  • Disclaimer
  • Terms Of Use

More Information

  • Home
  • About
  • Contact
  • Appetizers
  • Dessert
  • Dinner
  • Drinks
©2025, tastymomrecipes About Back To Top