Skip to content
DisclaimerTerms Of UseGDPR PolicyCookie Policy

tastymomrecipes

  • Home
  • Drinks
  • Appetizers
  • Dinner
  • Dessert
  • About
  • Contact
  • Privacy Policy
DisclaimerTerms Of UseGDPR PolicyCookie Policy

Olivia

- 1 large head of cauliflower, cut into bite-sized florets - 2 tablespoons extra virgin olive oil - 1 teaspoon smoked paprika - 1 teaspoon ground cumin - 1 teaspoon garlic powder - 1/2 teaspoon chili powder - Salt and freshly cracked black pepper to taste - 8 small corn or flour tortillas - 1 cup red cabbage, finely shredded - 1 ripe avocado, sliced into thin wedges - 1/2 cup fresh cilantro, roughly chopped - 1 lime, cut into wedges - Optional: your favorite hot sauce for drizzling The main ingredients make this dish tasty and colorful. Cauliflower serves as the star, while spices give it a warm flavor. The tortillas hold everything together. You can customize your meal with fresh toppings like cabbage and avocado. - Other vegetables for added flavor - Different sauces or dressings You can add more veggies to make your tacos unique. Try bell peppers, onions, or even corn. Different sauces and dressings can change the taste too. A zesty lime crema or a spicy salsa can make your tacos pop. - Mixing bowl, baking sheet, and roasting pan - Skillet for warming tortillas Having the right tools makes cooking easier. A mixing bowl helps combine the cauliflower with spices. A baking sheet is essential for roasting. Use a skillet to warm your tortillas just right, making them soft and easy to fold. For the full recipe, refer to the instructions above. Enjoy your cooking adventure! First, I preheat the oven to 425°F (220°C). This high heat helps the cauliflower roast well. Next, I grab a large mixing bowl. I add the bite-sized cauliflower florets along with olive oil, smoked paprika, ground cumin, garlic powder, chili powder, salt, and pepper. I mix everything well, coating the florets evenly. Now, I line a baking sheet with parchment paper. This makes cleanup easy. I spread the seasoned cauliflower in a single layer. It is important not to crowd the florets. This helps them roast evenly. Now it’s time to roast! I place the baking sheet in the hot oven. I set a timer for 25-30 minutes. Halfway through, I stir the cauliflower. This promotes even browning. I look for a golden-brown color on the edges. I know the cauliflower is done when it feels tender and has a nice crisp. While the cauliflower roasts, I prepare the tortillas. I heat a dry skillet on medium heat. I warm each tortilla for about 30 seconds on each side. This makes them soft and easy to fold. Once the cauliflower is ready, I take it out of the oven. I let it cool for a few minutes. Now comes the fun part! I place a generous amount of roasted cauliflower on each tortilla. Then, I layer on shredded red cabbage for crunch, avocado slices for creaminess, and a sprinkle of fresh cilantro for brightness. Finally, I squeeze fresh lime juice over each taco. If I want some heat, I drizzle on my favorite hot sauce. I serve these tacos right away for the best flavor. Ready to enjoy? Check the Full Recipe for more details! To get great roasted cauliflower, you must adjust the seasoning to your taste. I usually start with salt, pepper, and spices. A pinch more or less can change the flavor. Don't hesitate to taste a piece before serving. The right roasting temperature is key. I like to set my oven to 425°F (220°C). This heat gives the cauliflower a nice char and keeps it tender inside. Make sure your florets are in a single layer. Overcrowding will steam them instead of roasting. When stacking tacos, I suggest layering ingredients wisely. Start with roasted cauliflower, then add crunchy cabbage. Next, place avocado slices on top. This keeps everything balanced and tasty. To avoid soggy tacos, heat the tortillas before filling them. A warm tortilla holds up better. You can warm them in a skillet for about 30 seconds on each side. This simple step makes a big difference. Pair these tacos with fresh sides and drinks for a complete meal. A simple salad or some chips with salsa works well. For drinks, a light beer or sparkling water can be great. Presentation matters too! Arrange your tacos on a large platter. Garnish with extra cilantro and lime wedges. This adds color and makes the dish look inviting. Enjoy your meal! {{image_4}} You can make these tacos for everyone. If you want a vegan option, skip the cheese and sour cream. Instead, use a creamy avocado sauce or cashew cream. If you prefer non-vegan, sprinkle some cheese on top. You might enjoy feta or cotija cheese. For protein lovers, add black beans or grilled chicken for extra heartiness. Spices can change the taste a lot. Try adding chili flakes for heat or oregano for a fresh twist. You can also switch up the herbs. Cilantro is great, but try fresh parsley or dill too. The type of tortilla matters too. Corn tortillas give a nice crunch, but flour tortillas are soft and chewy. Experiment with both to find your favorite. Toppings can change with the seasons. In spring, use fresh radishes for a nice crunch. In fall, add roasted sweet potatoes for sweetness. For summer, fresh tomatoes and corn can brighten your tacos. For holidays, think about adding cranberry salsa or pumpkin puree for a festive touch. Each season brings new flavors to enjoy! After enjoying your roasted cauliflower tacos, store any leftovers properly. Place the cooled cauliflower in an airtight container. It helps to keep the flavors fresh. You can also use glass containers, which are great for microwave warming. If you want to freeze the cauliflower, ensure it is in a freezer-safe bag or container. Remove as much air as possible to prevent freezer burn. When reheating, keep the cauliflower crispy. Use an oven or air fryer to warm it up. Set the oven to 375°F (190°C) and heat for about 10 minutes. This will help retain that delightful crunch. Store tortillas separately to keep them soft and pliable. Warm them in a skillet for about 30 seconds before serving. Roasted cauliflower will last in the fridge for about 3 to 5 days. The tortillas should stay fresh for about a week. Signs that your leftovers are no longer good include off smells, a slimy texture, or unusual colors. Always trust your senses! If anything seems off, it’s best to discard it. Yes, you can prepare these tacos in advance. To do this, roast the cauliflower and store it in a container. Keep it in the fridge for up to three days. Warm it in the oven before serving. This keeps it crispy. You can also warm the tortillas just before eating. If you want to switch things up, use other vegetables like broccoli or sweet potatoes. You can even try chickpeas for extra protein. Just make sure to adjust the cooking time based on what you choose. Add more chili powder or sprinkle in cayenne pepper for heat. You can also drizzle your favorite hot sauce. Brands like Sriracha or Cholula work well. If you like a smoky flavor, try chipotle hot sauce. These options will add a nice kick to your tacos! Roasted cauliflower tacos are delicious and versatile. We covered key ingredients, tools, and step-by-step instructions. You learned tips for perfect roasting and how to assemble your tacos right. From vegan options to seasonal toppings, there's room for creativity. With proper storage and reheating, leftovers can shine just as bright. Enjoy experimenting to make this recipe your own. Every bite can be a tasty adventure!

Roasted Cauliflower Tacos Flavorful and Simple Meal

Are you ready to spice up your taco night? Roasted Cauliflower Tacos are the perfect blend of flavor and simplicity.

For this savory sweet potato black bean burger recipe, you will need: - 1 large sweet potato (approximately 1 cup when mashed) - 1 can (15 oz) black beans, thoroughly drained and rinsed - 1/2 cup breadcrumbs (choose whole wheat or gluten-free as preferred) - 1/4 cup finely diced red onion - 2 cloves garlic, minced - 1 teaspoon ground cumin - 1/2 teaspoon chili powder - 1/2 teaspoon smoked paprika - Salt and freshly ground black pepper to taste - 1 tablespoon olive oil (for cooking) - Optional: Lettuce leaves, slices of tomato, avocado, or any of your favorite burger toppings These ingredients blend together to create a tasty and nutritious burger that stands out. You can easily swap some ingredients for a different taste. Here are some options: - Sweet Potato: Use mashed butternut squash or pumpkin for a unique flavor. - Black Beans: Try pinto beans or chickpeas for a different texture. - Breadcrumbs: Oats can work well as a gluten-free option. - Onion: Green onions or shallots provide a milder taste. If you need gluten-free options, be sure to use gluten-free breadcrumbs. This ensures everyone can enjoy these delicious burgers. These burgers are not just tasty; they are also good for you! Here’s the breakdown per burger (without toppings): - Calories: About 180-220 - Protein: Approximately 7-10 grams - Fiber: Roughly 6-8 grams - Carbohydrates: About 30 grams - Fat: Around 5 grams Sweet potatoes and black beans offer vitamins and fiber, making these burgers a healthy choice. For the full recipe, check the details provided. Start by preheating your oven to 400°F (200°C). This temperature helps sweet potatoes cook evenly. Use a fork to pierce the sweet potato several times. This allows steam to escape as it bakes. Place the sweet potato on a baking sheet and bake for about 45 minutes. You want it soft enough to pierce easily with a fork. After baking, remove the sweet potato from the oven. Let it cool for a few minutes. Once cool, peel the skin off and place the flesh in a bowl. Use a fork to mash the sweet potato until smooth. A few lumps are okay; they add character to the burgers. In a large mixing bowl, combine the warm mashed sweet potato with the rinsed black beans. Use a fork or potato masher to gently mix them. Be careful to leave some black beans whole for texture. This adds a nice bite to your burger. Now, add the breadcrumbs, diced red onion, minced garlic, ground cumin, chili powder, and smoked paprika. Don’t forget to season it with salt and pepper! Mix everything well until it forms a uniform mixture. If the mixture feels too wet to shape, add a little more breadcrumbs. You want it moldable but not sticky. When it's time to cook, you have two great options: skillet or oven. For skillet cooking, heat olive oil in a large skillet over medium heat. Once the oil is hot, carefully place the patties in the skillet. Cook for about 5-7 minutes on each side. Look for a nice golden brown color on the outside for that perfect crispiness. If you prefer the oven, you can bake the patties at 375°F (190°C) for about 25 minutes, flipping halfway through. Either method works well, but the skillet gives a crispier texture. Enjoy the process and get ready for a delicious meal! For the full recipe, check out the details above. To know when the mixture is ready, look for a consistent blend. It should hold together well. If you can shape it without it falling apart, you’re good to go. To avoid crumbles while cooking, make sure your patties are compact. Press them firmly when shaping. If they feel too soft, add a bit more breadcrumbs. To elevate the taste, try adding fresh herbs like cilantro or parsley. You can also sprinkle in a bit of garlic powder or onion powder for depth. For sauces, consider a zesty chipotle mayo or classic avocado spread. These will bring out the flavors in your burgers and add a nice kick. For sides, sweet potato fries or a fresh salad pair perfectly. A cold drink, like lemonade or iced tea, works well too. For a fun presentation, stack the burgers on a colorful plate. Add your toppings beside them for a beautiful display. A sprinkle of fresh herbs or a slice of lemon can brighten the look and taste. For the full recipe, check out the cooking guide. {{image_4}} To make sweet potato black bean burgers vegan, skip the yogurt or mayonnaise. Instead, use mashed avocado or a vegan mayo. These swaps keep the burgers creamy and delicious. For a plant-based binder, you can use ground flaxseed mixed with water. This mix helps the patties stick together without eggs. You can switch black beans for other beans, like chickpeas or kidney beans. Each type of bean adds a different flavor. You can also add vegetables like corn or bell peppers to enhance taste and texture. Try different spices, too. Adding fresh herbs like cilantro or parsley can brighten the flavor of your burgers. You can grill the burgers for a smoky flavor. Preheat your grill and cook the patties for about 5-7 minutes on each side. If you prefer pan-frying, heat a skillet with olive oil. Cook the burgers in the skillet until they are golden brown and crispy. For a healthier option, try using an air fryer. Preheat the air fryer to 375°F (190°C) and cook for 10-12 minutes, flipping halfway. This method yields a crisp texture without excess oil. For the complete recipe, check out the [Full Recipe]. After making sweet potato black bean burgers, you may have some leftovers. Store them in an airtight container. Place them in the fridge right away. They will stay fresh for up to four days. Ensure they cool down before sealing to avoid condensation. If you want to freeze the patties, first let them cool completely. Then, lay them flat on a baking sheet. Freeze them for about an hour until solid. Once hardened, transfer them to a freezer bag. They will last for about three months. To reheat, bake them at 375°F (190°C) for about 15-20 minutes. This helps keep their texture and flavor. Sweet potato black bean burgers fit well in a weekly meal plan. You can cook a batch on the weekend. Portion them out for lunches or quick dinners. Just pack them in small containers with your favorite sides. You can also freeze individual patties for easy meals on busy days. Enjoy the flavor and nutrition all week long! You can tell the burgers are done when they are golden brown on both sides. They should feel firm to the touch and have a nice crust. If you notice a crispy exterior, that's a great sign! Use a spatula to gently lift one burger. If it holds together well, it's ready to eat. Yes, you can make these burgers ahead of time. You can prepare the patties and store them in the fridge for up to two days. This makes meal prep easy! You can also freeze the uncooked patties for later use. Just make sure to place parchment paper between them to prevent sticking. Yes, sweet potato black bean burgers can be gluten-free! Just choose gluten-free breadcrumbs or skip the breadcrumbs altogether. The sweet potato and beans hold the mixture together well. Always check labels if you are very sensitive to gluten. You have many tasty options for toppings! Some popular choices include: - Fresh lettuce leaves - Juicy tomato slices - Slices of avocado - A dollop of yogurt or mayonnaise - Spicy salsa or guacamole You can also get creative with pickles or your favorite sauces. Mix and match for fun flavors! Sweet potato black bean burgers offer a tasty and healthy meal option. We explored ingredients, preparation steps, and cooking methods. You learned how to create the perfect texture and flavor and even ways to customize it. Not only are these burgers delicious, but they can also fit various diets. Enjoy experimenting with toppings and sides for a fulfilling dish. Make these burgers a staple in your meal prep for quick and nutritious meals!

Savory Sweet Potato Black Bean Burgers Recipe

Looking for a delicious and healthy meal? Try my Savory Sweet Potato Black Bean Burgers! Packed with flavor and nutrients,

- 1 cup dried chickpeas, soaked overnight - 1 small onion, roughly chopped - 2 cloves garlic, minced - 1/4 cup fresh parsley, finely chopped - 1/4 cup fresh cilantro, finely chopped - 2 teaspoons ground cumin - 1 teaspoon ground coriander - 1/2 teaspoon baking powder - 1 tablespoon fresh lemon juice - 1/4 cup flour (whole wheat or all-purpose) - Salt and pepper to taste - 3 tablespoons olive oil Using these fresh ingredients is the key to great falafel. Chickpeas are the base. They give a nutty flavor and creamy texture. Soaking them overnight helps them soften. This makes them easier to blend. Onions and garlic add depth. They give a nice, savory balance to the chickpeas. Fresh parsley and cilantro brighten the dish. Their flavors really make the falafel pop. The spices are essential. Ground cumin brings warmth. Ground coriander adds a hint of citrus. Baking powder helps the falafel rise and become light. Lemon juice adds a touch of acidity, making the falafel taste fresh. The flour binds everything together. It keeps the falafel from falling apart. You can use whole wheat or all-purpose flour, depending on your preference. Salt and pepper are crucial for flavor. They ensure every bite is tasty. Finally, olive oil is important for that crispy texture. It helps the falafel brown nicely in the oven. - Calories per serving: Approximately 200 - Protein: 10 grams - Carbohydrates: 30 grams - Fat: 8 grams Crispy baked falafel is not just tasty, it's also healthy. Each serving packs protein from chickpeas. It has good carbs to keep you full. The healthy fats from olive oil are great for your body. This makes falafel a smart choice for meals. For the full recipe, check out the details above. - First, soak 1 cup of dried chickpeas overnight. This makes them soft. - Rinse the soaked chickpeas under cool water. This helps remove any dirt. - Chop 1 small onion into rough pieces. - Mince 2 cloves of garlic. - Finely chop 1/4 cup of fresh parsley and 1/4 cup of fresh cilantro. - Place the soaked chickpeas, chopped onion, minced garlic, parsley, cilantro, 2 teaspoons of ground cumin, and 1 teaspoon of ground coriander in a food processor. - Pulse the mixture until it is crumbly but not pureed. Scrape the sides to mix well. - Transfer the blend to a large bowl. Add 1/2 teaspoon of baking powder, 1 tablespoon of fresh lemon juice, and 1/4 cup of flour. - Stir gently until all ingredients are combined. If the mix feels too wet, add a bit more flour. - Shape the mixture into small balls or patties, about the size of a golf ball. - Place the shaped falafel on a lined baking sheet, leaving space between them. - Drizzle 3 tablespoons of olive oil over the falafel for crispiness. - Bake in a preheated oven at 400°F (200°C) for about 25-30 minutes. Flip them halfway for even cooking. They should turn golden brown and crispy. For the full recipe, refer to the earlier sections. Enjoy making your crispy baked falafel! To get that perfect crispy falafel, oil is key. Use olive oil to lightly coat the falafel. This helps create a crunchy outside. Make sure to flip the falafel halfway through baking. This step ensures all sides get nice and golden. You can boost the flavor by adding spices or herbs. Try adding a pinch of smoked paprika for a smoky kick. Fresh herbs like dill or mint can add a bright taste. For garnishing, sprinkle some extra parsley or cilantro on top. This adds color and freshness to your dish. One common mistake is over-processing the chickpea mixture. You want a coarse texture, not a paste. Another mistake is not baking them long enough or too long. Keep an eye on the falafel. They should be golden and crispy but not burnt. Following the Full Recipe will help you avoid these errors. {{image_4}} You can change the herbs in your falafel. Try using mint or dill for a fresh twist. These herbs add a bright flavor that complements the chickpeas well. You can also mix spices to adjust the taste. For a warm kick, add smoked paprika or cayenne pepper. If you prefer a milder flavor, use sweet paprika instead. Crispy baked falafel can fit many diets. For a gluten-free option, use gluten-free flour or almond flour. You can also skip the flour altogether for a low-carb choice. This recipe is naturally vegan and vegetarian. It uses chickpeas and herbs, making it perfect for plant-based diets. There are many ways to serve crispy baked falafel. Enjoy it with creamy tahini sauce or tangy tzatziki for dipping. Pair it with fresh salads or warm pita bread. You can also create delicious wraps by adding falafel, veggies, and sauces. For a hearty meal, serve falafel in bowls with grains and greens. Explore the [Full Recipe] to make your own crispy baked falafel! To keep your leftover falafel fresh, place it in a container. You can use an airtight container or a resealable plastic bag. Make sure the falafel cools to room temperature first. This method helps prevent sogginess. Keep the container in the fridge for up to three days. If you want to save falafel for later, freezing is a good option. Place the cooled falafel on a baking sheet in a single layer. Freeze them for about an hour. Once frozen, transfer the falafel to a freezer-safe bag. This way, they won't stick together. When you're ready to eat, just reheat them in the oven or air fryer for a crispy treat. In the fridge, falafel lasts about three days. In the freezer, they can last for up to three months. Always check for any signs of spoilage before eating. Storing falafel properly helps maintain their tasty flavor and texture. To make crispy baked falafel, focus on a few key ingredients. First, use dried chickpeas soaked overnight. This helps with texture. Then, add fresh herbs like parsley and cilantro. These give a bright flavor. Ground cumin and coriander add warmth. Finally, the right amount of flour helps bind the mix. Olive oil is crucial for crispiness, so don’t skip it! Yes, you can use canned chickpeas. However, this will change the texture. Canned chickpeas are softer, which can lead to mushy falafel. If using them, drain and rinse well. You may need to add more flour to thicken the mixture. Start with a smaller amount and adjust as needed. Crispy baked falafel pairs well with many sides. Consider serving it with warm pita bread. A fresh salad with crunchy veggies is a great choice too. For sauces, creamy tahini or tangy tzatziki work perfectly. You can also serve it with hummus for extra flavor. These pairings complement the falafel’s spices. Baking falafel typically takes about 25-30 minutes. Preheat your oven to 400°F (200°C). Flip the falafel halfway through to ensure even cooking. You want them golden brown and crispy on both sides. Keep an eye on them during the last few minutes for the best results. In this blog post, we covered how to make crispy baked falafel from scratch. We reviewed the key ingredients, detailed step-by-step instructions, and shared tips for perfecting texture and flavor. Remember, achieving the right balance of spices and using the right baking method makes all the difference. Whether you enjoy them in a wrap or as a side dish, homemade falafel can be tasty and healthy. Try these tips and see how easy falafel can be!

Crispy Baked Falafel Flavorful and Healthy Delight

Are you ready to whip up a nutritious and tasty treat? My crispy baked falafel is not only a delightful

- Broccoli: Choose a large head of broccoli. Look for tight florets that are bright green. Avoid yellow or wilted ones. Fresh broccoli gives the best taste and texture. - Garlic: I prefer fresh garlic. It has a stronger flavor than pre-minced options. If you use pre-minced, be aware it may taste milder. - Olive Oil: Use high-quality extra virgin olive oil. It adds richness and depth to the dish. Cheap oils can dull the flavor. - Seasonings: Red pepper flakes add a nice kick. Adjust the amount based on your spice level. Salt and pepper bring out the flavors, so don’t skip these. - Optional Topping: Grated Parmesan cheese is a great choice for added flavor. It melts beautifully over the hot broccoli and adds a savory note. For the Full Recipe, check the section above. Preheat the Oven: Start by preheating your oven to 425°F (220°C). This temperature helps the broccoli roast evenly. A hot oven caramelizes the edges, making them crispy and full of flavor. Mixing Ingredients: In a large mixing bowl, combine the broccoli florets and minced garlic. Make sure to mix them well. This step is key to ensure that each piece gets the tasty garlic flavor. Coating the Broccoli: Drizzle the olive oil over the broccoli and garlic. Stir gently to coat everything evenly. Next, add lemon zest, lemon juice, red pepper flakes, salt, and black pepper. Mix again until all ingredients are well blended. This thorough mixing makes sure each floret is full of flavor. Baking Sheet Setup: To ensure even roasting, spread the broccoli mixture in a single layer on a baking sheet. Use parchment paper for easy cleanup. Avoid overcrowding the pan. This way, each piece can roast properly. Cooking Time: Roast your broccoli in the preheated oven for about 20-25 minutes. This time gives it a tender texture while keeping it slightly crunchy. Watch for golden edges, which show it's ready. Stirring: About halfway through roasting, gently stir the broccoli. This helps all sides cook evenly. You want every floret to get that lovely golden color. For the full recipe, check out the details provided above. Enjoy your delicious Lemon Garlic Roasted Broccoli! - Adding Herbs: Fresh herbs make a big difference. Try adding parsley, basil, or thyme. Chop them finely and mix them in before roasting. This will give your broccoli a bright taste. - Spice Adjustments: If you like heat, add more red pepper flakes. For a milder flavor, reduce the amount. You can also try paprika or cayenne for different heat levels. - Roasting Alternatives: You can air fry the broccoli if you want a faster option. Set your air fryer to 380°F (193°C). Cook for about 12-15 minutes for a crispy texture. - Blanching First: Blanching broccoli in boiling water for 2-3 minutes makes it tender before roasting. This step helps keep the bright green color and adds to the crispiness when roasted. These tips help make your Lemon Garlic Roasted Broccoli even more delicious. Use them to adjust the flavors and cooking to your liking! For the full recipe, check the above section. {{image_4}} Vegan Option: If you want a vegan dish, skip the Parmesan cheese. You can use nutritional yeast instead. It adds a cheesy flavor without the dairy. This keeps the dish light and delicious. Gluten-Free Considerations: This recipe is naturally gluten-free. Just make sure your olive oil and seasonings are free of gluten. Fresh ingredients keep your meal healthy and safe for everyone. Citrus Add-ins: Want to change things up? Try adding lime or orange zest. Both give a bright twist to the broccoli. Just use the same amount as the lemon zest. You’ll enjoy the extra flavor. Nutty Profile: Want more crunch? Throw in some chopped nuts. Almonds or walnuts work great. Toss them in during the last few minutes of roasting. They add texture and flavor to your dish. For storing your Lemon Garlic Roasted Broccoli, use an airtight container. This keeps out moisture and air. If you don’t have one, a non-airtight option works too. Just cover it tightly with plastic wrap. Your broccoli stays fresh in the fridge for about 3 to 4 days. After that, it may lose its crispness and flavor. When it’s time to enjoy leftovers, the oven is best. Heat it at 350°F (175°C) for about 10 minutes. This helps keep the broccoli crispy. If you use the microwave, it may get soggy. You can also transform leftovers into a new meal. Dice the broccoli and mix it into an omelet or pasta. You can even toss it in a salad for extra flavor and nutrition. For the full recipe, check out [Full Recipe]. Can I use frozen broccoli for this recipe? Yes, you can use frozen broccoli. Just thaw it first and pat it dry. This helps remove excess moisture. It may not get as crispy but will still taste great. What can I serve with Lemon Garlic Roasted Broccoli? This dish pairs well with grilled chicken, fish, or tofu. You can also serve it with quinoa or rice for a complete meal. The bright flavors of the broccoli enhance any main dish. How do I know when the broccoli is fully roasted? Look for tender florets with crispy edges. You should see a nice golden color. If it’s still bright green and soft, it needs more time in the oven. Can I add more garlic or spices? Absolutely! If you love garlic, add an extra clove or two. You can also try adding spices like cumin or paprika for a different kick. Adjust the red pepper flakes based on your heat preference. How to make Lemon Garlic Roasted Broccoli ahead of time? You can prep the broccoli and marinade up to a day ahead. Store it in the fridge in an airtight container. When you're ready, roast it in the oven. It will taste just as fresh and zesty! For the full recipe, check out the earlier section. This blog post covered essential ingredients and steps for making Lemon Garlic Roasted Broccoli. We discussed choosing quality broccoli and garlic, the importance of olive oil, and tips for roasting. You learned flavor enhancements, cooking methods, and storage tips. Lastly, we explored variations for different diets and tastes. Incorporating these ideas can make a simple dish shine. Enjoy experimenting with these tips to create your perfect roasted broccoli!

Lemon Garlic Roasted Broccoli Easy and Healthy Recipe

Looking for a simple, healthy side dish? I’ve got the perfect recipe for Lemon Garlic Roasted Broccoli! This dish is

- 4 large whole wheat tortillas - 1 cup black beans, drained and rinsed - 1 cup spinach, roughly chopped - 1 medium bell pepper, diced - 1 small zucchini, diced - 1/2 cup corn kernels To make a veggie-packed breakfast burrito, start with whole wheat tortillas. They add fiber and nutrition. Black beans give protein and a hearty texture. Fresh vegetables, like bell peppers, zucchini, and spinach, bring color and flavor. - 1 ripe avocado, sliced - 1/2 cup shredded cheese For a creamier touch, add sliced avocado. It provides healthy fats and a smooth texture. Cheese is also a great choice. You can use sharp cheddar or a vegan cheese alternative. - 1/2 teaspoon ground cumin - 1/2 teaspoon smoked paprika - Salt and pepper to taste Seasoning is key to great flavor. Ground cumin adds warmth, while smoked paprika gives a nice depth. Don’t forget salt and pepper to enhance all the tastes. For the complete steps, check the Full Recipe. First, heat a drizzle of olive oil in a large skillet over medium heat. Add the diced bell pepper and zucchini. Sauté them for about 3-4 minutes. Keep stirring until they soften. Next, stir in the chopped spinach and corn. Cook for an extra 2 minutes. The spinach will wilt down nicely. Then, add the black beans, ground cumin, smoked paprika, salt, and black pepper. Mix everything well and cook for another 2 minutes to warm through. In a separate bowl, whisk the eggs until they are fully combined. Pour the whisked eggs into the skillet with the vegetable mixture. Gently stir until the eggs are fully cooked and scrambled, which takes about 3-5 minutes. Once done, remove the skillet from heat. Warm the tortillas in a dry skillet or microwave. This makes them soft and easy to fold. Next, take a generous scoop of the veggie-egg mixture and place it in the center of each tortilla. Add a few slices of fresh avocado and a sprinkle of shredded cheese on top. To wrap, first, fold the sides of the tortilla inward. Then roll it up from the bottom. This keeps the filling secure inside. If you want a crispy burrito, place them seam-side down in the skillet. Toast for 1-2 minutes on each side until golden brown. Now, enjoy the burritos warm with a side of salsa or hot sauce. You can also garnish with chopped cilantro if you like. For the full recipe, check the previous section. To get the best flavor and texture, start with the right heat. When sautéing vegetables, use medium heat. This way, they cook evenly without burning. Begin with denser veggies like bell peppers and zucchini. Cook them for about 3-4 minutes. Then, add the softer spinach and corn. They need just a couple of minutes to wilt and warm up. To avoid soggy tortillas, warm them in a dry skillet first. This makes them soft and easy to fold without tearing. You can also wrap them in a clean cloth to keep them warm while you work on the filling. A great burrito needs some tasty sauces. I love serving mine with salsa or hot sauce. You can also try guacamole for a creamy touch. Fresh cilantro on top adds flavor and color, too. For sides, consider serving with fresh fruit or a simple salad. This adds a nice balance to your meal. You can also pair it with crispy tortilla chips for some crunch. If you want to save time, meal prep is key. You can store the veggie filling in an airtight container in the fridge. It stays fresh for about 3-4 days. To freeze the burritos, wrap each one in foil or plastic wrap. Place them in a freezer bag. They can last up to three months! When you’re ready to eat, just reheat in the oven at 350°F for about 25-30 minutes. You can also microwave them, but the oven keeps them crisp. For the full recipe, check out the Veggie Packed Breakfast Burrito section. {{image_4}} You can switch up the veggies in your burrito. Try using: - Chopped kale or Swiss chard instead of spinach. - Diced tomatoes or mushrooms for extra flavor. - Sweet potatoes for a hearty touch. For vegan options, replace the eggs with flax eggs. Use nutritional yeast for a cheesy flavor without dairy. Add spices to make your burrito pop. Consider: - Fresh cilantro for a zesty kick. - A pinch of chili powder for heat. - Italian herbs like oregano for a unique twist. Try different cheeses too. Cheddar gives a sharp taste, while feta adds a salty bite. Vegan cheese can work well if you're avoiding dairy. Mix it up with global flavors! For a Mexican-style burrito: - Add jalapeños for spice. - Use pico de gallo or guacamole as toppings. For a Mediterranean twist, include: - Feta cheese and olives. - A drizzle of tzatziki sauce. These ideas help you make a burrito that fits your taste! For the full recipe, check the complete instructions above. To store leftover burritos, let them cool first. Wrap each burrito tightly in foil or plastic wrap. Place them in an airtight container. They will stay fresh in the fridge for up to four days. If you plan to eat them soon, this method works great. For longer storage, freezing is a smart choice. Wrap each burrito in foil or freezer-safe plastic wrap. Place them in a freezer bag, squeezing out any air. Label the bags with the date. Frozen burritos can last up to three months. This way, you have a quick meal ready whenever you need it. To reheat without losing texture, use these methods. - Microwave: Remove any foil and place the burrito on a microwave-safe plate. Heat on medium for 1-2 minutes. Check it halfway through to see if it needs more time. - Oven: Preheat your oven to 350°F (175°C). Wrap the burrito in foil and heat for about 15-20 minutes. - Skillet: Heat a non-stick skillet over medium heat. Place the burrito seam-side down. Cook for 3-4 minutes on each side until heated through and crispy. These methods will keep your burrito tasty! For the full recipe, click here. To make this yummy burrito, follow these easy steps: 1. Sauté the Vegetables: Heat olive oil in a skillet. Add diced bell pepper and zucchini. Cook for 3-4 minutes until soft. 2. Add Spinach and Corn: Stir in chopped spinach and corn. Cook for 2 more minutes until spinach wilts. 3. Mix in Black Beans: Add black beans, ground cumin, smoked paprika, salt, and pepper. Cook for 2 minutes. 4. Scramble the Eggs: Whisk eggs in a bowl. Pour them into the skillet. Stir gently until fully cooked, about 3-5 minutes. 5. Warm the Tortillas: Heat tortillas in a dry skillet or microwave until soft. 6. Assemble the Burritos: Place veggie-egg mix on each tortilla. Top with avocado and cheese. 7. Wrap It Up: Fold the sides in, then roll from the bottom. Make sure the filling is secure. 8. Serve and Enjoy: Enjoy with salsa or hot sauce on the side. This recipe is quick and easy, perfect for busy mornings. You can find the Full Recipe for more details. Yes, you can easily make this breakfast burrito vegan. Here’s how: - Egg Substitute: Use flax eggs instead of regular eggs. Mix 1 tablespoon of ground flaxseed with 2.5 tablespoons of water for each egg. - Cheese Alternatives: Choose a vegan cheese option or skip the cheese altogether for a lighter burrito. Nutritional yeast adds a cheesy flavor without dairy. These swaps keep your burrito tasty and healthy while fitting a vegan diet. Many vegetables work great in a breakfast burrito. Here’s a list of my favorites: - Bell Peppers: They add sweetness and color. - Zucchini: This veggie keeps things light and adds nice texture. - Spinach: Packed with nutrients, it wilts down and blends well. - Corn: Sweet corn adds a burst of flavor. - Mushrooms: These add a savory taste and meaty texture. - Onions: Sautéed onions bring depth and sweetness. Using these veggies boosts nutrition and flavor, making your burrito delightful. Making tasty breakfast burritos is easy with the right ingredients and steps. We covered whole wheat tortillas, flavorful black beans, fresh veggies, and exciting spices. Preparing and assembling them can be fun! Remember to try different veggies and sauces for variety. Storing and reheating correctly keeps them fresh. With some practice and creativity, you can customize your burritos just how you like. Enjoy your cooking journey and make every meal special!

Veggie Packed Breakfast Burrito Tasty and Easy Recipe

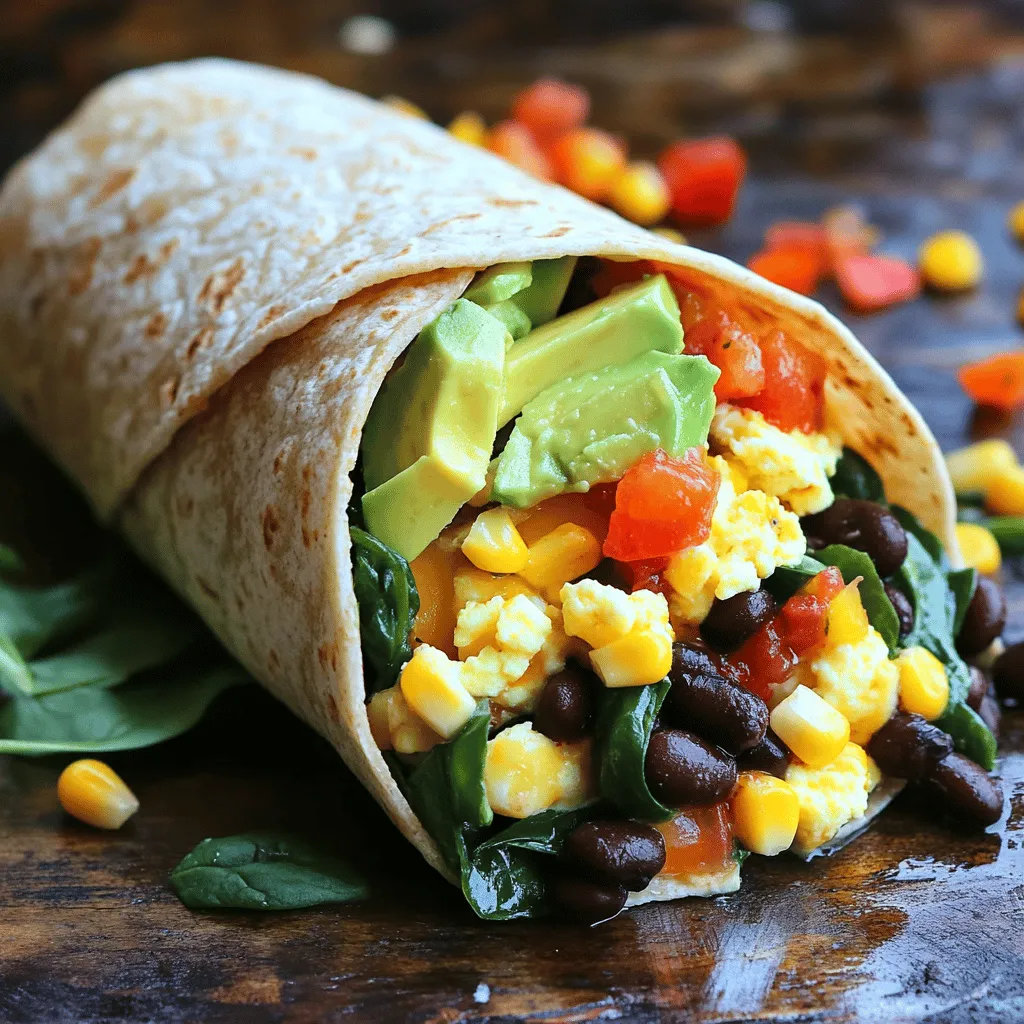
Start your day right with a Veggie Packed Breakfast Burrito! This recipe is simple, tasty, and full of nutrition. Imagine

- 4 ripe bananas - 1 cup dark chocolate chips - 1 tablespoon coconut oil - 1/4 cup crushed nuts - 1/4 cup unsweetened shredded coconut - Sea salt (optional) You need a few simple items to make chocolate-dipped frozen bananas. Start with 4 ripe bananas. They should be yellow, with a few brown spots. Those spots show they are sweet and ready to eat. You will also need 1 cup of dark chocolate chips. I suggest using chocolate with 70% cocoa for a rich flavor. Finally, add 1 tablespoon of coconut oil. This oil helps the chocolate melt smoothly and gives it a nice shine. Now, let’s talk toppings! You can customize your bananas with 1/4 cup of crushed nuts. Almonds, walnuts, or your favorite nuts work well. For an added crunch, sprinkle 1/4 cup of unsweetened shredded coconut on top. If you like a salty-sweet mix, use a pinch of sea salt as an optional garnish. With these ingredients, you can create a treat that is both fun and tasty. Remember, the full recipe is just a few steps away! - Start by peeling 4 ripe bananas. This step is simple but key. - You can cut the bananas in half or slice them into thick rounds. Both choices work well. - Next, skewer each banana piece with a wooden stick or toothpick. This makes for easy dipping later. - Arrange the banana pieces on a baking sheet lined with parchment paper. This helps prevent sticking. - Place the tray in the freezer for 1 to 2 hours. Wait until the bananas are solid. - In a microwave-safe bowl, add 1 cup of dark chocolate chips and 1 tablespoon of coconut oil. - Heat this mixture in the microwave in 30-second intervals. Stir it each time to get a smooth texture. - Take care not to overheat the chocolate. This can make it clumpy or burned. - Once the bananas are frozen, take them out of the freezer. - Use a fork to dip each frozen banana into the melted chocolate. Make sure the chocolate covers all sides. - Quickly roll or sprinkle each chocolate-covered banana with toppings, like crushed nuts or shredded coconut. - Return the coated bananas to the parchment-lined baking sheet. - Place them back in the freezer for about 30 minutes. This helps the chocolate firm up. - If you want, you can sprinkle a pinch of sea salt on top before they set. This adds a nice touch of flavor. Now, you have a fun and tasty treat! For the full recipe, refer to the earlier sections. Enjoy your delicious chocolate-dipped frozen bananas! For the best flavor, I suggest using 70% cocoa chocolate. This chocolate has a rich taste that pairs well with bananas. If you prefer a sweeter treat, feel free to use milk or white chocolate. Both options add a nice touch and change the flavor. Just remember, the darker the chocolate, the more intense the flavor! To freeze bananas for the best texture, start with ripe bananas. They should be yellow with a few brown spots. Peel and cut them into halves or thick slices. Spread them out on a baking sheet lined with parchment paper. Freeze them for about 1-2 hours. This allows them to freeze solid, making them perfect for dipping. There are many fun ways to serve chocolate-dipped bananas. You can arrange them on a bright platter for a party. Drizzle leftover melted chocolate over them for a fancy look. Pair these treats with other snacks, like yogurt or fresh fruit. They also go well with ice cream for a delicious dessert! {{image_4}} You can make your chocolate-dipped frozen bananas even more tasty! Add flavor extracts like vanilla or almond. Just a few drops can change the taste. You can also try different types of chocolate. Milk chocolate gives a sweet touch, while dark chocolate offers a rich flavor. Toppings can make your snack unique! Explore different nuts and seeds. Chopped almonds, walnuts, or sunflower seeds add crunch. You can also use sprinkles or crushed candies for fun colors and extra sweetness. Get creative here! Think about how you prepare bananas. You can use whole bananas or slice them into fun pieces. Whole bananas are great for big bites, while slices are perfect for sharing. You can even stuff bananas with nut butter or chocolate chips before dipping. This adds a surprise in every bite! For more details on how to create this delightful treat, check the Full Recipe. To store chocolate-dipped bananas in the fridge, place them in an airtight container. This keeps them fresh for a short time. You can stack them carefully to save space. Make sure not to crowd them, as this may cause the chocolate to stick together. Freezing chocolate-dipped bananas is a great way to save them. First, let the chocolate set completely. Then, place them in a single layer on a baking sheet. Freeze them until solid. Once frozen, transfer the bananas to a freezer bag or container. Remove as much air as possible to prevent freezer burn. To enjoy later, simply take them out and eat them straight from the freezer. They taste best frozen! Chocolate-dipped bananas stay fresh for about one month in the freezer. In the fridge, they last around 2-3 days. Always check for signs of spoilage. If the chocolate looks dull or has white spots, it may be bad. If the bananas smell off or have a mushy texture, toss them out. Always trust your senses! To avoid cracking chocolate on frozen bananas, use coconut oil. It helps the chocolate stay smooth. Mix the dark chocolate chips with one tablespoon of coconut oil while melting. This will create a silky texture. After dipping, let the chocolate set in the freezer. A thin layer of chocolate also helps. Don’t dip bananas when they are too cold. This can cause the chocolate to crack. You can use fresh or frozen bananas. Fresh bananas are easy to work with and taste great. If you use frozen bananas, let them thaw slightly. This makes them easier to dip. Frozen bananas may also have a softer texture after freezing. Both options work, but fresh bananas yield a firmer bite. Try to choose ripe bananas for the best flavor. I recommend using dark chocolate with 70% cocoa. It gives a rich taste and melts well. You can also use milk chocolate if you like sweeter snacks. White chocolate is another option, but it can be too sweet. Always look for chocolate chips made for melting. They stay smooth and easy to work with. Yes, you can make chocolate-dipped bananas ahead. Prepare them and store in the freezer. They will stay fresh for 1-2 months. Just wrap each banana in plastic wrap. Then, place them in a freezer bag. When you’re ready to eat, let them sit for a few minutes. This makes them easier to bite into. This guide covers all you need to make delicious chocolate-dipped bananas. We discussed ingredients, step-by-step instructions, and helpful tips. You can change up flavors and toppings to fit your taste. Remember to store them properly for later enjoyment. Enjoy this sweet treat that is easy to prepare and fun to customize! You will impress friends and family with these simple snacks. Dive into this treat today and explore all the tasty options!

Chocolate Dipped Frozen Bananas Delightful Snack Idea

If you’re searching for a fun and tasty snack, chocolate dipped frozen bananas are a perfect choice! With just a

- Sweet potatoes and other vegetables - 2 medium sweet potatoes, peeled and diced into ½-inch cubes - 1 red bell pepper, diced - 1 small red onion, finely diced - 2 cloves garlic, minced - Spices and seasonings - 1 teaspoon smoked paprika - ½ teaspoon ground cumin - Salt and pepper, to taste - 2 tablespoons extra virgin olive oil - Eggs and garnishes - 4 large eggs - Fresh parsley, chopped (for garnish) Gathering these ingredients is the first step to making a delicious Sweet Potato Breakfast Hash. The sweet potatoes give the dish a hearty base, while the red bell pepper and onion add color and flavor. Garlic, smoked paprika, and cumin bring warmth and depth. Eggs on top create a filling meal, and fresh parsley brightens everything up. You can easily swap out ingredients based on what you have. For example, use green bell peppers or add spinach for extra greens. The goal is to make a dish that you love. Follow the Full Recipe for the perfect cooking instructions. 1. Start by peeling and dicing the sweet potatoes. Aim for ½-inch cubes. This size helps them cook evenly. 2. Next, chop the red bell pepper and finely dice the red onion. Mince the garlic. These add great flavor. 3. Heat 2 tablespoons of extra virgin olive oil in a large skillet over medium heat. Wait until the oil shimmers. 4. Add the diced sweet potatoes to the skillet. Cook for about 10-12 minutes. Stir every few minutes. Look for a light golden brown color. 1. Once the sweet potatoes soften, add the red bell pepper and red onion. Stir them in. Cook for an additional 5-7 minutes. This makes sure all vegetables are tender. 2. Now, add the minced garlic, smoked paprika, and ground cumin. Season with salt and pepper. Sauté for about 2 minutes. This brings out the spice flavors. 3. Use a spoon to create 4 small wells in the sweet potato mixture. Crack an egg into each well. 4. Cover the skillet with a lid. Cook for about 5-7 minutes. Cook longer if you prefer firmer yolks. 5. Once the eggs are done, remove the skillet from heat. Garnish with fresh parsley. Serve warm and enjoy the meal! For the full recipe, refer back to the beginning of the article. To get the best sweet potato texture, start with small cubes. Cutting them into ½-inch pieces helps them cook evenly. Use medium heat to avoid burning. Stir often to make sure they brown nicely but don’t stick to the pan. To avoid soggy hash, make sure you dry the sweet potatoes after rinsing. Moisture can lead to a mushy mess. Cooking them in a single layer is also key. If your pan is overcrowded, steam forms, which ruins the crispness. Sweet Potato Breakfast Hash pairs well with fresh fruit or a side of toast. You can also serve it with avocado slices or a dollop of Greek yogurt for extra creaminess. For garnish, a sprinkle of fresh parsley adds color and flavor. You can also add sliced green onions or a pinch of red pepper flakes for a bit of heat. Plating the hash directly from the skillet gives it a homey feel. If you plate it, make sure an egg sits in the center for a beautiful presentation. For the full recipe, check out the Sweet Potato Breakfast Hash. {{image_4}} If you want to switch things up, you can easily replace sweet potatoes. Try butternut squash or regular potatoes for a different taste. Both have a similar texture and cook well in this dish. For vegetables, feel free to mix in zucchini, spinach, or mushrooms. Each adds a unique flavor and boosts nutrition. You can use what you have at home! For those on a vegan diet, skip the eggs. Instead, add tofu or chickpeas for protein. You can scramble the tofu with spices to mimic egg flavor. If you need a gluten-free option, this recipe is already safe! All the ingredients are naturally gluten-free. Just double-check any seasoning blends to ensure they meet your needs. Experiment with these variations to make the Sweet Potato Breakfast Hash your own. Check out the Full Recipe for more ideas! After you enjoy your sweet potato breakfast hash, you may have some left. Store leftovers in an airtight container. Make sure to keep them in the fridge. They will stay fresh for about 3 to 4 days. To reheat, use a skillet over medium heat. Add a splash of water to keep the hash moist. Stir occasionally until heated through. You can also use the microwave. Heat it for about 1-2 minutes. Stir halfway to keep the texture nice. If you want to save some for later, freezing is an option. First, let the hash cool completely. Then, transfer it to a freezer-safe container. You can also use a resealable bag. Remove as much air as possible to prevent freezer burn. Label the container with the date. The hash can be frozen for up to 3 months. When you're ready to eat, thaw it overnight in the fridge. Reheat it in a skillet or microwave, just like with leftovers. This method keeps the flavor and texture intact. It’s great for meal prep, making mornings easier. You can enjoy a tasty breakfast any day! How long does Sweet Potato Breakfast Hash last in the fridge? Sweet Potato Breakfast Hash lasts about 3 to 5 days in the fridge. Store it in an airtight container. This keeps it fresh and tasty for your next meal. Can I make this recipe ahead of time? Yes, you can make this recipe ahead of time. Cook the hash and store it in the fridge. Just reheat it when you are ready to eat. What other toppings can I use on my hash? You can add many toppings to your hash. Consider avocado, cheese, or hot sauce. Fresh herbs like cilantro or chives also add a nice touch. Can I prep ingredients the night before? Yes, you can prep ingredients the night before. Peel and dice the sweet potatoes and chop the veggies. Store them in the fridge for easy cooking in the morning. How to make a larger batch for meal prepping. To make a larger batch, simply double the ingredients. Use a bigger skillet to cook everything evenly. This way, you have enough for several meals. Enjoy your Sweet Potato Breakfast Hash all week long! This post covered everything you need for a tasty Sweet Potato Breakfast Hash. We went over the main ingredients, step-by-step cooking actions, and key tips to get it just right. Remember, you can make it your own with different veggies or dietary swaps. Proper storage will keep your hash fresh for meals later on. Enjoy crafting this delicious dish that’s easy to prepare and serve. Happy cooking, and don’t hesitate to experiment as you find your perfect blend!

Sweet Potato Breakfast Hash Hearty and Flavorful Meal

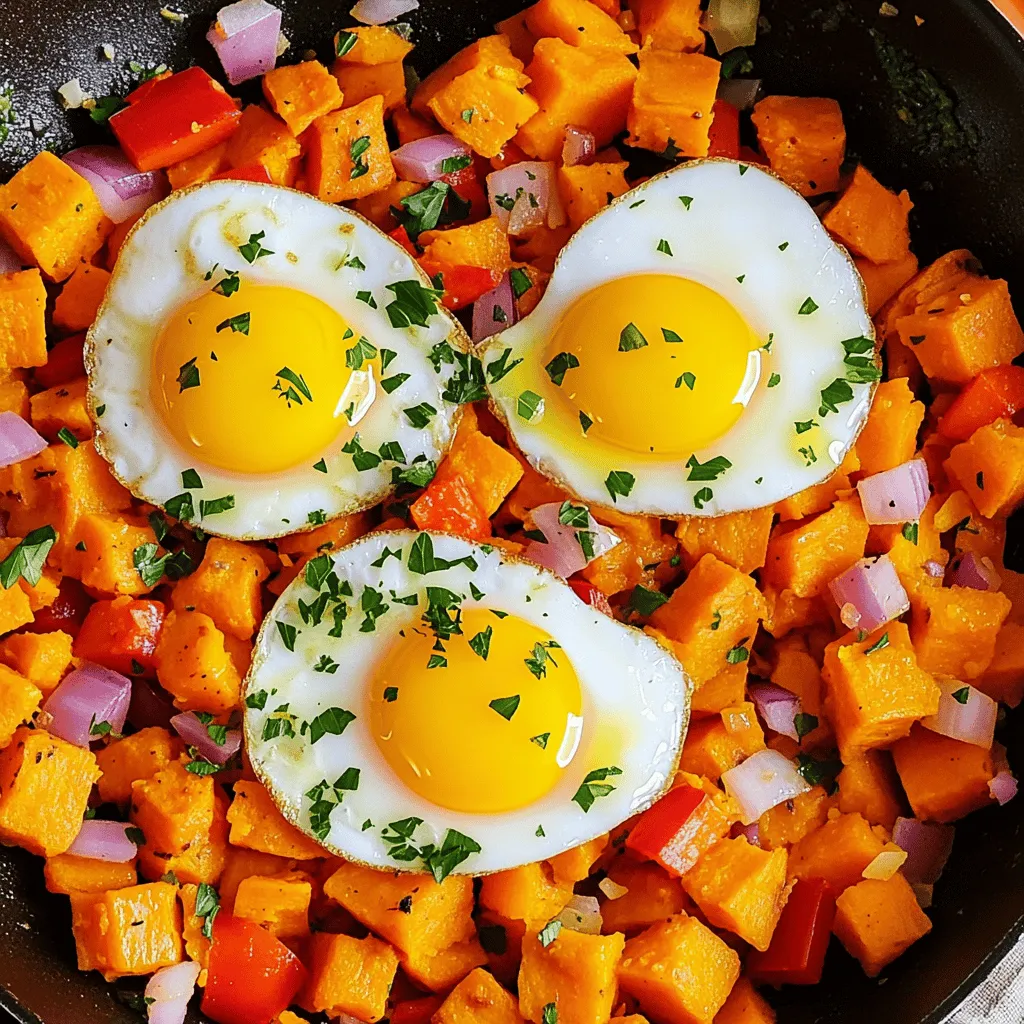
Looking for a hearty and flavorful breakfast? Sweet Potato Breakfast Hash is your answer. This dish is packed with vibrant

Use 1 pound of fresh asparagus. Look for bright green spears. They should be firm and crisp. Trim the woody ends before cooking. This step helps ensure a tender bite. You need 1 cup of panko breadcrumbs. This type of breadcrumb adds great crunch. It’s lighter than regular breadcrumbs. It makes the dish crispy and golden. Use ½ cup of finely grated Parmesan cheese. This cheese adds a rich, nutty flavor. It melts slightly during cooking, creating a tasty crust. Freshly grated cheese works best for this dish. You will also need: - 2 large eggs - 2 tablespoons freshly grated lemon zest - 1 tablespoon fresh lemon juice - 1 teaspoon garlic powder - ½ teaspoon sea salt - ¼ teaspoon freshly ground black pepper - Olive oil spray These ingredients work together to make the asparagus flavorful and crunchy. For the full recipe, check out the detailed instructions. First, preheat your oven to 425°F (220°C). This helps your asparagus cook well. While the oven heats, line a baking sheet with parchment paper. This step keeps the asparagus from sticking. It also makes cleanup easier. Next, take two large eggs and crack them into a shallow bowl. Add lemon juice, garlic powder, sea salt, and black pepper. Whisk them together until you see a smooth mix. The lemon juice adds a fresh taste. This egg mixture helps the breadcrumbs stick to the asparagus. Now, take your fresh asparagus. Dip each spear into the egg mix. Let any extra egg drip off. Then, roll the asparagus in the panko breadcrumb mixture. Press gently to help it stick. Place each coated spear on the baking sheet. After you coat them all, give them a light spray of olive oil. This makes them nice and crispy. Bake in the oven for 15-20 minutes. Watch closely until they turn golden brown. Enjoy this simple and tasty dish! For the complete process, check the Full Recipe. To get that perfect crunch, start with fresh asparagus. Look for firm, bright green spears. Trim the ends for even cooking. Use panko breadcrumbs instead of regular ones. They create a lighter, crispier texture. Lightly spray the coated asparagus with olive oil. This step helps to achieve that golden finish. Bake at 425°F (220°C) for 15-20 minutes. Keep an eye on them as they cook. You want them tender but not mushy. Serve the crispy lemon Parmesan asparagus on a colorful platter. It looks great with a sprinkle of extra Parmesan. Add lemon zest on top for a pop of color. A slice of lemon on the side encourages guests to add more flavor. Pair this dish with grilled chicken or fish for a complete meal. It also works well as a side for pasta dishes. Crispy lemon Parmesan asparagus pairs nicely with roasted meats. Think chicken, pork, or beef. It also complements lighter meals like quinoa or salad. A crisp white wine, like Sauvignon Blanc, pairs beautifully. If you want a non-alcoholic option, try sparkling water with lemon. You can find the full recipe for this tasty dish in the main article. {{image_4}} You can easily change the flavor of crispy lemon Parmesan asparagus. Try adding spices like paprika or cayenne pepper for a kick. You can also mix in fresh herbs like thyme or basil to enhance the taste. These small changes can make each batch unique and exciting. If you want a vegan twist, try using a flaxseed egg instead of the regular eggs. Mix 1 tablespoon of ground flaxseed with 2.5 tablespoons of water. Let it sit for a few minutes until it thickens. For the cheese, use nutritional yeast to add a cheesy flavor without dairy. It keeps the dish tasty while being vegan-friendly. You don’t have to stick with Parmesan cheese. You can experiment with different cheeses like pecorino or even a vegan cheese. Each option gives the dish a new flavor. For a sharper taste, try aged gouda. For a milder cheese, mozzarella works well. Just remember to keep the cheese finely grated for the best coating on the asparagus. For the complete recipe, check the [Full Recipe] provided earlier. After enjoying your crispy lemon Parmesan asparagus, store any leftovers in the fridge. Place them in an airtight container. They will stay fresh for up to three days. To keep the asparagus crispy, avoid stacking them. Instead, lay them flat in a single layer if possible. To reheat, the oven is your best friend. Preheat it to 350°F (175°C). Spread the asparagus on a baking sheet. Heat for about 10 minutes or until warm and crisp. Avoid the microwave; it makes the asparagus soggy. If you need a quick fix, a skillet works too. Heat it on medium and toss the asparagus for a few minutes. Freezing is not ideal for this recipe, but it can be done. First, let the asparagus cool completely. Then, place them in a single layer on a baking sheet and freeze for about an hour. After they are firm, transfer them to a freezer bag. Remove as much air as possible. Store for up to two months. When you’re ready to eat, bake them straight from the freezer. Just add a few extra minutes to the cooking time. For the full recipe, check the main section. Bake asparagus for 15-20 minutes at 425°F (220°C). Check for a golden color and crunch. Thinner spears will cook faster, while thicker ones take a bit longer. Keep an eye on them in the last few minutes to avoid burning. The right timing gives you that perfect crispy bite. You can use frozen asparagus, but fresh works best. Frozen asparagus may release water as it cooks. This can make your dish less crispy. If you use frozen, thaw and pat it dry first. This step helps maintain the crunch you want in your dish. If you lack panko breadcrumbs, regular breadcrumbs will work too. They won’t be as crunchy, but they will still add texture. You can also crush up crackers or use cereal like cornflakes. Just make sure they are finely crushed to coat the asparagus well. For the best taste, try to season any alternative you use. For the full recipe, check the earlier sections. In this blog post, we covered how to prepare crispy asparagus using fresh ingredients, like panko breadcrumbs and Parmesan cheese. I provided step-by-step instructions, plus tips for achieving that perfect crunch. We also explored tasty variations and smart storage methods. Remember, great asparagus is all about freshness and proper prep. Enjoy experimenting with flavors and find your favorite way to make this dish shine.

Crispy Lemon Parmesan Asparagus Simple and Tasty Dish

Crispy Lemon Parmesan Asparagus is a game-changer for your meals. It’s simple and oh-so-tasty! You only need a few ingredients

- 1 can (15 oz) chickpeas, drained and thoroughly rinsed - 2 tablespoons extra virgin olive oil - 4 cloves garlic, finely minced - 1 teaspoon dried oregano - 1 teaspoon dried thyme - 1 teaspoon smoked paprika - Salt and freshly ground black pepper to taste - Fresh parsley, finely chopped, for garnish Garlic herb roasted chickpeas are not only tasty but also good for you. Each serving has about 120 calories. The breakdown includes roughly 20 grams of carbs, 6 grams of protein, and 4 grams of fat. Chickpeas are a great source of plant-based protein. They contain fiber, which helps keep you full. Their rich nutrient profile supports heart health and aids digestion. These crispy snacks are perfect for any time of day. They are easy to make and full of flavor. You can find the full recipe above to create this delightful snack. Preheat the oven and prepare the chickpeas Start by preheating your oven to 400°F (200°C). This step is key for crispy chickpeas. Next, drain and rinse the chickpeas well. This removes the canning liquid and excess salt. Proper drying techniques for chickpeas Spread the rinsed chickpeas on a clean kitchen towel or paper towels. Pat them dry gently. Removing moisture is crucial. Moisture can make them soggy instead of crunchy. Tossing chickpeas with seasoning In a large bowl, mix the dried chickpeas with 2 tablespoons of olive oil. Add 4 cloves of minced garlic, 1 teaspoon of oregano, 1 teaspoon of thyme, and 1 teaspoon of smoked paprika. Season with salt and pepper. Toss everything well. Each chickpea should be coated in the tasty mix. Spreading chickpeas on a baking sheet Line your baking sheet with parchment paper. This makes cleanup easy. Spread the seasoned chickpeas in a single layer. Make sure they have room to roast evenly. Recommended oven settings and time Place your baking sheet in the preheated oven. Roast the chickpeas for 25 to 30 minutes. Shake the pan halfway through cooking. This helps them brown evenly. Tips for achieving perfect crispiness Keep an eye on the chickpeas during the last few minutes. Oven temperatures can vary. Once they are golden brown, take them out. Let them cool for a few minutes. They will get crunchier as they cool. To make your garlic herb roasted chickpeas shine, focus on seasoning. You can mix and match herbs based on your taste. Try adding chili powder or cumin for a kick. You can also switch up the oil. Avocado oil works great for a different flavor. For a crunchy texture, moisture is your enemy. After rinsing, make sure to dry the chickpeas well. Use a towel or paper towels to soak up any water. This step is key for a great crunch. One big mistake is not drying the chickpeas enough. This can lead to a soft snack instead of crispy ones. Also, watch your timing when roasting. If you leave them in too long, they can burn. Check them halfway through and shake the pan. This helps them cook evenly. Another issue is overcrowding the pan. Make sure the chickpeas have space. This allows hot air to circulate around them, leading to a nice crunch. Garlic herb roasted chickpeas are perfect for many meals. You can toss them in salads or grain bowls for a tasty crunch. They also add flavor to soups or stews. Get creative with snacks! Serve them with hummus or yogurt dips for a fun treat. You can also mix them with nuts for a savory trail mix. These roasted chickpeas are not just a snack; they can transform any dish! For the full recipe, check out the Garlic Herb Roasted Chickpeas recipe above. {{image_4}} You can spice up your garlic herb roasted chickpeas in fun ways. For a spicy kick, add chili powder or cayenne pepper. Just a little will go a long way in adding heat. You can also try different herbs. Rosemary or basil gives the chickpeas a fresh twist. Experimenting with flavors can make each batch unique and exciting. This recipe is already vegan! You can serve these chickpeas as a snack or a topping. They fit well in salads or grain bowls. If you want a gluten-free option, you're in luck! Chickpeas are naturally gluten-free. Just be sure to check any packaged spices for gluten. Roasted chickpeas are versatile. You can mix them into grain bowls for added crunch. They also work great in soups, bringing texture and flavor. For garnishing, sprinkle them on top of salads or even pasta. The options are endless, and they make any dish more delicious. For the full recipe, check out Garlic Herb Roasted Chickpeas 🧄. To keep your chickpeas crispy, let them cool first. Store them in an airtight container. I recommend using a glass jar or a plastic container with a tight lid. This helps maintain their crunch. You can keep them at room temperature for up to three days. If you want to keep them longer, place them in the fridge. Just remember, they might lose some crispiness this way. When you want to eat your leftover chickpeas, you can restore their crispiness. The best way is to reheat them in the oven. Set your oven to 400°F (200°C) and spread the chickpeas on a baking sheet. Heat them for about 5 to 10 minutes. Keep an eye on them so they don’t burn. You can also use an air fryer for a quick crisp-up. Make sure to eat your chickpeas within a week of cooking for the best taste. Yes, you can freeze roasted chickpeas! To freeze them, let them cool completely. Then, spread them on a baking sheet in a single layer and freeze for about an hour. After that, transfer them to a freezer bag. This keeps them from clumping together. When you want to eat them, just reheat directly from the freezer. Use the oven method mentioned earlier. They might not be as crispy as fresh, but they will still taste great. Roasted chickpeas last about 3 days at room temperature. Keep them in an airtight container to maintain their crunch. If you store them in the fridge, they can last for about a week. However, the texture may change. For the best taste and crunch, enjoy them fresh. Yes, you can use dried chickpeas, but they need prep. Soak them overnight in water. Then, cook them until they are tender. This process can take 1-2 hours. Once cooked, drain and rinse them before following the recipe. This ensures they get that crispy finish. Leftover garlic or herbs can be used in many ways. Mix extra garlic into your pasta or rice dishes. Toss leftover herbs into salads for added flavor. You can also blend them into dressings or dips. This way, nothing goes to waste, and you boost your meals. To enhance crispiness, start with very dry chickpeas. After rinsing, pat them dry well. You can also try roasting them longer, checking every few minutes to prevent burning. Another tip is to spread them out on the baking sheet in one layer. This allows hot air to circulate, giving you that perfect crunch. Roasting chickpeas is a simple way to make a tasty and healthy snack. You learned about the main ingredients, cooking steps, and helpful tips. We covered flavor variations and dietary options too. Remember to store leftovers properly to keep them crispy. These chickpeas are flexible; use them in bowls or as a snack. Enjoy experimenting with flavors and textures in your cooking. Embrace this easy recipe as a fun addition to your meals.

Garlic Herb Roasted Chickpeas Crispy and Flavorful Snack

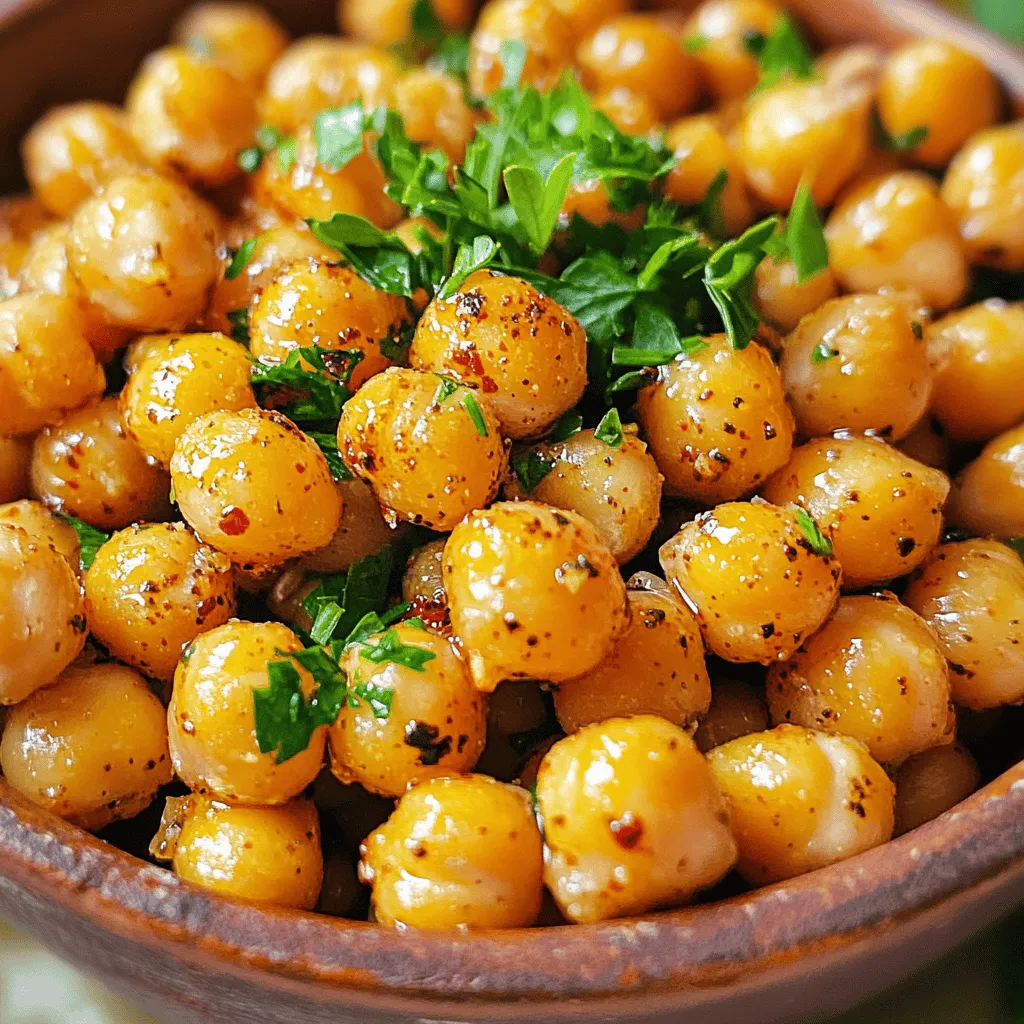
Are you ready to elevate your snack game? Garlic Herb Roasted Chickpeas are crispy, flavorful, and perfect for any craving.

- 2 cups fresh strawberries, hulled and halved - 1/4 cup coconut sugar (or regular granulated sugar) - 1/4 cup unsweetened shredded coconut - 2 tablespoons chia seeds - 1 tablespoon freshly squeezed lemon juice - A pinch of salt In this jam, fresh strawberries shine. Their sweet flavor pairs well with coconut sugar, which adds a lovely hint of caramel. The shredded coconut gives a nice texture and tropical feel. You can choose to add chia seeds for extra nutrition. They help thicken the jam and add a slight crunch. A touch of lemon juice brightens the flavor, while salt balances the sweetness. Feel free to mix and match the optional ingredients to suit your taste. You can adjust the sweetness with more or less sugar. This jam is simple yet packed with flavor, making it a treat for breakfast or a snack. You can find the full recipe above. 1. Start by combining the hulled strawberries and coconut sugar in a medium saucepan. 2. Cook this mixture over medium heat for about 5 to 7 minutes. You want the strawberries to soften and let out their juices. 3. Once they are tender, use a fork or a potato masher to mash the strawberries. You can make it smooth or leave some chunks for texture. 1. Next, mix in the unsweetened shredded coconut and chia seeds. 2. Add 1 tablespoon of freshly squeezed lemon juice and a pinch of salt. Stir well to blend all the ingredients. 3. Lower the heat and let the jam simmer for about 5 minutes. This helps the chia seeds absorb liquid and thickens the jam nicely. 1. After simmering, remove the saucepan from heat and let the jam cool for a few minutes. 2. Carefully transfer the jam into a clean jar or airtight container. 3. Allow it to cool completely at room temperature. For the best texture, chill in the fridge for at least 1 hour before serving. For the full recipe, visit the detailed instructions. Enjoy your delicious jam! - Adjusting sweetness with coconut sugar: Coconut sugar adds a rich flavor. If you want it sweeter, add a bit more. Start with a small amount and taste as you mix. You can always add more. - Choosing the right texture: Decide if you want smooth jam or a chunky one. For smooth, mash the strawberries well. If you prefer chunks, mash them lightly. This gives your jam a nice feel. - Presentation ideas for jam: Serve the jam in a lovely glass jar. Add a cute label to make it special. You can also place it on a wooden board with fresh bread and fruit. This makes a beautiful snack. - Best food pairings: Strawberry coconut chia jam goes great with toast, pancakes, or yogurt. It also tastes good with cheese or as a topping on desserts. The options are endless! - Overcooking the mixture: Keep an eye on the jam while it cooks. Overcooking can make it too thick. Stir often and remove it from heat when it looks right. - Not letting it cool properly: After cooking, let the jam cool at room temperature. If you seal it too soon, it may not thicken well. Patience is key for the best results. For the full recipe, check out the [Full Recipe]. {{image_4}} You can make this jam even more fun by adding other fruits. Try mixing in raspberries or blueberries for a twist. These fruits add different tastes and colors. You can also add spices like vanilla or cinnamon. Just a dash can enhance the jam's flavor. This way, you can create your own unique version of Strawberry Coconut Chia Jam. If you want a sugar-free option, you can use a sugar substitute. Stevia or monk fruit sweetener work well. These keep the sweetness without the extra calories. For those on a vegan diet, you can use maple syrup or agave nectar instead of sugar. This makes the jam suitable for everyone. Adjusting the sweetener is simple and keeps the jam delicious. You can find the full recipe for Strawberry Coconut Chia Jam [here](#). Strawberry Coconut Chia Jam lasts about two weeks in the refrigerator. Store it in a clean, airtight jar. Keep it sealed when not in use. This helps maintain its flavor and freshness. Always check for any off smells or changes in texture before using. If you notice anything unusual, it’s best to discard it. You can freeze your jam for up to six months. To do this, pour the jam into a freezer-safe jar, leaving some space at the top. This allows room for expansion as it freezes. Make sure to seal it tightly to avoid freezer burn. When you're ready to enjoy it, transfer the jar to the fridge overnight to thaw. Using stored jam is easy! You can simply spread it cold on toast or pancakes. If you want it warm, heat it gently in a saucepan over low heat. Stir it occasionally until it warms through. You can also mix it into yogurt or oatmeal for a tasty treat. Enjoy your jam in many ways! You can adjust sweetness easily. Just add more or less sugar. Start with coconut sugar. Taste the mix while cooking. If it's not sweet enough, sprinkle in more sugar. You can also use honey or maple syrup for natural sweetness. Remember, the berries are sweet too! Yes, frozen strawberries work well. They are easy to find, and they save time. Just thaw them first. Drain any extra juice before cooking. This helps keep the jam from getting too watery. Cook them the same way as fresh berries. There are a few reasons for this. First, you may not have cooked it long enough. Chia seeds need time to absorb liquid. If the mix is too watery, add more chia seeds. Let it simmer longer. If it still doesn't thicken, try mashing the berries more. This helps break down the fruit. In summary, making Strawberry Coconut Chia Jam is simple. You only need fresh strawberries, coconut sugar, and shredded coconut. Optional ingredients like chia seeds and lemon juice enhance flavor. Follow the steps to prepare, cook, and chill the jam. Remember to avoid common mistakes for perfect results. Explore variations for new flavors or dietary needs. This jam stores well in the fridge and can also be frozen. Enjoy your tasty creation on toast or yogurt, and have fun experimenting with different fruits!

Strawberry Coconut Chia Jam Simple and Delicious Recipe

Are you ready to elevate your breakfast game? My Strawberry Coconut Chia Jam is a simple, tasty treat you can

Older posts
Newer posts
← Previous Page1 … Page33 Page34 Page35 … Page68 Next →

dsad

© 2025 tastymomrecipes • Built with GeneratePress

Our Policies

  • Copyright Policy
  • Cookie Policy
  • GDPR Policy
  • Privacy Policy
  • Disclaimer
  • Terms Of Use

More Information

  • Home
  • About
  • Contact
  • Appetizers
  • Dessert
  • Dinner
  • Drinks
©2025, tastymomrecipes About Back To Top