Skip to content
DisclaimerTerms Of UseGDPR PolicyCookie Policy

tastymomrecipes

  • Home
  • Drinks
  • Appetizers
  • Dinner
  • Dessert
  • About
  • Contact
  • Privacy Policy
DisclaimerTerms Of UseGDPR PolicyCookie Policy

Olivia

- 2 ripe bananas - 1/4 cup honey or maple syrup - 1/2 cup unsweetened applesauce - 1 teaspoon pure vanilla extract - 1 cup rolled oats - 1 cup whole wheat flour - 1 teaspoon baking powder - 1/2 teaspoon baking soda - 1/2 teaspoon salt - 1/2 teaspoon ground cinnamon - 1/2 cup chopped walnuts or pecans (optional) - 1/4 cup dark chocolate chips (optional) These simple ingredients come together to create a tasty muffin. Bananas add natural sweetness and moisture. Honey or maple syrup enhances the flavor without refined sugar. Unsweetened applesauce keeps the muffins soft and tender. Whole wheat flour packs in fiber, making your snack more filling. Rolled oats provide texture and a hearty bite. Baking powder and baking soda help the muffins rise. Ground cinnamon adds warmth and a hint of spice. You can choose to fold in nuts for crunch or chocolate chips for a sweet touch. Each muffin contains about 100 calories. They are low in fat and high in fiber. Bananas give potassium, which helps your heart. Whole wheat flour offers B vitamins that provide energy. Oats are great for digestion and keep you full longer. These ingredients make your muffins not just tasty, but also healthy. Enjoy them as a snack or a quick breakfast. They are perfect for any time of day! For the full recipe, check the link above. 1. Preheat oven and prepare muffin tin Start by preheating your oven to 350°F (175°C). Line a muffin tin with paper liners or grease it lightly. This helps the muffins come out easily. 2. Mix wet ingredients In a large bowl, mash two ripe bananas until smooth. Add 1/4 cup of honey or maple syrup for sweetness. Then, mix in 1/2 cup of unsweetened applesauce and 1 teaspoon of pure vanilla extract. Stir until everything is well combined. 3. Mix dry ingredients In another bowl, whisk together 1 cup of rolled oats, 1 cup of whole wheat flour, 1 teaspoon of baking powder, 1/2 teaspoon of baking soda, 1/2 teaspoon of salt, and 1/2 teaspoon of ground cinnamon. Make sure these ingredients are evenly mixed. 1. Gradual incorporation of dry ingredients Slowly add the dry mix to the wet mix. Stir gently just until combined. Take care not to overmix, as this keeps the muffins light and fluffy. 2. Folding in optional ingredients If you want, fold in 1/2 cup of chopped walnuts or pecans for crunch. You can also add 1/4 cup of dark chocolate chips for a touch of sweetness. 1. Filling muffin cups Use a scoop or spoon to fill each muffin cup about two-thirds full. This helps them rise without spilling over. 2. Baking time and temperature Place the muffin tin in the oven and bake for 15-20 minutes. Check if they are done by inserting a toothpick into the center. It should come out clean. 3. Cooling process Once baked, remove the muffins from the oven. Let them cool in the tin for about 5 minutes. After that, transfer them to a wire rack to cool completely. Enjoy your Healthy Banana Oat Muffins! For the detailed recipe, refer to the Full Recipe section. To avoid overmixing, mix gently. When you combine wet and dry ingredients, stop as soon as they come together. Overmixing can lead to tough muffins. Keep a light hand for soft, fluffy results. Ingredient temperature matters. Use room temperature ingredients. This helps the batter mix well and rise evenly. Cold ingredients can lead to dense muffins. Serve your muffins warm for the best taste. They are perfect on their own or with butter. You can also dust them with powdered sugar for a sweet touch. Pair your muffins with a hot drink. Coffee or tea complements their flavors nicely. You could try them with almond milk for a fun twist. Spices can boost flavor. Add nutmeg or ginger for a warm kick. Citrus zest, like lemon or orange, adds brightness. These simple changes can transform your muffins. Consider different sweeteners too. You can use coconut sugar or agave nectar. Each sweetener brings its own flavor and sweetness level. This lets you customize your muffins to your taste. {{image_4}} You can easily change the taste of your banana oat muffins. Adding fruits like blueberries or cranberries gives a fun twist. These fruits bring sweetness and a pop of color. You can also swap out nuts. Instead of walnuts, try almonds or sunflower seeds. Each nut changes the texture and taste, making it your own. If you need gluten-free muffins, swap whole wheat flour for almond or oat flour. These options work great and keep the muffins moist. For a vegan version, replace honey with maple syrup. You can also use flax eggs. Mix one tablespoon of ground flaxseed with three tablespoons of water. Let it sit for a few minutes to thicken. Want mini muffins? Adjust your baking time. Bake mini muffins for about 10-12 minutes. The smaller size makes them cute and easy to grab. You can also change the ingredient ratios. Use the same amount of wet ingredients but half the dry ingredients for smaller batches. This way, you still get that delicious flavor in a tiny treat! To keep your muffins fresh, store them at room temperature in an airtight container. This keeps them soft for up to three days. If you want them to last longer, refrigerate them. Just make sure to wrap them tightly. In the fridge, they can stay good for about a week. Freezing muffins is a great way to save them for later. First, let the muffins cool completely. Then, wrap each muffin in plastic wrap or foil. Place them in a freezer-safe bag or container. They can last up to three months in the freezer. When you want to eat one, thaw it in the fridge overnight. You can also reheat them in the microwave for about 15-30 seconds. These banana oat muffins stay fresh for about three days at room temperature. In the fridge, they last about a week. Check for signs of spoilage, like mold or an off smell. If they feel dry or hard, it's best to toss them. Remember, fresh is always best! Yes, you can use both! Ripe bananas are yellow with small brown spots. They taste sweet and work well in muffins. Overripe bananas are brown and very soft. They are even sweeter and add moisture. Using overripe bananas gives the muffins a richer flavor. If you have them, use them! If you want sweeter muffins, try adding more honey or maple syrup. You can start with an extra tablespoon. Taste the batter before baking. You can also add chocolate chips for extra sweetness. Dried fruits like raisins or dates are great too. Adjust based on your taste buds! Yes, you can! If you want a gluten-free option, use almond flour or oat flour. These flours give a nice texture. For a lighter muffin, you can use all-purpose flour. Just remember that this may change the taste and texture a bit. For the complete recipe details, check out the Full Recipe. This blog post covers a simple and healthy muffin recipe. You learned about the key ingredients, step-by-step instructions, and tips for perfect muffins. Remember to try different flavors and storage methods to keep your muffins fresh. You can mix and match ingredients to fit your taste and dietary needs. With easy variations, these muffins can suit anyone. Enjoy your baking journey and share these tasty treats with others!

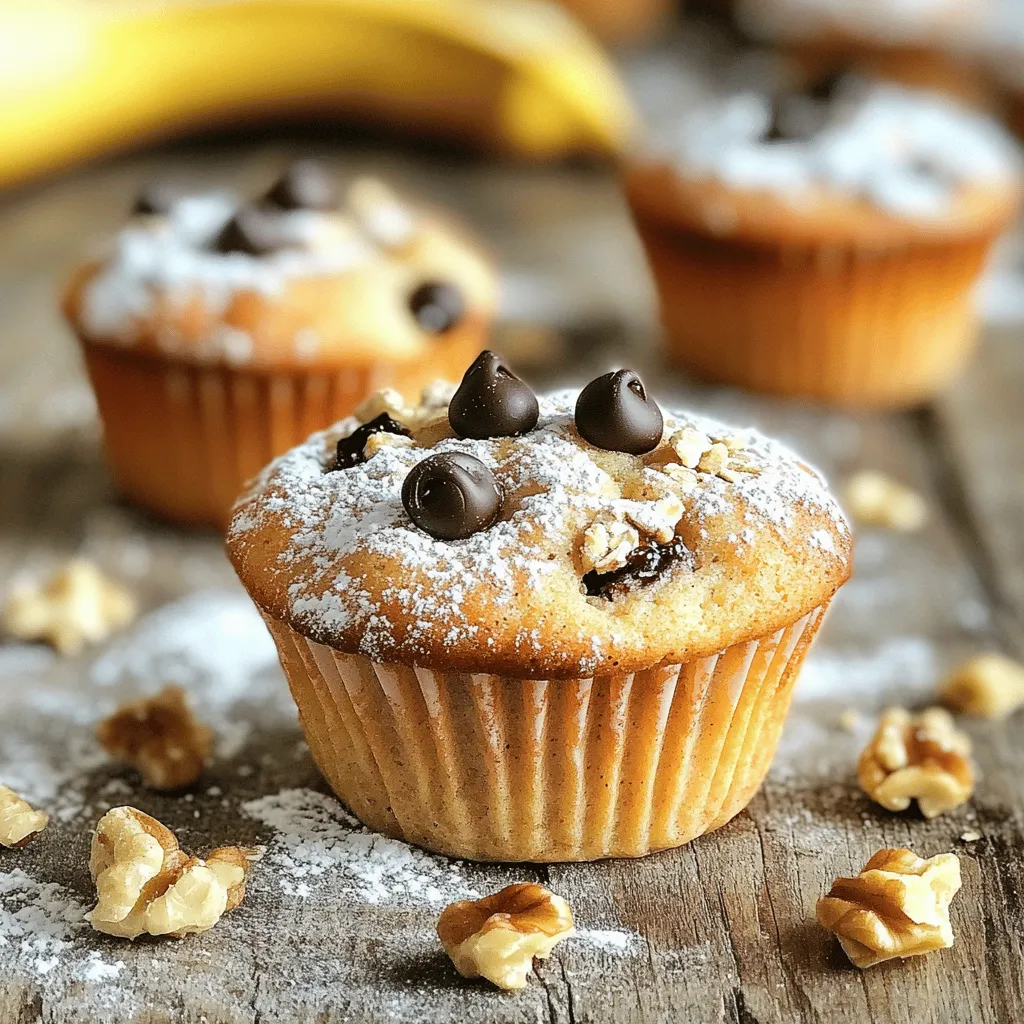
Healthy Banana Oat Muffins Easy and Nutritious Treat

Craving a tasty yet healthy treat? These Healthy Banana Oat Muffins are your answer! Packed with wholesome ingredients like bananas,

- 2 flatbreads or naan - 1 cup cooked chicken, shredded - 1 cup BBQ sauce (homemade or store-bought) - 1 cup mozzarella cheese, shredded - 1/2 cup red onion, thinly sliced - 1/2 cup corn kernels - 1/4 cup fresh cilantro, finely chopped - 1 tablespoon olive oil - Salt and pepper to taste - Baking sheet - Parchment paper - Medium bowl - Spatula When I set out to make BBQ chicken flatbread, I love gathering my ingredients first. This step makes cooking smoother and more fun. Start with the flatbreads or naan; they form the base. Then, grab the cooked chicken. I always keep some cooked chicken on hand. It saves time and makes meals easy. Next, choose your BBQ sauce. I like to use homemade when I can, but store-bought works well too. The flavor it brings is key to this dish. Mozzarella cheese is a must; it melts beautifully and adds creaminess. Red onion adds a nice crunch and sharp taste. Corn kernels give sweetness and texture. Finally, fresh cilantro brightens the whole dish. It’s the final touch that makes everything pop. For tools, a baking sheet and parchment paper help keep things tidy. A medium bowl is great for mixing the chicken and sauce. Lastly, a spatula makes spreading easy. Gather all these items before you start cooking, and you’ll be ready to make a tasty meal. Don't forget to check the [Full Recipe] for all the steps and tips! - Preheat the oven to 400°F (200°C). - In a medium bowl, combine the shredded chicken with BBQ sauce. Mix well until all the chicken is coated in sauce. - Brush both sides of the flatbreads with olive oil. - Spread the BBQ chicken mixture evenly over the flatbread, leaving a little space around the edges. - Sprinkle mozzarella cheese on top of the chicken. Then, add the red onion and corn evenly. - Place the flatbreads on a lined baking sheet to prevent sticking. - Bake for 12-15 minutes until the cheese is bubbly and golden brown. - Allow the flatbreads to cool for a few minutes. Then, garnish with chopped cilantro for a fresh touch. How to choose the right flatbread or naan I love using flatbreads or naan for this dish. They cook fast and taste great. Look for fresh, soft flatbreads. You want them to hold the toppings well. Whole wheat or garlic naan adds a fun twist and more flavor. Tips for a crispy crust To get that nice, crispy crust, brush your flatbread lightly with olive oil. This helps it brown well in the oven. Preheat your oven to 400°F (200°C) before baking. Baking on a hot surface gives the best results. For extra crunch, bake directly on the oven rack for the last few minutes. Suggestions for additional toppings You can mix it up with toppings. Try adding sliced bell peppers, jalapeños, or black olives. A sprinkle of feta cheese adds a nice salty kick. You can even toss on some arugula after baking for a fresh touch. How to make homemade BBQ sauce Making your own BBQ sauce is simple. Mix ketchup, brown sugar, vinegar, and spices like garlic powder and smoked paprika. Adjust the sweetness and heat to your taste. Homemade BBQ sauce can take this flatbread to the next level. Use it in the recipe for great flavor. For the full recipe, check out the link. {{image_4}} You can make a tasty vegetarian BBQ flatbread by swapping out chicken. Try using roasted vegetables like bell peppers, zucchini, and mushrooms. They add great flavor and color. For cheese lovers, use vegan cheese alternatives. These melt well and keep your dish creamy. This option is perfect if you want to be dairy-free. If you love pizza, try using pizza dough instead of flatbread. It gives a nice chewy texture. Roll out the dough to your desired thickness. Adjust the baking time if you use pizza dough. It may need a bit longer, around 15 to 20 minutes. Watch closely until it turns golden brown. These variations make BBQ chicken flatbread fun and flexible. You can enjoy it in new ways every time! For the full recipe, check out the BBQ Chicken Flatbread Delight. To store leftovers, first let your BBQ chicken flatbread cool completely. Then, wrap each piece in plastic wrap or foil. This keeps the flatbread fresh. Place the wrapped flatbreads in an airtight container. Store them in the fridge for up to three days. If you want to keep them longer, you can freeze them. Wrap each flatbread tightly in plastic wrap, then place them in a freezer bag. They can last up to three months in the freezer. When you're ready to enjoy your flatbread again, there are a few great ways to reheat it. The best method is to use an oven. Preheat it to 350°F (175°C). Place the flatbread directly on the oven rack or on a baking sheet. Heat for about 10 minutes. This will help keep the crust crispy. If you're in a hurry, you can use a microwave. Place the flatbread on a microwave-safe plate. Heat it for 30 seconds to 1 minute. To keep the crust from getting soggy, place a paper towel under the flatbread. This absorbs extra moisture. Remember, reheating in the oven gives the best texture. Enjoy your tasty BBQ Chicken Flatbread! For the full recipe, check the details above. You can use naan, pita bread, or even pizza dough. Each option offers a unique taste. Naan adds a soft and chewy texture. Pita is great for a lighter base. Pizza dough gives a thicker crust. BBQ Chicken Flatbread lasts about 3 days in the fridge. Make sure to store it in an airtight container. This helps keep it fresh and tasty. Yes, you can prepare the BBQ chicken mix in advance. Just store it in the fridge until you're ready to bake. Assemble your flatbreads just before cooking for the best results. Here are some great sides to serve: - Coleslaw - Grilled veggies - Corn on the cob - A fresh garden salad These dishes add balance and freshness to your meal. You can find the full recipe [here](#). In this blog post, we covered the ingredients and steps to make BBQ Chicken Flatbread. We talked about how to prepare, assemble, and bake it for a tasty meal. I shared tips for perfect texture and flavor, plus variations for different diets. Make sure to store leftovers properly and check the FAQs for common questions. This dish is easy to enjoy and customize. Now it’s time to get cooking and enjoy your creation!

Savory BBQ Chicken Flatbread Simple and Tasty Meal

Craving a quick meal that’s packed with flavor? Look no further! My savory BBQ Chicken Flatbread is not only simple

- 1 block (14 oz) firm tofu, thoroughly pressed and cubed - 2 tablespoons cornstarch - 2 tablespoons vegetable oil (plus more if needed) - 1 red bell pepper, thinly sliced - 1 yellow bell pepper, thinly sliced - 1 cup snap peas, trimmed - 1 medium carrot, peeled and julienned - 3 green onions, chopped (whites and greens separated) - 3 cloves garlic, finely minced - 1-inch piece fresh ginger, grated - 1/3 cup sweet chili sauce - 2 tablespoons soy sauce - 1 tablespoon sesame oil - Sesame seeds for garnish Sweet chili tofu stir fry shines with a few key seasonings. Soy sauce adds salt and umami. Sesame oil brings a nutty taste that warms the dish. Fresh ginger and garlic add depth and zest. Together, they create a well-rounded flavor profile that makes each bite exciting. For optional garnishes, try sesame seeds for crunch. Chopped green onions add color and a fresh taste. Lime wedges bring a burst of acidity that brightens the dish. These garnishes not only enhance the look but also boost the flavors of your stir fry. For the full recipe, check out the link provided. To start, we need to press the tofu. This helps remove extra moisture. Wrap the tofu block in paper towels. Place a heavy object on top for about 15 minutes. After pressing, cut the tofu into bite-sized cubes. Toss the cubes in cornstarch until they are fully coated. This step adds a nice crunch when we fry the tofu. Next, heat 1 tablespoon of vegetable oil in a large skillet or wok over medium-high heat. When the oil is shimmering, gently add the tofu cubes. Cook the tofu until it turns a golden brown color. This should take about 8-10 minutes. Be sure to turn them occasionally for even cooking. Once they are crispy, remove the tofu from the skillet and set it aside. In the same skillet, add the remaining tablespoon of vegetable oil. Now, introduce the sliced red and yellow bell peppers, snap peas, and julienned carrot. Stir-fry the vegetables for about 3-4 minutes. You want them to be tender but still crisp. This gives a nice texture to the dish. Now it's time to add flavor. Add the minced garlic and grated ginger to the skillet. Stir them continuously for about a minute until they smell good. Be careful not to burn them. Once the garlic and ginger are fragrant, return the crispy tofu to the skillet. Pour in the sweet chili sauce and soy sauce. Mix everything gently to coat the tofu and vegetables. Cook for another 2-3 minutes until everything is heated through. Finally, drizzle sesame oil over the stir fry and give it a final mix. For a detailed recipe, check the Full Recipe. How to avoid soggy tofu To keep your tofu firm, it’s key to press it well. Wrap the tofu in paper towels and place something heavy on top for about 15 minutes. This step removes excess water and prevents sogginess. Enhancing the crispiness Coating the tofu with cornstarch is a great trick. After pressing it, toss the cubes in cornstarch before frying. This helps create a crispy outer layer that pairs perfectly with the sweet chili sauce. Suggested spices and add-ins Feel free to get creative with spices! A pinch of red pepper flakes can add a kick. You can also toss in some chopped fresh basil or cilantro for added flavor. Balancing flavors with acidity Adding a splash of lime juice or rice vinegar can brighten up your dish. This acidity balances the sweetness of the chili sauce, creating a well-rounded flavor. Best sides and pairings Serve this dish with steamed jasmine rice or quinoa. Both options soak up the sauce well and make for a filling meal. You can also add a side of sautéed greens for extra nutrition. Creative plating ideas For a beautiful presentation, use deep bowls to showcase your vibrant stir fry. A sprinkle of sesame seeds on top adds visual appeal. A lime wedge on the side offers a fresh burst of flavor when squeezed over the dish. {{image_4}} You can switch tofu for tempeh or seitan. Tempeh has a nutty taste and adds protein. Seitan is chewy and works well in stir-fries. Both options are great for anyone who wants a meat-like texture. If you prefer legumes, try adding chickpeas. They are a tasty and filling vegetarian choice. Feel free to use any seasonal vegetables you like. Broccoli, zucchini, or bok choy all work well. You can also swap the bell peppers for other colors or types. Carrots can be replaced with baby corn or snap peas. This flexibility lets you personalize the dish to your taste. For a gluten-free option, use tamari instead of soy sauce. Tamari gives you the same salty flavor without gluten. If you need a vegan sauce, ensure your sweet chili sauce is vegan-friendly. Many brands offer vegan sweet chili sauce without fish sauce. These simple changes make the dish suitable for various diets. To store leftovers of your sweet chili tofu stir fry, follow these steps: - Let the stir fry cool down to room temperature. - Transfer it to an airtight container. - Place it in the fridge. The stir fry stays fresh for about 3 to 4 days in the fridge. Make sure to eat it before it goes bad! If you want to keep the stir fry longer, freezing is a great option. Here’s how to do it: - Allow the stir fry to cool completely. - Portion it into freezer-safe bags or containers. - Seal them tightly, removing as much air as possible. When you’re ready to eat, thaw it in the fridge overnight. To reheat, warm it in a pan on the stove or in the microwave. Stir it well to ensure even heating. Leftovers can be fun! Here are some tasty ideas to reinvent your sweet chili tofu stir fry: - Wraps: Use the stir fry as a filling for tortillas or lettuce wraps. - Salads: Toss it into a fresh salad for added flavor and protein. - Rice Bowls: Serve it over rice or quinoa for a quick meal. These ideas will help you enjoy your meal in new ways! Yes, you can use frozen tofu. Freezing tofu changes its texture. It makes it more porous, which helps it soak up more flavor. To prepare frozen tofu, let it thaw in the fridge overnight. After thawing, press it to remove excess water. Then, cut it into cubes and coat with cornstarch. This method works well in the sweet chili tofu stir fry. I love serving sweet chili tofu stir fry with fluffy rice or quinoa. These sides soak up the sauce well. You can also add a simple green salad for freshness. Steamed broccoli or bok choy pairs nicely too. These options balance the dish and make it more filling. To make a spicy version, add chili flakes or fresh chopped chili. You can mix in a tablespoon of sriracha or a spicy sauce. Adjust the amount to your heat preference. Adding spicy ingredients enhances the flavor of the sweet chili sauce. You’ll enjoy that extra kick! Leftovers of sweet chili tofu stir fry can last up to three days in the fridge. Store them in an airtight container. When reheating, add a splash of water to keep it moist. You can also reheat in the microwave or on the stove. Just be careful not to overcook it. Yes, you can use other sauces. For a different flavor, try teriyaki or hoisin sauce. Soy sauce mixed with a bit of honey also works well. Each sauce will change the taste but still bring out the tofu and veggies. Feel free to experiment with what you have on hand. For the full recipe, check the details above. This blog post covered all you need to know about making a delicious Sweet Chili Tofu Stir Fry. We explored essential ingredients, cooking steps, and handy tips. You can easily switch up the recipe with different proteins and veggies. Remember, cooking is fun! Feel free to adjust flavors to fit your taste. Store leftovers well and consider creative ways to use them. Enjoy your tasty stir fry and share it with friends!

Sweet Chili Tofu Stir Fry Flavorful and Simple Dish

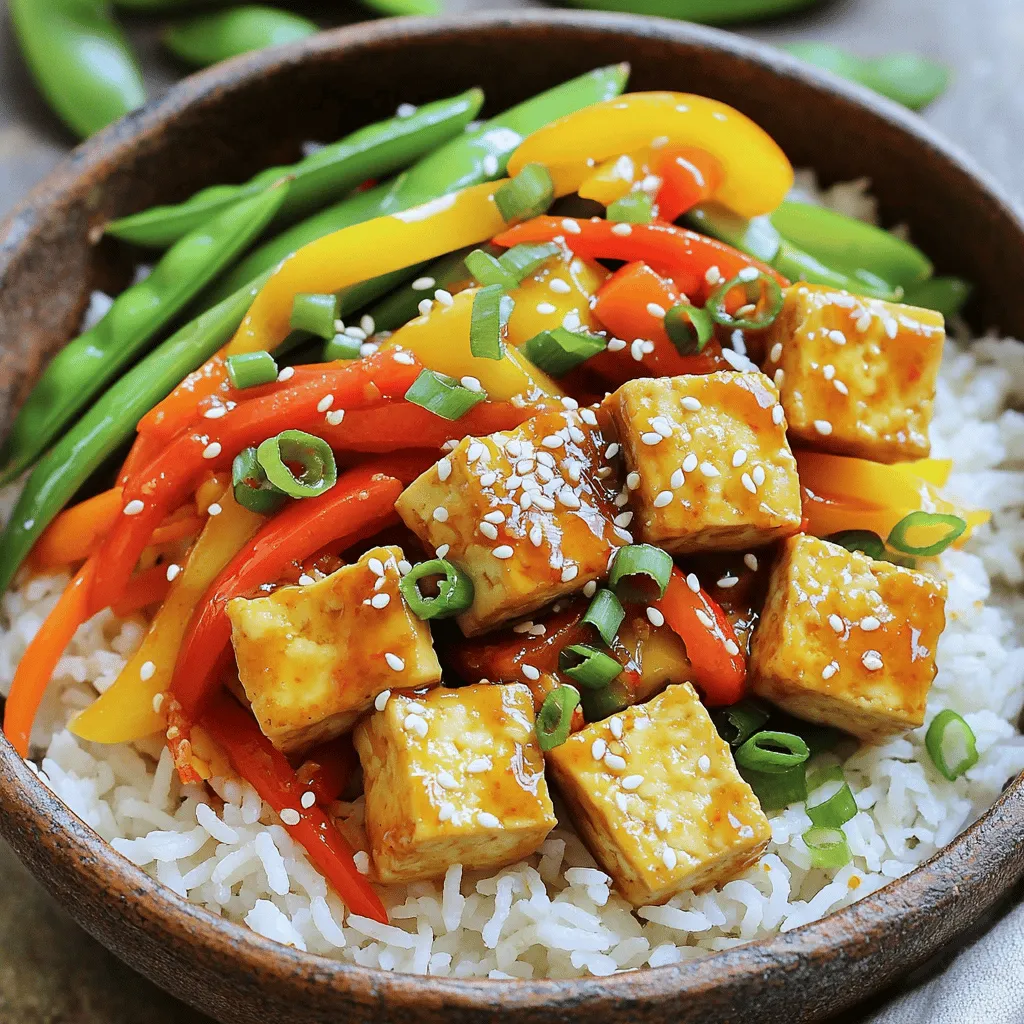
Are you craving a quick and tasty meal? My Sweet Chili Tofu Stir Fry is a perfect fit! It combines

To make delicious Zucchini Blueberry Muffins, you will need a few simple items. Here’s the list: - 1 cup freshly grated zucchini (about 1 medium zucchini) - 1 cup fresh or thawed frozen blueberries - 1/2 cup granulated sugar - 1/4 cup packed brown sugar - 1/3 cup vegetable oil - 1 large egg - 1 teaspoon pure vanilla extract - 1 cup all-purpose flour - 1 teaspoon baking powder - 1/2 teaspoon baking soda - 1/2 teaspoon ground cinnamon - 1/4 teaspoon salt Each ingredient plays a key role in making these muffins tasty. The zucchini adds moisture and nutrition. Blueberries bring sweetness and a burst of flavor. The sugars help to create a lovely golden crust. Vegetable oil keeps the muffins tender. The egg binds everything together and adds richness. The dry ingredients, like flour and baking powder, give structure and lift to the muffins. Cinnamon adds a warm, comforting spice, while salt balances all the flavors. For the full recipe, refer to the details I provided earlier. Enjoy baking these delightful muffins! 1. Preheat the Oven: Start by setting your oven to 350°F (175°C). This step is key. A hot oven helps the muffins rise well. 2. Prepare the Muffin Tin: Grease each muffin cup with butter or oil. You can also use paper liners. This makes it easy to take the muffins out later. 1. Combine Wet Ingredients: In a large bowl, mix the grated zucchini, granulated sugar, brown sugar, vegetable oil, egg, and vanilla extract. Use a whisk to blend well. Ensure everything is mixed evenly. 2. Mix Dry Ingredients: In another bowl, sift the flour, baking powder, baking soda, ground cinnamon, and salt. Sifting makes the flour light and helps the muffins rise better. 1. Combine Wet and Dry Mixtures: Gradually add the dry mix to the wet mix. Stir gently with a spatula. Mix until just combined. Overmixing can make the muffins tough. 2. Fold in Blueberries: Gently fold in the blueberries. Be careful not to crush them. This adds a nice burst of flavor to each bite. 3. Fill Muffin Tin and Bake: Use a spoon or ice cream scoop to fill each muffin cup about two-thirds full. This gives room for the muffins to rise. Bake them for 18-20 minutes. They are ready when a toothpick comes out clean. For the full recipe, check the details above to enjoy these tasty treats! - Avoid Overmixing: Mix your batter just until the dry ingredients blend with the wet ones. Overmixing makes muffins tough. You want a light and airy texture. - Cooking Time Adjustments: Each oven is unique. Keep an eye on your muffins after 15 minutes. They may need a few extra minutes, but check them often. A toothpick test helps here. It should come out clean or with a few crumbs. - Garnishing Options: Dust your muffins with powdered sugar for a sweet touch. Place some fresh blueberries on top for color and charm. This adds a nice pop and makes them look appealing. - Serving Recommendations: Serve your muffins warm for the best taste. They pair well with tea or coffee. For extra fun, offer a dollop of yogurt on the side. It makes a great breakfast or snack! These simple tips will help you create muffins that look good and taste great! For the full recipe, follow the detailed steps in the main section. {{image_4}} You can switch things up with different sweeteners. Honey or maple syrup can work well. Just adjust the amount, as these are sweeter than sugar. For gluten-free options, use almond flour or oat flour. These flours add a nice flavor and texture. Make sure to check if your baking powder is gluten-free too. Adding nuts or seeds can give your muffins a nice crunch. Try walnuts or pumpkin seeds for extra nutrition. They pair well with the blueberries. You can also mix in other fruits. Chopped apples or peaches can add a fresh twist. This way, you can enjoy different flavors in your muffins. For the full recipe, check the section above! To keep your zucchini blueberry muffins fresh, let them cool first. Place them on a wire rack for about 5 minutes. This prevents moisture buildup. Once cool, store them in an airtight container. They will stay fresh for up to three days at room temperature. If you want to keep them longer, refrigerating is an option. Just know that they might lose some softness. If you want to enjoy these muffins later, freezing is a great choice. To freeze, wrap each muffin in plastic wrap. Then, place them in a freezer bag. Be sure to remove as much air as possible. This helps prevent freezer burn. You can freeze the muffins for up to three months. To thaw, simply take a muffin out and let it sit at room temperature for about 1-2 hours. If you're in a hurry, you can microwave it for 10-15 seconds. This will warm it up nicely. Enjoy your muffins fresh and delicious! For the full recipe, check out the detailed instructions above. Can I use frozen zucchini? Yes, you can use frozen zucchini. Just thaw and drain it well. This helps avoid excess moisture in your muffins. How can I make these muffins dairy-free? To make these muffins dairy-free, swap the vegetable oil with a dairy-free option, like coconut oil. Use a plant-based milk to replace any dairy milk if needed. What makes muffins fluffy? Muffins become fluffy when you mix the wet and dry ingredients gently. This helps keep air in the batter, leading to a light texture. Can I substitute other fruits? Absolutely! You can use raspberries, blackberries, or even chopped apples. Just make sure to adjust the sweetness if needed. What to do if muffins are too dense? If your muffins are too dense, check your mixing technique. Overmixing can lead to tough muffins. Also, ensure your leavening agents are fresh. How to avoid soggy muffins? To avoid soggy muffins, make sure to drain any excess moisture from zucchini or other fruits. Also, bake them until a toothpick comes out clean. You now know how to make delicious blueberry zucchini muffins from scratch. We covered key ingredients, step-by-step instructions, tips, and variations. Pay attention to mixing and baking times for the best results. Try out different flavors or storage tips to keep your muffins fresh. Baking is fun and rewarding, so enjoy this tasty treat!

Zucchini Blueberry Muffins Healthy and Easy Recipe

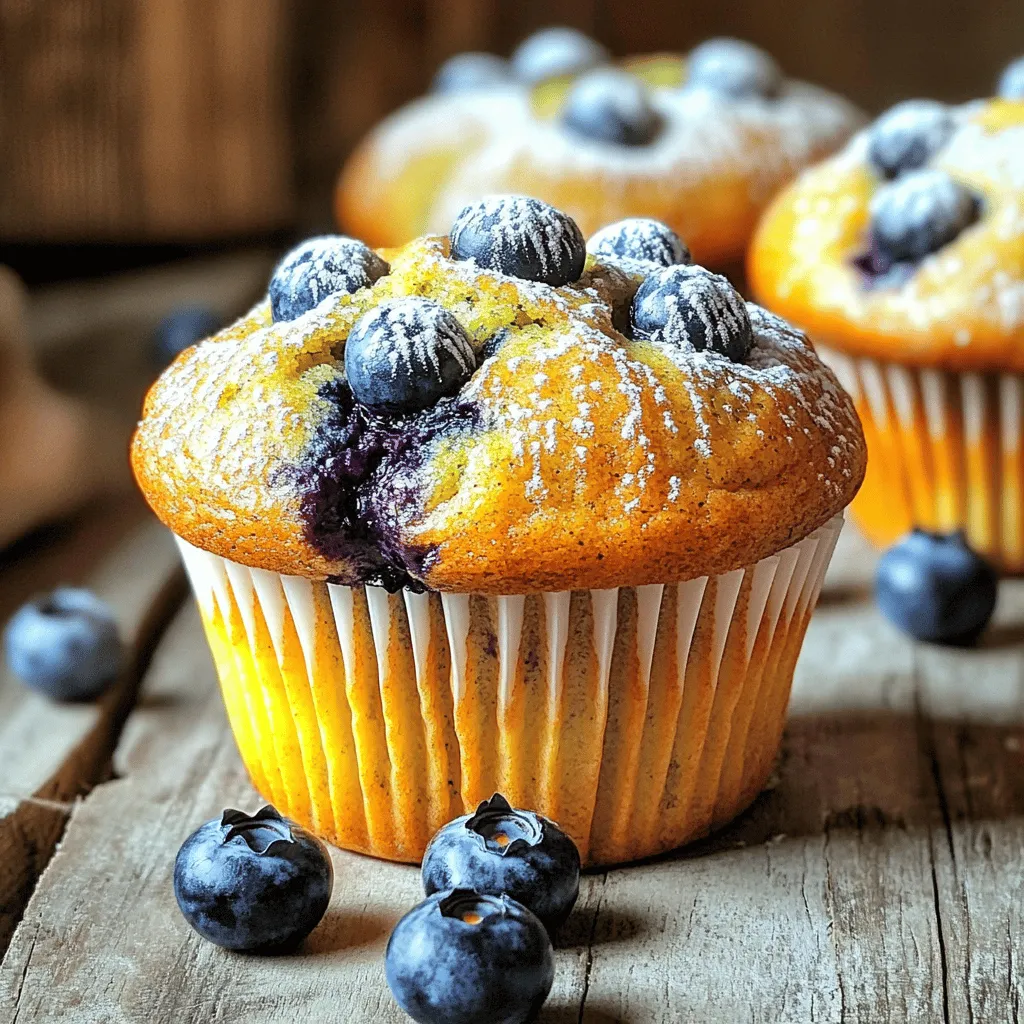
Are you ready to whip up some delicious Zucchini Blueberry Muffins? This easy recipe combines fresh zucchini and juicy blueberries

To create a Peach Pecan Crisp, you need a few key ingredients. Here’s what you will need: - 4 cups ripe peaches, sliced (about 6 medium peaches) - 1/4 cup granulated sugar - 1 tablespoon fresh lemon juice - 1 teaspoon pure vanilla extract - 1 teaspoon ground cinnamon - 1 cup rolled oats - 1/2 cup all-purpose flour - 1/2 cup packed light brown sugar - 1/2 cup lightly chopped pecans - 1/2 cup unsalted butter, melted - Pinch of sea salt These ingredients blend well together, creating a sweet, crunchy, and fruity dessert. The ripe peaches provide natural sweetness, while the pecans add a nice crunch. You can boost the flavor of your crisp with some optional ingredients. Consider adding: - 1/4 teaspoon nutmeg for warmth - 1/2 cup blueberries for a berry twist - 1/4 cup shredded coconut for extra texture - A splash of bourbon for a rich taste These add-ins can elevate the dish and make it even more delicious. Experiment with what you have on hand! To make this recipe easier, gather these kitchen tools: - A large mixing bowl for tossing the peaches - A smaller mixing bowl for the topping - A 9x13-inch baking dish for baking - A spatula for spreading the filling and topping - An oven mitt for safe handling These tools will help you create a perfect Peach Pecan Crisp. For the full recipe, refer to the instructions earlier in this article. First, gather all your ingredients. You need ripe peaches, sugar, lemon juice, vanilla, and cinnamon. Slice four cups of peaches and put them in a bowl. Add 1/4 cup of sugar, 1 tablespoon of lemon juice, 1 teaspoon of vanilla extract, and 1 teaspoon of ground cinnamon. Mix this gently. Make sure each peach slice gets coated well. Once done, pour this mixture into a greased 9x13-inch baking dish. Next, we make the topping. In a new bowl, mix 1 cup of rolled oats, 1/2 cup of flour, and 1/2 cup of packed brown sugar. Add 1/2 cup of chopped pecans and a pinch of sea salt. Finally, pour in 1/2 cup of melted butter. Stir until you get a crumbly texture. This will give your crisp a nice crunch. Evenly sprinkle this topping over the peach mixture. Make sure every peach is covered. Now, it's time to bake! Preheat your oven to 350°F (175°C). Once it's ready, place the baking dish inside. Bake for 30 to 35 minutes. You want to see a golden-brown topping and bubbly peaches below. Keep an eye on it during the last few minutes. This will help you get that perfect crisp! After baking, let it cool for about 10 minutes. This helps the juices settle, making it easier to serve. Enjoy your Peach Pecan Crisp as a warm treat. Don't forget, you can find the full recipe in the section above! When picking peaches, look for fruit that is firm yet yields slightly to pressure. Ripe peaches should have a sweet aroma. Choose peaches with a vibrant color, avoiding any green spots. The best flavor comes from peaches that are in season. If you can, buy local peaches for freshness and taste. If your peaches are very sweet, cut back on the sugar. You can also add spices like nutmeg for extra warmth. Add more lemon juice for a bright, zesty kick. Taste the mixture before baking. You want a balance that suits your taste. Ovens can vary in heat. If your oven runs hot, check the crisp a few minutes early. If your oven is cooler, it may need a bit more time. Look for a golden-brown topping and bubbling fruit as signs it’s done. Always trust your eyes and nose during baking. For the complete recipe, check out the Full Recipe section above. {{image_4}} You can use frozen or canned peaches if fresh ones are not available. For frozen peaches, thaw them first. Drain any excess liquid to avoid a soggy crisp. Canned peaches should be well-drained, too. The flavor remains sweet and delicious, making it a great option for this recipe. While pecans add a nice crunch, you can swap them for other nuts. Walnuts or almonds work well too. If you want a nut-free option, try adding seeds, like sunflower seeds. You can also mix in different oats, like quick oats or steel-cut oats. Each choice brings a unique flavor and texture to your crisp. To make this recipe gluten-free, choose gluten-free oats and flour. Look for certified gluten-free products to ensure safety. Coconut flour or almond flour can be great substitutes for all-purpose flour. These swaps keep the crisp tasty while catering to gluten-free diets. Enjoy your Peach Pecan Crisp with these easy changes! To keep your Peach Pecan Crisp fresh, store it in an airtight container. Make sure it cools completely before covering. Place it in the fridge for up to three days. The topping may soften a bit, but the flavor stays great. If you want to enjoy it later, freezing is a good option. To reheat your Peach Pecan Crisp, preheat your oven to 350°F (175°C). Place the crisp in a baking dish and cover it with foil. Heat for about 15-20 minutes. This keeps the topping crispy while warming the peaches. You can also use a microwave, but the oven gives better results. If you want to freeze Peach Pecan Crisp, wrap it tightly in plastic wrap or foil. You can store it in the freezer for up to three months. When you're ready to eat it, thaw it in the fridge overnight. Reheat it as mentioned above for the best taste. Yes, you can make Peach Pecan Crisp ahead of time. Prepare the peach filling and the topping separately. Store them in the fridge. When you're ready to bake, layer them in the dish and bake as directed. This helps save time on busy days. If you don’t have pecans, feel free to swap them. Walnuts are a great choice and add a nice crunch. Almonds also work well and give a different flavor. Just chop them roughly and use the same amount as pecans. To make this Peach Pecan Crisp dairy-free, replace the butter with coconut oil or a dairy-free butter substitute. Both options work well and keep the crisp tasty. Make sure to check the labels for dairy-free ingredients. Enjoy a scrumptious dessert without dairy! For the full recipe, check out the details above. Making Peach Pecan Crisp is simple and fun. We covered main ingredients, optional add-ins, and kitchen tools. Following that, I provided easy steps for prepping, assembling, and baking. I shared tips on choosing peaches and adjusting flavors. Variations included using frozen peaches or different nuts. Finally, I explained how to store and reheat leftovers. Enjoy your delicious dessert! With these steps, you can create a sweet treat everyone will love.

Peach Pecan Crisp Savory and Satisfying Delight

Are you ready to indulge in a warm, sweet, and crunchy treat? Peach Pecan Crisp is a dish that brings

- 1 ripe mango, cubed into bite-sized pieces - 1 medium cucumber, peeled and diced evenly - 1 red bell pepper, finely chopped for sweetness - 1 small red onion, minced for a hint of sharpness - 1 jalapeño pepper, finely minced (optional for an added kick) In this salsa, the ripe mango gives a sweet touch. The cucumber brings a cool crunch. Red bell pepper adds bright color and sweetness. Red onion gives a bit of sharpness. If you want heat, add jalapeño. Each ingredient plays a part in creating a balanced flavor. - Juice from 2 juicy limes, freshly squeezed - 2 tablespoons extra virgin olive oil - Sea salt and black pepper, to taste The dressing is simple but essential. Fresh lime juice adds brightness. Extra virgin olive oil adds richness. Sea salt and black pepper enhance all the flavors. Together, they make the salsa pop with flavor. - 1/4 cup of fresh cilantro, roughly chopped - Optional spices or herbs Fresh cilantro lifts the salsa with its unique taste. You can also add spices like cumin or herbs like mint for a twist. Experimenting with these can make your salsa even more exciting. For the full recipe, check out the detailed instructions. Enjoy making this refreshing and zesty treat! 1. First, take your ripe mango and cut it into cubes. Aim for bite-sized pieces. This makes it easy to eat and mix with other flavors. 2. Next, grab your medium cucumber. Peel it and dice it evenly. Uniform pieces help the salsa look nice and taste great. 3. Now, chop the red bell pepper finely. This adds sweetness and color. Then, mince the small red onion for a hint of sharpness. 1. In a big mixing bowl, combine the cubed mango, diced cucumber, chopped red bell pepper, and minced red onion. 2. If you like heat, add the minced jalapeño pepper. It gives a spicy kick that brightens the salsa. 3. Toss in the roughly chopped cilantro. Its fresh scent will mix well with the other ingredients. 1. In a separate bowl, whisk together the juice from two limes and two tablespoons of extra virgin olive oil. Add sea salt and black pepper to taste. 2. Drizzle the dressing over the salsa mixture. Make sure each piece is coated well. 3. Gently toss the salsa, taking care not to mush the mango. 4. Taste and adjust the seasoning. Add more salt, pepper, or lime juice if needed. 5. Cover the bowl and refrigerate for at least 30 minutes. This lets the flavors blend and taste even better. By following these steps, you create a vibrant and tasty Cucumber Mango Salsa that is perfect for any occasion! For the complete recipe, check out the Full Recipe. Choosing a ripe mango: Look for a mango that feels slightly soft when you squeeze it. The skin should have a mix of green and yellow, with some red blush. A ripe mango smells sweet near the stem, indicating it's ready to eat. Avoid hard or overly mushy options. Picking the perfect cucumber: Choose cucumbers that are firm and dark green. They should feel heavy for their size. Avoid cucumbers with soft spots or yellow skin. For the best flavor, opt for English cucumbers. They have fewer seeds and a thinner skin, making them great for salsa. Best ways to enjoy cucumber mango salsa: This salsa is fantastic as a dip with tortilla chips. It also works well as a topping for grilled fish or chicken. You can serve it on tacos for a fresh twist. It brightens up any dish with its zesty flavor. Pairing with main dishes: Cucumber mango salsa pairs perfectly with seafood, like shrimp or grilled salmon. It also complements spicy dishes, adding a cooling effect. Try it on tacos or as a side with grilled meats. The fresh taste balances rich flavors beautifully. Creative spice additions: For an extra kick, mix in diced jalapeño or a pinch of cayenne pepper. If you prefer a milder salsa, try adding bell pepper or even mango chutney. Consider fresh herbs like mint or basil for a unique touch. Achieving the right balance of flavors: Aim for a mix of sweet, sour, and salty. The mango adds sweetness, while lime juice gives a tangy twist. Use just enough salt to enhance the flavors without overpowering them. Taste as you mix, adjusting until it’s perfect. For the full recipe, refer to the main article. {{image_4}} You can change up your cucumber mango salsa with fun fruits. Try adding diced pineapple or papaya. These fruits add sweetness and zest, making your salsa even more exciting. You can also swap cilantro for fresh mint or basil. These herbs give a different flavor twist, making it unique. If you want your salsa milder, skip the jalapeño. Instead, use bell peppers for a sweet crunch. For a spicier kick, add more jalapeño or try diced serrano peppers. You can also use hot sauce or crushed red pepper flakes for heat. Just be careful; a little goes a long way! You can easily make this salsa vegan and gluten-free. All the ingredients are already plant-based, so you’re good to go! For those watching their salt, try using low-sodium options or skip the salt altogether. Your taste buds will still enjoy the fresh flavors! For the full recipe, check out the details above. To keep your cucumber mango salsa fresh, store it in an airtight container. This method prevents air from drying it out. Place the salsa in the fridge right after making it. Avoid letting it sit out, as warm temperatures can spoil the flavors. If you have leftovers, try to eat them within two to three days. The longer it stays, the less fresh it will taste. You can freeze cucumber mango salsa, but it may change texture. If you freeze it, use a freezer-safe container. Leave some space for expansion as it freezes. When you’re ready to use it, thaw it in the fridge overnight. This keeps the salsa cool and fresh. After thawing, stir it well to mix the ingredients again. Cucumber mango salsa can stay in the fridge for about three days. After that, it may lose its crispness and flavor. Signs of spoilage include a sour smell or slimy texture. If you notice any of these signs, it’s best to throw it away. Always trust your senses when deciding if food is safe to eat. For the full recipe, check out the earlier section! You can enjoy cucumber mango salsa with many dishes. Here are my top picks: - Grilled chicken or fish for a fresh taste - Tortilla chips for a crunchy snack - Tacos or burritos for a zesty kick - Salads to add a burst of flavor - Quesadillas for a delightful pairing This salsa adds a bright touch to any meal. Feel free to mix and match! Making cucumber mango salsa is quick and easy. Here’s the breakdown: - Prep Time: 15 minutes - Total Time: 45 minutes (includes chilling) You can whip this up fast, and letting it chill helps the flavors blend. Yes, you can use frozen mango. Here’s what you need to know: - Frozen mango is convenient and often just as sweet as fresh. - Thaw it before using to avoid extra water in your salsa. - Fresh mango will have a firmer texture, while frozen may be softer. Both options taste great, so choose what works best for you! Cucumber mango salsa is not just tasty; it’s also healthy. Here are some benefits: - Cucumbers are hydrating and low in calories. - Mangoes are high in vitamins A and C, boosting your immune system. - Cilantro has antioxidants that may improve health. - Lime juice adds vitamin C and aids digestion. This salsa is a fresh, healthy choice for your meals. Enjoy the flavors and health benefits! Cucumber mango salsa is fresh, tasty, and easy to make. You learned about the key ingredients like ripe mango and cucumber. We covered how to mix them and make a simple dressing. You got tips for selecting the best ingredients and ideas for serving. Feel free to add your unique twists or adjust the spice levels. Enjoy every bite and share this salsa with friends. It’s a fun way to bring brightness to your meals while being healthy. Your kitchen adventures just got better!

Cucumber Mango Salsa Refreshing and Zesty Treat

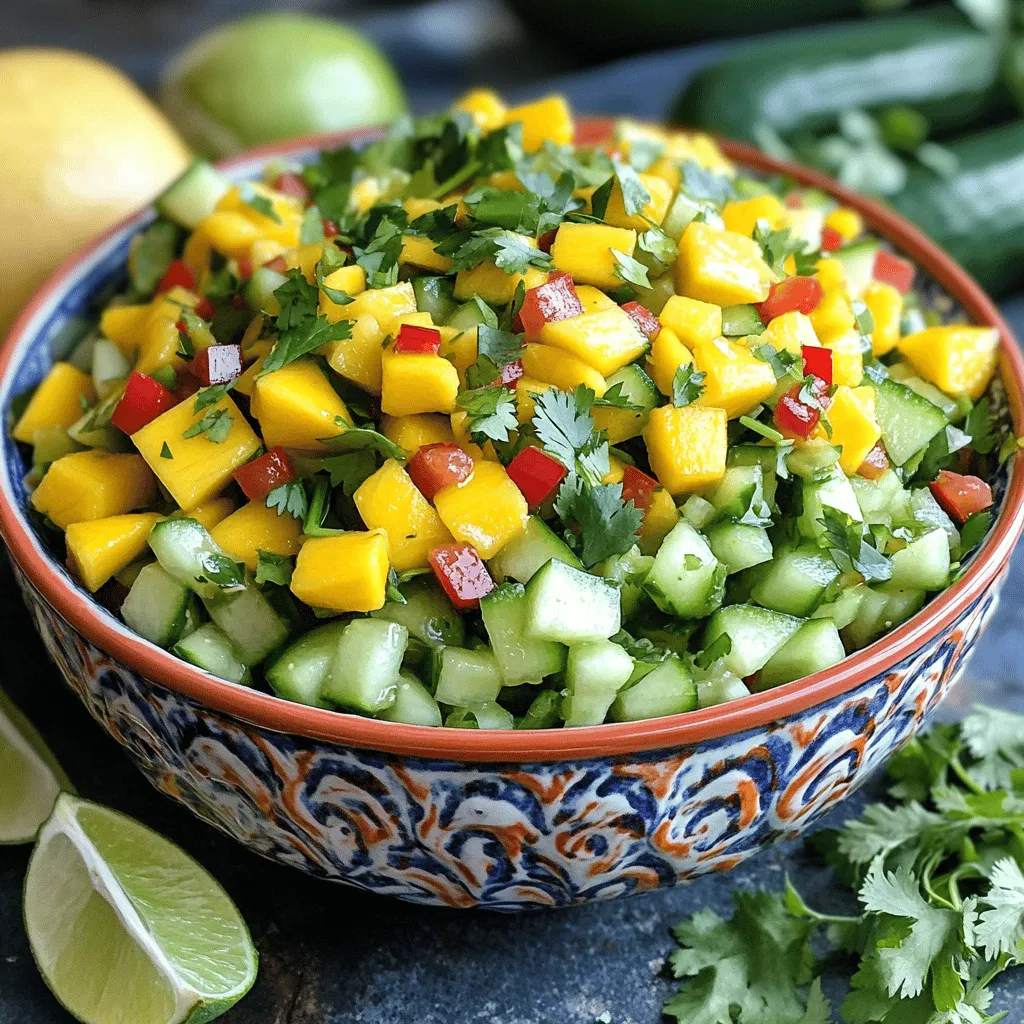
Looking for a burst of flavor that’s both refreshing and zesty? Cucumber Mango Salsa is just what you need! This

To make a tasty Baked Zucchini Parmesan Casserole, gather these ingredients: - 4 medium zucchinis, thinly sliced - 2 cups marinara sauce (store-bought or homemade) - 1 cup ricotta cheese - 1 cup grated Parmesan cheese - 1 cup shredded mozzarella cheese - 2 cloves garlic, minced - 1 teaspoon dried basil - 1 teaspoon dried oregano - Salt and freshly cracked black pepper to taste - 1 tablespoon olive oil - 1 cup breadcrumbs (preferably seasoned) - Fresh basil leaves for garnish You can swap some ingredients based on your taste or what you have at home. Try these ideas: - Use eggplant instead of zucchini for a different flavor. - Substitute cottage cheese for ricotta for a lighter option. - Swap mozzarella with provolone for a stronger taste. - Instead of marinara, use pesto for a fresh twist. - Use gluten-free breadcrumbs for a gluten-free dish. To ensure your casserole turns out well, measure carefully. Here are my tips: - Use dry measuring cups for solids like cheese and breadcrumbs. - Level off ingredients with a knife for precise measurements. - When using liquids, check the measurement at eye level. - For herbs, crushed or dried options can be more potent, so adjust as needed. - Keep your ingredients fresh for the best flavor and texture. For more details, check out the Full Recipe. To start, gather all your ingredients. You need fresh zucchini, marinara sauce, ricotta cheese, Parmesan cheese, mozzarella cheese, garlic, and spices. First, preheat your oven to 375°F (190°C). Next, slice the zucchinis thinly. Place the slices in a bowl and sprinkle them with salt. Let them sit for 15 minutes. This helps remove excess water, so your casserole won’t be soggy. After 15 minutes, pat the zucchini dry with paper towels. In a skillet, heat olive oil over medium heat. Add minced garlic and cook it for a minute until fragrant. Then, add the zucchini slices. Sauté them for 5 to 7 minutes. You want them soft but still firm. Once done, set the skillet aside. In another bowl, mix ricotta cheese, half of the grated Parmesan, dried basil, dried oregano, salt, and pepper. Stir until combined. Grab a 9x13 inch baking dish. Spread a thin layer of marinara sauce on the bottom. Then, layer half of the sautéed zucchini on top. Follow this with half of the ricotta mixture. Spread more marinara sauce over the ricotta. Repeat the layers with the rest of the zucchini and ricotta. Finish with mozzarella cheese, the remaining Parmesan, and breadcrumbs on top. Now, cover the dish tightly with aluminum foil and bake for 25 minutes. After that, remove the foil and bake for another 15 minutes. The top should be golden brown and bubbly. Let it cool for 10 minutes before serving. Enjoy your delicious Baked Zucchini Parmesan Casserole! For the full recipe, check out the earlier section. To get the best texture in your casserole, start by salting the zucchini. This step helps remove excess water. Let the zucchini rest for 15 minutes, then pat it dry. This will keep your casserole from becoming soggy. Cook the zucchini until it is tender but still firm. This gives a nice bite in each serving. You can boost the flavor by adding more herbs. Fresh basil adds a bright taste. Try mixing in some red pepper flakes for a little heat. A splash of balsamic vinegar can also deepen the flavor. If you love cheese, sprinkle some extra Parmesan on top before baking. The cheese will melt and create a tasty crust. One common mistake is skipping the salting step. This can lead to a watery dish. Another mistake is packing the layers too tightly. Make sure to spread each layer evenly. Lastly, don’t skip letting it cool before serving. This way, it holds its shape better on the plate. With these tips, your Baked Zucchini Parmesan Casserole will shine. For a full recipe, check out the section above. {{image_4}} You can make Baked Zucchini Parmesan Casserole gluten-free. Use gluten-free breadcrumbs instead of regular ones. This small change keeps the dish tasty without gluten. You can also check the marinara sauce for gluten. Most brands are safe, but it’s always good to read the label. This casserole is already vegetarian, but you can add more veggies. Try adding mushrooms, bell peppers, or spinach. These will add flavor and nutrition. You can also swap ricotta for a tofu mixture if you want a dairy-free option. Blend tofu with nutritional yeast and a bit of lemon juice for a creamy texture. Get creative with your casserole by adding extra flavors. Consider mixing in cooked ground turkey or chicken for protein. You can also add fresh herbs like thyme or parsley for a bright taste. For a spicy kick, toss in some red pepper flakes or jalapeños. These little changes can make your casserole unique and fun! For the full recipe, check out the detailed instructions above. To keep your baked zucchini parmesan casserole fresh, let it cool first. After it cools, cover it tightly with plastic wrap or aluminum foil. You can also place it in an airtight container. Store it in the fridge for up to three days. If you want to keep it longer, freezing is a great choice. Reheat your casserole in the oven for the best results. Preheat the oven to 350°F (175°C). Place the casserole in an oven-safe dish and cover it with foil. Bake for about 20-25 minutes or until it's hot all the way through. If you prefer the top crispy, remove the foil during the last 5 minutes. You can also reheat individual servings in the microwave. Just cover the dish with a microwave-safe lid and heat for 2-3 minutes. If you want to freeze the casserole, follow these steps. First, let it cool completely. Then, cut it into portions. Wrap each piece in plastic wrap, then place them in a freezer-safe bag or container. Label it with the date. You can freeze the casserole for up to three months. To enjoy, thaw it in the fridge overnight and reheat as mentioned above. This method keeps the flavors and texture intact. Baked Zucchini Parmesan Casserole takes about 60 minutes to cook. This includes 25 minutes covered and 15 minutes uncovered in the oven. You want the top to be golden and bubbly. Yes, you can make Baked Zucchini Parmesan Casserole ahead of time. Prepare it up to the baking step. Cover it and store it in the fridge for up to 24 hours. When ready to bake, add a few extra minutes to the cooking time. You can serve Baked Zucchini Parmesan Casserole with a crisp side salad. A slice of rustic bread also pairs well. Both options add freshness and help balance the rich flavors. For the full recipe, check out the detailed instructions above. In this blog post, we explored every aspect of making a Baked Zucchini Parmesan Casserole. From the full list of ingredients to helpful substitutions and measuring tips, we set you up for success. I provided clear steps for preparation, cooking, and assembly. You also learned ways to enhance flavor and avoid common mistakes. Keep these tips in mind as you experiment with variations, storage, and reheating methods. Now, enjoy making this dish your own and share it with family and friends.

Baked Zucchini Parmesan Casserole Easy and Tasty Meal

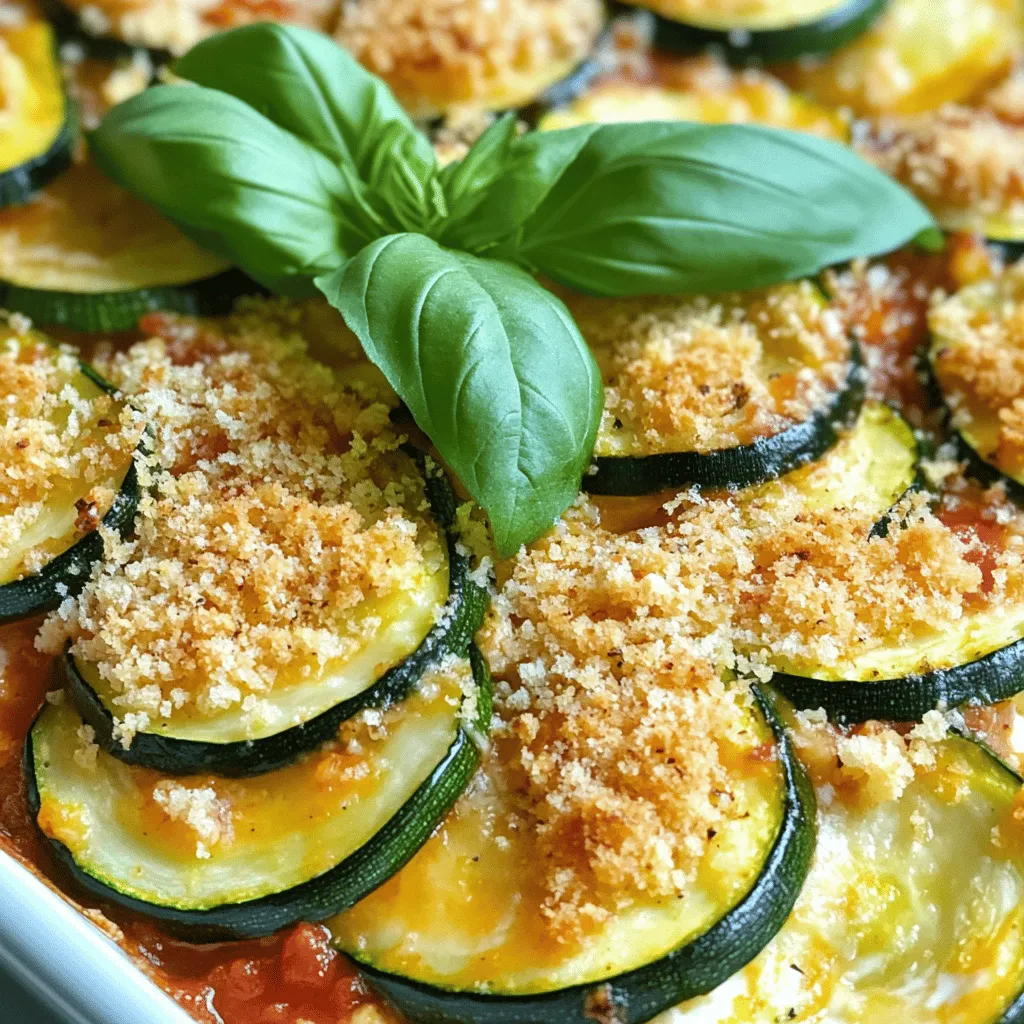
Are you ready to enjoy a warm and cheesy dish that’s both easy to make and full of flavor? This

- 2 ripe peaches, pitted and chopped - 1 cup Greek yogurt - 1/2 cup cream cheese, softened - 1/2 cup milk (dairy or non-dairy) - 2 tablespoons honey or maple syrup - 1 teaspoon pure vanilla extract - 1/4 teaspoon ground cinnamon - Ice cubes for texture - Additional toppings (whipped cream, peach slices) Making a peach cheesecake smoothie is simple and fun. You need fresh, ripe peaches for the best taste. The Greek yogurt adds creaminess, while the cream cheese brings that cheesecake flavor. Choose your milk, whether it's dairy or non-dairy, based on your preference. For sweetness, honey or maple syrup works well. I often use honey, but maple syrup is a great option too. Adding vanilla extract gives a nice depth, while a dash of cinnamon adds warmth. If you want a colder drink, add ice cubes. You can also top your smoothie with whipped cream and peach slices for a beautiful presentation. These ingredients all come together to create a creamy, refreshing drink that is perfect for any time of day. For the complete recipe, including instructions, check out the Full Recipe. To start, you need to prepare your peaches. First, wash them under cold water. If you want a smoother drink, peel the peaches. Use a knife to slice off the skin. After that, cut the peaches in half, remove the pit, and chop them into small chunks. Set these aside while you gather your other ingredients. Next, combine the base ingredients in a blender. Add the chopped peaches, Greek yogurt, softened cream cheese, and milk. Then, include your sweetener, vanilla extract, and ground cinnamon. This mix will create a rich and creamy base for your smoothie. Now, it’s time to blend. Turn your blender on high speed and mix until everything is smooth and creamy. Don’t forget to stop and scrape down the sides of the blender. This ensures all ingredients blend well. For a thicker texture, add ice cubes into the blender. Pulse the mixture again until it transforms into a frosty smoothie. If it’s too thick, you can pour in more milk bit by bit to reach your desired consistency. After blending, taste your smoothie. If it needs more sweetness, add extra honey or maple syrup. Blend briefly to mix in the new ingredients. When you’re ready to serve, pour the smoothie into chilled glasses. This keeps it refreshing. For a fun touch, top each glass with whipped cream and a fresh peach slice. It makes your drink look as good as it tastes! To blend your Peach Cheesecake Smoothie evenly, start with softer ingredients. Place the Greek yogurt and cream cheese at the bottom. This helps the blender run smoothly. Cut the peaches into small pieces to help them blend better. If your mixture is too thick, add a splash of milk. This helps it blend easily without leaving chunks. If you want a dairy-free smoothie, use coconut yogurt instead of Greek yogurt. Almond or oat milk works well too. For sweeteners, try using agave syrup or stevia if you want fewer calories. These options keep your smoothie tasty without adding too much sugar. Serving your smoothie in decorative glassware makes it look fancy. Choose tall glasses for a beautiful display. To garnish, use whipped cream on top. Add peach slices on the rim for a colorful touch. A sprig of mint can add a pop of green and freshness. These small details make your smoothie not only delicious but also gorgeous! {{image_4}} You can switch up the flavor of your Peach Cheesecake Smoothie easily. Try adding other fruits like strawberries or mangoes. These fruits add a fun twist and new taste. You can also mix in protein powder for a nutritional boost. This makes the smoothie more filling and great for post-workout. If you want a thicker smoothie, consider making it a smoothie bowl. You can pour it into a bowl instead of a glass. Top it with your favorite fruits, nuts, or seeds for added crunch. Adding oats or granola will give your smoothie more texture. This makes each sip interesting and satisfying. You can explore seasonal peach alternatives when peaches are not in season. Try using nectarines or apricots for a similar taste. Mixing in spices can also change the flavor. For fall, a pinch of pumpkin spice can add warmth. In winter, cinnamon or nutmeg can make it cozy and inviting. To store your Peach Cheesecake Smoothie, pour any leftovers into a sealed container. It’s best to keep it in the fridge. The smoothie will stay fresh for about one to two days. After that, the taste and texture can change. Always give it a quick stir before enjoying it again! You can freeze the smoothie for later use. Pour it into ice cube trays or freezer-safe bags. This way, it’s easy to grab a portion. To thaw, place the smoothie in the fridge overnight. If you need it fast, run warm water over the bag for a few minutes. If your smoothie separates after storage, don’t worry! Just re-blend it to bring back the creaminess. For thawed smoothies, check for any changes in texture. If it feels grainy, add a splash of milk or yogurt and blend again. Always ensure the ingredients are safe to consume. To create a vegan peach cheesecake smoothie, swap out dairy ingredients. Use plant-based yogurt in place of Greek yogurt. For cream cheese, choose a vegan cream cheese product. Instead of regular milk, almond or oat milk works well. You can still sweeten with maple syrup for a hint of sweetness. This version remains creamy and delicious while being plant-friendly. Yes, you can use frozen peaches! Frozen fruit adds a thick, creamy texture. It makes the smoothie cold and refreshing, perfect for hot days. Just blend the frozen peaches straight from the freezer. You may need to adjust the milk to get your desired consistency. This is a great way to enjoy the flavor of peaches all year round. This smoothie packs many health benefits. Greek yogurt is rich in protein and probiotics, which help your gut. Peaches are low in calories and high in vitamins A and C. They also contain antioxidants that support your skin and overall health. The honey or maple syrup adds natural sweetness without extra refined sugar. Enjoying this smoothie can be a tasty way to fuel your body! This article covered how to make a peach cheesecake smoothie. You learned about key ingredients, blending techniques, and fun variations. I shared tips for storage and presentation too. Remember, this smoothie is versatile and can fit your tastes. You can enjoy its creamy goodness while getting a dose of nutrition. Experiment with flavors to keep it exciting. Happy blending!

Peach Cheesecake Smoothie Creamy and Refreshing Drink

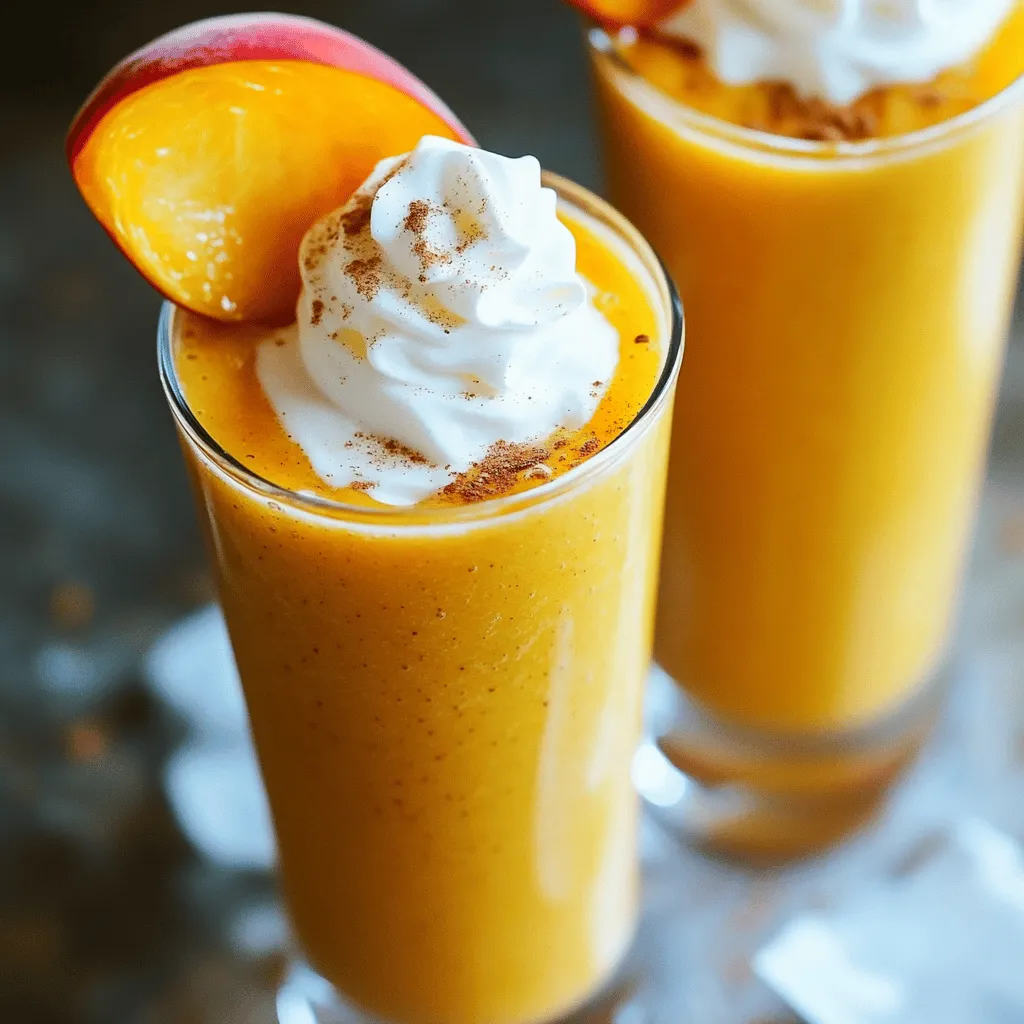
Craving a refreshing treat that feels like dessert? Let me introduce you to the Peach Cheesecake Smoothie. This creamy drink

- Zucchini and Carrots - You need 2 cups of finely grated zucchini. This is about 2 medium zucchinis. - You also need 1 cup of finely grated carrots, which is around 2 medium carrots. - Dry Ingredients - For the dry mix, gather 1 ½ cups of all-purpose flour. - Add 1 teaspoon of baking soda and 1 teaspoon of baking powder. - Include ½ teaspoon of fine salt, 1 teaspoon of ground cinnamon, and ½ teaspoon of ground nutmeg. - Wet Ingredients - For the wet mix, use ¾ cup of granulated sugar and ½ cup of packed brown sugar. - Crack in 3 large eggs, then pour in ½ cup of vegetable oil. - Finally, add 1 teaspoon of vanilla extract for flavor. - Optional Add-ins - If you want some crunch, add ½ cup of chopped walnuts or pecans. - For a sweet touch, consider ½ cup of raisins or dried cranberries. Using fresh, quality ingredients makes a big difference in taste. Each component adds flavor and moisture, creating a bread that is both healthy and delightful. If you want to try this recipe, check out the Full Recipe for more details. - Oven Temperature: Start by setting your oven to 350°F (175°C). This is the perfect temperature for baking. - Preparing the Loaf Pan: Take a 9x5-inch loaf pan and grease it well. You can also lightly flour it or use parchment paper for easy removal. - Drain Vegetables: Grate your zucchini and carrots. Let them sit in a bowl for a few minutes. This helps drain the extra moisture. - Mix Dry Ingredients: In a separate bowl, whisk together 1 ½ cups all-purpose flour, 1 teaspoon baking soda, 1 teaspoon baking powder, ½ teaspoon fine salt, 1 teaspoon ground cinnamon, and ½ teaspoon ground nutmeg. Make sure there are no lumps. - Combine Wet Ingredients: In another bowl, mix ¾ cup granulated sugar, ½ cup packed brown sugar, 3 large eggs, ½ cup vegetable oil, and 1 teaspoon vanilla extract. Whisk until smooth and combined. - Combine All Mixtures: Slowly add the wet mix to the dry mix. Stir gently with a spatula until just combined. It's okay if there are a few lumps. - Baking Instructions: Pour the batter into your prepared loaf pan. Bake in the oven for 50-60 minutes. Use a toothpick to check if it’s done. If it comes out clean or with a few moist crumbs, it’s ready. - Cooling Process: Let the bread cool in the pan for about 10 minutes. Carefully remove it and place it on a wire rack to cool completely before slicing. Make sure to refer to the Full Recipe for more details. Enjoy your baking! - Moisture Management: Zucchini and carrots hold a lot of water. To avoid a soggy bread, you want to squeeze out some moisture. After grating, let them sit for a few minutes. Then, use your hands to press out extra water before adding them to the batter. This keeps your bread fluffy and light. - Mixing Techniques: When mixing wet and dry ingredients, do it gently. Overmixing can make your bread tough. Stir until just combined, leaving a few lumps. This will help your bread stay soft and tender. - Storing Leftovers: To keep your bread fresh, wrap it tightly in plastic wrap or foil. Store it at room temperature for up to three days. For longer storage, slice the bread and freeze it. You can take out slices as needed. - Best Serving Practices: Serve your zucchini carrot bread warm for the best taste. A thin slice of butter complements the flavors well. For a fun touch, add a sprinkle of powdered sugar on top. You can also garnish with thin slices of fresh zucchini or carrot for a nice look. Enjoy! {{image_4}} You can swap all-purpose flour for whole wheat flour. This change adds fiber and nutrients. It can also give your bread a richer taste. If you're gluten-free, try almond flour or a gluten-free blend. For less sugar, use honey or maple syrup. Both add a unique flavor. They can also make your bread moist and sweet. If you want a lower-calorie option, consider using a sugar substitute like stevia. You can add more spices to give your bread a twist. Try adding ginger for warmth or cardamom for a floral note. A pinch of cloves can also bring a cozy flavor. Experiment and find what you love! Mix-ins can take your bread to a new level. Toss in chocolate chips for sweetness or coconut flakes for a tropical touch. You can also add seeds like chia or flax for extra crunch and nutrition. - Calories: Each slice of Zucchini Carrot Bread has about 180 calories. - Key Nutrients: This bread is rich in vitamin A from carrots and provides fiber from zucchini. It also offers potassium, which helps with heart health. Zucchini and carrots bring many health benefits to this bread. - Zucchini: This veggie is low in calories and high in water. It helps keep you full without adding too many calories. Zucchini also has vitamins C and A, which support your immune system and vision. - Carrots: Carrots are famous for being good for your eyes. They are loaded with beta-carotene, which turns into vitamin A in your body. Carrots also provide fiber, promoting healthy digestion. Together, these ingredients create a snack that is not only tasty but also good for you. Eating this bread can help you meet your daily veggie needs. Plus, it feels indulgent while still being healthy. Enjoying a slice can make you feel good inside and out, and trust me, you won't even miss the empty calories! Can I use frozen zucchini? Yes, you can use frozen zucchini. Thaw it first and drain excess water. This helps keep the bread moist without being soggy. How do I know when it's done baking? Check for doneness by inserting a toothpick in the center. If it comes out clean or with a few moist crumbs, it’s ready. What can I serve with Zucchini Carrot Bread? You can serve it warm with butter or cream cheese. It pairs well with a cup of tea or coffee, too. Can I make it gluten-free? Yes, you can make it gluten-free. Use a gluten-free flour blend instead of all-purpose flour. This will give you a similar texture and taste. For the complete recipe, check out the Full Recipe section. Here's how to make Zesty Zucchini Carrot Bread. This recipe is simple yet delightful. Ingredients: - 2 cups finely grated zucchini (approximately 2 medium zucchinis) - 1 cup finely grated carrots (approximately 2 medium carrots) - 1 ½ cups all-purpose flour - 1 teaspoon baking soda - 1 teaspoon baking powder - ½ teaspoon fine salt - 1 teaspoon ground cinnamon - ½ teaspoon ground nutmeg - ¾ cup granulated sugar - ½ cup packed brown sugar - 3 large eggs - ½ cup vegetable oil - 1 teaspoon vanilla extract - ½ cup chopped walnuts or pecans (optional) - ½ cup raisins or dried cranberries (optional) Instructions Summary: 1. Preheat your oven to 350°F (175°C). Prepare a 9x5-inch loaf pan. 2. Grate the zucchini and carrots. Let them drain to remove extra moisture. 3. In a bowl, mix flour, baking soda, baking powder, salt, cinnamon, and nutmeg. 4. In another bowl, whisk together sugars, eggs, oil, and vanilla until smooth. 5. Add the wet mix to the dry mix. Stir gently; don’t overmix. 6. Squeeze out moisture from the zucchini and carrots, then fold them in. 7. Pour the batter into the loaf pan. Smooth the top with a spatula. 8. Bake for 50-60 minutes until a toothpick comes out clean. 9. Cool the bread in the pan for 10 minutes, then on a wire rack. This Zucchini Carrot Bread is a treat for the senses. You can enjoy it warm with butter or sprinkle a little powdered sugar for a sweet touch. The flavors blend so well, and it’s a great way to sneak in healthy veggies. Try this Full Recipe for a delicious baking adventure! This blog post explored how to create delicious Zucchini Carrot Bread. You learned about the key ingredients and how to prepare them. I shared tips for mixing and baking to ensure perfect results. We discussed storage and serving ideas, plus ways to customize flavors. In closing, this bread not only tastes good but is also healthy. Try it today for a fun baking experience!

Zucchini Carrot Bread Flavorful and Healthy Delight

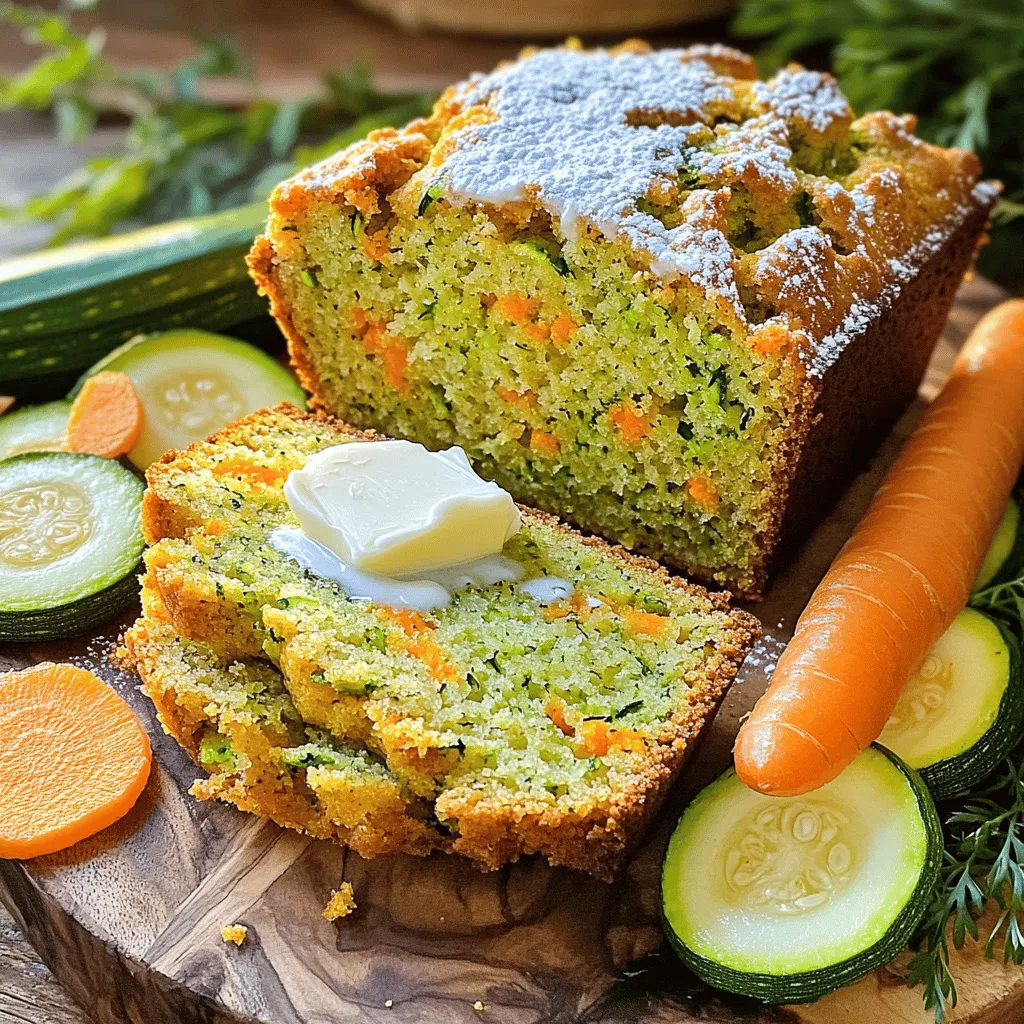
Looking for a tasty and healthy treat? Zucchini Carrot Bread is your answer! This delicious recipe combines fresh zucchini and

For a refreshing cucumber basil lemonade, gather these simple ingredients: - 1 large cucumber, peeled and diced - 1 cup fresh basil leaves, loosely packed - 1 cup freshly squeezed lemon juice (approximately 4-5 medium lemons) - 3/4 cup honey or agave syrup (sweetness can be adjusted to taste) - 4 cups cold water - Ice cubes - Optional garnishes (lemon slices, basil sprigs) Using fresh ingredients makes a big difference. The cucumber adds a cool, crisp flavor. The basil brings a pleasant herbal note. Fresh lemon juice gives it that bright, tangy kick. You can adjust the sweetness to match your taste by adding more or less honey. This recipe is flexible, so feel free to experiment with the amounts. For a fun twist, you can even try other herbs! Check out the Full Recipe for more details on how to make it. 1. First, get your large cucumber and peel it. Dice it into small pieces. 2. Place the diced cucumber and fresh basil leaves into your blender. 3. Add 1 cup of water to help everything blend well. 4. Blend on high until the mixture is smooth and creamy. 5. Now, take a fine mesh sieve and place it over a large pitcher. 6. Pour the blended mixture into the sieve to strain it. 7. Use the back of a spoon to press down on the solids. 8. Make sure to extract as much liquid as you can. Discard the solids. 9. Next, pour in 1 cup of freshly squeezed lemon juice into the pitcher. 10. Add 3/4 cup of honey or agave syrup to the lemon juice. 11. Use a whisk or a spoon to mix everything until the sweetener dissolves. 1. Now, add 3 cups of cold water to the pitcher. 2. Stir the mixture again until it is well combined. 3. Taste your lemonade and see if you want it sweeter. 4. If needed, add more honey or agave syrup to reach your desired sweetness. 5. Cover the pitcher and place it in the fridge for at least 30 minutes. 6. This chilling time helps the flavors blend together nicely. 7. When ready to serve, fill your glasses with ice cubes. 8. Pour the chilled cucumber basil lemonade over the ice. 9. For a nice touch, garnish each glass with a slice of lemon and a basil sprig. For the full recipe, refer to the details above. Enjoy your refreshing drink! To make a smooth cucumber basil lemonade, start with fresh ingredients. A ripe cucumber gives a crisp taste, while fresh basil adds a lovely aroma. When blending, cut the cucumber into small pieces. This helps the blender work faster and blend well. - Use a good-quality blender for best results. - Add a cup of cold water with the cucumber and basil to help the blend. Fresh ingredients are key for this drink. They provide vibrant flavor and color. Fresh basil leaves should be bright green and fragrant. This ensures you get the best taste and aroma in your lemonade. Adjusting the sweetness is simple. If you want a sweeter drink, add more honey or agave syrup. Start with the recommended 3/4 cup. Then, taste the mixture. If it’s not sweet enough, add a little more. If you prefer natural sweeteners, try these options: - Maple syrup offers a rich, unique flavor. - Coconut sugar adds a hint of caramel. - Stevia is a zero-calorie option for a light touch of sweetness. With these tips, you can make your cucumber basil lemonade just the way you like it. For the full recipe, check out the earlier section. {{image_4}} You can change the taste of cucumber basil lemonade by adding fruits. Strawberries and watermelon work great here. Just blend them with the cucumber and basil. This will give your drink a fun twist and new colors. Using flavored sweeteners can also change the taste. Ginger adds a spicy kick, while mint gives a cool touch. You can use these sweeteners instead of honey or agave. Feel free to mix and match until you find your favorite flavor! Garnishing your drink makes it look nice and taste better. Adding lemon slices on the rim of the glass is simple yet effective. You can also use fresh basil sprigs for a pop of green. These little touches make your lemonade more inviting. Pairing your cucumber basil lemonade with food can enhance your meal. This drink goes well with light dishes like salads or grilled chicken. It also complements spicy foods, as it cools the palate. You can enjoy it at picnics or barbecues for a perfect summer treat. Explore the [Full Recipe] to discover how to make this refreshing drink! To keep your cucumber basil lemonade fresh, store it in the fridge. Use a clean, airtight container or a pitcher with a lid. This will help lock in the flavors and aromas. Make sure to pour it into the container without any ice. Ice can make the drink watery and less enjoyable. The shelf life of cucumber basil lemonade is about three days. After that, the taste may change. It’s best to consume it within this time for the best flavor. If you notice any off smell or taste, it’s time to toss it. If you want to save some for later, freezing is a great option. Pour the lemonade into ice cube trays. This way, you can freeze it in small portions. Once frozen, transfer the cubes to a freezer bag. Make sure to label the bag with the date. When you want to enjoy it again, simply thaw the cubes in the fridge overnight. You can also drop them into a glass of water or soda for a cool drink. Enjoy your cucumber basil lemonade as a refreshing treat any time! Can I use bottled lemon juice instead of fresh? Yes, you can use bottled lemon juice. However, fresh lemon juice tastes better. It has a bright flavor and more nutrients. Fresh lemons also add a lovely aroma. How long does cucumber basil lemonade last in the fridge? Cucumber basil lemonade lasts for about three to five days in the fridge. Keep it in a sealed container. The flavors may change slightly over time, but it will still taste great. Is it possible to make this drink sugar-free? Yes, you can make this drink sugar-free. Use a sugar substitute like stevia or monk fruit. Adjust the amount based on your taste. This way, you can enjoy the drink without added sugar. What are the health benefits of cucumber and basil? Cucumber is hydrating and low in calories. It helps keep your skin fresh. Basil has anti-inflammatory properties. It can help with digestion and boost your mood. Together, they make a healthy drink choice. For the full recipe of cucumber basil lemonade, check out the recipe section. This blog post covered how to make a refreshing cucumber basil lemonade. You learned about the key ingredients, simple steps, and tips for the best taste. I shared ways to adjust sweetness and enhance flavors with fruits. Lastly, I discussed storage options for leftovers and answered frequent questions. Try this drink next time you need something cool and tasty. Enjoy the fresh flavors and make it your own!

Cucumber Basil Lemonade Refreshing Summer Drink

Ready to beat the summer heat? My Cucumber Basil Lemonade is your go-to drink for refreshment! This blend of cool

Older posts
Newer posts
← Previous Page1 … Page40 Page41 Page42 … Page68 Next →

dsad

© 2025 tastymomrecipes • Built with GeneratePress

Our Policies

  • Copyright Policy
  • Cookie Policy
  • GDPR Policy
  • Privacy Policy
  • Disclaimer
  • Terms Of Use

More Information

  • Home
  • About
  • Contact
  • Appetizers
  • Dessert
  • Dinner
  • Drinks
©2025, tastymomrecipes About Back To Top