Skip to content
DisclaimerTerms Of UseGDPR PolicyCookie Policy

tastymomrecipes

  • Home
  • Drinks
  • Appetizers
  • Dinner
  • Dessert
  • About
  • Contact
  • Privacy Policy
DisclaimerTerms Of UseGDPR PolicyCookie Policy

Olivia

- 4 cups fresh broccoli florets - 1 medium onion, finely chopped - 2 cloves garlic, minced - 3 cups vegetable broth - 1 cup heavy cream - 2 cups shredded sharp cheddar cheese - 1 teaspoon mustard powder - Salt and freshly ground black pepper to taste - 2 tablespoons extra virgin olive oil When I make broccoli cheddar soup, I love using fresh ingredients. Fresh broccoli gives the soup a vibrant color and a great taste. I often start with a medium onion. It adds a sweet base to the soup. Garlic comes next; it brings a warm, rich flavor that makes everything better. For the broth, I prefer vegetable broth. It blends well with the flavors of the broccoli and cheese. Heavy cream is key for that creamy texture. I use sharp cheddar cheese because it melts perfectly and has a strong taste that shines through. You can also adjust the seasoning. A little salt and black pepper can elevate the soup. I like to use extra virgin olive oil for sautéing. It adds a nice touch of flavor, too. - Ideas for lower-calorie options: You can use low-fat milk instead of heavy cream. This makes the soup lighter but still tasty. - Plant-based cheese alternatives: If you want a vegan option, use plant-based cheese. There are many good ones that melt well. - Gluten-free ingredient options: This recipe is naturally gluten-free. Just make sure your broth is gluten-free as well. These substitutions keep the soup enjoyable while catering to different diets. You can easily make it your own! - Chopping vegetables First, chop the onion into small pieces. Next, mince the garlic. Then, cut the broccoli into florets. Make sure they are all similar in size for even cooking. - Simmering the broth In a large pot, pour in the vegetable broth. Heat the broth on medium until it starts to simmer. This will help the flavors blend better as you add the other ingredients. - Sautéing onions and garlic Add the olive oil to the pot once it is hot. Toss in the chopped onion and cook for about five minutes. You want the onion to turn soft and clear. Next, add the minced garlic and cook for one more minute. This step adds a rich flavor. - Cooking broccoli and blending the soup Now, add the broccoli florets to the pot. Stir and let them cook for about three minutes. After that, pour in the simmering vegetable broth. Let everything cook for 10 to 15 minutes until the broccoli is tender. Then, use an immersion blender to blend the soup until smooth. If you don’t have one, use a regular blender in batches. - Incorporating cream and cheese Once blended, return the soup to the pot if needed. Stir in the heavy cream and mustard powder until mixed evenly. Gradually add the shredded cheddar cheese, stirring until it melts. - Adjusting seasoning Taste the soup and add salt and pepper as needed. If it is too thick, you can add more broth or cream to reach your desired thickness. Heat the soup gently, but do not let it boil. For the full recipe, check the complete list of steps. To avoid overcooked broccoli, watch the cooking time closely. Cook it just until it is bright green and tender. This keeps the broccoli crunchy and vibrant. For the cheese, use sharp cheddar. Its strong flavor pairs perfectly with the soup. You can also mix in some Gruyère for extra creaminess and taste. Garnish your soup for a beautiful look. A sprinkle of shredded cheese and whole broccoli florets on top works well. You can also drizzle a little cream in the center for a fancy touch. Pair your soup with crusty bread or a fresh salad. A light, green salad adds a nice crunch and balances the meal. Watch for issues with soup consistency. If the soup is too thick, add more broth or cream. Blend the soup until silky and smooth. If you don’t blend long enough, you’ll have chunks of broccoli. This can change the soup's texture and overall enjoyment. For the best results, blend thoroughly. {{image_4}} You can change your broccoli cheddar soup by adding different vegetables. Carrots and cauliflower blend well. They add color and flavor. You can also try adding peas for a sweet touch. If you like spice, add jalapeños. Chop them finely and add them when you sauté the onions. This gives the soup a nice kick without overpowering the cheese. For a vegan option, replace heavy cream with coconut milk. Use vegan cheese instead of cheddar. You can also skip the cheese for a lighter soup. Just make sure to keep the seasonings balanced. If you're watching carbs, try using cauliflower in place of broccoli. It still gives a nice texture and flavor. You can also skip the cream or use a low-carb milk alternative. In French-style broccoli cheddar soup, add a touch of nutmeg. It enhances the cheese's flavor. You can also stir in some white wine for depth. For an Italian twist, add sun-dried tomatoes and fresh basil. This gives your soup a rich, tangy twist that pairs well with the cheddar. You can even sprinkle some Parmesan on top for extra flavor. For the complete recipe, check the Full Recipe. To keep your broccoli cheddar soup fresh, store it in an airtight container. Let the soup cool down first. Once cooled, place it in the fridge. It will stay good for about 3 to 4 days. Make sure to reheat only the portion you plan to eat. This way, the rest stays fresh longer. If you want to save soup for later, freezing is a great option. Let the soup cool completely before pouring it into freezer-safe bags. Remove as much air as possible before sealing. You can store it for up to 3 months. When you are ready to eat, thaw the soup overnight in the fridge. Reheat it gently on the stove, stirring often. You can get creative with leftover soup! Use it as a base for pasta dishes or casseroles. Mix in cooked rice for a quick meal. You can also add more veggies or proteins to make a hearty stew. This way, you can transform your soup into something new and exciting! You can easily make a dairy-free version. For cream, use coconut cream or cashew cream. Both options add rich flavor. For cheese, try nutritional yeast or dairy-free cheddar. These will give you that cheesy taste without dairy. Yes, you can use frozen broccoli. It is quick and easy. Just remember to adjust your cooking time. Frozen broccoli cooks faster than fresh. Add it to the pot and simmer for about 5 to 7 minutes. This keeps the broccoli tender but not mushy. This soup pairs well with many sides. Try a crusty bread or a fresh salad. A light Caesar salad adds crunch and flavor. You can also serve it with grilled cheese for a cozy meal. There are a few ways to thicken your soup. You can add more cheese to make it richer. Another option is to blend in some cooked potato. If your soup is too thin, let it simmer longer. This will help it reduce and thicken. For a quick fix, mix in a cornstarch slurry. Just combine cornstarch with cold water and stir it in. In this blog post, we explored how to make a delicious broccoli cheddar soup from scratch. We covered the key ingredients, simple steps for preparation, and cooking. I shared tips to prevent common mistakes, along with fun variations to try. Remember, you can adjust flavors and ingredients to fit your taste. Experimenting with new twists keeps the dish exciting. Use this guide to enjoy your cooking and make a hearty meal. Happy cooking!

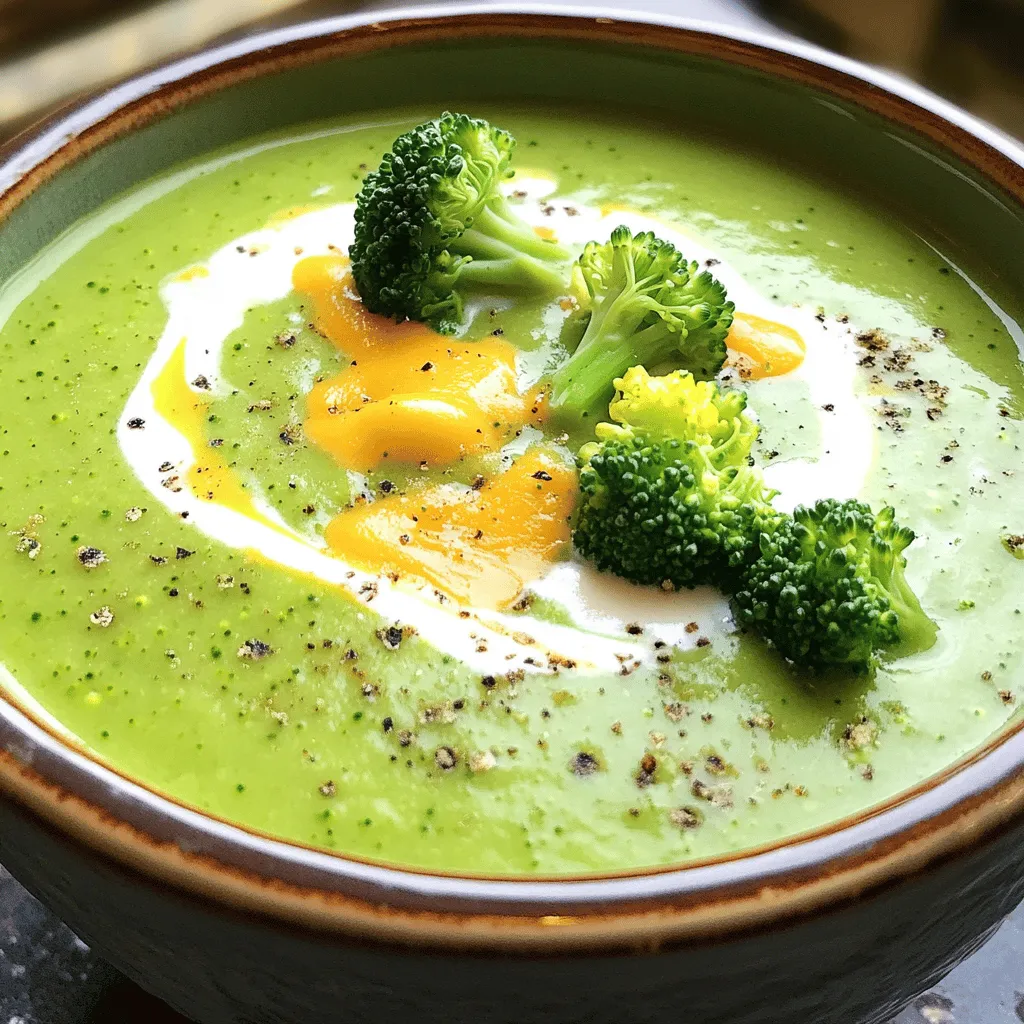
Easy Broccoli Cheddar Soup Simple and Tasty Recipe

Looking for a simple and tasty dish that warms the soul? I’ve got you covered with this Easy Broccoli Cheddar

For a delicious Chicken Zoodle Soup, gather these items: - 2 medium zucchinis, spiralized into noodles - 1 pound boneless, skinless chicken breasts - 4 cups low-sodium chicken broth - 1 medium onion, finely diced - 2 cloves garlic, minced - 2 medium carrots, sliced into rounds - 1 cup celery, sliced - 1 teaspoon dried thyme - 1 teaspoon dried oregano - Salt and freshly ground black pepper to taste - 2 tablespoons extra-virgin olive oil - Fresh parsley, chopped (for garnish) You can replace fresh ingredients with pantry staples or frozen options. Here are some ideas: - Zucchini: Use spaghetti squash or any squash you like. - Chicken: Swap for rotisserie chicken or turkey for a twist. - Carrots: Baby carrots or frozen mixed veggies work well. - Celery: Bell peppers or green beans can add crunch. - Broth: Use vegetable broth for a vegetarian option. These swaps help when you’re low on fresh items or want to try something new. This Chicken Zoodle Soup is not just tasty; it’s healthy too! Here’s a simple breakdown: - Calories: About 250 per serving - Protein: 30 grams from chicken - Carbs: 15 grams mainly from veggies - Fat: 8 grams, mostly from olive oil - Fiber: 3 grams, thanks to zucchini and carrots This soup is low in calories but high in nutrients. It’s a great choice for a light meal or when you're feeling under the weather. Enjoying a bowl of this soup helps you stay full without extra calories. To start, gather your ingredients. You need: - 2 medium zucchinis, spiralized into noodles - 1 pound boneless, skinless chicken breasts - 4 cups low-sodium chicken broth - 1 medium onion, finely diced - 2 cloves garlic, minced - 2 medium carrots, sliced into rounds - 1 cup celery, sliced - 1 teaspoon dried thyme - 1 teaspoon dried oregano - Salt and freshly ground black pepper to taste - 2 tablespoons extra-virgin olive oil - Fresh parsley, chopped (for garnish) Next, spiralize the zucchinis into zoodles. Set them aside for later. This step makes your soup light and fun! 1. First, heat the olive oil in a large pot over medium heat. 2. Add the diced onion and minced garlic. Sauté for about 3-4 minutes. You want them soft and fragrant. 3. Toss in the sliced carrots and celery. Stir occasionally for about 5 minutes. Let those veggies soften up! 4. Now, add the dried thyme, oregano, salt, and pepper. Stir well to mix the flavors. 5. Carefully pour in the chicken broth. Bring it to a rolling boil! 6. Once boiling, reduce the heat to a simmer. Add the chicken breasts. Cover the pot and let it simmer for 20 minutes. The chicken should cook through. 7. Remove the chicken from the pot. Use two forks to shred it into bite-sized pieces. 8. Return the shredded chicken back into the soup. 9. Stir in the zoodles. Let the soup simmer for 3-4 more minutes. You want the zoodles tender but still crunchy. 10. Taste your soup! Adjust the salt and pepper if needed. To shred chicken easily, wait for it to cool slightly after cooking. This makes it safer to handle. Use two forks: one to hold the chicken and the other to pull apart the meat. If you have a stand mixer, you can shred it quickly using the paddle attachment. Just be careful not to overdo it! Shredded chicken should be tender, not mushy. To cook zoodles just right, follow these simple steps. First, spiralize your zucchinis. Use a good spiralizer for even noodles. Next, heat a non-stick pan on medium heat. Add a little olive oil to the pan. Sauté the zoodles for about 2-3 minutes. You want them tender but still crisp. Overcooking makes them mushy. So, keep an eye on them! If you have leftover soup, store it properly. Let the soup cool down first. Then, pour it into an airtight container. Make sure to leave some space at the top. This helps prevent spills when freezing. You can keep it in the fridge for up to 3 days. For longer storage, freeze the soup. It stays fresh for about 2-3 months. Just remember to label it! To take your Chicken Zoodle Soup to the next level, use spices wisely. Dried thyme and oregano add great taste. You can also try adding a pinch of cayenne for heat. Fresh herbs like basil or cilantro can brighten the dish. Lemon zest gives a nice zing too. Always taste your soup before serving. Adjust the spices to match your preference. Enjoy your flavorful creation! {{image_4}} You can add more veggies to your chicken zoodle soup for extra flavor and nutrition. Consider using: - Bell peppers, diced - Spinach or kale, chopped - Mushrooms, sliced - Green beans, cut into small pieces - Peas, fresh or frozen These additions not only boost the soup's health value but also make it colorful. Just remember to chop the veggies into small pieces for even cooking. Add them during the sauté step, just like you do with the carrots and celery. If you're looking for protein alternatives, there are many options. Try: - Turkey breast instead of chicken - Tofu for a plant-based option - Shrimp for a seafood twist - Cooked beans like chickpeas for more fiber These swaps can change the flavor profile and keep the dish exciting. Adjust the cooking time based on the protein you choose. Always ensure your protein is fully cooked before serving. Choosing between low-sodium and regular broth can affect the taste and health of your soup. Low-sodium broth allows you to control the salt level better. This is great if you watch your sodium intake. Regular broth adds more salt but can enhance flavor. If you use regular broth, taste the soup before adding salt. Adjust according to your preference. Remember, balancing flavors is key to a delicious chicken zoodle soup. Want to try the full recipe? Check it out for all the details! You can freeze Chicken Zoodle Soup for later. First, let the soup cool down. Then, pour it into an airtight container. Leave some space at the top for expansion. If you want, you can freeze the broth and zoodles separately. This keeps the zoodles from getting mushy. In the fridge, Chicken Zoodle Soup lasts about three to four days. Store it in an airtight container. Make sure to check for any signs of spoilage before eating. To reheat your soup, pour it into a pot. Heat over medium until warm. Stir it often to keep it from sticking. If the zoodles look too soft, add a few fresh ones while reheating. You can also microwave it in a bowl. Heat in one-minute intervals, stirring in between. For the best taste, eat the soup fresh. But knowing how to store it well makes meal prep easy! For the full recipe, check the section above. Yes, you can. Just add all the ingredients to your slow cooker. Cook on low for 6-8 hours or high for 3-4 hours. Shred the chicken when it's done. Add zoodles in the last 30 minutes. This method gives you a deep, rich flavor without much work. Zoodles are a great choice for many reasons: - Low in carbs: They are a great substitute for pasta. - High in vitamins: They provide vitamins A and C, helping your immune system. - Good for hydration: Zucchini has a high water content, keeping you hydrated. - Low in calories: This makes your soup lighter and helps with weight control. Switching to zoodles can help you enjoy your favorite soup while staying healthy. Making Chicken Zoodle Soup dairy-free is easy: - Use low-sodium chicken broth, which is often dairy-free. - Skip any cream or cheese that some recipes may add. - Ensure your seasonings, like thyme and oregano, are also dairy-free. This way, you keep the soup creamy and tasty without adding dairy. For the full recipe, check out the Chicken Zoodle Soup section. This article covered all you need for Chicken Zoodle Soup. We explored the ingredients, shared tips, and offered storage info. You learned how to make it your own with variations and substitutions. Each step helps you create a tasty, healthy meal. In the end, Chicken Zoodle Soup is versatile and easy to prepare. With simple steps, you can enjoy a bowl packed with flavor and nutrients. Now, it’s time to gather your ingredients and start cooking. Enjoy your delicious soup today!

Savory Chicken Zoodle Soup Easy and Healthy Meal

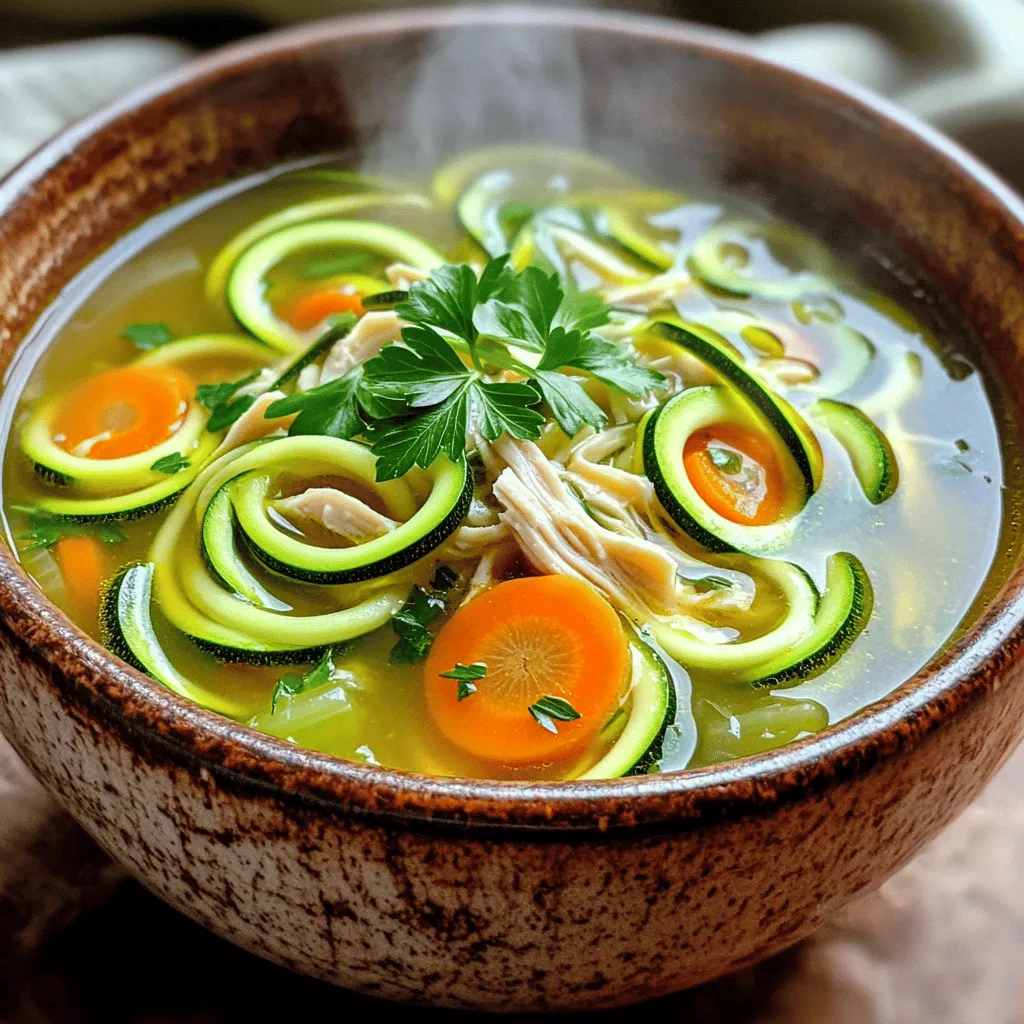
If you’re looking for a warm, comforting dish that’s also healthy, you’ve found it! This Savory Chicken Zoodle Soup is

To make Chicken Parmesan meatballs, you need fresh and simple ingredients. Here's what you'll need: - 1 lb ground chicken - 1 cup breadcrumbs (Italian-seasoned for extra flavor) - ½ cup grated Parmesan cheese - ½ cup shredded mozzarella cheese - 1 large egg - 2 cloves garlic, finely minced - 1 teaspoon dried oregano - 1 teaspoon dried basil - ½ teaspoon salt - ¼ teaspoon freshly ground black pepper - 1 cup marinara sauce (store-bought or homemade) - Fresh basil leaves for garnish These ingredients come together to create a dish full of flavor. The ground chicken serves as a light and healthy base. The breadcrumbs add texture, while the cheeses bring richness and depth. The egg helps bind everything together. Garlic, oregano, and basil infuse each bite with Italian flair. Marinara sauce completes the dish, making it comforting and delicious. And don’t forget the fresh basil for a pop of color. For the full recipe, check out the complete steps to craft this delightful meal. - Preheat the oven and prepare the baking sheet. Set your oven to 400°F (200°C). Line your baking sheet with parchment paper. This helps with easy cleanup and prevents sticking. - Combine all ingredients in a mixing bowl. In a large bowl, mix ground chicken, breadcrumbs, grated Parmesan cheese, shredded mozzarella, egg, minced garlic, and herbs. Make sure everything is well blended. - Shape the meatballs and arrange on the baking sheet. Use clean hands to scoop out portions. Roll them into balls, about 1.5 inches wide. Place each meatball on the baking sheet with space between them. - Bake the meatballs to perfection. Place the baking sheet in the oven and bake for 20 to 25 minutes. Look for a nice golden-brown color. Check the meatballs to ensure the inside reaches 165°F (74°C). - Heat up marinara sauce. While the meatballs bake, pour marinara sauce into a small saucepan. Heat it over medium heat. Stir occasionally until it warms up nicely. - Toss meatballs in sauce. Once baked, transfer the meatballs to the saucepan. Gently toss them in the sauce to coat them well. - Presentation tips for serving. For a beautiful plate, put the meatballs on a plate. Add extra marinara sauce and sprinkle fresh basil on top. If you like, add more grated Parmesan for extra flavor. For the full recipe, please refer to the original instructions. - How to keep meatballs moist: Use ground chicken with some fat. Adding breadcrumbs helps too. Mix in some grated cheese for more moisture. - Alternatives to ground chicken: You can use ground turkey or lean beef. Pork also works well for a different taste. - Importance of even meatball size: Make meatballs the same size for even cooking. Aim for 1.5 inches in diameter. This helps them cook through at the same rate. - Checking for doneness: Use a meat thermometer. The internal temperature should reach 165°F (74°C). If you don’t have one, cut a meatball in half. It should look white, not pink. - Adjusting baking time based on size: Larger meatballs need more time. If your meatballs are bigger than 1.5 inches, add 5-10 minutes. Keep an eye on them to avoid overcooking. - Adding extra spices: Try adding red pepper flakes for heat. A pinch of smoked paprika gives a nice depth. Fresh herbs like parsley can brighten the flavors. - Cheese options for added richness: Use a mix of cheeses. Mozzarella offers stretch, while provolone adds a sharp taste. For a stronger flavor, go for aged Parmesan. These tips will elevate your Chicken Parmesan meatballs and make them a crowd favorite. For the complete recipe, check out the Full Recipe section. Enjoy crafting this delightful dish! {{image_4}} If you need a gluten-free option, use gluten-free breadcrumbs. They work well and keep the meatballs tasty. You can find these at most stores or make your own by grinding gluten-free bread. For those who want to skip dairy, try using dairy-free cheese. Brands like Daiya or Violife offer great alternatives. They melt nicely and add flavor without the dairy. You can add vegetables to the meat mixture for extra nutrition. Chopped spinach or grated zucchini blends in well. They add moisture and flavor. You can also switch up the sauce. Instead of marinara, try pesto or Alfredo. Each sauce brings a new twist to the dish and keeps it fresh. Pair these meatballs with pasta or a fresh salad. They soak up the sauce and add heartiness to your meal. If you want a fun twist, serve them in a sub sandwich. Just place the meatballs in a hoagie roll and top with extra cheese and sauce. It's a delicious way to enjoy this dish on the go. For the full recipe, check out the Chicken Parmesan Meatballs Delight section. After you enjoy your Chicken Parmesan meatballs, store any leftovers right away. Place them in an airtight container. Make sure they cool down slightly before sealing. This helps keep them fresh. You can also freeze the meatballs for later. Arrange them in a single layer on a baking sheet. Freeze until firm, then transfer to a freezer bag. This way, you can enjoy them later without losing flavor. When it’s time to reheat, you want to keep them tasty. The best way is to use the oven. Preheat it to 350°F (175°C). Place the meatballs on a baking sheet. Cover them with foil to keep moisture in. Heat for about 10-15 minutes. You can also use the microwave. But be careful! Heat them in short bursts. Check every 30 seconds to avoid drying them out. In the fridge, your chicken meatballs last for about 3-4 days. If you want to keep them longer, the freezer is your friend. They can stay good for up to 3 months. Just remember to label your bags with the date. This helps you keep track of their freshness. For the full recipe, check out the details above. Can I make Chicken Parmesan Meatballs ahead of time? Yes, you can make Chicken Parmesan meatballs ahead of time. Prepare the meatballs and store them in the fridge for up to 24 hours. You can also freeze them for longer storage. Just make sure to cook them before serving. What can I serve with Chicken Parmesan Meatballs? I love serving these meatballs with spaghetti. You can also pair them with a fresh salad or garlic bread. They work great in a sub sandwich, too! How can I tell if the meatballs are cooked through? To check if your meatballs are done, use a meat thermometer. The center should reach 165°F (74°C). You can also cut one open. It should be juicy and no longer pink. Can I grill these meatballs instead of baking? Absolutely! Grilling adds a nice smoky flavor. Just shape the meatballs and grill them over medium heat. Cook for about 10-15 minutes, turning often. How do I make the recipe spicy? To spice it up, add red pepper flakes to the meat mixture. You can also mix in diced jalapeños or hot sauce for extra heat. Calories and macros per serving Each serving of Chicken Parmesan meatballs has about 350 calories. You get around 25g of protein, 15g of fat, and 30g of carbs. Health benefits of the ingredients used Ground chicken is lean and low in fat. Garlic boosts your immune system. Fresh herbs add flavor without extra calories. Plus, cheese gives you calcium for strong bones. For the complete recipe, check out the Full Recipe section. In this blog post, we explored a tasty Chicken Parmesan Meatballs recipe. We covered key ingredients like ground chicken and cheese, followed by easy steps to prepare and cook. I shared tips to keep your meatballs moist and variations to suit your taste. Remember to store leftovers correctly for the best flavor. Enjoy these meatballs with pasta or in a sub sandwich. They are simple to make and great for any meal. Try out this recipe, and you will make delicious meatballs every time.

Chicken Parmesan Meatballs Perfectly Crafted Delight

Welcome to your next favorite dish: Chicken Parmesan Meatballs! I’ll show you how to mix tender ground chicken with rich

- 20 jumbo pasta shells - 2 cups fresh spinach, finely chopped - 1 cup ricotta cheese - 1 cup mozzarella cheese, shredded - 1/2 cup Parmesan cheese, grated - 1 large egg, beaten - 1 teaspoon garlic powder - 1 teaspoon onion powder - Salt and pepper, to taste - 3 cups marinara sauce - Fresh basil leaves, for garnish The jumbo pasta shells are key for holding the filling. They provide a sturdy base for our dish. Fresh spinach adds a bright, earthy taste. It gives the dish a healthy twist. Ricotta cheese is creamy and rich. It blends well with the spinach and creates a smooth filling. Mozzarella cheese melts beautifully, adding gooey goodness. Parmesan cheese brings a salty, nutty flavor that enhances the dish. You can get creative with your stuffed shells. Add cooked ground beef or turkey for extra protein. Try adding herbs like oregano or thyme for more flavor. For a spicy kick, toss in some red pepper flakes. If you want a richer taste, use cream cheese with the ricotta. You can also swap marinara for a homemade sauce or a pesto drizzle. To start, boil water in a large pot. Add salt to the water to enhance flavor. Drop in 20 jumbo pasta shells and cook until they are al dente. This usually takes about 8 to 10 minutes. Once cooked, drain the shells and set them aside on a wire rack. This helps them cool down quickly. In a large mixing bowl, combine the filling ingredients. Add 2 cups of finely chopped spinach, 1 cup of ricotta cheese, half of the mozzarella, and half of the Parmesan. Don’t forget the beaten egg, garlic powder, onion powder, salt, and pepper. Mix everything well until it’s smooth and creamy. This filling is what makes the shells special. Now it’s time to put everything together. First, spread 1 cup of marinara sauce on the bottom of a 9x13-inch baking dish. Next, take each cooled pasta shell and fill it with the spinach and ricotta mixture. Place them open side up in the dish. Once all shells are filled, pour the remaining marinara sauce over them. Make sure each shell gets a good layer of sauce. Finally, sprinkle the rest of the mozzarella and Parmesan on top. - Cooking Time and Temperatures: Cover the dish tightly with aluminum foil. Bake in the preheated oven at 375°F (190°C) for 25 minutes. After that, remove the foil and bake for another 10 to 15 minutes. Look for bubbly and golden brown cheese as a sign that it is ready. Once done, let the dish cool for a few minutes before serving. To get the best texture in your stuffed shells, focus on the filling. Use fresh spinach and mix it well with ricotta cheese. This blend gives a creamy and smooth texture. Add a beaten egg to bind the filling. The egg helps hold everything together. Cook your pasta shells until they are just al dente. If they are too soft, they may break when you fill them. One common mistake is overcooking the pasta. If the shells are mushy, they won’t hold the filling well. Another mistake is skimping on the sauce. You need enough sauce to keep the shells moist while baking. Also, don’t forget to cover your dish with foil at first. This step helps melt the cheese without burning it. Serve your spinach and ricotta stuffed shells hot from the oven. A sprinkle of fresh basil on top adds color and taste. Pair the dish with a simple green salad for a balanced meal. Garlic bread is also a great side. The crunchy bread complements the creamy filling nicely. For a fun twist, try adding some red pepper flakes to your marinara sauce for a kick! Looking for the full recipe? You can find it in the recipe section! {{image_4}} If you need a gluten-free option, you can easily swap the pasta. Look for gluten-free jumbo shells made from rice or corn. These work well and taste great. Just follow the cooking instructions on the package. They should cook like regular shells, making them simple to use in this dish. Want to mix it up? You can add other ingredients to the filling. Try adding cooked ground turkey or chicken for extra protein. You can also mix in some cooked mushrooms or roasted red peppers for added flavor. For a spicy kick, toss in some red pepper flakes. These changes can make the dish more exciting and tailored to your taste. To make this dish lighter, consider using low-fat ricotta and mozzarella. You can also skip the egg if you want to cut down on fat. Instead, use a bit of plain Greek yogurt for added creaminess. This keeps the flavors rich while lowering the calories. Enjoy your meal guilt-free while still savoring every bite! To keep your tasty spinach and ricotta stuffed shells fresh, follow these steps: - Cool the dish: Let the shells cool to room temperature. - Use airtight containers: Transfer them to a container with a tight lid. - Refrigerate: Store in the fridge for up to 3 days. Reheating is easy and keeps the flavors alive. Here’s how to do it: - Oven method: Preheat your oven to 350°F (175°C). Place the shells in a baking dish with some sauce. Cover with foil and heat for 20 minutes. - Microwave method: Place one or two shells on a microwave-safe plate. Heat for 1-2 minutes, checking to ensure they are warm throughout. Freezing is a great option for meal prep. Here’s the best way to freeze them: - Prepare for freezing: Fill the shells as usual, but do not bake them. - Use freezer-safe containers: Place the filled shells in a single layer in containers. - Add sauce: Pour marinara sauce over the shells. - Seal tightly: Wrap the containers well with plastic wrap and then foil. - Label and freeze: Write the date on the container. They can freeze for up to 3 months. This way, you can enjoy your spinach and ricotta stuffed shells anytime! For the full recipe, check out the detailed cooking instructions. Yes, you can make these shells ahead of time. Prepare the dish up to the baking step. Cover it tightly and store it in the fridge for one to two days. When ready to bake, add a few extra minutes to the cooking time if the dish is cold. This makes meal prep easy and stress-free. If you need a ricotta substitute, try cottage cheese or cream cheese. Blend cottage cheese until smooth for a similar texture. Cream cheese adds a rich flavor but is thicker. You can also use Greek yogurt for a lighter option. Each choice brings a unique taste but works well in this recipe. To make homemade marinara sauce, start with these simple steps: - Sauté 1 chopped onion and 2 minced garlic cloves in olive oil until soft. - Add 1 can (28 oz) of crushed tomatoes. - Stir in 1 teaspoon of dried oregano, 1 teaspoon of sugar, and salt to taste. - Simmer for 20 minutes. This sauce is fresh, tasty, and easy to customize with herbs. - Where can I find the full recipe? You can find the full recipe for Spinach and Ricotta Stuffed Shells in the article above. It includes detailed steps and tips for making this dish a success. This blog post covered how to make delicious Spinach and Ricotta Stuffed Shells. We discussed key ingredients and shared tips for the best texture. I provided step-by-step instructions, including storage tips and variations, like gluten-free options. In closing, I encourage you to customize the dish to fit your taste. Enjoy experimenting with new fillings and sauces. Your kitchen can be your canvas, so create a meal that delights!

Spinach and Ricotta Stuffed Shells Deliciously Simple

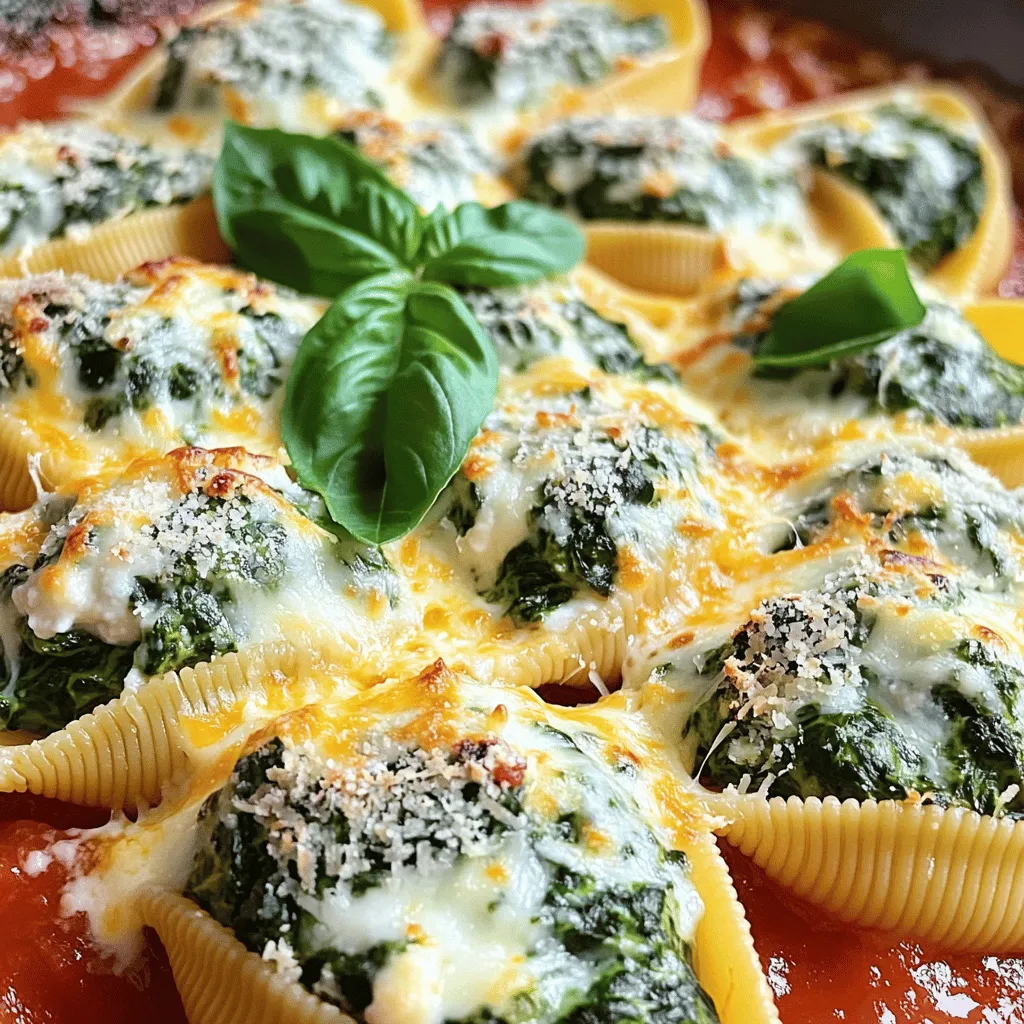
Are you ready to impress your family with a tasty dish? Spinach and Ricotta Stuffed Shells are both easy to

- 4 boneless, skinless chicken breasts - 1/2 cup all-purpose flour - 1 teaspoon salt - 1/2 teaspoon black pepper - 1/4 teaspoon garlic powder - 1/4 teaspoon paprika - 3 tablespoons olive oil - 1/4 cup low-sodium chicken broth - 2 tablespoons freshly squeezed lemon juice - 2 tablespoons capers, thoroughly rinsed - 2 tablespoons fresh parsley, finely chopped - Lemon slices, for garnish Gather these ingredients before you start cooking. Each item plays a key role in making your chicken piccata delicious. The chicken breasts provide the main protein, while the flour helps create a lovely coating. The spices give flavor, and the broth and lemon juice create a bright sauce. Capers add a unique tangy taste, and fresh parsley adds a pop of color. For the best results, use fresh ingredients. Fresh lemon juice tastes much better than bottled. Rinsing the capers removes extra salt, letting their flavor shine. Once you have everything ready, you can move on to the fun part—cooking! Check out the [Full Recipe] for detailed steps. To start, flatten the chicken breasts to an even thickness of about 1/2 inch. Use a meat mallet or a rolling pin. This step is key. It helps the chicken cook evenly. When the chicken is uniform, it turns out moist and tender. Next, mix the flour, salt, black pepper, garlic powder, and paprika in a shallow dish. This mixture adds great flavor. Dredge each piece of chicken in the flour mixture. Make sure to press gently to coat both sides well. Shake off any extra flour. This helps prevent clumping when cooking. Now, heat olive oil in a large skillet over medium heat. Wait until the oil shimmers. Carefully add the coated chicken breasts to the skillet. Cook each side for about 4-5 minutes. The chicken should be golden brown and reach an internal temperature of 165°F (75°C). Once cooked, transfer the chicken to a plate. In the same skillet, pour in the chicken broth and lemon juice. Add the rinsed capers too. Stir well to combine. Use a wooden spoon to scrape up any tasty browned bits stuck to the bottom. This process adds depth to the sauce. Let the mixture simmer for 2-3 minutes until it thickens slightly. Return the cooked chicken to the skillet, placing it in the sauce. Spoon some sauce over each piece. Allow the chicken to warm through for an extra 1-2 minutes. This ensures the flavors blend nicely. Take the skillet off the heat. Generously sprinkle fresh parsley over the chicken. This adds both flavor and color. Plate the chicken and pour extra sauce on top. Garnish with fresh lemon slices for a bright finish. For an elegant touch, serve it on a white plate. To make great chicken piccata, start with the right chicken. I recommend using boneless, skinless chicken breasts. They cook evenly and stay juicy. Flatten the chicken to about 1/2 inch thick. This step helps it cook faster and more evenly, ensuring a tender bite. For the sauce, use fresh lemon juice. Fresh juice gives the dish a bright flavor. Capers add a salty punch that works well with the lemon. To get the best sauce, let it simmer for a few minutes. This helps the flavors blend nicely. Stir the browned bits from the skillet into the sauce. These bits add extra flavor and depth. A common mistake is overcooking the chicken. Keep an eye on the cooking time. Cook each side for about 4-5 minutes until golden brown. Use a meat thermometer to check for doneness. It should reach 165°F (75°C). Another mistake is not seasoning enough. The flour mix should have salt, pepper, garlic powder, and paprika. This adds flavor to the chicken. Don’t forget to season the sauce too. Taste it and adjust if needed. A few kitchen tools can make your life easier. You’ll need a meat mallet or rolling pin to flatten the chicken. A shallow dish is great for mixing the flour and spices. Use a large skillet for cooking the chicken. A heavy-bottomed skillet helps with even heat distribution. While a skillet works best for this dish, you can also use a non-stick pan. Avoid using a pot, as it may not give you the right heat for browning. A good skillet allows for easy sauce making right after cooking the chicken. This is key for a quick and tasty chicken piccata. {{image_4}} You can easily make chicken piccata healthier. Here are some simple swaps: - Use whole wheat flour instead of all-purpose flour. This adds fiber and nutrients. - Choose low-sodium broth to cut down on salt. This helps keep your dish light and fresh. Want to boost flavor? Try these ideas: - Add sun-dried tomatoes to the sauce. They bring a sweet and tangy taste. - Incorporate fresh herbs like thyme. This adds depth and freshness to the dish. You can adjust the recipe for different diets: - To make it gluten-free, use a gluten-free flour blend. This keeps the dish friendly for those with gluten sensitivities. - For a vegan twist, swap chicken with tofu or tempeh. This still gives you a tasty meal without meat. Explore these variations to find your favorite version of chicken piccata! You can check the Full Recipe for the original dish. To keep your chicken piccata fresh, store it right. First, let it cool down. Then, place it in an airtight container. You can also use glass containers with a tight lid. This helps keep moisture in and air out. Store the leftovers in the fridge. They will last for about 3 to 4 days. When it’s time to reheat, use the stove. Heat a skillet over low heat. Add a splash of chicken broth or water. This will help keep the chicken moist. Place your chicken piccata in the skillet and cover it. Heat for about 5 to 7 minutes. Stir it gently to avoid drying out. You can also use a microwave, but be careful. Heat in short bursts to prevent dryness. To freeze chicken piccata, first cool it completely. Once cooled, cut it into portions. Wrap each piece in plastic wrap, then place them in a freezer bag. Remove as much air as possible. Label the bag with the date. Chicken piccata can stay fresh for up to 3 months in the freezer. When you're ready to eat, thaw it overnight in the fridge. Reheat it on the stove for the best results. It takes about 25 minutes. You spend 10 minutes on prep and 15 minutes cooking. This quick time makes it perfect for busy nights. Yes, you can use frozen chicken. Thaw the chicken before cooking. It cooks better when it's not frozen. To thaw, place it in the fridge overnight or use cold water. You can serve chicken piccata with many sides. Here are a few ideas: - Garlic mashed potatoes - Steamed green beans - A fresh salad - Pasta with olive oil To thicken the piccata sauce, you can do a few things: - Simmer it longer to reduce the liquid. - Mix a little cornstarch with water and add it to the sauce. - Stir in some butter at the end for a rich flavor. Yes, chicken piccata is great for meal prep. You can cook it ahead and store it in the fridge. Just reheat when you are ready to eat. It stays tasty for about 3-4 days. For best results, store the sauce separately to keep the chicken from getting soggy. In this blog post, we covered how to make Easy Chicken Piccata. You learned about the key ingredients and step-by-step cooking instructions. We shared tips to avoid common mistakes and enhance flavors. You also discovered storage methods and reheating tips for leftovers. Chicken Piccata is a versatile dish that anyone can make. With practice, you can master it. Enjoy cooking and impress your family and friends with this tasty meal!

Easy Chicken Piccata Quick and Flavorful Recipe

Are you ready to whip up a quick and delicious meal? Easy Chicken Piccata is your answer! This flavorful dish

- 1 lb boneless, skinless chicken breast - 1 cup all-purpose flour - 2 large eggs - 1 cup shredded unsweetened coconut - 1 cup panko breadcrumbs - Seasonings: garlic powder, smoked paprika, salt, pepper - Oil for frying - Dipping sauces: honey mustard, sweet chili sauce - Fresh herbs for garnish: parsley, cilantro The main ingredients for homemade chicken tenders are simple. You need chicken and a few pantry staples. I use boneless, skinless chicken breast for a tender bite. This choice is easy to cut into strips. The flour adds a nice base, while eggs help the coating stick. I mix shredded coconut with panko breadcrumbs. This combo gives a great crunch and flavor. I add garlic powder and smoked paprika for extra taste. Salt and pepper are key for seasoning. For frying, I suggest using a neutral oil like canola or vegetable. This oil has a high smoke point, making it perfect for frying to golden perfection. If you want to elevate your dish, consider using fresh herbs like parsley or cilantro for garnish. For a fun twist, try dipping sauces like honey mustard or sweet chili sauce. They add a sweet or spicy kick to your tenders. You can find the full recipe for crispy coconut chicken tenders to guide your cooking journey! - First, mix flour with garlic powder, smoked paprika, salt, and pepper. - In a second bowl, beat the eggs until smooth. - Start by coating chicken strips in the flour mixture. - Dip the floured chicken into the egg wash. - Finally, roll the chicken in the coconut and panko mixture. - Make sure the coating is even for the best crispiness. - Heat oil to 350°F (175°C) in a large skillet. - Carefully fry the chicken tenders in batches. - Cook them for 4-5 minutes on each side. - Look for a golden-brown color and an internal temperature of 165°F (74°C). - Once done, place the tenders on paper towels to drain excess oil. For the full recipe, you can check the Crispy Coconut Chicken Tenders. To make your chicken tenders crispy, start with the right oil temperature. Heat the oil to 350°F (175°C). If your oil is too cool, the tenders will soak up oil and become soggy. If it's too hot, they will burn. Use a thermometer to check the oil's temperature. This small tool can make a big difference. Not a fan of coconut? You can swap shredded coconut with crushed cornflakes for a crunchy texture. If you want a vegan option, use flaxseed meal mixed with water as an egg substitute. This mix binds the coating just like eggs do. After frying, serve your chicken tenders hot and crispy. Pair them with a selection of dipping sauces, like honey mustard or sweet chili sauce, for extra flavor. You can also serve them alongside fresh salads or crispy fries for a complete meal. This makes your plate colorful and fun! {{image_4}} You can make chicken tenders with many fun flavors. One tasty option is Asian-inspired coconut chicken tenders. Add sesame seeds to the coconut mix. This gives a nutty taste that pairs well with the coconut. Another tasty idea is to make a spicy version. Just add chili powder to the breading mix. This gives the chicken a nice kick. If you want a healthier option, try baking the chicken tenders. Preheat your oven to 400°F (200°C). Place the breaded chicken on a baking sheet. Bake for about 20 minutes, flipping halfway through. This will keep them crispy and golden. You can also use an air fryer. This method uses less oil. Preheat the air fryer to 375°F (190°C). Cook the chicken tenders in a single layer. Air fry for about 10-12 minutes, flipping them halfway. This method gives you crispy chicken with less mess. For the full recipe, check out the [Full Recipe]. To store cooked chicken tenders, first let them cool down. Place them in an airtight container. You can keep them in the fridge for up to three days. If you want to store them longer, freeze the chicken tenders. Wrap each tender in plastic wrap, then place them in a freezer bag. This way, they won’t stick together. You can freeze them for up to three months. When reheating chicken tenders, you want them crispy, not soggy. The best way is to use an oven. Preheat your oven to 375°F (190°C). Place the tenders on a baking sheet. Bake them for about 10-15 minutes. Flip them halfway to ensure even heating. You can also use an air fryer if you have one. Set the air fryer to 350°F (175°C) and cook for about 5-7 minutes. This keeps them crispy and tasty. You can prepare chicken tenders a day in advance. First, bread the chicken strips and place them on a baking sheet. Cover them with plastic wrap and store them in the fridge. This keeps them fresh. When you're ready to cook, heat the oil as you would normally. Fry them straight from the fridge. This helps keep them crispy. If you want to freeze them, place the breaded strips in a single layer on a baking sheet. Once frozen, transfer them to a freezer bag for long-term storage. To reheat, bake them at 400°F (200°C) for about 15-20 minutes or until heated through. This method preserves their crunch. Yes, you can use chicken thighs. They have more fat than breasts, which gives them a juicy flavor. The texture is also different; thighs are more tender and moist. If you prefer a richer taste, thighs are a great option. Keep in mind that they may take a bit longer to cook through. Always check the internal temperature. It should reach at least 165°F (74°C) for safe eating. If you don't have panko, you can use regular breadcrumbs. They work well but may not be as crispy. For a crunchier texture, try crushed cornflakes or crushed crackers. They add a nice flavor too. You can also use almond flour for a gluten-free option. Just make sure to adjust the seasoning since some alternatives may have added salt. This blog post covered how to make delicious coconut chicken tenders. We discussed required and optional ingredients, step-by-step instructions, tips for the perfect crispy texture, and storage information. You can also try different flavors and cooking methods. These tender, crunchy bites work well with various dips. Make them ahead of time for convenience. These chicken tenders can be a hit at any meal or gathering. Enjoy the cooking process, and have fun experimenting with your favorite flavors!

Homemade Chicken Tenders Crispy and Flavorful Delight

Ready to elevate your dinner game? Homemade chicken tenders are crispy, flavorful, and easy to make! With just a few

For Chicken and Spinach Stuffed Shells, you need: - 20 jumbo pasta shells - 2 cups cooked chicken, shredded - 1 cup fresh spinach, finely chopped - 1 cup creamy ricotta cheese - 1 cup shredded mozzarella cheese - 1/2 cup grated Parmesan cheese - 1 large egg, beaten - 2 cups marinara sauce (homemade or store-bought) - 1 teaspoon garlic powder - 1 teaspoon onion powder - Salt and pepper, to taste - Fresh basil leaves, for garnish These ingredients come together to create a rich and comforting dish that your family will love. You can also customize it by adding vegetables or herbs of your choice to the filling. If you want to change things up, consider these options: - Alternative proteins: Use turkey or tofu instead of chicken for different flavors. Both options work well with spinach and cheese. - Dairy-free cheese: For a vegan version, look for dairy-free ricotta and mozzarella. Many brands offer great taste and texture. - Gluten-free pasta: If you need a gluten-free option, swap the jumbo shells with gluten-free pasta shells. They cook similarly and hold the filling well. This flexibility helps you tailor the dish to fit your dietary needs while still enjoying a delicious meal. Check out the Full Recipe to get started on this delightful dish! To start, preheat your oven to 375°F (190°C). This temperature helps the dish bake evenly. While the oven heats, fill a large pot with water and add a good amount of salt. Bring it to a boil. Once boiling, add the jumbo pasta shells. Cook them according to the package instructions. You want them al dente, not too soft. When done, drain the shells and set them on a baking sheet to cool. This keeps them from sticking together. In a big mixing bowl, combine your filling ingredients. Start with 2 cups of shredded cooked chicken and add 1 cup of finely chopped fresh spinach. Then, mix in 1 cup of creamy ricotta cheese, 1/2 cup of grated Parmesan cheese, and half of the shredded mozzarella cheese. Crack one large egg into the bowl. Sprinkle in 1 teaspoon of garlic powder and 1 teaspoon of onion powder. Add salt and pepper to taste. Mix everything well until smooth. This mixture should be creamy and flavorful. Now, it’s time to stuff the shells. Take each cooled pasta shell and fill it with your chicken and spinach mixture. Don’t be shy; pack it in well! Place each filled shell seam-side up in a lightly greased 9x13 inch baking dish. Once all the shells are in, pour 2 cups of marinara sauce over them. Make sure each shell gets coated. Finally, sprinkle the remaining mozzarella cheese on top. Cover the dish with aluminum foil. Bake for 25 minutes. This keeps the shells moist. After that, remove the foil and bake for another 10-15 minutes. You want the cheese to bubble and turn golden brown. Once baked, let it cool for 5 minutes before serving. This wait helps the filling set. You’re ready to enjoy your delicious Chicken and Spinach Stuffed Shells! For the full recipe, see the section above. For perfect pasta shells, cook them for 8-10 minutes in boiling water. They should be al dente, firm but cooked. After draining, place them on a baking sheet. This keeps them from sticking together. Letting the dish rest for 5 minutes is key. This helps the filling set and makes serving easier. The flavors also meld together during this time, enhancing the taste. To spice up the recipe, add fresh herbs like basil or parsley. A pinch of red pepper flakes gives a nice kick. You can also mix in some Italian seasoning for extra flavor. Pair these stuffed shells with a simple salad or garlic bread. A drizzle of extra marinara on top adds moisture and taste. You can also serve them with a side of roasted vegetables for a colorful plate. If you want the full recipe, check out the complete guide above. {{image_4}} To make Chicken and Spinach Stuffed Shells vegetarian, swap chicken for mushrooms or lentils. Both options add great flavor and texture. You can also use ricotta and spinach alone. For gluten-free shells, look for pasta made from rice or corn. These options taste great and hold the filling well. You can play with the filling by adding different veggies. Chopped bell peppers, zucchini, or carrots work well. Just sauté them lightly before mixing with other ingredients. This keeps the filling fresh and adds nice flavors. Cheese blends can change the taste of your stuffed shells. Try using gouda or feta instead of ricotta. Combining different cheeses can create a rich flavor. You might also mix in some cream cheese for extra creaminess. For sauces, marinara is a classic choice, but you can use alfredo for a creamy twist. Pesto adds a fresh, herby flavor. Top the shells with a sprinkle of red pepper flakes for heat or add fresh herbs for a burst of color. After enjoying your Chicken and Spinach Stuffed Shells, store any leftovers safely. First, allow the dish to cool to room temperature. Then, place the shells in an airtight container. Use glass or plastic containers that seal tightly. If you want to freeze them, wrap the shells tightly in plastic wrap before placing them in a freezer-safe bag. This helps prevent freezer burn. Keep the leftovers in the fridge for up to four days. For frozen shells, they can last up to three months. To reheat your stuffed shells, the oven is the best method. Preheat it to 350°F (175°C). Place the shells in a baking dish, cover with foil, and warm for about 20 minutes. This keeps the shells moist and tasty. If you prefer the microwave, place them on a microwave-safe plate. Heat on medium power for 2-3 minutes. Check to make sure they are warm throughout. For both methods, add a splash of marinara sauce to keep them flavorful. Enjoy your delicious meal again! How can I make Chicken and Spinach Stuffed Shells ahead of time? You can prepare the stuffed shells a day in advance. Just follow the recipe until you fill the shells. Then, place them in a baking dish and cover with foil. Store them in the fridge overnight. When you are ready, bake them straight from the fridge. You may need to add a few extra minutes to the baking time. Can I prepare these shells with raw chicken? I do not recommend using raw chicken. The shells need fully cooked chicken for the best flavor and safety. Cooking the chicken before mixing it with other ingredients ensures your dish is tasty and safe to eat. What should I serve with Chicken and Spinach Stuffed Shells? These stuffed shells pair well with a simple side salad or garlic bread. A light salad with fresh veggies adds crunch. Garlic bread gives a nice touch to soak up any extra sauce. What are the best marinara sauce options? You can use homemade marinara for a fresh taste. If you go for store-bought, opt for a brand with no added sugars. Look for sauces that highlight fresh tomatoes and herbs. This will enhance the flavors of your stuffed shells. How do I know when stuffed shells are fully cooked? Check the cheese on top; it should be bubbly and golden brown. You can also insert a knife into the center. If it feels hot and the filling is warm, they are ready to enjoy. Letting them rest a few minutes helps the filling set, making them easier to serve. For a full recipe, check the complete guide! Chicken and Spinach Stuffed Shells are a delightful meal that you can easily customize. This dish is about fresh ingredients, clear steps, and tasty variations. You learned how to prep, fill, and bake these shells for a satisfying dinner. Remember, you can swap ingredients based on your needs and preferences. Storing leftovers is simple, and reheating is easy to keep flavors intact. With a few tips and tricks, you can make this dish shine every time. Enjoy creating your perfect stuffed shells!

Chicken and Spinach Stuffed Shells Flavorful Dinner Delight

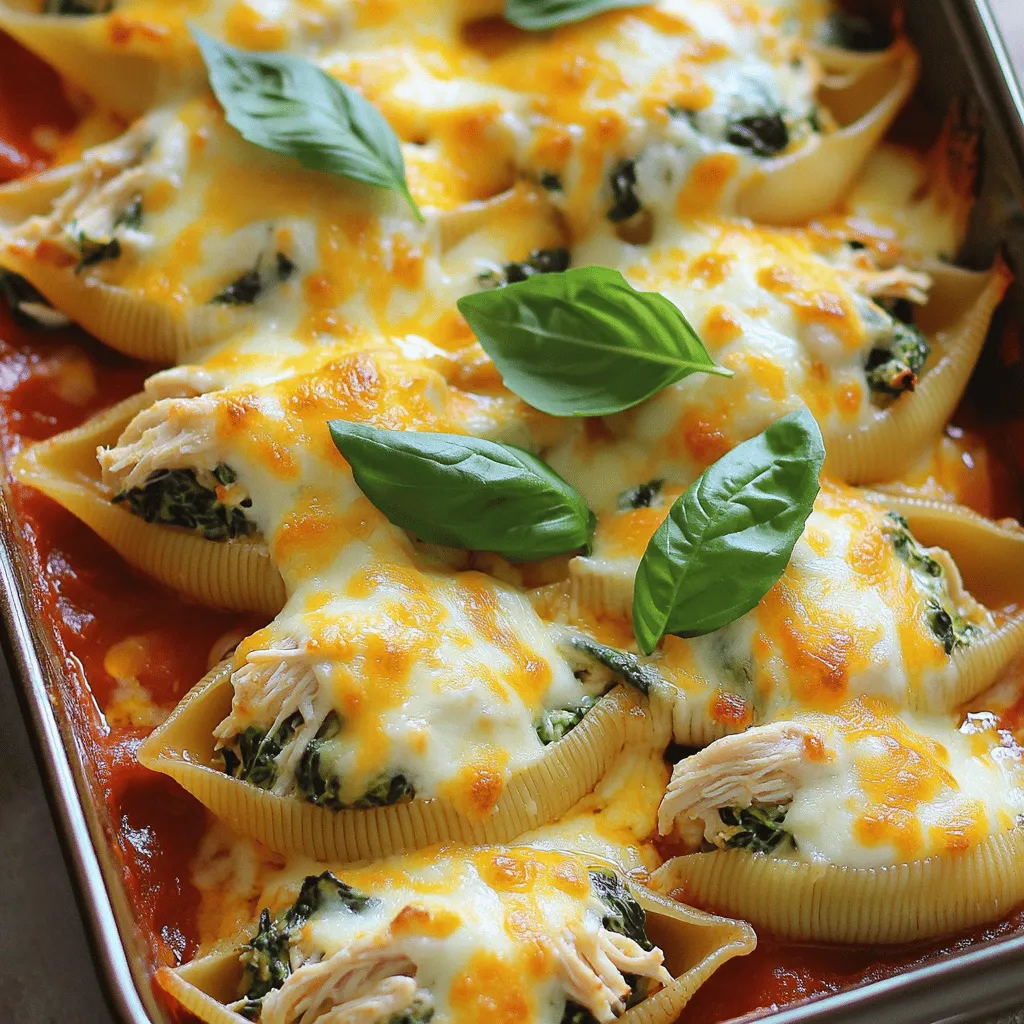
Are you ready to impress everyone at dinner? Chicken and Spinach Stuffed Shells are not only tasty but also easy

Here’s what you need for this tasty dish: - 2 boneless, skinless chicken breasts, cut into bite-sized cubes - 1 tablespoon olive oil - 1 medium onion, thinly sliced - 1 bell pepper of your choice (red, green, or yellow), sliced into strips - 2 cloves garlic, minced - 1 teaspoon chili powder - 1 teaspoon ground cumin - 1/2 teaspoon smoked paprika - Salt and freshly cracked black pepper, to taste - 8 ounces (approximately 2 cups) uncooked penne pasta - 3 cups low-sodium chicken broth - 1 can (14 ounces) diced tomatoes, drained - 1 cup frozen sweet corn kernels - 1/2 cup freshly shredded cheddar cheese - Fresh cilantro, chopped, for garnish Using fresh ingredients gives the best flavor. Fresh chicken, peppers, and onions add a crisp taste. However, frozen ingredients can save time. Frozen corn is just as good as fresh. Use what you can find or what you prefer. Spices make this dish pop. Here are some great options you can try: - Add a pinch of cayenne for heat. - Use oregano for a more herbal note. - Try lime juice for a zesty kick. You can also mix in fresh herbs like parsley or thyme. These options let you play with flavors and find your perfect blend. For the full recipe, check out the details above. To start, heat 1 tablespoon of olive oil in a large pot over medium-high heat. When the oil shimmers, add 2 boneless chicken breasts, cut into cubes. Season the chicken with salt, black pepper, 1 teaspoon chili powder, 1 teaspoon ground cumin, and 1/2 teaspoon smoked paprika. Cook for 5-7 minutes, stirring until the chicken turns golden brown. When done, remove the chicken and place it on a plate. Next, in the same pot, add 1 sliced medium onion and 1 sliced bell pepper. Sauté these for 3-4 minutes until they soften. Then, add 2 minced garlic cloves and cook for 1 more minute. Now, add 8 ounces of uncooked penne pasta to the pot. Pour in 3 cups of low-sodium chicken broth and add a can of drained diced tomatoes. Toss in 1 cup of frozen sweet corn and stir everything well. Bring the mixture to a boil, then lower the heat to a simmer. Cover the pot and let it cook for 12-15 minutes. Stir occasionally until the pasta is al dente and most of the liquid is absorbed. After the pasta cooks, return the chicken to the pot. Top it with 1/2 cup of shredded cheddar cheese. Stir gently until the cheese melts and blends in. Finally, take the pot off the heat. Let it sit for a few minutes to thicken. Serve hot, garnished with chopped cilantro. To get the best out of your One Pot Chicken Fajita Pasta, consider these tips: - Use fresh vegetables for better taste and crunch. - Don’t rush the browning of the chicken; it adds flavor. - Stir often to prevent the pasta from sticking to the pot. - Taste as you cook; adjust seasoning as needed. Seeing the cooking stages can help you feel more confident. 1. Chicken Browning: The chicken should be golden and cooked through. 2. Vegetables Sautéing: They should be soft and fragrant. 3. Pasta Cooking: The mixture should bubble and thicken but not burn. 4. Final Dish: The cheese should melt and coat the pasta nicely. You can find the full recipe for One Pot Chicken Fajita Pasta in the earlier section for more details. Common Mistakes to Avoid When Making One Pot Chicken Fajita Pasta One of the biggest mistakes is overcooking the pasta. Cook it just until it’s al dente. This keeps it from getting mushy. Another mistake is adding too much salt early on. Wait until the dish is almost done to taste and adjust. Also, don’t skip the step of browning the chicken first. This adds flavor that makes a big difference. Lastly, avoid using low-quality chicken broth. A good broth boosts the overall taste. Recommended Tools for Cooking To make this dish, you need a few key tools. A large, deep pot or Dutch oven is essential. This allows enough room for all the ingredients. A wooden spoon or spatula works well for stirring. Use a sharp knife and cutting board for prepping your veggies and chicken. A measuring cup for the broth and pasta is also helpful. These tools make the cooking process smooth and easy. Enhancements for Extra Flavor To amp up the flavor, try adding lime juice right before serving. This gives a fresh kick. You can also toss in black beans for added texture and protein. If you like heat, consider adding chopped jalapeños or a dash of hot sauce. Fresh herbs like parsley or chives can brighten the dish too. For a smoky flavor, incorporate a touch of chipotle powder. These simple tweaks make the meal even more delicious. For the full recipe, check out [Full Recipe]. {{image_4}} If you want a veggie twist, swap chicken for beans or tofu. Black beans or garbanzo beans work great. They add protein and texture. Use the same spices to keep the flavor strong. You can also add mushrooms for a meaty feel. Just sauté them with the onions and peppers. This veggie version is just as tasty and filling. Besides chicken, you can try shrimp or turkey. Shrimp cooks fast and adds a nice seafood flavor. For turkey, use ground turkey instead of cubed chicken. Cook it until browned before adding veggies. Keep the spices the same. Each protein brings its own flair to the dish. Feel free to mix in extra veggies. Zucchini, spinach, or even kale can boost nutrition. Sauté them with the onions for a tender bite. You can also play with spices. Add cayenne for heat or oregano for depth. A squeeze of lime juice at the end can brighten the flavors. Don’t be shy to get creative! You can always check the Full Recipe for more ideas. To keep your One Pot Chicken Fajita Pasta fresh, store it in an airtight container. Be sure to let it cool completely before sealing it. This helps prevent moisture buildup, which can make your pasta soggy. If you plan to eat it later, separate the pasta from any sauce. This way, each part stays fresh. When you are ready to enjoy the leftovers, use the stove or microwave. If using the stove, add a splash of chicken broth or water to the pot. Heat it on low, stirring often until warm. If you choose the microwave, use a microwave-safe bowl. Cover it with a lid or a damp paper towel to keep moisture in. Heat in short bursts, stirring in between, until it is hot. One Pot Chicken Fajita Pasta can last up to four days in the fridge. Store it properly in an airtight container. If you want it to last longer, consider freezing it. In the freezer, it can last up to three months. Just remember to thaw it in the fridge overnight before reheating. For a full recipe, check the details above. You can use shrimp or tofu as a tasty swap. Both options cook quickly. If you want a plant-based choice, try chickpeas or lentils. These will add protein and flavor. Each substitute gives a fun twist to the dish. Yes, you can! Gluten-free pasta works well in this recipe. Just cook it according to the package's time. Keep an eye on the texture, as it may cook faster or slower. This way, you can enjoy One Pot Chicken Fajita Pasta without the gluten. To add heat, use more chili powder or add diced jalapeños. You could also include hot sauce while cooking. If you want a smoky flavor, try adding chipotle peppers. Adjust the spice level to match your taste. It's all about what makes your taste buds dance! This blog post covered the tasty recipe for One Pot Chicken Fajita Pasta. We explored ingredients, cooking steps, and tips to avoid mistakes. I shared flavor enhancements and fun variations for different diets. Storing leftovers properly keeps your meal fresh. Remember, cooking is about fun and creativity. Use this recipe as a base and add your twist. Enjoy the process and delight in each bite!

Irresistible One Pot Chicken Fajita Pasta Recipe

Craving a delicious and easy dinner? Try my Irresistible One Pot Chicken Fajita Pasta! This all-in-one meal packs in bold

- Tortilla chips - 2 cups cooked chicken, shredded - 1 cup black beans, drained - 1 cup corn, drained - 2 cups shredded cheddar cheese - 1 cup fresh jalapeños, sliced - 1 ripe avocado, diced - 1/2 cup sour cream - 1/2 cup pico de gallo or salsa - 2 tablespoons olive oil - 1 teaspoon ground cumin - 1 teaspoon chili powder - Salt and pepper to taste - Fresh cilantro leaves for garnish For this recipe, you can use about 10-12 ounces of tortilla chips. The cooked chicken can come from a rotisserie chicken, making it easy. You can adjust the amount of cheese to your liking. If you prefer less cheese, try using 1.5 cups instead of 2. For a lighter option, swap sour cream with Greek yogurt. You can use canned corn or frozen corn, just make sure to drain it well. Each serving of these loaded nachos contains around 500 calories. You get protein from the chicken and beans. The cheese adds calcium, while the jalapeños give a kick of vitamin C. If you want a vegetarian option, skip the chicken and add more beans or veggies. This way, you can still enjoy a hearty and tasty dish. 1. Preheat your Oven: First, set your oven to 350°F (175°C). This step is key to getting that perfect melt on your cheese. 2. Prepare the Chicken Mixture: In a large skillet, heat 2 tablespoons of olive oil over medium heat. Add 2 cups of shredded chicken, 1 cup of black beans, and 1 cup of corn. Sprinkle in 1 teaspoon of ground cumin and 1 teaspoon of chili powder, along with a pinch of salt and pepper. Stir well. Cook for about 5-7 minutes, until everything is hot and smells amazing. 3. Layer the Nachos: Grab a large baking sheet. Spread a generous layer of 1 bag of tortilla chips evenly across the surface. 4. Add the Chicken Mixture: Spoon the heated chicken mixture over the chips. Make sure to cover most of the chips for even flavor. 5. Cheesy Goodness: Sprinkle 2 cups of shredded cheddar cheese over the chicken. Aim for full coverage to get that ultimate cheesy experience. 6. Top with Jalapeños: Scatter 1 cup of sliced jalapeños over the cheese. Adjust based on your spice preference. 7. Bake: Place the loaded nachos in the oven. Bake for about 15 minutes, until the cheese is melted, bubbly, and slightly golden. 8. Cool Down: Carefully remove the nachos from the oven using oven mitts. Let them cool for a couple of minutes to avoid burns. 9. Final Touches: After cooling, top with 1 ripe diced avocado, add dollops of 1/2 cup sour cream, and spoon over 1/2 cup pico de gallo or your favorite salsa. 10. Garnish and Serve: Finish by sprinkling fresh cilantro leaves on top for a burst of color and flavor. - Ensuring even distribution of toppings: Spread toppings evenly. This helps every bite taste great. - Baking time and temperature checks: Keep an eye on the nachos. Check around 12 minutes to avoid overcooking. - Creative presentation ideas: Serve nachos on the baking sheet or a colorful platter. Drizzle extra sour cream on top for flair. - Pairing options: Enjoy these nachos with a cold drink. Try a refreshing soda or a light beer for the perfect match. How to achieve the best cheese melt: The key to great nachos is the cheese. Use freshly shredded cheese instead of pre-packaged. Fresh cheese melts better and tastes great. Spread it evenly over your toppings to ensure all parts get that cheesy goodness. Avoiding soggy nachos: To keep your nachos from getting soggy, layer your chips first. Then, add the hot chicken mixture but keep it light. You want some chips exposed to the air. Bake them just long enough to melt the cheese, about 15 minutes at 350°F. Using spices or marinated chicken for extra flavor: For a flavor boost, try marinating your chicken. Use spices like cumin or chili powder before cooking. This makes every bite packed with taste. You can also use chipotle in adobo for a smoky twist. Additional toppings or garnishes to elevate the dish: Don’t stop at the basics! Add sliced olives, diced tomatoes, or pickled red onions. These toppings not only add flavor but also color. Fresh cilantro sprinkled on top gives a nice finish. Tips to avoid overcooking or burning the nachos: Keep an eye on your nachos while they bake. Ovens can vary in heat. If your cheese starts to brown too fast, cover it with foil. This stops burning while letting the cheese melt. Addressing ingredient balance: Make sure not to overload your nachos. Too many toppings can make them hard to eat. Stick to a good balance of chips, cheese, and toppings. This keeps them fun and easy to enjoy. {{image_4}} You can make simple swaps to fit your taste. For a vegetarian version, use beans or veggies instead of chicken. Black beans are a great choice for added protein. You can also mix in corn for sweetness. Try different cheese blends for unique flavors. Pepper jack adds a spicy kick, while mozzarella gives a milder taste. You can adjust the spice level based on your choice of jalapeños. Use fresh jalapeños for heat or jarred ones for a milder flavor. You can also try international twists. For example, BBQ chicken nachos give a sweet and tangy flavor. Use pulled BBQ chicken as a topping for an exciting change. Adjust your recipe for any gathering size. If you have a big crowd, simply double the ingredients. For smaller groups, cut the recipe in half. This way, everyone can enjoy the nachos. You can also use different sizes of serving dishes to fit your needs. Remember, nachos are perfect for sharing! To keep your loaded nachos fresh, store leftovers in an airtight container. This will help prevent them from getting soggy. You can keep them in the fridge for up to three days. The chicken and cheese may lose some texture, but they will still taste good. Reheat your nachos in the oven to maintain that crispy texture. Preheat your oven to 350°F (175°C), then place the nachos on a baking sheet. Heat for about 10 minutes or until warm. If you have extra toppings, like the avocado or sour cream, add those after reheating. For leftover nachos, you can make a nacho casserole. Layer them in a baking dish, add more cheese, and bake until bubbly. You can freeze loaded nachos, but it is best to freeze the components separately. Freeze the chicken mixture and cheese in separate bags. This way, you can thaw and assemble fresh nachos later. To defrost, place the chicken in the fridge overnight. Reassemble the nachos and bake as usual. This method helps keep the taste and texture just right. What type of chicken is best for loaded nachos? I love using rotisserie chicken. It saves time and adds great flavor. You can also use grilled or baked chicken. Just shred it into bite-sized pieces. The key is to keep it moist and tender. Can I make nachos ahead of time? Yes, you can! Prepare the chicken mixture and toppings in advance. Store them separately in the fridge. When ready to eat, just layer everything and bake. This way, you save time and still enjoy hot nachos! Can this recipe be made gluten-free? Absolutely! Just choose gluten-free tortilla chips. Many brands offer tasty options. Check the label to ensure they are certified gluten-free. This way, everyone can enjoy the nachos without worry. Options for low-carb or keto-friendly nachos For a low-carb version, swap chips for sliced bell peppers or zucchini. These veggies hold toppings well. You can also use cheese crisps as a crunchy base. They add flavor without the carbs! What can I use instead of sour cream? You can use Greek yogurt for a healthier twist. It has a similar texture and taste. But if you want something lighter, try mashed avocado. It adds creaminess and healthy fats. Alternatives for cheese for dairy-free diets For dairy-free options, use vegan cheese or nutritional yeast. Vegan cheese melts well and tastes great. Nutritional yeast adds a cheesy flavor without dairy. Both are perfect for those avoiding animal products. In this post, we explored how to create loaded nachos from start to finish. We covered the ideal ingredients, including chicken and tasty toppings. You learned precise measurements and nutritional info for better choices. The step-by-step guide made baking easy, while cooking tips helped avoid mistakes. We also discussed fun variations and storage tips for leftovers. In summary, making nachos is fun and flexible. With the right knowledge, you can impress friends and family at every gathering. Enjoy your nacho journey!

Loaded Nachos with Chicken Flavorful and Easy Recipe

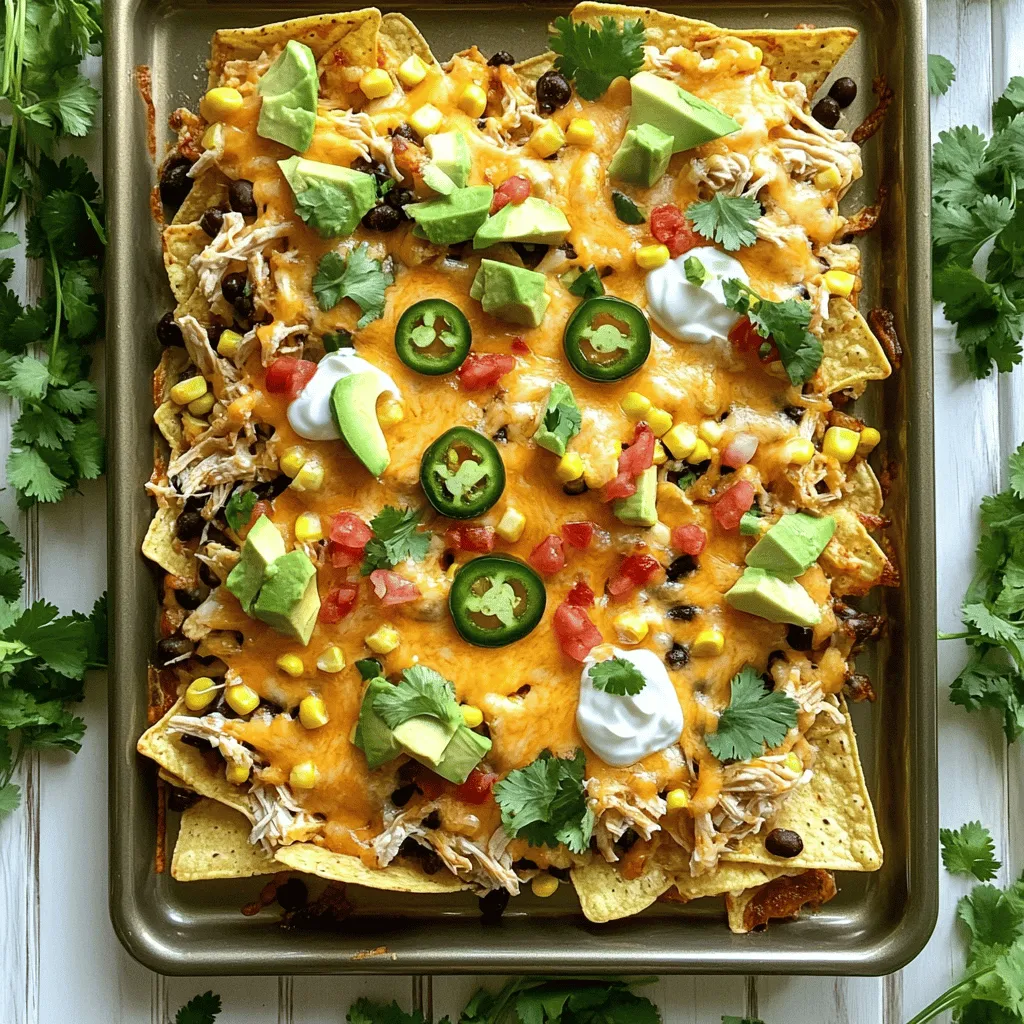
Craving a tasty dish that’s easy to make? Loaded Nachos with Chicken are your answer! In this blog post, I’ll

To make garlic butter steak bites, you need: - 1 pound sirloin steak, cut into 1-inch bite-sized cubes - 4 tablespoons unsalted butter - 4 cloves garlic, finely minced - 1 teaspoon fresh thyme leaves (or ½ teaspoon dried thyme) - 1 teaspoon fresh rosemary, finely chopped (or ½ teaspoon dried rosemary) - Sea salt and freshly ground black pepper, to taste - 1 tablespoon olive oil - Fresh parsley, finely chopped (for garnish) You’ll need these tools for this recipe: - A large, heavy-bottomed skillet - A sharp knife for cutting steak - A cutting board - A spatula for flipping steak bites - Measuring spoons for accurate ingredients - A serving plate for the finished dish Choosing the right steak is key for great flavor. Here are some tips: - Look for marbling: Marbling means fat within the meat. This adds flavor and juiciness. - Choose sirloin: Sirloin steak is tender and great for quick cooking. - Check the color: Fresh steak should be bright red. Avoid any that looks brown or dry. - Ask your butcher: Don’t hesitate to ask for advice. They can help you pick the best cut. These tips will help you make irresistible garlic butter steak bites. Enjoy the cooking! Start by cutting your sirloin steak into 1-inch cubes. This size helps them cook evenly. Next, season the cubes with sea salt and black pepper. Make sure each piece gets a good coating. This step adds flavor to your steak bites. Now, heat your skillet over medium-high heat. Add olive oil and let it get hot. Place the seasoned steak bites in a single layer. Avoid overcrowding the pan; this helps them brown nicely. Sear them for about 2-3 minutes without moving them. This creates a rich, brown crust. Flip the bites and cook for another 1-2 minutes, based on how well-done you like your steak. Once ready, take them out and set them aside on a plate. Lower the heat to medium and add unsalted butter to the same skillet. Let it melt completely. Once it melts, add minced garlic, thyme, and rosemary. Stir this mix for about 1 minute. Watch the garlic closely so it doesn’t burn. Return the steak bites to the skillet. Gently toss them in the garlic butter mix. Heat them through for about 1-2 minutes. Taste and adjust seasoning with more salt or pepper if needed. Finally, garnish with fresh parsley. Serve these garlic butter steak bites warm. They look great on a wooden platter, drizzled with extra garlic butter. For the full recipe, check here. For steak bites, doneness matters. You can cook them rare, medium, or well-done. Here’s how to check. - Rare: Cook for about 2 minutes per side. Aim for an internal temp of 120°F. - Medium: Cook for 3-4 minutes per side. Look for 130°F inside. - Well-Done: Cook for 5 minutes per side. The temp should reach 160°F. Use a meat thermometer for accuracy. This tool helps you avoid guesswork. Marinades add depth to your steak bites. Here’s a quick way to enhance flavor: - Simple Marinade: Mix olive oil, soy sauce, garlic, and lemon juice. - Let the steak cubes soak for at least 30 minutes. - This adds flavor and makes the meat tender. You can also try different herbs or spices to create new tastes. Steak bites can go wrong easily. Avoid these common errors: - Overcrowding the Pan: This makes the meat steam instead of sear. Cook in batches. - Not Letting the Meat Rest: After cooking, let the steak sit for 5 minutes. This keeps it juicy. - Skipping Seasoning: Always season your steak before cooking. This helps build flavor. By following these tips, you can create perfect garlic butter steak bites every time. For a full guide, check the Full Recipe. {{image_4}} You can use various cuts of steak for this dish. Sirloin is great, but try ribeye or tenderloin for more flavor and tenderness. Each cut brings its unique taste and texture. Ribeye has more fat, making it juicy and flavorful. Tenderloin is lean and very soft. Adjust cooking times based on the cut you choose to keep it tender. While garlic and butter are the stars, you can play with herbs. Try using fresh oregano or basil for a different touch. You can also mix in some chili flakes for a hint of heat. Experiment with different combinations to find what you love. This recipe is all about making it yours! If you like spice, add some heat! A pinch of cayenne or crushed red pepper works well. You could also stir in some hot sauce into the garlic butter. This adds an exciting kick that pairs well with the savory steak. Adjust the spice level to fit your taste. Enjoy the bold flavors! For the full recipe, check out the [Full Recipe]. To store leftover garlic butter steak bites, let them cool first. Place them in an airtight container. Make sure to keep them in the fridge. They will stay fresh for up to three days. If you put them in the fridge right away, they will hold their flavor better. When you want to eat the leftovers, reheat them gently. You can use a skillet over low heat. Add a bit of butter or olive oil to keep them moist. Stir often to ensure even heating. You can also use the microwave. Heat in short bursts to avoid overcooking. Cover the dish to keep moisture in. If you want to freeze the steak bites, do it right after they cool. Put them in a freezer-safe bag or container. Remove as much air as possible. They can last up to three months in the freezer. When you’re ready to eat them, thaw them in the fridge overnight. Reheat using the skillet method for the best taste. For a full recipe, check the details above. The best way to cook garlic butter steak bites is to sear them in a hot skillet. Start with a heavy pan and heat olive oil until it shimmers. Add the seasoned steak bites in a single layer. Cook without moving them for 2 to 3 minutes for a nice brown crust. Flip and cook for another 1 to 2 minutes. This method gives you juicy bites with a rich flavor. Cooking steak bites takes about 10 to 15 minutes. You need 2 to 3 minutes on one side and 1 to 2 minutes on the other side. After that, you’ll want to toss them in the garlic butter for an extra 1 to 2 minutes. The total time, from prep to plate, is around 20 minutes. Quick and easy! Yes, you can use garlic powder instead of fresh garlic. However, fresh garlic gives a better flavor. If you use powder, add about 1 teaspoon to the melted butter. Mix it in well with the herbs. This change can still create a tasty dish, but fresh garlic really shines in this recipe. - Is this recipe suitable for meal prep? Yes, this recipe is great for meal prep. You can cook the steak bites ahead of time and store them in the fridge for up to 3 days. Just reheating them in a skillet will keep them tasty. Pair them with sides like rice or veggies for a quick meal. - What can I serve with garlic butter steak bites? You can serve garlic butter steak bites with many sides. Here are some ideas: - Mashed potatoes for creaminess - Steamed broccoli for crunch - Rice to soak up the garlic butter - A fresh salad for a light touch These options make your meal balanced and delicious! For the full recipe, check out the section above. Enjoy cooking! In this post, we explored how to create tasty garlic butter steak bites. We covered essential ingredients, cooking tools, and tips for picking the right steak. I guided you through preparing, searing, and making a flavorful garlic butter sauce. We also shared tips for doneness, flavor enhancements, and how to avoid common mistakes. You now have the tools to make a delicious dish. Enjoy your cooking adventure!

Irresistible Garlic Butter Steak Bites Easy Recipe

If you crave a simple yet delicious meal, you’ve landed in the right spot. My Garlic Butter Steak Bites recipe

Older posts
Newer posts
← Previous Page1 … Page42 Page43 Page44 … Page68 Next →

dsad

© 2025 tastymomrecipes • Built with GeneratePress

Our Policies

  • Copyright Policy
  • Cookie Policy
  • GDPR Policy
  • Privacy Policy
  • Disclaimer
  • Terms Of Use

More Information

  • Home
  • About
  • Contact
  • Appetizers
  • Dessert
  • Dinner
  • Drinks
©2025, tastymomrecipes About Back To Top