Skip to content
DisclaimerTerms Of UseGDPR PolicyCookie Policy

tastymomrecipes

  • Home
  • Drinks
  • Appetizers
  • Dinner
  • Dessert
  • About
  • Contact
  • Privacy Policy
DisclaimerTerms Of UseGDPR PolicyCookie Policy

Olivia

This recipe uses simple, fresh ingredients. Here’s what you need: - 4 skinless salmon fillets - 3 tablespoons extra virgin olive oil - 4 cloves garlic, finely minced - 2 lemons (1 juiced, 1 thinly sliced) - 1 teaspoon dried oregano - 1 teaspoon smoked paprika - Salt and freshly cracked black pepper to taste - 1 cup cherry tomatoes, halved - 1 cup fresh baby spinach - Fresh parsley, chopped (for a vibrant garnish) These ingredients come together to create a bright and tasty meal. The salmon is rich in omega-3 fatty acids. Garlic adds a punch of flavor, while lemon brings a zesty brightness. The tomatoes and spinach add color and nutrients. You can enhance this dish with a few extra ingredients. Consider adding: - Red pepper flakes for heat - Capers for a briny touch - Fresh basil or dill for an herb boost These options can change the flavor and make the dish your own. Feel free to mix and match based on what you have on hand. You only need a few simple tools for this dish: - A large baking sheet - Parchment paper for easy cleanup - A small mixing bowl for the marinade - A whisk or fork to combine the marinade These items make the cooking process quick and easy. Having the right tools helps ensure your meal turns out perfect every time. For the full recipe, check the link above! Start by preheating your oven to 400°F (200°C). This step helps cook the salmon evenly. Line a large baking sheet with parchment paper. This makes cleanup easy later. In a small bowl, mix together the extra virgin olive oil, minced garlic, and juice from one lemon. Add dried oregano, smoked paprika, and a pinch of salt and pepper. Whisk it all together until smooth. This marinade adds great flavor to the salmon. Place the salmon fillets on the lined baking sheet. Pour the marinade over each fillet. Make sure every piece gets covered well. This will keep the salmon moist and tasty. Next, place thin lemon slices on top of each fillet. Scatter halved cherry tomatoes around the salmon. If any marinade is left, drizzle it over the tomatoes. Put the baking sheet in the preheated oven. Bake for 12 to 15 minutes. Check the salmon by using a fork. It should flake easily when it’s done. In the last 5 minutes, add fresh baby spinach around the salmon. This will wilt nicely and soak up the flavors. When finished, take the baking sheet out of the oven. Top with chopped parsley for a fresh look. Enjoy your one pan lemon garlic salmon! For the full recipe, click here. To cook salmon just right, aim for a few key points. First, use fresh salmon fillets. Fresh fish tastes better and cooks evenly. Next, don’t overcook it. Salmon is perfect when it flakes easily with a fork. Keep an eye on the clock. Set a timer for about 12-15 minutes. If you like it a bit rare, check earlier. You can also use a meat thermometer. The ideal temperature is around 125°F (52°C) for medium-rare. You can add your twist to this dish for more flavor. Try adding a splash of white wine to the marinade. It gives a nice depth to the taste. You can also add fresh herbs like dill or thyme. They pair well with salmon and bring out its flavors. For a spicy kick, add red pepper flakes to the marinade. If you want a citrus twist, try using lime instead of lemon. To make a complete meal, think about your sides. Roasted asparagus or green beans go well with salmon. They add color and crunch to your plate. You can also serve it with a light salad. A simple mix of greens and vinaigrette works great. Another option is quinoa or rice. They soak up the juices and complement the salmon’s flavor. Feel free to mix and match your sides to make it your own! For the full recipe, check above. {{image_4}} You can switch salmon for other proteins. Try chicken breast, shrimp, or tofu. Each option cooks well with the same flavors. Chicken takes a bit longer to cook, about 20-25 minutes. Shrimp cooks fast; it needs just 8-10 minutes. Tofu can be baked for 15-20 minutes. Adjust cook times based on the protein you choose. Feel free to mix up the veggies in this dish. You can replace cherry tomatoes with bell peppers or zucchini. Broccoli or asparagus also works well. Just cut them into bite-sized pieces. These veggies add color and nutrients. Make sure to adjust the cooking time. Some may need a little longer to tenderize. You can change the flavor with simple swaps. Use lime juice instead of lemon for a different zest. Fresh herbs like dill or basil can replace parsley. Add a pinch of red pepper flakes for heat. If you want a smoky taste, try adding smoked salt. Experimenting with flavors can make this dish uniquely yours. For more ideas, check out the Full Recipe. After enjoying your one pan lemon garlic salmon, store any leftovers in an airtight container. Keep it in the fridge for up to three days. Make sure to let it cool down before sealing the container. This helps maintain the salmon's texture and flavor. To reheat, use your oven or a microwave. If using an oven, preheat it to 350°F (175°C). Place the salmon on a baking sheet and cover it with foil. Heat for about 10 minutes. For the microwave, place the salmon on a plate. Heat in 30-second intervals until warm. Be careful not to overcook it. If you want to save leftovers longer, freezing is a great option. Wrap the salmon in plastic wrap, then place it in a freezer-safe bag. Remove as much air as possible. You can freeze it for up to two months. When you're ready to eat, thaw it overnight in the fridge before reheating. You can find the full recipe to enjoy this dish again or share with friends. You can check if the salmon is done by using a fork. Gently flake the thickest part of the fillet. If it flakes easily, it’s ready. Salmon is best when it reaches an internal temperature of 145°F (63°C). You can also look for a change in color. It should be opaque and not translucent. Yes, you can prep the salmon and marinade ahead of time. Store the salmon fillets in the fridge with the marinade for up to 24 hours. This helps build flavor. However, it's best to bake it fresh for the best taste and texture. If you don’t have fresh parsley, you can use fresh cilantro or basil. Both add a nice touch. Dried herbs like parsley can work too, but use less since they are more concentrated. Absolutely! This recipe is healthy and packed with nutrients. Salmon provides Omega-3 fatty acids, which are good for your heart. The tomatoes and spinach add vitamins and minerals. Using olive oil is a healthy fat choice too. Yes, you can use frozen salmon. Just make sure to thaw it first. You can do this by placing it in the fridge overnight or using the microwave. Once thawed, you can follow the full recipe as usual. This post covered key ingredients, tools, and step-by-step baking instructions for salmon. We explored tips for perfect cooking and tasty variations you can try. You learned how to store leftovers safely and how to reheat them without losing flavor. Cooking salmon can be simple and rewarding. Now, enjoy your flavorful dish and share it with loved ones. Happy cooking!

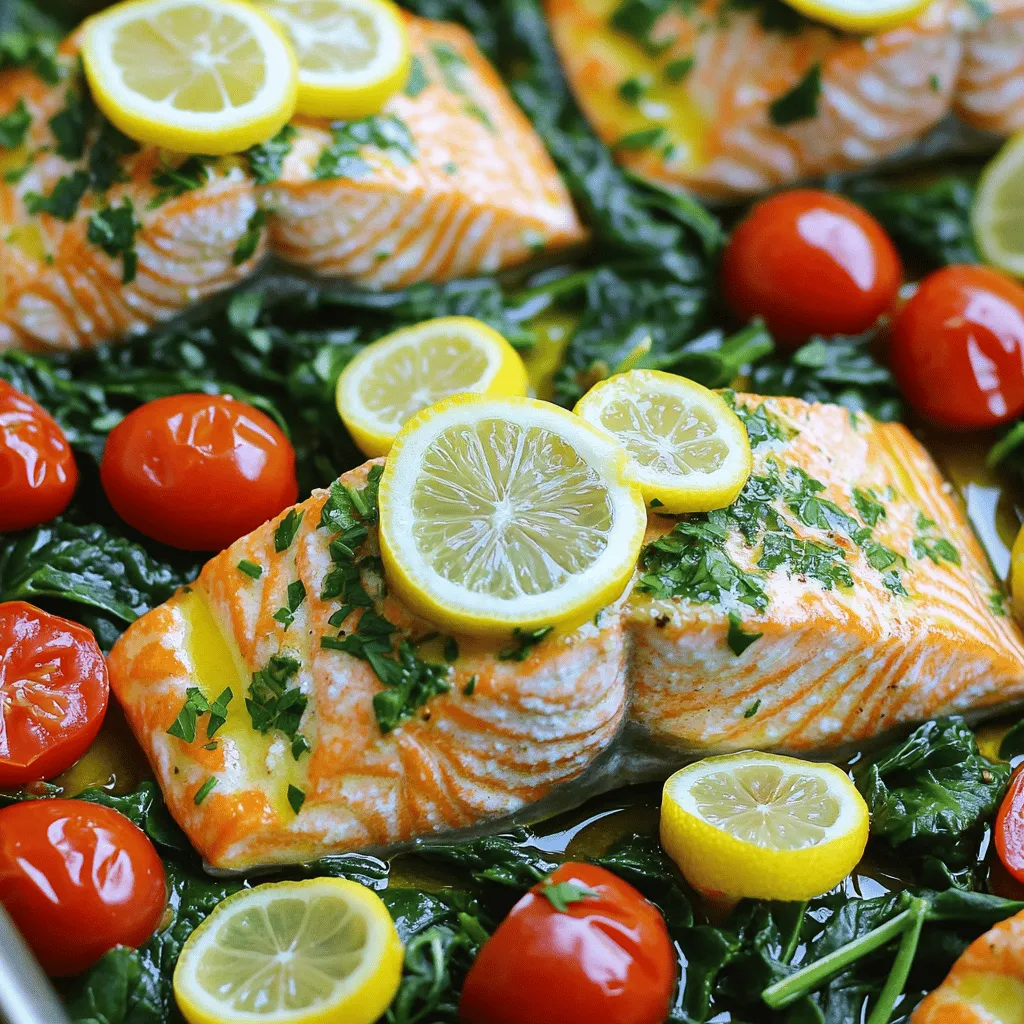
One Pan Lemon Garlic Salmon Quick and Easy Recipe

Are you ready to impress with a dish that’s quick, easy, and packed with flavor? This One Pan Lemon Garlic

To make cheesy scalloped potatoes, you need a few key items. Gather the following ingredients: - 3 large russet potatoes, thinly sliced - 2 cups shredded sharp cheddar cheese - 1 cup milk - 1 cup heavy cream - 2 tablespoons butter (for greasing) - 3 cloves garlic, minced - 1 teaspoon fresh thyme leaves (or ½ teaspoon dried thyme) - 1 teaspoon salt - ½ teaspoon black pepper - ¼ teaspoon cayenne pepper (optional, for a little kick) - ¼ cup grated Parmesan cheese (for topping) You can make this dish your own by adding some optional ingredients. Consider these for extra flavor: - Sliced onions for sweetness - Cooked bacon for a smoky taste - Spinach or kale for added greens - Different cheese types like Gruyère or mozzarella - Fresh herbs like parsley or chives for garnish Selecting the right potatoes and cheese is crucial for great flavor. Here are some tips: - Potatoes: Go for russet potatoes. They are starchy and make for creamy layers. Look for firm potatoes without blemishes. - Cheese: Choose sharp cheddar for a bold taste. Aged cheeses add depth, while fresh cheeses offer creaminess. - Freshness: Always check the expiration date on dairy products. Fresh ingredients yield the best results. When you use high-quality potatoes and cheese, your cheesy scalloped potatoes will shine. For the complete recipe, check out the [Full Recipe]. Start by preheating your oven to 350°F (175°C). This helps the dish cook evenly. While the oven heats, grab a large baking dish. Use two tablespoons of butter to grease the inside. This step prevents the cheesy goodness from sticking. In a big mixing bowl, take three large russet potatoes. Slice them thinly. Add three minced garlic cloves, one teaspoon of salt, and half a teaspoon of black pepper. If you want a little heat, add a quarter teaspoon of cayenne pepper. Toss the potatoes gently until they are coated with the seasoning. Next, add one teaspoon of fresh thyme leaves. Mix it all well. Now, it’s time to build your layers! Spread half of the potato mixture evenly in the greased baking dish. Then, sprinkle one cup of shredded sharp cheddar cheese over the first layer. Add the rest of the potato mixture on top of the cheese. In a separate bowl, whisk together one cup of milk and one cup of heavy cream. Pour this creamy mix over the layered potatoes. Top everything with the remaining cheddar cheese and a quarter cup of grated Parmesan cheese. Cover the dish with aluminum foil to keep moisture in. Bake it for 45 minutes. After that, remove the foil and bake for another 15-20 minutes. You want the potatoes to be fork-tender and the top to be bubbly and golden brown. Once cooked, let the dish rest for about 10 minutes before serving. This helps the cheese set. Now you are ready to enjoy your cheesy scalloped potatoes! For a full recipe, don’t forget to check the details! To make your scalloped potatoes great, slice the potatoes thin. Aim for about 1/8 inch thick. This helps them cook evenly. Use a mandoline slicer for even slices. Layer half of the potatoes, then sprinkle cheese. Repeat this for the second layer. This stacking adds flavor and texture. For a great cheese melt, mix different cheeses. Sharp cheddar adds a nice tang. Adding some Gruyère or mozzarella can create a creamy texture. Grate the cheese yourself for better melting. Pre-shredded cheese often contains anti-caking agents that can affect the melt. Add cheese on top before baking, and cover with foil to keep moisture in. One mistake is not seasoning the potatoes. Always add salt and spices to enhance flavor. Another issue is not using enough liquid. Ensure the potatoes are submerged in the cream mixture. Don’t skip the resting time after baking. This step helps the dish set and makes serving easier. For the full recipe, check out the details above! Enjoy your cooking! {{image_4}} You can make cheesy scalloped potatoes even better by adding veggies or proteins. Try spinach, broccoli, or sliced mushrooms for a fresh taste. To add protein, use cooked bacon, ham, or chicken. Just layer them in with the potatoes. This way, you create a heartier dish that everyone will love. Cheese is the star of this dish, so mix it up! While sharp cheddar is classic, you can use Gruyère or mozzarella for a different flavor. Mixing cheeses adds depth and richness. Consider adding a little blue cheese for a bold twist. Each combination will give your scalloped potatoes a unique touch. If you like heat, spice things up! Add cayenne pepper or sliced jalapeños for a kick. You can also add a dash of hot sauce to the cream mixture. For more flavor, try stirring in a teaspoon of mustard or smoked paprika. These spices will enhance the creamy goodness of your cheesy scalloped potatoes. For a complete guide on how to make this dish, check out the Full Recipe. To keep cheesy scalloped potatoes fresh, let them cool first. Place them in an airtight container. This will help lock in moisture and flavor. Store them in the fridge for up to three days. If you see any signs of spoilage, like off smells or mold, throw them away. When you’re ready to enjoy leftovers, preheat your oven to 350°F (175°C). Place the potatoes in an oven-safe dish. Cover it with foil to keep the moisture in. Heat for about 20 minutes or until the cheese is bubbly again. For a crispier top, remove the foil for the last five minutes. If you want to save cheesy scalloped potatoes for later, freezing works well. Cool the dish completely first. Use a freezer-safe container or wrap it tightly in plastic wrap. Label it with the date. You can freeze it for up to three months. To reheat, let it thaw overnight in the fridge. Then follow the reheating instructions above. This way, you’ll enjoy that cheesy goodness any time you wish! Scalloped potatoes use cream or milk for a rich sauce. They don’t have cheese mixed in. On the other hand, au gratin potatoes include cheese in the sauce and often have a crispy cheese topping. Both are delicious, but they offer different flavors and textures. If you love cheese, go for au gratin. If you prefer a creamier dish, choose scalloped. Yes, you can make cheesy scalloped potatoes ahead of time. Prepare them fully and store in the fridge. Cover the dish with foil or plastic wrap to keep it fresh. When ready to bake, let it sit at room temperature for 20 minutes. Then, bake as the recipe states. This way, you save time and still enjoy a yummy meal. Cheesy scalloped potatoes go well with many dishes. Here are a few ideas: - Roast chicken or turkey - Grilled steak or pork chops - Steamed green beans or broccoli - A fresh garden salad These pairings balance the richness of the potatoes and add variety to your meal. They help you create a comforting dinner that everyone will love. For the full recipe, check out the Cheesy Scalloped Potatoes Delight section. You learned about making cheesy scalloped potatoes, from ingredients to storage. Choosing quality potatoes and cheese is key. Layering techniques will help your dish shine. You can even customize with vegetables or different cheeses. Always store leftovers properly for the best taste. Now you can create a delicious meal that wows everyone. Enjoy the cooking process and share your tasty creation!

Cheesy Scalloped Potatoes Simple and Comforting Dish

Are you ready to dive into a warm bowl of cheesy goodness? Cheesy scalloped potatoes are a simple yet comforting

- 1 lb chicken breast, sliced into thin strips - 1 cup jasmine rice - 2 cups water or chicken broth - 1/4 cup low-sodium soy sauce - 2 tablespoons honey or maple syrup - 2 tablespoons rice vinegar - 2 cloves garlic, finely minced - 1 teaspoon fresh ginger, grated - 1 tablespoon cornstarch mixed with 2 tablespoons water - Olive oil for cooking - 1 cup broccoli florets - 1 carrot, julienned - 2 green onions, finely chopped - Sesame seeds for garnish - Each serving has about 400 calories. - There are around 30g of protein. - The dish contains about 60g of carbs. - It has around 10g of fat. With these ingredients, you can make a tasty Teriyaki Chicken Rice Bowl. Each bite is a mix of flavors and textures. The chicken is tender, and the rice is fluffy. Don't forget to check the full recipe for all the details! - Rinse 1 cup of jasmine rice under cold water. Do this until the water runs clear. This helps remove excess starch. - In a medium pot, combine the rinsed rice with 2 cups of water or chicken broth. Bring it to a boil over high heat. Once it boils, reduce the heat to low and cover the pot. Let it simmer for 15 minutes or until the rice is tender. Fluff it with a fork and keep it warm. - In a small bowl, combine 1/4 cup low-sodium soy sauce, 2 tablespoons honey or maple syrup, 2 tablespoons rice vinegar, 2 minced garlic cloves, and 1 teaspoon grated ginger. - Whisk these ingredients together until they blend well. This sauce will give your dish a great flavor. - Heat a drizzle of olive oil in a large non-stick skillet over medium-high heat. - Add 1 lb of sliced chicken breast to the pan. Season it with salt and pepper. Cook the chicken for about 5-7 minutes. You want it cooked through and golden brown. - Once the chicken is ready, add 1 cup of broccoli florets and 1 julienned carrot. Stir-fry for 3-4 minutes. This will keep the veggies bright and crisp. - To serve, place a scoop of rice in each bowl. - Top the rice with the chicken and vegetable mix. Make sure to create a beautiful display with the colors. - Sprinkle chopped green onions and sesame seeds on top for garnish. Enjoy your lovely teriyaki chicken rice bowl! For the full recipe, check out the detailed instructions above. To boost the taste of your teriyaki chicken rice bowls, always use fresh ingredients. Fresh garlic and ginger add a bright zing. You can also swap out the sauce. Try hoisin sauce for a sweet twist or sriracha for some heat. You can cook this dish on the stovetop or in a slow cooker. Stovetop cooking is quick and easy. If you use a slow cooker, let it simmer for a few hours. This method makes the chicken tender and juicy. Plan to meal prep by making a big batch. Store leftovers in the fridge for quick meals later. For the best chicken doneness, cook it until it reaches 165°F. Use a meat thermometer to check. For veggies, cook broccoli for about 3-4 minutes. Carrots need around 2-3 minutes. You want them tender but still crisp. This keeps the colors bright and flavors fresh. If you want to create this dish, you can find the full recipe linked above. {{image_4}} For a tasty vegetarian or vegan dish, swap the chicken for tofu. Tofu absorbs flavors well and adds protein. Here are some good options: - Firm tofu, pressed and cubed - Tempeh, sliced thin - Seitan, for a meat-like texture You can also try chickpeas or lentils for plant-based protein. Both options give a nice texture and balance to your meal. If you're watching carbs, cauliflower rice is a great choice. It is light and easy to make. Just pulse cauliflower florets in a food processor until they resemble rice grains. Other vegetable bases include: - Zucchini noodles (zoodles) - Shredded cabbage - Riced broccoli These options keep your meal fresh and full of flavor. You can mix up the flavors in your teriyaki chicken rice bowls. Try different sauces like: - Orange Teriyaki - Pineapple Teriyaki - Spicy Sriracha Sauce Adjust the spice level by adding more ginger or red pepper flakes. This way, you can create a dish that suits your taste. Store your teriyaki chicken rice bowls in the fridge for up to 4 days. Use an airtight container to keep the flavors fresh. Glass containers work great for this. To freeze the dish, let it cool completely. Then, place it in a freezer-safe container. It can last for up to 3 months in the freezer. When you're ready to eat, thaw it in the fridge overnight. Reheat it in a microwave or on the stove until it's hot. You can prepare the chicken and rice in advance. Cook a big batch on the weekend. Portion it into containers for quick meals during the week. This way, lunch or dinner is just a microwave away! You can serve many tasty sides with teriyaki chicken rice bowls. Here are some great options: - Steamed edamame - Roasted vegetables - Cucumber salad - Miso soup - Pickled ginger These sides add flavor and balance to your meal. Each brings its own unique taste, enhancing the overall experience. Yes, you can make these bowls ahead of time. Here are some tips for meal prepping: - Cook the rice and chicken separately. This keeps them fresh longer. - Store the sauce in a separate container. Mix it in when you’re ready to eat. - Use airtight containers to keep everything fresh. This way, you can enjoy a quick, delicious meal during the week. To add heat to your teriyaki sauce, try these ingredients: - Sriracha or chili paste - Red pepper flakes - Fresh chopped chili peppers Mix these into your sauce for an extra kick. Adjust the amount to suit your taste. Yes, you can use different proteins in this recipe. Here are some great alternatives: - Tofu for a vegetarian option - Beef or pork for a different flavor - Shrimp for a quick-cooking choice These options still pair well with the teriyaki sauce and keep the dish tasty. This guide covers everything to create delicious Teriyaki Chicken Rice Bowls. We explored key ingredients, step-by-step cooking methods, and smart tips for enhancing flavor. You learned about variations for different diets and how to store leftovers effectively. Now, you have the tools to enjoy this tasty dish anytime. Explore different ingredients and methods to keep it exciting. It's easy, fun, and rewarding to make these rice bowls at home. Dive in and enjoy your cooking journey!

Teriyaki Chicken Rice Bowls Tasty and Easy Meal

Looking for a tasty meal that’s simple to make? Teriyaki Chicken Rice Bowls are the answer. You only need a

- 1 lb large shrimp, peeled and deveined - 4 tablespoons unsalted butter - 4 cloves garlic, finely minced - 1 teaspoon red pepper flakes - 1 lemon, juiced and zested - 1/4 cup chicken or vegetable broth - Fresh parsley, coarsely chopped - Optional: cherry tomatoes, halved - Optional: asparagus, trimmed and cut The main ingredients are the stars of this dish. Shrimp bring a sweet, sea flavor. Butter adds a rich, creamy touch. Garlic gives a strong, savory kick. Together, they create a mouthwatering base. For flavor, I love using red pepper flakes. They add heat, but you can adjust them to your taste. Fresh lemon juice brightens the dish. It gives a tangy contrast to the rich butter. Chicken or vegetable broth keeps the shrimp juicy. When garnishing, fresh parsley adds color and freshness. If you want to add more texture and taste, try cherry tomatoes. They burst with sweetness. Asparagus brings a nice crunch and a healthy touch. Each ingredient makes this dish better, and you can mix and match to suit your taste. For the full recipe, check out the One Pan Garlic Butter Shrimp Delight. - Rinse and season the shrimp: Start by rinsing the shrimp under cool water. This helps remove any grit. After rinsing, pat them dry with paper towels. Next, season the shrimp with salt and black pepper. This step adds great flavor to the shrimp. - Prep fresh ingredients: Mince the garlic finely. This will help release its strong flavor. Chop the parsley coarsely for garnish. If you choose to use cherry tomatoes or asparagus, cut them now. This makes the cooking process smoother. - Melt butter in a skillet: Place a large skillet on medium heat. Add the butter pieces to the skillet. Let the butter melt completely. You want it to froth gently before moving on to the next step. - Infuse with garlic and spice: Once the butter is melted, add the minced garlic and red pepper flakes. Stir these together for about one minute. You want the garlic to smell fragrant but not brown. Brown garlic can taste bitter. - Cook shrimp until pink and opaque: Carefully add the seasoned shrimp to the skillet in a single layer. Cook each side for about 2 to 3 minutes. The shrimp will turn a vibrant pink color when ready. They should also look opaque. - Add broth, lemon juice, and optional ingredients: Sprinkle the lemon zest over the shrimp. Pour in fresh lemon juice and broth. Stir gently to mix everything. Let the dish simmer for about 2 minutes. This helps the flavors blend well. If you’re using cherry tomatoes or asparagus, add them now. Cook for an additional 3 to 4 minutes. The vegetables should be tender but still bright. Make sure to check the full recipe for more details! How to tell when shrimp are cooked Shrimp cook quickly. They turn pink and opaque when done. Look for a curled shape. This shows they are ready. Overcooking makes shrimp tough. Aim for 2-3 minutes per side. The importance of not overcooking garlic Garlic adds flavor but burns fast. Cook garlic for about 1 minute. It should smell good but not turn brown. Brown garlic tastes bitter. Keep an eye on it while cooking. Serving directly from the skillet vs. plated Serving from the skillet looks rustic and inviting. It makes the meal feel casual. For a more formal look, plate servings. Add lemon wedges for a pop of color. Garnishing ideas for visual appeal Fresh parsley brightens up the dish. Scatter it on top just before serving. You can also add lemon slices or cherry tomatoes. These add color and make your dish more appealing. Adjusting spice levels You can change the heat by adding more or less red pepper flakes. Start with a small amount. Taste as you go. This way, you find your perfect spice level without going overboard. Enhancing flavors with additional seasonings Try adding herbs like basil or thyme for more depth. A splash of soy sauce can also enhance the umami flavor. Experiment with different seasonings to find your favorite combination. {{image_4}} You can change the shrimp to other seafood, like scallops or fish. This keeps the dish fresh. You can also use chicken or pork for a different protein. For a vegetarian twist, swap shrimp with firm tofu or mushrooms. Tofu takes on flavors well and adds a nice texture. Mushrooms give a savory taste that will please any palate. Adding different herbs can change the whole dish. Basil brings a sweet and fragrant note. Cilantro adds brightness and pairs well with shrimp. You can also try sauces like soy or teriyaki. These sauces can bring a rich umami flavor and make it unique. Don't be afraid to mix and match! Incorporating seasonal vegetables makes the dish vibrant and fresh. In summer, try fresh zucchini or bell peppers. In winter, add hearty vegetables like brussels sprouts or kale. These changes not only enhance flavor but also make it more colorful. You can adapt the recipe based on what you have in your kitchen. To store your leftover One Pan Garlic Butter Shrimp, let it cool first. Place it in an airtight container. This keeps the shrimp fresh and tasty. Glass or plastic containers work well. They seal tight, keeping out air. Store it in the fridge for up to three days. Yes, you can freeze this dish! To do this, pack it in a freezer-safe container. Leave some space at the top, as it may expand. When you want to eat it, thaw it in the fridge overnight. Reheat it on the stove over low heat. Stir often to avoid burning. In the fridge, your shrimp will last about three days. In the freezer, it can stay good for up to three months. Always check for signs of spoilage. If the shrimp smells off or looks discolored, it’s best to toss it. Enjoying your One Pan Garlic Butter Shrimp fresh is always the best choice! What’s the best way to peel and devein shrimp? Peeling and deveining shrimp is easy. First, hold the shrimp in one hand. With the other hand, grab the shell at the head and pull it off. Next, use a small knife to make a shallow cut along the back. This cut reveals the dark vein. Gently pull it out with your fingers. Now your shrimp is clean and ready! Can I make this recipe in advance? You can prepare some parts ahead of time. Peel and devein the shrimp a day before. Store them in a sealed container in the fridge. You can also chop garlic and parsley in advance. Just keep them in separate containers. Cook the dish fresh for the best taste. How can I make this dish spicier? To add heat, increase the red pepper flakes. You can also add a few dashes of hot sauce. If you love spice, try adding sliced jalapeños or a pinch of cayenne pepper. Start with a little, then taste as you go to find your perfect heat level. Can I substitute the butter for a dairy-free option? Yes, you can! Use olive oil or coconut oil instead of butter. Both will give a nice flavor. If you want a buttery taste, try vegan butter. It melts well and works great in this dish. How many calories does One Pan Garlic Butter Shrimp contain? One serving of this dish has about 300 calories. This number may change based on extra ingredients. If you add cherry tomatoes or asparagus, the calories will be slightly higher. What are the main nutrients in this dish? This dish is rich in protein from the shrimp. It also has healthy fats from the butter. Garlic adds antioxidants, while lemon gives you vitamin C. If you add veggies, you’ll get even more vitamins and fiber! This recipe for One Pan Garlic Butter Shrimp blends simple ingredients with easy steps. You can prepare tasty shrimp, infused with garlic and lemon, in no time. Remember, don’t overcook the shrimp or garlic for the best flavor. Feel free to customize the dish with different proteins or vegetables. Store leftovers well to enjoy later. Your culinary adventure starts with these basics, so have fun experimenting in the kitchen! Enjoy your delicious creation!

One Pan Garlic Butter Shrimp Simple and Flavorful Dish

Want a quick and delicious meal? One Pan Garlic Butter Shrimp is just what you need! This simple dish mixes

To create a tasty No Bake Strawberry Icebox Cake, gather these simple ingredients: - 2 cups fresh strawberries, hulled and sliced - Zest of 1 lemon (optional) - Fresh mint leaves for garnish (optional) - 1 cup heavy whipping cream - 1 cup cream cheese, softened to room temperature - 3/4 cup powdered sugar - 1 package (14.1 oz) graham crackers - 1 teaspoon vanilla extract Using fresh strawberries makes this cake bright and flavorful. You can add lemon zest for a fresh twist. For a touch of elegance, top with mint leaves. The cream cheese, whipped cream, and sugar create a rich and smooth filling. Graham crackers serve as the base, giving a nice crunch. This recipe is simple and fun. You can find the Full Recipe to guide you through making it step by step. Enjoy every bite! To start, take 1 cup of heavy whipping cream. Use an electric mixer on medium-high speed. Whip it until soft peaks form, which takes about 3 to 5 minutes. Watch out! Over-whipping can make it grainy. Next, grab a separate bowl. Combine 1 cup of softened cream cheese, 3/4 cup of powdered sugar, and 1 teaspoon of vanilla extract. Mix these until smooth. You want a creamy texture with no lumps. Now, it's time to assemble! Take a 9x13 inch dish. Lay down a layer of graham crackers to cover the bottom. Spread half of the cream mixture over the crackers. Then, layer half of the sliced strawberries on top. Repeat this process with another layer of graham crackers, the rest of the cream, and the remaining strawberries on top. Cover the dish tightly and refrigerate for at least 4 hours, or overnight if you can wait! This chilling is key for flavors to blend. When ready, slice into squares and enjoy your delicious creation! For a touch of elegance, add fresh mint leaves as a garnish. You can find the Full Recipe linked above. To get great whipped cream, start with cold cream. Use a chilled bowl to help. Beat the cream until soft peaks form. This step takes about 3-5 minutes. Be careful not to over-whip. Over-whipped cream can turn grainy. You want a smooth, airy texture that holds its shape well. When building your icebox cake, even layers are key. Spread the cream mixture evenly over the graham crackers. Use a spatula to help with this. Place the strawberries in a single layer. Make sure they cover the cream well. This step makes your cake look pretty and inviting. Each layer should be visible when you slice it. To make your cake even more special, serve it on chilled plates. You can drizzle a bit of strawberry puree on the plate. This adds color and sweetness. A sprig of fresh mint on top gives a nice touch. It looks elegant and tastes fresh. These small details can make a big difference. Enjoy your no bake strawberry icebox cake! {{image_4}} You can switch up the strawberries for other fruits. Raspberries, blueberries, or blackberries work well. You can also try peaches or mangoes for a tropical twist. Each fruit adds its own flavor and makes the cake unique. Just make sure the fruit is fresh. This keeps the taste bright and clean. Adding flavors can make your dessert special. Try a bit of almond extract for a warm touch. Cinnamon or nutmeg can add a nice spice to the cream. You can also add a splash of orange juice or zest for brightness. These little changes can make a big difference in taste. Experiment with what you like best. Want a gluten-free version? Just swap graham crackers for gluten-free cookies. You can use gluten-free vanilla wafers or almond flour cookies. They work great and keep the cake's texture. Always check the labels to make sure they fit your needs. Making this cake gluten-free means everyone can enjoy it! For the full recipe, please check the detailed instructions above. To store leftovers, cover the dish tightly with plastic wrap. This keeps the cake fresh and moist. Place it in the fridge for up to three days. If the cake is not covered, it may dry out. Always check for any off smells before eating. You can freeze the icebox cake for later enjoyment. First, cut it into squares. Wrap each piece in plastic wrap, then place them in a freezer-safe bag. This way, you can pull out just what you need. The cake stays good in the freezer for up to a month. Just remember to let it thaw in the fridge overnight before serving. No Bake Strawberry Icebox Cake tastes best within three days of making it. After this, the texture may change as the crackers soak up moisture. If frozen, the cake maintains its quality well. To enjoy the best flavor, eat it fresh. For full details, check the Full Recipe. Yes, you can make this cake ahead of time. I often prepare it the day before. This allows the flavors to blend and the texture to improve. It tastes even better after a night in the fridge. Just cover it well to keep it fresh. You have options for heavy cream. You can use whole milk or half-and-half. For a non-dairy option, try coconut cream or almond milk. Each will change the flavor slightly, but they work well in this recipe. Look for a few signs that your cake is ready. It should feel firm and set when you touch it. The graham crackers will soften and blend into the cream. If it has chilled for at least four hours, it should be perfect. Enjoy slicing into this treat! In this blog, I shared how to make a no-bake strawberry icebox cake. We covered fresh ingredients, dairy essentials, and the base components. I showed you step-by-step instructions and essential tips for perfect layers. You learned simple variations and storage tips to keep it fresh. This cake is easy to make and good for any occasion. Enjoy experimenting with flavors to make it your own!

No Bake Strawberry Icebox Cake Delightful and Easy Recipe

Looking for a quick and delightful dessert? This No Bake Strawberry Icebox Cake is your answer! Fresh strawberries, creamy layers,

- 12 slider rolls - 1 pound thinly sliced beef (ribeye or sirloin recommended) - 1 medium onion, thinly sliced - 1 green bell pepper, thinly sliced - 2 cups shredded provolone cheese - 3 tablespoons olive oil - 2 tablespoons Worcestershire sauce - 1 teaspoon garlic powder - Salt and pepper, to taste - Optional: Fresh parsley, chopped, for garnish Choosing the right beef is key for great taste. Ribeye or sirloin works best, as they are tender and juicy. For the peppers, green bell adds a nice crunch and flavor. You can also try red or yellow bell peppers if you like a sweeter taste. Provolone cheese melts well and enhances the flavor. The olive oil keeps everything moist and helps with cooking. If you need a different meat, chicken or turkey can work well too. For a vegetarian option, try using mushrooms or a plant-based meat substitute. If you're dairy-free, look for a vegan cheese that melts nicely. Ensure your slider rolls are gluten-free if you have a gluten allergy. There are many tasty options available for everyone! Start by preheating your oven to 350°F (175°C). This is key for baking the sliders. While the oven heats up, gather your ingredients. You will need slider rolls, beef, and some veggies. In a large skillet, pour in three tablespoons of olive oil. Heat it over medium-high heat. Once hot, add one medium onion and one green bell pepper, both thinly sliced. Sauté these for about 5-7 minutes. You want them soft and fragrant. Next, push the veggies to one side of the skillet. On the other side, add one pound of thinly sliced beef. Season this with salt, pepper, and one teaspoon of garlic powder. Cook the beef for about 3-4 minutes. Use a spatula to break it apart as it browns. Once the beef is cooked, stir in two tablespoons of Worcestershire sauce. Mix it all well, then take the skillet off the heat. Now, take your 12 slider rolls and slice them in half. Place the bottom halves in a greased baking dish. Spoon the beef and veggie mix evenly over the bottom halves. Next, sprinkle two cups of shredded provolone cheese on top of the meat mix. Then place the top halves of the rolls on the cheese layer. For added flavor, brush the tops lightly with olive oil or melted butter. Cover the dish with aluminum foil to keep the sliders moist. Bake them in the preheated oven for 15 minutes. After that, remove the foil and bake for another 5-10 minutes. This will melt the cheese and make the tops golden brown. Once done, let the dish cool for a couple of minutes. Slice the sliders into pieces and enjoy this tasty meal. For extra flair, you can garnish with chopped fresh parsley. For the full recipe, check out the detailed instructions above! Slice the beef thin. This helps it cook fast and stay tender. Place the beef in the freezer for about 30 minutes before slicing. This makes it firm and easier to cut. Use a sharp knife, and cut against the grain. This keeps the meat tender. Always use medium-high heat for sautéing. This helps the veggies cook evenly. Start with the onions. Cook them until they are soft and clear. Then add the bell peppers. Stir them often to avoid burning. Aim for about 5-7 minutes of cooking time. This brings out their sweet flavor. Use good-quality provolone cheese for the best taste. Shred the cheese yourself for better melting. Spread it evenly over the beef mix. This ensures every bite is cheesy. Bake the sliders covered first, then uncovered to melt and brown the cheese. This gives a nice, gooey texture. Follow these tips for a tasty slider experience! Check the Full Recipe for more details. {{image_4}} You can make your sliders spicy by adding peppers. Try using jalapeños or banana peppers. Slice them thin and sauté them with your onions and bell peppers. This will give your sliders a great kick. If you want more heat, add crushed red pepper flakes to the beef mix. Just a pinch goes a long way! While provolone cheese is classic, you can mix it up! Try using cheddar, Swiss, or even pepper jack cheese. Each cheese adds a unique flavor. If you're feeling adventurous, blend different cheeses for a rich, gooey texture. Just remember, the cheese should melt well to create that creamy goodness in every bite. You can easily make these sliders meat-free. Use thinly sliced mushrooms instead of beef. Portobello or shiitake mushrooms work best. For cheese, try vegan cheese or even a cashew cheese spread. Season your mushrooms well with garlic powder and Worcestershire sauce for a savory flavor. These changes keep the dish tasty while catering to different diets. For the full recipe, check out the Cheesy Philly Slider Delight. After enjoying your sliders, let any leftovers cool. Place them in an airtight container. This keeps the flavors fresh. Store them in the fridge for up to three days. The key is to keep them covered to avoid drying out. To reheat, preheat your oven to 350°F (175°C). Place the sliders on a baking sheet. Cover them with foil to prevent burning. Heat for about 10-15 minutes, until warm. If you want a crispy top, remove the foil for the last few minutes. You can freeze these sliders for longer storage. Wrap each slider tightly in plastic wrap. Place them in a freezer-safe bag. Make sure to remove as much air as possible. They will keep well for up to three months. To enjoy, thaw them in the fridge overnight, then reheat as mentioned above. This way, you can always have a tasty meal ready when needed! Yes, you can use other meats. Chicken or turkey works well if you prefer. Just slice it thinly, like beef. For a different flavor, try using pork. You can use the same method as with beef. Just make sure to adjust the cooking time as needed. To make gluten-free sliders, you can use gluten-free rolls. Many stores sell them now. Just check the label to be sure they are gluten-free. You can also use lettuce wraps instead of rolls. This keeps the filling together and cuts out the bread. These sliders pair well with many sides. You can serve them with crispy fries or sweet potato fries. A fresh salad with crunchy veggies is also a great choice. For something fun, try potato chips or coleslaw. They add a nice crunch and contrast to the sliders. Enjoy your meal! In this blog post, we explored how to make delicious Philly Cheesesteak Sliders. We covered the essential ingredients and substitutions for dietary needs. I shared simple step-by-step instructions that ensure your sliders come out perfectly. You learned tips for slicing beef, sautéing veggies, and making them cheesy. We also talked about fun variations and how to store your leftovers. In summary, making these sliders is easy and rewarding. Enjoy creating your perfect version!

Easy Philly Cheesesteak Sliders Tasty and Simple Meal

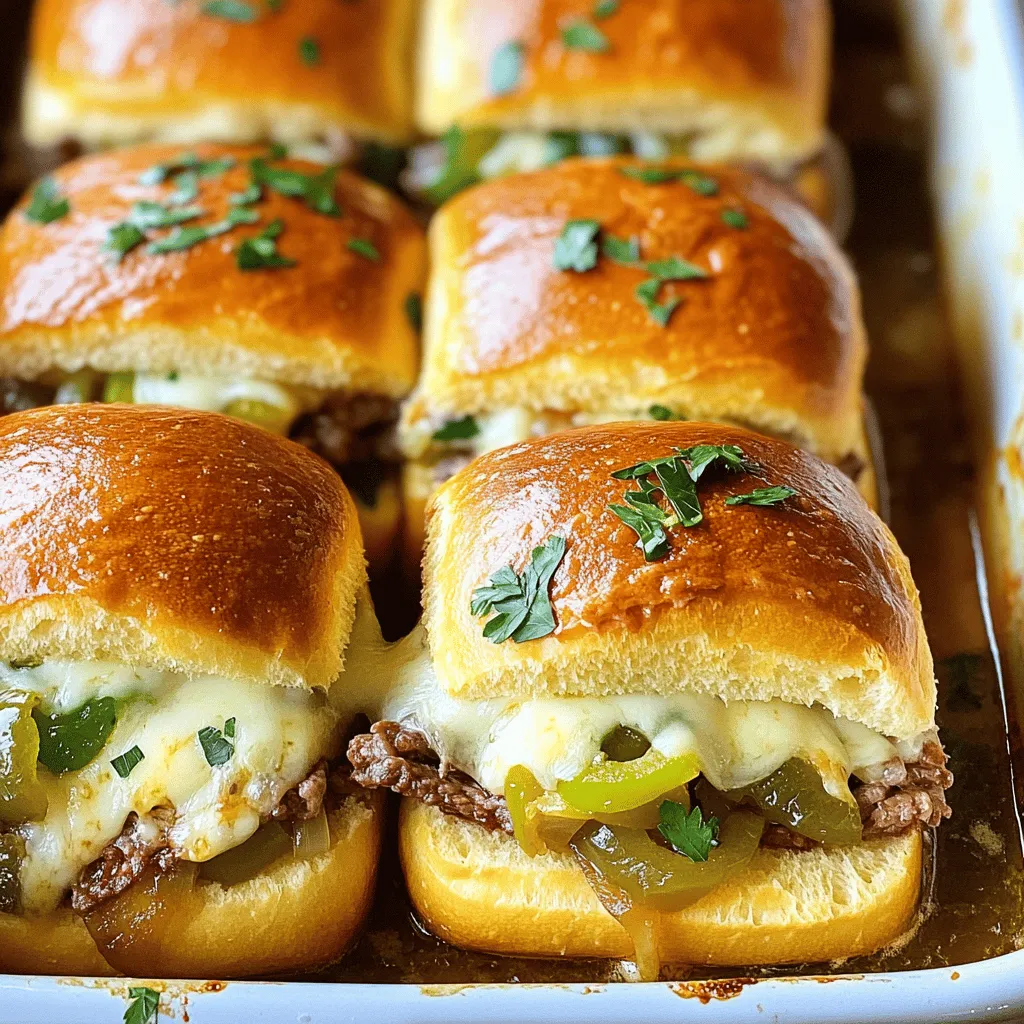
If you’re craving a hearty meal that’s quick and easy, these Easy Philly Cheesesteak Sliders are just for you. With

- 2 cups cooked brown rice - 1 pound boneless, skinless chicken breasts - 2 cups fresh broccoli florets - 1 cup shredded sharp cheddar cheese - 1/2 cup cream cheese - 1 cup low-sodium chicken broth - 1 cup whole milk - Garlic powder, onion powder, paprika, salt, black pepper - 1/2 cup breadcrumbs for topping - Fresh parsley for garnish This casserole shines with its simple yet hearty ingredients. You start with brown rice, which adds a nutty flavor. The chicken provides protein, while fresh broccoli adds color and crunch. For the creamy base, you mix in cheddar and cream cheese. The broth and milk make it rich and smooth. The spices like garlic, onion powder, and paprika boost the flavor. You can adjust the salt and pepper to your taste. If you want a crunchy topping, add breadcrumbs. They give a nice texture. Fresh parsley makes a lovely garnish. It adds a pop of color and freshness. For the full recipe, you can check out the [Full Recipe]. Each ingredient plays a role in creating a delicious meal that is easy to make and even better to share. - Preheat oven to 350°F (175°C). - Grease a 9x13 inch baking dish. Start by heating your oven. This makes sure your bake cooks evenly. Greasing the dish prevents it from sticking. Use cooking spray or butter for best results. - Cook diced chicken until golden brown. - Season with spices for enhanced flavor. In a large skillet, cook the diced chicken over medium heat. It takes about 5-7 minutes to turn golden brown. Stir often to avoid burning. Add garlic powder, onion powder, and paprika for a tasty kick. Season with salt and black pepper to your taste. - Combine rice, chicken, broccoli, cream cheese, broth, and milk. - Ensure even distribution of the cream cheese. In a big bowl, mix the cooked brown rice, chicken, and chopped broccoli. Add softened cream cheese, chicken broth, and milk. Stir gently until everything is combined. Make sure the cream cheese spreads evenly. - Fold in cheddar cheese and adjust seasonings. - Spread mixture in the baking dish and add topping. Next, fold half of the shredded cheddar cheese into the mixture. Taste it and add more salt or pepper if needed. Pour the mixture into the greased dish. Top with the rest of the cheddar cheese. If you want a crunchy topping, sprinkle breadcrumbs on top. - Bake for 25-30 minutes until golden brown and bubbly. - Allow to cool slightly before serving. Place the baking dish in your preheated oven. Bake for 25-30 minutes. Look for a golden brown top and bubbling cheese. Once done, take it out and let it cool for a few minutes. This helps the bake set for easy serving. For the full recipe, check out the entire guide above. To avoid mushy rice, use cooked brown rice. It holds its shape better than white rice. Also, do not overcook the rice before adding it to the bake. If the rice is too soft, it will turn mushy in the oven. For a crispy topping, use breadcrumbs. Mix them with melted butter for extra crunch. Sprinkle them on top of the cheese before baking. This gives a nice texture contrast with the creamy filling. To elevate flavor, try adding spices like cayenne or Italian herbs. A pinch of cayenne gives a nice kick. Italian herbs like basil and oregano add freshness. Mix these spices into the chicken while it cooks. Letting the dish rest before serving is important. This helps the flavors meld together. It also makes the casserole easier to cut and serve. Allow it to sit for about 5-10 minutes after baking. For garnishing, sprinkle fresh parsley on top before serving. This adds color and freshness. You can also add extra cheddar cheese for a melty effect. Pair the bake with a side salad or steamed veggies. A light salad complements the richness of the casserole. It balances the meal and adds more nutrients. Check out the Full Recipe for more tips on serving! {{image_4}} If you have food allergies or preferences, you can make simple swaps. For a gluten-free option, use gluten-free breadcrumbs or skip them entirely. You can replace the whole milk with almond milk for a dairy-free bake. This keeps the dish creamy without dairy. For cheese, you can try mozzarella or a dairy-free cheese blend. These options melt well and add great flavor. Chicken is the star, but you can switch it up. Turkey works well and has a similar taste. For a plant-based option, use tofu. Just press it to remove extra water and cube it. You can also add beans or lentils for a vegetarian twist. This adds protein and fiber. Feel free to get creative with veggies. Bell peppers add a sweet crunch, while carrots give a nice color. You can mix in spinach or peas for extra nutrients. Want to change the grain? Quinoa is a great choice. It cooks quickly and adds a nutty flavor. You can also use cauliflower rice for a low-carb option. For the full recipe, check out the details above. Store your leftovers in an airtight container. This keeps moisture in and prevents drying. I recommend using glass containers for easy reheating. You should eat the leftovers within 3 to 4 days. If they sit longer, they may lose flavor and texture. For freezing, let the bake cool completely first. Then, wrap it tightly in plastic wrap and foil. This helps prevent freezer burn. You can freeze it for up to 3 months. When you’re ready to eat, move it to the fridge to thaw overnight. This keeps the taste and texture nice. To reheat, use an oven set at 350°F (175°C). Cover the dish with aluminum foil to keep it moist. Heat for about 20 minutes or until warm. You can also use the microwave, but be careful not to dry it out. Stir every few minutes to keep it cheesy and flavorful. Enjoy! You can use sour cream or Greek yogurt. Both add creaminess. If you want a dairy-free option, try cashew cream. This gives a similar texture and taste. Yes, you can prepare it a day in advance. Mix all the ingredients and store them in the fridge. Just bake it when you are ready to serve. It lasts about three to four days in the fridge. Store it in an airtight container. Make sure to cool it before placing it in the fridge. Yes, frozen broccoli works well. Just thaw and drain it before mixing. This saves time and still gives great flavor. Absolutely! Adding extra cheese makes it even creamier. Try using a mix of cheddar and mozzarella for a rich taste. Just fold it in before baking for the best results. For more details on making this dish, check the Full Recipe. This blog shared a simple recipe for Cheesy Chicken Broccoli Rice Bake. You learned about the main ingredients, like chicken, cheese, and broccoli. I provided step-by-step instructions on how to cook and bake the dish. Plus, I highlighted tips for perfecting your meal and ways to customize it. In summary, you can make this dish in various ways to suit your taste. Enjoy trying new variations and make it your own. Happy cooking!

Cheesy Chicken Broccoli Rice Bake Flavorful Casserole

Looking for a warm, hearty dish that the whole family will love? My Cheesy Chicken Broccoli Rice Bake is just

- 4 salmon fillets (approximately 6 oz each) - 2 tablespoons extra virgin olive oil - 4 cloves garlic, finely minced - 1 cup cherry tomatoes, halved - 1 cup fresh spinach, roughly chopped - 1 cup heavy cream - ½ cup freshly grated Parmesan cheese - 1 teaspoon Italian seasoning blend - Fresh basil leaves for garnishing - Salt and freshly ground black pepper to taste - Large non-stick skillet - Spatula - Measuring cups and spoons The main ingredients for this dish create a rich flavor. Salmon fillets are the star. They are full of healthy fats and cook quickly. Garlic adds depth and aroma. Cherry tomatoes bring sweetness and color. Spinach gives a nice touch of green. Heavy cream makes the sauce silky. Parmesan cheese adds a savory kick. Some optional ingredients can enhance the dish. Italian seasoning adds extra flavor. Fresh basil offers a bright touch. Salt and pepper help balance the taste. For kitchen tools, you need a large, non-stick skillet. This pan helps cook the salmon evenly. A spatula makes it easy to flip the fillets. Measuring cups and spoons help with accuracy. This dish is simple yet elegant. You can find the full recipe for Creamy Garlic Tuscan Salmon to guide you further. Enjoy making this delightful meal! 1. Heating the olive oil: Start by heating 2 tablespoons of extra virgin olive oil in a large, non-stick skillet over medium heat. Let the oil get hot but not smoking. This is key for a good sear. 2. Seasoning the salmon: While the oil heats, take your 4 salmon fillets. Generously season both sides with salt and freshly ground black pepper. This step adds flavor from the start. 3. Searing the salmon: Once the oil shimmers, carefully place the salmon fillets skin-side down in the skillet. Sear them for about 4-5 minutes. Look for a golden brown color and ensure they cook through. After cooking, transfer the salmon to a plate and cover it with foil to keep warm. 4. Sautéing garlic and tomatoes: In the same skillet, lower the heat slightly. Add 4 finely minced garlic cloves and sauté for about 1 minute. You want the garlic fragrant but not burnt. Next, toss in 1 cup of halved cherry tomatoes and cook for 3-4 minutes. Stir occasionally until they soften and release their juices. 5. Adding spinach: Stir in 1 cup of roughly chopped fresh spinach. Allow it to wilt and reduce in volume. This should take about 2 minutes. The spinach adds color and nutrition to your dish. 6. Combining heavy cream and cheese: Reduce the heat to low. Carefully pour in 1 cup of heavy cream, stirring to mix well. This will form the base of your creamy sauce. 7. Adjusting flavor with seasonings: Add ½ cup of freshly grated Parmesan cheese and 1 teaspoon of Italian seasoning. Stir continuously until the cheese fully melts and the sauce becomes creamy. Taste and adjust seasoning with salt and black pepper if needed. 8. Finishing with the salmon: Return the cooked salmon fillets to the skillet. Spoon the creamy sauce generously over each fillet. Let it simmer for another 2 minutes. This melds the flavors and warms the salmon through. For the full recipe, including tips on serving and presentation, check out the complete guide. Enjoy the deliciousness of Creamy Garlic Tuscan Salmon! - Ensuring salmon is cooked perfectly: Cook the salmon for 4-5 minutes per side. Look for a golden-brown color. It should flake easily with a fork. Always check the thickest part for doneness. The internal temperature should reach 145°F. - Preventing garlic from burning: Sauté garlic on low heat. Stir it often to keep it from burning. If garlic burns, it becomes bitter. Always add it after the salmon. - Best sides to pair with Creamy Garlic Tuscan Salmon: Serve with garlic bread or creamy risotto. A fresh green salad also complements the dish well. Roasted vegetables add color and flavor too. - Plating ideas for presentation: Use white plates for a clean look. Place salmon in the center and drizzle sauce over it. Garnish with fresh basil and extra Parmesan. This makes the dish pop visually. - Overcooking the salmon: Salmon can dry out quickly if overcooked. Keep an eye on the time and check for flakiness. Remove it from heat when it’s just done. - Using low-quality ingredients: Always choose fresh, high-quality ingredients. Good salmon makes a big difference. Fresh garlic and ripe tomatoes enhance flavor. Don’t skimp on the cream or cheese either. {{image_4}} You can switch up the protein in Creamy Garlic Tuscan Salmon. Chicken or shrimp work great. For chicken, use boneless thighs or breasts. If you choose shrimp, make sure they are peeled and deveined. Both will soak up the creamy sauce well. Want a dairy-free option for the sauce? Use coconut cream instead of heavy cream. This will add a slight sweetness while keeping it creamy. You can also try cashew cream. Just blend soaked cashews with water until smooth. This gives you a rich, creamy texture without dairy. Herbs can boost the flavor of your dish. Try adding fresh dill or parsley for a fresh taste. They add brightness and pair well with the creaminess of the sauce. Just chop them finely and stir them in at the end. Adding extra veggies can also enhance your dish. Consider bell peppers or zucchini. They add color and crunch. Simply chop and sauté them with the garlic before adding the cream. This gives your meal more texture and nutrition. If you need gluten-free options, this recipe is already safe. All ingredients are gluten-free. Just check your Parmesan cheese label to be sure. For low-carb choices, skip heavy cream and use a low-carb alternative. You can use a mix of broth and cream cheese. This keeps the dish creamy but cuts down on carbs. Enjoy your meal without worry! For the full recipe, be sure to check the [Full Recipe]. To store leftovers, let the salmon cool down first. Place it in an airtight container. Make sure to add the creamy sauce on top to keep the fish moist. This will help the flavors stay fresh. You can keep it in the fridge for up to three days. For proper sealing, use plastic wrap or foil before closing the container. This extra layer keeps air out and helps prevent spoilage. You can freeze individual fillets or the sauce. If you freeze the salmon, wrap each fillet in plastic wrap. Then, place them in a freezer-safe bag. This method keeps the fish fresh for up to three months. When freezing the sauce, let it cool first. Pour it into a separate container, leaving some space at the top. It will expand when frozen. For thawing, place the salmon or sauce in the fridge overnight. This slow method helps keep the texture nice. You can also use the microwave on defrost mode if you are in a hurry. To reheat the salmon, the best method is low heat on the stove. Place the salmon in a skillet with a bit of water. Cover it to keep moisture in. Heat it for about 5-7 minutes until warm. For the sauce, you can also use the stove. Heat it gently in a saucepan while stirring. This keeps the flavors rich and creamy. Avoid high heat to prevent splitting or burning the sauce. You can tell the salmon is done when it flakes easily with a fork. The color should change from bright pink to a light peach. Make sure the center is no longer translucent. Use a meat thermometer if you want to be precise. The internal temperature should reach 145°F. Yes, you can make the creamy sauce ahead of time. Just store it in an airtight container in the fridge. When you are ready to use it, reheat gently on low heat. Stir well before adding the salmon. This helps keep the sauce smooth and creamy. You can use half-and-half or whole milk as a lighter option. For a dairy-free choice, try coconut cream or cashew cream. These options will change the flavor slightly but still create a nice sauce. Adjust the seasoning to suit your taste. Leftovers will last about 3 to 4 days in the fridge. Make sure to store them in a sealed container. To keep the salmon moist, add a little sauce on top before sealing. This helps maintain flavor and texture. Yes, you can use frozen salmon. Just thaw it in the fridge overnight before cooking. You can also place it in a sealed bag and submerge it in cold water for quicker thawing. Cook the salmon as you normally would once it is fully thawed. For the complete cooking experience, check out the Full Recipe. This blog post explored making Creamy Garlic Tuscan Salmon. We discussed key ingredients, kitchen tools, and step-by-step cooking instructions. Tips helped ensure a perfect cook, while serving ideas enhanced your meal. I shared helpful variations for dietary needs and storage info for leftovers. In closing, this dish is simple yet flavorful. With the right techniques, you'll impress anyone at your table. Enjoy cooking and savor every bite!

Creamy Garlic Tuscan Salmon Delightfully Easy Dish

If you’re looking for a quick and tasty dinner, you’ve found it! Creamy Garlic Tuscan Salmon is a dish that

- Bread type recommendations: Use thick bread for the best results. Texas toast or brioche gives a fluffy bite. Both absorb the batter well and hold their shape during cooking. - Eggs and milk: Eggs create a rich base. They add protein and help the sticks puff up. Milk adds creaminess. You can choose whole milk or any milk you like. Both work well. - Spices and sweeteners: Vanilla brings warmth and depth. I always use pure vanilla extract for the best flavor. Ground cinnamon adds a cozy spice. Brown sugar sweetens and helps to caramelize the sticks as they cook. - Suggestions for additional toppings: For a special touch, dust your sticks with powdered sugar. You can also add fresh fruits like berries or banana slices. These brighten up the dish and add natural sweetness. - Alternative syrups and sauces: Maple syrup is classic, but you can try honey or agave syrup. For a twist, use chocolate sauce or a fruit compote. These options give a new flavor to your French toast sticks. For a full recipe, check out the *Full Recipe* section. To make the perfect French toast sticks, start by preparing the batter. In a mixing bowl, whisk together: - 2 large eggs - 1/2 cup milk - 1 teaspoon vanilla extract - 1 teaspoon ground cinnamon - 1 tablespoon brown sugar - A pinch of salt Whisk until everything blends well. This mixture needs to be smooth so it clings nicely to the bread. Next, slice your bread. I suggest using thick bread like Texas toast or brioche. Cut each slice into three equal strips. This gives you twelve sticks that are perfect for dipping. Your skillet needs to be just right for frying. Preheat it over medium heat. Add a small pat of butter or a drizzle of oil. Swirl it to coat the bottom evenly. Now, coat the bread strips. Dip each one into the batter, covering all sides. Let any extra batter drip off. This step helps avoid sogginess. Place the coated sticks in the skillet. Do not overcrowd them; give each stick space. Fry for 2-3 minutes on each side. You want them golden brown and crispy. Flip them carefully for even cooking. Once crispy, remove the sticks from the skillet. Place them on a plate lined with paper towels. This absorbs excess oil, making your sticks crunchy. For a final touch, dust the warm sticks with powdered sugar if you like. Serve them with maple syrup for dipping. This adds sweetness and flavor, making your breakfast even better. To make perfect French toast sticks, keep your bread from getting soggy. Here’s how to avoid excess batter: - Use thick bread. Thick slices soak up less batter than thin ones. Texas toast or brioche works well. - Dip quickly. When you dip the bread, do it fast. Immerse it but don’t let it sit too long. - Shake off extra. After dipping, gently shake the sticks to remove any extra batter. This helps keep them crispy. For flipping techniques, use a spatula. Here are some tips for even cooking: - Wait for the right time. Don’t flip too early. Wait until the bottom is golden brown. - Be gentle. When flipping, use a spatula to lift from the edge. This keeps the sticks intact. - Fry in batches. Avoid overcrowding the pan. This ensures even cooking and crispiness. Presentation can make your French toast sticks even more fun. Here are some creative serving ideas: - Plate artfully. Arrange the sticks in a fan shape. Add a small bowl of syrup in the center. - Garnish with fruit. Fresh berries or banana slices add color and freshness. They look great and taste good. When it comes to pairing, consider these options: - Drink pairings. A glass of milk or a warm cup of cocoa complements the sweetness. - Side suggestions. Serve with crispy bacon or sausages for a hearty breakfast. For the full recipe, you can explore our detailed instructions and tips. Enjoy your delightful breakfast! {{image_4}} You can easily change the flavor of your French toast sticks. Here are some fun ideas: - Chocolate Bliss: Add chocolate chips to the batter. They melt and create a sweet surprise. - Fruity Twist: Mix in mashed bananas or pureed strawberries for a fruity taste. You can also top your sticks with fresh fruit. - Nutty Delight: Sprinkle in some chopped nuts, like walnuts or pecans. This adds a nice crunch and flavor. If you need gluten-free options, use gluten-free bread. For a dairy-free version, swap milk with almond or oat milk. This way, everyone can enjoy these tasty treats. You can make your French toast sticks special for the seasons. Here are some ideas: - Pumpkin Spice: During fall, mix pumpkin puree and pumpkin spice into the batter. This gives a warm and cozy flavor. - Peppermint Twist: For winter holidays, add crushed peppermint candies to the batter or sprinkle them on top. It adds a festive touch. These variations will keep your breakfast exciting and fresh all year round. Try them out, and let your taste buds celebrate! To keep your homemade French toast sticks fresh, store them in the fridge. Place the sticks in an airtight container. This helps maintain their flavor and texture. They will stay good for about three days. If you want to save them for longer, freeze your French toast sticks. Lay them flat on a baking sheet and freeze for about an hour. Once frozen, transfer them to a freezer bag. This prevents them from sticking together. They can last up to three months in the freezer without losing quality. When it's time to enjoy your leftovers, the oven is the best choice. Preheat your oven to 375°F (190°C). Place the French toast sticks on a baking sheet. Bake for about 10 minutes or until they are warm and crispy again. If you're in a hurry, you can use the microwave. Place a few sticks on a microwave-safe plate. Heat them for about 30 seconds. Check if they’re warm enough and heat more if needed. However, the microwave may make them softer than the oven. What type of bread works best for French toast? I recommend using thick bread for the best texture. Texas toast or brioche are my favorites. They soak up the egg mixture well and stay fluffy inside. This makes each bite a delight. Can I make French toast sticks ahead of time? Yes, you can prepare French toast sticks in advance. Cook them as usual, then cool completely. Store them in an airtight container in the fridge. When ready to eat, warm them up in the oven. This keeps them crispy. Why are my French toast sticks soggy? Soggy French toast sticks often happen from too much egg mixture. Make sure to dip the bread quickly and shake off extra batter. Also, frying on too low heat can cause sogginess. Use medium heat to achieve that perfect crunch. How do I prevent my French toast from sticking to the pan? To avoid sticking, use a non-stick skillet or frying pan. Be sure to preheat the pan and add enough butter or oil. This creates a slick surface that helps the sticks fry nicely. Caloric content and nutritional value Each serving of French toast sticks has about 250 calories. This can vary based on the type of bread and toppings. They provide carbs and protein from eggs, making them a filling breakfast. Healthy substitutions for ingredients (low-sugar, whole grain) You can make this recipe healthier with simple swaps. Use whole grain bread for added fiber. Replace brown sugar with a sugar substitute for lower calories. You can also use almond milk instead of whole milk for a lighter version. In this blog post, we explored how to make delicious homemade French toast sticks. We covered key ingredients and tips for a fluffy texture. I shared step-by-step instructions from prep to cooking and serving. You learned about variations and storage tips for leftovers. In the end, homemade French toast sticks can be both fun and easy. Enjoy experimenting with flavors and toppings to make them your own!

Homemade French Toast Sticks Crunchy Breakfast Delight

Craving a breakfast that’s both fun and delicious? Look no further than these Homemade French Toast Sticks! They’re crispy, sweet,

Million Dollar Spaghetti Casserole is a hearty dish that combines pasta, meat, and cheese. This recipe is simple yet tasty, making it perfect for family dinners or gatherings. You can find the full recipe listed above. Here’s what you need: - 12 oz spaghetti - 1 lb ground beef or turkey - 1 medium onion, finely diced - 3 cloves garlic, minced - 2 cups marinara sauce - 1 cup ricotta cheese - 2 cups shredded mozzarella cheese (divided) - 1 cup grated Parmesan cheese (divided) - 1 large egg - 2 teaspoons Italian seasoning - Salt and freshly cracked pepper to taste - Fresh basil leaves for garnish If you want to switch things up, here are some options: - Use ground chicken instead of beef or turkey. - Substitute marinara sauce with your favorite pasta sauce. - Try cottage cheese instead of ricotta for a lighter choice. - Use a mix of different cheeses for added flavor. - Add spinach or zucchini for a veggie boost. These swaps can help you customize the dish to your taste! To start, gather your ingredients. You will need: - 12 oz spaghetti - 1 lb ground beef or turkey - 1 medium onion, finely diced - 3 cloves garlic, minced - 2 cups marinara sauce - 1 cup ricotta cheese - 2 cups shredded mozzarella cheese (divided) - 1 cup grated Parmesan cheese (divided) - 1 large egg - 2 teaspoons Italian seasoning - Salt and freshly cracked pepper to taste - Fresh basil leaves for garnish First, preheat your oven to 350°F (175°C). Next, cook the spaghetti in a large pot of salted boiling water. Follow the package directions until the spaghetti is al dente. Drain it and set it aside. In a large skillet over medium heat, add your ground meat. Cook until it turns brown, breaking it into small pieces as it cooks. Add the diced onion and minced garlic. Cook until the onion softens and looks clear. Drain extra fat if needed. Pour in the marinara sauce and mix with the meat. Let it simmer for about 5 minutes. Add Italian seasoning, salt, and pepper to taste. Meanwhile, mix the ricotta cheese, egg, half of the mozzarella, and half of the Parmesan in a bowl. Stir until smooth. Now, it’s time to layer your casserole. In a large casserole dish, place half of the cooked spaghetti at the bottom. Top it with half of the meat sauce. Then, spoon half of the ricotta mixture on top. Repeat this layering with the rest of the spaghetti, meat sauce, and ricotta. For the final touch, sprinkle the remaining mozzarella and Parmesan on top. Cover the dish with aluminum foil and place it in your preheated oven. Bake for 30 minutes. After that, remove the foil and bake for another 15 minutes. You want the cheese to bubble and turn a light golden color. Layering is key to making this casserole great. Start with spaghetti to give it a solid base. The meat sauce adds flavor and moisture. The ricotta mixture brings creaminess. Make sure you distribute each layer evenly. This helps every bite taste just as good. When you finish layering, the top cheese layer will create a lovely crust when it bakes. After baking, let the casserole cool for about 10 minutes before serving. This helps it set and makes serving easier. Garnish with fresh basil for a nice pop of color and flavor. Don't forget to check the full recipe for all the details! To get the cheese just right, mix ricotta, egg, and half of the mozzarella and Parmesan. This blend gives a creamy texture that melts perfectly. Make sure to combine well so it becomes smooth. A well-mixed cheese layer will ensure even flavor in every bite. You can also add a pinch of salt to enhance the taste. A watery casserole can ruin your meal. To prevent this, drain excess fat from the meat after cooking. Also, let the marinara sauce simmer a bit longer. This helps thicken the sauce. Using whole wheat or thicker pasta can also help absorb moisture. If you still find your casserole a bit runny, a sprinkle of breadcrumbs on top can soak up excess liquid. Serve your Million Dollar Spaghetti Casserole with a fresh salad. A simple green salad with a light vinaigrette is perfect. Garlic bread is also a great side. It adds a crunchy texture and complements the meal well. For drinks, pair it with a nice red wine or sparkling water with lemon. This adds a refreshing touch to your dining experience. Enjoy your meal with family and friends, and watch them go back for seconds! {{image_4}} You can easily make a vegetarian Million Dollar Spaghetti Casserole. Simply replace the meat with veggies. Try using mushrooms, zucchini, or bell peppers. You can also add lentils for protein. This version keeps the same rich flavors while being meat-free. If you need a gluten-free option, swap regular spaghetti for gluten-free pasta. Many brands offer great alternatives made from rice or quinoa. Make sure to check the marinara sauce too. Some brands may contain gluten, so read the label carefully. To boost flavor, consider adding spices and herbs. A pinch of red pepper flakes adds heat. Fresh or dried basil elevates the taste. You can also try oregano or thyme for depth. These simple additions can make your casserole even more delicious. For the full recipe, check out the Million Dollar Spaghetti Casserole section. To keep your Million Dollar Spaghetti Casserole fresh, store it in an airtight container. Make sure the dish has cooled to room temperature before sealing it. This helps prevent condensation, which can make the pasta soggy. If you plan to eat it within three days, it’s safe to keep it in the fridge. When you're ready to enjoy your leftovers, preheat your oven to 350°F (175°C). Place the casserole in an oven-safe dish. Cover it with foil to keep it moist while reheating. Bake for about 20-25 minutes, or until heated through. If you prefer the top crispy, remove the foil for the last 5 minutes. You can also reheat individual portions in the microwave for quicker servings. Just cover the dish and heat for about 2-3 minutes, checking often. If you want to store your Million Dollar Spaghetti Casserole for longer, freezing is a great option. Cut the casserole into portions and place each piece in freezer-safe containers. Make sure to label them with the date. It can last up to three months in the freezer. When you're ready to eat it, thaw it overnight in the fridge. Then, reheat as mentioned above. This way, you can enjoy a delicious meal anytime! Million Dollar Spaghetti Casserole lasts about 3 to 5 days in the fridge. To keep it fresh, store it in an airtight container. This keeps moisture in and prevents it from drying out. Always check for any off odors or discoloration before eating leftovers. Yes, you can prepare this dish in advance. You can assemble the casserole a day ahead. Just cover it tightly and store it in the fridge. When you are ready to bake, take it out and let it sit for about 30 minutes at room temperature. This helps it cook evenly. To reheat leftovers, preheat your oven to 350°F (175°C). Place the casserole in an oven-safe dish and cover it with foil. Heat for about 20 to 25 minutes. You can also reheat it in the microwave. Just use a microwave-safe container and heat in short bursts until warm. Enjoy your delicious meal again! This blog post covered all you need for making Million Dollar Spaghetti Casserole. We reviewed the key ingredients and shared helpful substitutions. Step-by-step instructions guide you through preparation and cooking. Tips ensure you avoid common issues, while variations let you customize for dietary needs. Lastly, I shared smart storage methods for leftovers. With these details, you're ready to create a tasty dish that's sure to impress. Enjoy your cooking adventure!

Mouthwatering Million Dollar Spaghetti Casserole Recipe

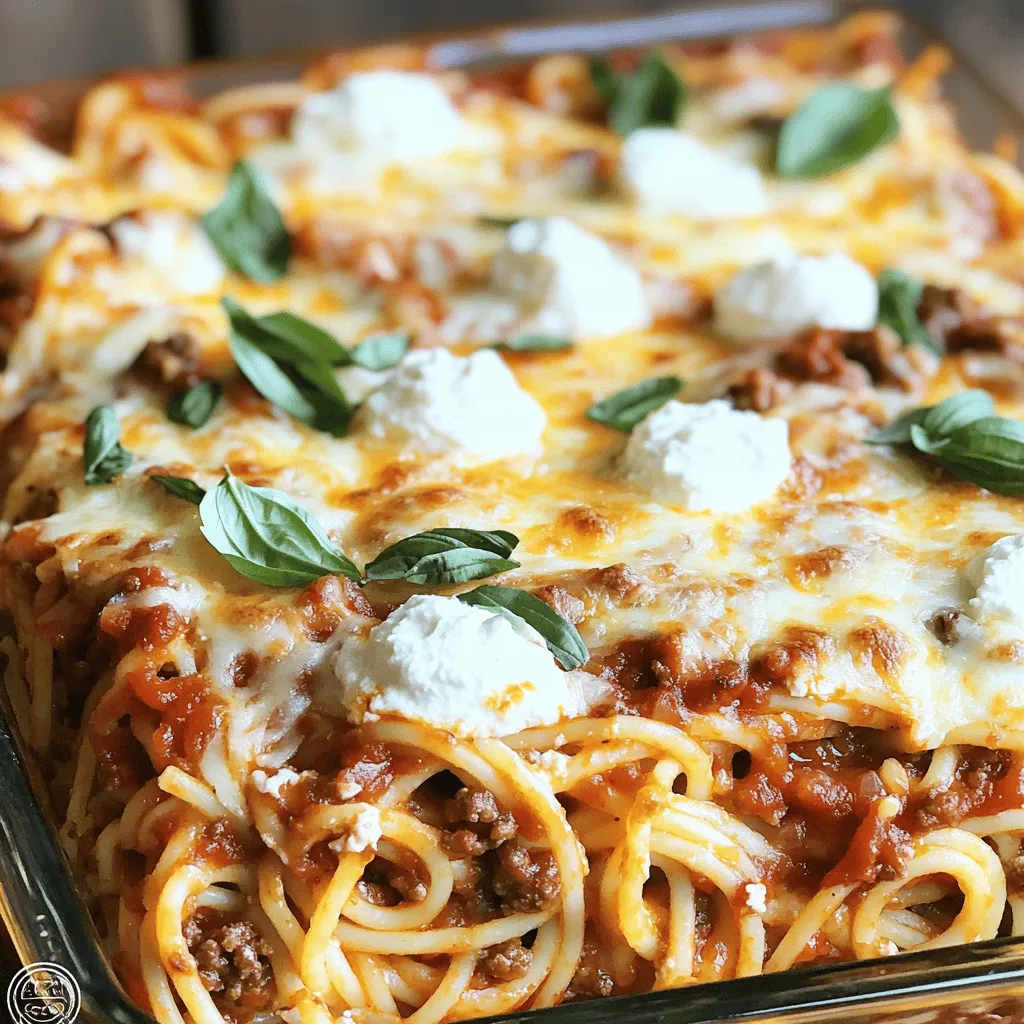
Get ready to indulge in a cheesy, hearty meal with my Mouthwatering Million Dollar Spaghetti Casserole recipe! This crowd-pleaser combines

Older posts
Newer posts
← Previous Page1 … Page43 Page44 Page45 … Page68 Next →

dsad

© 2025 tastymomrecipes • Built with GeneratePress

Our Policies

  • Copyright Policy
  • Cookie Policy
  • GDPR Policy
  • Privacy Policy
  • Disclaimer
  • Terms Of Use

More Information

  • Home
  • About
  • Contact
  • Appetizers
  • Dessert
  • Dinner
  • Drinks
©2025, tastymomrecipes About Back To Top