Skip to content
DisclaimerTerms Of UseGDPR PolicyCookie Policy

tastymomrecipes

  • Home
  • Drinks
  • Appetizers
  • Dinner
  • Dessert
  • About
  • Contact
  • Privacy Policy
DisclaimerTerms Of UseGDPR PolicyCookie Policy

Olivia

To make a hearty Vegan Sweet Potato Chili, you'll need these fresh and vibrant ingredients: - 2 medium sweet potatoes, peeled and diced into 1-inch cubes - 1 can (15 oz) black beans, rinsed and drained - 1 can (15 oz) kidney beans, rinsed and drained - 1 can (14.5 oz) diced tomatoes, including juices - 1 medium red onion, finely chopped - 2 cloves garlic, minced - 1 red bell pepper, chopped into chunks - 1 yellow bell pepper, chopped into chunks - 2 cups vegetable broth - 1 tablespoon olive oil - 2 tablespoons chili powder - 1 teaspoon ground cumin - 1 teaspoon smoked paprika - Salt and freshly ground black pepper to taste - Fresh cilantro, chopped (for garnish) - Creamy avocado slices (for serving) These ingredients work together to create a warm, flavorful meal. The sweet potatoes add a natural sweetness and texture. The beans provide protein, making this dish filling. The spices bring a nice kick, while the veggies add color and nutrients. For the full recipe, check out the details above! To make this vegan sweet potato chili, you need a large pot. Start by warming olive oil over medium heat. Once the oil is hot, add the chopped red onion. Sauté for about 5 minutes until the onions become soft and clear. Next, add minced garlic and cook for another minute. This makes your kitchen smell amazing! After the garlic, add the diced sweet potatoes and bell peppers. Mix in chili powder, cumin, smoked paprika, salt, and pepper. Stir well and cook for 5 more minutes. This helps the veggies absorb all the spices. Pour in vegetable broth and canned tomatoes, including their juices. Stir everything together and bring it to a boil. Once it boils, lower the heat, cover the pot, and let it simmer for 25 to 30 minutes. This allows the sweet potatoes to soften and the flavors to blend. Finally, add the black beans and kidney beans. Heat for an additional 5 minutes. Taste the chili and adjust the seasoning as needed. This process is key to a flavorful dish. Sautéing onions and garlic is very important. It builds a strong base for your chili. The onions add sweetness, while the garlic brings depth. This combination makes your chili taste rich. When you add spices, do it while cooking the veggies. This allows the heat to release their oils and flavors. Make sure to mix well. The chili powder gives heat, the cumin adds earthiness, and smoked paprika offers a nice smoky taste. This layering of flavors is what makes your chili delicious. Simmering is the key to great chili. It allows all the ingredients to marry and develop deep flavors. Be patient during this step. Once the sweet potatoes are fork-tender, you are almost done! After simmering, taste the chili again. Adjust the salt and pepper if needed. This final seasoning is essential. It can make all the difference in taste. Let the chili rest for a few minutes before serving. This helps all the flavors to settle in. For full details, check the [Full Recipe]. To elevate the taste of your vegan sweet potato chili, start with good herbs and spices. I recommend using: - Cumin: It adds warmth and depth. - Chili powder: This brings a nice kick. - Smoked paprika: This gives a subtle smoky flavor. - Fresh cilantro: It brightens the dish. Best Practices for Seasoning: - Add spices early to let them bloom. - Taste as you go; adjust salt and spice levels. For this recipe, use a large pot. A heavy-bottomed pot helps heat evenly. A wooden spoon is great for stirring. If you like speed, a food processor can chop veggies quickly. An immersion blender also works if you want a smoother texture. When cooking sweet potato chili, watch out for overcooking the sweet potatoes. They should be fork-tender but not mushy. To improve texture, add beans at the end. Stir gently to keep them whole. Adjust liquid for a thick or thin chili based on your preference. {{image_4}} You can change the beans and veggies in this chili. Try using pinto or cannellini beans instead of black or kidney beans. You can also add corn, zucchini, or carrots for extra flavor and texture. If you want more protein, add some cooked quinoa or lentils. These swaps keep the dish exciting and tasty! Want your chili milder? Just cut back on the chili powder. You can also add a little sugar to balance the heat. If you like it spicy, add jalapeños or cayenne pepper. A little goes a long way, so start with a small amount. You can always add more if needed! To make this chili gluten-free, use gluten-free vegetable broth. Most canned beans and tomatoes are gluten-free, but check the labels. If you need it nut-free, this recipe already fits that need. Just keep an eye on the toppings. Make sure any garnishes, like sour cream, are also dairy-free. You can follow the Full Recipe for all the details! To store leftover vegan sweet potato chili, let it cool first. Use an airtight container for best results. This keeps the chili fresh and flavorful. In the fridge, it lasts about 4 to 5 days. When you're ready to eat, just reheat it on the stove or in a microwave. You can freeze vegan chili for later. Use freezer-safe containers or bags. Leave some space at the top for expansion. When you want to enjoy it again, thaw it overnight in the fridge. For reheating, warm it on the stove over low heat. Stir often for even heating. You can also microwave it in short bursts, stirring in between. To make quick meals, prep a big batch of chili. Store it in single servings. This way, you can grab a portion when you need it. You can also use it in various meals. Try it over rice, in tacos, or as a soup base. The possibilities are endless! For more ideas, check the Full Recipe. Vegan sweet potato chili can last in the fridge for about 4 to 5 days. Store it in an airtight container. For longer storage, freeze it. It can stay fresh in the freezer for up to 3 months. Just thaw it overnight in the fridge before reheating. Yes, you can use fresh tomatoes! If you use fresh tomatoes, chop about 4 medium-sized ones. Make sure to remove the seeds and excess liquid for a thicker chili. Add them with the broth and beans. This will bring a fresh taste to your chili. You can serve your chili with rice or quinoa for a hearty meal. Cornbread or tortilla chips make great sides too. Top your chili with fresh cilantro, avocado, or vegan sour cream. These toppings add flavor and texture to every bite. If your chili is too thin, there are easy ways to thicken it. You can mash some of the sweet potatoes with a fork. This will give your chili a creamier texture. Another option is to let it simmer longer without the lid. This will reduce the liquid and make it thicker. You can create a delicious vegan sweet potato chili using simple and fresh ingredients. We explored step-by-step instructions, tips to enhance flavor, and common mistakes to avoid. By trying variations and following storage tips, you can enjoy this dish multiple times. Remember, small tweaks can lead to big flavor changes. Enjoy your cooking journey and share this tasty chili with friends and family! Their smiles will show how great it is.

Vegan Sweet Potato Chili Flavorful and Filling Meal

Are you ready to enjoy a warm bowl of Vegan Sweet Potato Chili? Packed with flavors and nutrients, this dish

To make garlic butter mushrooms, gather these key ingredients: - 500g fresh button mushrooms, thoroughly cleaned and stems trimmed - 4 tablespoons unsalted butter - 4 cloves garlic, finely minced - 1 teaspoon fresh thyme leaves (or ½ teaspoon dried thyme) - 1 tablespoon soy sauce - 1 tablespoon fresh lemon juice - Salt and freshly cracked black pepper, to taste - Fresh parsley, finely chopped, for garnish - Grated Parmesan cheese, for serving (optional) Each ingredient plays a role in the flavor and texture of the dish. Fresh button mushrooms are the star here, bringing a juicy and earthy taste. Unsalted butter adds richness, while garlic gives that pungent kick we all love. Fresh thyme adds a fragrant note, and soy sauce brings umami depth. A splash of lemon juice balances everything with a hint of brightness. Finally, salt and pepper enhance the natural flavors. This recipe is simple but delivers great taste. I encourage you to try the full recipe and enjoy the process of cooking these garlic butter mushrooms! Melting the Butter First, heat a large skillet over medium heat. Add 4 tablespoons of unsalted butter. Watch the butter as it melts. It should foam but not brown. This step builds a rich base for the dish. Sautéing the Garlic Next, add 4 cloves of finely minced garlic to the melted butter. Stir constantly for about 1 minute. You want the garlic to smell great without changing color. This ensures a fresh garlic flavor in your dish. Adding Mushrooms to the Skillet Now, raise the heat to medium-high. Add 500 grams of cleaned button mushrooms to the skillet. Stir well to coat them in the garlic butter. This step makes sure every mushroom gets that tasty flavor. Achieving the Perfect Color and Texture Let the mushrooms cook for about 5 to 7 minutes. Stir occasionally. You want them to be golden brown and tender. This gives you that lovely texture and color. Incorporating Thyme, Soy Sauce, and Lemon Juice Once the mushrooms are perfect, add 1 teaspoon of fresh thyme, 1 tablespoon of soy sauce, and 1 tablespoon of fresh lemon juice. Stir everything together. Cook for an extra 2 to 3 minutes to blend the flavors. Final Seasoning Adjustments Taste your dish and season with salt and freshly cracked black pepper. Adjust to your liking. This final touch makes all the flavors pop. To see how to put everything together, check out the Full Recipe. Enjoy your garlic butter mushrooms! Using Fresh vs Dried Herbs Fresh herbs bring bright flavors. They add a lovely aroma and taste. Use about three times more fresh herbs than dried. For garlic butter mushrooms, I suggest fresh thyme. It works well with the garlic and butter. If you only have dried thyme, that’s okay. Just use half as much. Incorporating Additional Seasonings You can add more flavor with different seasonings. A splash of balsamic vinegar can brighten the dish. For a kick, add a pinch of red pepper flakes. You could also try adding a sprinkle of smoked paprika. Each option gives a new twist to the garlic butter mushrooms. Proper Skillet Usage Use a large skillet for even cooking. This helps mushrooms brown nicely. Avoid crowding the pan. If you pack too many in, they will steam instead of brown. Cook in batches if needed. This way, each mushroom gets a chance to shine. Adjusting Heat for Perfect Cooking Start with medium heat to melt the butter. Then, raise it to medium-high for the mushrooms. This helps achieve that golden brown color. Watch them closely. You want them tender but not mushy. Stir often for even cooking. The right heat makes all the difference in this dish. {{image_4}} You can easily make garlic butter mushrooms vegan. Instead of unsalted butter, use olive oil or vegan butter. It gives a nice flavor without dairy. The rest of the recipe stays the same. You still get that rich taste with garlic and mushrooms. For a gluten-free option, ensure the soy sauce is gluten-free. Many brands offer this choice. You can also use tamari as a substitute. This way, you enjoy all the flavors without any gluten. Feel free to switch up the herbs in this dish. Try rosemary or oregano for a twist. If you love basil, add it at the end for a fresh touch. Each herb gives a unique flavor to the garlic butter mushrooms. You can also add other veggies to this recipe. Spinach or zucchini pairs well with mushrooms. Just slice them thinly and add them to the skillet with the mushrooms. This adds color and extra nutrition to your dish. To keep your garlic butter mushrooms fresh, use proper containers. Glass or plastic containers with tight lids work best. Make sure the mushrooms cool down before sealing. Store them in the fridge right away. They stay fresh for about 3 to 5 days. Check for any signs of spoilage before eating. If they smell off or look slimy, it’s time to toss them. For reheating garlic butter mushrooms, use a skillet for the best results. Heat the skillet on medium-low. Add a splash of water or a little butter to prevent sticking. Then, add the mushrooms. Stir and cook for about 5 minutes until they are heated through. You can also use a microwave for quick reheating. Place the mushrooms in a microwave-safe dish and cover. Heat in short bursts, stirring in between, until hot. Enjoy them warm again! Can I use frozen mushrooms for this recipe? Yes, you can use frozen mushrooms. However, fresh mushrooms will give a better taste and texture. Frozen mushrooms may release more water, so adjust your cooking time. Drain any excess liquid if needed. What dishes pair well with garlic butter mushrooms? Garlic butter mushrooms are very versatile. They pair well with steak, chicken, or fish. You can also serve them over pasta or rice. They make a great topping for crostini, too. How can I make this dish spicy? To add spice, include red pepper flakes or diced fresh chili peppers. You can mix in a bit of hot sauce while cooking. Adjust the amount based on your heat preference. Can I prepare garlic butter mushrooms ahead of time? Yes, you can prepare them ahead. Cook the mushrooms and let them cool. Store them in the fridge for up to three days. Reheat them gently in a skillet before serving. For the full recipe, check out the garlic butter mushrooms delight section. This guide walks you through making delicious garlic butter mushrooms. We covered the essential ingredients, step-by-step cooking methods, and shared helpful tips. You can try different herbs or make it vegan. Storing leftovers is easy, and reheating is simple too. Embrace these flavors in your meals. With practice, you’ll impress friends and family. Cooking should be fun and tasty, so dive in and enjoy!

Garlic Butter Mushrooms Flavorful and Simple Recipe

If you love quick and tasty dishes, you’ll adore Garlic Butter Mushrooms! This simple recipe combines fresh mushrooms with rich

- 14 oz firm tofu, well-pressed and drained - 3 tablespoons cornstarch - 2 tablespoons soy sauce (low sodium recommended) - 1 tablespoon sesame oil - 1 tablespoon garlic powder - 1 tablespoon onion powder - 1 teaspoon smoked paprika - 1 teaspoon freshly ground black pepper - Salt, to taste - 2 tablespoons green onions, finely chopped (for garnish) - Toasted sesame seeds (for finishing touch) How to properly press tofu To press tofu, start with a block of firm tofu. Wrap it in a clean kitchen towel or paper towels. Place a heavy object on top, like a cast-iron skillet. Let it sit for at least 15 minutes. This step helps remove excess water, making the tofu crispier when baked. Measuring out cornstarch and liquids Use a measuring spoon for cornstarch and liquids. Accurate measuring ensures the right texture. For the soy sauce and sesame oil, pour them into separate bowls ready for mixing. This makes marinating easy. Preparing garnishes Chop green onions finely. You want small pieces that add color and flavor. Measure out sesame seeds if you want to toast them. Toasting adds a nutty flavor that enhances the dish. First, preheat your oven to 400°F (200°C). This step ensures even cooking. Next, line a baking sheet with parchment paper. This keeps the tofu from sticking. Cut your well-pressed tofu into 1-inch cubes. Use a sharp knife for clean cuts. Place the cubes in a mixing bowl. This makes it easy to marinate later. In another bowl, mix the soy sauce, sesame oil, garlic powder, onion powder, smoked paprika, and black pepper. Whisk until it's smooth. This marinade gives the tofu great flavor. Drizzle this mixture over the tofu cubes. Toss gently with your hands. Make sure each piece is covered well. Let the tofu marinate for about 15 minutes. This will help the flavors soak in. After marinating, sprinkle cornstarch over the tofu. Toss the cubes again until they are all coated. The cornstarch is key for a crispy texture. Now, arrange the tofu cubes on your prepared baking sheet. Space them evenly; this helps them cook well. Place the baking sheet in the oven and bake for 25-30 minutes. Flip the tofu halfway through. This ensures they brown evenly. When the tofu is golden brown and crispy, take it out. Let it cool for a few minutes. Lightly season with salt, then add green onions and sesame seeds for garnish. Enjoy this dish with some steamed rice or your favorite sauce. For the full recipe, refer to the previous section. To get that perfect crispy texture, cornstarch is key. It creates a nice coat around the tofu. This coat helps to absorb moisture while baking, resulting in a delightful crunch. To avoid soggy tofu, press it well. Use a tofu press or wrap it in a clean towel. Place something heavy on top for about 30 minutes. This step removes excess moisture and makes a big difference. Adding extra seasonings can elevate your dish. Try adding chili powder for heat or ginger for a fresh kick. You can also mix in some lemon zest for brightness. For a deeper flavor, marinate the tofu longer. It’s best to let it soak for at least 30 minutes. You can even marinate it overnight in the fridge. This gives the tofu time to absorb all those tasty flavors. For the full recipe, check out the details above. Enjoy cooking! {{image_4}} You can change the type of tofu you use. Firm tofu works great for this recipe. It holds its shape and gets crispy. If you want a softer texture, you can use soft or silken tofu. Just remember, soft tofu may not get as crispy. You can still enjoy it in stir-fries or salads. If you need a substitute for tofu, try tempeh or seitan. Both are tasty and offer a great texture. Tempeh has a nutty flavor and works well with marinades. Seitan is chewy and can mimic meat. Both options are perfect for adding protein to your meal. You can easily change the flavor of your crispy tofu. For Asian-inspired flavors, use soy sauce, ginger, and garlic. These ingredients create a delicious, savory taste. You can also add sesame seeds for extra crunch. If you like spice, try adding chili powder or sriracha. These flavors will give your tofu a kick. You can also mix in fresh herbs like basil or cilantro. This adds brightness and freshness to each bite. Feel free to experiment with different spices and herbs to create your perfect flavor profile. To store your crispy tofu, let it cool first. Place the tofu in an airtight container. This keeps it fresh and tasty. Make sure to store it in the fridge. Use it within three days for the best flavor and texture. Avoid stacking the tofu too high. This can cause it to lose its crunch. To reheat crispy tofu, use an oven or air fryer. Preheat your oven to 375°F (190°C). Place the tofu in a single layer on a baking tray. Heat for about 10-15 minutes. This will help regain its crispiness. You can also use the air fryer. Set it to about 350°F (175°C) and heat for 5-7 minutes. What can you do with leftover tofu? Try adding it to a stir-fry, salad, or wrap. You can also mix it into soups for extra protein. It’s a great way to use it up while enjoying new flavors. For the full recipe, check out the main article. To make Oven Baked Crispy Tofu, follow these steps: 1. Preheat your oven to 400°F (200°C). Line a baking sheet with parchment paper. 2. Cut 14 oz of firm tofu into 1-inch cubes. Place them in a bowl. 3. In another bowl, mix together 2 tablespoons soy sauce, 1 tablespoon sesame oil, 1 tablespoon garlic powder, 1 tablespoon onion powder, 1 teaspoon smoked paprika, and 1 teaspoon black pepper. 4. Pour this marinade over the tofu and toss gently. Let it sit for 15 minutes. 5. Sprinkle 3 tablespoons cornstarch over the tofu and toss again. This helps create the crispy texture. 6. Spread the tofu in a single layer on the baking sheet. Ensure they are spaced out. 7. Bake for 25-30 minutes, flipping halfway for even browning. 8. Once golden and crispy, take them out. Add a light sprinkle of salt, green onions, and sesame seeds. Yes, you can use different oils. If you don’t have sesame oil, try: - Olive oil for a milder taste. - Avocado oil for a high smoke point. - Coconut oil for a hint of sweetness. Each oil gives the tofu a unique flavor. Experiment to find your favorite. Crispy tofu pairs well with many dishes. Here are some ideas: - Steamed rice or quinoa for a hearty base. - Stir-fried vegetables for added crunch and color. - A fresh salad with a tangy dressing. - Dipping sauces like soy sauce or sweet chili for extra flavor. These sides make your meal balanced and delicious. To know if your tofu is done, look for these signs: - It should be golden brown and crispy on the outside. - The texture should feel firm and slightly crunchy. - When you poke it, it should bounce back, not feel soft. Using these cues will help you achieve perfect crispy tofu every time. In this post, we explored how to make delicious oven-baked crispy tofu. We discussed key ingredients, like firm tofu and tasty seasonings. Properly measuring and preparing your ingredients is crucial. I shared step-by-step instructions for marinating and baking the tofu to perfection. We looked at tips for achieving that ideal crispy texture and suggested flavor enhancements. Finally, I covered storage and reheating to keep your leftovers tasty. Enjoy experimenting with different flavors and tofu types to make this dish your own!

Oven Baked Crispy Tofu Simple and Delicious Recipe

If you’re craving a dish that’s both simple and downright delicious, you’ve come to the right place! This Oven Baked

Here are the key ingredients to make these tasty homemade chewy granola bars: - 2 cups rolled oats - 1 cup mixed nuts (almonds, walnuts, and cashews) - 1/2 cup honey or maple syrup - 1/2 cup almond butter or peanut butter - 1 teaspoon vanilla extract - 1/2 teaspoon ground cinnamon - 1/2 cup dried fruits (raisins, cranberries, or chopped apricots) - 1/4 cup chia seeds (optional) - Pinch of salt You can switch up the nuts or dried fruits based on your taste. I love using walnuts and cranberries for a nice crunch and sweet bite. The oats give the bars a great base, while the nut butter and honey hold everything together. You can also use maple syrup for a vegan option. Don't forget the pinch of salt; it adds a nice balance to the sweetness. When I make these bars, I often add chia seeds for extra nutrition. They help with texture, too! You can find all these ingredients at your local store or online. Check out the Full Recipe for more details on how to bring this all together. - Preheat the oven to 350°F (175°C) and prepare the baking pan. - Mix dry ingredients in a bowl. Start by preheating your oven to 350°F (175°C). This step gets your oven ready for baking. Next, grab an 8x8 inch baking pan. Line it with parchment paper. Make sure to leave some paper hanging over the edges. This helps you lift the bars out later. In a big bowl, combine the rolled oats, mixed nuts, dried fruits, chia seeds (if you want), ground cinnamon, and a pinch of salt. Stir well. You want all the dry ingredients mixed evenly. - Heat honey/maple syrup and nut butter, stir in vanilla. - Combine wet and dry mixtures until thoroughly coated. Now, take a small saucepan and heat the honey or maple syrup. Add the almond butter or peanut butter. Stir it often over low heat until the mixture is smooth. This should take about 2 to 3 minutes. Once done, take it off the heat and stir in the vanilla extract. This adds a nice flavor. Pour the warm mixture over the dry ingredients in your bowl. Use a spatula or a wooden spoon to mix. Make sure the oats and nuts are well coated with the sticky mixture. This step is key to getting chewy bars. - Transfer the mixture to the pan, press down, and bake. - Cool down and cut into bars. Next, transfer the mixture into your prepared baking pan. Press it down firmly with a spatula or your hands. This helps the bars hold together after baking. Put the pan in your preheated oven. Bake for about 15 to 20 minutes. Look for a nice golden brown color and a sweet nutty smell. After baking, take the pan out and let it cool for at least 30 minutes. Once it cools, you can lift it out using the parchment paper. Place it on a cutting board. Now use a sharp knife to cut the cooled mixture into bars. Enjoy these healthy and tasty chewy granola bars, or store them in an airtight container. They will be good for up to a week. For the full recipe, check the detailed instructions above. To get chewy granola bars, you need to press the mixture firmly into the pan. The more you press, the better they hold together. If you want crunchy bars, add a few extra minutes to the baking time. This slight change can make a big difference. After baking, let them cool completely in the pan before cutting. This helps them set and stay chewy. You can add fun flavors to your bars. Try mixing in coconut flakes or a dash of nutmeg. You can also switch nut butters. Almond butter gives a sweet taste, while peanut butter offers a richer flavor. Each nut butter adds its own unique twist. Consider using sunflower seed butter for a nut-free option. Ovens can vary, so keep an eye on your bars as they bake. If your oven runs hot, check them a few minutes early. Look for a golden top and a nice nutty smell. If they look too brown, take them out right away. Remember, the bars will firm up as they cool. For the best results, always follow the guidelines in the Full Recipe. {{image_4}} If you want to make nut-free bars, seeds are a great option. Use pumpkin seeds or sunflower seeds instead of nuts. They give a nice crunch and are full of nutrients. If you love nuts, feel free to mix it up! Try using almonds, walnuts, or pecans based on what you like best. Each nut adds its own flavor and texture. You can swap honey or maple syrup for other sweeteners. Agave syrup works well too. If you prefer brown sugar, that’s an option too! Just remember, each sweetener has a different sweetness level. You may need to adjust the amount based on how sweet you want your bars. Get creative with your bars by adding extra ingredients. Chocolate chips make a tasty treat, and coconut flakes add a tropical flair. You can also mix in seasonal fruits like dried apples or peaches. These add flavor and make your granola bars unique. Check out the Full Recipe for more ideas. To keep your granola bars fresh, use an airtight container. Glass or plastic containers work well. Make sure the lid fits tightly to seal in freshness. You can also wrap each bar in parchment paper for easy grabbing. This keeps them from sticking together. For long-term storage, consider vacuum-sealing the bars. This method removes air and helps prevent spoilage. At room temperature, these bars last about one week. Store them away from direct sunlight and heat. If you want to keep them longer, freezing is a great option. Wrap the bars in plastic wrap and place them in a zip-top bag. They can last up to three months in the freezer. When ready, just thaw them in the fridge overnight before enjoying. Enjoy these bars as a quick snack or breakfast. They are great on their own. For a fun twist, serve them with yogurt or fresh fruit. You can also crumble them over a smoothie or salad for added crunch. Pairing with nut butter or honey can enhance the flavor even more. These simple ideas can make your snack time even better. Yes, you can easily make these bars vegan. Replace honey with maple syrup. Use a plant-based nut butter like peanut or sunflower seed butter. Choose dried fruits that are unsweetened and check labels for any animal-based additives. This way, you get a tasty vegan treat. If you don’t have almond butter, use peanut butter. It adds a rich flavor but may taste different. Sunflower seed butter is a great nut-free option. Be aware that each nut butter brings its own unique flavor and texture to the bars. For gluten-free bars, choose certified gluten-free oats. You can also skip nuts if allergies are a concern. Instead, use seeds like pumpkin or sunflower seeds. Always read labels to ensure that all ingredients are safe for your dietary needs. Yes, adding protein powder is easy! Mix in 1 to 2 scoops of your favorite protein powder with the dry ingredients. This may change the texture slightly, so add a bit more nut butter or liquid. This helps keep the bars chewy and delicious. Bars can fall apart for a few reasons. Not pressing the mixture firmly enough can lead to crumbling. Ensure your mixture is well combined so it sticks together. If you bake them for too short a time, they may not hold their shape. Follow the baking time closely for the best results. This blog post provided a clear guide to making delicious granola bars. You learned about key ingredients, easy steps, and helpful tips. Customizing your bars can enhance flavor and meet your needs. Remember to adjust baking times for best results. Store your bars properly to enjoy them longer. With these insights, you can create tasty snacks that fit your taste and lifestyle. Now, go ahead and make your own granola bars, and enjoy every bite!

Homemade Chewy Granola Bars Simple and Wholesome Snack

Looking for a delicious snack that’s easy to make? You’ll love these homemade chewy granola bars! Packed with wholesome ingredients

To make Spicy Roasted Cauliflower Tacos, you need simple, fresh ingredients. Here’s what you will need: - 1 medium head of cauliflower, cut into bite-sized florets - 2 tablespoons extra virgin olive oil - 1 tablespoon chili powder - 1 teaspoon ground cumin - 1 teaspoon smoked paprika - 1/2 teaspoon garlic powder - 1/2 teaspoon onion powder - Salt and freshly cracked black pepper, to taste - 8 small corn tortillas - 1 cup finely shredded purple cabbage - 1 ripe avocado, sliced - 1/4 cup fresh cilantro, roughly chopped - Lime wedges for serving - Optional: your favorite hot sauce for an added kick These ingredients create a perfect balance of flavors. The cauliflower gives the tacos a hearty base. The spices add warmth and depth. The fresh toppings bring crunch and brightness. You can find the full recipe with detailed steps to guide you through the cooking process, ensuring a delicious meal every time. Set your oven to 425°F (220°C). This high heat is key for roasting. It will caramelize the cauliflower and bring out its natural sweetness. In a large bowl, mix the cauliflower florets with olive oil and spices. Use 2 tablespoons of olive oil, 1 tablespoon of chili powder, 1 teaspoon of ground cumin, and 1 teaspoon of smoked paprika. Add 1/2 teaspoon of garlic powder, 1/2 teaspoon of onion powder, and salt and pepper to taste. Toss until every floret is covered. This step makes each bite flavorful. Spread the cauliflower on a baking sheet in one layer. Roast for 25-30 minutes. Halfway through, stir the florets for even cooking. Look for tender, golden brown pieces with crispy edges. While the cauliflower roasts, warm the corn tortillas in a dry skillet over medium heat. Heat each side for about 30 seconds until they are soft and warm. Once the cauliflower is ready, it’s taco time! Take a warm tortilla and add roasted cauliflower. Top it with shredded purple cabbage and slices of creamy avocado. Finish with fresh cilantro and a squeeze of lime juice. For extra heat, add your favorite hot sauce. Serve the tacos warm with lime wedges on the side. For complete instructions, check the Full Recipe. To get the best texture, aim for crispiness on the outside. Start with a hot oven, set at 425°F. Cut the cauliflower into even florets for uniform cooking. Toss the florets with olive oil and spices until well-coated. Spread them out on a baking sheet to allow airflow. Roast for about 25-30 minutes. Stir halfway to ensure even browning. The goal is a tender inside and a golden, crispy exterior. Warming tortillas can be tricky. To avoid cracks, use a dry skillet over medium heat. Heat each tortilla for about 30 seconds on each side. You want them warm and pliable. This way, you can fold them without breaking. If you have a tortilla warmer, use it to keep them warm while you finish cooking the cauliflower. Fresh cilantro adds a burst of flavor to your tacos. Its bright taste balances the spice from the cauliflower. Always use fresh lime juice to enhance the dish. A squeeze of lime brightens every bite. For an extra kick, drizzle your favorite hot sauce over the top. This simple garnish makes the tacos even more delicious. {{image_4}} You can make these tacos your own! Start by adding different vegetables or proteins. Try black beans for protein or bell peppers for crunch. You can also use zucchini or sweet potatoes. Each adds new flavors and textures that brighten your meal. Want more heat? Add more chili powder or hot sauce. If you prefer mild, cut back on the spices. You can also use a sweet pepper like a bell pepper instead of chili. This lets you control the spice. Toppings change everything! Try adding pickled onions or sliced radishes for a zing. Feta cheese or a drizzle of yogurt can add creaminess. For a fresh twist, consider mango salsa or a dollop of guacamole. These toppings create unique flavors and make each bite exciting. For more ideas, check out the Full Recipe for Spicy Roasted Cauliflower Tacos. To store your spicy roasted cauliflower tacos, let them cool first. Place the leftovers in an airtight container. Keep them in the fridge for up to three days. This method helps keep the flavors fresh. Make sure to separate the tortillas from the filling. This way, the tortillas won’t get soggy. When you're ready to enjoy leftovers, reheat them carefully. I suggest using the oven. Preheat it to 350°F (175°C). Spread the cauliflower on a baking sheet and warm for about 10-15 minutes. This keeps the cauliflower crispy. For the tortillas, wrap them in foil and heat them in the oven for about 5 minutes. This method helps them stay soft and pliable. If you want to save some for later, freezing works well. Pack the roasted cauliflower in freezer-safe bags or containers. Remove as much air as possible to prevent freezer burn. You can freeze the tortillas too. Stack them with parchment paper between each one. They freeze well and can be used later for other meals or tacos. Yes, you can make these tacos vegan. The main ingredients are already plant-based. Here are some substitutes you can use: - Use a vegan hot sauce instead of regular hot sauce. - Replace the avocado with guacamole for extra creaminess. - Add more veggies like bell peppers or zucchini for extra taste. To make the cauliflower crispier, follow these tips: - Cut the florets into smaller pieces for better roasting. - Use a higher oven temperature, like 450°F (232°C). - Make sure the cauliflower is spread out on the baking sheet. This helps it roast evenly. - Turn the florets halfway through cooking to get all sides crispy. These tacos pair well with several side dishes: - Serve with a fresh green salad for a light option. - Add some rice or quinoa for a filling meal. - Consider black beans or refried beans for extra protein. - Top with salsa or a corn salad for a festive touch. For the complete recipe, check out the Full Recipe section. In this post, we explored the delicious Spicy Roasted Cauliflower Tacos. We covered key ingredients, step-by-step instructions, and helpful tips. You learned how to achieve crispy cauliflower and how to store leftovers. Don’t forget the importance of fresh garnishes and various toppings for your tacos. Experiment with flavors to find what suits you. Enjoy your cooking journey and the vibrant taste of these tacos!

Spicy Roasted Cauliflower Tacos Flavorful and Quick Meal

Are you ready for a quick, tasty meal? These Spicy Roasted Cauliflower Tacos are packed with flavor and sure to

To make ranch roasted chickpeas, you need just a few key items. Here’s the list: - 1 can (15 oz) chickpeas, thoroughly drained and rinsed - 2 tablespoons extra virgin olive oil - 2 teaspoons ranch seasoning mix (store-bought or homemade) - 1 teaspoon garlic powder - ½ teaspoon onion powder - ½ teaspoon smoked paprika - ¼ teaspoon salt (adjust to preferred taste) - ¼ teaspoon freshly ground black pepper - Fresh parsley, finely chopped (for garnish) These ingredients combine to create a tasty, crunchy snack. The chickpeas provide protein and fiber, while the ranch seasoning brings bold flavor. You can switch things up with some optional ingredients. Here are a few ideas: - A pinch of cayenne pepper for heat - Nutritional yeast for a cheesy taste - Lemon zest for a fresh, bright flavor - Other herbs like dill or chives for variety Feel free to experiment with these options. Each adds a unique twist to the classic ranch flavor. Ranch roasted chickpeas are not only delicious but also nutritious. Each serving has: - Approximately 120 calories - 5g of protein - 5g of fat - 18g of carbohydrates - 6g of fiber This snack is a better choice than chips or cookies. It keeps you full and satisfied without the guilt. For the full recipe, check out the steps to make these tasty chickpeas. Start by preheating your oven to 400°F (200°C). This heat helps the chickpeas get crispy. Drain and rinse one can of chickpeas. After rinsing, spread them on a clean kitchen towel. Pat them dry to remove extra water. This step is key for crispiness. If they are wet, they won’t get crunchy. Next, grab a medium-sized bowl. Add the dry chickpeas to the bowl. Pour in two tablespoons of extra virgin olive oil. Then, add two teaspoons of ranch seasoning mix. You can use store-bought or make your own. Follow this with one teaspoon of garlic powder, half a teaspoon of onion powder, and half a teaspoon of smoked paprika. Finally, add a quarter teaspoon of salt and black pepper. Toss everything well so each chickpea gets coated in the flavorful mix. Now, line a baking sheet with parchment paper. This makes cleanup easy and prevents sticking. Spread the seasoned chickpeas in a single layer. Make sure they have space between them; this helps them roast evenly. Place the baking sheet in your preheated oven. Roast the chickpeas for 25-30 minutes. Stir them halfway through to ensure they brown nicely. When they turn golden brown, they are ready. Once done, take them out and let them cool for a few minutes. This cooling time makes them even crunchier. Before serving, sprinkle some fresh parsley on top for a nice touch. Enjoy your ranch roasted chickpeas as a tasty snack! For the full recipe, check out the details above. To get the best crunch from your ranch roasted chickpeas, start with dry chickpeas. After rinsing, use a towel to pat them completely dry. Any moisture will make them soft instead of crunchy. Spread them out on the baking sheet in a single layer. This allows hot air to circulate and crisp them up evenly. Stir them halfway through roasting. This helps them brown on all sides. Seasoning is key to tasty chickpeas. Use two teaspoons of ranch seasoning for a great flavor. You can adjust this based on your taste. If you want more heat, try adding some cayenne pepper. For a milder taste, cut back on the seasoning. Remember to taste your mix before roasting. You can always add more seasoning later, but you can't take it away! If you have leftover chickpeas, store them in an airtight container. They can stay fresh for about three days at room temperature. For longer storage, keep them in the fridge. If they lose some crispiness, you can re-crisp them in the oven. Just pop them back in at 400°F (200°C) for about 5-10 minutes. This will bring back their crunch. For the full recipe, check out the detailed instructions above. {{image_4}} To make your ranch roasted chickpeas spicy, add cayenne pepper or chili powder. Use about ½ teaspoon for a nice kick. You can mix it in with the other seasonings. If you want more heat, feel free to add more. This spicy twist keeps your taste buds excited. Herbs can add great flavor to your chickpeas. Try adding dried herbs like thyme, dill, or oregano. About 1 teaspoon of your chosen herb works well. Mix them in with the ranch seasoning. This gives a fresh taste and a lovely aroma. You can also use fresh herbs after roasting for a pop of color. Switching up your seasonings can lead to exciting new flavors. Consider using taco seasoning for a zesty taste or curry powder for something unique. About 2 teaspoons of either works well. Mix these alternatives with your chickpeas for a fun twist. The options are endless, so feel free to get creative! For more details on the base recipe, check out the Full Recipe. To keep your ranch roasted chickpeas tasty, store them in an airtight container. They stay fresh for about three days at room temperature. If you notice them getting soft, they need to be eaten quickly. The crunch is what makes them fun to snack on. If you want to enjoy your roasted chickpeas again, reheating is easy. Preheat your oven to 350°F (175°C). Spread the chickpeas on a baking sheet in a single layer. Heat them for about 10 minutes. This method helps bring back that crunchy texture. Avoid the microwave, as it can make them soggy. You can freeze ranch roasted chickpeas, but they may lose some crispiness. To freeze, place them in a freezer-safe bag. Remove as much air as possible. They can last up to three months. When you are ready to eat them, thaw them in the fridge overnight and reheat in the oven for the best results. Check out the Full Recipe for more tips! Yes, you can use dried chickpeas. First, soak them overnight in water. This helps them cook well. After soaking, boil them until tender. This may take about 1 to 2 hours. Then, drain and rinse them. Follow the same steps in the recipe. Just remember that the texture may differ slightly. Ranch roasted chickpeas last about 3 to 5 days when stored properly. Keep them in an airtight container. This helps maintain their crunch. If they lose their crispiness, you can re-roast them for a few minutes. This will bring back the fun texture. Ranch roasted chickpeas work great in many dishes. You can add them to salads for extra crunch. They also make a tasty topping for soups. Try them as a snack on their own or with dip. They are fun to eat while watching your favorite show. For a full recipe, check out the details above. Ranch roasted chickpeas are easy and fun to make. We explored the main ingredients, prep steps, and tips for perfect texture. Plus, I shared tasty variations and storage tips to keep them fresh. Remember, these snacks are not just healthy but also packed with flavor! Use these insights to create your own version and enjoy a tasty treat at home. Happy cooking!

Ranch Roasted Chickpeas Crispy and Flavorful Snack

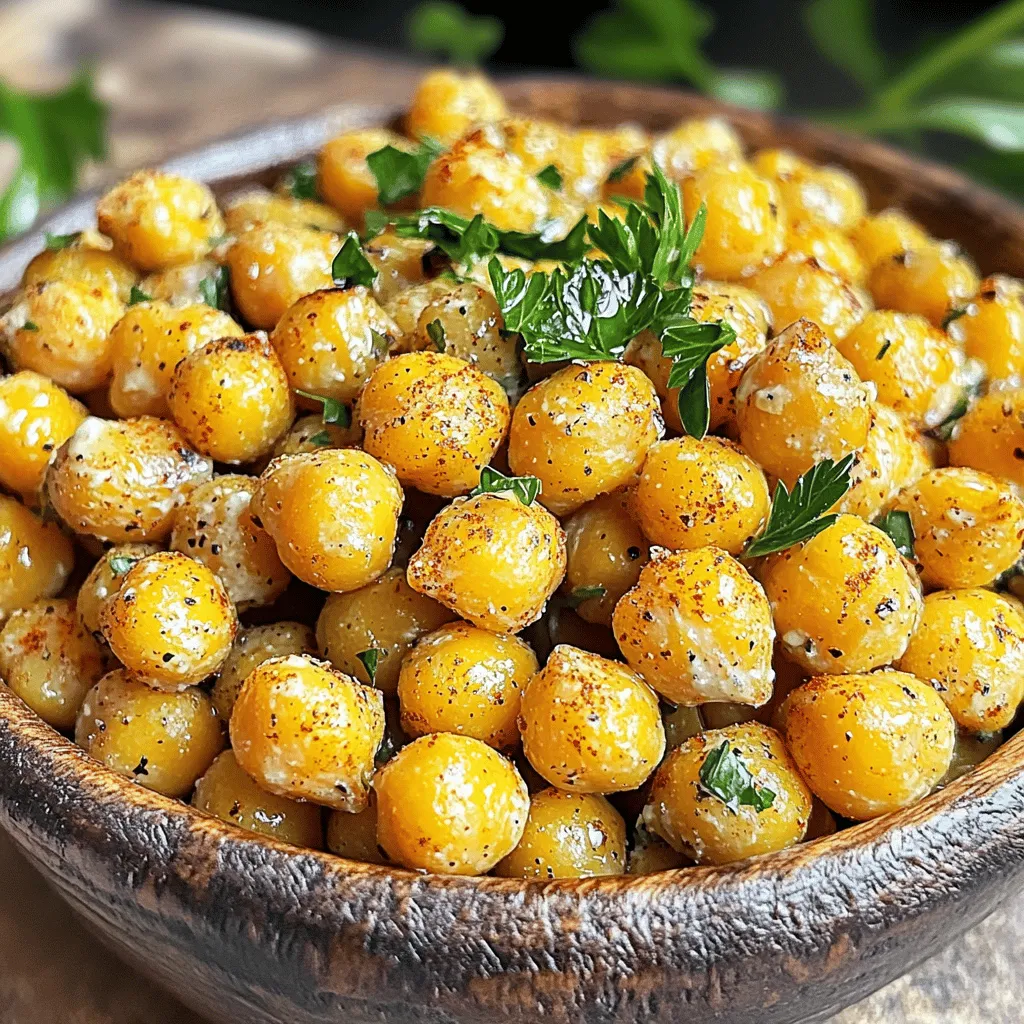
Looking for a tasty snack that’s both crunchy and full of flavor? Ranch Roasted Chickpeas are your answer! Not only

- 2 cups cherry tomatoes, halved - 3 tablespoons extra virgin olive oil - 4 cloves garlic, finely minced - 1 teaspoon dried oregano - Salt and freshly cracked black pepper to taste - 8 oz spaghetti or your preferred pasta - 1/4 cup fresh basil leaves, roughly chopped - 1/4 cup grated Parmesan cheese (optional for serving) - 1 teaspoon balsamic vinegar (optional for depth of flavor) Each ingredient plays a key role in the dish. The cherry tomatoes bring sweetness and acidity. Olive oil adds richness and helps the flavors meld. Garlic gives a punchy aroma, while oregano adds a hint of earthiness. Salt and pepper enhance all the flavors. Spaghetti provides a perfect base for the sauce. Fresh basil adds brightness and freshness. Parmesan cheese gives a savory finish, if you choose to add it. Balsamic vinegar can deepen the flavor, giving a sweet tang. Each serving has about 350 calories, 10 grams of protein, 60 grams of carbs, and 10 grams of fat. Using fresh ingredients boosts flavor and nutrition. Fresh tomatoes are high in vitamins and antioxidants. Olive oil offers healthy fats that support heart health. Garlic may help boost your immune system. Fresh basil contains vitamins A and K. This dish is not just tasty; it also supports a balanced diet. To start, you need to prepare the cherry tomatoes and garlic. First, wash the cherry tomatoes well. Next, cut each tomato in half. This helps them roast evenly. For the garlic, take four cloves and finely mince them. This step releases their rich flavor. When selecting tomatoes, look for bright red ones. They should feel firm but not hard. Avoid any tomatoes with blemishes or soft spots. Fresh and ripe tomatoes give the best taste to your pasta. Roasting the tomatoes is key to this dish. Preheat your oven to 400°F (200°C). This high heat caramelizes the sugars in the tomatoes. On a large baking sheet, combine the halved tomatoes with two tablespoons of olive oil, minced garlic, dried oregano, and some salt and pepper. Toss everything together. Spread the mixture in a single layer to ensure even roasting. Place the baking sheet in the oven. Roast the tomatoes for about 20-25 minutes. You want them to burst and turn golden around the edges. This brings out their sweet flavor. While the tomatoes roast, cook the pasta. Fill a large pot with water and bring it to a rapid boil. Add a generous amount of salt, about one tablespoon, to the water. This helps flavor the pasta. Once boiling, add your spaghetti or preferred pasta. Cook until it is al dente, which means it’s firm to the bite. After cooking, drain the pasta but remember to reserve about half a cup of the starchy water. This water helps bind the sauce later on. Now it's time to mix everything together. In a large mixing bowl, combine the roasted tomatoes with any juices from the baking sheet. Add the drained pasta to this mix. Drizzle in the last tablespoon of olive oil and balsamic vinegar if you’re using it. Toss everything well. Gradually add the reserved pasta water until you reach the right sauce consistency. You want the sauce to coat the pasta nicely, not be too watery. Finally, fold in the chopped basil and taste it. Adjust with more salt and pepper if needed. Serve your warm pasta in a bowl. You can top it with grated Parmesan cheese if you want. Enjoy this delicious dish! For the full recipe, check the earlier sections. To cook pasta well, avoid common mistakes. First, always use a large pot of water. This gives the pasta space to move around. Add salt to the water; it helps the pasta taste better. Check for doneness by tasting the pasta. It should be firm but not hard. This is called al dente. If you wait too long, it can become mushy. Herbs and spices can boost flavor. Try adding fresh basil or parsley. You can also use dried oregano or thyme. These herbs pair well with roasted tomatoes. Balsamic vinegar adds depth to the dish. It has a sweet and tangy flavor. Olive oil makes the pasta rich and smooth. A drizzle of both can elevate your meal. For a great look, serve pasta in a big bowl or on individual plates. Add extra fresh basil leaves on top for color. Grate Parmesan cheese over the dish for a nice finish. Drizzle some olive oil on top for shine. This makes it look gourmet. You can find more tips in the Full Recipe. {{image_4}} To make this dish vegan, swap out the Parmesan cheese for a plant-based alternative. Nutritional yeast is great for a cheesy flavor. You can also use cashew cream for a rich, creamy texture. Add nuts like pine nuts or walnuts for extra crunch. Fresh spinach or arugula can add a peppery taste. Don't forget to toss in some olives for a briny kick. If you need gluten-free pasta, there are many types available. Brown rice pasta or chickpea pasta work well. You can even make your own gluten-free pasta with rice flour and egg or water. There are many recipes online to guide you through this process. Homemade pasta can taste fresher and more delightful. Italian cuisine has many styles. In Southern Italy, they often use more garlic and olive oil. Northern regions may add cream for a richer sauce. In Tuscany, roasted tomatoes may mix with capers and olives. Each region has its unique twist on roasted tomato pasta. Explore these variations to find your favorite! To store leftover roasted tomato pasta, let it cool first. Place the pasta in an airtight container. This keeps it fresh and tasty. You can store it in the fridge for up to three days. For longer storage, freeze it. Use freezer-safe bags or containers to avoid freezer burn. When reheating, the best method is to use the stove. Place the pasta in a pan over low heat. Add a splash of water or olive oil. This keeps the pasta moist and helps it heat evenly. Stir it gently as it warms up. If you want to refresh leftovers, consider adding fresh basil or a sprinkle of cheese. This adds flavor and makes the dish feel new again. Enjoy your roasted tomato pasta even after storing it! For detailed cooking steps, check out the Full Recipe. You can store roasted tomato pasta in the fridge for about 3 to 5 days. Make sure to use an airtight container to keep it fresh. Before serving, check for any off smells or changes in color. If it looks fine, you can reheat it. Always ensure it reaches 165°F (74°C) when reheating to keep it safe. Yes, you can freeze roasted tomato pasta. Let it cool completely before packing it into freezer-safe containers. Use a container that fits your needs, leaving some space for expansion. When ready to eat, thaw it overnight in the fridge. Reheat it on the stove or in the microwave until hot. Spaghetti is a classic choice, but many types work well. Here are some great options: - Penne: Holds sauce well. - Fusilli: Twists catch bits of tomato. - Farfalle: Fun shape adds variety. - Whole wheat pasta: Adds nutrition and flavor. Experiment and find your favorite! To add some heat, try these simple tips: - Red pepper flakes: Sprinkle in while mixing the pasta. - Fresh chili: Chop and sauté with garlic. - Hot sauce: Drizzle in at serving for extra kick. Adjust the spice level to your taste! This blog post covered key ingredients for roasted tomato pasta and their roles. We looked at how to prepare tomatoes and garlic, then roasted them to perfection. We also explored cooking pasta al dente and combining everything for a balanced dish. Let's not forget the useful tips for flavor and presentation, along with variations for all diets. Fresh ingredients shine in this dish, and you can store leftovers for later. Now, you have all the tools to create a delicious meal. Happy cooking!

Roasted Tomato Pasta Flavorful and Easy Recipe

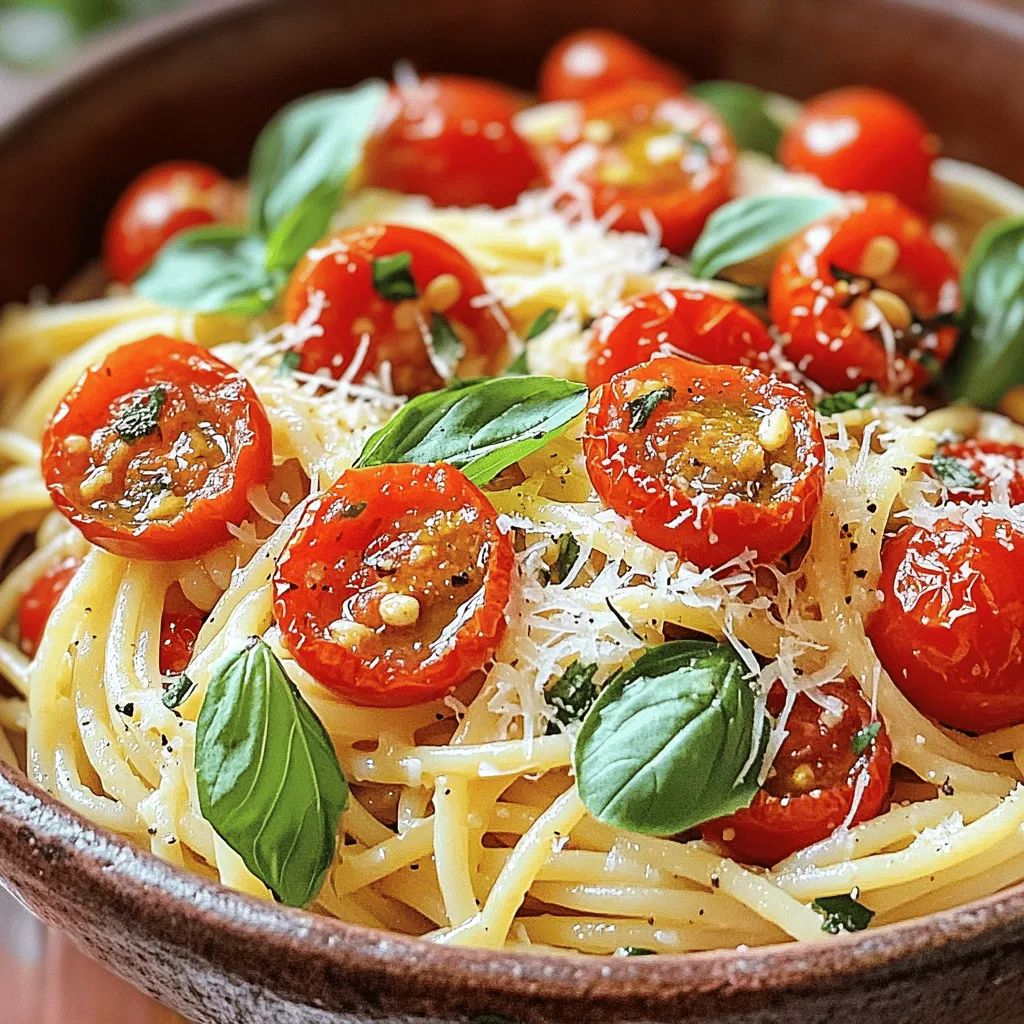
Are you ready to take your pasta game to the next level? This Roasted Tomato Pasta recipe is not just

To make Chicken Alfredo Stuffed Shells, you will need these simple ingredients: - 20 jumbo pasta shells - 2 cups cooked chicken, shredded - 1 cup ricotta cheese - 1 cup mozzarella cheese, shredded - 1/2 cup grated Parmesan cheese - 2 cups Alfredo sauce (store-bought or homemade) - 1 teaspoon garlic powder - 1 teaspoon Italian seasoning - Salt and pepper to taste - Fresh parsley, chopped (for garnish) Understanding how to convert measurements can help you adjust the recipe. Here are some useful conversions: - 1 cup = 8 ounces - 1/2 cup = 4 ounces - 1 teaspoon = 5 milliliters - 2 cups = 16 ounces These conversions make it easier to scale the recipe or substitute ingredients. Using quality ingredients enhances the final dish. Here are my suggestions: - Chicken: Use rotisserie chicken for great flavor and ease. - Cheese: Opt for fresh mozzarella and real Parmesan. They melt better. - Alfredo Sauce: If you can, make your own sauce for the best taste. - Pasta: Buy high-quality jumbo shells. They hold the filling well. Investing in good ingredients makes a big difference in taste and texture. Enjoy the process of gathering these items as you prepare to create a comforting dish! For the full recipe, check out the details above. I start by prepping all my ingredients. First, I gather the jumbo pasta shells, cooked chicken, and cheeses. This helps me stay organized. Then, I preheat my oven to 375°F (190°C). It’s important to have the oven ready when it’s time to bake. Next, I boil a large pot of salted water. I cook the pasta shells according to the package instructions until they are al dente. This means they should be firm but cooked. Once done, I drain the shells and let them cool for a few minutes. To cook perfect shells, timing is key. I use a large pot and plenty of water. This helps the pasta cook evenly. I add salt to the water to enhance the flavor of the pasta. When the shells are ready, I make sure not to overcook them. Overcooked shells can break, which makes stuffing them harder. I check them a minute or two before the time is up. Once they are just right, I drain them gently. I let them cool on the counter, so I can handle them easily later. For assembly, I mix my filling in a bowl. I combine the cooked chicken, ricotta, half of the mozzarella, Parmesan, garlic powder, and Italian seasoning. After mixing well, I start stuffing the shells. I take each shell and fill it with the chicken mixture. I place them in a greased 9x13 inch baking dish. After all shells are filled, I pour Alfredo sauce over them. I make sure each shell gets a good coating. I sprinkle the rest of the mozzarella on top for a cheesy finish. Next, I cover the dish with foil to keep moisture in. I bake the shells for 25 minutes. After that, I remove the foil and bake for another 10 minutes. I look for the cheese to be bubbly and golden. Finally, I let the dish cool for about 5 minutes before serving. A sprinkle of fresh parsley adds color and flavor. You can find the complete cooking method in the Full Recipe to guide your cooking adventure! When making Chicken Alfredo stuffed shells, avoid overcooking the pasta. Cook it just until al dente. If you cook it too long, the shells may break. Another mistake is not draining the shells well after cooking. Too much water can dilute the sauce. Make sure to let the filling cool a bit before stuffing. This helps the shells hold their shape. To enhance flavors, season the filling well. Use salt and pepper to taste. Adding garlic powder boosts the taste. Italian seasoning adds a nice herb flavor, too. Don’t skimp on cheese. A mix of mozzarella and Parmesan gives a rich, savory taste. You can also try adding a squeeze of lemon juice for freshness. For creamier stuffed shells, use full-fat ricotta cheese. It makes a big difference in texture. Mixing in some Alfredo sauce with the filling adds extra creaminess. Make sure the sauce is smooth and warm when you pour it over the shells. This will help it spread evenly and soak in. Garnish with fresh parsley for a colorful finish. You can find the full recipe and more tips to make this dish shine. {{image_4}} You can make your Chicken Alfredo Stuffed Shells even more special. Try adding cooked spinach or mushrooms for extra flavor. You could also mix in some sun-dried tomatoes for a sweet twist. Adding a bit of cooked bacon can also give your dish a smoky taste. If Alfredo sauce does not suit your taste, you have options. A creamy pesto sauce can give your shells a fresh, herby flavor. A marinara sauce can add tang and brightness. For a lighter choice, consider using a light cream sauce. Each of these sauces brings its unique touch to the dish. You can easily adapt this recipe for a vegetarian diet. Replace the chicken with grilled zucchini, bell peppers, or eggplant. For gluten-free shells, look for gluten-free pasta options. Many brands offer great substitutes that taste wonderful. With these changes, you can enjoy Chicken Alfredo Stuffed Shells without worry. To store your Chicken Alfredo stuffed shells, let them cool first. Place them in an airtight container. They will stay fresh for about three days in the fridge. Make sure to cover them well to keep moisture in. This helps keep the shells soft and tasty. When you want to eat leftovers, preheat your oven to 350°F (175°C). Place the stuffed shells in an oven-safe dish. Add a little more Alfredo sauce on top to keep them moist. Cover the dish with foil to prevent them from drying out. Heat them for about 20 minutes or until hot. You can also use a microwave. Just heat in short bursts, stirring in between, until warm. If you want to freeze your stuffed shells, do it before baking. Assemble the dish and cover it tightly with plastic wrap and foil. This keeps out air and prevents freezer burn. They can last for up to three months in the freezer. When you're ready to bake, thaw them overnight in the fridge. Then, bake as usual. You will love how fresh they taste, even after freezing! For more detailed instructions, check the Full Recipe. If you don’t have ricotta cheese, you can use cottage cheese. Blend it until smooth for a similar texture. Cream cheese is another option. Just soften it first, then mix it well with the other ingredients. You can even use Greek yogurt for a healthier twist. It adds a nice tang and creaminess. Yes, you can prepare Chicken Alfredo Stuffed Shells ahead of time. Assemble the dish and cover it tightly. Store it in the fridge for up to 24 hours. When you’re ready to bake, let it sit at room temp for about 30 minutes. This helps it cook evenly. You can also freeze the stuffed shells. Just make sure to thaw them overnight before baking. You’ll know the stuffed shells are done when the cheese is bubbly and golden. After baking, a knife inserted in the center should feel hot. The sauce should be simmering around the edges. If you want to be sure, use a food thermometer. The center should reach 165°F (74°C). Let them cool for a few minutes before serving. This makes them easier to handle and enjoy! This blog post covered everything you need for a delicious Chicken Alfredo Stuffed Shells dish. We explored the key ingredients, precise measurements, and quality suggestions. I shared clear steps for prep, cooking, and baking, plus tips for avoiding common mistakes. You found out about tasty variations and how to store leftovers properly. In the end, with these insights, you're ready to impress with this dish. Enjoy cooking and tasting every bite!

Chicken Alfredo Stuffed Shells Tasty and Comforting Dish

Craving a dish that warms your heart and pleases your palate? Chicken Alfredo Stuffed Shells are just what you need.

To make easy lemon bars, gather these simple ingredients: - 1 cup all-purpose flour - 1/2 cup powdered sugar, plus more for dusting - 1/2 cup unsalted butter, softened to room temperature - 1 cup granulated sugar - 2 large eggs, at room temperature - 1/4 cup freshly squeezed lemon juice (about 2 medium lemons) - Zest of 1 lemon, finely grated - 1 teaspoon baking powder - A pinch of salt Using fresh ingredients is key for great lemon bars. Fresh lemons bring bright, zesty flavor. They help the bars taste lively and delicious. Old lemons may taste dull. The zest from fresh lemons adds an extra punch that elevates your bars. Fresh eggs also help the filling set better, making the bars smooth and creamy. Always choose the best quality for the best results. If you lack an ingredient, don't worry! Here are some swaps: - Swap all-purpose flour with gluten-free flour for a gluten-free option. - Instead of unsalted butter, you can use coconut oil for a dairy-free choice. - You can replace granulated sugar with honey or maple syrup, but adjust the amount. - If you don't have fresh lemons, bottled lemon juice works, but fresh is best! Feel free to get creative with these substitutions while making sure your lemon bars stay delightful. For the full recipe, check the complete instructions! Start by preheating your oven to 350°F (175°C). Grab a 9x9-inch baking dish and lightly grease it with butter or spray. This helps the bars come out easily. In a medium bowl, mix 1 cup of all-purpose flour with 1/2 cup of powdered sugar. Then, add 1/2 cup of softened unsalted butter. Use a fork to blend until it looks like coarse crumbs. Press this mix firmly into the bottom of your baking dish. This will be the crust for your lemon bars. While the crust cools, let’s make the lemon filling. In a large bowl, whisk together 1 cup of granulated sugar, 2 large eggs, and 1/4 cup of freshly squeezed lemon juice. Don’t forget the zest of 1 lemon! Add 1 teaspoon of baking powder and a pinch of salt. Mix it all until smooth, with no lumps. Pour this zesty filling over the slightly cooled crust. Make sure to spread it evenly. Now, return the dish to the oven and bake for another 20-25 minutes. Look for the edges to puff slightly and the filling to be just set. Once baked, take it out and let it cool completely in the dish on a wire rack. This cooling step helps the filling set nicely. Finally, dust the top with extra powdered sugar before cutting into squares. Enjoy your Easy Lemon Bars as a perfect treat! For the full recipe, check here: [Full Recipe]. To get the best texture in your lemon bars, focus on the crust and filling. The crust should be crumbly yet firm. Press it down well before baking. Bake it until it turns lightly golden. For the filling, mix until smooth. Avoid lumps for a creamy finish. This helps your bars set nicely. One common mistake is overmixing the filling. This can lead to a tough texture. Another mistake is skipping the cooling step. Let the bars cool completely before cutting. This helps them hold their shape. Use a sharp knife for clean cuts. Dust with powdered sugar right before serving for a pretty touch. To boost the lemon flavor, use fresh juice and zest. The zest adds a bright aroma. If you want more zing, add extra lemon juice. You can also try a bit of lemon extract for a stronger taste. Pair these bars with fresh berries for a vibrant taste experience. {{image_4}} You can easily make gluten-free lemon bars. Use almond flour or a gluten-free flour blend. These flours provide a nice texture. Just replace the all-purpose flour with your choice. Follow the same steps as the original recipe. Your bars will still be zesty and delicious! You can get creative by adding fruit or nuts to your lemon bars. Try mixing in blueberries or raspberries for a fruity twist. Chopped pecans or walnuts can add a nice crunch too. Just remember to fold these extras gently into the lemon filling. This helps keep their shape and flavor. If you need a healthier option, consider using alternative sweeteners. You can use honey, maple syrup, or stevia. These natural sweeteners can change the flavor a bit. Adjust the amount based on your taste. Just make sure to keep the balance of wet and dry ingredients the same. This will ensure your lemon bars bake perfectly. Check out the Full Recipe for details on how to make these tasty treats. Lemon bars need proper storage to keep them fresh. I recommend placing them in an airtight container. This keeps moisture out and preserves their zesty flavor. If you stack the bars, use parchment paper between the layers. This prevents sticking. Always store them in the fridge to maintain their taste and texture. When stored correctly, lemon bars last about five days in the fridge. You may notice they taste best within the first few days. As time passes, the texture may change slightly, but the flavor remains. If you want to enjoy them longer, consider freezing them. To freeze lemon bars, first, let them cool completely. Then, cut them into squares. Wrap each square in plastic wrap tightly. Place the wrapped bars in a freezer-safe bag or container. This way, they can last up to three months. When you’re ready to eat them, thaw them in the fridge overnight. You can enjoy them cold or warm them up slightly in the oven. For more details, check the Full Recipe. Yes, you can make lemon bars ahead of time. They store well in the fridge for up to a week. This makes them great for parties or gatherings. Just cover them tightly with plastic wrap or foil. This keeps them fresh and tasty. You can also freeze them for longer storage. When you’re ready to eat, just thaw them in the fridge overnight. You can tell when lemon bars are done by looking at the edges. They should be slightly puffed and set. The center might jiggle a bit but will firm up as they cool. You can also insert a toothpick. If it comes out clean or with a few moist crumbs, they are ready. Be careful not to overbake, as they can become dry. Lemon bars are great on their own, but you can serve them with a few extras. A dollop of whipped cream adds a nice touch. Fresh berries like strawberries or blueberries go well too. You might also try a scoop of vanilla ice cream for a fun dessert. Pair them with a cup of tea or coffee for a delightful treat. For the full recipe, check the details above. Lemon bars blend fresh ingredients with simple steps. I shared crucial tips for perfecting the crust and filling. You learned about tasty variations, like gluten-free and fruit add-ins. Storing the bars right helps keep them fresh longer. In the end, these bars are fun to make and enjoy. Try your own twist on this classic treat!

Easy Lemon Bars Delightful and Simple Treat Recipe

If you crave a sweet, tangy treat that’s easy to make, you’re in the right spot! These Easy Lemon Bars

Gather these simple ingredients for a tasty meal: - 1 pound large shrimp, peeled and deveined - 1 ripe mango, diced into small cubes - 1 red bell pepper, thinly sliced into strips - 1/2 red onion, finely chopped - 2 cloves garlic, minced - 1 jalapeño, finely minced (optional) - Juice of 2 fresh limes - 2 tablespoons olive oil - 1 teaspoon smoked paprika - 1 teaspoon ground cumin - Salt and freshly cracked black pepper to taste - 8 small corn or flour tortillas - Fresh cilantro leaves for garnish - Sliced radishes for garnish (optional) These ingredients come together to create a burst of flavors. The shrimp provide a sweet and savory base, while the mango adds a fresh touch. The spices, like smoked paprika and cumin, give depth to every bite. Use fresh lime juice for a zesty kick that brightens the dish. The optional jalapeño can add heat if you like spiciness. To make the tacos, you will need tortillas to wrap around the filling. Corn or flour tortillas work well, but you can also try lettuce wraps for a lighter option. The garnishes of cilantro and radishes add color and crunch. For the full recipe, follow the detailed steps to cook this dish perfectly. Enjoy your cooking adventure! First, grab a medium bowl. Add the shrimp, minced garlic, lime juice, smoked paprika, ground cumin, salt, and pepper. Mix well until the shrimp are covered in the marinade. Let them soak in those flavors for 15 minutes. This step makes the shrimp extra tasty. While the shrimp marinate, heat 1 tablespoon of olive oil in a skillet over medium-high heat. Toss in the thinly sliced red bell pepper, chopped onion, and minced jalapeño if you like it spicy. Sauté the veggies for about 3 to 4 minutes. They should be soft and a little caramelized. Once done, set this mixture aside on a plate. Now, take your marinated shrimp and add them to the hot skillet. Use the remaining tablespoon of olive oil if needed. Cook the shrimp for about 2 to 3 minutes on each side. They should turn pink and be fully cooked. This is where the magic happens. To warm the tortillas, you can use a skillet or the microwave. If using a skillet, heat them on medium for a few seconds on each side. If using a microwave, place them on a plate and cover with a damp paper towel. Warm for about 30 seconds. Soft tortillas are key for great tacos! Take a warm tortilla and place a generous amount of cooked shrimp in the center. Next, add a scoop of diced mango and the sautéed vegetable mixture on top. For a fresh touch, sprinkle some cilantro leaves. If you want extra crunch, add sliced radishes. Serve immediately for the best flavor! Check the Full Recipe for more details. To make these tacos shine, adjust the seasoning to your taste. Some like it spicy, while others prefer milder flavors. Start with a pinch of salt and a squeeze of lime juice. Taste as you go. Fresh ingredients make a big difference too. Choose ripe mangoes and bright bell peppers. They add a burst of flavor and color. Ensure the shrimp are cooked just right. They should turn pink and opaque, which takes about 2-3 minutes per side. Overcooking the shrimp makes them tough and rubbery. Keep an eye on them, and remove them from heat as soon as they are done. This way, you’ll keep them tender and juicy. How you serve the tacos matters. Use colorful platters to make the dish pop. Add fresh garnishes like cilantro and lime wedges. Lime adds brightness, while hot sauce can please those who love heat. Arrange the tacos nicely and consider adding sliced radishes. They add crunch and make the plate look even better. For the complete process, check the Full Recipe. {{image_4}} You can swap shrimp for chicken or tofu. Both options work great in this recipe. If you have leftover grilled meats, use them! Shred or chop them and toss them in the same marinade. This keeps flavors high and waste low. Want to add more flavor? Try adding avocado. Its creaminess balances the spice well. You can also add other fruits like pineapple. Pineapple gives a sweet twist that complements the spicy shrimp. For a low-carb choice, use lettuce wraps instead of tortillas. They add crunch and freshness. You can also try different types of tortillas. Whole wheat or spinach tortillas can add a unique taste and color. To keep your shrimp tacos fresh, place any leftovers in an airtight container. This helps prevent moisture loss and keeps the flavors intact. For the best quality, eat the tacos within two days. The longer they sit, the more the shrimp may lose their nice texture. When reheating shrimp, avoid a microwave if possible. Instead, warm them in a skillet over low heat. This keeps them tender and prevents rubberiness. For tortillas, you can warm them in a pan or use a microwave. Just heat them for about 10-15 seconds to make them soft again. Enjoy your tacos just like the first time! If you want the full recipe, check out the Full Recipe for detailed steps. To keep shrimp tender, cook them for a short time. Overcooking makes shrimp rubbery. Aim for 2-3 minutes per side in a hot skillet. The shrimp should turn pink and opaque when done. Always use fresh shrimp for the best texture. If you follow these tips, your shrimp will stay juicy and delicious. Yes, you can prepare tacos in advance. Marinate the shrimp up to 2 hours before cooking. This helps the shrimp soak in the flavors. You can sauté the veggies ahead too. Store them in the fridge, and they will stay fresh. Assemble the tacos just before serving for the best taste. Several side dishes complement these tacos nicely. Consider serving: - Refried beans for a hearty addition - Cilantro lime rice for a zesty touch - A fresh corn salad for crunch - Chips with mango salsa for a fun snack These sides enhance the taco experience and make your meal more enjoyable. You can find the Full Recipe for Spicy Mango Shrimp Tacos in the article above. It includes all the details you need to make these tasty tacos. Check it for step-by-step instructions and tips for a perfect dish! In this post, I shared a simple recipe for delicious Spicy Mango Shrimp Tacos. We discussed choosing fresh ingredients and marinating shrimp for great flavor. You learned how to cook shrimp and sauté veggies for a perfect dish. Remember, you can swap shrimp for chicken or tofu and try different toppings. Enjoy these tacos fresh for the best taste. They are easy, fun, and sure to impress!

Spicy Mango Shrimp Tacos Flavorful and Easy Recipe

Looking for a delicious dish that’s easy to make? Try my Spicy Mango Shrimp Tacos! These tacos combine juicy shrimp

Older posts
Newer posts
← Previous Page1 … Page46 Page47 Page48 … Page68 Next →

dsad

© 2025 tastymomrecipes • Built with GeneratePress

Our Policies

  • Copyright Policy
  • Cookie Policy
  • GDPR Policy
  • Privacy Policy
  • Disclaimer
  • Terms Of Use

More Information

  • Home
  • About
  • Contact
  • Appetizers
  • Dessert
  • Dinner
  • Drinks
©2025, tastymomrecipes About Back To Top