Skip to content
DisclaimerTerms Of UseGDPR PolicyCookie Policy

tastymomrecipes

  • Home
  • Drinks
  • Appetizers
  • Dinner
  • Dessert
  • About
  • Contact
  • Privacy Policy
DisclaimerTerms Of UseGDPR PolicyCookie Policy

Olivia

To make tasty buffalo chicken wraps, you need the following main ingredients: - 2 cups cooked chicken, shredded - 1/2 cup buffalo sauce - 1/4 cup cream cheese, softened - 1/2 cup ranch dressing - 1/2 cup celery, finely chopped - 1/2 cup shredded lettuce - 1/2 cup shredded cheddar cheese - 4 large flour tortillas These ingredients create a delicious blend of flavors. The chicken provides protein, while the buffalo sauce adds heat. You can enhance your wraps with these optional ingredients: - Fresh cilantro, for garnish - Sliced avocado, for creaminess - Diced tomatoes, for freshness - Pickled jalapeños, for extra spice These ingredients add more depth to your wraps. You can mix and match to find your favorite flavor. Using fresh ingredients makes a big difference. Here are some tips: - Choose high-quality chicken. Cook it yourself or buy a rotisserie chicken. - Look for fresh celery. It should be crisp and green. - Use fresh lettuce. Romaine or iceberg works well. - Get good-quality tortillas. They should be soft and pliable. Fresh ingredients ensure your buffalo chicken wraps taste great. Remember, the better the ingredients, the better your meal! For the full recipe, check the earlier section. Making Buffalo chicken wraps is simple and fast. You need just a few steps. First, gather all your ingredients. This saves time and makes cooking easier. You will have a tasty meal ready in just 15 minutes. 1. Start by mixing the shredded chicken and buffalo sauce in a large bowl. Make sure the chicken is well coated. 2. Next, add the softened cream cheese. Stir it in until it's mixed well with the chicken. 3. Now, fold in the chopped celery and ranch dressing. Mix it gently so all the flavors blend. 4. Lay each tortilla flat on your clean surface. You want them ready for filling. 5. Spoon your buffalo chicken mix onto the center of each tortilla. Leave some space at the edges for rolling. 6. Sprinkle shredded lettuce and cheese on top of the chicken mix. This adds crunch and taste. 7. Roll the tortilla tightly from one end. Tuck in the sides to keep the filling inside. 8. With a sharp knife, cut each wrap in half diagonally. This makes them easy to hold and eat. 9. Arrange the wraps on a platter. If you like, add chopped cilantro for garnish. - Use large tortillas to hold all the tasty filling. - Make sure to spread the filling evenly. This helps with rolling. - Tuck the sides in while rolling to keep everything inside. - If you find it hard to roll, try warming the tortillas slightly. This makes them more flexible. For the complete recipe, check out the Full Recipe section! To make the best Buffalo chicken wraps, start with quality chicken. I use cooked chicken that is shredded. The chicken should be warm when mixing with the buffalo sauce. This helps the sauce stick and enhances the flavor. Mix the chicken with the buffalo sauce well. I suggest using a large bowl for easy stirring. Adding cream cheese makes the filling creamy and less spicy. Don't skip on the ranch dressing; it adds a great taste! You can adjust the spice level to fit your taste. If you want less heat, use less buffalo sauce. You could also mix in some sour cream or extra cream cheese. For those who love heat, add extra buffalo sauce. A sprinkle of cayenne pepper can also boost the spice. Always taste the filling before wrapping it up. This way, you can tweak the flavors to your liking. Having the right tools makes cooking easier. Here are a few I recommend: - Large mixing bowl - Sharp knife for cutting - Cutting board - Measuring cups and spoons - Large spatula for mixing - Clean surface for rolling the wraps These tools help you prepare the wraps quickly. You’ll enjoy the process and the results! For the full recipe, check the detailed instructions above. {{image_4}} Grilling your buffalo chicken wraps gives them a smoky flavor. Start by preparing your filling just as you would for the regular wraps. Heat your grill to medium. Once hot, place each wrapped tortilla on the grill. Cook for about 3 to 4 minutes on each side. Look for nice grill marks. This makes the tortilla crispy. It also adds a rich taste that takes your wraps to the next level. Not everyone loves chicken, and that's okay! You can create a vegetarian version. Instead of chicken, use grilled vegetables like zucchini, bell peppers, or mushrooms. You can also use chickpeas or tofu as a protein source. Mix these with buffalo sauce and cream cheese. This keeps the creamy texture and spicy kick. Serve it just like the regular wraps for a tasty treat. You can mix and match flavors to create your own spin. Try adding sliced avocado for creaminess. You can also add sliced jalapeños for extra heat. Crumbled blue cheese can give a nice tang. Another great idea is to add some pineapple for sweetness. Each addition changes the taste and makes the wraps unique. Explore these options to find your favorite flavor mix. For the full recipe, check out the earlier section. To keep your buffalo chicken wraps fresh, place them in an airtight container. This helps them stay moist and tasty. If you have extra filling, store it separately to avoid soggy wraps. You can store leftovers in the fridge for up to three days. Always let the wraps cool down before sealing them up. This prevents condensation inside the container. Reheating is easy! You can use a microwave or an oven. For the microwave, place the wrap on a plate and cover it with a damp paper towel. Heat for about 30 seconds on high. For the oven, wrap the buffalo chicken wrap in foil and heat at 350°F for about 10 minutes. This keeps the wrap crispy. If you want to freeze buffalo chicken wraps, wrap each one tightly in plastic wrap. Then, place them in a freezer bag. This keeps them safe and fresh. You can freeze them for up to three months. When you're ready to eat, thaw them in the fridge overnight before reheating. This way, they taste just as good as fresh! For the full recipe, check the details above. Yes, you can make Buffalo Chicken Wraps ahead of time. Prepare the filling and store it in the fridge. Wraps can stay fresh for up to two days. When you are ready to serve, fill the tortillas and roll them. This method saves time and makes meal prep easy. You can use blue cheese dressing instead of ranch for a bolder flavor. If you prefer, try plain Greek yogurt for a healthier option. You can also mix sour cream with herbs for a tasty homemade substitute. Feel free to experiment with flavors that you love! To make your Buffalo Chicken Wraps healthier, use whole wheat tortillas instead of regular ones. You can also add more veggies like spinach or bell peppers for extra nutrients. Use a lighter dressing or reduce the amount of buffalo sauce for less heat. This keeps the flavor while making it a healthier choice. To wrap it up, we covered how to make delicious Buffalo chicken wraps. You learned about key ingredients and tasty options to up the flavor. I shared easy steps, helpful tips, and fun variations. You can store leftovers properly and even freeze wraps for later. Remember, you can adjust spice levels to fit your taste. Try new twists and enjoy your cooking! Now, go make those wraps!

Savory Buffalo Chicken Wraps Quick and Easy Recipe

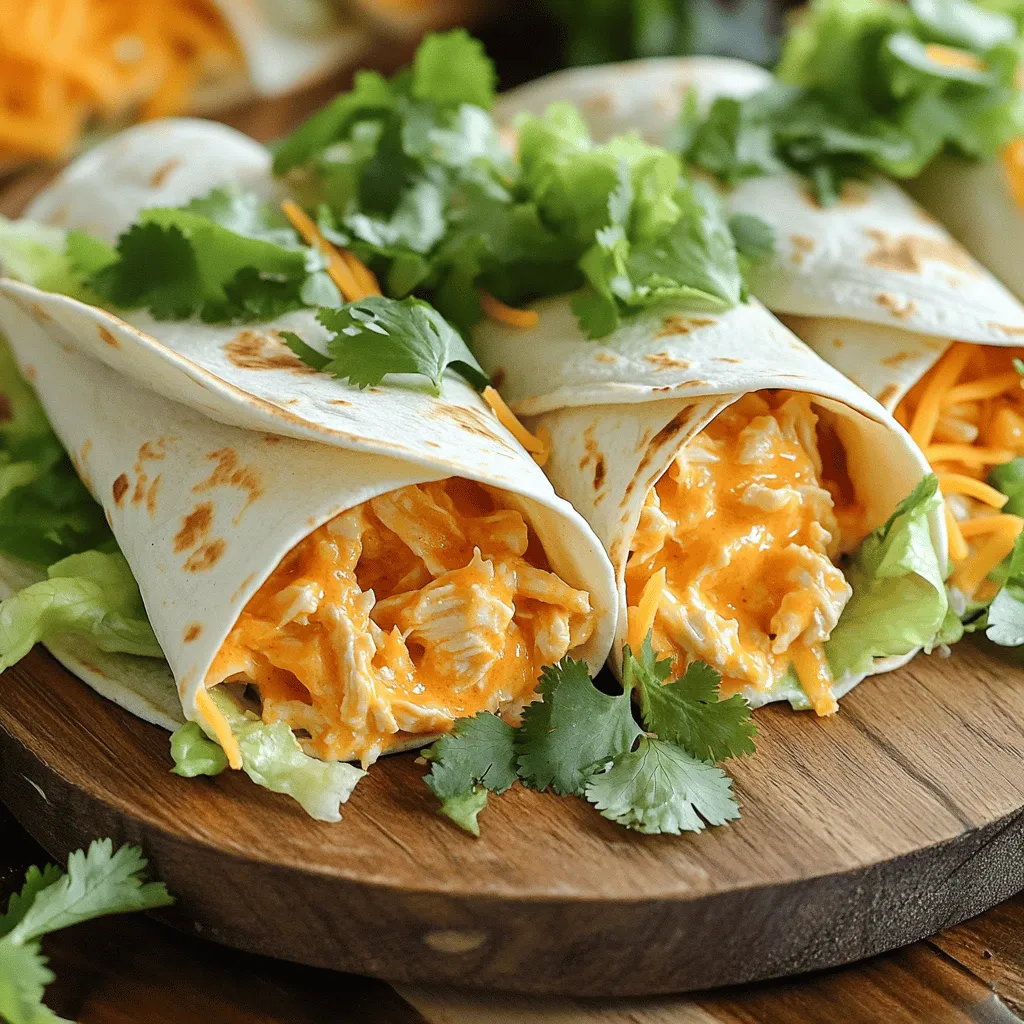
Are you ready to spice up dinner? This quick and easy Buffalo Chicken Wraps recipe is perfect for busy nights.

To make these energy bites, you need a few key ingredients: - 1 cup rolled oats - 1/2 cup creamy peanut butter - 1/3 cup honey or maple syrup - 1/4 cup ground flaxseed - 1/4 cup mini chocolate chips (or dark chocolate chips) - 1/4 cup unsweetened shredded coconut - 1 teaspoon vanilla extract - A pinch of sea salt These ingredients work together to create tasty bites that are easy to make. The oats provide fiber, while the peanut butter adds protein and healthy fats. Honey or maple syrup gives them sweetness that kids love. You can add some fun ingredients to change the flavor of your energy bites. Here are a few ideas: - Chopped nuts, like almonds or walnuts - Dried fruit, such as cranberries or raisins - A scoop of protein powder - Cinnamon or cocoa powder for extra taste Feel free to mix and match to find your favorite combo. These add-ins let you customize the bites to your liking. Each ingredient offers unique benefits: - Rolled oats are great for digestion and keep you full. - Peanut butter is rich in protein and healthy fats. - Honey or maple syrup adds energy and nutrients. - Ground flaxseed is high in omega-3 fatty acids and fiber. - Chocolate chips add joy, while the coconut gives healthy fats. This mix of ingredients makes these bites a nutritious snack. They provide energy for your busy day. You can find the full recipe above to try this fun and easy treat! To make Peanut Butter Energy Bites, follow these easy steps. First, grab a large bowl. Mix the rolled oats, ground flaxseed, shredded coconut, and a pinch of sea salt. Stir these dry ingredients until they blend well. In another bowl, combine the creamy peanut butter, honey, and vanilla extract. Mix until it’s smooth and creamy. Now, pour this peanut butter blend into the dry mix. Stir until everything is combined. The mixture will be sticky but easy to shape. Add in the mini chocolate chips and fold them in gently. Next, use your clean hands to scoop about 1 tablespoon of the mix. Roll it into a ball. Repeat this step until you form about 12 to 15 bites. Place the bites on a baking sheet lined with parchment paper. Mixing is key for great texture. Make sure you blend the dry ingredients well first. This ensures each bite tastes the same. When you mix the wet ingredients, stir well until smooth. If your peanut butter is thick, warm it slightly. This will help it mix better with honey and vanilla. When combining the wet and dry mixes, don’t rush. Take your time to ensure an even mix. If you want more texture, try adding chopped nuts or seeds. Chilling the bites is important for the right texture. After rolling them, place the bites in the fridge. Let them chill for about 30 minutes. This helps them firm up. If you can’t wait, they are tasty straight away! For a fancier look, drizzle some melted chocolate over them after chilling. Enjoy your Peanut Butter Energy Bites! You can find the Full Recipe for more details. To make the best peanut butter energy bites, start with the right mix. Use fresh oats for texture and flavor. Make sure your peanut butter is creamy. It helps bind all the ingredients well. You want a sticky, moldable mix. If it's too dry, add a splash of water. If it's too wet, add more oats. One common mistake is not measuring the ingredients well. Always use measuring cups for accuracy. Another mistake is not chilling the bites. Chilling helps them hold their shape. If your bites fall apart, try adding a little more ground flaxseed. This will help bind them better. You can serve these bites in many fun ways. Try placing them in a colorful bowl for a snack display. I love drizzling melted dark chocolate on top for a special touch. They also taste great with fresh fruit or yogurt. For a quick breakfast, pair them with a smoothie. Enjoy them as a pre-workout snack or an afternoon treat. For detailed instructions, check the Full Recipe. {{image_4}} You can mix and match flavors in your energy bites. Here are some ideas: - Cocoa powder: Add 2 tablespoons for a chocolatey twist. - Dried fruit: Try raisins, cranberries, or chopped apricots for sweetness. - Nut butter blend: Swap peanut butter for almond or cashew butter. - Spices: A pinch of cinnamon or nutmeg adds warmth. If you have dietary needs, you can easily adjust this recipe: - Gluten-free: Use certified gluten-free oats. - Vegan: Replace honey with maple syrup. - Low-carb: Use sugar-free syrup and skip the chocolate chips. - Nut-free: Substitute sunflower seed butter for peanut butter. Change your energy bites with the seasons. Here are some fun ideas: - Fall: Mix in pumpkin puree and pumpkin spice for a seasonal treat. - Winter: Add crushed peppermint or cocoa nibs for a festive flair. - Spring: Incorporate fresh berries or coconut for a light taste. - Summer: Use fresh mango or pineapple for a tropical vibe. These variations keep your energy bites fun and interesting! Check out the Full Recipe for more details. Enjoy creating your own unique bites! To keep your peanut butter energy bites fresh, use an airtight container. This helps keep moisture out and prevents them from becoming hard. Store them in a cool, dry place, like a pantry or cupboard. If you live in a warm area, the fridge is a good choice. Just remember to let them sit at room temperature for a few minutes before enjoying. Peanut butter energy bites can last up to one week in the fridge. If kept at room temperature, they stay fresh for about three days. You can tell they’re still good if they smell pleasant and look clean. Always check for any signs of spoilage, like off smells or mold. For longer storage, freezing is a great option. Place the energy bites in a single layer on a baking sheet. Freeze them for about an hour until firm. Then, transfer them to a freezer-safe bag or container. They can last up to three months in the freezer. When ready to eat, simply thaw them overnight in the fridge or at room temperature for a quick snack. You can use honey or maple syrup for a touch of sweetness. Both options work well. Honey gives a rich flavor, while maple syrup adds a unique twist. You can also adjust the amount based on your taste. If you prefer less sweetness, reduce the amount by a tablespoon. This way, you still get that yummy taste without it being too sweet. Yes, natural peanut butter is great! It adds a pure peanut flavor and is often healthier. Just make sure it is creamy and not too dry. Natural peanut butter might be runnier than processed kinds, so adjust the amount of oats slightly if needed. This keeps your bites from being too sticky or crumbly. To make nut-free energy bites, swap peanut butter with sunflower seed butter. It mimics the texture and taste well. You could also use soy nut butter for a similar effect. Ensure all other ingredients are nut-free as well. This way, you can enjoy the bites without worrying about allergens. Peanut Butter Energy Bites are packed with nutrients. Here are some benefits: - Protein: Peanut butter provides a good source of protein. - Fiber: Rolled oats and flaxseed offer dietary fiber, aiding digestion. - Healthy Fats: Peanut butter contains healthy fats that keep you full. - Energy Boost: These bites are perfect for a quick energy boost. They make a healthy snack or a post-workout treat. Enjoying them can help fuel your day! Peanut butter energy bites are easy to make and fun to enjoy. We covered key ingredients and how to mix them well. Remember to chill them for the best texture. Explore different flavors and add-ins to keep things exciting. Store them correctly to keep them fresh. These bites are not just tasty; they're also healthy. Enjoy these snacks anytime, and feel good about what you eat. You have all you need to make great energy bites right at home.

Peanut Butter Energy Bites Simple and Nutritious Recipe

Looking for a quick and tasty snack? Peanut Butter Energy Bites are your answer! Packed with nutrition, these bites are

- 4 medium zucchini, spiralized into noodles - 3 tablespoons extra virgin olive oil - 4 cloves garlic, finely minced - 1/2 teaspoon red pepper flakes (optional for a kick) - 1/2 cup freshly grated Parmesan cheese - Salt and freshly ground black pepper, to taste - 2 tablespoons freshly chopped parsley, for garnish Garlic Parmesan Zoodles are simple and quick. You start with fresh zucchini. Zucchini has a mild taste that works well with garlic. You can spiralize the zucchini into noodles, which we call zoodles. This adds fun to the dish. Using extra virgin olive oil is key for flavor. It gives zoodles a rich taste. The garlic adds a strong aroma and taste. I use four cloves for a punch. If you enjoy heat, add red pepper flakes. They give a nice kick to the dish. Then, we have Parmesan cheese. Freshly grated cheese melts beautifully. It coats the zoodles and adds creaminess. Don't forget to season with salt and pepper. This makes sure every bite tastes great. Finally, sprinkle fresh parsley on top. It adds color and freshness to the dish. Garlic Parmesan Zoodles are low in calories. One serving has about 250 calories. They are low in fat and carbs too. This dish has about 15 grams of fat and 8 grams of carbs. Each serving also packs around 10 grams of protein. Zoodles are a low-carb alternative to pasta. They help reduce carbs in meals. Zucchini is full of dietary fiber. Fiber helps digestion and keeps you full longer. Zoodles also contain vitamins A and C. These vitamins are good for your skin and immune system. Eating zoodles is a tasty way to enjoy healthy food. To make zoodles, you need a spiralizer. First, wash the zucchini well. Cut off the ends of each zucchini. Place one zucchini in the spiralizer and twist to create long noodles. Repeat this with the other zucchinis. After spiralizing, place the zoodles in a bowl and set them aside for later. In a large skillet, pour in the olive oil and warm it over medium heat. Wait until the oil shimmers. Then, add the minced garlic. Sauté it for 1-2 minutes, stirring often. You want it fragrant, not burnt. If you like a bit of heat, sprinkle in the red pepper flakes now. Stir for another minute to mix in the spice. Next, gently add the zoodles to the skillet. Toss them in the garlicky oil. Sauté for about 3-4 minutes. They should be tender but still crunchy. Take the skillet off the heat. Immediately sprinkle the grated Parmesan cheese over the zoodles. Toss everything together well. The cheese will start to melt and coat the zoodles. Season with salt and freshly ground black pepper to taste. Serve warm, topped with chopped parsley for a fresh touch. This dish is simple yet full of flavor. For the full recipe, check here. To get that perfect garlic taste, keep these tips in mind. Start with fresh garlic; it has the best flavor. Mince it finely so it cooks evenly. Heat the oil over medium heat, but watch it closely. If garlic burns, it turns bitter. This can ruin your dish. Sauté the garlic for just 1-2 minutes until it smells amazing. If you want some heat, add red pepper flakes after the garlic. This way, the spice blends well without overpowering the garlic. For zoodles, the cooking time is key. You want them tender but still firm. Aim for 3-4 minutes of cooking. This keeps them al dente, which is great for texture. Overcooking makes zoodles soggy and watery. Keep tossing them gently in the pan. This helps them cook evenly. Remember, zoodles cook faster than regular pasta. So keep an eye on them! How you serve Garlic Parmesan Zoodles can elevate your meal. Use a shallow bowl for a nice look. Place the zoodles in the center, then add a sprinkle of parsley on top. For extra flair, drizzle a little olive oil around the edges. This adds a touch of elegance. You can also add a few extra parsley leaves for color. A well-plated dish makes your meal even more enjoyable! For the complete recipe, check out the Full Recipe section. {{image_4}} You can make Garlic Parmesan Zoodles even more filling by adding protein. Chicken works great. Simply sauté bite-sized pieces along with the garlic. Shrimp is another tasty option. Cook the shrimp until pink and add them with the zoodles. For a plant-based choice, try tofu. Use firm tofu, cut it into cubes, and sauté until golden. This way, you get more flavor and nutrients in your dish. Want to change up the taste? You can add different herbs and spices. Basil brings a sweet touch. Oregano adds a warm, earthy flavor. If you like heat, try crushed red pepper flakes. They add a nice kick. Fresh herbs like thyme or dill can also enhance your zoodles. Get creative with your spice rack to find your favorite combo. Zoodles are not just for zucchini! You can mix in other spiralized veggies for fun. Carrots add a sweet crunch. Sweet potatoes bring a hearty taste. You can also try butternut squash for a creamy texture. This mix not only adds color but also boosts nutrition. Get your spiralizer ready for a colorful veggie feast! For a full recipe, check out the Garlic Parmesan Zoodles. To keep your zoodles fresh, place them in an airtight container. Make sure they cool down first. Add a paper towel inside the container to absorb moisture. This helps prevent sogginess. Store them in the fridge and use within 2-3 days for best quality. When reheating zoodles, avoid the microwave if possible. Microwaving can make them mushy. Instead, heat a skillet over medium-low heat. Add a small amount of olive oil. Toss the zoodles gently until warm. This keeps their nice texture and flavor intact. Freezing zoodles is easy but requires some prep. First, blanch them in boiling water for 1-2 minutes. This helps keep their color and texture. Drain and cool them quickly in ice water. Once cooled, pack them in freezer bags, removing as much air as you can. They can last up to 3 months in the freezer. To use, thaw them in the fridge overnight before cooking. Zoodles are noodles made from zucchini. They are a fun, low-carb alternative to pasta. You can spiralize zucchini into long, thin strands, giving you the same shape as traditional noodles. Zoodles are rich in vitamins A and C, making them healthy. They also add fiber to your meal, helping with digestion. Plus, they soak up flavors well, making them perfect for dishes like Garlic Parmesan Zoodles. Yes, you can use other veggies! Carrots make bright, sweet noodles. Sweet potatoes offer a hearty taste. Butternut squash is another great option for zoodles. You can spiralize these veggies just like zucchini. Each type brings a unique flavor and texture, so feel free to mix them up. This way, you can create colorful and delicious meals. Garlic Parmesan Zoodles are quite healthy. A serving is low in calories and high in nutrients. Zucchini provides dietary fiber and vitamins while keeping carbs low. The olive oil adds healthy fats. Parmesan gives protein and calcium. This dish is a great choice for anyone watching their diet. Enjoy it without guilt and feel satisfied. Leftover zoodles can last up to three days in the fridge. Store them in an airtight container to keep them fresh. If you notice any water in the container, drain it before eating. Always check for signs of spoilage, like a bad smell or sliminess. Reheat gently to avoid making them soggy. Enjoy your leftovers with ease! In this post, we explored the joys of Garlic Parmesan Zoodles. You learned about ingredients that make this dish tasty and healthy. We went through step-by-step cooking tips, including how to achieve the perfect texture. We also discussed storage tips and fun variations for added flavor and protein. Zoodles are great for low-carb meals and bursting with vitamins. Enjoy making and sharing this dish in your kitchen!

Garlic Parmesan Zoodles Flavorful and Healthy Dish

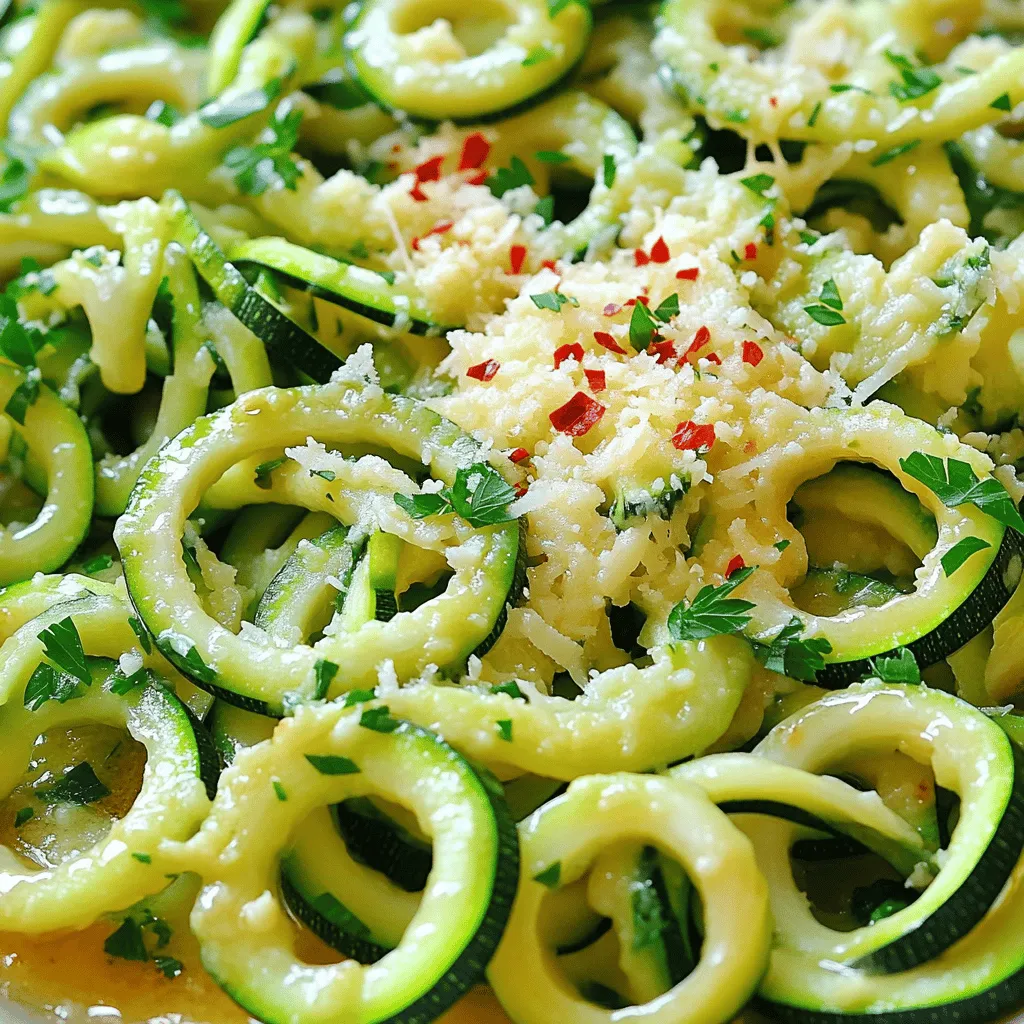
Are you ready to transform your dinner routine? Garlic Parmesan Zoodles are not just a tasty dish; they are a

For a bright and tasty Mango Salsa Chicken, gather the following: - 4 boneless, skinless chicken breasts - 1 ripe mango, diced into small chunks - 1 small red onion, finely chopped - 1 red bell pepper, diced into small pieces - 1 jalapeño, seeded and minced for heat - 1/4 cup fresh cilantro, roughly chopped - Juice of 2 limes, freshly squeezed - 2 tablespoons extra virgin olive oil - 1 teaspoon ground cumin for a warm flavor - Salt and pepper to taste When cooking, I always measure carefully. For this recipe, use the following servings: - 4 chicken breasts serve 4 people. - A ripe mango is key. Look for skin that is slightly soft to the touch. - Fresh herbs add flavor. Smell them! They should be fragrant. Choosing fresh ingredients makes a big difference. For mangoes, check the color. A vibrant yellow and a little give means it’s ripe. For cilantro, choose bright green leaves without brown spots. This step ensures your dish shines with fresh taste and vibrant colors. For the full recipe, follow my simple steps for a delightful meal. Enjoy the process! To start, you need to prep your grill. Set your grill to medium-high heat. This is key for cooking chicken evenly. The right temperature helps get a nice sear on the outside while keeping the inside juicy. Aim for around 375°F to 450°F. Now, let’s make the mango salsa. In a bowl, mix these ingredients: - 1 ripe mango, diced into small chunks - 1 small red onion, finely chopped - 1 red bell pepper, diced into small pieces - 1 jalapeño, seeded and minced - 1/4 cup fresh cilantro, roughly chopped Next, squeeze the juice of one lime over the mix. Add a pinch of salt and pepper. Gently fold everything together. This helps each flavor shine. Set it aside to let the flavors blend. Next, we prepare the chicken marinade. In a bowl, whisk together: - 2 tablespoons extra virgin olive oil - Juice of the second lime - 1 teaspoon ground cumin - A pinch of salt and pepper This marinade adds depth to your chicken. Rub this mixture all over the chicken breasts. Make sure each piece is coated well. Let them sit for a bit to soak in those flavors. Now, it’s time to grill the chicken. Place the marinated chicken on the hot grill. Cook for about 6-7 minutes on each side. You want the chicken to reach an internal temperature of 165°F. This ensures it's fully cooked. Keep an eye out for those lovely grill marks too! Once cooked, transfer the chicken to a cutting board. Let it rest for 5 minutes. This helps keep the chicken juicy. When serving, place the grilled chicken on colorful plates. Top each piece with a generous scoop of mango salsa. Add lime wedges on the side for extra zest. A sprinkle of chopped cilantro on top adds a nice touch. For the full recipe, check out the details above. Enjoy your fresh and tangy grill delight! To ensure even cooking on the grill, start with a good preheat. Heat your grill to medium-high. This helps the chicken cook through without burning. Make sure to space the chicken breasts apart. This allows heat to circulate around them. Flip the chicken only once. This creates nice grill marks and keeps moisture inside. You can spice up your mango salsa easily. Try adding diced avocado for creaminess. A splash of orange juice can boost the sweetness. For extra heat, toss in more jalapeño or a pinch of cayenne pepper. Fresh mint or basil can add a twist, too. Experiment with these flavors to find your favorite mix. A meat thermometer is your best friend for cooked chicken. Insert it into the thickest part of the breast. The chicken is done when it reads 165°F (75°C). After grilling, let the chicken rest for five minutes. This helps keep the juices inside. Slicing right away can make the chicken dry. Enjoy your flavorful, juicy chicken! {{image_4}} You can easily switch the chicken for shrimp or tofu. Shrimp cooks fast on the grill. Just marinate them like the chicken. Grill for about 3-4 minutes per side. Tofu is a great choice, too. Use firm tofu for the best texture. Cut it into thick slices, marinate, and grill for about 5-6 minutes each side. Get creative with flavors! You can add tropical fruits, like pineapple or kiwi. They add a nice sweetness that pairs well with the salsa. Fresh herbs, like mint or basil, can also change the taste. These herbs add a fresh twist that surprises the palate. Try using lime zest for a more vibrant citrus kick. Pair your mango salsa chicken with tasty sides! Rice is a simple choice. You can also use warm tortillas for a fun wrap. Fresh salads or grilled veggies work great, too. They balance the dish with crunch and color. For a refreshing drink, try a limeade or iced tea. Enjoy the vibrant flavors together for a complete meal. For the full recipe, don't forget to check the earlier section. To keep your Mango Salsa Chicken fresh, use an airtight container. Glass containers work best, but plastic ones are fine too. Store the chicken in the fridge for up to four days. Make sure the chicken cools down before sealing the container. This helps prevent moisture build-up. When reheating, keep the chicken juicy and tasty. The best method is to use the microwave. Place the chicken on a plate and cover it with a damp paper towel. Heat it in short bursts, about 30 seconds each time. Check if it’s warm enough before serving. You can also use a skillet over low heat. This keeps the chicken from drying out. Want to save some for later? Freezing is a great option. First, let the chicken cool completely. Then, wrap each piece in plastic wrap. Place the wrapped chicken in a freezer-safe bag. This prevents freezer burn. You can freeze the chicken for up to three months. To defrost, place it in the fridge overnight. If you're in a hurry, use the microwave's defrost setting. Avoid thawing the chicken at room temperature. This keeps it safe to eat. For the full recipe, check out the complete guide on making this tasty dish! You can pair Mango Salsa Chicken with many side dishes. Here are some tasty ideas: - Rice: White, brown, or cilantro lime rice work well. - Tortillas: Soft tortillas make a great wrap for the chicken. - Salad: A fresh green salad adds crunch and color. - Grilled Vegetables: Zucchini, bell peppers, or corn enhance the meal. - Beans: Black beans or refried beans add protein and fiber. - Beverages: Try a cold lemonade or a light white wine. These options will make your meal balanced and fun! Yes, you can make the salsa ahead of time! Here are some tips for storage: - Refrigerate: Keep the salsa in an airtight container. - Timing: It’s best to make it up to 2 days ahead for fresh taste. - Flavor: If you make it early, the flavors will blend nicely. Just remember to stir it before serving. This will make it even better! To check if your chicken is cooked, look for these signs: - Color: The chicken should be white, not pink. - Juices: Clear juices run out when you cut it. - Temperature: Use a meat thermometer. It should read 165°F (75°C). These steps will ensure your chicken is safe and juicy! Yes, you can cook Mango Salsa Chicken in the oven. Here’s how: - Preheat: Set your oven to 375°F (190°C). - Arrange: Place the marinated chicken on a baking sheet. - Cook: Bake for about 25-30 minutes, or until the chicken is done. This method gives you a nice, juicy chicken with less fuss! For the full recipe, check out the details above. Mango Salsa Chicken combines tasty ingredients and easy steps for a fun meal. You learned about choosing ripe mangoes and grilling juicy chicken. I shared tips for storage and reheating. Consider trying alternate proteins or unique flavors. This dish is versatile and sure to impress at any table. Enjoy making it your own and savoring every bite!

Mango Salsa Chicken Fresh and Tangy Grill Delight

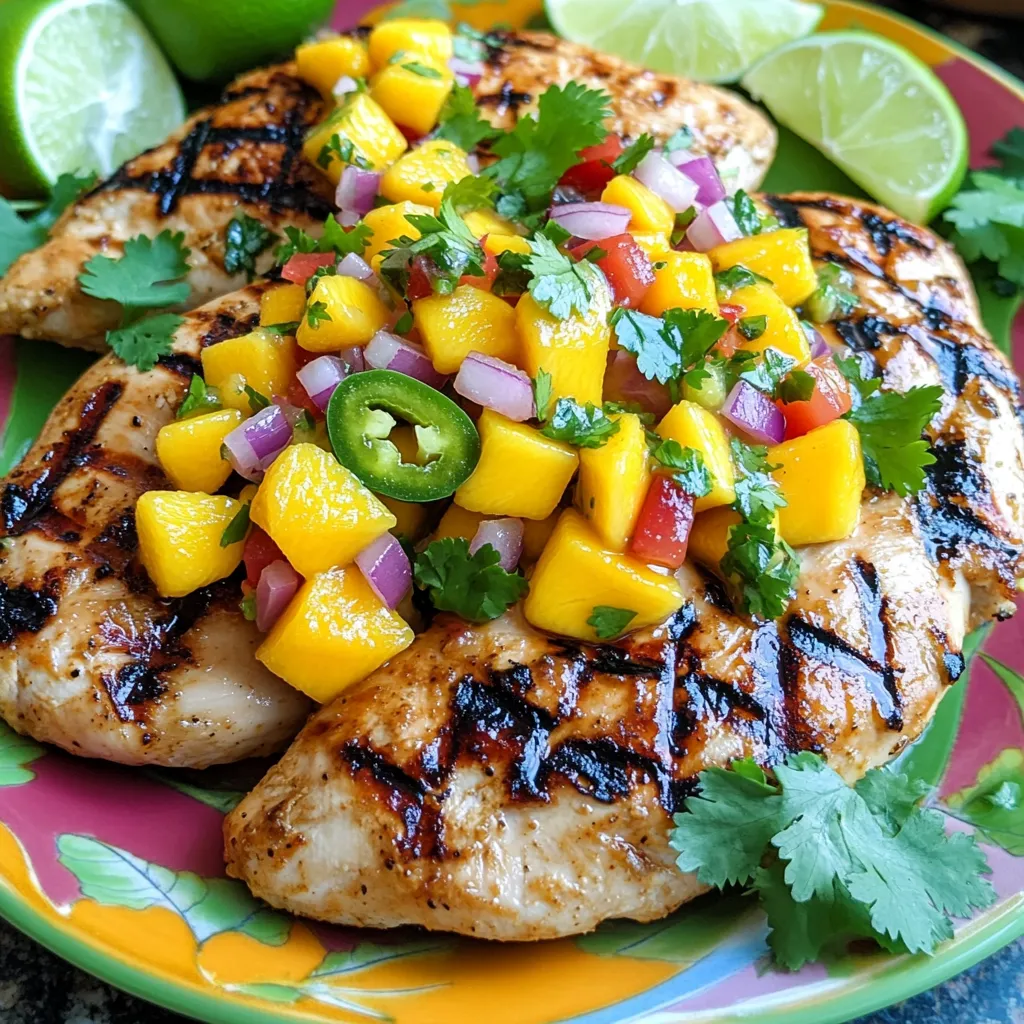
If you’re craving something fresh and vibrant, Mango Salsa Chicken is your answer! This dish combines juicy chicken breasts with

To make Easy Chicken Marsala, gather these key ingredients: - 2 boneless, skinless chicken breasts - 1/2 cup all-purpose flour - Salt and freshly ground black pepper, to taste - 2 tablespoons olive oil - 1 tablespoon unsalted butter - 8 oz mushrooms, sliced (button or cremini variety preferred) - 1 cup chicken broth - 1 tablespoon balsamic vinegar - 2 cloves garlic, minced - 1 teaspoon dried oregano - Fresh parsley, chopped (for garnish) Each ingredient plays a vital role in creating the dish's rich and savory flavor. The chicken provides protein, while the mushrooms add earthiness. The broth and balsamic vinegar bring depth to the sauce. To cook Easy Chicken Marsala, you'll need a few essential tools: - Meat mallet or rolling pin - Shallow dish for dredging - Large skillet - Wooden spoon - Plate for keeping cooked chicken warm These tools help make the cooking process smooth and fun. Having the right tools can really enhance your cooking experience. Choosing the freshest ingredients is key to great flavor. Here are some tips: - Chicken: Look for bright, pink meat with no off-smells. - Mushrooms: Choose firm, dry mushrooms without dark spots. - Garlic: Pick garlic bulbs that are firm and free from sprouting. - Parsley: Fresh parsley should be vibrant and not wilted. Fresh ingredients make a noticeable difference in taste. When shopping, take your time to select the best items for your dish. First, take your chicken breasts and place them between two sheets of plastic wrap. Use a meat mallet or a rolling pin to pound them to about 1/2 inch thick. This step helps the chicken cook evenly. Next, grab a shallow dish and mix the flour, salt, and pepper. Dredge each chicken breast in this flour mixture, coating them well. Shake off any extra flour before cooking. Heat olive oil and butter in a large skillet over medium-high heat. Once the butter bubbles, add the floured chicken breasts. Cook each side for about 4-5 minutes until they turn golden brown. Make sure they are fully cooked. After that, remove the chicken from the skillet and place it on a warm plate. In the same skillet, add the sliced mushrooms. Cook them for around 5-7 minutes until they are tender and brown. Stir them occasionally for even cooking. After that, add minced garlic and sauté for another minute. Then, pour in chicken broth and balsamic vinegar, scraping the tasty bits from the skillet. Add dried oregano, and let the mixture simmer gently. Now, return the chicken breasts to the skillet. Spoon some mushroom sauce over them and let them simmer for 2-3 minutes. This allows the chicken to absorb the sauce's flavors. Taste the sauce and adjust the seasoning with salt and pepper if needed. Finally, sprinkle fresh parsley on top for a burst of color. For the full recipe, check the details above. To get juicy chicken, start by pounding the breasts evenly. Use a meat mallet or rolling pin. Aim for about 1/2 inch thick. This keeps the chicken from drying out. When cooking, don't overcrowd the pan. Give each piece space to brown well. This creates a nice crust and locks in flavors. One common mistake is skipping the flour coating. It helps create a crispy texture. Another mistake is cooking over too high heat. This can burn the chicken outside while leaving it raw inside. Always check the chicken's doneness with a meat thermometer. It should reach 165 degrees Fahrenheit. Finally, don't forget to taste the sauce before serving. Adjust the seasoning to suit your taste. For a beautiful dish, plate the chicken breasts attractively. Spoon the savory mushroom sauce over the top. Garnish with fresh parsley to add color. Serve with creamy mashed potatoes or bright steamed vegetables. This adds color and makes the meal more appealing. For a touch of elegance, use a warm plate. It keeps the meal hot longer. Enjoy your lovely Chicken Marsala! {{image_4}} You can easily adapt this recipe for different diets. If you want a gluten-free option, swap all-purpose flour for almond flour or a gluten-free blend. For those who prefer chicken alternatives, try turkey cutlets or even tofu. If you need a dairy-free version, replace butter with vegan butter or omit it entirely. You can add more depth to the dish with simple add-ins. Consider tossing in capers for a briny punch. Sun-dried tomatoes can add a nice sweetness. A splash of white wine can also elevate the sauce, making it richer. For a herb boost, fresh thyme or basil can bring a new layer of flavor. While button or cremini mushrooms shine in this dish, other mushrooms can also work well. Shiitake mushrooms give a robust flavor. Portobello mushrooms provide a meatier texture. Even dried mushrooms can be rehydrated and added for an intense, earthy taste. Each type brings its unique flair, so feel free to experiment. To store your leftover chicken marsala, let it cool down. Place it in an airtight container. This helps keep the flavors fresh. You can store it in the fridge for up to three days. If you want to keep it longer, freezing is a great option. When reheating chicken marsala, aim for gentle heat. You can use a skillet over low heat. Add a splash of chicken broth to keep it moist. Stir occasionally until it warms through. You can also use the microwave. Heat it in short bursts, stirring in between. You can freeze chicken marsala, but remember a few key points: - Do let it cool completely before freezing. - Do use an airtight container or freezer bag. - Don't freeze it with sides like pasta or rice, as they don't freeze well. - Don't keep it in the freezer for more than three months. By following these tips, you can enjoy your chicken marsala later! You can serve Easy Chicken Marsala with many sides. I love creamy mashed potatoes. They soak up the sauce well. Steamed vegetables also pair nicely. You can use green beans or broccoli for color and crunch. For a lighter option, try a fresh salad. A simple arugula salad with lemon dressing works great too. These sides balance the richness of the dish. Yes, you can make Easy Chicken Marsala in advance. Cook it fully and let it cool. Then, store it in an airtight container in the fridge. It will stay fresh for about three days. When you are ready to eat, just reheat it on the stove. Add a splash of chicken broth to keep it moist. This way, the flavors meld even more. Yes, Easy Chicken Marsala is good for freezing. Cool the dish completely before freezing. Place it in a freezer-safe container. It can last up to three months in the freezer. To reheat, thaw it overnight in the fridge. Then, warm it slowly on the stove. Stir in some broth or water to avoid dryness. For the full recipe, check out the earlier section. It will guide you through every step. Enjoy making this delicious dish! In this blog post, we explored how to make Easy Chicken Marsala, covering simple ingredients and tools needed. You learned step-by-step cooking instructions, tips to avoid mistakes, and how to store leftovers. We discussed variations to suit your taste and answered common questions. You now have the skills to create a tasty dish that impresses. Enjoy cooking your Chicken Marsala and share it with friends and family. Happy cooking!

Easy Chicken Marsala Quick and Flavorful Recipe

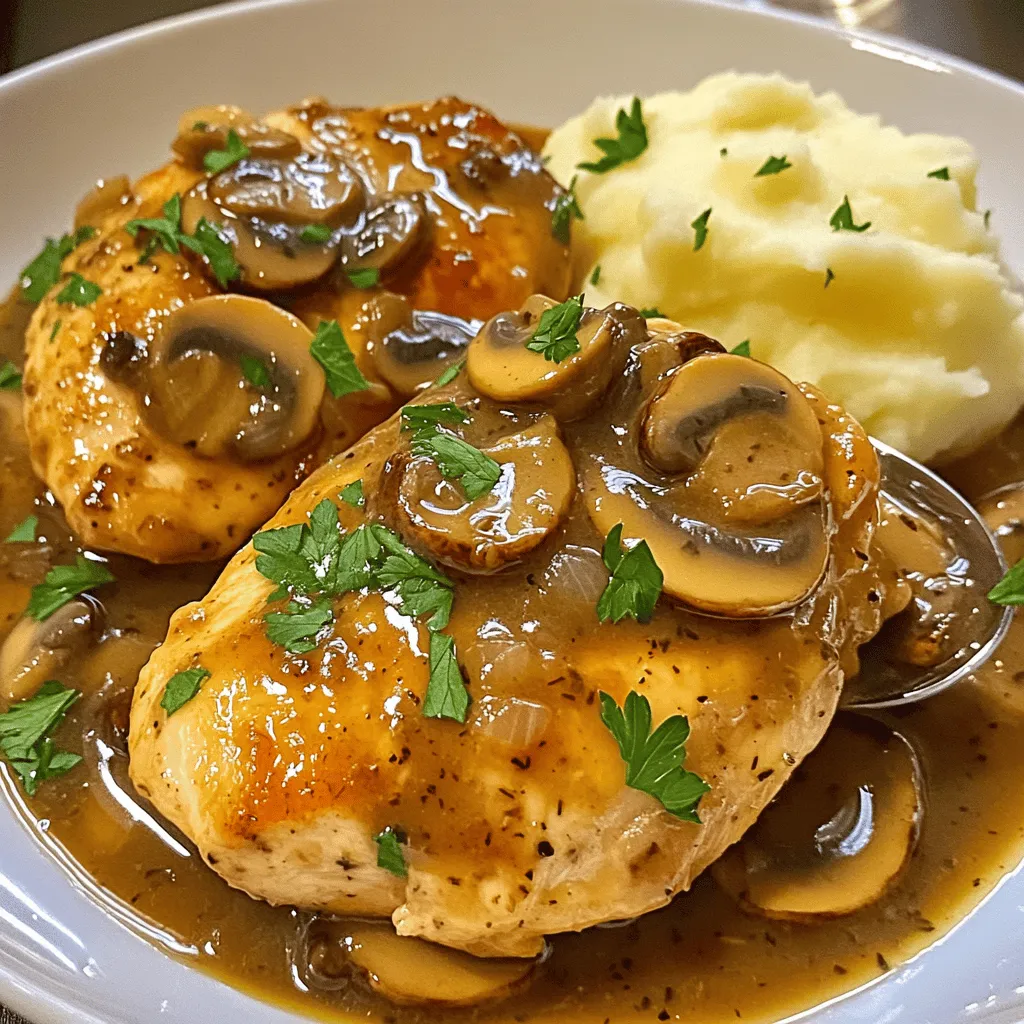
Are you ready to impress your family with a delicious meal? My Easy Chicken Marsala is quick, flavorful, and perfect

For the best Tomato Basil Bruschetta, use fresh ingredients. Here’s what you need: - 1 baguette, sliced diagonally into 1/2 inch thick pieces - 4 ripe tomatoes, diced into small cubes - 1/4 cup fresh basil leaves, finely chopped - 2 cloves garlic, minced to a paste - 3 tablespoons extra-virgin olive oil, divided - 1 tablespoon balsamic vinegar - Salt and freshly cracked black pepper to taste - Shavings of Parmesan cheese for garnish (optional) Choosing ripe tomatoes and fresh basil makes all the difference. Ripe tomatoes burst with flavor. Fresh basil adds a bright, herbal note. This combination creates a zesty topping that sings on the palate. Gather these kitchen tools for making your bruschetta: - Baking sheet - Pastry brush - Mixing bowl - Spoon for serving Optional items can enhance your presentation. A large, elegant platter shows off your bruschetta beautifully. You might also want a small bowl of extra balsamic vinegar for drizzling. This invites guests to customize their bites. You can find the full recipe [here](#). To make the perfect tomato basil bruschetta, start with fresh ingredients. Preheat your oven to 400°F (200°C). This step is key for crisp bread. While the oven heats, slice your baguette into 1/2 inch thick pieces. Lay them out on a large baking sheet. Now, brush each slice with olive oil. Use about 1 tablespoon for even coverage. This helps the bread toast nicely. Place the baking sheet in the oven. Bake for 5-7 minutes until golden brown. Flip the slices halfway through for even crispness. Next, let’s prepare the topping. In a bowl, combine diced tomatoes, chopped basil, and minced garlic. Add balsamic vinegar and the remaining olive oil. Season with salt and black pepper. Mix gently to blend the flavors. You want the texture to be chunky, not mushy. This gives your bruschetta a fresh and vibrant taste. Once your bread cools slightly, it's time to assemble. Spoon the tomato basil mixture onto each slice. Pile it high for a burst of flavor! If you want to impress, add Parmesan shavings on top. For presentation, arrange the bruschetta on a large platter. Garnish with whole basil leaves for color. You can also add a small bowl of balsamic vinegar on the side. This lets guests add more flavor if they wish. Serve immediately to enjoy the warm, crispy bread with fresh toppings. When picking tomatoes, look for ripe, firm ones. The best types are Roma or vine-ripened tomatoes. These have great flavor and texture. If you want a sweeter taste, try cherry tomatoes. They add a nice pop of color too. For basil, choose fresh leaves that are bright green and fragrant. Avoid any that look wilted or brown. If fresh basil is hard to find, use dried basil. Just remember, dried herbs are stronger, so use less. If you have dietary needs, there are great swaps. For gluten-free eaters, use gluten-free bread. You can also skip the cheese to make it dairy-free. This keeps the dish tasty for everyone. To get the perfect crispiness for the baguette, choose a good quality bread. A fresh baguette makes all the difference. Slice it diagonally into half-inch pieces. This gives a larger surface area for toasting. Brush each slice with olive oil before toasting. This oil helps achieve that golden brown color. Toast the slices in the oven at 400°F for about 5-7 minutes. Flip them halfway to ensure even toasting. Avoid crowding the baking sheet; this keeps air flowing around each piece. Don’t let the bread burn! Keep an eye on it as it toasts. You want crispy, not crunchy. To elevate your bruschetta, consider adding toppings. A drizzle of balsamic glaze adds sweetness. Crumbled feta or goat cheese can add a tangy flavor. You can also try thinly sliced olives or roasted peppers. Herbs like oregano or thyme work well too. They can give a nice earthy taste that pairs well with tomatoes. For a spicy kick, add a sprinkle of red pepper flakes. Try serving bruschetta with a side of fresh mozzarella. This can balance the acidity of the tomatoes. It also makes your dish more filling. Enjoy experimenting with flavors! For the full recipe, check out the complete guide. {{image_4}} Bruschetta is more than just tomatoes and basil. You can mix it up! Try smoked salmon for a rich taste. Feta cheese adds a creamy texture, too. You can even use roasted red peppers or olives for a punch of flavor. In Italy, each region has its own twist on bruschetta. In Tuscany, they may add white beans for a heartier bite. In Naples, you might find bruschetta topped with fresh mozzarella and cherry tomatoes. These variations keep the dish exciting and fresh! Need to make bruschetta vegan? Easy! Just skip the cheese and use a good olive oil. Gluten-free? Choose gluten-free bread or even polenta instead of baguette. For a healthier option, use whole grain bread. You can swap out balsamic vinegar for lemon juice to brighten the flavors. This way, everyone can enjoy this tasty treat without worry! To keep any leftover bruschetta tasty, store the toppings and bread separately. Place the fresh tomato basil mixture in an airtight container. This keeps it fresh for up to three days in the fridge. For the toasted bread, store it in a paper bag. Avoid using plastic, as it can make the bread soggy. If you have unbaked bread slices, wrap them in plastic and freeze for later use. When you want to enjoy your bruschetta again, reheating is key. Preheat your oven to 350°F (175°C). Lay the toasted slices on a baking sheet. Heat them for about five minutes until warm. This keeps them crispy. Avoid using the microwave, as it can make the bread chewy. Never reheat the tomato topping in the oven. Instead, let it sit at room temperature. This ensures each bite tastes fresh. Watch out for common mistakes, like leaving the bread too long in the oven. This can dry it out. Keep an eye on it to enjoy that perfect crunch again. For the full recipe, check out the instructions above and enjoy! What is the history of bruschetta in Italian cuisine? Bruschetta dates back to ancient Rome. The name comes from "bruscare," which means to toast. This dish started as a simple snack for farmers. They topped toasted bread with fresh ingredients. Over time, it became popular across Italy, with each region adding its twist. Can I make bruschetta in advance for a party? Yes, you can prepare the topping ahead of time. Make the tomato basil mix and store it in the fridge. Toast the bread just before serving. This way, the bread stays crunchy and fresh. How can I customize the tomato basil bruschetta recipe? You can add other toppings like mozzarella or olives. Try using different herbs like oregano or parsley. For a spicy kick, add red pepper flakes. Feel free to mix and match to suit your taste. What is the best type of bread for bruschetta? A baguette works great for bruschetta. Its crusty outside and soft inside make it perfect for toasting. Ciabatta is another good choice. It has a nice texture and holds toppings well. How long can I keep bruschetta in the fridge? The tomato basil topping lasts about 2-3 days in the fridge. However, the toasted bread will become soggy if stored. Keep them separate for the best taste and texture. Can I freeze bruschetta toppings? Yes, you can freeze the toppings. Store them in an airtight container. They will keep for about a month. Thaw them in the fridge before using, but the texture might change slightly. For the freshest taste, I suggest making the topping fresh when you can. In this blog post, we explored how to make delicious Tomato Basil Bruschetta. We started with the fresh ingredients that make this dish shine, emphasizing the need for ripe tomatoes and sweet basil. You learned the necessary kitchen tools, step-by-step preparation, and tips for perfecting your toast. We also shared creative variations and dietary-friendly options to suit everyone. Lastly, I provided great storage and reheating advice. Enjoy making this classic dish that’s perfect for any gathering!

Tomato Basil Bruschetta Zesty and Flavorful Appetizer

Ready to impress your guests with a deliciously vibrant appetizer? Tomato Basil Bruschetta is a zesty treat that combines ripe

- 2 lbs Yukon Gold potatoes, peeled and quartered - 1 whole head of garlic - 4 tablespoons unsalted butter, at room temperature - ½ cup heavy cream (or substitute with milk) - Salt and freshly ground black pepper, to taste - 2 tablespoons fresh chives, finely chopped (for garnish) - 1 teaspoon olive oil - Baking sheet - Aluminum foil - Large pot - Potato masher - Electric mixer (optional) When you gather these ingredients, you set the stage for a flavorful dish. Yukon Gold potatoes give a rich, buttery taste. The whole head of garlic transforms into a sweet, caramel flavor when roasted. Butter and cream add a silky smoothness, making every bite melt in your mouth. Fresh chives not only brighten the dish visually but also add a fresh touch to the flavor. Using the right tools makes cooking easier. A large pot helps boil the potatoes quickly. A potato masher is perfect for achieving that creamy texture. If you prefer extra fluffiness, an electric mixer can be your best friend. With these simple tools and ingredients, you can create delicious roasted garlic mashed potatoes that will impress anyone at your table. For the full recipe, check out the detailed instructions above. - Preheat oven to 400°F (200°C). - Slice the top of the entire head of garlic. - Drizzle with olive oil and wrap in foil. Roasting garlic brings out its sweet, rich flavor. The heat softens the cloves and gives them a nice, mellow taste. Wrapping the garlic in foil helps it roast evenly. You will know it's done when the cloves feel soft and smell amazing. - Place quartered potatoes in a pot and cover with cold water. - Add salt and bring to a boil. - Cook for 15-20 minutes until fork-tender. Use Yukon Gold potatoes for the best flavor. They have a creamy texture that works well when mashed. Cooking them in cold water ensures even cooking. You want them soft enough to mash easily, so test with a fork. - Squeeze roasted garlic into the pot with potatoes. - Add unsalted butter and mash until smooth. - Gradually pour in heavy cream and mix to desired creaminess. Mashing the garlic with the potatoes creates a wonderful blend of flavors. The butter adds richness, while the cream makes it velvety. Adjust the cream to get the texture you love. For a special touch, sprinkle fresh chives on top before serving. For the full recipe, check out the details above. - Season with salt and fresh black pepper to taste. - Consider adding additional herbs like rosemary or thyme. Adding herbs can change the whole dish. Rosemary gives a pine-like taste, while thyme adds warmth. Start with a little, then taste and adjust. - Use an electric mixer for a fluffier texture. - Adjust cream quantity based on preferred creaminess. If you want light and airy mashed potatoes, the mixer is your best friend. For creaminess, add more cream slowly. This way, you can stop when it feels just right. The perfect roasted garlic mashed potatoes are all about personal taste. For more ideas, check the Full Recipe. {{image_4}} - Substitute Yukon Gold with Russet or red potatoes. Each type brings a unique taste. - Use Greek yogurt instead of heavy cream for a tangy twist. This option cuts calories and adds creaminess. - Add roasted garlic along with garlic powder for a bold flavor boost. The roasted garlic gives a sweet, rich taste. - Incorporate shredded cheese for a cheesy effect. Try sharp cheddar or creamy mozzarella to elevate your dish. These variations make your Roasted Garlic Mashed Potatoes unique and fun. Don't hesitate to mix and match! You can store roasted garlic mashed potatoes in an airtight container. They will stay fresh in the fridge for up to 3 days. Make sure to let them cool completely before sealing. This keeps them from becoming too moist. If you want to keep them longer, freezing is a good option. Use a freezer-safe container to store the mashed potatoes. They can last for up to 2 months in the freezer. When you are ready to eat them, reheat gently. You can use the stovetop or microwave for this. Just add a splash of milk or cream to keep them creamy. Yes, you can prepare and refrigerate them a day in advance. This makes meal prep easy. When you are ready to serve, just reheat them. Try using milk or a mixture of yogurt and broth for a lighter version. This keeps the flavor rich without the extra fat. They pair well with roasted meats, grilled vegetables, and hearty stews. Think roasted chicken or beef. The garlic flavor enhances many main dishes. Add a splash of milk or cream and reheat over low heat while stirring. This keeps them nice and creamy. If they seem dry, add more liquid as needed. For the full recipe, check out the details above. Enjoy your cooking! In this post, we explored how to make roasted garlic mashed potatoes. We covered ingredients, tools, and easy steps to achieve the perfect texture. You learned tips for flavor and texture enhancement, alternative ingredients, and storage methods. These mashed potatoes can elevate any meal. They are versatile and forgiving. Whether you make them creamy or cheesy, they will impress. Enjoy trying your new skills and savor your delicious creation!

Roasted Garlic Mashed Potatoes Creamy Flavor Boost

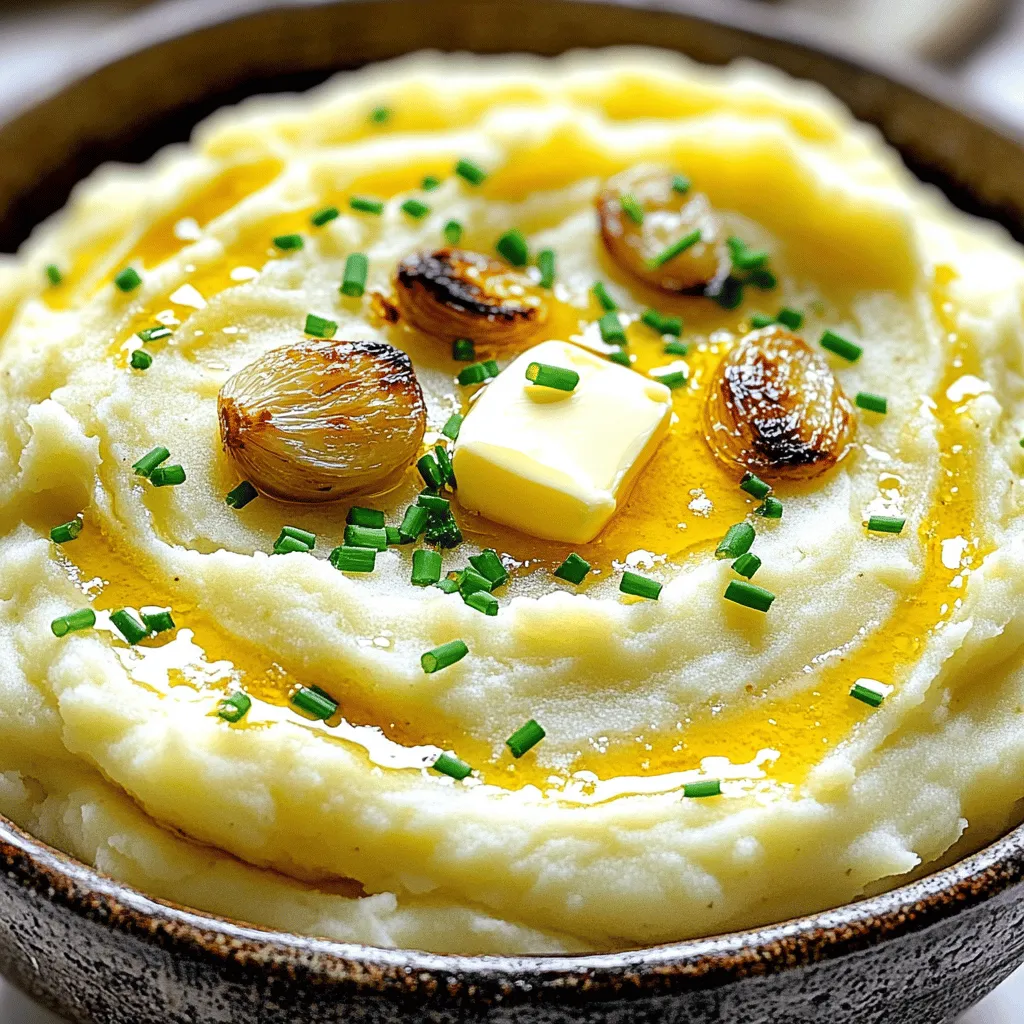
Looking for a side dish that’s rich, creamy, and full of flavor? Roasted Garlic Mashed Potatoes are your answer! With

To make Honey Lemon Glazed Chicken, you need: - 4 boneless, skinless chicken thighs - 1/4 cup honey - 1/4 cup freshly squeezed lemon juice - 2 tablespoons soy sauce - 2 garlic cloves, finely minced - 1 teaspoon fresh ginger, finely grated - Salt and freshly ground pepper to taste - 2 tablespoons olive oil - Zest of 1 lemon - Fresh parsley, chopped, for garnish These ingredients come together to create a sweet and tangy glaze that makes the chicken shine. While the main ingredients are key, a few items can enhance your cooking experience: - Resealable plastic bag or shallow dish for marinating - Whisk for blending the marinade - Grill or skillet for cooking These tools help ensure the chicken absorbs all the flavors and cooks evenly. Choosing the right ingredients makes a big difference. Here are some tips: - Chicken Thighs: Look for thighs that are plump and pink. They should be firm to the touch. - Honey: Choose raw or pure honey for the best flavor. It should be thick and aromatic. - Lemon Juice: Fresh-squeezed juice gives the best taste. Avoid bottled juice when possible. - Garlic and Ginger: Select fresh cloves and roots. They should feel firm and smell strong. By picking high-quality ingredients, you ensure your Honey Lemon Glazed Chicken is a hit. Don't forget to check the Full Recipe for all steps and details! To start, gather your ingredients. You will need honey, fresh lemon juice, soy sauce, minced garlic, grated ginger, lemon zest, and some salt and pepper. In a medium bowl, whisk these together. This glaze will give your chicken a sweet and tangy flavor. Make sure you mix well to combine all the flavors. This step is key to getting that delicious taste. Next, take your chicken thighs. Place them in a resealable plastic bag or a shallow dish. Pour the marinade over the chicken. Ensure each piece is well coated. Seal the bag or cover the dish tightly. Let it sit in the fridge for at least 30 minutes. For even better flavor, marinate it for up to 2 hours. This allows the chicken to soak up all the tasty glaze. When it's time to cook, you can choose to grill or use a skillet. Preheat your grill or a skillet over medium-high heat. If you use a skillet, add olive oil to prevent the chicken from sticking. Remove the chicken from the marinade and let the excess drip off. Reserve some marinade for basting later. Place the chicken on the grill or in the skillet. Cook for about 5-7 minutes without moving it. This helps to create a nice golden brown crust. Flip the chicken and brush it with the reserved marinade. Cook for another 5-7 minutes. The chicken should reach an internal temperature of 165°F (75°C). Once cooked, let it rest for 5 minutes. This will keep the chicken juicy and full of flavor. For more detailed cooking instructions, refer to the Full Recipe. To get the best glaze, mix the honey and lemon juice well. The honey gives sweetness, while lemon adds a bright zing. Use fresh lemon juice for the best flavor. If you want more depth, add some soy sauce. This adds a savory touch to the glaze. Remember to use a whisk to blend everything smoothly. The goal is a thick, sticky glaze that clings well to the chicken. Cooking chicken to the right temperature is key. Aim for an internal temperature of 165°F (75°C). You can use a meat thermometer to check this. When grilling, start with high heat to get a nice sear. Then, lower the heat to cook through without burning. If cooking in a skillet, keep the heat medium-high. This way, you get a golden crust and juicy meat. Letting the chicken rest is crucial. After cooking, take it off the heat and let it sit for about 5 minutes. This helps the juices settle back into the meat. If you skip this step, the juices will run out when you cut it. Resting keeps the chicken moist and tasty. Trust me, it makes a big difference in each bite! For the full recipe, check the earlier section. {{image_4}} You can switch out chicken for other meats. Try this glaze with pork tenderloin or shrimp. Both proteins absorb flavors well. You can use the same marinade and cooking method. Just adjust cooking times based on the protein. For pork, cook until it reaches 145°F (63°C). For shrimp, cook until they turn pink and firm. Adding vegetables makes the dish more colorful and healthy. You can grill or sauté bell peppers, zucchini, or asparagus. Toss them in the leftover marinade for extra flavor. Cook the veggies alongside the chicken. This adds a nice crunch and balances the sweet glaze. You can also serve them on the side for a lovely presentation. If you like heat, try adding chili flakes to the glaze. Start with a pinch and adjust to taste. This adds a fun kick to the sweet and tangy flavor. Mix the chili flakes into the marinade before coating the chicken. You can also sprinkle some on top right before serving. This spicy twist will make your meal exciting and unique. After cooking, let your Honey Lemon Glazed Chicken cool. Store any leftovers in an airtight container. Place the container in the fridge within two hours. This keeps the chicken fresh and safe to eat. It will last for up to three days in the fridge. Make sure your fridge is at 40°F (4°C) or lower for best results. To reheat, you can use the oven, microwave, or stovetop. If using the oven, preheat it to 350°F (175°C). Place the chicken in an oven-safe dish and cover with foil. Heat for about 15-20 minutes. For the microwave, place the chicken on a microwave-safe plate. Heat in short bursts of 1-2 minutes, checking often. Stir the chicken to ensure even heating. The stovetop is another great option. Heat a skillet over medium heat and add a little oil. Cook for about 5-7 minutes, turning the chicken often. If you want to save the chicken for later, freezing is a great option. First, let the chicken cool completely. Wrap it tightly in plastic wrap, then place it in a freezer-safe bag. Remove as much air as possible to prevent freezer burn. It can stay in the freezer for up to three months. When you're ready to eat, thaw it overnight in the fridge before reheating. This keeps the chicken juicy and tasty. For the full recipe, check out the earlier section. Yes, you can use chicken breasts. They will work well in this recipe. Chicken breasts cook faster than thighs, so adjust the cooking time. Cook them for about 4-6 minutes per side. The glaze will still add great flavor. To check if the chicken is done, use a meat thermometer. The internal temperature should reach 165°F (75°C). If you don’t have a thermometer, cut into the thickest part of the chicken. The meat should be white, not pink. You can pair this dish with many sides. Here are some great options: - Steamed rice - Quinoa - Roasted vegetables - Fresh salad - Mashed potatoes Each of these sides will complement the sweet and tangy flavors of the honey lemon glaze. For the full recipe, you can refer back to the earlier section. To make Honey Lemon Glazed Chicken, start with your marinade. Mix the honey, lemon juice, soy sauce, garlic, ginger, lemon zest, salt, and pepper in a bowl. This blend creates a sweet and tangy glaze that will enhance the chicken's flavor. Next, place the chicken thighs in a plastic bag or a shallow dish. Pour the marinade over them and seal or cover. Marinate the chicken for at least 30 minutes in the fridge, or up to 2 hours for more flavor. Preheat your grill or skillet over medium-high heat. If using a skillet, add olive oil to prevent sticking. Remove the chicken from the marinade, letting the excess drip off. Keep the leftover marinade for basting later. Cook the chicken thighs on the grill or skillet for about 5-7 minutes without moving them. This step helps create a golden brown crust. Flip the chicken and brush some reserved marinade on top. Cook for another 5-7 minutes until the internal temperature hits 165°F (75°C). After cooking, let the chicken rest for about 5 minutes. This resting time keeps it juicy and tender. Slice the chicken and drizzle any remaining glaze over the slices. Finish with fresh parsley for a pop of color. - 4 boneless, skinless chicken thighs - 1/4 cup honey - 1/4 cup freshly squeezed lemon juice - 2 tablespoons soy sauce - 2 garlic cloves, finely minced - 1 teaspoon fresh ginger, finely grated - Salt and freshly ground pepper to taste - 2 tablespoons olive oil - Zest of 1 lemon - Fresh parsley, chopped, for garnish These ingredients come together to create a balanced flavor profile that is both refreshing and satisfying. For a delightful meal, serve the glazed chicken on a colorful platter. Drizzle extra glaze over the chicken and add lemon wedges. A sprinkle of parsley adds a lovely touch. Pair it with rice or a fresh salad to complete the dish. You can also serve it alongside steamed vegetables for a healthy balance. In this post, we covered essential ingredients, cooking steps, and helpful tips for making delicious Honey Lemon Glazed Chicken. Use fresh ingredients for the best taste. Grilling or skillet cooking both yield great results. Don’t forget to let it rest for perfect juiciness. You can also switch up proteins and add veggies for variety. With proper storage, enjoy leftovers too! Now, you have the tools to impress anyone with this dish. Enjoy creating this flavorful recipe!

Honey Lemon Glazed Chicken Flavorful Dinner Delight

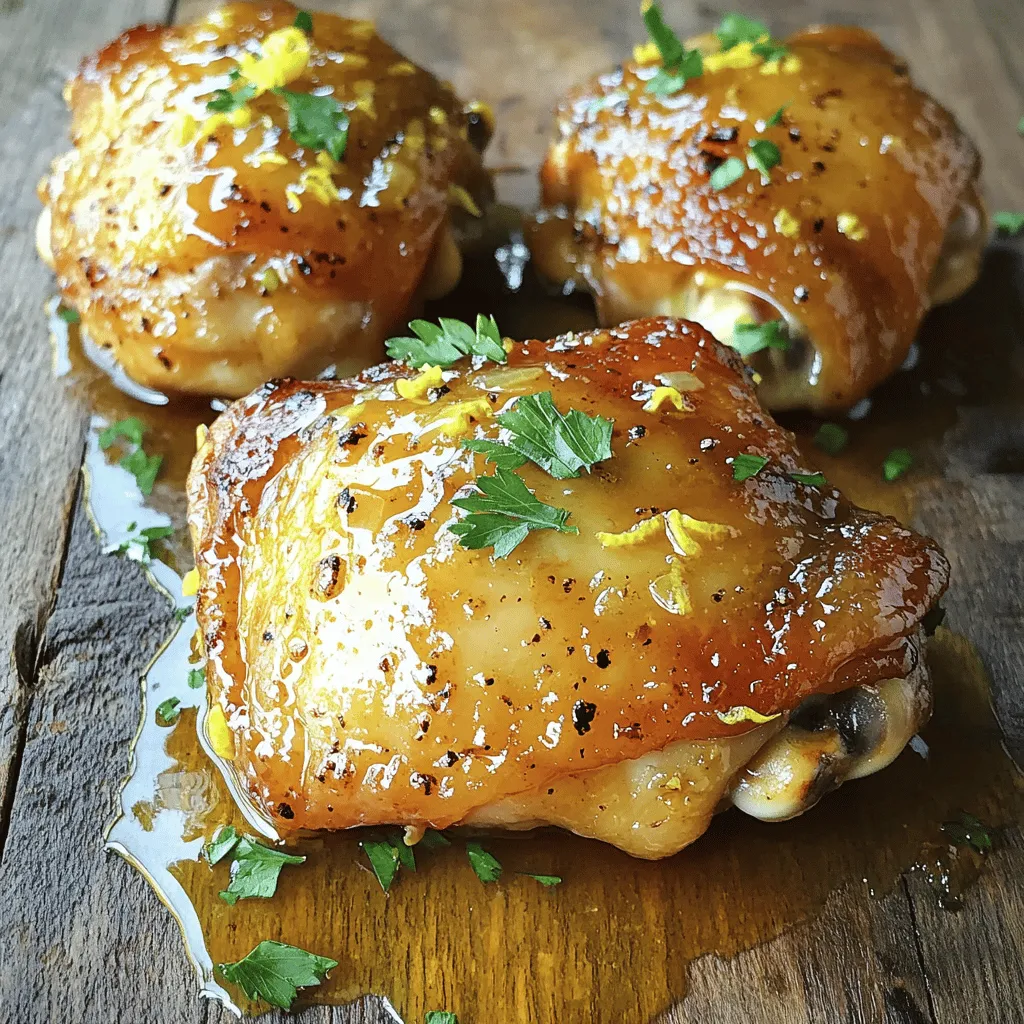
Ready to elevate your dinner game? Our Honey Lemon Glazed Chicken recipe is a tasty delight you won’t forget! I’ll

To make Maple Glazed Carrots, you will need the following: - 1 pound fresh baby carrots (or peeled and sliced large carrots) - 3 tablespoons pure maple syrup - 2 tablespoons unsalted butter, softened - 1 tablespoon extra virgin olive oil - 1 teaspoon ground cinnamon - 1/2 teaspoon sea salt - 1/4 teaspoon freshly ground black pepper - Fresh parsley, finely chopped (for garnish) You can swap items if needed. Here are some options: - Use honey instead of maple syrup for a different sweetness. - Replace unsalted butter with vegan butter for a dairy-free option. - If you don’t have ground cinnamon, try nutmeg for a warm flavor. - Olive oil can be replaced by avocado oil or canola oil. Choosing fresh carrots makes a big difference. Here are some tips: - Look for bright orange color. This means they are fresh and sweet. - Check for firmness. Soft or wrinkled carrots are old and not tasty. - If possible, buy organic carrots. They often have better flavor. - Try to pick carrots with green tops. They should look fresh and vibrant. Start your cooking by preheating the oven to 400°F (200°C). This high heat helps caramelize the carrots. While the oven warms, line a baking sheet with parchment paper. This step makes cleaning easy and keeps the carrots from sticking. In a large mixing bowl, combine these ingredients: - 3 tablespoons pure maple syrup - 2 tablespoons unsalted butter, softened - 1 tablespoon extra virgin olive oil - 1 teaspoon ground cinnamon - 1/2 teaspoon sea salt - 1/4 teaspoon freshly ground black pepper Whisk these items together until the butter melts. You want a smooth glaze that coats the carrots well. Next, add 1 pound of fresh baby carrots to your bowl. Toss them gently in the maple glaze. Make sure each carrot gets a nice coating. Once coated, spread the carrots on your prepared baking sheet. Lay them out in a single layer. This helps them cook evenly. Now you’re ready to roast! Follow the full recipe for the rest of the cooking steps, and enjoy the sweet and savory flavors of your Maple Glazed Carrots. To achieve a perfect glaze, mix the maple syrup, butter, and olive oil well. This creates a smooth blend. Whisk until the butter melts. The glaze should coat the carrots evenly. You can adjust the sweetness by adding more maple syrup if you like it sweeter. A touch of cinnamon adds warmth and depth. You’ll know the carrots are done when they are tender and slightly golden. Cook them for about 25-30 minutes at 400°F. Halfway through cooking, flip the carrots. This helps them caramelize evenly. Test a carrot with a fork; it should pierce easily. One common mistake is overcrowding the baking sheet. Ensure the carrots are in a single layer. This allows for even cooking and browning. Another mistake is skipping the flipping step. Flipping helps all sides get that lovely caramelized finish. Lastly, don’t rush the cooking time. Patience is key for the best flavor! For a detailed guide on making Maple Glazed Carrots, check out the Full Recipe. {{image_4}} You can easily change the flavor of maple glazed carrots. Try adding spices like nutmeg or ginger. These spices give a warm taste. Fresh herbs like thyme or rosemary work well too. Just sprinkle them on before roasting. This small change can make a big difference. Mix in other veggies for more color and taste. Sweet potatoes or parsnips fit nicely with carrots. Chop them into similar sizes and coat them in the maple glaze. You can also add bell peppers for a sweet crunch. This makes the dish even more fun and tasty. If you want to switch up the sweetness, try alternatives to maple syrup. Honey or agave syrup can work well. For a richer flavor, use brown sugar. Each sweetener brings its own twist to the dish. Just keep the same amount as the maple syrup in the full recipe. You can store leftover maple glazed carrots in the fridge. Place them in an airtight container. They will stay fresh for up to four days. When you want to eat them again, take them out. This way, you keep all that sweet flavor. To reheat the carrots, you have a few options. The oven works best. Preheat it to 350°F (175°C). Spread the carrots on a baking sheet. Heat for about 10-15 minutes. You can also use a microwave. Just place them in a safe dish, cover lightly, and heat for about 2-3 minutes. Stir halfway to ensure even warmth. If you want to save them for later, freezing is a great choice. First, let the carrots cool completely. Then, place them in a freezer-safe bag. Try to remove as much air as possible. They can last for about three months in the freezer. When ready to use, thaw them in the fridge overnight. Reheat as mentioned before. Enjoy that sweet taste again! For the full recipe, check out the details above. Yes, you can use frozen carrots. However, fresh carrots taste better. If you use frozen, thaw them first. Pat them dry to remove extra moisture. This helps the glaze stick better and gives a nice caramel color. To make Maple Glazed Carrots vegan, replace the butter with coconut oil or a vegan butter. The maple syrup and olive oil are already vegan. This change keeps the flavor rich while making it plant-based. These carrots go well with many dishes. They complement roasted chicken, turkey, or pork. You can also serve them with grains like quinoa or rice. For a vegetarian meal, pair them with a hearty salad or a grain bowl. Enjoy the sweet and savory flavors together! For the full recipe, check out the section above. This blog post offered a clear guide on making maple glazed carrots. We looked at ingredients, substitutions, and tips for choosing fresh carrots. Next, I shared step-by-step instructions to prepare the dish with a perfect glaze. You learned about variations, storage options, and important FAQs. In the end, maple glazed carrots are simple and tasty. Use fresh ingredients and enjoy this side dish anytime. Happy cooking!

Maple Glazed Carrots Savory and Simple Side Dish

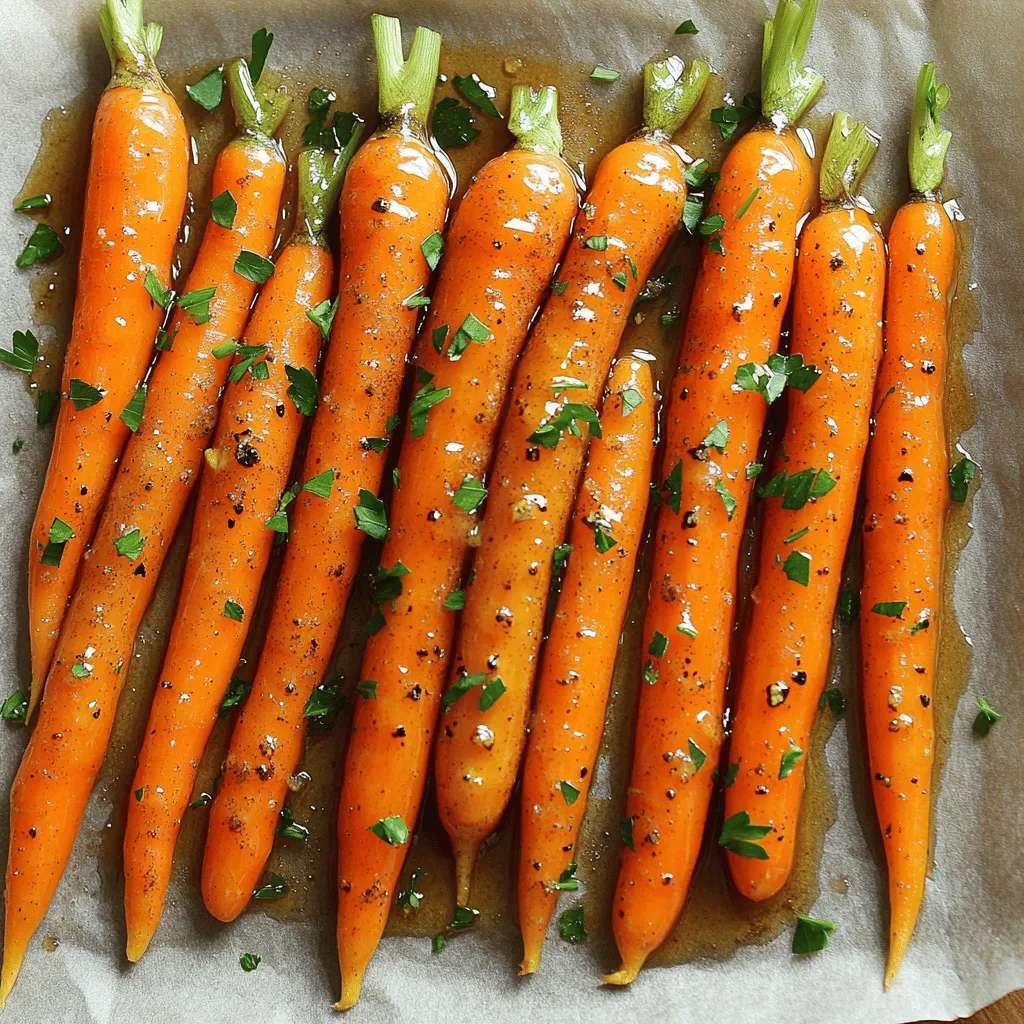
Looking for a side dish that’s as simple as it is delicious? Maple glazed carrots are your answer! These sweet

- 1 can (15 oz) chickpeas, thoroughly drained and rinsed - 2 ripe avocados, carefully diced - 1 cup cherry tomatoes, halved for a juicy burst - 1 cucumber, diced into small chunks - 1 small red onion, finely chopped to enhance flavor - 1/4 cup fresh cilantro, finely chopped for freshness - Juice of 1 lime for a zesty kick - 2 tablespoons extra virgin olive oil for richness - 1 teaspoon ground cumin to add warmth - Salt and freshly ground pepper to taste Chickpeas are the heart of this salad. They add protein and fiber. Avocados bring creaminess and healthy fats. Cherry tomatoes add sweetness, while cucumbers add crunch. Red onion gives a nice bite, and cilantro brings a fresh taste. Lime juice brightens the flavors, and olive oil adds richness. Ground cumin adds a warm, earthy note, while salt and pepper bring it all together. - Other vegetables, like bell peppers or carrots - Cheese variations, such as feta or goat cheese - Nuts or seeds for added crunch You can customize this salad. Add other veggies for more color and taste. Cheese adds creaminess and flavor. Nuts or seeds give a satisfying crunch. - Caloric content: Approximately 350 calories per serving - Macronutrients: About 15g protein, 20g fat, 30g carbs - Health benefits: High in fiber, healthy fats, vitamins, and minerals This salad is not just tasty; it's good for you too. It offers fiber for digestion and healthy fats for heart health. Plus, the vitamins and minerals from the fresh ingredients boost your overall health. The recipe I shared is a great way to enjoy a healthy meal. For the full recipe, check the section above. - Preparation of Ingredients Start by gathering all your ingredients. You need chickpeas, avocados, cherry tomatoes, cucumber, red onion, and cilantro. Rinse the chickpeas well and drain them. Dice the avocados and cucumber into small pieces. Halve the cherry tomatoes and chop the red onion finely. This colorful mix will bring joy to your dish. - Mixing the Salad In a large bowl, add the chickpeas, diced avocados, halved cherry tomatoes, diced cucumber, and chopped red onion. Use a spatula to mix gently. Be careful! We want to keep the avocado intact. This creates a vibrant salad that looks as good as it tastes. - Ingredients for the Dressing For the dressing, you will need lime juice, extra virgin olive oil, ground cumin, salt, and pepper. These ingredients will enhance the flavor of your salad. - Whisking Technique In a small bowl, combine the lime juice, olive oil, cumin, salt, and pepper. Use a whisk to mix well until the dressing is smooth. This simple step is key to balancing the flavors. - Tossing Method Drizzle the dressing over the salad mixture. Use a large spoon to gently toss everything together. Make sure all the ingredients are coated without smashing the avocados. - Final Adjustments for Taste Taste your salad. Add more salt, pepper, or lime juice if needed. This step is crucial. Let the salad rest for ten minutes. This allows the flavors to blend. Then, enjoy your fresh and tasty avocado chickpea salad! For the complete recipe, check out the [Full Recipe]. Ensuring Avocado Ripeness To pick the best avocados, look for ones that feel slightly soft when you press gently. If it's too firm, it is not ready. If it feels too mushy, it may be overripe. Always choose ripe avocados for a creamy texture in your salad. Seasoning Tips Seasoning is key to a great salad. Start with a pinch of salt and a dash of pepper. Taste as you mix to find the right balance. The lime juice adds brightness, but adjust it to match your taste. Don’t be shy with the cumin, as it adds warmth and depth. Presentation Ideas Serve the salad in a large shallow bowl. Drizzle some extra olive oil on top for shine. Garnish with fresh cilantro leaves for color. Add lime wedges on the side for those who crave more tang. Pairing Tips with Other Dishes This salad pairs well with grilled chicken or fish. It also works great as a filling for wraps or sandwiches. Serve it alongside rice or quinoa for a complete meal. How to Store Leftovers Store any leftover salad in an airtight container. This keeps it fresh and prevents browning. Use it within two days for the best taste and texture. Best Practices for Maintaining Freshness To maintain freshness, store the dressing separately. Combine it with the salad just before serving. This keeps the avocados and veggies crisp. {{image_4}} You can spice up your avocado chickpea salad in many ways. Adding spices like chili or paprika gives it a nice kick. Just sprinkle a bit on top before serving. The heat from chili makes it exciting. Paprika adds a mild smokiness that enhances the taste. You can also swap herbs to change the flavor. If you like basil, try it instead of cilantro. It adds a sweet touch that pairs well with the creamy avocado. Parsley is another great option. It brings a fresh and bright flavor to the mix. This salad is already vegan-friendly, but you can make it even more so. Use tahini instead of olive oil for added creaminess. It keeps the salad plant-based while adding a nutty flavor. You can also add nutritional yeast for a cheesy taste without dairy. If you need gluten-free options, this salad fits the bill perfectly. All the main ingredients are gluten-free. Just ensure any spices you add are also gluten-free. This way, everyone can enjoy the dish without worry. The beauty of this salad lies in its flexibility with the seasons. In summer, add juicy peaches or berries for sweetness. They bring a fresh burst of flavor. In fall, try adding roasted sweet potatoes or apples for warmth. Incorporating seasonal produce can elevate the dish. Use fresh corn in summer for a crunch. In winter, consider diced winter squash for a hearty touch. Adjusting the ingredients to the season keeps the salad interesting and tasty. Enjoy experimenting! To make Avocado Chickpea Salad, you need a few simple steps. First, gather your ingredients: - 1 can (15 oz) chickpeas, thoroughly drained and rinsed - 2 ripe avocados, carefully diced - 1 cup cherry tomatoes, halved for a juicy burst - 1 cucumber, diced into small chunks - 1 small red onion, finely chopped to enhance flavor - 1/4 cup fresh cilantro, finely chopped for freshness - Juice of 1 lime for a zesty kick - 2 tablespoons extra virgin olive oil for richness - 1 teaspoon ground cumin to add warmth - Salt and freshly ground pepper to taste Combine the chickpeas, avocados, tomatoes, cucumber, and onion in a bowl. Gently mix in cilantro. In a separate bowl, whisk lime juice, olive oil, cumin, salt, and pepper. Pour this dressing over the salad. Toss everything with care to keep the avocado intact. Let it rest for 10 minutes before serving, so flavors blend. For the full recipe, check the detailed instructions. Yes, you can prepare this salad ahead of time! To keep it fresh, store the salad in an airtight container. It lasts well in the fridge for up to two days. However, the avocado may brown slightly. To slow this down, add lime juice evenly over the avocado pieces. You can also store the dressing separately. Mix it in just before serving for the best taste and texture. This salad goes well with many dishes! Here are some great side options: - Grilled chicken or fish for protein - Quinoa or couscous for a grainy side - Pita bread or whole-grain crackers for crunch - A light soup, like tomato or cucumber gazpacho - Fresh fruit, such as watermelon or berries, for sweetness Pairing these items with your Avocado Chickpea Salad will elevate your meal and make it even more enjoyable! To make this Avocado Chickpea Salad, follow these steps: 1. Start by gathering your ingredients. You will need a can of chickpeas, ripe avocados, cherry tomatoes, cucumber, red onion, cilantro, lime, olive oil, cumin, salt, and pepper. 2. Drain and rinse the chickpeas. This step removes extra salt and keeps the salad fresh. 3. Dice the avocados and cucumber, and halve the cherry tomatoes. Chop the red onion and cilantro finely. 4. In a big bowl, mix the chickpeas, avocado, tomatoes, cucumber, and onion. Make sure to combine them well. 5. In a separate bowl, whisk together the lime juice, olive oil, cumin, salt, and pepper. This dressing adds flavor. 6. Pour this dressing over the salad. Gently toss everything together to coat the ingredients well. 7. Let the salad sit for about 10 minutes. This waiting time helps the flavors mix. When selecting ingredients, look for ripe avocados. They should feel slightly soft when you press them. Choose firm cucumbers and bright tomatoes for the best taste. Fresh cilantro enhances the flavor greatly, so use it if you can. Always taste and adjust seasoning to your liking. You can find the full recipe here. This article explored making a fresh Avocado Chickpea Salad. We covered key ingredients like chickpeas, avocados, and cherry tomatoes. You learned how to prepare the salad, mix the dressing, and combine it all for the best taste. I shared useful tips and variations to make the dish fit your style. Remember, this salad is not only tasty but also packed with nutrients. It's perfect for any meal. Enjoy making your version of this simple and healthy salad.

Avocado Chickpea Salad Fresh and Tasty Delight

Are you ready for a fresh, tasty delight? This Avocado Chickpea Salad bursts with flavor and color. Packed with healthy

Older posts
Newer posts
← Previous Page1 … Page47 Page48 Page49 … Page68 Next →

dsad

© 2025 tastymomrecipes • Built with GeneratePress

Our Policies

  • Copyright Policy
  • Cookie Policy
  • GDPR Policy
  • Privacy Policy
  • Disclaimer
  • Terms Of Use

More Information

  • Home
  • About
  • Contact
  • Appetizers
  • Dessert
  • Dinner
  • Drinks
©2025, tastymomrecipes About Back To Top