Skip to content
DisclaimerTerms Of UseGDPR PolicyCookie Policy

tastymomrecipes

  • Home
  • Drinks
  • Appetizers
  • Dinner
  • Dessert
  • About
  • Contact
  • Privacy Policy
DisclaimerTerms Of UseGDPR PolicyCookie Policy

Olivia

To make loaded nachos, gather these key items: - 1 bag of crisp tortilla chips - 1 cup of shredded sharp cheddar cheese - 1 cup of black beans, thoroughly rinsed and drained - 1 cup of succulent diced tomatoes (fresh or canned) - 1 jalapeño, sliced thinly (adjust for spice preference) - ½ cup of corn (fresh or canned, drained if canned) - ½ cup of creamy guacamole - ½ cup of tangy sour cream - ¼ cup of fresh cilantro, chopped finely - 1 teaspoon of taco seasoning for extra flavor - Salt and pepper to taste These ingredients create a perfect blend of taste and texture. The cheese melts beautifully over the chips, while the beans and tomatoes add heartiness. You can customize your nachos with these tasty toppings: - Sliced olives - Chopped green onions - Diced avocado - Fresh salsa - Crumbled queso fresco Adding these toppings lets you mix flavors. Each bite can be a new experience. To make your meal even better, serve loaded nachos with: - Fresh salsa or pico de gallo - A side of refried beans - A simple green salad These sides balance the meal and add freshness. They enhance the nacho experience, making it even more enjoyable. For the full recipe, check the earlier section. Start by gathering all your ingredients. You need: - 1 bag of crisp tortilla chips - 1 cup of shredded sharp cheddar cheese - 1 cup of black beans, rinsed and drained - 1 cup of diced tomatoes - 1 jalapeño, sliced thinly - ½ cup of corn - ½ cup of guacamole - ½ cup of sour cream - ¼ cup of chopped cilantro - 1 teaspoon of taco seasoning - Salt and pepper Preheat your oven to 350°F (175°C). This is key for crispy nachos! Spread the tortilla chips in a single layer on a baking sheet. This helps the cheese melt evenly. Now, sprinkle the shredded cheese generously over the chips. You want every chip covered! In a bowl, mix black beans, tomatoes, corn, taco seasoning, salt, and pepper. Stir to combine. Next, spoon this mixture over the chips and cheese. Add the sliced jalapeños on top for heat. Place the baking sheet in the oven for about 10 minutes. The cheese should be melty and bubbly. Keep an eye on it to avoid burning. When done, take the nachos out carefully. Top the hot nachos with guacamole and sour cream. These creamy additions make a big difference! Finish with chopped cilantro for a fresh look. Serve immediately for the best flavor. Enjoy your loaded nachos fiesta! For the full recipe, check out the detailed instructions above. To get that cheese just right, choose sharp cheddar. It melts well and adds great flavor. Layer the cheese thickly over the chips. The more cheese, the better! Bake them at 350°F for about 10 minutes. Keep an eye on them. When the cheese bubbles, it’s ready. This is the key to gooey nachos. For great nachos, use sturdy tortilla chips. Look for ones that won’t break easily. Thick chips hold toppings better. Brands like Tostitos or Mission are popular choices. You want chips that are crisp and fresh. Avoid chips that are too salty, as they can overpower your dish. Seasonings can take your nachos to the next level. Taco seasoning is my go-to for a bold taste. You can also sprinkle on some cumin or paprika for warmth. A pinch of salt and pepper elevates the flavors nicely. Don’t forget to mix in spices with your bean and tomato mix. It spreads the flavor throughout each bite. {{image_4}} For a tasty vegetarian twist, swap out the black beans for refried beans. Add a layer of sautéed peppers and onions for extra flavor. You can also mix in some sliced olives and diced avocados. These add creaminess and a nice texture. Don’t forget the cheese! Use a mix of Monterey Jack and cheddar for a rich taste. To make vegan loaded nachos, replace cheese with a nut-based cheese. You can find many brands at stores. Or, blend soaked cashews with nutritional yeast and lemon juice for a creamy topping. Use black beans, corn, and fresh tomatoes as your base. Top with sliced jalapeños and fresh cilantro. Serve with guacamole made from ripe avocados, lime juice, and spices. Want to impress your friends? Try adding gourmet toppings! Drizzle a spicy aioli over the nachos for a kick. You can also use truffle oil for a unique flavor. Consider adding pulled pork or grilled shrimp for a protein boost. Finally, sprinkle some microgreens or edible flowers for a beautiful finish. These toppings will make your nachos stand out at any gathering. For the full recipe, don’t forget to check out the Loaded Nachos Fiesta page! To store leftover nachos, place them in an airtight container. This keeps them fresh. Make sure to cover them well. You should store them in the fridge. They last about 2-3 days. Keep in mind, the chips may get a bit soft. When you're ready to enjoy your nachos again, reheating is simple. Preheat your oven to 350°F (175°C). Spread the nachos on a baking sheet. Heat them for about 5-10 minutes. This helps make the cheese melty again. You can also use a microwave, but the chips won't stay crisp. Heat in short bursts of 30 seconds until warm. Freezing nachos is an option, but it requires some care. I recommend freezing only the toppings and chips separately. Place the chips in a freezer bag, and seal tightly. For toppings, use small containers. They will keep for about 1-2 months. When you're ready to eat, bake the chips and add the toppings fresh. This keeps the crunch and taste. For the full recipe, check out Loaded Nachos Fiesta. Yes, you can make Loaded Nachos without an oven. You can use a microwave or stovetop instead. For the microwave, layer your chips and toppings in a microwave-safe dish. Heat it for about 2-3 minutes or until the cheese melts. On the stovetop, use a skillet. Add your chips and toppings, cover, and heat on low until everything is warm and cheesy. The best toppings for Loaded Nachos really depend on your taste. Here are some popular options: - Shredded cheese (like cheddar or Monterey Jack) - Black beans or pinto beans - Fresh diced tomatoes - Sliced jalapeños - Chopped onions or green onions - Creamy guacamole - Tangy sour cream - Fresh cilantro - Salsa or pico de gallo Mix and match these to create your perfect plate of nachos! To make Loaded Nachos gluten-free, choose tortilla chips that are labeled gluten-free. Many brands offer chips made from corn without any wheat. For toppings, use gluten-free beans and fresh vegetables. Check sauces and seasonings for hidden gluten. This way, you can enjoy your nachos without worry! For the full recipe, you can find all the details in the recipe section above. Loaded nachos are fun and tasty. We explored key ingredients, preparation steps, and storage tips. You learned how to create perfect nachos with melted cheese. We also discussed variations, like vegetarian and gourmet options. Remember, you can customize nachos to suit your tastes. Enjoy making them for your next gathering or a cozy night in. Great nachos bring joy and flavor to every bite. So get cooking and enjoy your creation!

Loaded Nachos Flavorful and Easy Dinner Recipe

If you’re craving a fun, tasty meal that’s quick to make, you’re in the right place. My Loaded Nachos recipe

- 1 ½ cups graham cracker crumbs - ½ cup unsalted butter, melted - 2 tablespoons granulated sugar - 16 oz cream cheese, softened - ¾ cup granulated sugar - 1 teaspoon vanilla extract - 3 large eggs, at room temperature - 1 cup sour cream - 1 teaspoon ground cinnamon - 2 large apples, peeled and diced - 2 tablespoons unsalted butter - ¼ cup brown sugar - 1 teaspoon vanilla extract - ½ teaspoon ground cinnamon - 1 tablespoon fresh lemon juice - ½ cup brown sugar - ¼ cup unsalted butter - ¼ cup heavy cream - 1 teaspoon vanilla extract When making this caramel apple cheesecake, you need fresh and quality ingredients. The crust starts with graham cracker crumbs for a sweet base. The filling combines cream cheese, sugar, and eggs to create a creamy texture. For the apple filling, use firm apples like Granny Smith. They add a nice tartness. The caramel sauce gives a rich finish, blending sweetness with richness. Each ingredient plays a role in crafting a delicious dessert. If you want the full details, check out the Full Recipe. - Preheat the oven to 325°F (160°C). - In a bowl, mix graham cracker crumbs, melted butter, and sugar. Press this mixture into the bottom of a springform pan. - Bake for 10 minutes, then let it cool completely. - In a skillet, melt butter over medium heat. - Add diced apples, brown sugar, vanilla extract, cinnamon, and lemon juice. Cook for 5-7 minutes until apples are tender. - Remove from heat and set aside to cool. - In a large bowl, beat cream cheese with an electric mixer until smooth. - Gradually add sugar and vanilla extract, mixing until combined. - Add eggs one at a time, mixing on low speed. Avoid overmixing. - Slowly mix in the sour cream and ground cinnamon until the batter is creamy. - Pour half of the cheesecake mixture over the cooled crust. - Spread half of the apple filling on top of the cheesecake mixture. - Pour the rest of the cheesecake mixture over the apples, then add the remaining apple filling on top. - Bake in the oven for 50-60 minutes. The cheesecake should be set but slightly jiggly in the center. - After baking, turn off the oven. Crack the door open and let the cheesecake cool inside for 1 hour. - In a saucepan over medium heat, combine brown sugar, butter, and heavy cream. - Stir until the mixture boils and the sugar dissolves. Boil for 2 minutes without stirring. - Remove from heat and stir in vanilla extract. For the complete details on how to make this dish, refer to the Full Recipe. To make your cheesecake perfect, avoid overmixing. This keeps it smooth and creamy. When mixing, just blend until everything is combined. Also, bake at a low temperature. Set your oven to 325°F. This helps the cheesecake cook evenly and keeps it from cracking. When it’s time to serve, chill your cheesecake well. Serve it with warm caramel sauce drizzled on top. This will make every bite extra special. For a lovely touch, garnish with a sprinkle of cinnamon. Thin apple slices also look great and add flavor. Make sure all your ingredients are at room temperature. Cold ingredients can lead to lumps in your cheesecake. Also, let the cheesecake cool properly after baking. If you skip this step, it may crack. Cooling in the oven for an hour helps it set without issues. For more details on making this delicious treat, check out the Full Recipe. {{image_4}} You can make a no-bake version of this cheesecake. It’s quick and easy! For the crust, use crushed cookies. Mix them with melted butter and press them into your pan. Instead of baking, use gelatin to set the filling. This keeps the cheesecake creamy and smooth without heat. Here’s a tip: chill the cheesecake in the fridge for at least 4 hours. This way, it will firm up nicely. You can also add whipped cream on top for extra fluffiness. Want a vegan twist? Substitute cream cheese with cashew cream or coconut cream. You can blend soaked cashews until smooth. Use flax eggs instead of regular eggs. Just mix 1 tablespoon of ground flaxseed with 2.5 tablespoons of water. Let it sit for a few minutes to thicken. For caramel sauce, try using coconut milk and maple syrup. This gives a rich flavor without dairy. If you need gluten-free options, use gluten-free graham cracker crumbs for the crust. Check the package to make sure they are certified gluten-free. For the filling, all the other ingredients are usually gluten-free, but double-check labels to avoid any gluten. Make sure to avoid cross-contamination with gluten in your kitchen. This way, you can enjoy a delicious caramel apple cheesecake without worry. For the full recipe, check out the details above. You can store the cheesecake in the refrigerator for up to five days. Make sure to cover it tightly with plastic wrap or place it in an airtight container. This keeps the flavors fresh and prevents it from drying out. If you want to keep it even longer, add a layer of foil over the wrap. This extra step helps lock in moisture and flavor. To freeze the cheesecake, first, let it cool completely. Then, wrap it tightly in plastic wrap, followed by aluminum foil. This method prevents freezer burn and preserves the taste. You can freeze it for up to three months. When you're ready to enjoy it, remove it from the freezer and place it in the fridge to thaw overnight. For the best texture, avoid thawing at room temperature, as this can make it too soft. I recommend using Granny Smith apples. They are tart and firm. This tartness balances the sweet cheesecake and caramel. Honeycrisp apples are also great. They add a nice crunch and sweetness. Avoid soft apples like Red Delicious, as they become mushy when baked. The cheesecake needs about 50-60 minutes to bake. It should be set but still jiggle in the center. After baking, cool it in the oven for about one hour. This step helps prevent cracks. Then, chill it in the fridge for at least four hours for the best texture. Yes, you can make this cheesecake a day or two ahead. Just cool it completely before wrapping it in plastic wrap. Store it in the fridge until you’re ready to serve. This cheesecake tastes even better after sitting for a day. The flavors blend well together. You can use plain Greek yogurt as a substitute. It offers a similar tang and creaminess. Another option is cream cheese thinned with a bit of milk. This will change the texture slightly but still taste great. Just remember, each substitute alters the final flavor a little. This cheesecake blends creamy filling with sweet apples and rich caramel. You learned about the key ingredients, from crust to filling. I shared step-by-step instructions to guide you through making it perfectly. Remember the tips to avoid common mistakes. Storage tips help you keep it fresh longer. Enjoy serving this dessert chilled with warm caramel sauce for the best taste. Try the variations for new flavors, too. This cheesecake is sure to impress your friends and family every time.

Caramel Apple Cheesecake Irresistible Homemade Delight

If you love dessert, you’ve got to try my Caramel Apple Cheesecake! This creamy treat layers rich cheesecake with sweet

To make creamy garlic mashed potatoes, you need a few key ingredients: - 2 lbs Yukon Gold potatoes, peeled and cut into uniform dice - 4 cloves garlic, peeled - ½ cup unsalted butter, softened to room temperature - ⅔ cup heavy cream (adjust for creaminess preference) - Salt and freshly cracked black pepper, to taste - ¼ cup sour cream (for added creaminess and tang) - Fresh chives, finely chopped (for a vibrant garnish) These ingredients work together to create a rich and smooth dish. Yukon Gold potatoes bring a buttery flavor. Garlic adds depth and aroma. Butter and sour cream enrich the texture. If you don’t have Yukon Gold potatoes, you can use Russet potatoes. They mash well and provide a fluffy texture. For a lighter dish, swap heavy cream with half-and-half or milk. You can also use olive oil instead of butter for a healthier option. If you want a dairy-free version, use a plant-based cream and skip the butter. Using high-quality ingredients matters. Fresh garlic enhances the flavor. Choose potatoes with no blemishes for the best mash. Unsalted butter lets you control the salt level. Good ingredients lead to better taste and texture. When you take care in your choices, your creamy garlic mashed potatoes will shine. For the full recipe, check the details above. Start with 2 pounds of Yukon Gold potatoes. I like these potatoes because they are creamy and smooth. Peel and cut them into equal-sized pieces. Place the diced potatoes and 4 cloves of garlic in a large pot. Cover them with cold water and add a big pinch of salt for flavor. This helps the potatoes soak in some taste. Set the pot over medium-high heat. Wait until the water boils. Once it starts boiling, lower the heat to medium. Let it simmer for 15 to 20 minutes. You want the potatoes to be fork-tender. After that, drain the potatoes and garlic in a colander. Return them to the pot. Put the pot back on low heat for a minute. This helps any extra moisture dry out. Now, use a potato masher or ricer. Mash the potatoes and garlic until they are smooth and creamy. Next, add ½ cup of softened butter and ¼ cup of sour cream to the potatoes. Stir well until the butter melts and mixes in. Now, gradually pour in ⅔ cup of heavy cream. Mix it until you get your desired creaminess. You can add more or less cream based on your taste. Finally, season with salt and freshly cracked black pepper. Taste it to see if it needs more. For a special touch, fold in some finely chopped fresh chives. This adds color and flavor to your dish. Check out the Full Recipe for more details! To get creamy garlic mashed potatoes, start with Yukon Gold potatoes. These potatoes have a smooth texture and rich flavor. When boiling, make sure the potatoes are fork-tender. Drain them well to avoid watery mashed potatoes. Use a potato masher or ricer for the best results. Ricing gives you the smoothest texture. Finally, add heavy cream gradually. You can adjust the amount for your preferred creaminess. Garlic is key for flavor, but you can add more. Try roasting the garlic before mashing. Roasted garlic brings a sweet, nutty taste. Adding sour cream gives your dish a tangy kick. Fresh chives offer a bright finish and extra flavor. You can also sprinkle some cheese for a rich touch. Always remember to taste and adjust salt and pepper for balance. One common mistake is not salting the water. Salting the water helps season the potatoes. Another is over-mashing, which can make them gluey. Be gentle when mixing in the butter and cream. If you want a lighter dish, avoid heavy cream. Instead, use half-and-half or milk for a different texture. Keep these tips in mind to make the best creamy garlic mashed potatoes. For the full recipe, check out the recipe section. {{image_4}} To add a fresh twist, try garlic herb mashed potatoes. You can mix in herbs like parsley, thyme, or rosemary. Start by chopping a tablespoon of your favorite herbs and add them to the mashed potatoes. This gives your dish a bright flavor that complements the garlic. If you love cheese, cheesy mashed potatoes are for you. For this variation, add shredded cheese like cheddar or parmesan. Stir in about one cup of cheese after mashing the potatoes. The cheese melts in, making the dish rich and creamy. It’s a perfect way to make your mashed potatoes even more indulgent. You can make creamy garlic mashed potatoes vegan. Swap out the dairy for plant-based options. Use almond milk or coconut milk instead of heavy cream. Replace butter with vegan butter or olive oil. This keeps the dish creamy while being friendly to your diet. Feel free to explore these variations and make these mashed potatoes truly your own. For the full recipe, check out the complete steps above. Creamy garlic mashed potatoes taste great with many meats. They pair well with roasted chicken, beef, or pork. The smooth texture complements the juicy flavors of grilled steak. If you serve them with fried chicken, it adds a creamy balance. Try them with herb-crusted lamb for a special treat. These potatoes also work nicely with meatloaf, adding warmth to every bite. For special events, creamy garlic mashed potatoes shine brightly. They make every meal feel fancy. Serve them during holiday dinners or family gatherings. Add a sprinkle of fresh chives for color. You can also top them with crispy bacon bits for a fun twist. This dish can impress guests at birthday parties or anniversaries. It brings comfort and style to any table. Presentation matters when serving creamy garlic mashed potatoes. Use a large serving bowl for a family-style meal. For a refined touch, serve in individual ramekins. You can create swirls in the potatoes with a fork for a fun look. Drizzle with a little extra cream or melted butter for a glossy finish. A sprinkle of chives adds color and freshness. You can even use a piping bag for a professional touch. For the full recipe, you can explore more ideas and tips! Yes, you can make mashed potatoes ahead of time. Prepare them as usual and cool them down. Then, store the mashed potatoes in an airtight container in the fridge. They will stay fresh for up to three days. When you are ready to serve, reheat them gently. The best potatoes for mashing are Yukon Gold or Russet potatoes. Yukon Gold potatoes give a creamy texture and buttery flavor. Russet potatoes are fluffy and light. Both types work well, but Yukon Gold is my favorite for a smooth dish. To reheat creamy mashed potatoes, place them in a pot over low heat. Stir frequently to avoid sticking. You can add a splash of heavy cream or milk to keep them creamy. Alternatively, you can use the microwave, heating them in short bursts. Be sure to stir in between to ensure even heating. For the full recipe, check out the Creamy Garlic Mashed Potatoes section. In this post, we explored key ingredients, step-by-step instructions, and helpful tips for making perfect mashed potatoes. We also discussed tasty variations and serving ideas to elevate your dish. Good ingredients and the right methods can make a huge difference. Pay attention to common pitfalls, and you'll avoid mistakes. With this knowledge, you can create mashed potatoes that impress. Enjoy your creamy creation at special occasions or any meal!

Creamy Garlic Mashed Potatoes Perfectly Smooth Dish

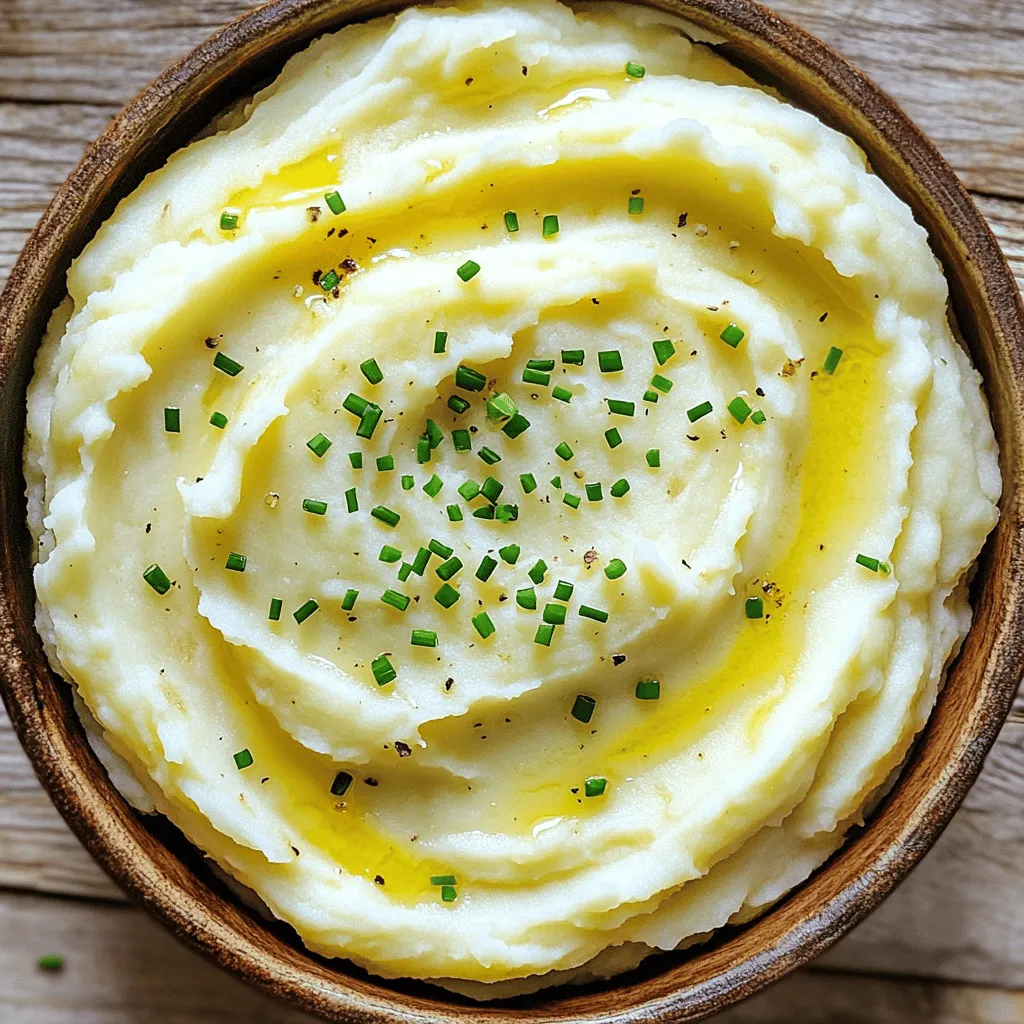
Looking for the perfect side dish? These creamy garlic mashed potatoes bring smoothness and flavor to your table. With just

- 1 lb baby carrots, peeled - 2 tablespoons unsalted butter - 3 tablespoons honey - 3 garlic cloves, finely minced - 1 teaspoon fresh thyme leaves (or 1/2 teaspoon dried thyme) - Salt and freshly ground black pepper to taste - Optional: A sprinkle of chopped fresh parsley for garnish - Large pot - Skillet - Cooking utensils Honey garlic glazed carrots are a great side for many dishes. They pair well with: - Roasted chicken - Grilled steak - Baked fish - Quinoa or rice dishes These carrots add a sweet and savory touch that enhances any meal. You can serve them warm in a nice bowl. Drizzle the leftover sauce on top for extra flavor. The vibrant color will catch your eye and make your meal more appetizing. Try this dish for your next family dinner or holiday gathering. You can find the full recipe below. - Bring a large pot of water to a rolling boil. - Add 1 lb of peeled baby carrots. - Cook for 5-7 minutes until tender but crunchy. - Drain the carrots and set them aside. - In a skillet, melt 2 tablespoons of unsalted butter over medium heat. - Add 3 minced garlic cloves once the butter bubbles. - Sauté for 1 minute until the garlic is golden. - Mix in 3 tablespoons of honey and 1 teaspoon of fresh thyme. - Stir well for 1-2 minutes to thicken the sauce. - Add the cooked carrots and toss in the sauce until well coated. - Season with salt and freshly ground black pepper to taste. - Let the carrots simmer for another 2-3 minutes. - Serve the carrots warm in a decorative bowl. - Drizzle leftover sauce over the top for a lovely finish. - These glazed carrots pair well with roasted meats or can stand alone. For the full recipe, check out the detailed instructions above. Enjoy making these delicious honey garlic glazed carrots! To get that perfect crunch in your carrots, start with fresh baby carrots. Boil them for just 5-7 minutes. You want them tender but still firm. This method gives you a nice bite. If you like a sweeter taste, add more honey. You can also mix in a pinch of salt to balance the flavors. Taste as you go, and adjust until it feels just right for you. If you have leftovers, store them in an airtight container. Keep them in the fridge for up to three days. When you want to heat them, use a skillet. Add a splash of water to help steam them. This keeps them moist and tasty. You can also microwave them, but be careful not to overcook. You can prepare the carrots a day in advance. Cook them and store in the fridge. When you are ready to eat, just heat them up in a skillet. This saves time and keeps the flavors strong. For even better taste, add the honey glaze right before serving. This way, you keep the carrots vibrant and full of flavor. Check out the Full Recipe for more details on preparation! {{image_4}} If you want to switch things up, try different sweeteners instead of honey. Maple syrup or agave nectar work well. They add their own unique taste but still keep the dish sweet. For herbs, you can use rosemary or parsley. They will change the flavor, but in a tasty way. You can serve honey garlic glazed carrots in many fun ways. Try them as a warm salad. Just toss them with some greens and a splash of lemon. You can also add them to wraps. They give a sweet crunch to any filling. Moreover, these carrots fit into many cuisines. Use them in Asian stir-fries or Mediterranean dishes for a new twist. If you need gluten-free options, this recipe is already safe! Just ensure your honey is pure and check other labels. For a vegan version, swap the butter for olive oil or coconut oil. This keeps the dish rich and tasty without any animal products. Adjust the recipe based on your dietary needs, and you’ll still have a delicious side. Each serving of Honey Garlic Glazed Carrots contains about 150 calories. You get around 22 grams of carbohydrates, 6 grams of fat, and 1 gram of protein. The baby carrots provide a good dose of vitamins A and C, which help with your immune system. Honey adds natural sweetness and antioxidants, while garlic gives you heart health benefits. Thyme adds flavor and has anti-inflammatory properties. This recipe contains butter, which can be a concern for those with dairy allergies. If you're avoiding dairy, you can swap butter for olive oil. Honey is safe for most diets, but vegans should use maple syrup instead. For a healthier twist, consider using less honey or butter. You can also choose to steam the carrots instead of boiling them to keep more nutrients. To lighten up this dish, use less butter and honey. You can add more vegetables like green beans or peas to boost nutrition. Mixing in a variety of colors makes the dish more appealing and healthy. For a fresh taste, try adding a squeeze of lemon juice before serving. This adds brightness and complements the honey and garlic nicely. Honey garlic glazed carrots last about 3 to 5 days in the fridge. To keep them fresh, store them in an airtight container. This helps prevent moisture loss and keeps the flavors intact. If you notice any signs of spoilage, it’s best to discard them. Reheat them in a skillet to restore their shine and flavor. You can use frozen carrots, but fresh carrots taste better. Frozen carrots may lose some crunch during cooking. However, they save time and are convenient. If you use frozen, thaw them first and pat them dry. This helps the glaze stick better. Honey garlic glazed carrots pair well with many main dishes. Here are some great options: - Roast chicken - Grilled salmon - Beef stew - Pork chops - Quinoa salad Each of these dishes complements the sweet and savory flavors of the carrots. They add color and nutrition to your meal, making every plate pop. For the full recipe, check out the Honey Garlic Glazed Carrots section above. This article covered everything you need to make honey garlic glazed carrots. You learned about the ingredients, step-by-step cooking instructions, and helpful tips. I also shared ways to modify the recipe for different diets and preferences. Try this dish as a side with your favorite meals. Enjoy the sweet and savory flavor that everyone loves. It’s easy to make and sure to impress. Now, go ahead and get cooking!

Honey Garlic Glazed Carrots Simple and Flavorful Side

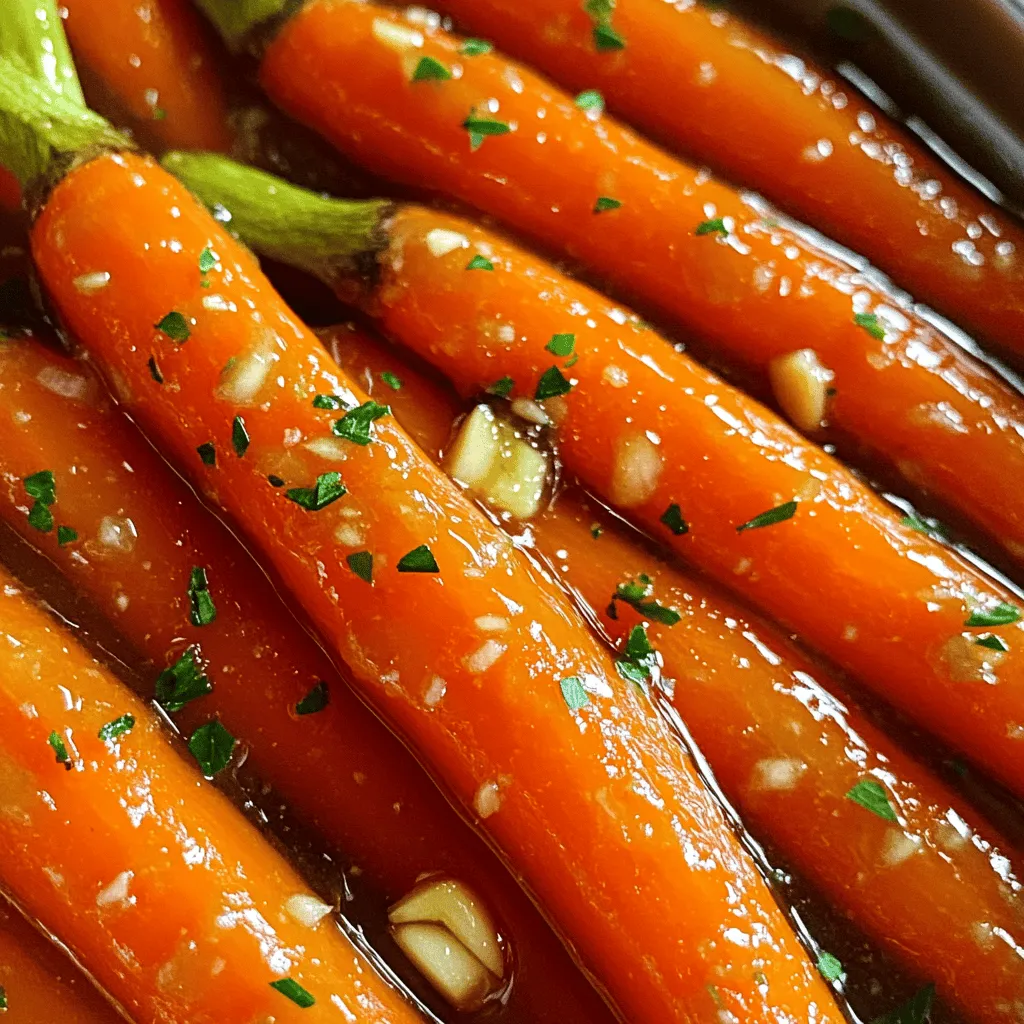
Looking for a side dish that’s both simple and packed with flavor? Honey Garlic Glazed Carrots are just the answer!

To make a delicious Maple Pecan Pie, you need the right ingredients. Here’s what you’ll need: - 1 ½ cups pecan halves - 1 cup pure maple syrup - ¾ cup packed brown sugar - ½ cup granulated sugar - 4 large eggs - 4 tablespoons unsalted butter, melted - 1 teaspoon vanilla extract - 1 tablespoon all-purpose flour - 1 teaspoon salt - 1 pre-made pie crust (store-bought or homemade) For variations, you can try adding spices like cinnamon or nutmeg for extra warmth. If you want a nuttier flavor, consider using chopped walnuts or hazelnuts in place of some pecans. You’ll need some basic kitchen tools: - A measuring cup and spoons - A large mixing bowl - A whisk for blending - A spatula for spreading - A 9-inch pie dish for baking These tools will help you create that perfect pie, so gather them before you start cooking! You can find the Full Recipe for step-by-step instructions and tips. Start by preheating your oven to 350°F (175°C). This ensures your pie bakes evenly. Next, take your pre-made pie crust and place it in a 9-inch pie dish. Crimp the edges to make them look nice. You can use your fingers or a fork for this. To prevent bubbling, gently prick the bottom of the crust with a fork. Set the crust aside while you mix the filling. In a large bowl, combine the maple syrup, brown sugar, and granulated sugar. Use a whisk to mix these ingredients until smooth. This step is key to a sweet filling. Next, add the eggs to the bowl, one at a time. Make sure each egg blends in well before adding the next. This helps create a fluffy filling. Once your eggs are mixed in, add melted butter, vanilla extract, flour, and salt. Stir until everything is smooth. Finally, fold in the pecan halves. This ensures each slice has delicious pecans. Now it’s time to pour the filling into the crust. Use a spatula to spread it evenly. This helps the pie bake uniformly. Place the pie in the oven and bake for 50-60 minutes. You’ll know it’s done when the top is golden brown and the filling is set with a slight jiggle in the center. After baking, take the pie out of the oven. Let it cool at room temperature for at least 2 hours. This cooling time helps the filling firm up, making slicing easier. For the full recipe, refer to the detailed instructions above. To make your filling just right, aim for a smooth and fluffy mix. Mix the sugars and syrup well before adding the eggs. This helps create a good base. When you add eggs, do it one at a time. Make sure each one blends in fully before the next. For the crust, pre-bake it for about 10 minutes. This step keeps it crispy and prevents sogginess. To add more depth to your pie, consider adding spices. A touch of cinnamon or nutmeg can elevate the flavor. You can also try a hint of bourbon for a unique twist. When serving, slice the pie into wedges. Top each slice with whipped cream and a sprinkle of chopped pecans. Drizzling a little maple syrup over the top makes it even more inviting. Watch out for over-mixing the filling. This can make the pie tough. Always fold in the pecans gently to keep their shape. If your crust cracks, it may be too dry. Use a bit more butter or water when making it. If the filling doesn't set, it might need more baking time. Look for a golden top and slight jiggle in the center. For the full recipe, refer to the Maple Pecan Delight Pie section. {{image_4}} You can switch out maple syrup for other sweeteners. Honey and agave syrup work well. If you use honey, the pie may taste floral. Agave will make it milder. When using these sweeteners, reduce the sugar amount by about 25%. This keeps the pie from being too sweet. Remember, each sweetener brings a unique flavor. Adjust the liquid in the recipe slightly to keep the right consistency. Pecans are classic, but you can try other nuts. Walnuts and hazelnuts offer different flavors. Almonds bring a nice crunch and a hint of sweetness. Each nut changes the pie’s flavor and texture. If you swap nuts, keep the same amount for balance. Toasting the nuts before adding them can enhance their taste. This adds a nice depth to your pie. To make the pie vegan, substitute the eggs with flaxseed meal or chia seeds. Use three tablespoons of water mixed with one tablespoon of flaxseed for each egg. You can also use a vegan butter substitute. For a gluten-free crust, look for premade options or make one with almond flour and coconut oil. These changes keep the pie just as tasty and satisfying. Enjoy the same delicious flavors while catering to dietary needs. After baking, let the pie cool for at least 2 hours. Cooling helps the filling set properly. You can set it on a wire rack to speed up the cooling. Once cool, wrap the pie tightly in plastic wrap or aluminum foil. This keeps the pie fresh and prevents it from absorbing odors from the fridge. Place it in the refrigerator if you plan to eat it within a week. If you want to freeze the pie, allow it to cool completely first. Wrap it well in plastic wrap and then in foil. This double layer helps maintain quality. You can freeze the pie for up to three months. When ready to eat, thaw it overnight in the fridge. Reheat in the oven at 350°F (175°C) for about 15 minutes. This warms the pie and makes it taste fresh. The pie lasts up to one week in the fridge. If the filling looks watery or has an off smell, it’s time to toss it. Always check for signs of spoilage before digging in. Enjoy your pie while it’s fresh for the best taste! To store your Maple Pecan Pie, let it cool completely. Use plastic wrap or foil to cover the pie. Place it in the fridge for up to four days. Keep it on a flat surface to avoid spills. If you want to keep it longer, consider freezing it. Wrap it tightly in plastic wrap and then in aluminum foil. Frozen pie can last up to three months. Yes, you can make Maple Pecan Pie ahead of time. Bake the pie a day or two before your event. Let it cool and store it in the fridge. This makes serving easy and stress-free. You can also freeze the pie. Just remember to thaw it overnight in the fridge before serving. This way, you have one less thing to worry about on the big day. If your Maple Pecan Pie is not setting, check a few things. First, ensure you bake it long enough. The filling should be set with a slight jiggle in the center. If it's too runny, it may need more time. Also, make sure you mixed the eggs thoroughly. This helps the filling bind properly. If it's still not setting, it may need a bit more flour. Adjusting these steps can help you achieve the perfect pie. You learned about making a delicious Maple Pecan Pie. We covered essential ingredients, step-by-step baking, and helpful tips. You now have ideas for variations and storage tips to keep your pie fresh. Remember, a well-prepped crust and the right baking time are vital. Don't forget to experiment with flavors and adjustments for your taste. With these tips, you can bake a pie that impresses family and friends. Enjoy your baking journey!

Maple Pecan Pie Irresistible Holiday Dessert Recipe

Are you ready to impress your guests this holiday season? This Maple Pecan Pie recipe combines rich flavors and a

To make this tasty Garlic Parmesan Roasted Cauliflower, gather the following items: - 1 medium head of cauliflower - 4 cloves of garlic - 1/4 cup freshly grated Parmesan cheese - 3 tablespoons extra virgin olive oil - 1 teaspoon sea salt - 1/2 teaspoon freshly ground black pepper - 1/2 teaspoon smoked paprika - Fresh parsley (for garnish) - Lemon wedges (for serving) Each ingredient plays a key role in making this dish delicious. The cauliflower gives us a great base. Garlic adds a nice, strong flavor. Parmesan cheese brings a rich, cheesy goodness. Olive oil helps everything roast well, while the spices enhance the taste. Fresh parsley adds color and a fresh touch, and lemon juice brightens it all up. For the full cooking instructions, refer to the Full Recipe. First, set your oven to 425°F (220°C). This temperature helps the cauliflower roast perfectly. Next, line a baking sheet with parchment paper. This step prevents the cauliflower from sticking. Take your medium head of cauliflower and break it into bite-sized florets. In a large bowl, add the florets and toss them with four finely minced garlic cloves. Make sure the garlic spreads evenly over all the florets. This ensures every bite bursts with flavor. Now, drizzle three tablespoons of extra virgin olive oil over the cauliflower. Use your hands or a spatula to mix it well. Every piece should get a nice coat of oil. Then, sprinkle one teaspoon of sea salt, half a teaspoon of freshly ground black pepper, and half a teaspoon of smoked paprika over the mixture. Toss it again to ensure each piece is seasoned. Spread the seasoned cauliflower in a single layer on the baking sheet. This way, each floret gets enough heat to roast well. Bake it for 20 minutes. After that time, take it out and sprinkle a quarter cup of grated Parmesan cheese over the florets. Return the baking sheet to the oven. Keep an eye on it for another 10 to 15 minutes. You want the cauliflower tender and the cheese golden brown. Once it’s done, carefully remove the baking sheet from the oven. Let it cool for a few moments. Transfer the cauliflower to a serving platter. For a finishing touch, garnish with finely chopped parsley. Serve with lemon wedges on the side. Squeezing lemon over the dish adds a fresh taste that brightens every bite. To get the best flavor and texture, proper roasting is key. Roasting at 425°F (220°C) gives a great balance of crispness and tenderness. You want the edges to turn golden brown. Adjusting seasoning is also vital. Taste your dish before serving. If it needs more salt or pepper, go ahead and add it. Each oven is different, so don’t hesitate to tweak the seasonings. Using fresh garlic and cheese makes a big difference. Fresh garlic gives a strong, bold flavor. Grated Parmesan cheese melts beautifully and adds richness. If you don’t have Parmesan, try Pecorino Romano or nutritional yeast for a vegan option. You can even mix in some fresh herbs like thyme or rosemary for extra flavor. Having the right tools makes cooking easier. Use a large mixing bowl to toss the cauliflower. A good spatula helps coat the florets evenly with oil and spices. For baking, choose a sturdy baking sheet. It should be large enough to hold the cauliflower in a single layer, so it roasts well. Parchment paper helps prevent sticking and makes cleanup a breeze. {{image_4}} You can easily change the flavor of garlic Parmesan roasted cauliflower. One great way is to add spices. A pinch of cayenne gives a nice kick. Italian herbs like oregano or basil can add depth too. You can also mix in other vegetables. Carrots, bell peppers, or Brussels sprouts work well. They roast nicely and bring their own flavors to the dish. If you want a dairy-free option, use vegan cheese. It melts well and adds a nice taste. You can also try other cheeses. Feta adds a tangy flavor, while cheddar gives a bold kick. Keep in mind that different cheeses will change the taste of the dish. Pair garlic Parmesan roasted cauliflower with main courses like grilled chicken or fish. It also goes well with steak. For parties, serve it as a tasty appetizer. You can even use toothpicks for easy eating. Plating it on a colorful platter makes it look fancy and fun. Don't forget to squeeze lemon on top for a fresh taste! To keep the flavor of Garlic Parmesan roasted cauliflower, store it in the fridge. Place it in an airtight container. This will help keep it fresh. Try to eat it within three days for the best taste. If you have extra, let it cool first before storing. This helps stop extra moisture from forming. To reheat, use your oven if you can. Set it to 350°F (175°C) and warm the cauliflower for about 10 minutes. This helps it stay crispy. If you use a microwave, heat for 30 seconds at a time. Stir in between to check for warmth. Avoid overheating, or it will get soggy. You can freeze Garlic Parmesan roasted cauliflower, but it may change a bit. First, let it cool completely. Pack it in a freezer-safe bag or container. Remove as much air as you can. When you're ready to eat it, thaw it in the fridge overnight. Reheat it in the oven to bring back some of that crispy texture. Leftovers of Garlic Parmesan Roasted Cauliflower stay good for about 3 to 5 days. Store them in an airtight container in the fridge. This keeps them fresh and tasty. Yes, you can prepare this dish ahead of time. Chop the cauliflower and mix it with garlic and oil. Store it in the fridge for up to a day. When ready to cook, just add the seasonings and roast. Garlic Parmesan Roasted Cauliflower is a healthy choice. Cauliflower is low in calories and high in fiber. Garlic boosts your immune system. Olive oil adds healthy fats, and Parmesan gives protein. This dish pairs well with many meals. Serve it with grilled chicken or fish. It also goes great with pasta or a fresh salad. Try serving it at your next dinner party! For detailed cooking instructions, check out the Full Recipe. This blog post detailed how to make Garlic Parmesan Roasted Cauliflower. We covered key ingredients, step-by-step instructions, and helpful tips. Remember to use fresh products for the best taste. You can explore variations by adding spices or using different cheeses. Storing and reheating leftovers properly helps keep flavors intact. This dish is healthy and pairs well with many meals. Try this recipe and enjoy a delicious, simple dish that impresses!

Garlic Parmesan Roasted Cauliflower Delightful Dish

Are you ready to transform your meals with a delightful dish? Garlic Parmesan Roasted Cauliflower is the game-changer your dinner

- Fresh strawberries - Ripe pineapple - Juicy mango - Plump blueberries - Kiwi - Natural honey - Freshly squeezed lime juice - Lime zest - Fresh mint leaves - Additional lime zest The ingredients for this Honey Lime Fruit Salad make it a bright and tasty treat. You can mix and match fruits based on what you like best. I love using fresh strawberries for their sweetness and bright color. Ripe pineapple adds a tropical twist, while juicy mango brings a rich flavor. Plump blueberries add a nice pop of color and taste. Kiwi gives it a fun tartness. To make the dressing, use natural honey for its smooth texture. Freshly squeezed lime juice brings a zesty kick, and lime zest enhances the flavor with its aromatic oils. You can add fresh mint leaves and extra lime zest as garnishes. These are optional but add a lovely touch. For the complete recipe, check out the Full Recipe section. Start with the strawberries. Hull and quarter them into bite-sized pieces. Next, grab the ripe pineapple. Dice it into small chunks. Then, take the juicy mango and dice it just like the pineapple. For the kiwi, peel it first, then slice it thin. Now, combine all these fruits in a large mixing bowl. Don't forget to add the plump blueberries. Their sweetness adds a nice touch! In a separate bowl, whisk together the natural honey, freshly squeezed lime juice, and lime zest. This mixture will create a sweet and tangy dressing. Make sure it blends smoothly. The honey gives a nice shine to the fruit salad! Now, it's time to toss! Drizzle your honey-lime dressing over the colorful fruits in the mixing bowl. Use a spatula or a wooden spoon to toss them gently. This ensures every piece gets coated in that delicious dressing. Let the salad sit for about 10-15 minutes. This resting time helps the flavors mix together. Before serving, toss it again lightly to refresh the mix. Top with fresh mint leaves for a bright finish. Enjoy your Honey Lime Fruit Salad! To create the best honey lime fruit salad, start by choosing ripe fruits. Ripe fruits taste sweeter and have a better texture. For strawberries, look for bright red ones. For pineapples, choose ones that smell sweet. Mangoes should feel slightly soft when you gently press them. Blueberries should be plump and firm, while kiwis should yield to gentle pressure. Allow the salad to rest for about 10-15 minutes after mixing. This time helps the flavors blend. The honey and lime dressing will soak into the fruits, making each bite burst with flavor. Serving is just as important as making the salad. Use chilled bowls or a nice platter to show off the colors. The vibrant reds, yellows, and greens look stunning together. You can also sprinkle some extra lime zest on top. A few more mint leaves add a pop of green and freshness. This fruit salad is not just tasty; it’s also healthy. Strawberries are full of vitamins and antioxidants. Pineapples help with digestion, while mangoes provide vitamin A. Blueberries are great for your heart, and kiwis are rich in vitamin C. Honey adds sweetness without refined sugar. It also has natural antioxidants. Lime juice gives a boost of vitamin C. Together, these ingredients create a refreshing and healthy dish. For the full recipe, check out the Honey Lime Fruit Salad Delight. {{image_4}} You can mix different fruits to keep things fresh. Try using seasonal fruits. In summer, add peaches or cherries. In fall, consider apples or pears. You can also add nuts or seeds for crunch. Sliced almonds or chia seeds work great. This boosts texture and adds healthy fats. For a vegan option, use agave syrup instead of honey. This keeps the sweetness while making it plant-based. If you're watching your sugar intake, consider using stevia or monk fruit sweetener. These alternatives provide sweetness without extra sugar. You can change the dressing to add new flavors. Try orange juice instead of lime for a sweeter taste. You can also add spices like cinnamon or ginger for a unique twist. Fresh herbs like basil can add freshness to the dressing, making it even more exciting. Feel free to explore these variations to make your Honey Lime Fruit Salad a special treat every time. For the full recipe, check the section above. To keep your Honey Lime Fruit Salad fresh, store it in the fridge. Use an airtight container to prevent air from spoiling the fruits. This salad stays fresh for about 2-3 days. After this time, fruits may lose their crispness and flavor. You can make the dressing ahead of time. Mix honey, lime juice, and zest in a jar. Store it in the fridge until you are ready to use it. For the fruit, wash and cut it as needed. Keep the prepared fruits in separate containers. This way, they stay fresh longer and you can mix them when you’re ready to enjoy your salad. If you have leftovers, get creative! You can mix the fruit salad with yogurt for a tasty breakfast. It also works as a topping for pancakes or waffles. Another idea is to use it as a filling for a smoothie. Each option adds a fun twist to the salad and helps reduce waste. You can use many fruits for this salad. I recommend fresh strawberries, ripe pineapple, juicy mango, plump blueberries, and kiwi. These fruits bring sweet and tart flavors. You can swap fruits based on what you have. For example, use apples or grapes if you want. Seasonal fruits like peaches or cherries are also great choices. Just remember to keep a balance of sweet and tangy fruits. Yes, you can prep this fruit salad ahead of time. Just cut the fruits and store them in an airtight container. To keep everything fresh, add the honey-lime dressing right before serving. This way, the fruits stay crisp, and the flavors stay bright. If you want to make the dressing early, store it separately in the fridge. It will keep well for a few days. This fruit salad is perfect for many occasions. Serve it at brunch, barbecues, or picnics. You can pair it with grilled chicken or fish for a refreshing side dish. It also works well as a dessert. Add a scoop of yogurt or ice cream on top for a sweet treat. You can even use it as a topping for pancakes or waffles. The options are endless! In this blog post, I shared how to create a fresh fruit salad. You learned about selecting ripe fruits like strawberries and mangoes. I explained how to make a simple dressing with honey and lime juice. Consider presenting your salad in a chilled bowl for a fun look. Don't forget the health benefits of these fruits. Enjoy customizing the recipe with seasonal ingredients. With these tips, you can make a vibrant dish that's perfect for any occasion.

Honey Lime Fruit Salad Refreshing and Fruity Delight

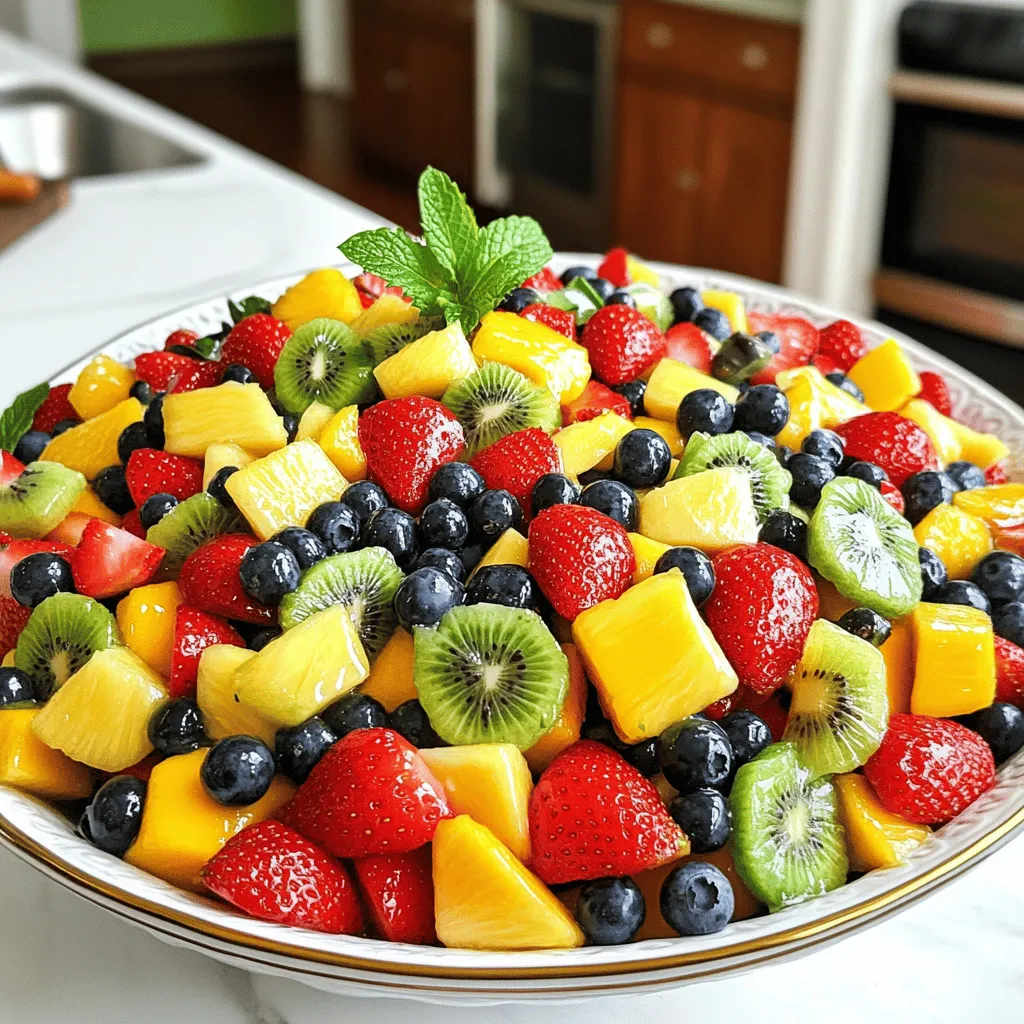
Looking for a light and refreshing treat? Our Honey Lime Fruit Salad is the answer! Bursting with fresh strawberries, juicy

- 4 cups mixed salad greens (arugula, spinach, and baby kale) - 1 cup dried cranberries - 1 cup walnut halves, lightly toasted - 1/2 cup crumbled feta cheese - 1/4 cup red onion, thinly sliced - 1/2 cup diced apple (Gala or Fuji) - 1/4 cup extra virgin olive oil - 2 tablespoons apple cider vinegar - 1 tablespoon honey - Salt and pepper to taste When making cranberry walnut salad, fresh ingredients matter. Start with four cups of mixed salad greens. I love combining arugula, spinach, and baby kale. Each green brings a crisp flavor. Next, add a cup of dried cranberries. They give a sweet burst in every bite. Then, use a cup of walnut halves. Lightly toast them for richer taste and crunch. For creaminess, crumbled feta cheese works wonders. Half a cup adds a salty flavor. Thinly slice a quarter cup of red onion for a nice kick. Lastly, include half a cup of diced apple. Gala or Fuji apples are best for their sweetness. The dressing is simple but tasty. Pour a quarter cup of extra virgin olive oil into a bowl. Mix in two tablespoons of apple cider vinegar and one tablespoon of honey. Add salt and pepper to taste. This combination of ingredients creates a balanced salad. It has sweetness, crunch, and creaminess. You can find the full recipe above. Enjoy your cooking! - Combine 1/4 cup extra virgin olive oil, 2 tablespoons apple cider vinegar, and 1 tablespoon honey. - Add salt and pepper to your taste. - Whisk until smooth and set aside. - Heat a dry skillet over medium heat. - Add 1 cup walnut halves. - Toast for about 5 minutes, stirring often. - Place 4 cups mixed greens in a large bowl. - Gently fold in 1 cup dried cranberries, 1 cup toasted walnuts, 1/2 cup crumbled feta, 1/4 cup sliced red onion, and 1/2 cup diced apple. - Drizzle your dressing over the salad. - Toss gently to coat all ingredients. - Serve immediately in individual bowls. This simple process creates a fresh and vibrant dish. Enjoy it as a side or a light main meal. For the complete recipe, check the Full Recipe section. To make your cranberry walnut salad great, always toast your walnuts. Toasting brings out their rich flavor and crunch. You can do this easily in a dry skillet over medium heat for about five minutes. Stir them often until they smell nice. Also, remember to adjust the sweetness with honey. Start small and taste as you go. You want the flavors to blend well. For a stunning presentation, serve your salad in clear glass bowls. This way, the colors pop, and guests can see all the tasty ingredients. To make it look even better, add extra crumbled feta and whole walnuts on top. This adds both flavor and style, making your dish feel gourmet. Watch out for overdressing your salad. Too much dressing can make it soggy. Aim for a light coating to keep the greens crisp. Another mistake is not cooling your toasted walnuts before adding them to the salad. Hot walnuts can wilt the greens, so let them cool first for the best texture. {{image_4}} You can change the nuts in the salad. Swap walnuts for pecans or almonds. Both nuts add a nice crunch. You can also add fruits. Try pears or citrus for extra flavor. These changes make the salad even more tasty. Get creative and use what you love! Want a vegan option? Just skip the cheese and use maple syrup instead of honey. This keeps the salad sweet and plant-based. If you need gluten-free options, check your dressing. Many brands offer gluten-free choices. You can enjoy this salad while meeting your diet needs. To keep your salad fresh, store it in an airtight container in the fridge. This way, it stays crisp and tasty. Aim to eat it within 1-2 days for the best flavor. The longer it sits, the less fresh it will taste. You can prepare parts of this salad in advance. Make the salad dressing ahead of time and store it separately. This helps keep the greens fresh and crunchy. You can also assemble the salad ingredients up to a day prior. Just wait to add the dressing until you're ready to serve. This will keep everything looking great and tasting fresh. Yes, but store the dressing separately to keep greens fresh. This step is key. If you mix the dressing in too early, your greens can wilt. Keep them crisp by waiting until just before serving. Goat cheese or nutritional yeast are excellent alternatives. Goat cheese adds a creamy texture and tangy taste. Nutritional yeast offers a cheesy flavor for a vegan option. Both choices blend well with the other salad ingredients. Consider adding grilled chicken, chickpeas, or tofu for a protein boost. Grilled chicken adds a savory depth. Chickpeas provide a nice crunch and are great for plant-based diets. Tofu is a versatile choice that absorbs flavors well. This blog post has shown you how to make a delicious Cranberry Walnut Salad. You learned about all the key ingredients, from fresh greens to tasty dressing. Toasting the walnuts adds a nice touch. Remember to avoid common mistakes, like overdressing your salad. You can also play with the recipe by using different nuts or fruits. With these tips, you can enjoy a healthy meal any day. It's all about fresh, vibrant flavors coming together. Happy salad making!

Cranberry Walnut Salad Simple and Fresh Delight

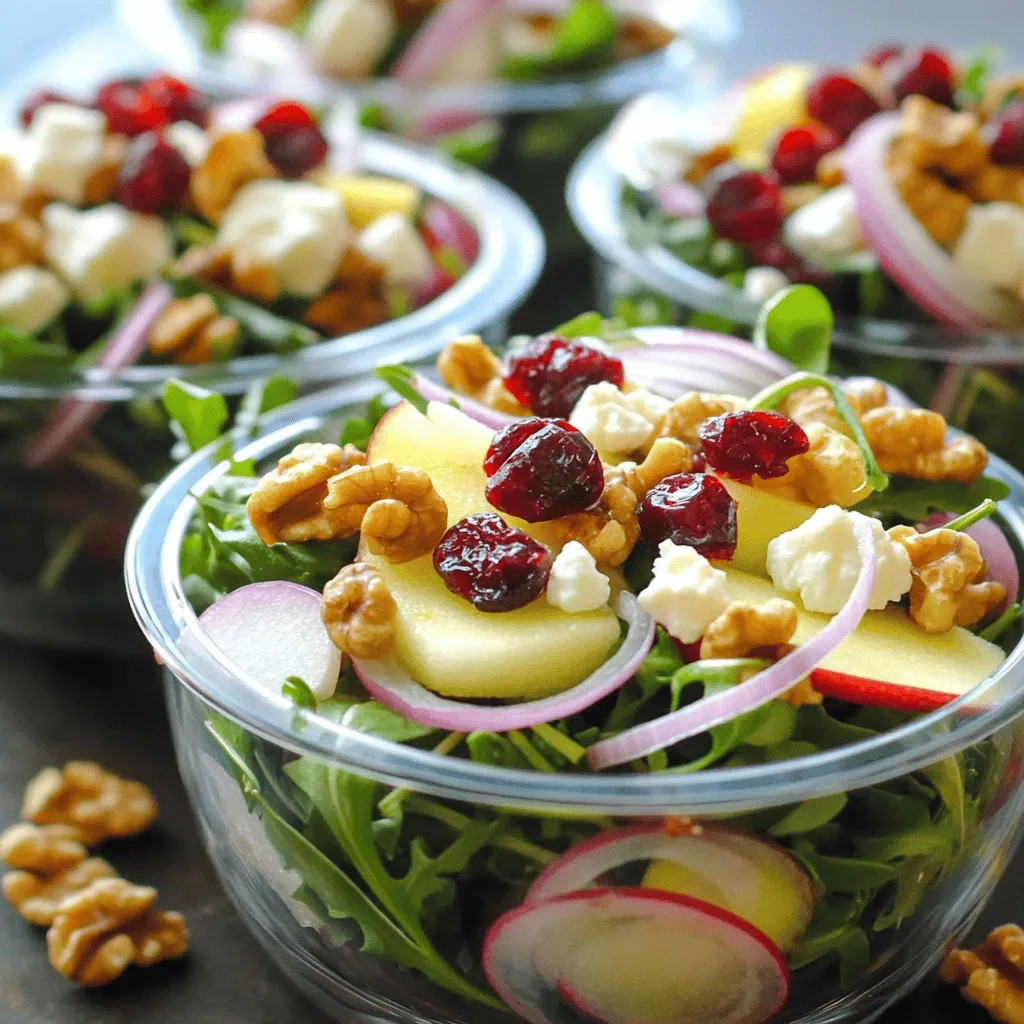
Looking for a fresh and delightful salad that’s easy to make? You’re in the right place! The Cranberry Walnut Salad

- Ripe avocados - Whole grain or sourdough bread - Large eggs - White vinegar - Salt and freshly cracked pepper - Extra virgin olive oil - Red chili flakes (optional) - Fresh herbs for garnish - Lemon wedges for serving For this avocado toast with poached egg, I love using ripe avocados. They add creaminess and richness. I often choose whole grain or sourdough bread for the perfect base. These breads bring a nice texture and flavor. Next, I use large eggs for poaching. The size helps them cook evenly. White vinegar is key for poaching. It helps the egg whites stay together. Don't skip the salt and freshly cracked pepper. They enhance flavor beautifully. Extra virgin olive oil adds a tasty finish. If you enjoy a bit of spice, try red chili flakes. Fresh herbs like cilantro or parsley brighten the dish. Finally, lemon wedges add a zesty touch when squeezed on top. These ingredients work together to create a delicious meal. Follow the full recipe for step-by-step guidance. Enjoy every bite of this simple yet elegant dish! Toasting the bread is simple. You can use a toaster or a skillet. If you use a skillet, heat it to medium. Cook the bread until it turns golden brown. Aim for a nice crispness that holds up to toppings. Perfect toast should be crunchy on the outside but soft inside. Start by cutting the avocados in half. Remove the pit and scoop the flesh into a bowl. Use a fork to mash the avocado. Leave some chunks for texture. For flavor, add salt, freshly cracked pepper, and a drizzle of extra virgin olive oil. Mix well but don’t overdo it. The right texture is creamy yet slightly chunky. Fill a medium saucepan with water, about 2 inches deep. Bring the water to a gentle simmer. Add a tablespoon of white vinegar to help the eggs keep their shape. Crack each egg into a small bowl. Gently slide each egg into the simmering water. Poach for 3-4 minutes for a runny yolk. If you prefer a firmer yolk, cook a bit longer. Use a slotted spoon to lift the eggs out and drain on paper towels. Spread the mashed avocado generously on each slice of toasted bread. Make sure to cover every inch of the toast. This adds rich flavor in every bite. Now, gently place one poached egg on top of the avocado. When you cut into the egg, the yolk should flow over the avocado. This makes each bite even tastier. For the final touch, sprinkle salt, pepper, and chili flakes if you like heat. Garnish with fresh herbs for a pop of color. For the full recipe, check out Avocado Toast with Poached Egg. To make a great poached egg, avoid these common mistakes: - Using boiling water: It should be at a gentle simmer. - Skipping vinegar: This helps the egg hold its shape. - Cracking eggs directly in: Use a small bowl first. For beginners, here are some easy tips: - Use fresh eggs; they hold their shape better. - Swirl the water gently before adding the egg; this helps it stay round. - Time your eggs carefully. Aim for 3-4 minutes for a runny yolk. To bring out the best in your avocado toast, try these seasonings and toppings: - Salt and pepper: Essential for basic flavor. - Red chili flakes: Add a spicy kick if you like heat. - Lemon juice: A squeeze brightens the dish. For extra flair, consider these toppings: - Fresh herbs: Cilantro or parsley adds color and freshness. - Feta cheese: Crumbled feta brings saltiness and creaminess. - Sliced radishes: They add crunch and a peppery note. Pair your avocado toast with these tasty sides or drinks: - Fresh fruit: Berries or sliced oranges add sweetness. - Yogurt: A creamy side complements the toast well. - Coffee or tea: A warm drink balances the meal. These ideas will elevate your avocado toast experience! For the full recipe, check the earlier section. {{image_4}} You can use many types of bread for your avocado toast. Whole grain offers a hearty bite, while sourdough brings a nice tang. If you need gluten-free options, try gluten-free bread or rice cakes. Each type adds its own flavor and texture, so feel free to experiment. Add unique toppings to make your dish special. Try sliced radishes for crunch or feta cheese for creaminess. You can also add smoked salmon for a savory touch or cherry tomatoes for sweetness. Pair flavors like avocado and lemon for brightness or chili flakes for heat. Let your taste buds guide you. If you want a vegan version, skip the egg. Try using tofu instead. You can scramble or slice it and add it on top. For seasoning, use nutritional yeast to get that cheesy flavor. You can also mix in some lemon juice and herbs for a fresh kick. This way, you enjoy a tasty dish without any animal products. To keep your leftover avocado toast fresh, it's best to store it in the fridge. Place any uneaten toast in an airtight container. This will help preserve its taste and texture. Always store the toast and toppings separately if possible. Avocado can brown quickly, so keep it covered with plastic wrap or in a sealed container. When it comes time to reheat your toast, use a toaster or an oven. This method will help keep the bread crispy. Avoid using a microwave, as it can make the toast soggy. Heat for just a few minutes until warm. For avocados, store them at room temperature if they are not ripe. Once ripe, keep them in the fridge to slow down the browning process. To prevent browning, you can squeeze some lemon juice on the exposed flesh. Eggs should be kept in their original carton in the fridge. This helps maintain their freshness. Check the expiration date to ensure they are good to use. For bread, store it in a cool, dry place. A bread box or sealed bag works well. If you want to keep it fresh for longer, freeze the slices. Just toast them directly from the freezer when ready to eat. Enjoy your avocado toast with poached egg, knowing your ingredients are stored properly for the best taste. For the full recipe, check out the Avocado Toast with Poached Egg. The best way to poach an egg is to use fresh eggs. This helps keep the shape. Start with a pot of water, about 2 inches deep. Bring it to a gentle simmer. Add one tablespoon of white vinegar. The vinegar helps the egg whites set. Crack each egg into a small bowl first. Then, gently slide the egg into the water. Cook for 3-4 minutes for a runny yolk. For a firmer yolk, cook a bit longer. Use a slotted spoon to lift the egg out. Drain it on a paper towel before serving. To stop avocado from browning, use lemon juice. The acid in the juice slows down oxidation. You can also store avocado in an airtight container. Keep it in the fridge if you cannot eat it right away. When serving, add the avocado just before eating. This keeps it fresh and green. If you mash the avocado, mix in some lemon juice right away. You can prep avocado toast ahead of time, but with care. Toast the bread in advance; it keeps well. Store it in a sealed bag to keep it crisp. For the avocado, mash it but add lemon juice to slow browning. Store the mash in the fridge. When ready to eat, assemble the toast quickly. Add the poached egg and enjoy! Avocado toast packs many health benefits. Avocados are rich in healthy fats, which are good for your heart. They also have fiber, helping with digestion. Whole grain bread adds more fiber and nutrients. This meal keeps you full and provides energy. Enjoying it for breakfast or lunch is a great choice! Yes, you can make avocado toast without eggs. For a vegan option, try using tofu. Silken tofu can be a great substitute. You can also spread hummus or add sliced tomatoes. Nutritional yeast can add a cheesy flavor. Feel free to mix in your favorite toppings! Avocado toast is simple yet delicious. We covered key ingredients like ripe avocados, bread, and eggs. You learned how to prepare each part from toasting bread to poaching eggs. I shared tips for enhancing flavors and avoiding common mistakes. Each section helps you create a great meal. Remember, you can customize this recipe easily. Explore different bread, toppings, or even vegan options. Enjoy your avocado toast adventures, and don’t forget to share your creations!

Avocado Toast with Poached Egg Perfectly Made Dish

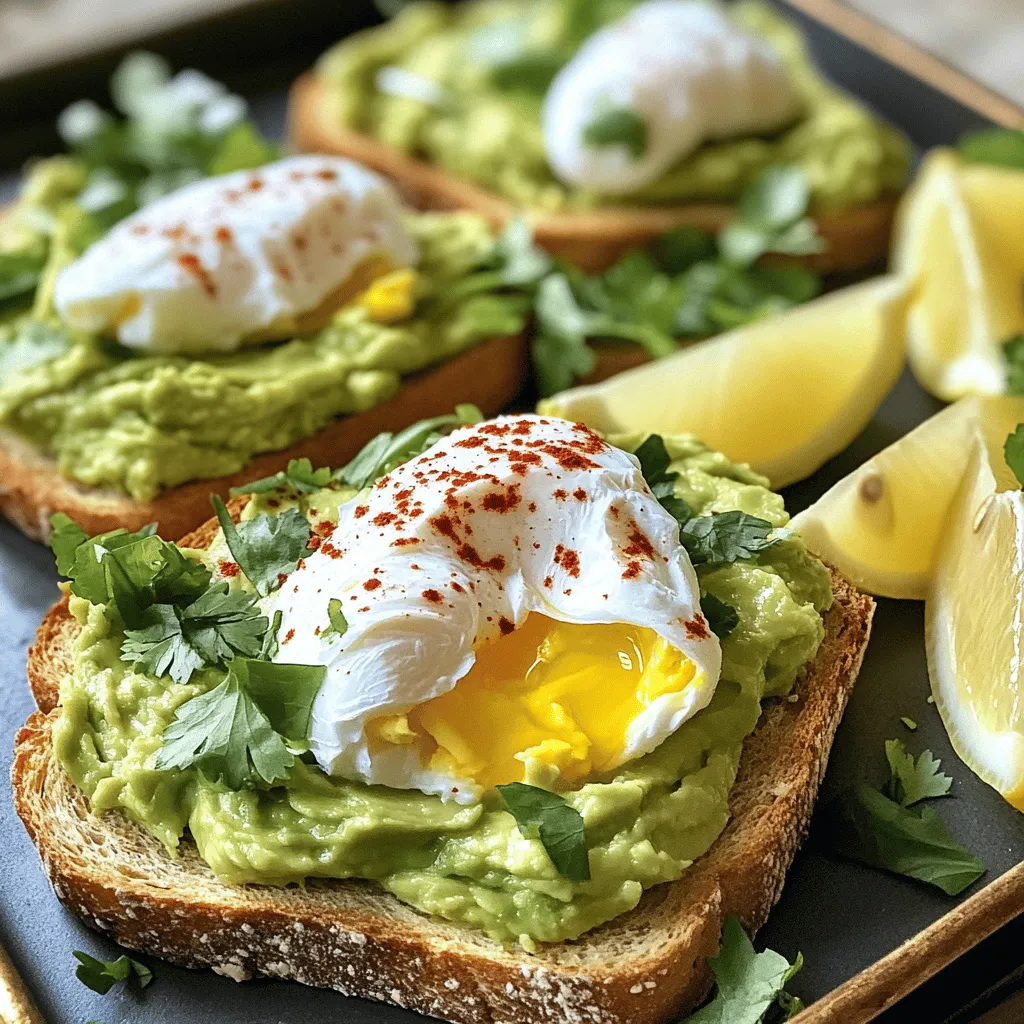
Avocado toast with a poached egg is the perfect breakfast. It’s healthy, tasty, and easy to make. You’ll love the

To make the Sweet Potato and Black Bean Chili, you need a mix of fresh and canned ingredients. Each adds to the hearty flavor. Here’s what you will need: - 1 large sweet potato, peeled and diced into 1-inch cubes - 1 can (15 oz) black beans, drained and rinsed thoroughly - 1 can (14.5 oz) diced tomatoes, with their juices - 1 medium onion, finely chopped - 3 cloves garlic, minced - 1 bell pepper (red or green), chopped into bite-sized pieces - 2 cups vegetable broth, low-sodium preferred - 1 tablespoon chili powder - 1 teaspoon ground cumin - 1 teaspoon smoked paprika - 1/2 teaspoon cayenne pepper (adjust according to your spice preference) - Salt and freshly ground black pepper to taste - 2 tablespoons extra virgin olive oil - Juice of 1 lime (about 2 tablespoons) - Fresh cilantro leaves, chopped, for garnish Each ingredient plays a key role. The sweet potato adds a creamy texture. Black beans bring protein and earthiness. Diced tomatoes add acidity and moisture. Onion and garlic create a deep, rich base. Bell pepper contributes crunch and sweetness. Vegetable broth makes the chili hearty. Spices like chili powder and cumin give warmth and depth. Olive oil enhances flavors and helps with cooking. Lime juice brightens the dish. Finally, cilantro adds freshness at the end. For the full recipe, check the detailed instructions to make this delicious meal! - Heating the oil: In a large pot, pour in the olive oil. Heat it over medium heat until it shimmers. This step helps enhance the flavors. - Sautéing vegetables: Add the chopped onion and bell pepper to the pot. Sauté for about five minutes. Stir often until the onion turns translucent. Then, add the minced garlic and cook for one to two more minutes. The aroma will fill your kitchen! - Incorporating sweet potatoes: Now, stir in the diced sweet potato. Mix everything well. Cook for another three to four minutes. This helps the sweet potatoes soften just a bit before the chili cooks fully. - Adding spices and tomatoes: Sprinkle the chili powder, cumin, smoked paprika, cayenne pepper, salt, and black pepper over the softened vegetables. Mix well to coat them. Then, pour in the diced tomatoes with their juices. This adds a rich flavor. - Simmering the chili: Pour in the vegetable broth next. Bring the mixture to a gentle simmer. Once it simmers, reduce the heat to low. Cover the pot and cook for about 15 to 20 minutes. Check if the sweet potatoes are tender. - Mixing in black beans: After the sweet potatoes are tender, stir in the drained black beans. Add the lime juice for some zest. Let the chili cook for another five minutes, just until the beans heat through. - Tasting and adjusting seasoning: Before you serve, taste the chili. Adjust the seasoning if needed. Add more salt, pepper, or lime juice as per your liking. - Serving and garnishing: Spoon the chili into bowls. Top it with chopped cilantro. This not only adds color but also a fresh flavor. Enjoy your hearty Sweet Potato and Black Bean Chili! For the full recipe, check the details above. To make your chili just right, adjust the cooking time. If you like your sweet potatoes very soft, add a few extra minutes. For a firmer bite, stick to the time in the recipe. You can also customize the spice level. If you want heat, add more cayenne pepper. If you prefer mild, cut back on the chili powder. Taste as you go, and find your perfect balance. When it comes to serving, consider some warm bread or rice on the side. Cornbread pairs well and adds a nice touch. You can also serve it over rice for a hearty meal. For serving containers, choose deep bowls. They hold the chili well and keep it hot. Look for bowls that are easy to hold, especially if you’re serving a crowd. This chili is rich in nutrients. Sweet potatoes provide fiber, vitamins, and minerals. They boost your immune system and support eye health. Black beans are a great source of protein and fiber, too. They help with digestion and keep you feeling full. Together, these ingredients create a healthy meal that tastes great. For more details, check the Full Recipe. {{image_4}} You can easily adapt this chili to fit your needs. For a vegan option, skip any meat and stick to the recipe. Sweet potatoes and black beans provide all the protein you need. If you want to add meat, ground turkey or beef works well. You can also use plant-based proteins like tempeh or lentils. These choices boost protein without losing flavor. To make your chili even better, think about adding other veggies. Corn, zucchini, or carrots can add nice textures. You can also try different spices to add a new twist. Consider adding oregano or coriander for a fresh taste. A splash of hot sauce can kick up the heat too! If you don’t have sweet potatoes, try using butternut squash. It has a similar sweetness and texture. When it comes to beans, canned black beans are quick and easy. But fresh beans can add more flavor; just cook them first. Using fresh tomatoes instead of canned can brighten the dish. Just remember to chop them well! For the complete recipe, check out the Full Recipe section. To store your Sweet Potato and Black Bean Chili, let it cool first. Place it in airtight containers. Glass or plastic containers work well. Make sure they are sealed tight to keep flavors fresh. You can store it in the fridge for up to five days. For long-term storage, freezing is a great option. First, let the chili cool completely. Then, transfer it to freezer-safe containers. Leave some space at the top for expansion. You can freeze it for up to three months. To thaw, move it to the fridge overnight. Reheat it on the stove over medium heat. Stir often to heat evenly. Sweet Potato and Black Bean Chili lasts about five days in the fridge. If you freeze it, it can last up to three months. Always check for changes in color or smell before eating. When stored properly, this chili will keep its hearty flavor and nutrition. Enjoy it whenever you crave a warm meal! For the full recipe, check here. Can I use frozen sweet potatoes? Yes, you can use frozen sweet potatoes. They save time and work well. Just add them straight to the pot without thawing. Adjust cooking time as needed since they may soften faster. What can I serve with Sweet Potato and Black Bean Chili? You can serve it with rice, cornbread, or tortilla chips. A dollop of sour cream or avocado adds creaminess too. Pairing it with a fresh salad brightens the meal. Is this chili spicy? The heat level depends on how much cayenne pepper you use. Start with less if you prefer milder chili. You can always add more spice later. How do I make it creamier? To make it creamier, blend a small portion of the chili. This will give it a smooth texture. You can also stir in a bit of cream or yogurt. Can I make this in a slow cooker? Yes, you can make this chili in a slow cooker. Combine all ingredients and cook on low for 6-8 hours. The flavors will blend nicely over time. What if I don't have black beans? If you don’t have black beans, use kidney beans or pinto beans instead. They add similar texture and flavor. Canned or cooked beans work well. Alternatives for tomatoes? If you lack diced tomatoes, crushed tomatoes are a great swap. You can also use tomato sauce for a smoother chili. Just ensure you adjust the liquid ratio. For the full recipe, check out the Sweet Potato and Black Bean Chili. This blog post covered a tasty Sweet Potato and Black Bean Chili. We explored the ingredients, from sweet potatoes to spices. I shared step-by-step instructions for preparation and cooking. Tips for storage and variations ensured flexibility. You learned about health benefits and how to serve this dish. In conclusion, enjoy making this chili your own. Customize it with your favorite flavors. With the right ingredients and techniques, you will create a dish everyone loves. Happy cooking!

Sweet Potato and Black Bean Chili Hearty Flavor Boost

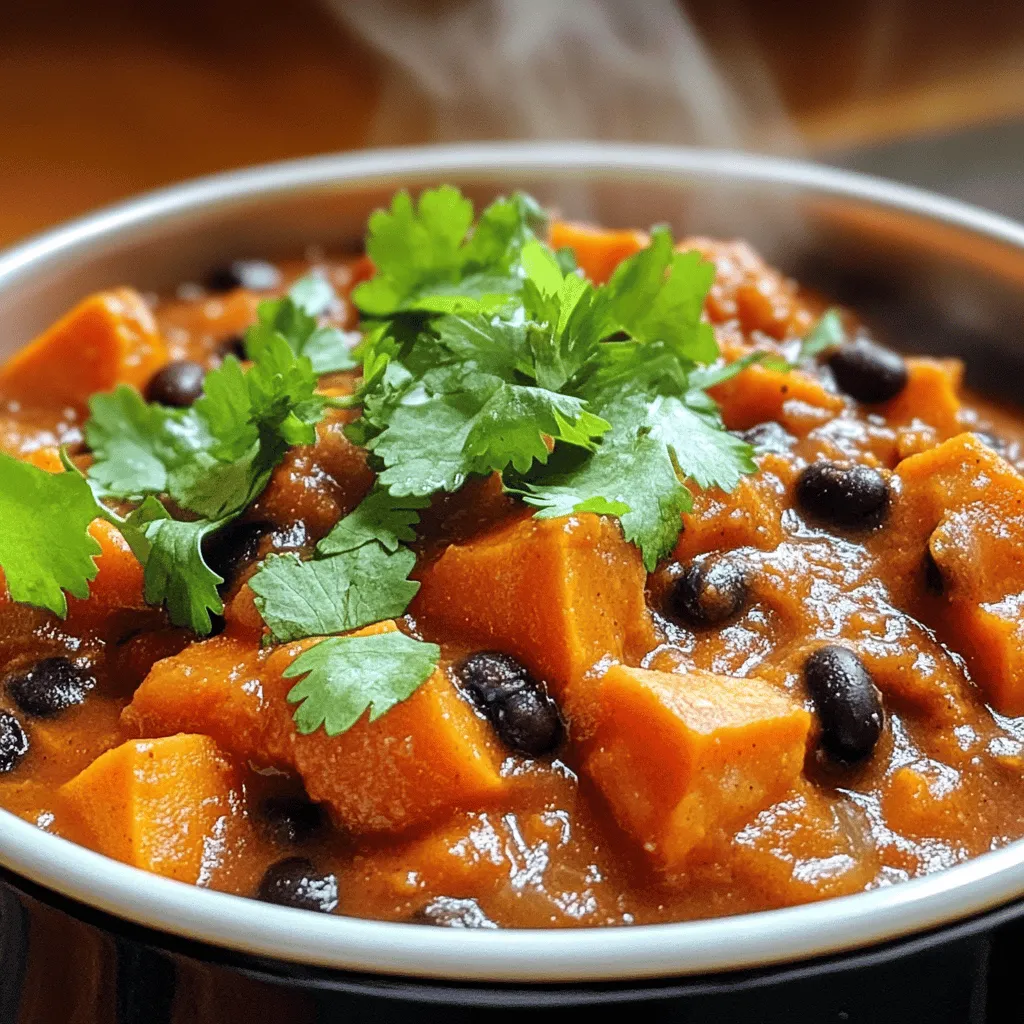
Craving a hearty, delicious meal that warms your soul? This Sweet Potato and Black Bean Chili is the answer! Packed

Older posts
Newer posts
← Previous Page1 … Page49 Page50 Page51 … Page68 Next →

dsad

© 2025 tastymomrecipes • Built with GeneratePress

Our Policies

  • Copyright Policy
  • Cookie Policy
  • GDPR Policy
  • Privacy Policy
  • Disclaimer
  • Terms Of Use

More Information

  • Home
  • About
  • Contact
  • Appetizers
  • Dessert
  • Dinner
  • Drinks
©2025, tastymomrecipes About Back To Top