Skip to content
DisclaimerTerms Of UseGDPR PolicyCookie Policy

tastymomrecipes

  • Home
  • Drinks
  • Appetizers
  • Dinner
  • Dessert
  • About
  • Contact
  • Privacy Policy
DisclaimerTerms Of UseGDPR PolicyCookie Policy

Olivia

- 1 lb Brussels sprouts, trimmed and halved - 3 tablespoons extra virgin olive oil - Sea salt and freshly cracked black pepper, to taste - 2 tablespoons sriracha sauce - 2 tablespoons pure honey - 2 teaspoons rice vinegar - 1 tablespoon toasted sesame seeds - 2 green onions, finely sliced Choosing fresh Brussels sprouts is key. Look for bright green, firm sprouts. Avoid any that are yellow or wilted. Using high-quality olive oil makes a big difference. Extra virgin olive oil adds depth to the dish. It enhances flavor without overpowering the Brussels sprouts. For sriracha, I recommend popular brands like Huy Fong or Trader Joe’s. These brands balance heat and flavor well. Adjust the amount based on your spice preference. 1. Preheat your oven to 400°F (200°C). A hot oven cooks the sprouts evenly. 2. Trim the Brussels sprouts by cutting off the stems. Then, slice them in half. This helps them roast better. - Take a baking sheet and line it with parchment paper. This makes clean-up easy. - Spread the halved Brussels sprouts on the sheet in a single layer. Leave space between each sprout to allow for even roasting. - Roast them in the oven for 20-25 minutes. Halfway through, give them a gentle toss. You want them golden-brown and tender. - While the sprouts roast, make the sriracha honey glaze. In a bowl, mix sriracha, honey, and rice vinegar. Whisk them until the mixture is smooth. - When the sprouts are done, drizzle the glaze over them. Toss gently to coat each sprout evenly. - Return the glazed sprouts to the oven for an extra 5 minutes. This makes the glaze sticky and enhances the taste. For the full recipe, check the full recipe section above! To ensure even cooking and caramelization, spread the Brussels sprouts in a single layer. This helps them roast well without steaming. Toss them halfway through cooking for a nice golden-brown color. If you like more spice, add extra sriracha to the glaze. Taste as you mix to find your perfect balance. These Brussels sprouts go great with grilled chicken or fish. They also pair well with rice or quinoa. For a colorful presentation, use a bright dish. Drizzle some leftover glaze over the sprouts for extra flavor. Garnish with sesame seeds and green onions for a pop of color and crunch. Brussels sprouts are low in calories. One cup has about 38 calories. They are also high in vitamins C and K. Honey adds natural sweetness and some antioxidants. Sriracha brings heat and flavor. Together, they make a healthy and tasty dish. {{image_4}} You can elevate your Sriracha Honey Brussels sprouts. Add garlic for a savory kick. Minced garlic brings great depth. Ginger is another option. It adds a fresh, zesty note. You can also try different sweeteners. Maple syrup works well, giving a richer flavor. Brown sugar can add a hint of caramel too. Feel free to switch out vegetables. Cauliflower or carrots can work beautifully. They roast the same way as Brussels sprouts. You can also use different vinegars for a unique taste. Balsamic vinegar adds sweetness, while apple cider vinegar gives a nice tang. Experimenting with these swaps can make the dish your own. You can easily make this dish vegan. Just use agave syrup instead of honey. The flavor will still shine through. For gluten-free options, ensure your sriracha is gluten-free. Most brands are safe, but check the label. These simple changes let everyone enjoy this dish. To store your Sriracha Honey Brussels Sprouts, first let them cool. Place them in an airtight container. This keeps them fresh and tasty. Refrigerate your sprouts within two hours of cooking. They will stay good for about 3 to 5 days. Reheating Brussels sprouts can be tricky. I recommend using an oven or an air fryer. Preheat the oven to 350°F (175°C). Spread the sprouts on a baking sheet. Heat for about 10 to 15 minutes. This method helps keep them crispy. Avoid using a microwave, as it can make them soggy. You can freeze roasted Brussels sprouts, but it changes their texture. To freeze, let them cool completely. Place them in a freezer-safe bag, removing as much air as possible. They will last for up to 3 months. Thaw them overnight in the fridge before reheating. Use the oven or air fryer for best results. For the full recipe, refer to the original guide. How to make Sriracha Honey Brussels Sprouts from scratch? To make Sriracha Honey Brussels Sprouts, gather your ingredients. You will need Brussels sprouts, olive oil, sea salt, black pepper, sriracha, honey, rice vinegar, sesame seeds, and green onions. Start by trimming and halving the Brussels sprouts. Toss them with olive oil, salt, and pepper. Roast them in a preheated oven at 400°F for 20-25 minutes. While they roast, mix sriracha, honey, and rice vinegar for the glaze. After roasting, coat the sprouts with the glaze and roast for another 5 minutes. Finally, add sesame seeds and green onions. You can find the full recipe [here](#). Can I make these Brussels sprouts ahead of time? Yes, you can prepare Brussels sprouts ahead of time. Roast them and store in the fridge. They stay good for about 3 days. Just reheat them in the oven to keep them crispy. What do Brussels sprouts pair well with? Brussels sprouts pair well with many dishes. They go great with roasted meats like chicken or pork. They also work well with grains like quinoa or rice. Add them to salads for extra crunch. Can I use other types of hot sauce instead of sriracha? Yes, you can use other hot sauces if you prefer. Try chili garlic sauce for a similar heat. Just remember to adjust the amount to match your taste. Why are my Brussels sprouts not crispy? If your Brussels sprouts are not crispy, they may be crowded on the baking sheet. Spread them out to allow air to circulate. Also, ensure your oven is properly preheated to achieve that golden-brown finish. How do I prevent them from getting mushy? To avoid mushy Brussels sprouts, do not overcook them. Stick to the roasting time. Use fresh, firm sprouts. If they sit too long after cooking, they can lose their texture. Serve them right after roasting for the best results. You now know how to make tasty Sriracha Honey Brussels sprouts. We covered the key ingredients, quality tips, and whether you can try substitutions. I shared step-by-step instructions to roast them perfectly. You also learned how to store and reheat any leftovers. These sprouts make a great side dish. They add fun flavors to many meals. Enjoy experimenting with different herbs and spices.

Sriracha Honey Brussels Sprouts Bold and Flavorful Dish

Get ready to elevate your vegetable game with my Sriracha Honey Brussels Sprouts! This bold and flavorful dish combines crispy

Here are the ingredients you will need to make your roasted vegetable pasta: - 2 cups mixed vegetables (zucchini, bell peppers, red onion, cherry tomatoes) - 3 cloves garlic - 2 tablespoons extra-virgin olive oil - Sea salt and black pepper - 1 teaspoon dried Italian seasoning - 8 ounces pasta (penne or fusilli) - 1/4 cup fresh Parmesan cheese (optional) - Fresh basil leaves for garnish Gathering these fresh ingredients helps create a vibrant dish. You can customize the vegetables based on what you like or what’s in season. Fresh herbs add a nice touch, giving the dish a bright flavor. For a creamier pasta, consider adding cheese. The full recipe will guide you through bringing these elements together. - Preheat the oven to 425°F (220°C). - Chop your mixed vegetables into small pieces. I love using zucchini, bell peppers, red onions, and cherry tomatoes. They add great color and taste. Next, mince the garlic and toss it with the veggies. Drizzle two tablespoons of olive oil over them. Sprinkle sea salt, black pepper, and Italian seasoning. Mix well so every piece gets coated. - Place seasoned vegetables on a baking sheet. - Roast for 20-25 minutes. Spread the vegetables evenly on your baking sheet. Make sure they are not crowded; this helps them roast well. Place the sheet in your preheated oven. Roast for 20 to 25 minutes. Stir them halfway through to ensure they cook evenly. They should turn golden and caramelized. - Boil water and cook pasta as per package instructions. - Reserve starchy pasta water. While the veggies roast, bring a large pot of salted water to a boil. Add 8 ounces of pasta, like penne or fusilli, and cook according to the package instructions. Once done, drain the pasta in a colander. Be sure to save about half a cup of that starchy pasta water for later. - Mix roasted vegetables with drained pasta. - Adjust consistency with reserved pasta water. In a large bowl, combine the roasted vegetables with the drained pasta. If the dish looks dry, add a splash of the reserved pasta water. Stir gently until everything is well mixed and has the right texture. - Add Parmesan cheese and toss gently. - Garnish with fresh basil leaves. To finish, sprinkle a quarter cup of grated Parmesan cheese over the pasta. Toss it gently so the cheese melts slightly. For a fresh touch, add torn basil leaves as a garnish. Now, your roasted vegetable pasta is ready to enjoy! For the full recipe, check out the section above. To get the best out of your roasted vegetables, cut them into even sizes. Aim for 1-inch pieces. This helps them cook at the same rate. For caramelization, use a hot oven. Roasting at 425°F (220°C) works well. Give the veggies space on the baking sheet. Crowding them can lead to steaming instead of roasting. Cook your pasta al dente. This means it should have a slight bite. Overcooked pasta can turn mushy when mixed with roasted vegetables. To keep some pasta water, reserve about 1/2 cup before draining. This starchy water helps bind the dish and adds flavor. To add extra flavor, consider spices like red pepper flakes or smoked paprika. Fresh herbs like thyme or rosemary can also brighten the dish. Using flavored oils, like garlic-infused olive oil, can make a big difference. Drizzle a bit over your veggies before roasting for added depth. {{image_4}} You can use any seasonal vegetables you like. Fresh asparagus, carrots, or eggplant work well. These veggies add color and taste. If you want to swap out, try using broccoli or cauliflower. They roast nicely too. For those with special diets, think about using mushrooms or spinach. These options are rich in nutrients and flavor. You can also mix in some sweet potatoes for a touch of sweetness. When it comes to pasta, you have choices. For gluten-free options, try rice or chickpea pasta. They cook well and taste great. Whole grain pasta is another good choice. It adds extra fiber and a nutty flavor. You can also explore lentil or quinoa pasta. These alternatives boost protein and keep the dish light and healthy. To enhance your meal, add grilled chicken or shrimp. These proteins pair well with the roasted vegetables. Cook them simply with salt and pepper for a nice taste. If you prefer plant-based proteins, consider chickpeas or tofu. Both options are filling and add good texture. You can sauté tofu with soy sauce for added flavor. To keep your roasted vegetable pasta fresh, store it in the fridge. Place it in an airtight container. This helps prevent moisture loss and keeps flavors intact. Aim to eat it within three days for the best taste. When reheating, use the stovetop for the best texture. Add a splash of water or broth to the pan. This keeps the pasta from drying out. Stir often until heated through. For a quick fix, you can use the microwave. Heat in short bursts, stirring in between. This helps the dish heat evenly. To refresh leftover pasta, add a dash of olive oil or a sprinkle of fresh herbs. It adds flavor and moisture. If you want to save some for later, freezing is a great option. Allow the pasta to cool completely. Then, portion it into freezer-safe bags or containers. Squeeze out as much air as possible before sealing. This will help avoid freezer burn. To thaw, place the container in the fridge overnight. For faster results, run warm water over the sealed bag. When ready to eat, reheat on the stovetop or in the microwave, adding a little water or broth for moisture. Enjoy your roasted vegetable pasta anytime, whether fresh or frozen! You can find the Full Recipe to guide you through the process. Yes, you can easily make this dish vegan. To replace the cheese, use nutritional yeast. This adds a cheesy flavor without dairy. You can also swap the pasta for a gluten-free option if needed. Make sure to check all labels to avoid hidden dairy in ingredients. To add heat, try red pepper flakes or chopped fresh chili. Mix these into the olive oil before roasting the vegetables. If you like a smoky flavor, add smoked paprika. You can also serve the final dish with hot sauce on the side for extra spice. A simple green salad pairs nicely with this pasta. You can include leafy greens, cucumbers, and a light vinaigrette. Garlic bread is another great option for a hearty meal. Grilled vegetables or a light soup can also complement the flavors well. Roasted vegetable pasta lasts about 3 to 5 days in the fridge. Store it in an airtight container to keep it fresh. Always check for signs of spoilage before eating leftovers. Reheat gently to maintain the texture. Yes, you can use frozen vegetables for this recipe. They are convenient and save time. However, they may release more water when cooked, making the dish a bit soggier. If using frozen, roast them for a shorter time. This helps them crisp up better. Roasted vegetable pasta is simple and rewarding. You learned about key ingredients, cooking steps, and storage tips. Each step helps you create a tasty dish that's healthy too. Remember, you can customize with different veggies or pasta types. Also, storing leftovers properly will keep your meal fresh. Enjoy creating this versatile dish that suits your taste. Your kitchen adventures await with endless variations!

Roasted Vegetable Pasta Quick and Flavorful Meal

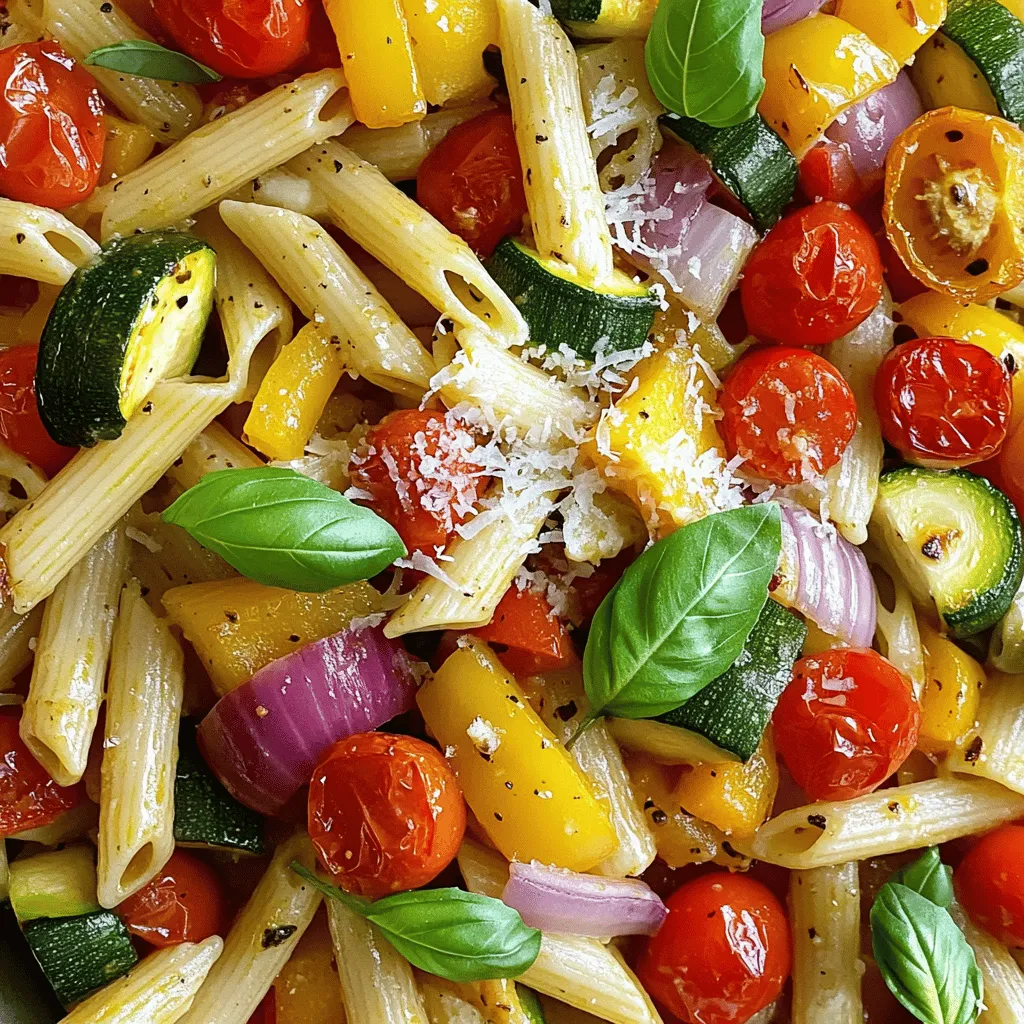
Looking for a quick and tasty meal? Let me introduce you to Roasted Vegetable Pasta! This dish bursts with flavor

- Chicken thighs, bone-in and skin-on - Scallions, garlic, and onion - Scotch bonnet peppers and fresh thyme - Spices: allspice, cinnamon, nutmeg - Soy sauce, extra virgin olive oil, and lime juice - Salt and pepper to taste When I make jerk chicken, I choose chicken thighs. They stay juicy and flavorful. You’ll want to use bone-in, skin-on thighs. This helps keep the meat moist while grilling. Next, I grab fresh scallions, garlic, and onion. They add a strong base flavor. Then, I reach for Scotch bonnet peppers. They bring heat, so adjust the amount to fit your taste. Fresh thyme is key for that authentic taste. I also use spices like allspice, cinnamon, and nutmeg. These spices create a warm and inviting flavor profile. For the marinade, I need soy sauce, extra virgin olive oil, and lime juice. These ingredients help tenderize the chicken. Don’t forget salt and pepper to taste. You can find the full recipe online to make this delicious dish. With these ingredients ready, you’re all set for a flavorful grilling adventure! To start, gather your ingredients: scallions, garlic, onion, Scotch bonnet peppers, thyme, and spices. Next, add these items to a food processor. Blend them until you achieve a smooth consistency. The result should be a fragrant marinade that is thick and vibrant. Now, take your chicken thighs and place them in a zip-lock bag or a deep bowl. Pour the marinade over the chicken, ensuring every piece gets coated well. Seal the bag tightly or cover the bowl with plastic wrap. You should marinate the chicken for at least 2 hours. For the best flavor, let it sit overnight. When you are ready to grill, preheat your grill to medium-high heat. Remove the chicken from the marinade, letting any excess drip off. Place the chicken thighs skin-side down on the grill. Grill each side for about 7-10 minutes. Check the internal temperature; it should reach 165°F (75°C). The skin should look crispy and golden-brown. Once done, take the chicken off the grill and let it rest for 5-10 minutes. This helps keep the meat juicy. Enjoy your jerk chicken hot with sides like coconut rice or grilled veggies. For the detailed recipe, refer to the Full Recipe. To get the right heat in your jerk chicken, use Scotch bonnet peppers. These peppers pack a punch! Start with one and taste. If you like it spicier, add more. Remember, the heat builds over time, so be cautious. Marinating is key for flavor. I recommend marinating the chicken for at least two hours. For the best taste, leave it overnight. This gives the spices time to soak in. You’ll notice a big difference! For crispy skin, place the chicken skin-side down on the grill first. This helps it get nice and crunchy. Don’t flip it too soon; let it cook for about 7-10 minutes before turning. Using a meat thermometer is smart. Check the thickest part of the chicken. When it hits 165°F (75°C), it’s done! This tool helps you avoid undercooking or overcooking. Jerk chicken pairs well with many sides. Coconut rice and peas are a classic choice. Grilled vegetables also make a colorful plate. For garnishing, add lime wedges and fresh herbs on the side. This adds a pop of color and freshness. Your plate will look as good as it tastes! For the full recipe, check out the [Full Recipe]. {{image_4}} For jerk chicken wings, you can use the same marinade from the full recipe. The cooking method is simple. Grill them for about 10-12 minutes. Flip them halfway for even cooking. The wings should be crispy and have an internal temp of 165°F (75°C). You can tweak the sauce too. Try adding honey for sweetness or lime juice for tang. These little changes can bring new life to your wings. Jerk chicken tacos are a fun twist. Start with shredded jerk chicken as your base. Use warm corn or flour tortillas to wrap it. For a great assembly, add diced onions, fresh cilantro, and avocado slices. Don't forget the toppings! A drizzle of lime crema or mango salsa can elevate your tacos. These flavors pop and make the dish exciting. If you want to switch things up, try using pork or tofu. For pork, choose thick chops or tenderloin. The cooking time will be similar, but always check for doneness. For tofu, use firm or extra-firm tofu for the best texture. Adjust the marinade if needed. Tofu soaks up flavors well, so marinate it for at least 30 minutes. This way, you’ll get a tasty dish regardless of the protein you choose. To keep your jerk chicken fresh, store it in the fridge. Place it in an airtight container. This helps keep the chicken juicy and flavorful. It will last for about three to four days. If you have more, consider freezing it. Wrap each piece in plastic wrap, then put it in a freezer bag. Jerk chicken can stay frozen for up to three months. Remember to label the bags with the date. When you reheat jerk chicken, you want to keep it moist. The best way is to use an oven. Preheat it to 350°F (175°C). Place the chicken in a baking dish, add a splash of water, and cover it with foil. Heat for about 20 minutes or until warm. You can also use a microwave, but be careful. Heat in short bursts and cover it to avoid drying out. Food safety is important with leftovers. Always check for signs of spoilage before eating. Look for off smells or changes in texture. If it seems off, throw it away. Always reheat chicken to at least 165°F (75°C) to kill any bacteria. Keep your fridge at 40°F (4°C) or below to ensure safety. Jerk chicken comes from Jamaica. It has roots in the Maroons, runaway slaves who used spices to preserve meat. They made jerk cooking a part of their culture. The method involves marinating and slow-cooking meat over pimento wood. Today, jerk chicken is a beloved dish across the Caribbean and beyond. Yes, you can. If you can't find Scotch bonnet peppers, use habanero peppers. They have a similar heat level. For less heat, try jalapeños or bell peppers. Adjust the number of peppers to fit your taste. Marinate your chicken for at least 2 hours. For deeper flavor, let it sit overnight. This helps the spices soak into the meat. Longer marination means a stronger taste. Great sides for jerk chicken include coconut rice and peas. Grilled vegetables also work well. You can add a fresh salad or plantains for variety. These sides balance the spicy flavors of the chicken. For the full recipe, check out the details above! This blog post covered the key ingredients and steps for making delicious jerk chicken. You learned how to prepare the marinade, marinate the chicken, and grill it perfectly. Tips on variations and storage ensure you can enjoy your meal for days. Remember, the right spices and techniques provide great flavor. Whether you make tacos or wings, jerk chicken is a tasty choice. Enjoy experimenting with this dish, and let your creativity shine!

Caribbean Jerk Chicken Flavorful Grilling Guide

Get ready to fire up the grill! This guide to Caribbean Jerk Chicken will help you create mouth-watering, flavorful meals

- 8 oz rice noodles - 2 tablespoons vegetable oil - 3 cloves garlic, minced - 1 red bell pepper, thinly sliced - 1 cup snap peas, ends trimmed - 1 tablespoon fresh ginger, finely grated - 1-2 Thai bird chilies, finely chopped - 3 tablespoons soy sauce - 1 tablespoon fish sauce - 1 tablespoon brown sugar - 1 cup fresh Thai basil leaves - Fresh lime wedges, for serving - Chopped peanuts, for garnish (optional) Choosing the best rice noodles: Look for rice noodles that are white and smooth. They should not have any dark spots. Fresh noodles are soft and pliable. Dried noodles work, but check the cooking time. Selecting ripe vegetables: Choose red bell peppers that are firm and shiny. Snap peas should feel crisp and snap easily when bent. Look for bright colors, as they signal freshness. Freshness of herbs and spices: Thai basil should smell sweet and look vibrant. Avoid leaves that are wilted or brown. Fresh ginger should be firm and smooth. For chilies, pick ones that are bright and unblemished. Fresh ingredients make a big difference in flavor. Use this guide to elevate your spicy Thai noodles. For the full recipe, check out the detailed instructions. To start, cook the rice noodles. Follow the package directions carefully. When the noodles are soft, drain them in a colander. Rinse the noodles under cold water. This step stops the cooking and helps keep them firm. Cooling the noodles is key. It prevents them from getting mushy later on. Next, heat vegetable oil in a large wok. Use medium-high heat for the best results. Add minced garlic and grated ginger. Stir them for about 30 seconds. You want to watch for a golden color. This shows they are fragrant and ready to use. Now, it’s time for the vegetables. Add sliced red bell pepper and snap peas to the wok. Stir-fry for 3 to 4 minutes. Keep the veggies crisp, but let them soften a bit. Stirring often helps cook them evenly. Next, mix in the spice. Add chopped bird chilies, soy sauce, fish sauce, and brown sugar. Stir everything well for 1 to 2 minutes. This allows the flavors to blend. If you like more heat, add more chilies. Adjust the spice to match your taste. Finally, add the rice noodles to the wok. Toss them well with the vegetable mixture. Stir-fry for an extra 2 to 3 minutes. This heats the noodles and coats them with sauce. Remove the wok from heat and gently fold in the fresh Thai basil leaves. Stir until the basil wilts and releases its lovely smell. Enjoy your flavorful dish! You can find the Full Recipe for more details. To make spicy Thai noodles shine, focus on balancing flavors. You want sweetness, saltiness, and spice all to sing together. Use brown sugar for a sweet touch. The soy sauce adds salt, and the bird chilies bring the heat. Adjust each element to your taste as you mix. For a restaurant-style finish, cook on high heat. This gives the noodles a nice char. Stir constantly to avoid burning. Keep the veggies crisp but tender. This contrast makes each bite delightful. Pair your spicy Thai noodles with fresh lime wedges. The acidity brightens the dish. You can also serve them with a side of cucumber salad or spring rolls. These add crunch and freshness. For presentation, use a vibrant bowl. Arrange noodles neatly and sprinkle with chopped peanuts. A few basil leaves on top add color and fragrance. The lime wedges beside the dish look great too! You will need a large wok or deep skillet. This helps in cooking the noodles evenly. A spatula or tongs makes it easy to toss everything. Consider using a sharp knife for slicing veggies. A cutting board is essential for safety. If you have a colander, it helps drain the noodles without mess. With these tools, you’ll create perfect spicy Thai noodles every time. {{image_4}} You can easily swap some ingredients to fit your taste. For fish sauce, try using soy sauce. This change works well for a vegetarian dish. If you want more flavor, consider using a mix of soy sauce and a little bit of lime juice. You can also change the vegetables and proteins. Instead of red bell pepper, use carrots or bok choy. For protein, try chicken, tofu, or shrimp. Each option brings a unique twist to the dish. Thai food has many styles. Each region adds its own twist to noodle dishes. In the north, they often use thicker noodles with a rich sauce. In the south, dishes may include coconut milk and seafood, making them creamy and spicy. You can find spicy noodle options too. For instance, the Pad Kee Mao, or drunken noodles, is famous for its heat. This dish uses wide rice noodles and has a bold flavor that many love. If you need a gluten-free recipe, don’t worry. You can use gluten-free rice noodles. They work great in this dish. Just follow the same cooking steps as regular noodles. Look for options made from brown rice or mung beans. These noodles have a nice bite and hold up well when cooked. You won’t lose flavor or texture when you make this simple swap. To keep your spicy Thai noodles fresh, follow these steps: - Cool Down: Let the noodles cool to room temperature. - Use Airtight Containers: Store them in airtight containers. This helps keep moisture out. - Refrigerate: Place the containers in the fridge within two hours of cooking. They stay fresh for about 3-4 days. When it’s time to enjoy leftovers, here’s how to reheat them: - Stovetop Method: Heat a pan over medium heat. Add a splash of water or oil. Toss the noodles in and stir until warm. - Microwave Method: Place noodles in a microwave-safe bowl. Add a little water. Cover with a lid or microwave-safe wrap. Heat in short bursts, stirring in between. To keep noodles flavorful, avoid microwaving for too long. This prevents them from becoming mushy. Freezing spicy Thai noodles can be a great way to save extra portions: - Freeze in Portions: Divide noodles into meal-sized portions. Use freezer-safe bags or containers. - Label and Date: Write the date on each bag. They stay good for up to three months. When you’re ready to eat, thaw them overnight in the fridge. To reheat, follow the stovetop method. This keeps the noodles nice and tasty. Spicy Thai noodles are a tasty dish made with rice noodles and bold flavors. The dish often has garlic, ginger, and fresh herbs. Thai bird chilies add heat, making the dish spicy. You can also find sweet and salty notes from soy sauce and sugar. Each bite offers a mix of textures and tastes. The fresh Thai basil gives it a unique, aromatic touch. This dish is popular in Thai cuisine for its balance of flavors. To reduce the heat, start by using fewer Thai bird chilies. You can also remove the seeds and ribs, which hold most of the heat. Adding more vegetables, like bell peppers or snap peas, can help balance the spice. Another trick is to mix in a bit of extra sugar or a splash of coconut milk. This will soften the heat without losing taste. Taste as you go to find your perfect level of spice. Yes, you can make spicy Thai noodles ahead of time. Cook the noodles and store them separately from the sauce and veggies. This helps keep everything fresh. You can store the noodles in the fridge for up to three days. When you want to eat, just warm them up in a pan. Add a splash of water or broth to keep them moist. Mix in the sauce and veggies before serving for best results. Spicy Thai noodles pair well with many sides. Try spring rolls or a fresh salad for a light touch. You can also serve them with a spicy cucumber salad. A bowl of coconut soup can balance the heat nicely. For a heartier meal, consider grilled chicken or shrimp. These proteins add flavor and make the meal more filling. Mix and match to create a tasty spread. You can find the Full Recipe for spicy Thai noodles in the recipe section of this article. It provides detailed steps and ingredient lists to help you cook this dish with ease. Following the Full Recipe will guide you to making a delicious meal that impresses. You learned how to make delicious spicy Thai noodles. We covered the best ingredients, tips for cooking, and serving ideas. Remember to pick fresh veggies and perfect your flavors for a great meal. Explore different variations and know how to store leftovers for next time. With these steps, you can enjoy a tasty dish that impresses everyone. Now, it’s your turn to create this flavorful meal!

Spicy Thai Noodles Flavorful and Simple Dish Recipe

Looking for a tasty meal that’s quick to make? Spicy Thai Noodles hit the spot! This colorful dish bursts with

To create cheesy spinach stuffed shells, you need a few simple items. These ingredients blend together to give you a tasty and satisfying dish. Here is what you will need: - 20 jumbo pasta shells - 2 cups fresh spinach, finely chopped - 1 cup creamy ricotta cheese - 1 cup shredded mozzarella cheese (plus an additional 1/2 cup for topping) - 1/2 cup grated parmesan cheese (plus an additional 1/4 cup for topping) - 1 large egg, beaten - 1 teaspoon garlic powder - 1 teaspoon onion powder - Salt and freshly cracked black pepper to taste - 2 cups rich marinara sauce - Fresh basil leaves, for garnish Each ingredient plays a role in making the dish rich and flavorful. The spinach adds a healthy touch, while the cheeses create a creamy filling. The egg helps bind everything together for a perfect texture. Don’t forget to use fresh herbs for garnish, as they elevate the dish's appeal. For exact measurements and more details, check out the Full Recipe. - Step 1: Preheat your oven to 375°F (190°C). This helps the cheese melt just right. - Step 2: Cook the jumbo pasta shells in boiling water until they are al dente. Drain them carefully and place them on a paper towel to absorb any extra water. - Step 3: In a large mixing bowl, combine fresh spinach, ricotta cheese, 1/2 cup of mozzarella, 1/4 cup of parmesan, the beaten egg, garlic powder, onion powder, salt, and pepper. This mix gives great flavor! - Step 4: Stir all the ingredients together until the mixture is smooth and everything is mixed well. - Step 5: Pour 1 cup of marinara sauce into the bottom of a 9x13 inch baking dish. This keeps the shells moist while baking. - Step 6: Take each cooked shell and fill it with the spinach and cheese mixture. Press gently so it fills well. Place the stuffed shells seam side up in the dish. - Step 7: Pour the remaining marinara sauce over the stuffed shells. Make sure each one is covered in sauce. - Step 8: Sprinkle the rest of the mozzarella and parmesan cheese on top for a gooey finish. Cover the dish with foil to keep the moisture in. - Step 9: Bake the dish for 25 minutes with the foil on. Then, remove the foil and bake for an extra 10-15 minutes. The cheese should be melted and golden brown. - Step 10: Let the dish cool for a few minutes. Finish by garnishing with fresh basil leaves for a pop of color and flavor. Enjoy this easy and satisfying dish anytime! For a detailed recipe, check the Full Recipe section. - Use fresh spinach for best flavor. Fresh spinach packs a punch in taste and nutrients. - Ensure pasta is al dente to prevent overcooking. This keeps the shells from becoming mushy. - Serve with garlic bread or a side salad. Both add great texture and flavor. - Drizzle extra marinara sauce for presentation. This makes the dish look more appealing. - Substitute with different cheese blends. Try using gouda or cheddar for unique flavors. - Add ricotta or goat cheese for a twist. These cheeses add creaminess and depth to the filling. For a complete guide, check the Full Recipe for Cheesy Spinach Stuffed Shells. {{image_4}} You can easily add protein to your cheesy spinach stuffed shells. Cooked chicken or sausage gives a nice boost. Simply chop them and mix into the cheese filling. For a vegetarian option, try using beans like black beans or chickpeas. They add protein and keep the dish hearty. If you need a gluten-free dish, use gluten-free jumbo shells. They work just as well as regular shells. Another fun option is to use zucchini boats instead of pasta. Cut the zucchini in half, scoop out some flesh, and fill them like you would with the shells. Switching up the sauce can change the whole dish. Try using Alfredo sauce for a creamy twist. You can also use pesto for a fresh, herby flavor. Each sauce offers a unique taste that pairs well with the cheesy filling. Try these variations for a fun and unique meal. For the full recipe, check out the details above! Store leftovers in an airtight container in the fridge for up to 3 days. This keeps the flavors locked in and the dish fresh. When you’re ready to eat, just take it out and enjoy. You can freeze the stuffed shells for up to 2 months before baking. Just make sure to wrap them well. When you’re ready to eat, thaw them in the fridge overnight. Then, bake them according to the recipe instructions. To reheat, you can use the oven or the microwave. For the oven, preheat to 350°F (175°C) and heat until warm. This ensures the cheese stays nice and gooey. In the microwave, heat in short bursts to avoid overcooking. Enjoy your cheesy spinach stuffed shells just like they were fresh out of the oven! You can easily make Cheesy Spinach Stuffed Shells vegetarian by swapping out meat-based ingredients. Use mushrooms or add extra vegetables like zucchini and bell peppers. This will keep the dish hearty and flavorful without meat. Yes, you can prepare these shells in advance. Simply assemble them and then refrigerate or freeze. When you're ready to bake, just pop them in the oven. This saves time on busy days. To prevent pasta shells from breaking, cook them al dente. This means they should be firm but not hard. Also, handle them gently when stuffing. This will keep the shells intact while you fill them with that cheesy goodness. You can customize the flavors of your stuffing by trying different herbs and spices. Add fresh basil, oregano, or even a pinch of red pepper flakes for heat. This lets you create a stuffing that fits your taste perfectly. For the full recipe, check out the detailed instructions above! In this article, we covered how to make Cheesy Spinach Stuffed Shells. You learned about the fresh ingredients, from creamy ricotta to rich marinara sauce. I shared step-by-step instructions to ensure perfect results. Tips for serving and variations help you customize this dish. Store any leftovers for later enjoyment. Now, get ready to try this delicious recipe! You'll impress your family or friends. Enjoy every bite of this comforting meal!

Cheesy Spinach Stuffed Shells Flavorful and Simple Dish

Are you ready to indulge in a warm, cheesy delight? Cheesy Spinach Stuffed Shells are not only delicious but also

For a great Buffalo Chicken Dip, you need simple but flavorful items. Here are the main ingredients: - 2 cups cooked chicken, shredded - 8 oz cream cheese, softened to room temperature - 1/2 cup sour cream - 1/2 cup ranch dressing (or blue cheese dressing for a twist) - 1/2 cup buffalo sauce (adjust to your desired level of heat) - 1 cup shredded sharp cheddar cheese - 1/4 cup green onions, finely chopped (for a fresh garnish) - Tortilla chips or crunchy celery sticks for dipping These ingredients create a rich and creamy dip with a spicy kick. The chicken adds protein, while the cheese gives a nice, gooey texture. You can customize your dip with optional ingredients. Consider these alternatives: - Use Greek yogurt instead of sour cream for a healthier option. - Swap ranch dressing for blue cheese dressing if you like bold flavors. - Add diced jalapeños for extra heat. - Mix in some cooked bacon for a smoky touch. These substitutions can change the flavor while keeping the dip delicious. Choosing the right ingredients makes a big difference. Here are some tips: - Pick fresh chicken, ideally cooked at home. This adds great flavor and texture. - Choose high-quality cream cheese for smoothness. - Look for full-fat sour cream and cheese for creaminess. - Use a trusted brand for buffalo sauce that matches your heat preference. Quality ingredients ensure a tasty dip that everyone will enjoy. Don't forget to check the freshness of your green onions for the best garnish! To start, gather all your ingredients. You need: - 2 cups cooked chicken, shredded - 8 oz cream cheese, softened - 1/2 cup sour cream - 1/2 cup ranch dressing (or blue cheese dressing for a twist) - 1/2 cup buffalo sauce - 1 cup shredded sharp cheddar cheese - 1/4 cup green onions, finely chopped - Tortilla chips or crunchy celery sticks for dipping First, preheat your oven to 350°F (175°C). This step ensures your dip cooks evenly. Next, shred your cooked chicken, if you haven’t done so already. Shredding helps mix it well with the other ingredients. In a large mixing bowl, combine the softened cream cheese, sour cream, ranch dressing, and buffalo sauce. Use a hand mixer or spatula to blend until the mixture is smooth. This creamy base is the heart of the dip. Now, fold in the shredded chicken and half of the cheddar cheese. Mix gently to keep a nice texture. You want every bite to have a bit of chicken and cheese. Pour the mixture into a baking dish. Spread it out evenly for even cooking. Now, sprinkle the remaining cheddar cheese over the top. This layer will melt into a delicious, cheesy crust. Place the baking dish in the oven and bake for 20-25 minutes. Look for bubbling edges and a golden top. This is when the dip is ready. After baking, remove the dish from the oven. Let it cool for about 5 minutes. This step helps the flavors settle. While it cools, chop the green onions for garnish. When ready to serve, sprinkle the green onions on top. This adds color and a fresh taste. Serve the dip warm with tortilla chips or celery sticks. Your guests will love diving into this tasty treat! For the full recipe, check out the details above. To get a creamy dip, start with softened cream cheese. This helps blend well with other ingredients. Use a hand mixer for a smooth result. Mix until there are no lumps left. You can add sour cream to enhance the creamy feel. If you want more flavor, try using flavored cream cheese. Buffalo chicken dip tastes great with many sides. I love serving it with crunchy tortilla chips. Fresh celery sticks also add a nice crunch. You can even use pita bread for a fun twist. For a colorful touch, add sliced veggies around the dip. This makes the spread look inviting and fun! Reheating this dip is easy. Place it in a microwave-safe bowl. Heat it in short bursts of 30 seconds. Stir after each burst until warm. You can also reheat it in the oven. Just cover it with foil and bake at 350°F for 15 minutes. This keeps it from drying out. Enjoy your tasty dip again! For the full recipe, refer to the Buffalo Chicken Dip Extravaganza. {{image_4}} You can switch up the flavor by adding different cheeses. Try using mozzarella for a gooey stretch. Gouda adds a rich, smoky taste. Feta brings a nice tangy twist. Mixing these cheeses will make your dip even more exciting. You can also blend in cream cheese for extra creaminess. Just remember, balance the flavors so they complement each other well. Buffalo Chicken Dip is great with more than just chicken. You can use shredded turkey for a lighter option. Pulled pork gives a sweet and smoky taste. If you prefer plant-based meals, try chickpeas or tofu for a vegan twist. Just ensure you season them well to capture that classic buffalo flavor. Each protein will give a unique spin to your dip. To kick up the heat, adjust the amount of hot sauce. Start with a small amount and taste as you go. If you like it fiery, add more until it’s perfect for you. Consider using different brands of hot sauce for varied flavors. Some sauces have fruity notes, while others pack more heat. Experiment to find your preferred balance of spice. To store leftover Buffalo Chicken Dip, let it cool first. Once it’s cool, transfer it to an airtight container. Cover the dip tightly. You can keep it in the fridge for up to three days. Make sure to label the container with the date for easy tracking. You can freeze Buffalo Chicken Dip for later use. Place the cooled dip in a freezer-safe container. Be sure to leave some space at the top. This allows for expansion as it freezes. It will stay fresh for about three months. When you’re ready to enjoy it, thaw it in the fridge overnight before reheating. Reheating Buffalo Chicken Dip is simple. You can use an oven or a microwave. For the oven, preheat it to 350°F (175°C). Place the dip in a baking dish and cover it with foil. Heat for 15-20 minutes or until it's hot. If you use a microwave, heat in 30-second intervals, stirring in between. Enjoy your dip warm with chips or veggies! Yes, you can make Buffalo Chicken Dip ahead of time. Prepare the dip and store it in the fridge. Just cover it well with plastic wrap or a lid. You can keep it for up to two days. When you are ready to serve, bake it as directed in the Full Recipe. This saves time and lets the flavors meld together. If you want a change, use blue cheese dressing instead of ranch. The dip will still taste great with its bold flavor. You can also try Greek yogurt for a lighter option. This swap keeps the dip creamy while adding a touch of healthy goodness. Buffalo Chicken Dip is gluten-free as long as you use gluten-free ingredients. The main ingredients, like chicken and cheese, are safe. However, check the labels on the ranch dressing and buffalo sauce. Some brands may contain gluten. Pair the dip with gluten-free chips or veggies for a tasty snack. You learned about the key ingredients for Buffalo Chicken Dip and how to choose them. We covered easy steps for prepping, mixing, and baking your dip. I shared tips for a creamy texture and how to serve it. You can customize it with different cheeses or proteins. Lastly, I explained storage and reheating to keep it fresh. With these insights, you can create a tasty dip for any event. Have fun making it your own!

Buffalo Chicken Dip Flavorful Party Favorite Recipe

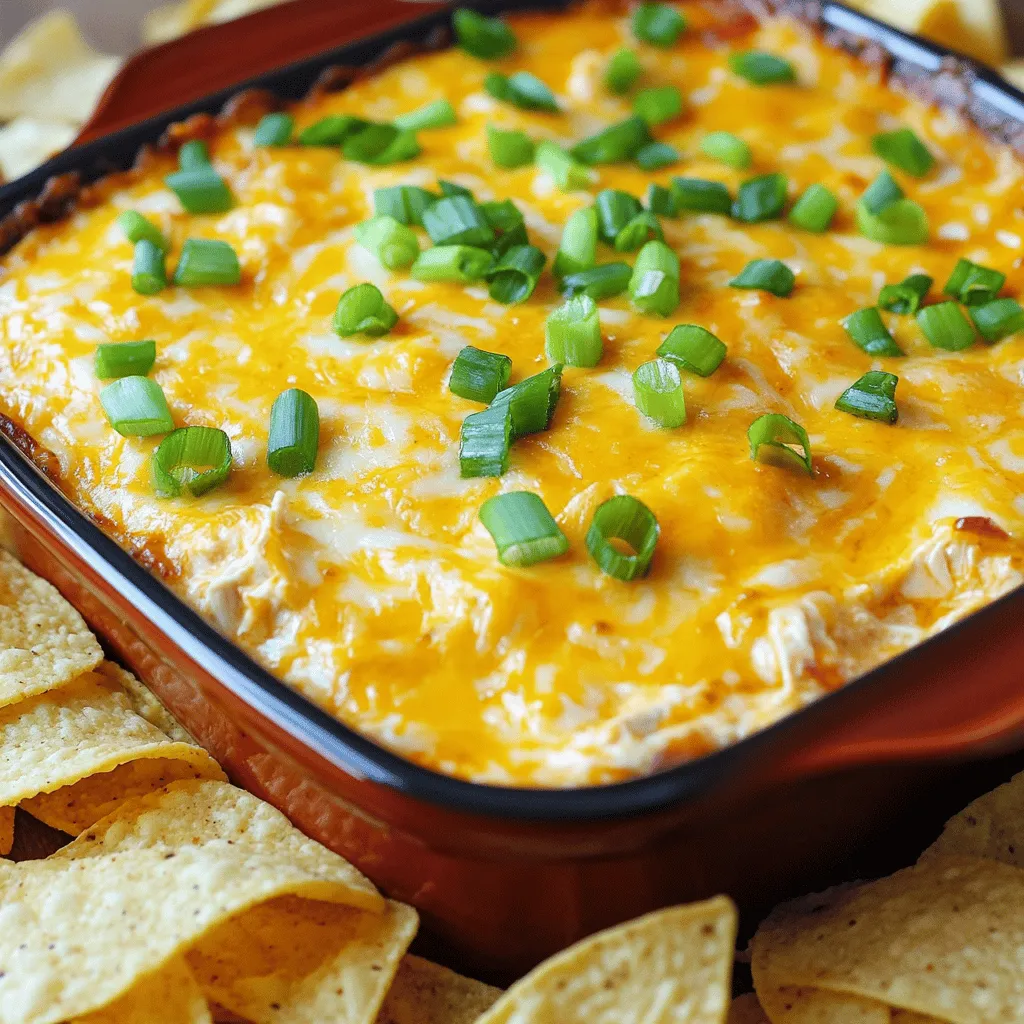
Looking for a dish that will steal the show at your next gathering? Buffalo Chicken Dip is a crowd-pleaser that

- 1 lb boneless, skinless chicken thighs, diced into bite-sized pieces - 1 teaspoon chili powder - 1 teaspoon ground cumin - 1 teaspoon garlic powder - 1 teaspoon onion powder - ½ teaspoon smoked paprika - Salt and freshly ground black pepper to taste - 1 cup buttermilk - 1 cup all-purpose flour - 1 cup panko breadcrumbs - Vegetable oil for frying I love using chicken thighs for this recipe. They stay juicy and flavorful. The spices bring a great kick. Each bite bursts with taste, thanks to the garlic and onion powders. - 8 small corn tortillas - 1 cup shredded lettuce - 1 cup diced tomatoes - ½ cup chopped fresh cilantro - 1 ripe avocado, sliced - Lime wedges for serving For toppings, fresh ingredients matter most. Shredded lettuce adds crunch. Diced tomatoes give a juicy pop. Avocado brings creaminess, while cilantro adds freshness. Don’t forget lime wedges to brighten the flavors! - Large skillet for frying - Mixing bowls for marinating and coating - Slotted spoon for draining chicken - Serving platter for presentation Having the right tools makes cooking easy. A large skillet helps fry chicken evenly. Mixing bowls keep things organized. A slotted spoon lets excess oil drip away, keeping your tacos crispy. For serving, a bright platter showcases your tasty creation beautifully. For the full recipe, refer to the Crunchy Fiesta Chicken Tacos. Marinating chicken in buttermilk makes it juicy and tender. Buttermilk has acids that break down proteins in the chicken. This helps keep the meat moist during cooking. I suggest marinating for at least 30 minutes. If you have time, marinate for a few hours for even better results. The spice mix gives your tacos great flavor. I use chili powder, ground cumin, garlic powder, onion powder, and smoked paprika. Mix these spices in a bowl and add salt and pepper to taste. You can change the spice levels to fit your taste. For more heat, add cayenne pepper or more chili powder. For a milder flavor, use less chili powder. Once the chicken is marinated, it’s time to coat it. Start by tossing the chicken in the spice mix, making sure every piece is covered. Then, dredge the chicken in flour, shaking off the extra. Dip the chicken back in buttermilk before coating it in panko breadcrumbs. This gives it a crispy layer. Heat vegetable oil in a skillet over medium-high heat. When the oil shimmers, add the chicken. Fry the pieces for about 4-5 minutes on each side. You want them golden brown and cooked through. Use a slotted spoon to take them out. Let the chicken sit on paper towels to absorb excess oil. Check out the Full Recipe for all the steps and details! To get that ideal crunch in your chicken tacos, use vegetable oil for frying. This oil has a high smoke point and allows for even cooking. Heat the oil to about 350°F (175°C). This temperature helps the chicken fry up golden and crisp. Avoid soggy tacos by not overcrowding the frying pan. Fry the chicken in small batches. This keeps the oil hot and the chicken crispy. You can spice up your chicken with creative seasoning. Try adding a touch of cayenne for heat or some oregano for a twist. For marinating, swap buttermilk with yogurt for a tangy flavor. Let the chicken soak in the marinade for at least 30 minutes. This step makes the chicken tender and flavorful. Pair your crispy chicken tacos with a refreshing drink like limeade or iced tea. These beverages balance the spices in the tacos. For a great presentation, arrange the tacos on a colorful platter. Add lime wedges and a bowl of salsa on the side. This makes the dish inviting and fun to enjoy! For the full recipe, click here. {{image_4}} You can switch chicken for other meats if you want. Try pork or shrimp for a change. Each protein brings its own flavor. For a vegetarian option, use cauliflower or jackfruit. Both absorb flavors well and offer a nice texture. Seasoning your chicken can change the whole dish. Use taco seasoning for a classic taste. Try adding lime zest for brightness. If you like heat, mix in cayenne pepper or chipotle powder. Toppings also matter! Fresh toppings like mango salsa or pickled onions add a unique twist. Want a healthier option? Bake your chicken instead of frying. Coat it in the same spices and breadcrumbs. Bake until golden brown, which gives a nice crunch. Grilling is another tasty method. It adds a smoky flavor that pairs well with chicken. The grill also gives a nice char. For full details on how to prepare these tacos, check out the Full Recipe. To keep your crispy chicken tacos fresh, store them in an airtight container. This method helps lock in flavor and texture. Place the tacos in the fridge within two hours of cooking. They stay good for 2-3 days. To maintain crunchiness, reheat the tacos in an oven. Set the oven to 350°F (175°C) and bake for about 10 minutes. This method makes the tortillas crispy again. You can also use an air fryer for quick reheating. Just a few minutes at 350°F will work well. Yes, you can freeze crispy chicken! Wrap each taco tightly in foil or plastic wrap. Place them in a freezer bag to prevent freezer burn. When you’re ready to enjoy, thaw in the fridge overnight. Reheat in the oven or air fryer for the best results. To make crispy chicken tacos, follow these steps: 1. Marinate boneless, skinless chicken thighs in buttermilk for at least 30 minutes. 2. Mix together chili powder, cumin, garlic powder, onion powder, smoked paprika, salt, and pepper. 3. Coat the marinated chicken in the spice mix, then dredge in flour, dip in buttermilk, and coat with panko breadcrumbs. 4. Heat vegetable oil in a skillet and fry the chicken until golden brown. 5. Warm corn tortillas in another skillet and assemble tacos with crispy chicken and toppings. This method makes every bite crunchy and full of flavor. For the full recipe, check the earlier section. The best chicken for tacos is boneless, skinless chicken thighs. They stay moist and tender. Thighs also have more flavor than chicken breasts. If you prefer a leaner option, you can use chicken breasts, but they may dry out if overcooked. You can also use shredded rotisserie chicken for quick tacos. Yes, you can prepare crispy chicken ahead of time. Fry the chicken and store it in a warm oven. This keeps it warm and crispy until serving. You can also marinate the chicken and coat it the day before. Just fry it right before serving for the best crunch. Fresh toppings make your tacos shine. Here are some great options: - Shredded lettuce for crunch - Diced tomatoes for freshness - Chopped cilantro for flavor - Sliced avocado for creaminess - Lime wedges for a zesty kick Feel free to add your favorite salsa or hot sauce for more taste! In this blog post, I covered how to make delicious crispy chicken tacos. We explored the key ingredients, including chicken thighs, spices, and toppings. I shared step-by-step instructions, from marinating to frying. Plus, we discussed tips for achieving the perfect crunch and variations for different tastes. Remember, whether you choose to store leftovers or try new flavors, crispy chicken tacos can delight any meal. Enjoy experimenting with your favorite ingredients and make this dish your own!

Crispy Chicken Tacos Flavorful and Crunchy Delight

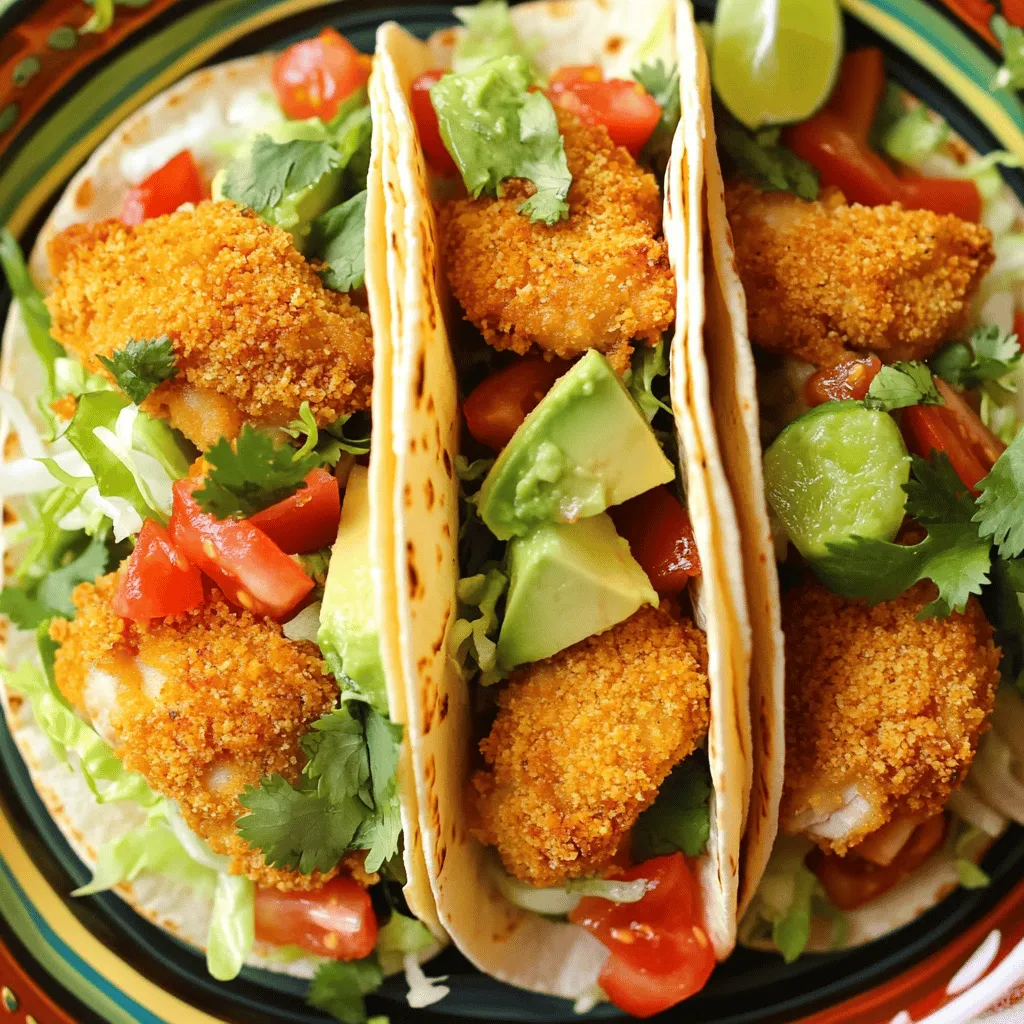
Are you ready to bite into the crunchiest, most flavorful chicken tacos ever? In this guide, I’ll share my secret

- 4 medium sweet potatoes - 1 can (15 oz) black beans, rinsed and drained - 1 cup corn (fresh or frozen) - 1 red bell pepper, finely diced - 1 small red onion, finely diced - 2 cloves garlic, minced - 1 teaspoon ground cumin - 1 teaspoon smoked paprika - 1 tablespoon extra-virgin olive oil - Salt and freshly ground pepper to taste - ½ cup Greek yogurt or ripe avocado, for topping - Fresh cilantro, chopped (for garnish) - Lime wedges (for serving) These ingredients create the perfect flavor boost for your stuffed sweet potatoes. Sweet potatoes are naturally sweet and creamy, making them a great base. The black beans add protein and a nice texture. Corn brings a fresh crunch, while the red bell pepper and onion add color and sweetness. Spices like cumin and smoked paprika deepen the flavor. Olive oil helps sauté the veggies and gives a rich finish. Topping with Greek yogurt or avocado adds creaminess. Fresh cilantro and lime wedges give a burst of freshness. Try to use fresh ingredients for the best taste. You can find the full recipe to guide you through the cooking steps and enjoy this delicious dish! 1. Preheat your oven to 400°F (200°C). This makes sure the sweet potatoes roast well. 2. Wash the sweet potatoes under running water. Scrub them lightly to remove dirt. 3. Pierce each sweet potato several times with a fork. This helps steam escape while cooking. 4. Place them on a baking sheet. Roast for 45-50 minutes until soft and tender. A fork should easily go through. 1. While the sweet potatoes roast, heat olive oil in a large skillet over medium heat. 2. Add diced red onion and bell pepper. Cook for about 5 minutes until they soften. 3. Stir in minced garlic, ground cumin, smoked paprika, salt, and pepper. Cook for another minute. This brings out the spices' rich flavors. 4. Mix in rinsed black beans and corn. Stir well to combine, cooking for 5-7 minutes. This lets the flavors meld together. 1. When the sweet potatoes are done, take them out and let them cool a bit. 2. Slice each sweet potato open lengthwise. Create a pocket for the stuffing. 3. Fluff the insides with a fork. This makes them light and airy. 4. Spoon the black bean mixture into each sweet potato. Fill them generously for a satisfying bite. 5. Top each stuffed sweet potato with Greek yogurt or creamy avocado. This adds a fresh touch. 6. Garnish with chopped cilantro. Serve with lime wedges for a zesty finish. For the full recipe, check out the details provided. Enjoy making your stuffed sweet potatoes! To get the best flavor, ensure even roasting. I like to pierce the sweet potatoes with a fork. This helps steam escape and keeps them from bursting. Roast them until they're soft and tender. This usually takes about 45-50 minutes at 400°F. For added flavor, think about enhancements. You can mix in some spices like chili powder or cayenne for heat. Fresh herbs like parsley or basil can add brightness. Alternate toppings are fun too! Try using guacamole instead of Greek yogurt. A sprinkle of feta or diced tomatoes can also add a nice touch. Using the right tools makes cooking easier. A sharp knife and cutting board are must-haves. A large skillet helps cook the stuffing evenly. I recommend using a sturdy baking dish for the sweet potatoes. Look for one that holds heat well. This way, your sweet potatoes cook evenly. You can customize this dish to fit your diet. Swap black beans for kidney beans or chickpeas if you prefer. If you're avoiding dairy, use avocado as a topping. You can also try cashew cream for a tasty vegan option. Another great idea is to add diced veggies to the filling for extra nutrition. {{image_4}} You can add spicy jalapeños for heat. They give a nice kick to the dish. Just slice them thin and mix them into the black bean filling. If you want a savory touch, try cheese! Feta, cheddar, or pepper jack melt nicely and enhance the flavors. Sprinkle some on top before baking for a gooey, delicious finish. Want to mix it up? You can use other legumes or plant-based proteins. Chickpeas or kidney beans work well too. They add different textures and tastes. You can also create a fusion by using lentils. Cooked lentils blend nicely with the other ingredients and add protein. For a Mexican twist, top your sweet potatoes with fresh salsa or avocado. These toppings brighten the dish and add freshness. If you prefer Mediterranean flavors, try adding feta cheese and olives. They give a salty, rich taste that pairs well with sweet potatoes. Explore these variations to make stuffed sweet potatoes truly your own. For the full recipe, check out the section above! To keep your stuffed sweet potatoes fresh, store leftovers in the fridge. Place them in an airtight container to prevent drying out. If you have extra stuffing, store it separately. This keeps the texture nice and prevents sogginess from the sweet potatoes. I recommend using glass containers for storage. They are safe, reusable, and do not absorb food odors. If you prefer plastic, choose BPA-free containers. Always let the sweet potatoes cool down before sealing them to avoid condensation. When you're ready to eat your leftovers, you can quickly reheat stuffed sweet potatoes in the microwave. Place one on a microwave-safe plate and cover it with a damp paper towel. Heat on medium power for 1-2 minutes. Check if it's warm enough; you can always heat it longer. If you want a crispy skin, reheat them in the oven. Preheat your oven to 350°F (175°C). Place the sweet potatoes on a baking sheet and heat for about 10-15 minutes. This method keeps the texture nice and avoids that rubbery feel. Yes, you can freeze stuffed sweet potatoes! First, let them cool completely. Wrap each potato tightly in plastic wrap. Then, place them in a freezer bag or container. They can last up to three months in the freezer. To thaw, move them to the fridge for a few hours or overnight. When you're ready to eat, reheat them as I mentioned above. This way, you enjoy your delicious stuffed sweet potatoes anytime! For the full recipe, check out the recipe section. Can I use other types of potatoes? Yes, you can use regular potatoes or even yams. Keep in mind, sweet potatoes add a unique sweetness and flavor. If you choose another type, adjust cooking times. They may cook faster or slower. How can I make this recipe vegan? To make this dish vegan, skip the Greek yogurt or use a plant-based yogurt. Avocado is a great topping, too. You can also add more veggies for extra flavor and nutrients. What sides pair well with stuffed sweet potatoes? Stuffed sweet potatoes pair nicely with a simple green salad. Grilled or roasted vegetables also make a great side. You could serve them with a light soup for a full meal. Caloric content and health benefits One stuffed sweet potato has around 300 calories. Sweet potatoes are rich in vitamins A and C. Black beans provide protein and fiber, making this meal filling and healthy. Balancing a meal with stuffed sweet potatoes These stuffed sweet potatoes are balanced on their own. If you want more protein, add grilled chicken or tofu. Pairing them with a green salad adds freshness and crunch. Can I make stuffed sweet potatoes in an Instant Pot? Yes, you can cook sweet potatoes in an Instant Pot! Place them on a rack with water. Cook on high pressure for about 15 minutes, then let the steam release naturally. Grilling versus baking sweet potatoes Grilling sweet potatoes adds a smoky flavor. To grill, wrap them in foil and place on the grill for about 30 minutes. Baking gives them a soft texture, perfect for stuffing. Each method has its own charm. Stuffed sweet potatoes are a fun, tasty dish. You learned about key ingredients, easy steps, and helpful tips. You can make this meal fit your taste and diet. With options for spicy and cheesy add-ins, the flavor can change every time. Proper storage keeps leftovers fresh and ready. Whether you bake, grill, or make it vegan, the ways to enjoy this dish are endless. Try these ideas, share your favorite type, and keep exploring delicious flavors. Your kitchen adventures will be rewarding!

Stuffed Sweet Potatoes with Black Beans Flavor Boost

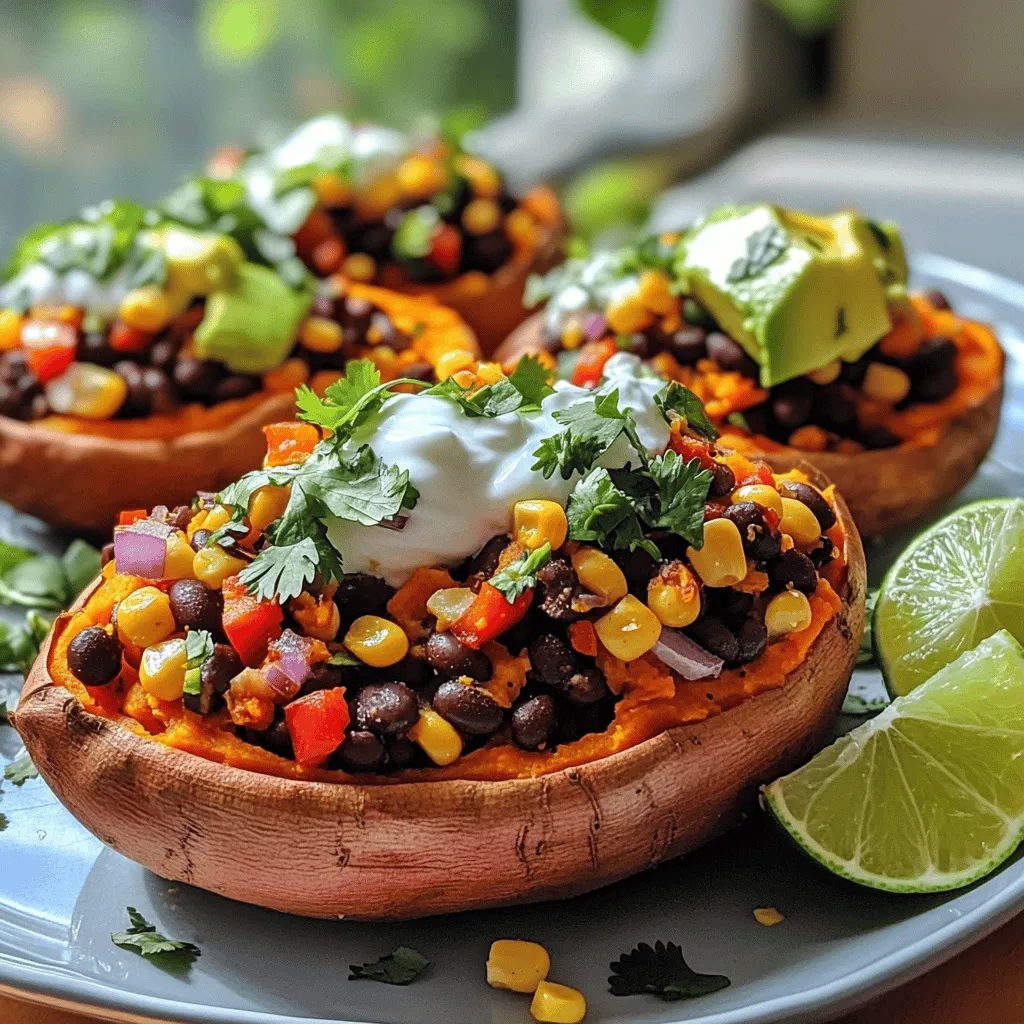
Looking for a hearty, healthy meal that’s bursting with flavor? Stuffed sweet potatoes with black beans are the answer! Packed

- 2 ripe avocados, diced into cubes - 1 cup cherry tomatoes, halved - 1/4 red onion, finely chopped - 1 small jalapeño, seeded and minced - Juice of 1 lime - 2 tablespoons fresh cilantro, chopped - 1/2 teaspoon garlic powder - Salt and pepper, to taste To start, gather your fresh ingredients. The key here is using ripe avocados. They should feel soft when you press them gently. If they are too hard, they won’t taste great. Dicing the avocados is easy. Just cut them in half, remove the pit, and scoop the flesh out. Then, chop it into small cubes. This helps the salsa mix well. Halving cherry tomatoes adds sweetness. They bring bright color and flavor. Finely chop the red onion for a mild kick but not too strong. The jalapeño adds heat, so adjust it to your taste. Freshness matters. Using fresh cilantro brightens the salsa. Fresh lime juice prevents browning and makes it zesty. Garlic powder adds depth without overpowering the other flavors. Always taste and adjust salt and pepper. This makes the salsa just right for you. Remember, fresh ingredients create the best zesty avocado salsa. For the full recipe, check the recipe section. - Step 1: Dicing avocados Start by taking two ripe avocados. Cut them in half and remove the pit. Carefully scoop the flesh out with a spoon. Dice the avocado into small cubes and place them in a medium mixing bowl. - Step 2: Adding cherry tomatoes Next, take one cup of cherry tomatoes. Cut each tomato in half. Add the halved tomatoes to the bowl with the avocado. This will add sweetness and color to the salsa. - Step 3: Mixing in red onion and jalapeño Now, finely chop a quarter of a red onion. Add this to the bowl. For some heat, take a small jalapeño, seed it, and mince it. Mix both the onion and jalapeño into the avocado and tomato mixture until all the ingredients combine well. - Avoiding mushy avocados To keep your avocados firm, choose ripe ones that are not overly soft. Dice them gently to avoid mashing. - Ensuring an even mix of ingredients Stir the mixture gently. You want to combine flavors without turning the avocados into mush. A light hand is key here. - How to serve the salsa Serve your zesty avocado salsa in a bright bowl. Surround it with crispy tortilla chips for easy dipping. - Ideal accompaniments This salsa pairs well with grilled chicken or fish. You can also enjoy it on tacos or with nachos for a fun snack. You can find the Full Recipe for a detailed guide on how to create this delicious dish! To elevate your zesty avocado salsa, consider adding spices. A pinch of cumin adds a warm, earthy note. For a kick, try a dash of smoked paprika. You can also use different types of lime. Key limes offer a tart, bold flavor. Persian limes provide a milder taste. Experiment to find your favorite. Store any leftover salsa in an airtight container. This keeps it fresh longer. To prevent browning, press plastic wrap directly on the surface of the salsa. You can also add more lime juice on top. This extra layer helps keep that vibrant green color. For the best flavor, enjoy your salsa within a day or two. For the full recipe, check out the section above. {{image_4}} You can switch out the jalapeño for milder peppers, like green bell pepper. This change makes the salsa less spicy. You might also try serrano peppers for a different heat level. You can use fresh herbs like parsley or mint instead of cilantro. Each herb brings a new flavor twist to the salsa. Want to make your salsa even more exciting? Add diced mango for sweetness or fresh corn for crunch. Both ingredients blend well with the creamy avocado. You can also pair your zesty avocado salsa with other dips. Try it with bean dip or a creamy yogurt dip for a fun snack platter. These combinations make your meal colorful and fun, pleasing everyone at the table. Avocados offer many health perks. They are rich in healthy fats, which are good for your heart. They also have fiber, which helps digestion. Plus, avocados are full of vitamins like C, E, and K. These are great for your skin and bones. Tomatoes add even more benefits. They are low in calories and high in vitamin C. This vitamin boosts your immune system. Onions have their own benefits too. They can help lower blood pressure and provide antioxidants. Together, these ingredients create a tasty and healthy salsa. Each serving of zesty avocado salsa has about 100 calories. This is a great snack or side dish. The nutritional breakdown includes: - Fats: 8g (mostly healthy fats from avocados) - Carbs: 10g (mainly from tomatoes and onions) - Proteins: 2g (a little from all the ingredients) This salsa is light and perfect for any meal. Enjoy it with chips, tacos, or on top of grilled chicken. The balance of flavors makes it a delightful choice for your table. Check the Full Recipe for all the details! How can I make the salsa spicier? To add heat, use more jalapeño. You can also try adding diced serrano peppers or even a splash of hot sauce. Each of these will bring a kick to your salsa. Start with a little, then taste and adjust. Can I prepare this salsa in advance? Yes, you can make it ahead. However, fresh salsa tastes best. If you prepare it early, store it in the fridge. Use an airtight container to keep it fresh. Add more lime juice to help prevent browning. What can I use if I don’t have lime? If you don't have lime, lemon juice works well too. It gives a similar tang. You can also use vinegar, like apple cider vinegar. Just adjust the amount to your taste. Is there a substitute for fresh cilantro? If you don’t like cilantro, try parsley. It adds a fresh flavor without the strong taste. Chopped green onions can also work as a nice substitute. How to tell if avocados are ripe? To check ripeness, gently squeeze the avocado. It should yield slightly to pressure but not feel mushy. You can also look for dark green skin. Avoid any avocados with large dark spots. What to serve with zesty avocado salsa? Zesty avocado salsa pairs great with tortilla chips. You can also serve it with grilled meats or tacos. It works well as a topping for fish or even on eggs. For a fun twist, try it in wraps or sandwiches. For the full recipe, check out the details above! This blog post covered how to make a tasty avocado salsa. We looked at the key ingredients and their preparation. Freshness is key for great flavor. The step-by-step guide showed you how to mix everything just right. We also shared tips for storage and spice tweaks. In conclusion, enjoy creating your own unique salsa. Feel free to try new ingredients or flavors. This dish can fit any gathering and impress your friends!

Zesty Avocado Salsa Fresh and Flavorful Delight

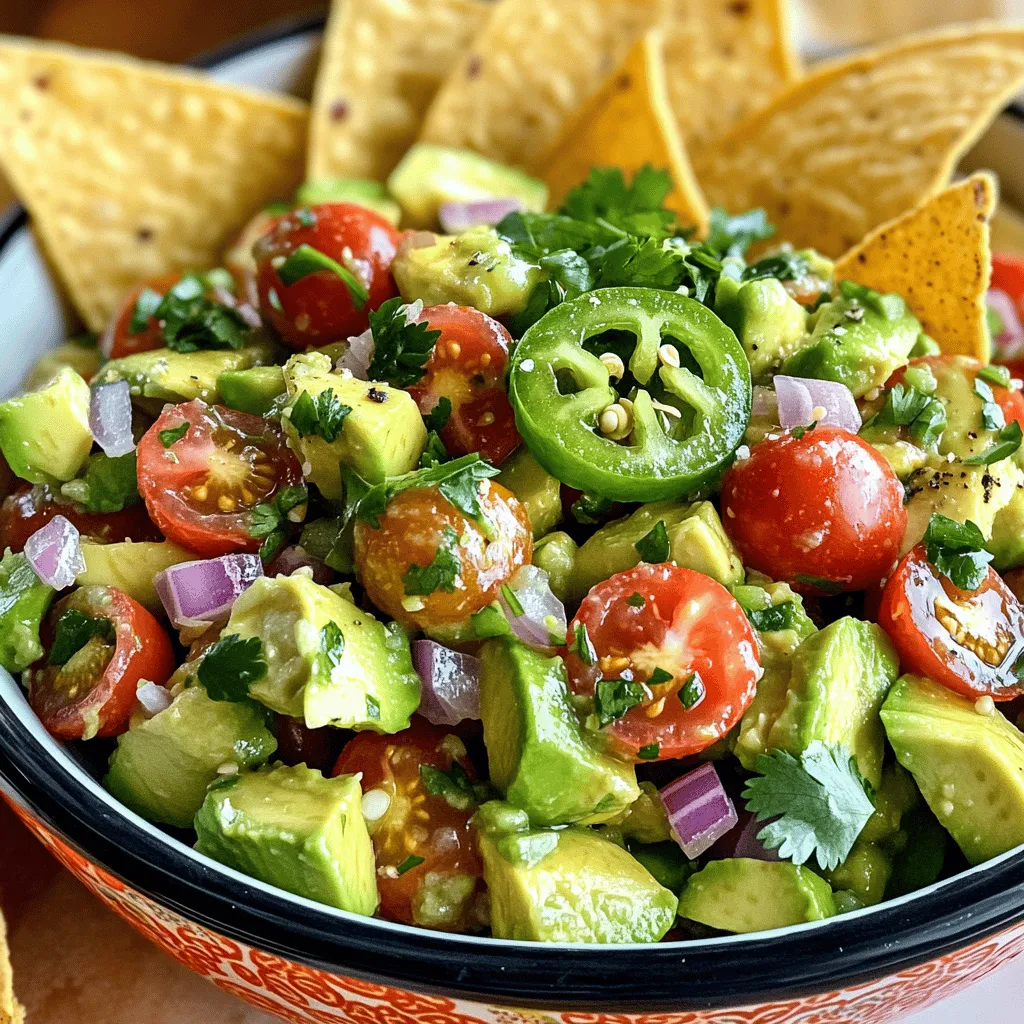
If you’re craving a fresh and simple dip, you’ll love my Zesty Avocado Salsa. This colorful dish bursts with flavor

- 1 cup rolled oats - 2 cups vegetable broth (or water) - 2 cups fresh spinach, roughly chopped - 1 small onion, finely diced - 2 cloves garlic, minced You need rolled oats as the base. They cook quickly and provide a hearty texture. Use vegetable broth or water for a warm, flavorful base. Fresh spinach adds color and nutrition. Dice a small onion for sweetness and flavor. Minced garlic gives the dish a fragrant kick. - 1/4 cup grated cheese (feta or cheddar) - Chopped fresh herbs (cilantro, parsley, or chives) Adding cheese is a great way to enhance creaminess. Feta adds a tangy taste, while cheddar is more mellow. Fresh herbs brighten the dish and add a pop of color. - 1 tablespoon olive oil - 1/2 teaspoon turmeric powder - 1/2 teaspoon ground cumin - Salt and freshly ground black pepper to taste Olive oil helps sauté the onion and garlic. Turmeric adds a lovely golden hue and earthy flavor. Cumin brings warmth, making the dish more complex. Don't forget salt and pepper to balance all the flavors. For the full recipe, check out the details in the provided section. - Warm olive oil in a medium pan over medium heat. - Add the finely diced onion and sauté until soft, about 3-4 minutes. - Add the minced garlic and cook until fragrant, about 1-2 minutes. - Sprinkle in turmeric and cumin, stirring well. Let cook for 30 seconds. - Pour in vegetable broth and bring to a boil. - Stir in rolled oats and reduce heat to low. Cover and simmer for 5 minutes. - Add the roughly chopped spinach and mix well. Cook for another 2-3 minutes. - Season with salt and black pepper to taste. If using cheese, stir it in now. - Serve hot, garnished with fresh herbs for color and flavor. For more details, check out the Full Recipe. To get the best texture for your oats, use rolled oats. They cook quickly and turn creamy. Start with the right liquid ratio. For a thicker dish, use less broth. For creamier oats, add more. I usually use two cups of broth for one cup of oats. It gives a great result! Spices can make a big difference. Try adding a pinch of chili flakes for heat. You can also mix in smoked paprika for a smoky taste. Fresh herbs like basil or dill can brighten the dish too. If you are feeling adventurous, add a squeeze of lemon juice. It adds a nice zing. Savory oats pair well with soft-boiled eggs. The yolk adds creaminess and flavor. You can also serve it alongside roasted tomatoes or sautéed mushrooms. For a nice touch, present the dish in a bowl with a sprinkle of fresh herbs on top. It makes the meal look inviting and fresh. For the full recipe, check out Savory Oats Delight with Spinach. {{image_4}} You can swap oats for quinoa or other grains. Quinoa brings a nice nutty taste. Other grains like farro or barley work well too. You can also mix in different greens. Try kale, Swiss chard, or even arugula for a spicy kick. Adding veggies like bell peppers or mushrooms can change the dish’s flavor. Make it yours by experimenting with what you have at home. To spice things up, add chili or cayenne pepper for heat. This version wakes up your taste buds and adds a warm kick. For a Mediterranean twist, toss in olives and sun-dried tomatoes. This combination brings a savory, briny flavor that brightens the dish. You can also use herbs like oregano or thyme for more depth. Each variation makes savory oats feel fresh and exciting. For a vegan version, skip the cheese and use plant-based broth. You can also add nuts or seeds for protein. This makes the dish hearty and filling. If you need it gluten-free, just ensure your oats are certified gluten-free. Many brands offer this option, so check the label. With these simple changes, the dish remains delicious while meeting your dietary needs. To keep your savory oats fresh, store them in an airtight container. Place the container in the fridge. These oats stay good for up to three days. For freezing, portion the oats into freezer-safe bags. Remove as much air as possible before sealing. This way, they can last up to three months. When reheating, add a splash of broth or water. This helps restore the texture. Use the microwave for quick reheating. Heat in 30-second intervals, stirring between each. You can also reheat on the stove. Use low heat and stir often to keep the oats creamy. In the fridge, the savory oats last for about three days. If frozen, they can last up to three months. Look for signs of spoilage, such as mold or an off smell. If the oats look dry or hard, it’s best to toss them. Enjoy your savory oats while they are fresh for the best taste! For the full recipe, check out Savory Oats Delight with Spinach. To cook savory oats well, follow these tips: - Use rolled oats for a creamy texture. - Cook them in vegetable broth for added flavor. - Sauté onions and garlic first to enhance taste. - Stir in spices like turmeric and cumin to elevate the dish. - Keep an eye on your cooking time to avoid mushy oats. This method ensures your oats are tasty and comforting every time. Yes, you can make savory oats ahead of time. Here are some meal prep tips: - Cook a big batch and store it in the fridge. - Divide into portions for quick breakfasts. - Reheat with a splash of broth or water to restore creaminess. - Add fresh spinach right before serving for the best taste. Making these ahead saves time on busy mornings. You can add many toppings to savory oats for more flavor. Consider these popular options: - Crumbled feta or cheddar cheese for creaminess. - Avocado slices for healthy fats and a smooth texture. - Chopped nuts for crunch and added protein. - A poached egg for richness and extra nutrition. - Fresh herbs like cilantro or parsley for brightness. These toppings can elevate your savory oats and make them exciting. Savory oats with spinach are a quick and healthy meal. We discussed essential ingredients, step-by-step cooking, and ways to enhance flavor. You can adapt this dish with various grains and spices for new tastes. Store leftovers properly to enjoy them later. Remember, this dish is versatile and can fit many diets. Experiment with toppings and flavors to make it your own. Enjoy creating your savory oats and happy cooking!

Savory Oats with Spinach Wholesome Comfort Meal

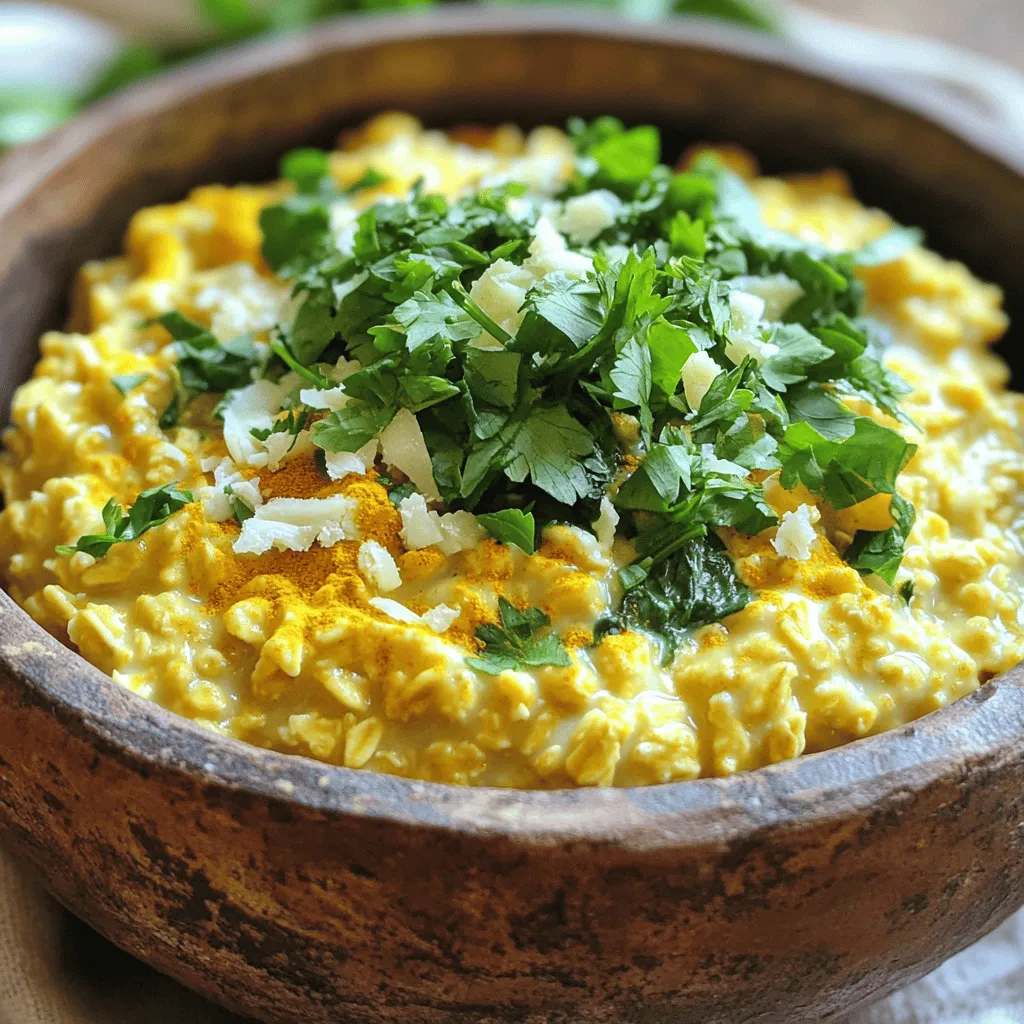
Looking for a quick, healthy meal that warms your soul? Savory oats with spinach are the answer! This wholesome dish

Older posts
Newer posts
← Previous Page1 … Page51 Page52 Page53 … Page68 Next →

dsad

© 2025 tastymomrecipes • Built with GeneratePress

Our Policies

  • Copyright Policy
  • Cookie Policy
  • GDPR Policy
  • Privacy Policy
  • Disclaimer
  • Terms Of Use

More Information

  • Home
  • About
  • Contact
  • Appetizers
  • Dessert
  • Dinner
  • Drinks
©2025, tastymomrecipes About Back To Top