
Pumpkin Spice Granola Tasty and Healthy Snack Option
Are you ready to enjoy a tasty snack that is also good for you? This Pumpkin Spice Granola brings the
Are you ready to enjoy a tasty snack that is also good for you? This Pumpkin Spice Granola brings the
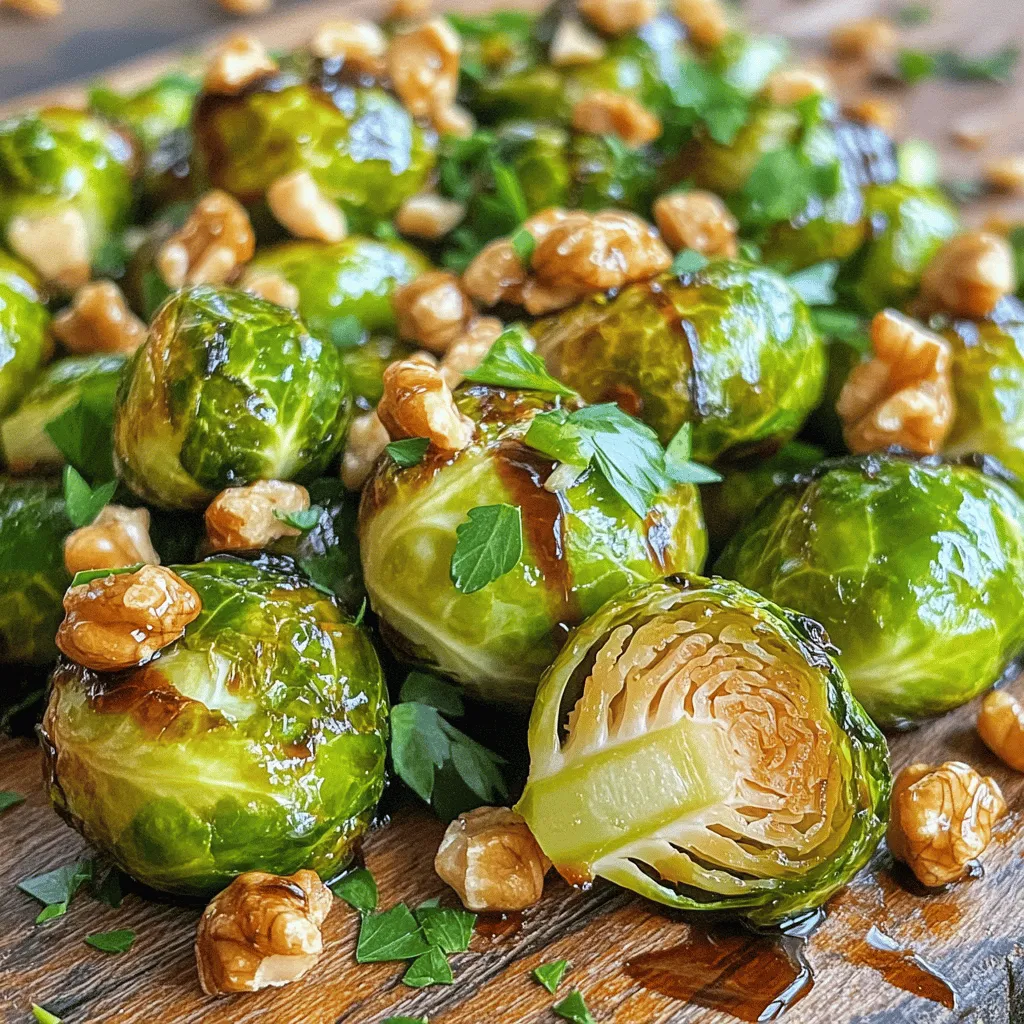
Looking for a simple yet tasty side dish? Balsamic Roasted Brussels Sprouts are here to save the day! These little
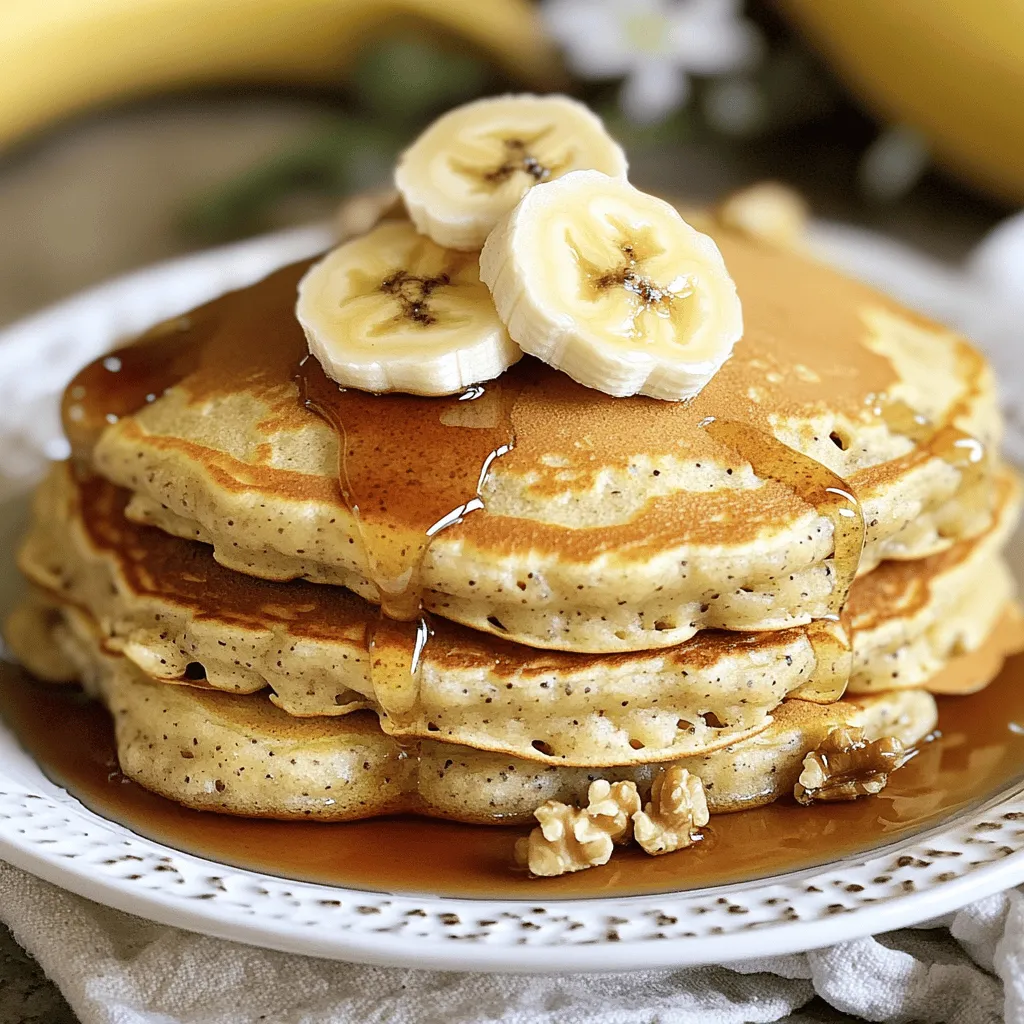
If you love banana bread, wait until you try these banana bread pancakes! They are easy to make and bursting
![- 1 large ripe banana, frozen - 2 tablespoons creamy peanut butter - 1 tablespoon unsweetened cocoa powder - 1 tablespoon honey or maple syrup (optional) - 1 cup almond milk (or preferred milk) - 1/4 cup Greek yogurt - 1 tablespoon mini chocolate chips (garnish) - 1 tablespoon chopped roasted peanuts (garnish) To make a Peanut Butter Cup Smoothie, you need simple yet tasty ingredients. Each one adds to the rich flavor and creamy texture. The frozen banana gives a smooth base. Its natural sweetness pairs perfectly with the peanut butter. Creamy peanut butter is the star, adding depth and protein. Unsweetened cocoa powder gives that chocolatey kick. If you like it sweeter, honey or maple syrup works well. Almond milk adds a nice creaminess without being heavy. Greek yogurt makes it even richer and adds protein. Finally, mini chocolate chips and chopped roasted peanuts are optional, but they add a fun crunch and extra flavor. You can find the full recipe for this delightful smoothie online. - Step 1: Start with the frozen banana. This gives your smoothie a thick, creamy base. - Step 2: Add the remaining ingredients to the blender. You will need peanut butter, cocoa powder, honey or maple syrup, almond milk, and Greek yogurt. - Step 3: Blend until smooth. This should take about 30 to 60 seconds. If the mix is too thick, add a bit more almond milk. - Step 4: Adjust sweetness if necessary. Taste your smoothie. If it needs more sweetness, add honey or maple syrup. Blend again briefly. - Step 5: Pour and garnish before serving. Use mini chocolate chips and chopped roasted peanuts for a tasty crunch. Making this Peanut Butter Cup Smoothie is quick and easy. You can find the full recipe above for more details. Enjoy a delicious treat! - Use frozen bananas for creaminess: Frozen bananas make your smoothie thick and rich. They add natural sweetness too. I always keep some in my freezer. - Adjust almond milk for desired thickness: If you want a thicker smoothie, use less almond milk. For a thinner one, just add more milk. It’s all about what you like best! - Experiment with sweeteners and flavors: Try honey, maple syrup, or even agave. You can also add vanilla extract or a pinch of salt for extra flavor. - Alternatives to almond milk: If you’re not a fan of almond milk, you can use oat milk, soy milk, or coconut milk. Each gives a unique taste and texture. - Peanut butter alternatives for nut allergies: If you have nut allergies, use sunflower seed butter or soy nut butter. They still give that creamy feel and flavor. - Dairy-free yogurt options: For a dairy-free option, try coconut yogurt or almond yogurt. They add creaminess and a nice taste without dairy. For the full experience, check the [Full Recipe] to make your own Peanut Butter Cup Smoothie! {{image_4}} You can easily give your Peanut Butter Cup Smoothie a fun twist. Here are some ways to mix it up: - Add protein powder for extra nutrition: This boost helps you feel full and supports muscle health. Choose your favorite flavor, like chocolate or vanilla. Just mix in a scoop with the other ingredients before blending. - Incorporate spinach for added greens: Toss in a handful of fresh spinach. It blends well and adds nutrients without changing the taste. You’ll enjoy a healthy green boost! - Use different nut butters for varied flavors: Try almond butter or cashew butter instead of peanut butter. Each nut butter brings its own unique taste and creaminess to your smoothie. Seasonal ingredients can add a refreshing touch to your smoothie. Consider these options: - Use seasonal fruits for a twist: In spring, add strawberries. In fall, use pumpkin puree. These fruits can change the flavor and give you a tasty treat that fits the season. - Incorporate spices like cinnamon or nutmeg: A pinch of cinnamon warms up your smoothie, while nutmeg adds a cozy touch. These spices can enhance the flavor and make your drink even more delicious. For the full recipe, check out the Peanut Butter Cup Smoothie Delight! You can store your Peanut Butter Cup Smoothie in an airtight container. A mason jar works well for this. Place the jar in the fridge right after making your smoothie. It will stay fresh for up to 24 hours. After that, the texture may change, and it might separate. If you see separation, just shake or stir it before drinking. Freezing your smoothie is a great way to enjoy it later. Pour the smoothie into an ice cube tray or a freezer-safe container. Make sure to leave some space at the top, as liquids expand when frozen. Your smoothie can last in the freezer for up to 3 months. When you're ready to enjoy it, take out the cubes or container. Let it thaw in the fridge overnight or at room temperature for a few hours. If it's too thick, blend it again with a splash of milk. This way, you’ll have a creamy treat ready to sip! Can I make this smoothie vegan? Yes, you can make this smoothie vegan. Just use plant-based yogurt and maple syrup. Swap out almond milk for any non-dairy milk you enjoy. This way, you keep all the rich and creamy flavor without using dairy. Is this smoothie healthy? This smoothie can be healthy. It has good fats from peanut butter and fiber from bananas. Greek yogurt adds protein too. Just watch how much honey you add for sweetness. When you keep it balanced, it makes a great snack or breakfast. What can I add to boost the protein content? To boost the protein, add a scoop of your favorite protein powder. You can also try adding more Greek yogurt. If you want, toss in some nuts or seeds too. This will make your smoothie even more filling and nutritious. For the full recipe, check out the Peanut Butter Cup Smoothie Delight. The Peanut Butter Cup Smoothie is a simple, tasty drink. You see how easy it is to make with just a few ingredients. Frozen bananas give it a creamy feel, while peanut butter and cocoa bring rich flavors. You can customize it with your favorite milk or sweetener. If you want a healthy boost, add greens or protein! Store leftovers in the fridge or freeze extras for a quick treat later. Enjoy this smoothie as a delightful snack or meal on the go. So, blend, sip, and savor!](https://tastymomrecipes.com/wp-content/uploads/2025/05/34610ce5-7b5e-4af9-8d1d-488b64cdfe16.webp)
Are you ready to indulge in a creamy and rich Peanut Butter Cup Smoothie? This delightful blend mixes sweet banana,
![To make this tasty dish, you need the following ingredients: - 2 large ripe avocados - 2 cups cooked chicken, shredded - 1/4 cup creamy Greek yogurt - 1 tablespoon Dijon mustard - 1 tablespoon fresh lime juice - 1/2 cup cherry tomatoes, halved - 1/4 cup red onion, finely diced - 1/4 cup fresh cilantro, chopped - Salt and pepper, to taste - 4 whole grain wraps or large lettuce leaves You can swap ingredients to suit your taste. Instead of Greek yogurt, use sour cream for a tangy kick. For added crunch, mix in diced bell peppers or cucumbers. You can also use different herbs like parsley or dill. If you love spice, add some diced jalapeños. Each serving of this creamy avocado chicken salad has about: - Calories: 300 - Protein: 25g - Carbohydrates: 20g - Fat: 15g - Fiber: 7g This salad is both filling and nutritious. It offers a nice balance of healthy fats from the avocado and protein from the chicken. Enjoying this meal supports your health while keeping your taste buds happy. For the full recipe, check out the details above. To make your creamy avocado chicken salad, start with the avocados. Cut them in half and remove the pit. Scoop the green flesh into a bowl. Use a fork to mash the avocado. Aim for a smooth but chunky texture. This adds a nice bite to your salad. Next, add the Greek yogurt, Dijon mustard, and lime juice. Mix these well into the avocado. This will create a rich, creamy dressing. Now, gently fold in the shredded chicken. I often use rotisserie chicken for a quicker option. Add the halved cherry tomatoes, diced red onion, and chopped cilantro. Stir until all ingredients are mixed and coated in the creamy dressing. Taste your salad and season it with salt and pepper. Adjust the flavors to your liking. To mash avocados well, always pick ripe ones. A ripe avocado will yield slightly when you press it. Cut it open and check for a bright green color inside. This means it’s ready to use. When mashing, use a fork instead of a blender. A fork gives you better control over the texture. Mash in a bowl, and don’t overdo it; you want some chunks for a nice mouthfeel. When serving your creamy avocado chicken salad, you have great choices. You can use whole grain wraps or large lettuce leaves. For wraps, spoon your salad into the center. Roll them up tightly and slice in half. This makes for easy eating on the go. If you prefer lettuce, take large leaves and fill them. Fold the leaves around the filling. This is a lighter option that keeps it fresh and crunchy. Don't forget to check the [Full Recipe] for more details! To cook chicken, start with boneless, skinless chicken breasts. Boil them in water for about 15 to 20 minutes. Check that the chicken reaches 165°F (75°C) inside. Once done, let it cool. Then, use two forks to shred the chicken into bite-sized pieces. This method keeps the chicken juicy and tender. When picking avocados, look for ones that feel slightly soft when you press them. The skin should be dark green or almost black. Avoid avocados that feel mushy or have dark spots. If they are hard, leave them on the counter for a few days. They will ripen nicely, and you can enjoy their creamy texture in your salad. To make your salad even better, consider adding extras like diced bell peppers, chopped cucumber, or even corn. These will add crunch and color. You could also mix in nuts or seeds for a nutty flavor. Fresh herbs like dill or parsley can brighten the taste. Feel free to experiment and find your perfect mix! For the complete recipe, check out the Full Recipe section. {{image_4}} If you want to keep it low-carb, you can skip the yogurt. Instead, use more avocado. This change makes it richer and creamier. You can also swap the wraps for lettuce leaves. Lettuce wraps are light and fresh, perfect for a keto diet. You can boost nutrition with extra veggies. Try adding diced bell peppers or cucumbers. They add crunch and color. Shredded carrots can also add sweetness. Always feel free to mix and match based on what you enjoy. Don’t have chicken? No worries! You can use tuna or canned salmon instead. These options add flavor and protein. For a plant-based choice, try chickpeas or tofu. Both will give you a healthy twist. With these variations, you can find the perfect mix for your taste. Check out the Full Recipe for more ideas! To store your leftover chicken salad, place it in an airtight container. This helps keep it fresh and prevents odors from other foods in the fridge. Make sure to cover the container tightly. You can enjoy the salad for lunch or dinner later. The main ingredients in this salad have different shelf lives. Cooked chicken lasts about three to four days in the fridge. Avocados, once cut, should be eaten within one to two days. Greek yogurt is good for about a week after opening. Check expiration dates to ensure freshness. When you want to enjoy your salad again, here are some tips. First, add a squeeze of fresh lime juice just before serving. This brightens the flavors. If the salad has been in the fridge for a while, stir it gently. This helps mix the ingredients again. If it looks dry, add a little more yogurt to bring back its creamy texture. Yes, you can make Creamy Avocado Chicken Salad ahead of time. It stays fresh for up to two days in the fridge. However, the avocado may brown slightly. To prevent this, squeeze extra lime juice on the salad before storing. This will keep it looking bright and fresh. When you’re ready to eat, give it a quick stir. This will mix any separated ingredients back together. You can serve this salad in many ways. Here are a few ideas: - Whole grain wraps - Large lettuce leaves - Fresh pita bread - On top of a bed of mixed greens - With tortilla chips for a crunchy side Each option adds a unique twist to the dish. Choose what fits your meal best! Absolutely! Creamy Avocado Chicken Salad is great for meal prep. It’s easy to divide into containers for quick lunches. Just remember to store it in airtight containers to keep it fresh. For the best taste, eat it within two days. This salad also pairs well with other meal prep items, like brown rice or quinoa. You can mix and match for a full week of tasty meals. For the complete recipe, check out the Full Recipe section! In this blog post, we explored making a creamy avocado chicken salad. We covered a list of ingredients, cooking tips, and how to store leftovers. You learned about variations, like low-carb options and how to add veggies. Finally, I answered common questions about meal prep and serving ideas. Enjoy making this salad your own. It is easy, tasty, and good for you. Try different flavors and share with friends!](https://tastymomrecipes.com/wp-content/uploads/2025/05/2441b4a5-b8ba-4559-88db-23a97bfa3550.webp)
Looking for a fresh and healthy meal idea? You’re in the right place! My Creamy Avocado Chicken Salad packs flavor
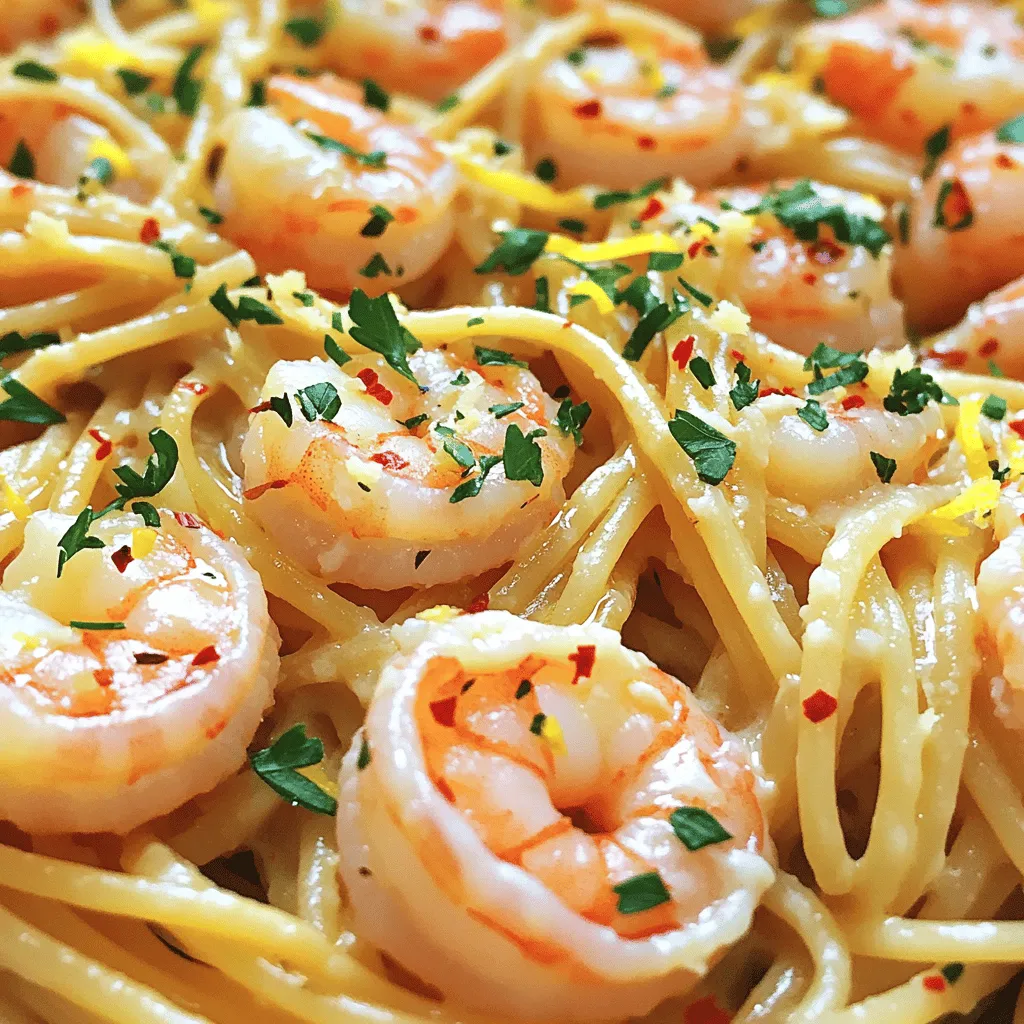
Looking for a quick and tasty dinner? Garlic Butter Shrimp Pasta is your answer! This dish combines tender shrimp, rich
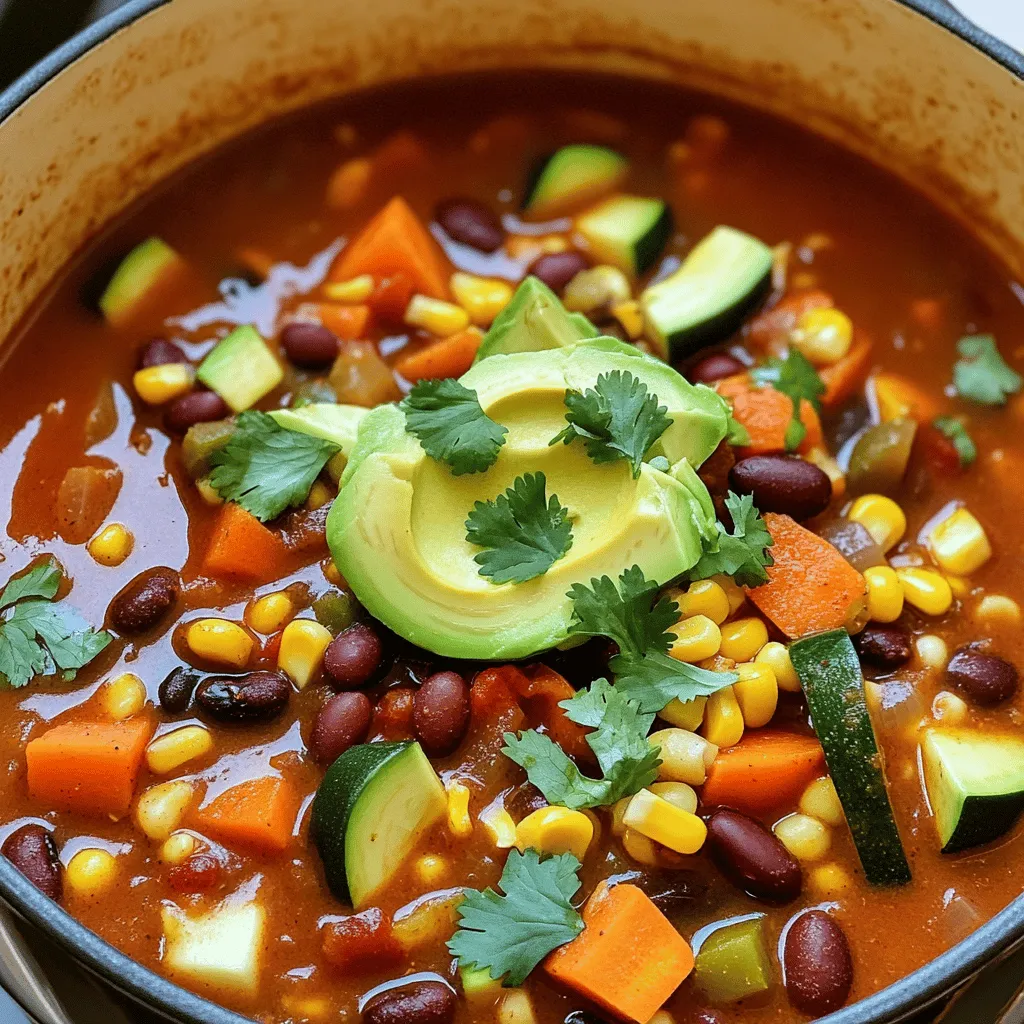
Craving a warm bowl of comfort? Vegetarian chili is your answer! Packed with flavor and nutrients, this hearty dish satisfies
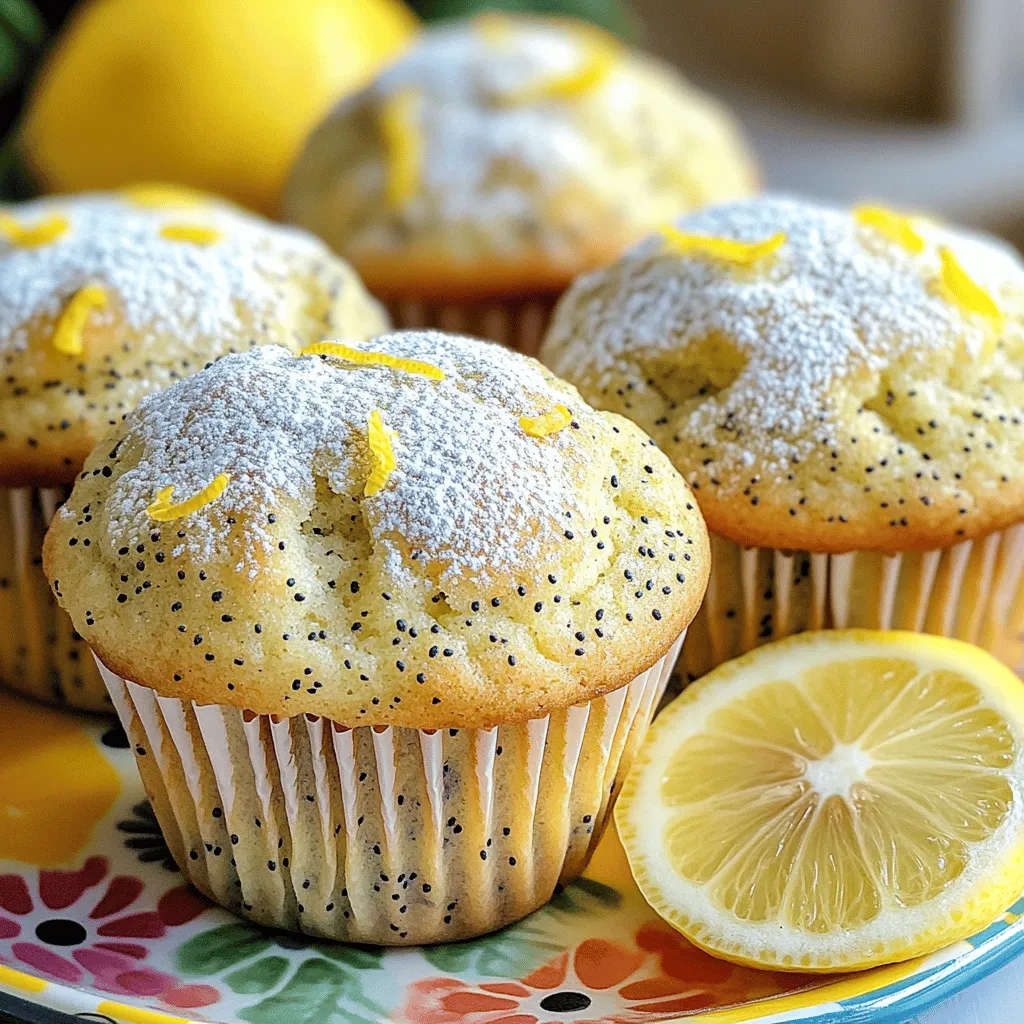
Looking for a bright and easy treat? These Lemon Poppy Seed Muffins are simple and bursting with flavor! You’ll love
![- 4 large bell peppers (different colors for variety) - 2 cups cooked, shredded chicken - 1/2 cup buffalo sauce (adjust according to heat preference) - 1/2 cup cream cheese, softened - 1/2 cup shredded cheddar cheese - 1/4 cup fresh green onions, sliced - 1/2 cup celery, finely chopped - Salt and freshly ground black pepper to taste - Olive oil for prepping You will need vibrant bell peppers for this dish. I like using a mix of colors. The filling comes from shredded chicken, which I often prepare in advance. You can use rotisserie chicken for ease. Buffalo sauce adds heat, so choose a brand you love. Cream cheese gives a creamy texture, while cheddar cheese adds flavor. Green onions and celery bring freshness and crunch. When preparing your peppers, make sure to wash them well. Remove the seeds and membranes carefully. This helps them cook evenly. The olive oil helps prevent sticking and adds flavor. Seasoning with salt and pepper enhances all the tastes. This simple list makes for a tasty meal. You can find the full recipe to guide you through the steps. Enjoy creating your Buffalo Chicken Stuffed Peppers! 1. Preheat your oven to 375°F (190°C). This step is key to cooking the peppers just right. 2. Take four large bell peppers and slice the tops off. Remove the seeds and membranes. This makes room for the filling. 3. Drizzle a bit of olive oil over the cut side of each pepper. Then, season them with salt and pepper. 1. In a large bowl, combine 2 cups of cooked, shredded chicken with 1/2 cup of buffalo sauce. Adjust the sauce amount for your heat preference. 2. Add 1/2 cup of softened cream cheese, 1/2 cup of shredded cheddar cheese, 1/4 cup of sliced green onions, and 1/2 cup of finely chopped celery to the bowl. 3. Mix everything well until it’s all blended together. Taste it and adjust the spice if needed. 1. Stuff each prepared bell pepper with the buffalo chicken filling. Press it down gently to fit it all in. 2. Cover the baking dish with aluminum foil. Bake the stuffed peppers in the oven for 25 minutes. 3. After 25 minutes, carefully remove the foil. Continue baking until the cheese is bubbly and golden. This should take another 10 to 15 minutes. Enjoy your delicious Buffalo Chicken Stuffed Peppers! For the full recipe details, check out the Full Recipe. Garnish your stuffed peppers with fresh green onions for a pop of color. Add a drizzle of extra buffalo sauce on top for more flavor. You can pair these peppers with a crisp side salad or some roasted veggies. They complement each other well, adding freshness to the meal. To get the perfect heat balance, taste your filling as you mix. Adjust the buffalo sauce to match your spice level. If you want less heat, use less sauce. For even stuffing distribution, pack the filling gently but firmly into each pepper. Make sure each one is filled to the top for the best bite. You can swap the chicken for ground turkey for a lighter option. For a vegetarian twist, try using black beans or quinoa. Changing the cheese can add new flavor. Consider using pepper jack for heat or mozzarella for creaminess. You can also experiment with different sauces, like ranch or BBQ, to create your own spin on this dish. For the full recipe, check out the details above. {{image_4}} Buffalo chicken stuffed peppers last about 3 to 5 days in the fridge. Store them in an airtight container. This keeps them fresh and tasty. When you’re ready to eat, simply take them out and reheat. To store leftovers, let the peppers cool completely first. This helps avoid extra moisture. Then, place them in a single layer in your container. Avoid stacking them, as this can make them mushy. To freeze stuffed peppers, follow these easy steps. First, let them cool down completely. Then, wrap each pepper tightly in plastic wrap. Next, place them in a freezer-safe bag. Squeeze out all the air to prevent freezer burn. When you want to eat them, take the peppers out of the freezer. Let them thaw in the fridge overnight. For reheating, you can bake them at 375°F (190°C) for about 20-25 minutes. This will warm them through and keep them delicious. For more details on making these tasty stuffed peppers, check the Full Recipe. Each serving of Buffalo Chicken Stuffed Peppers has about 350 calories. This meal is filling and packed with flavor. Here’s the macronutrient breakdown: - Protein: 30 grams - Carbohydrates: 20 grams - Fats: 18 grams These values may vary based on the exact ingredients you use. For example, using low-fat cheese can lower the fat content. Buffalo Chicken Stuffed Peppers offer several nutritional advantages. - Bell Peppers: They are high in vitamins A and C, which support your immune system. They also provide fiber that helps with digestion. - Chicken: This ingredient is a great source of lean protein. It helps build muscles and keeps you full longer. - Cream Cheese: While it adds creaminess, you can use low-fat cream cheese to cut calories. To make this meal healthier, consider these tips: - Swap regular cheddar for reduced-fat cheese. - Use Greek yogurt instead of cream cheese for added protein and less fat. - Add more veggies to the filling, like spinach or zucchini, for extra nutrients. For the complete recipe, check out the [Full Recipe]. Enjoy your tasty and hearty meal! Can I use frozen chicken for the recipe? Yes, you can use frozen chicken. Just ensure it's fully cooked before shredding. You can boil or bake the chicken first. This method helps save time. How can I make it spicier? To add more heat, increase the buffalo sauce. You can also add diced jalapeños or a sprinkle of cayenne pepper. These will boost the flavor and spice. Can I prepare these in advance? Absolutely! You can prep the stuffed peppers a day ahead. Just fill them and store them in the fridge. Bake them when you're ready to enjoy. What’s the best way to reheat the stuffed peppers? Reheat the stuffed peppers in the oven. Set it to 350°F (175°C) and bake for about 15-20 minutes. This keeps them warm and tasty. For quick reheating, a microwave works too, though they may lose some texture. For the full recipe, click [Full Recipe]. This recipe shows how to make stuffed bell peppers with chicken and buffalo sauce. You learned how to prepare, stuff, and bake these tasty treats. Plus, you have tips for serving and variations to keep it fresh. Remember, you can store leftovers easily or try new ingredients. Enjoy making these delicious peppers your way. They are satisfying and fun to share. Keep experimenting and enjoy the process!](https://tastymomrecipes.com/wp-content/uploads/2025/05/6bcdbf60-cd20-4745-9e86-bfee76d55c91.webp)
Are you craving a meal that’s both tasty and filling? Buffalo Chicken Stuffed Peppers deliver just that! Imagine tender bell
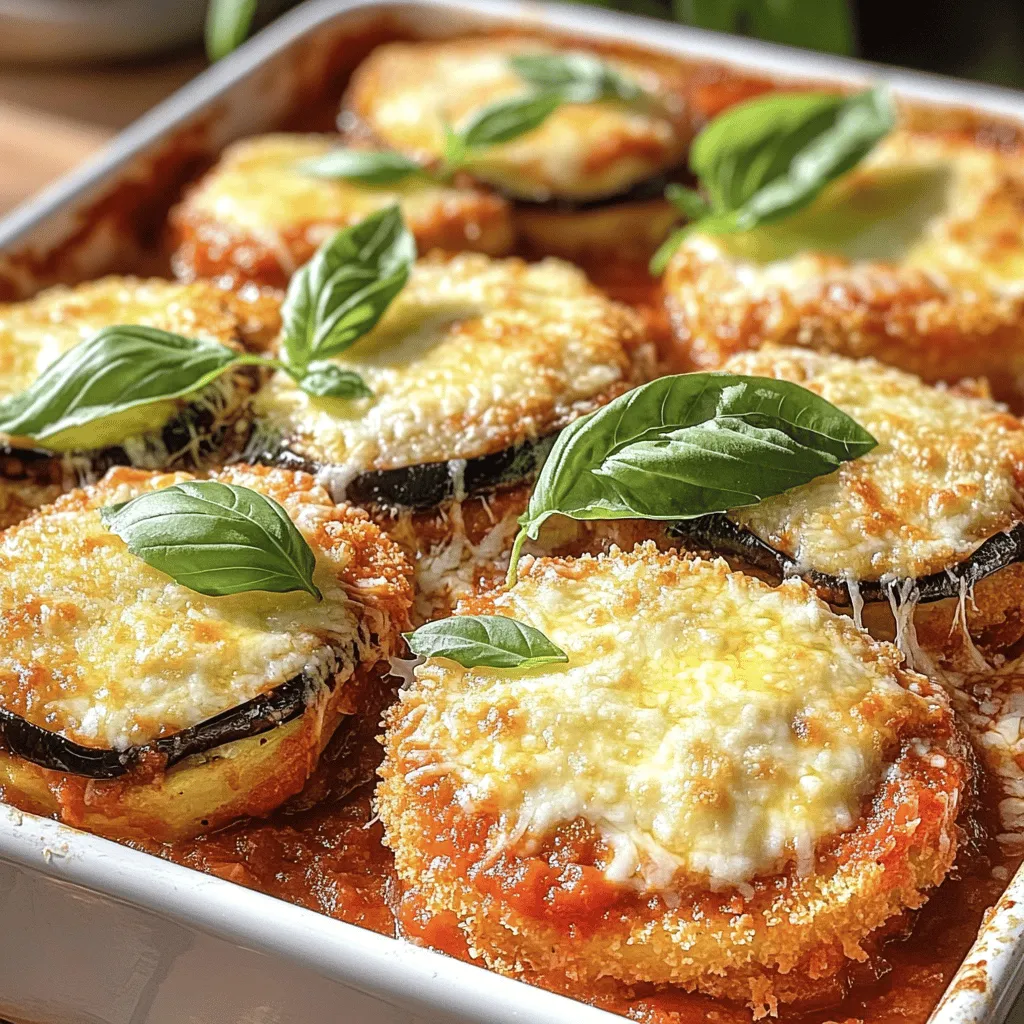
Craving a cozy, comforting dish that is both easy to make and packed with flavor? Look no further! This Eggplant
