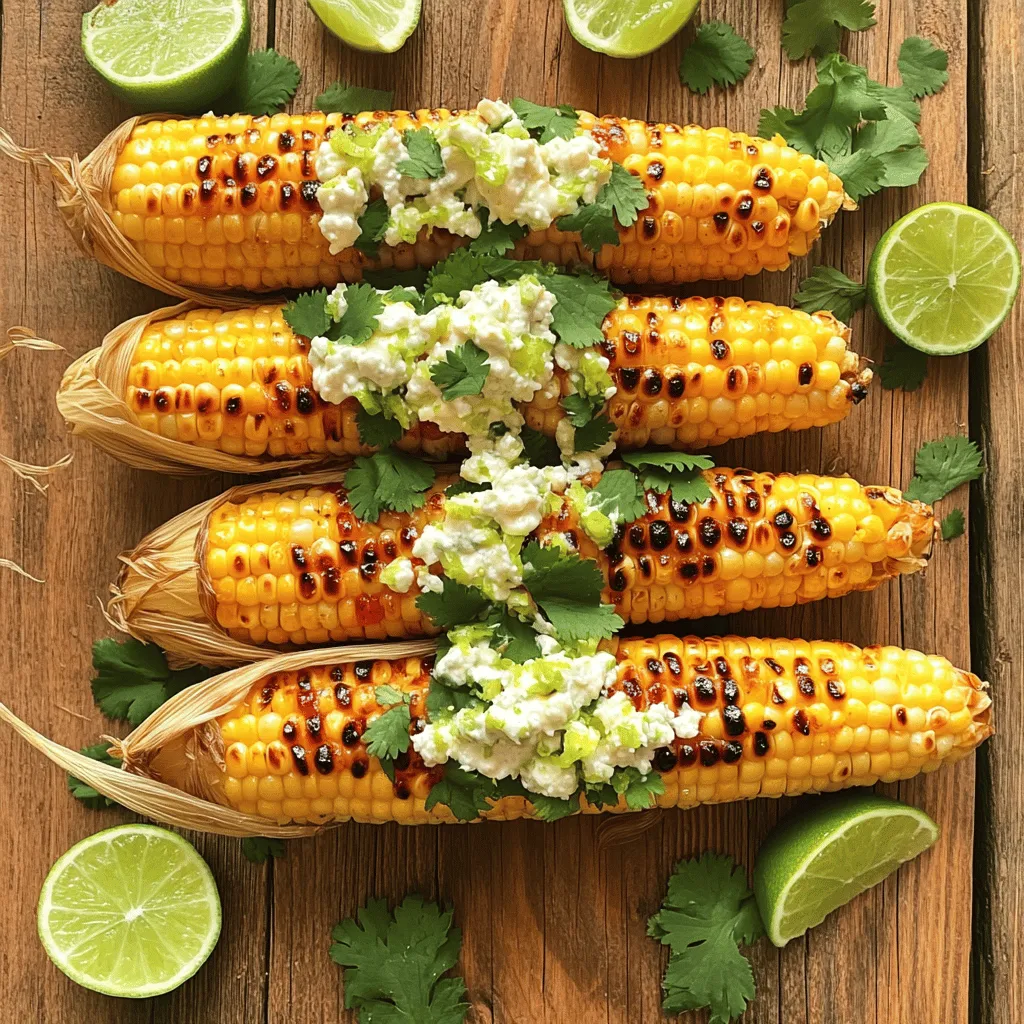
Chili Lime Grilled Corn Zesty and Flavorful Recipe
Grilling season is here, and I have the perfect recipe for you: Chili Lime Grilled Corn. This dish bursts with
Grilling season is here, and I have the perfect recipe for you: Chili Lime Grilled Corn. This dish bursts with

Get ready to fire up your grill with my flavorful teriyaki beef skewers! This recipe combines tender beef sirloin with
![- 8 oz (225g) spaghetti or favorite pasta - 2 tablespoons extra-virgin olive oil - 4 cloves garlic, finely minced - 6 cups fresh spinach (approximately 3 oz) - 1 cup heavy whipping cream - 1/2 cup freshly grated Parmesan cheese - 1 teaspoon sea salt - 1/2 teaspoon freshly cracked black pepper - Juice of 1 fresh lemon (about 1 tablespoon) The ingredients for creamy garlic spinach pasta are simple yet powerful. The base starts with your favorite pasta. I love using spaghetti, but you can choose any kind. The key is to cook it al dente so it holds up with the sauce. Next, we add the magic of garlic. You can never go wrong with minced garlic. It fills your kitchen with a warm, inviting aroma. The olive oil works as a base for our sauce. It adds richness and depth to the dish. Spinach is the star here. Fresh spinach wilts beautifully, adding nutrition and color. The heavy cream brings a velvety texture. The Parmesan cheese melts in, creating a thick, creamy sauce. Now let's not forget the seasonings! Sea salt and black pepper enhance all the flavors. A squeeze of fresh lemon juice adds brightness and balances the creaminess. For the full recipe, you can check out the Full Recipe link. Enjoy the vibrant flavors and ease of this delightful dish! - Bring a large pot of salted water to a rolling boil. - Add spaghetti and cook until al dente. To get that perfect texture, you want your pasta firm, not mushy. Check the package for cooking times. When it's done, save half a cup of the pasta water. Then, drain and set the pasta aside. - Heat olive oil over medium heat. - Add minced garlic and sauté until fragrant. In the same pot or a skillet, add the olive oil and turn the heat up to medium. Once hot, toss in the minced garlic. Stir it for about 1-2 minutes, until it smells amazing. Be careful not to let it burn, or it will taste bitter. - Gradually add spinach, stirring until wilted. - Pour in heavy cream and mix in Parmesan cheese and seasonings. Now, add your fresh spinach to the pot. Stir until it wilts, which takes about 2-3 minutes. Once the spinach is ready, reduce the heat to low. Pour in the heavy cream and mix it well with the garlic and spinach. Add the Parmesan cheese, salt, and pepper. If you like, sprinkle in some nutmeg. Mix until the cheese melts and the sauce is smooth. - Toss the drained pasta with the creamy sauce. - Adjust sauce thickness with reserved pasta water. Time to combine! Add the drained pasta into the skillet. Toss it gently in the creamy sauce. If the sauce is too thick, use a bit of the reserved pasta water to get your desired creaminess. For the full experience, check out the [Full Recipe]. Enjoy your creamy garlic spinach pasta! To make the sauce just right, balance is key. Use a ratio of 1 cup of cream to 1/2 cup of cheese. This mix gives a rich and creamy flavor. If you like more cheese, add a bit more. To spice it up, try adding garlic powder or cayenne pepper. This boosts flavor without overpowering it. Garnish your creamy pasta with extra Parmesan cheese. It adds a nice touch. A sprinkle of red pepper flakes gives it a little heat. For wine, a crisp white like Sauvignon Blanc pairs well. Its acidity cuts through the creaminess. Cleaning up can be quick and easy! After cooking, soak pots in warm, soapy water. This helps remove any stuck bits. Use a non-scratch sponge to avoid damage. Wash utensils right after use to keep your space neat. {{image_4}} You can make this dish even better by adding more veggies. Here are some tasty options: - Mushrooms: Slice and sauté them for 4-5 minutes. - Cherry Tomatoes: Halve and toss them in for 2-3 minutes. - Zucchini: Cut into thin rounds and cook for 3-4 minutes. - Bell Peppers: Dice and add for 3-4 minutes. Feel free to mix and match these vegetables based on your taste. Adding protein can turn this pasta into a full meal. Here’s how: - Chicken: Cook in a pan until golden, about 6-8 minutes. Slice and mix in. - Shrimp: Sauté in olive oil for 3-4 minutes until they turn pink. - Ground Meat: Brown in the pan for 5-7 minutes before adding the sauce. Choose your favorite protein to boost the meal’s flavor and nutrition. You can enjoy this dish even if you have dietary needs. Here are some great swaps: - Gluten-Free Pasta: Use rice or quinoa pasta, which cooks similarly. - Vegan Cream: Substitute heavy cream with coconut cream or cashew cream. - Vegan Cheese: Use nutritional yeast or cashew cheese for a cheesy flavor. These alternatives keep your meal tasty and satisfying. For the full recipe, check the complete guide! Store your creamy garlic spinach pasta in an airtight container. This keeps the moisture in and the food fresh. It’s best to refrigerate it right after serving. Creamy pasta can last in the fridge for about 3 to 5 days. Be sure to check for any signs of spoilage before enjoying your leftovers. To reheat, use a stove or microwave. If using the stove, add a splash of water or cream. Heat it gently over low heat, stirring often. This helps keep the pasta creamy. In the microwave, heat in short bursts, stirring in between. This avoids hot spots and keeps the dish smooth. Yes, you can freeze creamy garlic spinach pasta. To freeze, let it cool completely. Place it in a freezer-safe container. Leave some space at the top, as it will expand. To thaw, move it to the fridge overnight. Reheat it gently, adding cream or water to restore the creaminess. Enjoy your meal later! For the full recipe, check back to ensure you have all the steps to make it perfect. You can boost the flavor with fresh herbs like basil or parsley. Adding crushed red pepper gives a nice kick. You might also try a sprinkle of oregano or thyme. These herbs add depth and freshness to the dish. I like to mix in a bit of lemon zest for brightness. This really brings out the garlic and cream. It makes each bite more exciting! Yes, you can make this dish in advance. Cook the pasta and sauce, then cool them separately. Store them in airtight containers in the fridge. When you’re ready to eat, simply reheat them together. Add a splash of cream or pasta water to keep it creamy. This dish tastes great even after a day in the fridge! Spaghetti is a classic choice for this creamy garlic spinach pasta. It holds the sauce well and has a nice texture. Fettuccine or penne also work nicely. They mix well with the creamy sauce. Use your favorite pasta shape to make it your own! This blog post covered the key ingredients to make creamy garlic spinach pasta. You learned about cooking methods, storage, and variations to fit your tastes. Cooking is fun, and this dish is easy to make. Add your favorite veggies or proteins for more flavor. Remember, you can enjoy leftovers too. Make it ahead and reheat for quick meals. Now, you're ready to create a tasty pasta dish that impresses everyone. Enjoy the process and happy cooking!](https://tastymomrecipes.com/wp-content/uploads/2025/05/0c2e9b87-bbd0-4648-bc51-dc25360c7837.webp)
Looking for a quick meal that bursts with flavor? This Creamy Garlic Spinach Pasta is your answer! With simple ingredients
 for more details on making this dish. You can store Peach and Blueberry Crumble in the fridge for up to three days. Just cover it with plastic wrap or foil. If you freeze it, it lasts for about three months. To freeze, let it cool first, then wrap it well. Thaw it in the fridge before reheating. Yes, you can use frozen blueberries. However, they may make the filling a bit more watery. Fresh blueberries hold their shape better and add a lovely texture. If you use frozen ones, try to drain any excess juice before mixing them with the peaches. You can use other fruits like nectarines, plums, or apples. Each fruit brings its own taste. For a fun twist, try mixing fruits! Berries can add a nice flavor, too. Just remember to adjust the sweetness based on the fruit you choose. Yes, you can make this crumble gluten-free. Use rolled oats labeled gluten-free and swap out all-purpose flour for almond or coconut flour. This keeps the texture while making it safe for those with gluten allergies. Enjoy a tasty dessert that everyone can love! This article covered the essential ingredients, step-by-step instructions, and helpful tips for making a delicious peach and blueberry crumble. You should feel ready to create a tasty dessert that impresses. Remember, you can customize flavors and textures to suit your taste. Enjoy serving it warm with ice cream or fresh fruit. Your baking journey is now easier with these insights. Happy cooking!](https://tastymomrecipes.com/wp-content/uploads/2025/05/0947946d-1ded-4307-b127-9d7cba7e2540.webp)
Summer calls for fresh, fruity desserts, and nothing tops that list like Peach and Blueberry Crumble. This dessert bursts with
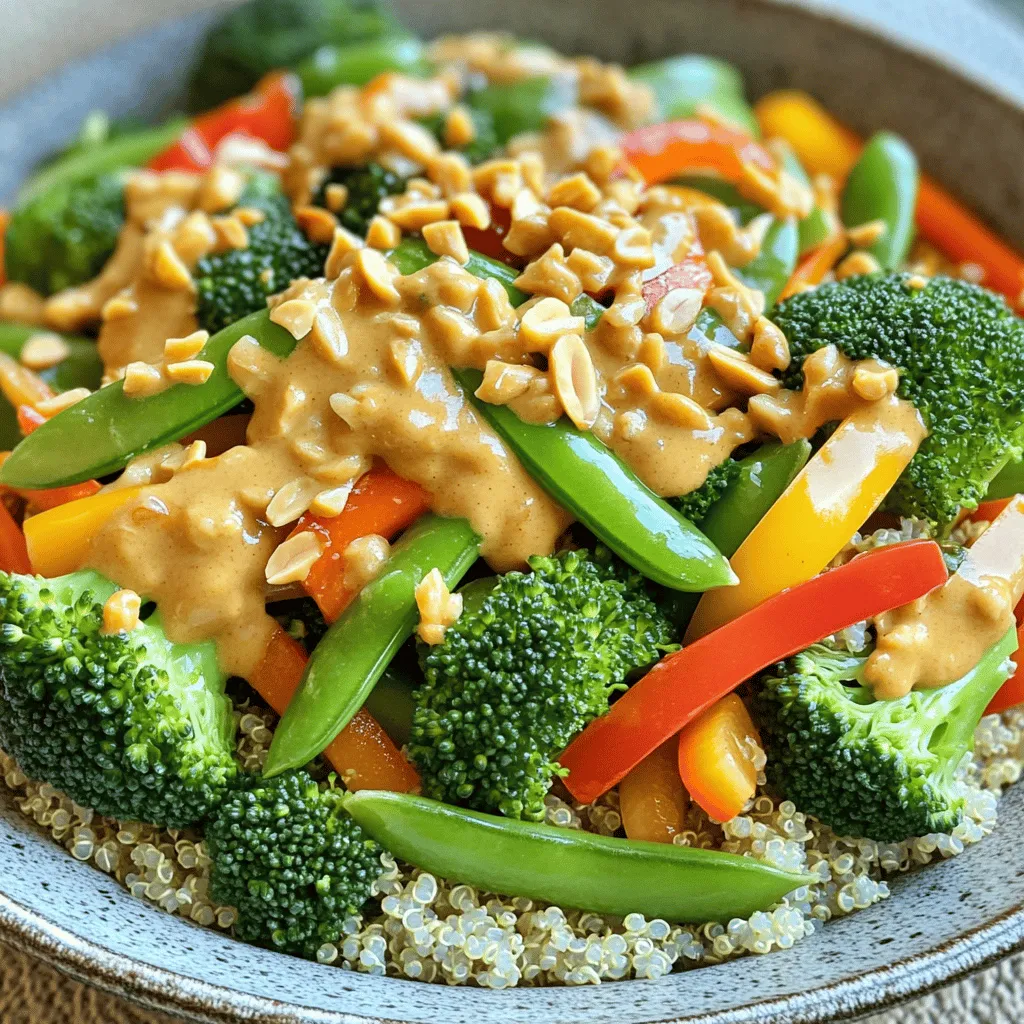
Are you ready to whip up a quick and tasty meal? This Vegetable Stir-Fry with Peanut Sauce is packed with
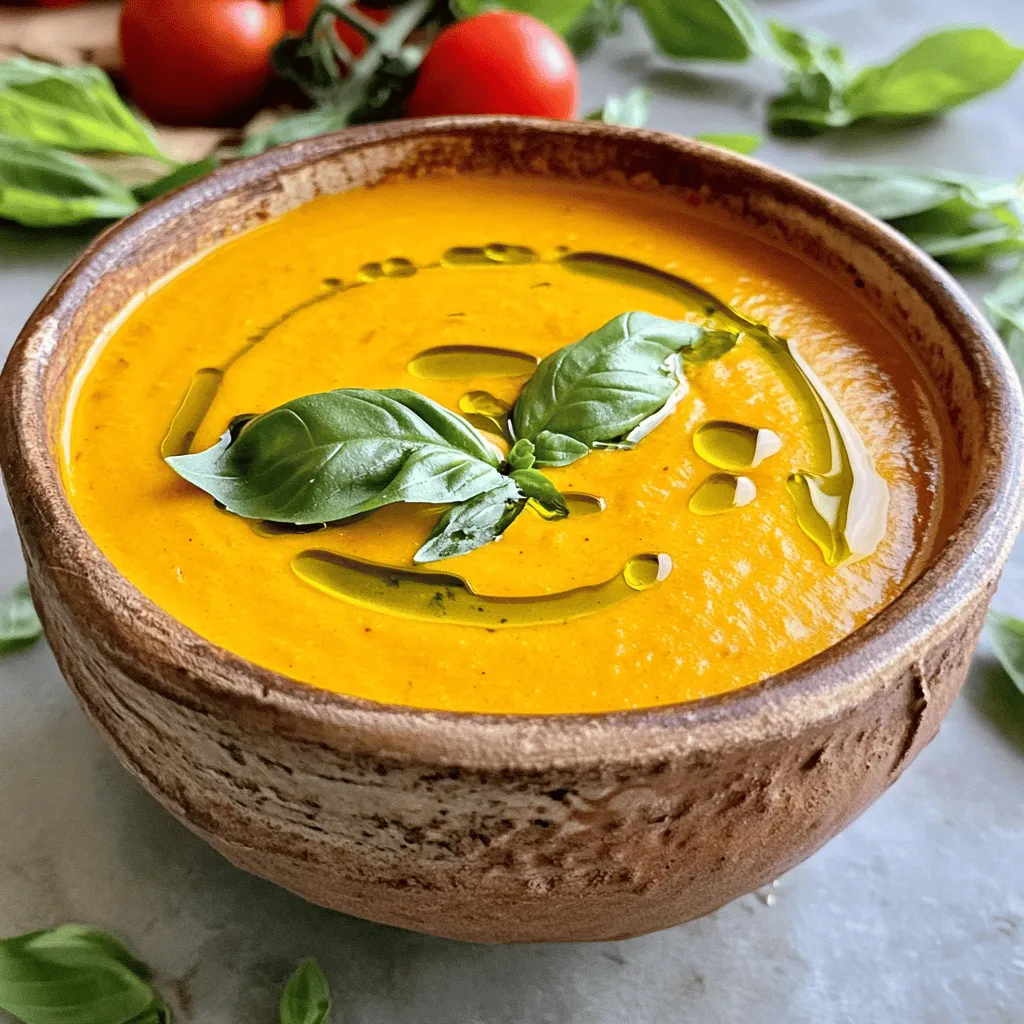
Creamy Tomato Basil Soup is a cozy dish that’s simple to make and packed with flavor. I’ll show you how
![- Chicken: 1.5 lbs boneless, skinless chicken thighs - Marinade: 1 cup plain yogurt, spices, ginger, and garlic - Liquids: 1 can crushed tomatoes and 1 cup coconut milk To make a great Chicken Tikka Masala, you need the right ingredients. Start with the chicken. I prefer boneless, skinless chicken thighs. They stay juicy and tender. You need 1.5 lbs for this dish. Next is the marinade. This is where the magic begins! You will mix 1 cup of plain yogurt with spices, ginger, and garlic. The yogurt helps the spices stick to the chicken and adds creaminess. In the marinade, use garam masala, cumin, coriander, turmeric, and cayenne pepper for heat. For the sauce, you will need 1 can of crushed tomatoes. Fire-roasted tomatoes add a nice depth of flavor. Also, include 1 cup of coconut milk. This gives a rich, creamy texture to the dish. Gathering these ingredients is key to creating a tasty meal. Each element plays a big role in the final flavor. For the full recipe, check out the detailed steps later on! Step 1: Combine yogurt with spices and prepare marinade. In a large bowl, mix 1 cup of yogurt with 2 tablespoons of garam masala, 1 tablespoon of ground cumin, 1 tablespoon of ground coriander, 1 teaspoon of turmeric, and 1 teaspoon of cayenne pepper. Add 1 tablespoon of minced ginger and 1 tablespoon of minced garlic. Stir until smooth. This marinade will bring all the flavors together. Step 2: Coat chicken pieces and refrigerate. Take 1.5 lbs of boneless, skinless chicken thighs, cut into bite-sized pieces. Add the chicken to the marinade. Ensure every piece is coated well. Cover the bowl with plastic wrap or a lid. Place it in the fridge for at least 30 minutes. For best results, marinate overnight. This step lets the chicken soak in all those tasty flavors. Step 3: Sauté onions in oil. Set your Instant Pot to 'Sauté' mode. Pour in 2 tablespoons of vegetable oil or ghee. Once the oil is hot, add 1 large, finely chopped onion. Cook it for about 5 minutes until it's soft and translucent. This step builds the base flavor for your dish. Step 4: Add chicken and brown. Now, add the marinated chicken and all the marinade into the pot. Stir occasionally, cooking for about 5 minutes. You want the chicken to brown slightly. This adds depth to the flavor. Step 5: Mix in tomatoes and coconut milk. Pour in 1 can of crushed tomatoes and 1 cup of coconut milk. Stir well to combine. This will create a rich and creamy sauce that envelops the chicken. Step 6: Seal and cook on high pressure. Close the Instant Pot lid and make sure the pressure valve is set to seal. Switch to 'Manual' mode and set the timer for 10 minutes on high pressure. After cooking, allow the pot to release pressure naturally for 5 minutes. Then, carefully turn the valve for quick release. This method ensures the chicken stays tender and juicy. Now you have a delicious Chicken Tikka Masala ready to serve! Marinating Overnight: Benefits for maximum flavor Marinating the chicken overnight makes a big difference. It allows the spices to soak in well. This makes the chicken taste rich and full of flavor. If you are short on time, marinate it for at least 30 minutes. But trust me, overnight is best. Spice Adjustments: Customize heat level to taste You control the heat! If you like it spicy, add more cayenne. If you prefer mild, reduce the cayenne pepper. Taste the marinade before adding the chicken. Adjusting spice levels helps you create a dish just right for your taste buds. How to ensure chicken is tender and juicy To keep the chicken juicy, don’t overcook it. Set the Instant Pot for 10 minutes on high. The chicken will cook quickly while staying tender. After cooking, give it a gentle stir to mix the flavors. Importance of natural pressure release Letting the pressure release naturally helps the chicken stay moist. After the timer goes off, wait 5 minutes before using quick release. This extra time allows the juices to settle. Your Chicken Tikka Masala will taste even better! {{image_4}} You can have fun with this recipe by switching up the main ingredients. If you want a vegetarian option, try using tofu or vegetables instead of chicken. Tofu absorbs flavors well and gives a nice texture. Use firm or extra-firm tofu for the best results. Cut it into bite-sized pieces and marinate just like the chicken. Another option is to use chickpeas or lentils. They add protein and are tasty in this dish. You can also use vegetables like bell peppers, zucchini, or cauliflower for a colorful mix. If you are looking for dairy-free options, swap the yogurt for coconut yogurt or cashew cream. These alternatives work well and will keep the dish creamy. You can also use almond milk in place of coconut milk for a lighter sauce. Pairing your Chicken Tikka Masala with the right sides makes a big difference. Fluffy basmati rice is a classic choice. It soaks up the sauce and adds a nice touch. Naan bread is another great option. You can use it to scoop up the masala, making each bite delicious. For a restaurant-style presentation, serve the dish in shallow bowls. Drizzle a swirl of coconut milk on top for a rich look. Add a sprinkle of fresh cilantro for color and a burst of flavor. A slice of lime or lemon on the side adds a nice zesty touch. You can also serve a small salad with cucumbers and tomatoes for a refreshing side. Enjoy exploring these variations to make your meal unique and tasty! For the full recipe, please refer to the [Full Recipe]. To keep your chicken tikka masala fresh, store it in an airtight container. Let it cool to room temperature first. Then, seal the container and place it in the fridge. It stays good for up to four days. If you want to save it for later, freezing is a great option. Pour the cooled dish into a freezer-safe container. Leave some space at the top for expansion. Your chicken tikka masala can last in the freezer for up to three months. When you're ready to eat, thaw it overnight in the fridge. Reheat it on the stove over medium heat. Stir it often to ensure it heats evenly. You can also use the microwave. Just cover it to keep moisture in. Chicken tikka masala will last about four days in the fridge. Always check for signs of spoilage, like off smells or changes in color. In the freezer, it can last for three months without losing flavor or texture. For the best taste, consume it sooner rather than later. Enjoy those rich flavors while they are fresh! For the full recipe, check the link provided. You can serve many tasty sides with Chicken Tikka Masala. Here are some great ideas: - Basmati rice: The fluffy rice soaks up the sauce well. - Naan bread: This soft bread is perfect for dipping. - Raita: A cool yogurt dip that balances the spice. - Salad: A simple cucumber and tomato salad adds crunch. - Lassi: This yogurt drink cools the palate and pairs nicely. Yes, you can make Chicken Tikka Masala ahead of time. Here’s how: - Prepare and cook: Cook the dish as usual. - Cool and store: Let it cool down before storing it in an airtight container. - Refrigerate: It lasts for 3-4 days in the fridge. - Reheat: Warm it on the stove or microwave. Add a splash of water if it’s too thick. If your Chicken Tikka Masala is too spicy, try these tips: - Add dairy: Stir in some yogurt or cream to tone down the heat. - Sweeten it: A bit of sugar or honey can balance the spice. - Serve with sides: Pair with rice or naan to dilute the heat. For the complete recipe of Instant Pot Chicken Tikka Masala Delight, check the [Full Recipe]. This blog covered how to make Chicken Tikka Masala in an Instant Pot. We discussed the key ingredients, steps for marinating and cooking, and shared tips for the perfect dish. You can try variations like tofu for a vegetarian option. Storing leftovers is easy, and I provided ways to reheat them. In the end, making this dish can be fun and delicious. With these steps, you’ll have a tasty meal that impresses. Enjoy every bite, and happy cooking!](https://tastymomrecipes.com/wp-content/uploads/2025/05/f51f6e95-5be6-4e37-a2c5-420e4cd7e85c.webp)
Craving a rich, flavorful meal that’s quick to make? You’re in the right place! My Instant Pot Chicken Tikka Masala
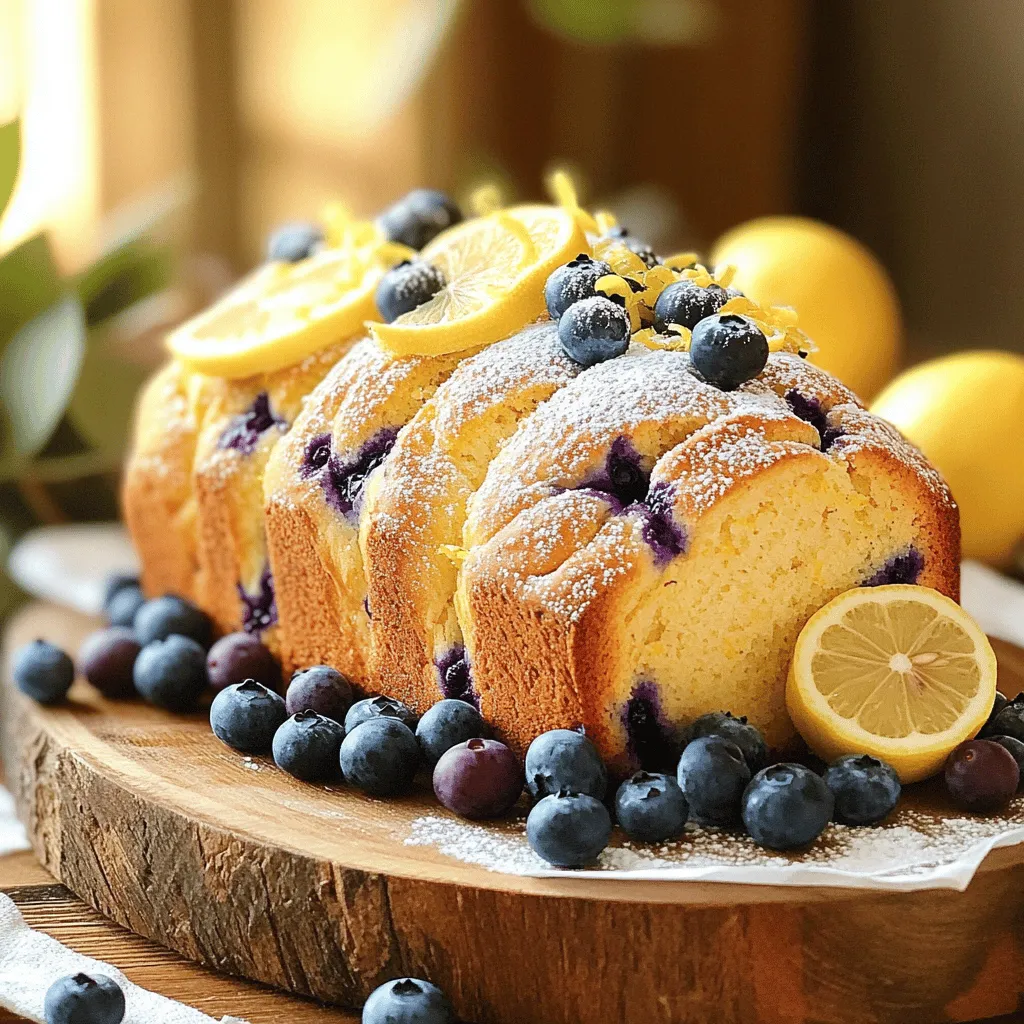
Imagine waking up to the sun shining and the smell of fresh lemon blueberry bread wafting through your kitchen. This
![- Cauliflower florets - All-purpose flour (or gluten-free alternative) - Unsweetened plant-based milk The main ingredient is cauliflower. You want it cut into bite-sized florets. This makes them easy to eat. For the batter, use all-purpose flour or a gluten-free version to suit your needs. The liquid is unsweetened plant-based milk. Almond, soy, or oat milk works well here. - Garlic powder - Onion powder - Smoked paprika Spices add a lot of flavor. Garlic powder gives it a nice kick. Onion powder adds depth. Smoked paprika brings a hint of smokiness. These three spices make your wings special. - Hot sauce (recommended brands) - Vegan butter - Optional garnish: fresh parsley For the buffalo sauce, choose your favorite hot sauce. Frank's RedHot is a great choice. Mix this with melted vegan butter for a creamy texture. Fresh parsley adds a pop of color if you like. This sauce makes your wings truly irresistible. For the full recipe, check out the detailed cooking steps. 1. Preheat your oven to 450°F (230°C). This helps the wings cook evenly. 2. Line a large baking sheet with parchment paper. This keeps the cauliflower from sticking. 3. In a big bowl, whisk together the flour, plant-based milk, garlic powder, onion powder, smoked paprika, salt, and black pepper. Mix well until the batter is smooth. 1. Take each cauliflower floret and dip it into the batter. Make sure it gets fully coated. 2. Let any extra batter drip off. Then, arrange the florets on the baking sheet in a single layer. 1. Place the baking sheet in the oven. Bake the cauliflower wings for 20 minutes. They should turn golden and slightly crispy. 2. While the cauliflower is baking, mix your buffalo sauce. Combine the hot sauce and melted vegan butter in a bowl. Stir until well blended. 1. After 20 minutes, take the baking sheet out of the oven. Toss the baked cauliflower in the buffalo sauce. 2. Return the coated cauliflower to the baking sheet. Bake for another 10-15 minutes, until they are extra crispy. 3. Once done, let the wings cool for a few minutes. Before serving, sprinkle with fresh parsley for a colorful touch. For the full recipe, check out the details earlier in this article. To get that perfect crunch, baking is key. Frying can add extra oil and calories. When baking, arrange each cauliflower floret in a single layer. This helps them cook evenly and get crispy. If you crowd the pan, they will steam instead of bake. You can easily make this dish lighter. Use whole wheat flour instead of all-purpose flour. This adds fiber and keeps calories lower. For a sodium reduction, choose low-sodium hot sauce. You can also mix in some spices to add flavor without the salt. For a stunning plate, use a large white dish. The bright orange color of the wings pops against the white. Arrange the wings in a circle, and place fresh parsley on top. Serve with celery sticks and a small bowl of vegan ranch. This makes for a fun and tasty meal. Explore the [Full Recipe] to create these flavorful wings and impress your guests! {{image_4}} You can switch up the sauce on your vegan cauliflower buffalo wings for fun. If you like a sweet twist, try BBQ sauce. It adds a smoky flavor that is hard to resist. For a sweeter option, use teriyaki or sweet and sour sauce. These sauces bring a delightful change, making your wings exciting each time you serve them. Dipping sauces can make your meal even better. Vegan ranch dressing is a great choice. It cools down the heat and adds a creamy touch. You can also pair your wings with fresh salads or veggie platters. The crunch of veggies balances the bold flavors of the wings. Cauliflower is so versatile! You can make cauliflower tacos as a fun twist. Just use spiced cauliflower instead of meat. Another tasty idea is cauliflower sliders. They make great mini sandwiches for parties. You can find my full recipe for spicy vegan cauliflower buffalo wings in the earlier section. Enjoy exploring these variations and making your meals more fun! To keep your Vegan Cauliflower Buffalo Wings fresh, store them in the fridge. Place them in an airtight container. This helps lock in flavor and keeps them from drying out. If you plan to eat them later, you can freeze them too. Just lay them flat in a freezer-safe bag. Make sure to squeeze out the air before sealing. When you reheat your wings, the goal is to keep them crispy. Use an oven, if possible. Preheat it to 375°F (190°C). Spread the wings on a baking sheet and bake for about 10 minutes. This will help restore their crunch. Avoid using the microwave because it can make them soggy. In the fridge, your Vegan Cauliflower Buffalo Wings will last about 3-5 days. If you store them in the freezer, they can last up to 3 months. Just remember to check for any ice crystals before using. If you see them, it’s best to toss the wings. Enjoy the full recipe for the best results! To make vegan cauliflower buffalo wings gluten-free, swap the all-purpose flour with gluten-free flour. Many brands offer good options that work well. You can also use almond flour or chickpea flour. Check the hot sauce label for gluten, as some brands may include it. Always pick a gluten-free sauce to keep the wings safe for those with gluten allergies. Yes, you can prepare these wings ahead of time. Start by baking them once and letting them cool. You can store them in the fridge. When ready, brush on the buffalo sauce and bake again. This method keeps the flavors bright. You can also marinate them. Just let the florets soak in the batter overnight. This adds extra flavor. You can easily make allergen-friendly changes. If you need a nut-free option, use soy or oat milk. For soy-free, choose almond or coconut milk. If someone has a corn allergy, avoid corn starch in gluten-free flour blends. Always read labels to avoid hidden allergens. These wings pair well with many sides. Serve with celery sticks and carrot sticks for crunch. A fresh salad also works great. Try a creamy vegan ranch dressing for dipping. For drinks, serve with a cold, refreshing soda or a light beer. You can even make a fun mocktail to complete the meal. Check out the full recipe for more ideas! Vegan Cauliflower Buffalo Wings are easy and fun to make. We covered main ingredients, spices, and how to prepare them. I shared tips for crispiness and healthier options. Variations allow you to try different sauces and pairings. Storing and reheating tips help keep your wings fresh. Explore the FAQs for more helpful details. Enjoy these tasty bites any time! You’ll love how simple they are to make and customize.](https://tastymomrecipes.com/wp-content/uploads/2025/05/055cac95-7f8a-444c-8df8-6b424d10f6a7.webp)
If you’re craving a tasty twist on a classic, these Vegan Cauliflower Buffalo Wings are your answer! Packed with flavor,
![- 1 lb (450g) large shrimp, peeled and deveined - 3 cloves garlic, finely minced - 1 teaspoon paprika - 1 teaspoon chili powder - 1/2 teaspoon cayenne pepper (adjust based on your heat preference) - 2 tablespoons fresh lime juice - 2 tablespoons olive oil - Salt and pepper to taste - 8 small corn tortillas - 1 cup cabbage, finely sliced - 1/2 cup sour cream or Greek yogurt - 1/4 cup fresh cilantro, chopped - Lime wedges for serving I love using fresh shrimp for this dish. Choose large shrimp for the best bite. The garlic and spices really make the shrimp pop. Don't skip the lime juice; it adds a bright flavor. For the tortillas, I prefer corn ones. They hold up well and add a nice texture. Cabbage gives a crunch. The sour cream or Greek yogurt adds creaminess. Cilantro adds a fresh touch. You can find the full recipe above for detailed steps! To start, grab a mixing bowl. Add the large shrimp, minced garlic, paprika, chili powder, cayenne pepper, fresh lime juice, olive oil, salt, and pepper. Mix everything well until the shrimp are coated in the spices. This step is key to getting a great flavor. Let the shrimp marinate for 15 minutes. This allows them to soak up all those tasty flavors. Next, heat a non-stick skillet over medium-high heat. Once it’s hot, add the marinated shrimp in a single layer. Cook them for about 2-3 minutes on each side. You want the shrimp to turn pink and opaque. This shows they are done. Once cooked, remove the skillet from the heat. The shrimp should look vibrant and ready to shine in your tacos. While the shrimp cook, you need to warm the corn tortillas. You can do this by placing them in a dry skillet over medium heat. Heat them for a few minutes until soft and slightly charred. Alternatively, wrap the tortillas in a damp paper towel and microwave them for about 30 seconds. This will make them soft and pliable. Warm tortillas are the perfect base for your spicy garlic shrimp. For the full recipe and more details, check out the [Full Recipe]. For the best flavor, marinate your shrimp for about 15 minutes. This gives the spices time to soak in. You can adjust the marination time, but don’t go over 30 minutes. Too long can make shrimp mushy. When you cook the shrimp, aim for a high heat. This helps create a nice sear. Cook them until they turn pink and opaque. This usually takes about 2-3 minutes on each side. Plating is key for a fun meal. Stack the tacos on a large platter. Sprinkle extra cilantro on top for color. Lime wedges add a fresh touch. For drinks, consider pairing your tacos with a light beer or a refreshing margarita. Both choices enhance the spicy flavors of the dish nicely. One common mistake is overcooking the shrimp. Overcooked shrimp can become rubbery and tough. Always watch the cooking time closely. Another mistake is choosing the wrong tortilla. I recommend using small corn tortillas. They add a nice flavor and hold the filling well. Flour tortillas can work, but corn is traditional and tastier. {{image_4}} You can switch shrimp for other proteins. Try using white fish, like cod or tilapia. These fish cook quickly and soak up flavors well. You can also use chicken if you prefer poultry. Just cut it into small pieces and cook it the same way as the shrimp. For a vegetarian option, consider using tofu or jackfruit. Tofu absorbs flavors nicely when marinated. Jackfruit has a great texture and can mimic shredded meat. To boost the flavor of your tacos, add more spices. Consider using cumin or coriander for a warm taste. Fresh herbs like parsley or mint can add a bright touch. You can also play with sauces. A zesty mango salsa pairs well with this dish. A spicy chipotle sauce can kick things up a notch. Don’t be afraid to experiment with flavors! Toppings can make your tacos even more delicious. Avocado slices add a creamy texture. Pickled onions bring a nice tangy crunch. You can also add crumbled queso fresco for a salty bite. For those who love heat, consider adding a spicy sauce. Hot sauce or a jalapeño salsa can turn up the spice level. Get creative with your toppings! For the full recipe, check out [Full Recipe]. To keep leftover shrimp fresh, place them in a sealed container. Make sure to cool the shrimp before sealing. Store them in the fridge for up to two days. The tortillas can stay fresh for about three days. Wrap them in foil or plastic to keep them soft. For freezing shrimp, lay them flat in a single layer on a baking sheet. Once frozen, move them to a freezer-safe bag. This method avoids clumping and helps them stay fresh for up to three months. Tortillas can be frozen too. Stack them with parchment paper between each one, then wrap tightly in plastic. To reheat shrimp tacos, warm them in a skillet over medium heat. This helps keep the shrimp tender. For tortillas, heat them in a dry skillet or microwave for 15 seconds. This keeps the tortillas soft. Ensure you don't overheat them, as that can make them tough. Enjoy your leftovers just as much as the first time! For the full recipe, check out the earlier section. You can tell shrimp is cooked when it turns pink and opaque. The shrimp should curl into a C shape. If it feels firm and springs back when touched, it is ready. Overcooked shrimp can become rubbery. So, watch carefully while cooking. Yes, you can prep shrimp tacos in advance. Cook the shrimp and store them in the fridge for up to two days. Warm the tortillas just before serving. You can also prepare toppings like cabbage and sour cream ahead of time. Just assemble the tacos when ready to eat. Some great sides to pair with shrimp tacos include: - Mexican rice - Black beans - Grilled corn - Chips and salsa - A light salad These sides balance the bold flavors of the tacos. If you miss an ingredient, don't worry! Here are some simple swaps: - Use lime juice instead of lemon juice. - Swap shrimp with fish, chicken, or tofu. - Try cabbage or lettuce for crunch. - Use Greek yogurt instead of sour cream. Feel free to get creative! Check the Full Recipe for more ideas. Spicy garlic shrimp tacos are easy and fun to make. You marinate fresh shrimp, cook them, and wrap them in warm tortillas. Remember to be careful when cooking shrimp and pick the right tortillas. You can change the toppings and proteins to fit your taste. Lastly, store or freeze leftovers properly for later. Enjoy your flavorful tacos and make them your own with different twists!](https://tastymomrecipes.com/wp-content/uploads/2025/05/22943e40-677a-4437-92fe-7a92b0671685.webp)
Craving a tasty meal that’s quick and easy? Look no further! My Spicy Garlic Shrimp Tacos blend bold flavors with
