Skip to content
DisclaimerTerms Of UseGDPR PolicyCookie Policy

tastymomrecipes

  • Home
  • Drinks
  • Appetizers
  • Dinner
  • Dessert
  • About
  • Contact
  • Privacy Policy
DisclaimerTerms Of UseGDPR PolicyCookie Policy

Olivia

To make delicious cinnamon sugar churros, you need these key ingredients: - 1 cup water - 1/2 cup unsalted butter, cubed - 1 tablespoon granulated sugar - 1/4 teaspoon salt - 1 cup all-purpose flour - 2 large eggs, at room temperature - 1 teaspoon pure vanilla extract - Vegetable oil, for frying - 1/2 cup granulated sugar (for coating) - 1 tablespoon ground cinnamon Each ingredient plays an important role in creating the churros' flavor and texture. The water and butter form the dough's base, while eggs help give it structure. The sugar and cinnamon add that irresistible sweetness we all love. If you don’t have all the ingredients on hand, here are some substitutes you can use: - Use coconut oil instead of vegetable oil for frying. - Substitute margarine for unsalted butter. - You can use brown sugar in place of granulated sugar for a richer taste. - If you’re out of vanilla extract, almond extract works great too. These substitutes can give your churros a unique twist while keeping them delicious. To make churros, you will need a few simple tools: - Medium saucepan - Wooden spoon or spatula - Piping bag with a large star-shaped nozzle - Deep frying pan or deep fryer - Candy thermometer (to check oil temperature) - Slotted spoon - Paper towels for draining Having the right equipment makes the process easier and helps you achieve the best results. Enjoy making these sweet treats! To make the dough, start with a medium saucepan. Add 1 cup of water, the cubed butter, 1 tablespoon of sugar, and 1/4 teaspoon of salt. Heat this mixture over medium heat. Stir until it boils and the butter melts. Once boiling, take the pan off the heat. Now, add 1 cup of all-purpose flour. Stir with a wooden spoon until the dough pulls away from the pan. Let the dough cool for about 5 minutes. Next, add 2 large eggs, one at a time. Mix well after each addition. This helps the dough stay smooth. Finally, stir in 1 teaspoon of pure vanilla extract. You want a glossy dough that looks inviting. Now it’s time to fry! Heat vegetable oil in a deep pan to 375°F (190°C). A thermometer helps to check the heat. While the oil heats, put the churro dough into a piping bag. Use a large star-shaped nozzle for that classic churro shape. Carefully pipe 4 to 6-inch strips of dough into the hot oil. Cut them off with kitchen scissors for a clean edge. Fry each churro for about 2 to 3 minutes until golden brown. Use a slotted spoon to remove them from the oil. Let them drain on a plate lined with paper towels. While the churros drain, it's time for the fun part—coating them! In a shallow dish, mix 1/2 cup of granulated sugar with 1 tablespoon of ground cinnamon. While the churros are still warm, roll them in the cinnamon-sugar mixture. Make sure they are well coated. This adds sweetness and a lovely crunch. Now your cinnamon sugar churros are ready to enjoy! For a special touch, serve them in a tall glass or a rustic basket. Add a rich chocolate dipping sauce for an indulgent treat. For the full recipe, don’t forget to check the details! To get a crunchy outside and soft inside, fry at the right temperature. I recommend 375°F (190°C). Use a thermometer to check. If the oil is too hot, the outside cooks fast, leaving the inside raw. If too cold, they absorb oil and get soggy. Fry in batches for even cooking. This way, each churro gets enough space to expand and crisp up. Don’t skip the vanilla extract. It adds depth to the dough. You can also mix in a pinch of nutmeg for warmth. For a twist, add orange zest to the dough. This brightens the flavor and makes them unique. Finally, let the churros sit in the cinnamon sugar while warm. This helps the sugar stick better and enhances the sweet flavor. Avoid overmixing the dough after adding eggs. It can make the churros tough. Don’t skip draining the churros on paper towels. This step removes excess oil and keeps them crispy. Finally, be careful not to overcrowd the frying pan. This can lower the oil temperature and affect the texture. Follow these tips for the best cinnamon sugar churros. For the full recipe, check the earlier section. {{image_4}} You can make churros even more special by adding a chocolate filling. To do this, melt dark chocolate and let it cool slightly. Pipe the chocolate into the center of each churro right after frying. This filling adds a rich, gooey surprise that everyone loves. Chocolate-filled churros offer a nice balance to the sweet cinnamon sugar coating. They are perfect for parties or a sweet treat at home. You can easily make churros vegan. Replace the eggs with a mixture of ground flaxseed and water. Use 1 tablespoon of ground flaxseed mixed with 3 tablespoons of water for each egg. This will help bind the dough. Use vegan butter or coconut oil for frying. The result is a delicious treat that everyone can enjoy, regardless of their diet. Vegan churros still taste great and have that classic texture. Get creative with your churro flavors! You can add orange zest to the dough for a bright, fresh taste. Nutmeg also works well, giving a warm spice note. Try mixing in a bit of cocoa powder for a chocolate twist. These simple add-ins can elevate your churros from good to great. Experimenting with flavors can lead to fun surprises for your taste buds. To store leftover churros, let them cool completely first. Place them in an airtight container. This keeps them fresh and prevents them from getting soggy. If you do not have an airtight container, wrap them tightly in plastic wrap. Store them at room temperature for up to two days. For longer storage, the fridge is fine, but they may lose some crunch. To reheat churros, an oven works best. Preheat your oven to 350°F (175°C). Place the churros on a baking sheet. Heat them for about 5-7 minutes. This method helps restore their crispiness. If you want a quick option, you can use a microwave. Just heat them for 10-15 seconds. But they will not be as crispy this way. If you want to freeze churros, do so after they cool. Place them in a single layer on a baking sheet. Freeze for a couple of hours until solid. Then, transfer them to a freezer bag. This way, they can last up to three months. When ready to eat, thaw overnight in the fridge. Reheat in the oven for the best results. Enjoy these sweet treats anytime! For the full recipe, check out the earlier section. To make cinnamon sugar churros from scratch, you need simple ingredients. First, boil water, butter, sugar, and salt. Once it boils, stir in flour to make a dough. After cooling, mix in eggs and vanilla. Pipe the dough into hot oil and fry until golden. Finally, roll in a mix of sugar and cinnamon. You can find the full recipe above for detailed steps. Churros taste great with many dipping sauces. The classic choice is chocolate sauce. You can also try caramel sauce for a sweet twist. For something fruity, consider strawberry or raspberry sauce. Each sauce adds a unique flavor, making every bite even better. Yes, churros can be made in advance. You can fry them and store them in an airtight container for a day. To keep them fresh, store them in the fridge. When you’re ready to eat, reheat them in the oven. This keeps them crispy and delicious. Cinnamon sugar churros are a fun treat to make. You learned about key ingredients, substitutes, and what equipment to use. I shared steps to prepare, fry, and coat your churros. Tips helped you avoid common mistakes and achieve the best texture. Plus, you discovered variations like chocolate-filled and vegan options. These churros are not just tasty; they spark creativity in the kitchen. Enjoy making them yourself, and share with friends!

Cinnamon Sugar Churros Irresistible Sweet Treat

If you love sweet snacks, then you’ll adore cinnamon sugar churros! These crispy, golden treats are coated in rich cinnamon

Let's dive into the ingredients for these delightful no-bake cheesecake bites. Each one plays a key role in making this dessert both tasty and easy to prepare. - 1 cup cream cheese, softened to room temperature - 1/2 cup creamy Greek yogurt - 1/3 cup powdered sugar - 1 teaspoon pure vanilla extract - 1/2 cup crushed graham crackers These essential ingredients create a rich and creamy base. Cream cheese gives it that classic cheesecake flavor. The Greek yogurt adds a nice tang and creaminess. Powdered sugar sweetens it just right, and vanilla extract enhances the overall taste. Crushed graham crackers provide a crunchy element that contrasts beautifully with the creamy filling. - 1/4 cup unsweetened cocoa powder (for a chocolate variant) - 1/4 cup mini chocolate chips - Fresh berries for topping Feel free to experiment with these optional ingredients! Adding cocoa powder turns these bites into a chocolate lover's dream. Mini chocolate chips bring extra sweetness and texture. Fresh berries make a lovely topping. They not only add color but also a fruity burst with each bite. If you need to make substitutions, there are plenty of options. You can use low-fat cream cheese for a lighter version. Dairy-free cream cheese works well for a vegan treat. For a healthier twist, try using honey or maple syrup in place of powdered sugar. You can also swap in almond flour for crushed graham crackers for a gluten-free option. These easy swaps keep the flavors intact while catering to different diets. Explore these choices to make this dessert your own! For the full recipe, refer to the [Full Recipe]. Start by gathering your ingredients. You need cream cheese, Greek yogurt, powdered sugar, and vanilla extract. You can also use crushed graham crackers and mini chocolate chips if you like. 1. Take a medium bowl. Add the softened cream cheese and Greek yogurt. 2. Use an electric mixer to beat the mixture. Mix until it is smooth and creamy. 3. Next, add the powdered sugar and vanilla extract. Keep mixing until everything blends well. 4. If you want chocolate bites, add cocoa powder now. Mix until it is fully combined. Mixing is key for a great texture. Make sure your cream cheese is soft. This helps to avoid lumps. If you want a thicker bite, add more graham crackers. For creamier bites, add a bit more yogurt. - Mix on medium speed for the best results. - Stop to scrape the bowl sides. This ensures even mixing. Now you can shape the mixture into balls. Use your hands or a small cookie scoop. Aim for about 1 inch in size. 1. Place the balls on a parchment-lined baking sheet. 2. Leave space between them. This helps them not stick together. 3. Cover the sheet with plastic wrap. 4. Refrigerate for at least 2 hours. This will help them set nicely. Once chilled, top each bite with a fresh berry for color and flavor. You can find the full recipe in the earlier section. Enjoy your delicious no-bake cheesecake bites! To get a smooth and creamy texture, start with softened cream cheese. This helps blend it easily with the Greek yogurt. Use an electric mixer to mix these two ingredients well. Beat them until no lumps are left. Gradually add the powdered sugar and vanilla extract. Mix until everything is silky smooth. If you want a chocolate flavor, sift in cocoa powder last. This ensures even mixing and avoids clumps. Mistakes can happen, but they are easy to fix. First, do not skip softening the cream cheese. Cold cream cheese will not blend well. Second, measure your ingredients carefully. Too much powdered sugar can make it overly sweet. Lastly, don’t rush the chilling process. Letting the bites chill for at least 2 hours will help them set properly. This step is key for a great texture. Presentation makes a big difference. Arrange your cheesecake bites on a pretty platter. Garnish them with fresh berries for color and taste. A light dusting of powdered sugar on top adds elegance. You can also use mini cupcake liners for individual servings. This adds a fun touch and makes them easy to grab. For the full recipe, check out the detailed steps and variations! {{image_4}} You can make no-bake cheesecake bites in many fun ways. Each variation adds a unique twist to this easy dessert treat. For a rich chocolate version, simply add cocoa powder. You need 1/4 cup for a deep flavor. Mix it in with the cream cheese and yogurt. If you want extra sweetness, fold in mini chocolate chips. These bites will be a chocolate lover's dream. Serve them with a drizzle of chocolate sauce for added flair. Fruit can add a fresh taste to your cheesecake bites. You can use berries, mango, or even peaches. Just fold in a cup of your chosen fruit into the cream cheese mixture. For a lovely touch, top each bite with a fresh berry. This not only looks good but also tastes amazing. You can even blend some fruit into the yogurt for added flavor. If you want a healthier treat, use lower sugar options. Substitute powdered sugar with a natural sweetener, like stevia or monk fruit. You can also use dairy-free cream cheese and yogurt for a vegan version. This way, you can enjoy the bites without the extra calories. They’ll still taste great while fitting your diet needs. These variations make no-bake cheesecake bites fun and exciting. Explore different flavors and have fun in your kitchen. You can find the full recipe to get started on these delightful treats. To keep your no-bake cheesecake bites fresh, store them in an airtight container. Place a layer of parchment paper between layers to avoid sticking. Make sure to keep them in the fridge. This keeps them cool and yummy. You can freeze these cheesecake bites. First, place them on a baking sheet lined with parchment paper. Freeze them for about 1 hour until firm. Then, move the bites to a freezer-safe bag or container. They can last up to 2 months in the freezer. When you want to enjoy them, just thaw them in the fridge overnight. These cheesecake bites stay fresh for about 5 days in the fridge. After that, they may lose their taste and texture. For the best quality, eat them within this time. If you notice any changes in smell or appearance, it’s best to toss them. Enjoy these treats while they are at their best! For the full recipe, check the earlier section to make sure you have everything you need. Yes, you can use low-fat cream cheese. It will change the flavor a bit. The texture might be less rich, but your cheesecake bites will still taste good. Just ensure that it is softened well before mixing. This helps keep the mixture smooth. The cheesecake bites need to set for at least 2 hours. This time helps them firm up nicely. If you want them extra cold and firm, you can leave them in the fridge longer. Just remember to cover them well so they don’t dry out. Absolutely! You can make these bites up to two days in advance. Just store them in the fridge in an airtight container. This makes them a great treat for parties or gatherings. They taste fresh and delicious when you’re ready to serve them. For the full recipe, check out the detailed instructions and enjoy making these delightful bites! You learned about making no-bake cheesecake bites using key ingredients and tips. We covered optional ingredients for customizing flavors and dietary needs. I shared methods for perfecting texture and avoiding mistakes. These cheesecake bites are easy, fun, and great for any occasion. Enjoy experimenting with flavors and presentations. Your friends will love these treats, and you will feel proud!

Delectable No-Bake Cheesecake Bites Easy Dessert Treat

Looking for a sweet treat that’s both easy and delicious? You’ve found it! My Delectable No-Bake Cheesecake Bites will impress

To make a delicious veggie pizza, gather these fresh ingredients: - 1 ½ cups all-purpose flour - 1 teaspoon instant yeast - ½ teaspoon salt - ½ teaspoon sugar - ½ cup warm water (around 110°F/43°C) - 1 tablespoon olive oil - ½ cup pizza sauce - 1 cup shredded mozzarella cheese - ½ cup bell peppers (a mix of red, yellow, and green), diced - ½ cup cherry tomatoes, halved - ¼ cup red onion, thinly sliced - 1 cup fresh spinach leaves - 1 teaspoon dried oregano - 1 teaspoon garlic powder - Salt and pepper, to taste Each ingredient adds its own unique flavor. The flour forms the crust, while yeast helps it rise. Salt and sugar balance the taste. Warm water activates the yeast for a nice, fluffy base. Olive oil adds richness. For the toppings, mozzarella cheese melts beautifully over the sauce. The colorful bell peppers and sweet cherry tomatoes give a fresh taste. Red onion adds a bit of crunch, and spinach brings a healthy green touch. Dried oregano and garlic powder enhance the aroma and flavor. You can find the complete cooking steps in the Full Recipe. Enjoy creating this tasty veggie pizza, bursting with color and flavor! 1. Mixing dry ingredients: In a large bowl, combine 1 ½ cups of all-purpose flour, 1 teaspoon of instant yeast, ½ teaspoon of salt, and ½ teaspoon of sugar. Mix well with a whisk. 2. Adding wet ingredients: Gradually add ½ cup of warm water and 1 tablespoon of olive oil to the dry mix. Stir until a shaggy dough forms. 3. Kneading the dough: Place the dough on a lightly floured surface. Knead for about 5-7 minutes until it feels smooth and elastic. 1. Shaping the dough: Shape the dough into a ball. 2. Covering and resting: Place it in a lightly oiled bowl. Turn it to coat. Cover with a clean kitchen towel. Let it rise in a warm spot for about 1 hour, or until it doubles in size. 1. Preheating the oven: Preheat your oven to 475°F (245°C) during the last 15 minutes of rising. If you have a pizza stone, place it in the oven. 2. Rolling out the dough: Once the dough has risen, punch it down gently. On a floured surface, roll it out into a 12-inch circle. You can also shape it on a parchment-lined baking sheet. 3. Assembling and baking the pizza: Spread ½ cup of pizza sauce over the dough, leaving a small border. Sprinkle 1 cup of shredded mozzarella cheese on top. Then, layer the diced bell peppers, halved cherry tomatoes, sliced red onion, and fresh spinach leaves evenly. Season with 1 teaspoon of dried oregano, 1 teaspoon of garlic powder, and salt and pepper to taste. Carefully transfer the pizza to the hot oven and bake for 12-15 minutes until the crust is golden brown and the cheese is bubbly. 4. Cooling and slicing: Remove the pizza from the oven. Let it cool for a few minutes. Slice it into wedges and serve warm. Kneading is key for great dough. It helps develop gluten, which gives the dough strength. Knead for about 5-7 minutes until it feels smooth. If you live in a hot area, the dough rises quickly. In cooler places, it takes longer. To help, warm your kitchen. Place the bowl near a warm oven or in sunlight. You can also cover it with a warm towel to keep the heat in. For extra flavor, use spices like oregano, garlic powder, and crushed red pepper. These spices add a nice kick. You can also mix in some Italian seasoning for a savory touch. Fresh herbs like basil or parsley make a big difference too. Add them right before serving to keep their taste bright. You can use them as a garnish or mix them into the veggies. I recommend using mozzarella cheese for a classic taste. You can also try provolone or a blend for a richer flavor. Experimenting with different cheeses can surprise you! For the sauce, homemade is often best. You can control the flavors and freshness. However, a good store-bought sauce saves time. Look for one with natural ingredients and no added sugar for the best taste. For the full recipe, check out the detailed instructions above. {{image_4}} For a gluten-free veggie pizza, you can use almond flour, rice flour, or a gluten-free blend. Each option gives a different taste and texture. Make sure to add some xanthan gum for binding. This helps hold the crust together. When baking, adjust the time. Gluten-free crusts often need more time to cook. Check for a golden color and firm texture to know it’s done. If you want a vegan pizza, try using dairy-free cheese. Brands like Daiya or Follow Your Heart offer tasty options. You can also create your own with nuts like cashews blended with nutritional yeast for a cheesy flavor. Add protein-rich toppings like chickpeas, lentils, or tofu. These not only boost nutrition but also add great texture and taste to your pizza. Using seasonal veggies can make your pizza fresh and exciting. In spring, try asparagus and peas. In summer, add zucchini and eggplant. Fall brings butternut squash and kale, while winter can feature Brussels sprouts and root veggies. Choose colorful veggies to make your pizza pop. Bright colors not only look appealing but also provide different flavors and nutrients. Mixing textures adds to the experience, making every bite delicious. For the full recipe, check out the delightful veggie pizza recipe above. To store leftover veggie pizza, let it cool completely. Place the slices in an airtight container. You can also wrap them tightly in plastic wrap or foil. This keeps the pizza fresh. Use the leftovers within 3 to 4 days for the best taste. If you want to save pizza for later, freezing is a great option. Cut the pizza into slices. Wrap each slice in plastic wrap, then in foil. This helps prevent freezer burn. You can store it for up to 2 months. When ready to eat, thaw it in the fridge overnight. Reheat slices in the oven at 375°F (190°C) for about 10-15 minutes. Leftover veggie pizza can inspire fun new meals. You can chop it into small pieces and add it to salads. This gives your salad a tasty twist. You can also mix it with eggs for a veggie frittata. Another idea is to blend it into a pasta dish for extra flavor. The options are endless! You can use store-bought or homemade pizza dough. Store-bought dough saves time and is easy. Look for fresh options in the fridge section. Homemade dough gives you control over flavors and texture. It’s fun to make, too! The basic recipe includes flour, yeast, salt, and water. Both options work well for a delicious veggie pizza. Seasoning is key to a tasty veggie pizza. Use fresh herbs like basil or oregano. Sprinkle garlic powder for a rich taste. Adding a splash of balsamic vinegar can brighten the flavors. Also, roast your veggies before topping the pizza for a deeper taste. Don't forget to balance the flavors with salt and pepper. Absolutely! You can mix and match your favorite veggies. Try mushrooms, zucchini, or artichokes for variety. Swap out bell peppers for spicy jalapeños if you like heat. You can also add olives for a salty kick. The sky's the limit when it comes to toppings! Explore what you love to make your pizza unique. You now have all the steps to make your own veggie pizza. From choosing the right ingredients to tips for perfect dough, every part is key. Experimenting with options like gluten-free and vegan can really change things up. Store leftovers carefully so you can enjoy them later. Finally, think about flavor and toppings to make each pizza unique. Enjoy your cooking and let your creativity shine!

Delicious Veggie Pizza Fresh and Flavorful Recipe

Are you ready to create the best veggie pizza ever? This Delicious Veggie Pizza Fresh and Flavorful Recipe is packed

This chili is hearty and delicious. Here’s what you need: - 2 medium sweet potatoes, peeled and diced into 1-inch cubes - 1 can (15 oz) black beans, drained and thoroughly rinsed - 1 can (14 oz) diced tomatoes, including their juices - 1 cup vegetable broth (low-sodium preferred) - 1 medium onion, finely diced - 2 cloves garlic, minced - 1 red bell pepper, diced - 1 green bell pepper, diced - 2 tablespoons olive oil - 1 tablespoon chili powder - 1 teaspoon ground cumin - 1 teaspoon smoked paprika - 1/2 teaspoon cayenne pepper (adjust according to your spice tolerance) - Sea salt and freshly cracked black pepper to taste - Fresh cilantro or parsley, chopped for garnish You can add fun toppings to your chili for more flavor. Here are some tasty options: - Creamy avocado slices - Zesty lime wedges - Shredded cheese Sweet potatoes are packed with vitamins A and C. They help boost your immune system. Black beans are a great source of protein and fiber. They keep you feeling full longer. Bell peppers provide vitamin C and antioxidants. Garlic supports heart health and adds yummy flavor. With so many benefits, this chili is not just tasty but good for you too! This chili comes together quickly. First, gather all your ingredients. You will need sweet potatoes, black beans, diced tomatoes, and some spices. This dish is great for a cozy night. It takes about 15 minutes to prep and 30 minutes to cook. 1. Sauté the Vegetables: In a large pot, heat 2 tablespoons of olive oil over medium heat. Add 1 diced onion and sauté for about 5 minutes. The onion should be soft and fragrant. 2. Add Garlic and Peppers: Stir in 2 minced garlic cloves, 1 diced red bell pepper, and 1 diced green bell pepper. Cook for 3-4 minutes until the peppers get soft. Stir often to keep them from sticking. 3. Mix in Spices: Sprinkle in 1 tablespoon of chili powder, 1 teaspoon of ground cumin, 1 teaspoon of smoked paprika, and 1/2 teaspoon of cayenne pepper. Add a pinch of sea salt and black pepper. Stir for 1 minute. This brings out the spice flavors. 4. Add Sweet Potatoes: Toss in 2 diced sweet potatoes. Stir them well with the veggies and spices. Make sure they are coated evenly. 5. Combine Remaining Ingredients: Pour in 1 can of rinsed black beans, 1 can of diced tomatoes with juices, and 1 cup of vegetable broth. Mix everything together until it’s well combined. 6. Simmer the Chili: Increase the heat to bring the pot to a gentle boil. Once boiling, lower the heat, cover, and let it simmer for 25-30 minutes. Stir every so often. The sweet potatoes should be tender. 7. Taste and Adjust: After simmering, taste your chili. Add more salt, pepper, or spices if needed. Adjust it to your liking. 8. Serve: Ladle the warm chili into bowls. Top with fresh cilantro or parsley. You can also add optional toppings like avocado slices or lime wedges for extra flavor. - Use fresh spices for better taste. They make a big difference! - Let the chili sit for a while after cooking. This helps the flavors blend. - Experiment with different spices to find your favorite mix. - Serve it hot! A warm bowl of chili is always more inviting. This savory sweet potato black bean chili is tasty and filling. You can find the [Full Recipe] for more details! One mistake many make is not cutting sweet potatoes evenly. This can lead to uneven cooking. Aim for 1-inch cubes for best results. Another common error is skipping the seasoning. Always taste as you cook. If you don’t, your chili may lack flavor. Also, don’t rush the simmering step. Allow the chili to cook slowly. This helps the flavors blend well. To boost flavor, start with sautéing your veggies. This step creates a rich base. Use medium heat and let the onions become translucent. Don’t forget to add garlic for depth. Stir in your spices early, too. This unlocks their natural oils and flavors. Lastly, simmer the chili covered. This traps steam and enhances the taste. If you like heat, adjust the cayenne pepper. Start with a little, then taste. You can always add more, but you can't take it out! For milder chili, skip the cayenne or use less. Consider adding a dollop of sour cream or yogurt as a cooling agent. Remember, the right spice balance can make your dish shine. {{image_4}} You can easily swap some ingredients in this chili. If you don’t have sweet potatoes, try using butternut squash. It adds a nice sweetness. You can use canned kidney beans instead of black beans if you prefer. For a different flavor, replace the red bell pepper with a yellow one. You can also add corn for extra texture. This sweet potato black bean chili is already vegan and gluten-free. All the main ingredients are plant-based and gluten-free. If you want to make it creamier, add coconut milk after cooking. This will enhance the flavor while keeping it vegan. You can make this chili fit any diet. If you're low-carb, reduce the sweet potatoes or swap them with zucchini. For a protein boost, add quinoa or lentils. If you want a spicy kick, toss in diced jalapeños or a dash of your favorite hot sauce. Each change helps you enjoy this dish while meeting your dietary needs. To store leftover chili, let it cool to room temperature. Once cooled, place it in an airtight container. Store it in the fridge for up to five days. Make sure to label the container with the date. This helps you keep track of freshness. If you want to save chili for later, freezing is a great option. Portion the chili into freezer-safe bags or containers. Leave some space for expansion. Seal tightly to prevent freezer burn. You can freeze it for up to three months. When you’re ready to enjoy it, just thaw it in the fridge overnight. Reheating chili can enhance its taste. For the best results, use a pot on the stove. Heat over medium-low and stir often. This helps keep the texture smooth. If it seems too thick, add a splash of vegetable broth or water. You can also microwave it, but stir halfway through for even heating. Enjoy your chili warm with all the flavors intact! You can use leftover chili in many ways. Serve it over rice or quinoa for a filling meal. Mix it with eggs for a spicy breakfast scramble. You can also blend it to make a soup. Stuff it into baked potatoes for a hearty side dish. Add it to tacos for a unique twist. The options are endless! Sweet Potato Black Bean Chili can last about four to five days in the fridge. Store it in an airtight container to keep it fresh. If you see any mold or odd smells, it’s best to toss it. Reheating is easy; just warm it on the stove or in the microwave. Yes, you can make this chili in a slow cooker! Start by sautéing the onion and garlic in a pan. Then, add all ingredients to the slow cooker. Cook on low for six to eight hours or on high for three to four hours. This method makes the flavors even better! Yes, Sweet Potato Black Bean Chili is very healthy. It is packed with fiber from the beans and sweet potatoes. These ingredients help support digestion and heart health. The chili is also low in fat and offers many vitamins and minerals. Plus, it is full of plant-based protein, making it a great option for everyone. For the full recipe, check out the section above! Sweet Potato Black Bean Chili is a tasty and nutritious dish. We covered key ingredients, their benefits, and how to prepare them. I shared step-by-step cooking instructions and tips for flavor. We also looked at common mistakes and spice adjustments to avoid. With variations and storage tips, you can make this chili fit any need. In the end, enjoy experimenting with this recipe. Your taste buds and health will thank you.

Savory Sweet Potato Black Bean Chili Recipe to Try

Looking for a hearty and healthy dish that warms your soul? Try my Savory Sweet Potato Black Bean Chili! This

- 2 pounds beef chuck, cut into 1-inch cubes - 3 tablespoons olive oil - 1 large onion, chopped - 3 cloves garlic, minced - 4 large carrots, peeled and sliced into ½-inch rounds - 3 medium potatoes, peeled and cut into 1-inch cubes - 1 cup frozen peas I love using beef chuck for stew. It has great flavor and becomes tender. I cut it into one-inch cubes for even cooking. The olive oil helps brown the meat, giving it a rich taste. The onion and garlic add a lovely aroma. Carrots and potatoes provide sweetness and heartiness. Frozen peas are perfect for color and texture. - 3 cups beef broth (preferably low-sodium) - 2 tablespoons tomato paste - 2 teaspoons Worcestershire sauce - 1 teaspoon dried thyme - 1 teaspoon dried rosemary - Salt and freshly ground black pepper to taste For my stew, I use low-sodium beef broth. It keeps the dish hearty without being too salty. Tomato paste adds depth, while Worcestershire sauce gives a savory kick. Thyme and rosemary bring fresh flavor. I always season with salt and pepper to enhance all the tastes. - Fresh parsley, chopped I love to garnish my beef stew with fresh parsley. It adds a pop of color and a hint of freshness. Just chop it finely and sprinkle it on top before serving. This little touch makes the stew look inviting and delicious. {{ingredient_image_2}} - Heat 3 tablespoons of olive oil in a large pot over medium-high heat. - Add 2 pounds of beef chuck, cut into 1-inch cubes. - Brown the beef in batches. This helps it cook evenly. - Each batch should take about 4-5 minutes. - Remove the browned beef and set it aside on a plate. - In the same pot, add 1 large chopped onion. - Cook the onion for about 5 minutes until it turns translucent. - Then, add 3 cloves of minced garlic. - Cook the garlic for 1-2 minutes until it smells great. - Return the beef to the pot. - Mix in 2 tablespoons of tomato paste and 2 teaspoons of Worcestershire sauce. - Make sure the beef is well coated with the sauces. - Pour in 3 cups of beef broth and bring it to a gentle simmer. - Add 4 large sliced carrots and 3 medium cubed potatoes. - Season with salt, black pepper, 1 teaspoon of dried thyme, and 1 teaspoon of dried rosemary. - Stir well to combine all the ingredients. - Cover the pot and reduce the heat to low. - Let the stew simmer for about 2 hours. - Stir occasionally to prevent sticking. - About 10 minutes before serving, stir in 1 cup of frozen peas. - Taste the stew and adjust the seasoning as needed. - Use a ladle to serve the hot beef stew into bowls. - Garnish each bowl with a sprinkle of chopped fresh parsley. - This adds color and extra flavor to your dish. - Best practices for browning beef: To brown beef well, heat olive oil in a pot. Add the beef in small batches. This helps the meat brown evenly. Allow each piece to cook for 4-5 minutes. Don't rush this step. A good browning adds rich flavor. - How to enhance flavor with seasonings: Use fresh herbs like thyme and rosemary. They add depth to your stew. A spoonful of tomato paste boosts the taste too. Don’t forget salt and pepper. They help to bring out all the flavors. - Refrigeration guidelines: Store leftover stew in an airtight container. It will keep well in the fridge for 3-4 days. Make sure it cools down before sealing. - Freezing instructions: You can freeze beef stew for up to 3 months. Use freezer-safe containers. Leave some space at the top for expansion. Thaw it in the fridge overnight before reheating. - Serving suggestions: Ladle the stew into rustic bowls. This gives a cozy feel. A sprinkle of fresh parsley on top makes it look bright. It’s all about that inviting look. - Accompaniments like bread or salad: Serve the stew with crusty bread. It soaks up the tasty broth. A fresh side salad adds crunch and color. Together, they make a full meal. Pro Tips Brown the Meat Well: Ensure you properly brown the beef in batches. This step adds depth to the flavor and creates a rich base for your stew. Use Quality Broth: Opt for a low-sodium beef broth to control the saltiness of your stew. Homemade broth can elevate the taste significantly. Add Fresh Herbs: For an enhanced flavor profile, consider adding fresh herbs like thyme or rosemary during the last 30 minutes of cooking. Let It Rest: After cooking, allow the stew to sit for 10-15 minutes before serving. This resting period allows the flavors to meld even more. {{image_4}} You can easily change up your beef stew. Try using different vegetables like turnips or parsnips. These veggies add a nice twist. For the meat, consider different cuts of beef. Brisket or round steak can work well. Each cut gives a different taste to your stew. If you need a gluten-free option, choose gluten-free broth and sauces. You can also make a vegetarian version. Replace the beef with mushrooms or jackfruit. This keeps the stew hearty and filling without meat. To boost flavors, add a splash of red wine. It deepens the taste of the stew. Mushrooms also add a nice earthy flavor. You can experiment with spices too. Adding smoked paprika or cumin gives a unique twist. These small changes can make your stew feel brand new. Each serving of this hearty beef stew has about 350 calories. It contains approximately: - 24 grams of protein - 15 grams of fat - 28 grams of carbs - 4 grams of fiber This stew fills you up with good nutrition. The key ingredients in this stew offer great health benefits. Here’s a look at some of them: - Beef Chuck: Packed with protein, iron, and zinc, beef helps build strong muscles. - Carrots: Rich in beta-carotene, carrots support good vision and skin health. - Potatoes: A good source of potassium, potatoes help with heart health. - Onion and Garlic: Both have antioxidants and can boost your immune system. For healthy eating, serve this stew with a side of whole grain bread. This adds fiber and keeps you full longer. If you have dietary needs, here are some options: - Low-Sodium Options: Use low-sodium beef broth. This helps control salt intake. - Substitutions for Allergens: If you are allergic to beef, try using chicken or turkey instead. For a vegetarian option, use mushrooms and lentils. These changes keep the stew tasty while meeting your needs. To thicken your beef stew, you have a few easy options. First, you can mix a bit of cornstarch with cold water. Add this mix to the stew slowly while stirring. This helps to avoid lumps. Another way is to mash some of the potatoes in the stew. This will create a creamy texture. Lastly, you can let it simmer longer with the lid off. This allows steam to escape, making the stew thicker. Yes, you can make hearty beef stew in a slow cooker! Just brown the beef first. This adds great flavor. Then, add all the ingredients to the slow cooker. Set it on low for 6 to 8 hours or high for 3 to 4 hours. This method keeps the meat juicy. You may want to add the peas in the last 30 minutes to keep them bright and tender. Beef stew pairs well with many sides. Here are some great options: - Crusty bread for dipping - A simple green salad - Mashed potatoes for extra comfort - Steamed vegetables for balance These sides make the meal hearty and satisfying. Store leftover beef stew in an airtight container. It stays good in the fridge for up to 3 days. To reheat, warm it in a pot over low heat. Stir often to heat evenly. You can also microwave it in short bursts, stirring in between. If you want to keep it longer, beef stew freezes well. Just let it cool, then place it in a freezer-safe container. It can last for about 3 months in the freezer. This beef stew recipe blends rich flavors and simple steps to create a comforting dish. You learned about key ingredients, from the beef chuck to fresh parsley. I shared tips for perfecting every part, including storage and presentation. Variations let you tailor the stew to your taste and dietary needs. Remember, each bowl is not only tasty but packed with nutrition. Enjoy cooking and sharing this warm meal with family and friends. It’s a classic that never disappoints!

Hearty Beef Stew Simple and Comforting Recipe

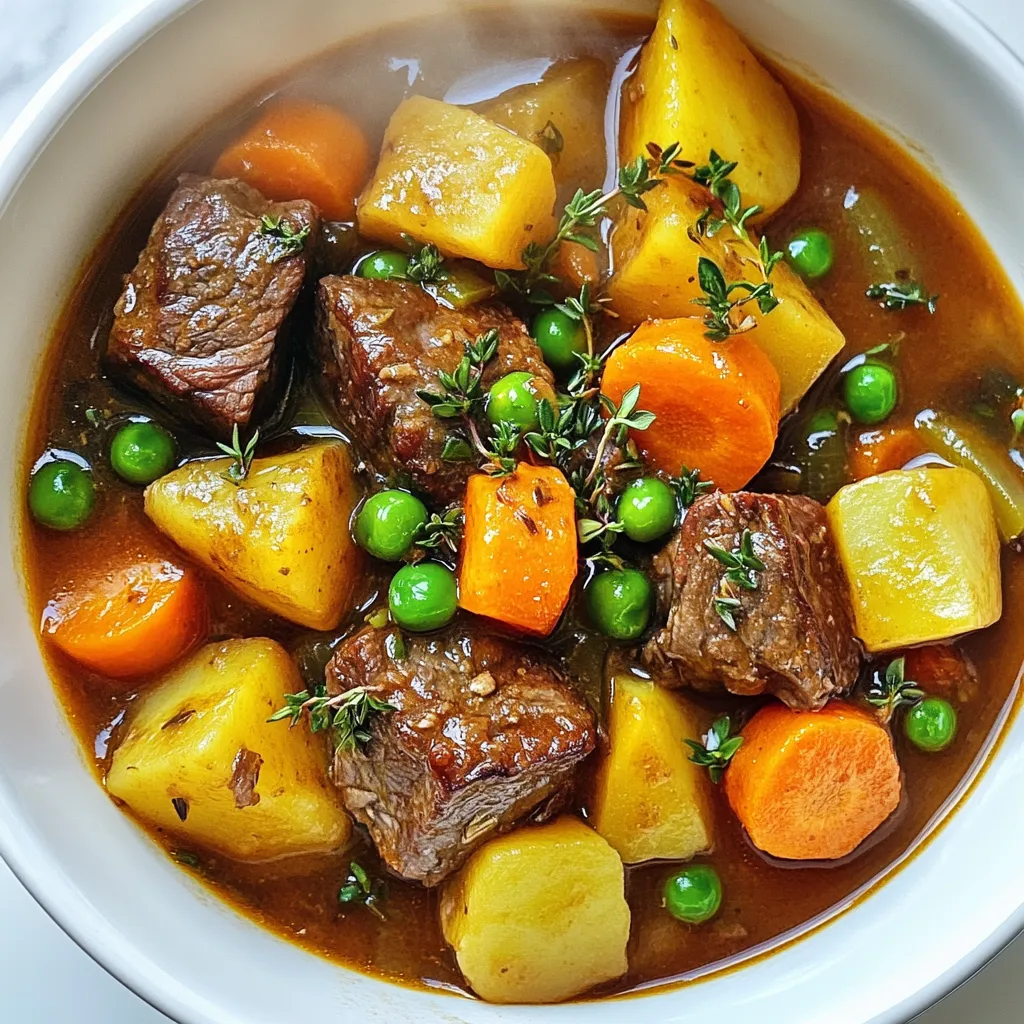
Warm, savory, and oh-so-comforting, this Hearty Beef Stew will quickly become your go-to recipe. Picture tender beef, fresh veggies, and

- 3-4 pounds beef chuck roast - 2 tablespoons olive oil - 2 medium onions, sliced - 4 cloves garlic, minced - 3 large carrots, chopped - 2-3 celery stalks, chopped - 1 can (14 oz) diced tomatoes, with juice - 2 cups beef broth - 2 teaspoons dried oregano - 1 teaspoon dried basil - Salt and pepper to taste The main ingredients for Italian pot roast make this dish rich and hearty. The beef chuck roast is the star, providing a tender texture when cooked slowly. I use olive oil for searing, which adds a nice flavor. The onions, garlic, carrots, and celery create a tasty base. Diced tomatoes give a fresh taste and help build the sauce. Beef broth adds depth, while oregano and basil bring the dish together. - Red pepper flakes for heat - Fresh herbs for garnish If you like a little spice, add red pepper flakes. They give a nice kick to the roast. Fresh herbs, like basil, make a great finishing touch. They brighten the dish and add a pop of color. - Pasta options - Mashed potatoes - Crusty bread For a complete meal, serve the roast with pasta or creamy mashed potatoes. Both options soak up the sauce well. Crusty bread is also a great choice. It’s perfect for dipping into the rich sauce. Each bite will keep you wanting more! {{ingredient_image_2}} - Seasoning the beef: Start by seasoning the beef chuck roast. Use salt and pepper generously. Make sure every side gets coated well. This step is key for flavor. - Searing for flavor: Next, heat olive oil in a large pot over medium-high heat. Once hot, carefully place the roast in the pot. Sear all sides until they are rich and brown. This should take about 3-4 minutes per side. Once done, take the roast out and set it aside. - Cooking onions and garlic: In the same pot, add the sliced onions. Sauté them until they soften, about 5 minutes. Then, add the minced garlic. Stir for another 1-2 minutes until you smell the garlic. - Incorporating carrots and celery: Now, add the chopped carrots and celery. Sauté these for 3-4 minutes. They should start to soften but still have some crunch. - Adding tomatoes and broth: Pour in the diced tomatoes with their juice. Then, add the beef broth. The mixture should start to look rich and tasty. - Returning the roast to the pot: Carefully return the seared roast to the pot. Nestle it among the vegetables and liquid. This step helps the roast soak up all the flavors. - Stovetop vs. slow cooker method: You can cook this dish on the stovetop or in a slow cooker. For the stovetop, bring the pot to a gentle simmer. Cover it and reduce the heat to low. For a slow cooker, set it on low for 6-7 hours. - Cooking duration and temperature: Let the roast cook for about 3-4 hours on the stovetop. It should become very tender. When you poke it with a fork, it should shred easily. To get a tender pot roast, start with a good cut of meat. Beef chuck roast works best. The marbled fat keeps the meat moist. Season it well with salt and pepper before cooking. Searing the roast adds flavor and helps lock in juices. Cook it slowly, either on the stove or in a slow cooker. This gentle cooking method breaks down tough fibers, making the roast fork-tender. To boost flavor, add dried oregano and basil. These herbs give the dish a classic Italian taste. You can also use fresh herbs if you prefer. Red pepper flakes add warmth, but you can skip them if you like mild flavors. For a twist, try cooking the roast with red wine or balsamic vinegar. These liquids add depth and richness to the sauce. Serving is key to a great meal. Place the sliced roast on a large platter. Spoon the sauce and veggies over the top. This makes it look inviting and delicious. Garnish with fresh basil leaves for a pop of color. Drizzle a bit of olive oil on top for added richness. Serve the pot roast with pasta, creamy mashed potatoes, or crusty bread. These sides soak up the tasty sauce and complete your dish. Pro Tips Resting the Meat: Allow the roast to rest for at least 10 minutes after cooking. This helps the juices redistribute, ensuring a moist and flavorful slice. Flavor Boost: For deeper flavor, consider marinating the roast overnight with olive oil, garlic, and herbs before cooking. Vegetable Variations: Feel free to add other vegetables like potatoes or parsnips for added texture and flavor in your pot roast. Storage Tips: Store leftovers in an airtight container in the refrigerator for up to 3 days, or freeze for up to 3 months for a quick meal later. {{image_4}} Italian pot roast has many regional styles. In Tuscany, cooks use red wine for a rich flavor. In Naples, they add olives and capers for a salty kick. You can swap in different meats like pork or lamb. Try adding mushrooms for an earthy taste. Each region brings its flair to this classic dish. For gluten-free options, use certified gluten-free beef broth. Most ingredients are naturally gluten-free, so check labels. If you prefer vegetarian, substitute the beef with a hearty vegetable like jackfruit. Use vegetable broth for the liquid. You can also add more root veggies for texture and flavor. You can use an Instant Pot for a quick meal. Set it to pressure cook for about 60 minutes. For oven-braising, preheat to 300°F. Cook the roast in a covered pot for 3 to 4 hours. Both methods yield tender meat and savory sauce. Adjust cooking times based on your method. After making Italian pot roast, you might have some tasty leftovers. To store them, place the roast in an airtight container. Make sure to cover it well to keep moisture in. You can keep it in the fridge for about 3 to 4 days. If you want to save it longer, freezing is a great option. If you freeze the pot roast, it can last for up to 3 months. First, let the roast cool down completely. Then, cut it into portions for easier use later. Use freezer-safe bags or containers for storage. Squeeze out as much air as possible to prevent freezer burn. When it's time to enjoy your leftovers, you have two easy options: microwave or stovetop. For the microwave, place the roast in a safe dish, cover it, and heat it for 2-3 minutes. Stir it halfway through to ensure even heating. For stovetop, place the roast in a pan over low heat with a splash of broth. This keeps it moist and tasty. Always check that it’s hot all the way through before serving. This way, you’ll enjoy the best flavor and texture. The best cut for pot roast is beef chuck. It has good fat and connective tissue. This makes it tender when cooked slowly. Other good options are brisket and round roast. These cuts also add flavor. Yes, you can make pot roast ahead of time. Cook it fully, then cool it down. Store it in the fridge for up to three days. When ready to eat, reheat it on the stove or in the oven. Add some broth to keep it moist. You know the pot roast is done when it shreds easily with a fork. The meat should feel tender. You can also check the internal temperature. It should be at least 190°F for perfect doneness. Yes, you can use a slow cooker for pot roast. Sear the meat first for flavor. Then, add all the ingredients to the slow cooker. Set it on low for 6-7 hours. You will still get a tender and tasty roast this way. In this blog post, we explored the key ingredients for a delicious pot roast, including beef chuck and fresh veggies. I outlined step-by-step instructions for preparing and cooking the roast. You learned some handy tips to enhance flavor and texture, along with variations to suit different tastes. In closing, pot roast is versatile and easy to make. Experiment with ingredients and methods to find your favorite version. Enjoy the warmth and comfort this dish brings to your table.

Italian Pot Roast Flavorful and Tender Comfort Dish

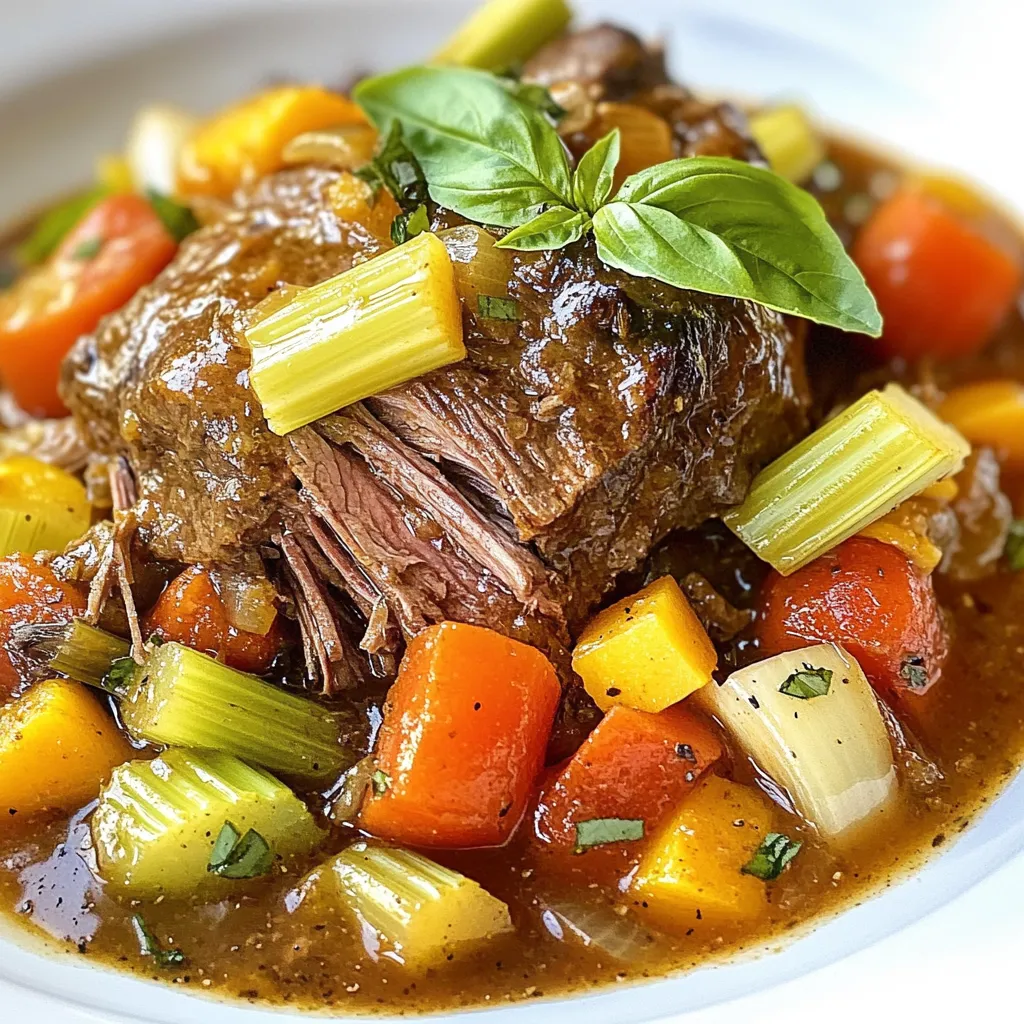
Get ready to enjoy a warm hug in a bowl with my Italian Pot Roast. This dish is not just

For this dish, you need two salmon fillets. Each should weigh about six ounces. Salmon is a great source of protein and healthy fats. It cooks quickly, making it ideal for busy nights. You can use skin-on or skinless fillets based on your preference. You will need: - 1 cup cooked jasmine rice (or rice of your choice) - 1 cup broccoli florets (fresh or frozen) - 1/2 cup shredded carrots (fresh or pre-packaged) - 1/4 cup sliced green onions (scallions) Jasmine rice adds a nice flavor. You can swap it for brown rice or quinoa if you want. Broccoli and carrots provide color and crunch. They also add vitamins to the meal. Green onions add a fresh taste and make the dish look pretty. For flavor, use 1/4 cup of teriyaki sauce. You can make your own or buy it at the store. Homemade sauce lets you control the sweetness and saltiness. This sauce gives the salmon a sweet and savory glaze. It pairs perfectly with rice and veggies. You also need: - 1 tablespoon sesame seeds (toasted, if possible) - 1 tablespoon olive oil (or any cooking oil of your choice) - Salt and pepper to taste Sesame seeds add a nice crunch. Olive oil helps cook the salmon and gives flavor. Don’t forget to season with salt and pepper for taste. These ingredients come together to make a quick and tasty meal. Enjoy the vibrant flavors and fresh colors in your Minute Teriyaki Salmon Bowls! {{ingredient_image_2}} Start by seasoning your salmon fillets. Use salt and pepper to cover both sides well. This adds flavor and helps the fish taste great. Next, heat olive oil in a non-stick skillet. Set the heat to medium-high until the oil shimmers. This step is key for a good sear. Once the oil is hot, place the salmon fillets in the skillet skin-side down. Let them cook for about four minutes. Avoid moving them during this time. This ensures you get a nice golden sear. After four minutes, the edges will look brown. Gently flip the fillets over. Now, pour teriyaki sauce over the salmon. You can use homemade or store-bought sauce. Cook for another three to four minutes. Baste the salmon with the sauce while it cooks. This helps keep the fish moist. It is done when it flakes easily with a fork. While the salmon cooks, it’s time to prepare your broccoli. You can steam it in a pot. Add one to two inches of water and bring it to a boil. Place the broccoli in the pot and cover for three to four minutes. If you prefer, use a microwave. Put the broccoli in a safe dish with a splash of water. Cover it and microwave until tender but still bright green. Now, let’s assemble the bowls. Start with a nice layer of cooked jasmine rice in each bowl. This is your base. Place the teriyaki salmon on top of the rice. Next, add the steamed broccoli and shredded carrots over the salmon. The colors will look beautiful, and it will taste amazing. To finish, sprinkle sliced green onions and sesame seeds on top. This adds extra flavor and a nice crunch. The green onions give a fresh taste, while sesame seeds add texture. Your Minute Teriyaki Salmon Bowls are now ready to serve! Enjoy this quick and tasty meal right away for the best flavor. When picking salmon, look for bright, shiny skin. Fresh salmon should smell like the ocean, not fishy. I prefer wild-caught salmon for its flavor and health benefits. Farmed salmon is good too, but check for sustainability. Skin-on fillets hold moisture better and give a nice texture. To cook rice, rinse it first. This removes extra starch and keeps it fluffy. Use a 1:1 ratio for jasmine rice and water. Bring water to a boil, then add the rice. Cover the pot and lower the heat. Let it simmer for about 15 minutes. Turn off the heat and let it sit for 5 minutes before fluffing with a fork. For broccoli, steaming keeps it bright and crisp. You can use a pot or microwave. If you want more flavor, sauté the veggies in a little olive oil. Roasting is another great option. Toss them in olive oil, salt, and pepper, then bake at 400°F for about 20 minutes. This gives a nice caramelized taste. Pro Tips Choose Quality Salmon: Opt for wild-caught salmon if available, as it tends to have a richer flavor and better texture compared to farmed salmon. Customize Your Veggies: Feel free to swap out the broccoli and carrots for your favorite vegetables like snap peas, bell peppers, or zucchini to suit your taste. Make It Spicy: Add a dash of sriracha or red pepper flakes to the teriyaki sauce for a spicy kick that complements the sweetness of the sauce. Leftover Rice Hack: Use leftover rice for this recipe to save time. Just make sure to heat it thoroughly before serving. {{image_4}} You can swap salmon for other proteins. Chicken or shrimp works well too. Simply adjust the cooking time based on the protein you choose. If using chicken, cook it until it reaches 165°F. For shrimp, cook until they turn pink and opaque. This gives you a nice variety of flavors and textures. To make this dish vegetarian or vegan, use tofu or tempeh. Press the tofu to remove extra water. Cut it into cubes and marinate it in teriyaki sauce. Cook it the same way as the salmon. Tempeh is nutty and pairs well with teriyaki too. This way, you keep all the great flavors while catering to different diets. Add your favorite toppings for extra flavor. Try avocado slices, edamame, or radishes. You can also toss in some nuts or seeds for crunch. Fresh herbs like cilantro or basil can brighten the dish. Customize your bowls to suit your mood and taste. This keeps each meal fresh and exciting! To keep your leftover teriyaki salmon bowls fresh, store them in airtight containers. Make sure to separate the rice, salmon, and veggies if possible. This helps keep everything nice and tasty. You can keep the bowls in the fridge for up to three days. If you want to save them longer, freeze the components. They can last up to three months in the freezer. When you’re ready to enjoy your leftovers, reheating is easy. For best results, use the microwave. Place the bowl in the microwave and cover it with a damp paper towel. Heat it in 30-second bursts until warm. If you prefer the stove, heat a non-stick skillet over low heat. Add a splash of water or broth to keep it moist, then cover and warm until hot. Meal prep makes life easier! You can cook the salmon and veggies ahead of time. Store them in separate containers in the fridge. When you are ready, just heat and serve over freshly cooked rice. You can also prepare the rice in advance. Cook a big batch and store it in the fridge. This way, you can whip up a teriyaki salmon bowl in just a few minutes! Yes, you can use frozen salmon fillets. Just make sure to thaw them first. Place the fillets in the fridge overnight or submerge them in cold water for about an hour. This way, the salmon will cook evenly. Frozen salmon may take a minute or two longer to cook than fresh salmon. Keep an eye on it to ensure it’s flaky and tender. If you don’t have teriyaki sauce, you can make a simple mix. Combine soy sauce, honey, and a little rice vinegar. This mix gives you a sweet and salty flavor similar to teriyaki. You can also use barbecue sauce or a mix of soy sauce with brown sugar. These options add a nice twist to the dish while keeping it tasty. Cooking salmon usually takes about 8-10 minutes. If you follow my recipe, it cooks for 4 minutes on one side and 3-4 minutes after flipping. The salmon is done when it flakes easily with a fork. Always check for doneness, as cooking times may vary based on the thickness of the fillets. Aim for a nice golden crust for the best flavor. This blog post provided a clear guide for making delicious salmon bowls. We covered the key ingredients, from fresh salmon to crispy veggies and savory rice. You learned simple step-by-step instructions for cooking and assembling your meal. I shared tips on choosing salmon and perfect rice. We explored tasty variations, storage info, and answered common questions. Remember, cooking is fun and allows for creativity. Enjoy making your salmon bowls unique!

Minute Teriyaki Salmon Bowls Quick and Tasty Meal

Ready for a meal that’s quick, tasty, and simple? These Minute Teriyaki Salmon Bowls are perfect for busy days. In

- 1 lb ground chicken or turkey - 1/4 cup breadcrumbs - 1/4 cup green onion, finely chopped - 1 tablespoon fresh ginger, minced - 2 cloves garlic, minced - 1 large egg - 1 tablespoon soy sauce (or tamari for gluten-free) - 1 tablespoon sesame oil - Salt and pepper to taste - 1 cup teriyaki sauce (store-bought or homemade) - 2 cups cooked jasmine rice or quinoa - 2 cups steamed broccoli florets - 1 cup shredded carrots - Sesame seeds for garnish - Extra green onions for garnish When I make teriyaki meatball meal prep bowls, I love how simple and tasty they are. You start with the main ingredients. Choose ground chicken or turkey for a lean option. Breadcrumbs help bind the meatballs together. Green onion adds flavor, while fresh ginger and garlic give them a nice kick. The egg acts as a binder too. Soy sauce and sesame oil add depth to the flavor. Don't forget salt and pepper for taste! Next, think about the accompanying ingredients. Cooked jasmine rice or quinoa serves as a base. I often prefer quinoa for added protein. Steamed broccoli and shredded carrots add color and crunch. Finally, sprinkle sesame seeds and extra green onions on top for garnish. They not only look good but taste great too! {{ingredient_image_2}} This blog post covered delicious teriyaki meatballs and their perfect meal prep. You learned about key ingredients like ground chicken, ginger, and soy sauce. I shared steps to make, shape, and bake flavorful meatballs. We explored storage tips to keep your meals fresh and tasty. Remember, you can customize these bowls to fit your taste. Try different meat or veggies to mix things up. Enjoy your flavorful meal prep journey!

Teriyaki Meatball Meal Prep Bowls Tasty and Simple Recipe

Are you looking for a quick, tasty meal prep idea? These Teriyaki Meatball Meal Prep Bowls are just what you

Here’s what you need to make these tasty treats: - 1 cup creamy peanut butter - 1/4 cup powdered sugar - 1/2 teaspoon vanilla extract - 1 cup small pretzel twists - 1 cup semi-sweet chocolate chips - 1 teaspoon coconut oil (optional) - Sea salt for garnishing These ingredients come together to create a sweet and salty delight. The creamy peanut butter mixes with powdered sugar and vanilla to give a rich flavor. The pretzel twists add crunch and saltiness. Melting the chocolate with a bit of coconut oil makes a smooth coating. You can even sprinkle sea salt on top for an extra kick. Each bite will be a blend of flavors that you will love. {{ingredient_image_2}} Start by grabbing a big mixing bowl. Add the creamy peanut butter, powdered sugar, and vanilla extract. Use a spatula or wooden spoon to mix until smooth and creamy. This mix should be easy to spread but thick enough to stay on the pretzel. Next, take about 1 teaspoon of this peanut butter mix. Spread it evenly on one pretzel twist. Then, place another pretzel twist on top. Press gently to make a sandwich. Keep making these sandwiches until you use all the peanut butter mix. After making all your pretzel sandwiches, place them on a baking sheet lined with parchment paper. This step helps with easy cleanup later. Now, it’s time for the chilling process. Pop the baking sheet into the fridge for about 30 minutes. This helps the peanut butter firm up and stay in place. While those pretzel bites chill, let’s melt the chocolate chips. Take a microwave-safe bowl and add the chocolate chips. If you want a nice sheen, add the optional coconut oil. Heat the bowl in the microwave for 30 seconds. After that, stir well. Repeat this until the chocolate is smooth and fully melted. Be careful not to overheat it! Now comes the fun part! Take the chilled pretzel sandwiches out of the fridge. Dip each one into the melted chocolate. Make sure it gets fully coated. After dipping, let any extra chocolate drip off back into the bowl. Place the dipped pretzels back onto the parchment-lined baking sheet. Before the chocolate hardens, sprinkle a pinch of sea salt on each one. This adds a nice touch of flavor. Return the baking sheet to the fridge for another 30 minutes. This time helps the chocolate set and harden. To ensure the chocolate hardens well, keep the pretzel bites spaced apart. This way, they won’t stick together. After the time is up, your chocolate-dipped peanut butter pretzel bites are ready to enjoy! - Adjusting peanut butter consistency: If your peanut butter is too thick, add a little coconut oil. This will make it creamy and easy to spread. If it’s too runny, add more powdered sugar to thicken it up. A smooth, spreadable mix is key. - Using different types of chocolate: You can use milk chocolate or dark chocolate for a different taste. Each type brings its own flavor to the pretzel bites. Try mixing chocolates for a fun twist! - Overheating chocolate: When melting chocolate, heat it slowly. Use the microwave in short bursts. Stir in between to prevent burning. Burned chocolate becomes thick and hard, making it hard to dip. - Not using enough powdered sugar: The powdered sugar helps the peanut butter set. If you skip it or use too little, the filling may be too soft. This will make it messy and hard to dip. - Creative serving ideas: Arrange the pretzel bites on a fun plate. You can stack them for height or line them up like little soldiers. This makes them look more inviting. - Adding garnishes for decoration: Drizzle extra melted chocolate on top for flair. You can also sprinkle crushed nuts or colorful sprinkles. These small touches make your bites look fancy and fun! Pro Tips Chill for Better Dipping: Ensure your pretzel sandwiches are well chilled before dipping. This helps the chocolate adhere better and results in a smoother finish. Use Quality Chocolate: Opt for high-quality semi-sweet chocolate chips for a richer flavor. You can also experiment with dark chocolate for a deeper taste. Customize with Toppings: Get creative! Consider adding crushed nuts, sprinkles, or even a drizzle of white chocolate on top for added texture and flavor. Store Properly: Keep your chocolate-dipped pretzel bites in an airtight container in the refrigerator to maintain their freshness and prevent them from becoming sticky. {{image_4}} You can add crushed nuts or sprinkles for fun textures. Chopped peanuts or almonds give a nice crunch. Sprinkles add color and joy, making each bite even more exciting. You can also mix in flavored chocolate. Try white chocolate, dark chocolate, or even mint chocolate. Each variation changes the taste and makes your pretzel bites unique. If you need gluten-free, look for gluten-free pretzel options. Many brands offer delicious gluten-free pretzels that fit right in. For a vegan-friendly version, swap the chocolate for dairy-free chocolate chips. You can also use maple syrup instead of powdered sugar. These swaps keep the treats tasty for everyone. Get creative with seasonal themes. For holidays, use colored chocolate for a festive touch. Red and green for Christmas or pastel colors for Easter work great. You can also add seasonal flavors. A hint of pumpkin spice for fall or peppermint for winter can make your treats stand out. These twists make the pretzel bites perfect for any celebration. Store your chocolate dipped peanut butter pretzel bites in an airtight container. This keeps them fresh. If you leave them out, they might get stale. For room temperature, they can stay good for a few days. If you want to keep them longer, refrigerate them. The cold helps to maintain their taste and texture. Just make sure they are in a sealed container to prevent moisture. These tasty treats last about one week when stored properly. After that, they may not taste as good. Look for signs of spoilage. If the chocolate appears dull or the pretzels feel soft, it’s time to toss them. Always check for any strange smells as well. Keeping an eye on these signs helps ensure you enjoy them at their best. If you want to warm them up, use the microwave. Heat them for about 10 seconds. This keeps the texture nice and does not burn the chocolate. You can also let them sit at room temperature for a few minutes. This way, they become soft without losing that lovely chocolate coating. Enjoying them warm can enhance the flavor! To make your bites look professional, follow these tips: - Use a fork to dip each pretzel. This helps create an even coat. - Allow excess chocolate to drip off. This avoids clumps. - Use a piping bag to drizzle extra chocolate on top. This adds flair. - Aim for even spacing on the tray. It makes them look neat. - Sprinkle sea salt right after dipping. This enhances taste and looks. Yes, you can use other nut butters! Here are some good options: - Almond butter for a nutty twist. - Cashew butter for a sweeter taste. - Sunflower seed butter for a nut-free option. Just ensure the nut butter has a similar creamy texture. Pair these pretzel bites with fun snacks and drinks. Here are some ideas: - Milk or chocolate milk for a classic combo. - Coffee or tea for a cozy treat. - Fresh fruit like strawberries for a sweet contrast. - Ice cream or yogurt for a creamy delight. These bites also make great party snacks! To prevent chocolate from seizing, follow these tips: - Use a microwave-safe bowl for melting chocolate. - Heat in short bursts, stirring in between. This keeps it smooth. - Avoid water getting into the chocolate. Water causes it to seize. - Use coconut oil to help maintain a smooth texture. Yes, you can freeze these pretzel bites! Here’s how: - Place them in a single layer on a tray first. This prevents sticking. - Once frozen, transfer them to an airtight container. - Label the container with the date. They last up to three months. - To thaw, leave them in the fridge overnight. This keeps them fresh. In this post, we explored making delicious chocolate-dipped peanut butter pretzel bites. We covered easy steps for mixing, assembling, and melting chocolate. I shared tips to enhance your treats, from presentation to storage. Remember that you can adapt this recipe to suit your taste or dietary needs. These pretzel bites are fun and perfect for any occasion. Enjoy your creations and make them your own!

Chocolate Dipped Peanut Butter Pretzel Bites Delight

Get ready for a sweet and salty treat with my Chocolate Dipped Peanut Butter Pretzel Bites! This easy recipe combines

- 8 oz. penne pasta - 12 oz. kielbasa, sliced - 1 tablespoon extra virgin olive oil - 1 medium onion, finely diced - 3 cloves garlic, minced - 1 red bell pepper, thinly sliced - 1 medium zucchini, diced - 4 cups low-sodium chicken broth - 1 teaspoon dried Italian seasoning - 1/2 teaspoon red pepper flakes (optional) - Salt and freshly cracked pepper - 1 cup cherry tomatoes, halved - 1 cup fresh spinach, chopped - 1/2 cup finely grated Parmesan cheese - Fresh basil leaves for garnish This dish starts with simple ingredients. Each one plays a key role. First, the penne pasta gives a nice bite. Next, the kielbasa adds a rich, savory flavor. The olive oil helps the ingredients cook well. Then, we have the onion and garlic. They create a fragrant base. The red bell pepper and zucchini add color and crunch. Chicken broth is vital. It brings moisture and depth to the dish. Italian seasoning gives it a lovely, herby taste. If you like spice, the red pepper flakes are optional. Don't forget salt and pepper to taste. They enhance all the flavors. Cherry tomatoes add sweetness, while spinach brings freshness. Finally, Parmesan cheese makes it creamy and rich. Gather these ingredients, and you are ready to make a delicious meal. It’s simple, yet so flavorful! {{ingredient_image_2}} First, grab a large pot. Pour in one tablespoon of olive oil and heat it over medium heat. Watch for it to shimmer. Then, add the sliced kielbasa. Cook it for about 5-7 minutes. You want it browned and a bit crispy. This step adds great flavor. Next, add the finely diced onion, minced garlic, and thinly sliced red bell pepper to the pot. Stir well and cook for 3-4 minutes. The onion should turn translucent, and the peppers will soften. This mix will bring out a sweet aroma. Now, it’s time for the zucchini. Add the diced zucchini and stir everything together. Carefully pour in 4 cups of low-sodium chicken broth. Bring this to a gentle simmer. Once simmering, add the 8 oz. of penne pasta, 1 teaspoon of dried Italian seasoning, and 1/2 teaspoon of red pepper flakes if you like some heat. Season with salt and freshly cracked pepper. Make sure the pasta is fully submerged. Cover the pot and let it simmer for 10-12 minutes. Stir occasionally to keep the pasta from sticking. After the pasta cooks to your liking, fold in 1 cup of halved cherry tomatoes and 1 cup of chopped spinach. Cook for another 2-3 minutes until the spinach wilts and the tomatoes soften. Remove the pot from heat. Stir in 1/2 cup of finely grated Parmesan cheese. This makes the dish creamy. Taste and adjust the seasoning if needed. You can add more salt or pepper. To ensure even cooking of your pasta, always stir it during cooking. This helps prevent sticking and allows the pasta to absorb the rich flavors. Make sure the pasta is fully submerged in the broth. If it’s not, add a bit more broth or water. This will keep it from becoming dry. If you want to add some heat, increase the red pepper flakes. For a milder dish, skip them altogether. You can also add a splash of hot sauce for a different spice profile. Taste as you go, and adjust until you find your perfect level of heat. For a creamier sauce, use more Parmesan cheese. It melts beautifully and adds a rich flavor. You can also stir in a splash of heavy cream or a dollop of cream cheese after cooking. This will make your dish even more luscious and satisfying. Pro Tips Cook Pasta Al Dente: Make sure to cook the penne pasta until it is al dente to ensure the best texture. It will continue to absorb liquid while resting, so slightly undercooking it is a great strategy. Enhance Flavor: For an added depth of flavor, consider browning the kielbasa longer until it’s caramelized. This creates a rich, savory base for your dish. Vegetable Variations: Feel free to mix up the vegetables! Seasonal veggies like asparagus or mushrooms can be great substitutes in this recipe. Garnish for Freshness: Don’t skip the fresh basil leaves! They not only add a burst of color but also a fresh, aromatic touch that brightens the dish. {{image_4}} You can make your one pot kielbasa pasta even more colorful and healthy. Here are some great veggies to try: - Mushrooms: They add a nice earthy flavor. - Broccoli: Toss in some florets for crunch. - Carrots: Dice them for a sweet touch. - Peas: Add them for a pop of color and sweetness. Feel free to mix and match these vegetables. They not only boost nutrition but also add fun flavors to your dish. If you want to switch up the protein, there are many options. You can try: - Chicken: Use bite-sized pieces. Cook them until golden. - Turkey Sausage: A lighter option that still packs flavor. - Tofu: For a vegetarian choice, use firm tofu. Sauté it to add texture. These substitutes keep the meal exciting and cater to different diets. You can use other pasta shapes besides penne. Here are a few ideas: - Fusilli: Its twists hold sauce well. - Farfalle: These bow-ties add a fun look. - Shells: They catch the sauce nicely. Choosing different pasta shapes can change the meal's texture and fun. Enjoy experimenting! To store leftovers safely, let the dish cool down. Once cooled, place it in an airtight container. Make sure to cover it tightly to keep it fresh. This meal lasts about 3 to 4 days in the fridge. Always check for any bad smells or changes in color before eating leftovers. If you want to freeze your pasta, first allow it to cool completely. Then, transfer it to a freezer-safe container. You can also use heavy-duty freezer bags, removing as much air as you can. It will stay good for about 2 to 3 months in the freezer. When you're ready to eat it, just thaw it in the fridge overnight. To reheat your One Pot Kielbasa Pasta, the best method is on the stove. Place it in a pot over medium heat. Add a splash of chicken broth or water to prevent it from drying out. Stir it often until it's heated through. You can also use a microwave, but be sure to cover it to keep the moisture in. Heat in short bursts, stirring in between, for even warming. Yes, you can use other types of sausage. Try smoked sausage, Italian sausage, or turkey sausage. Each will change the flavor a bit. Just ensure you slice them thinly, so they cook well. You can also use plant-based sausage for a meat-free option. To keep pasta from sticking, stir it often while it cooks. You can also add a little olive oil to the pot. Make sure the pasta is fully submerged in the broth. This helps it cook evenly and stay separate. If you notice sticking, stir more while it simmers. One Pot Kielbasa Pasta pairs well with a fresh salad. A simple green salad with lemon vinaigrette works great. You can also serve it with garlic bread for a tasty side. If you like, add some roasted veggies for extra color and flavor. Enjoy your meal with a light dessert, like fruit or sorbet. This blog post revealed how to make a delightful one-pot kielbasa pasta. We explored necessary ingredients, easy steps, and helpful tips for success. Remember, you can swap ingredients or add veggies for a twist. Proper storage ensures your leftovers stay fresh and tasty. Whether you're a busy cook or a pasta lover, this meal shines. I hope you enjoy making this dish for yourself or loved ones. Happy cooking!

One Pot Kielbasa Pasta Simple and Flavorful Meal

Looking for a quick and tasty meal? One Pot Kielbasa Pasta is a simple solution! In just one pot, you’ll

Older posts
Newer posts
← Previous Page1 … Page71 Page72 Page73 … Page75 Next →

dsad

© 2025 tastymomrecipes • Built with GeneratePress

Our Policies

  • Copyright Policy
  • Cookie Policy
  • GDPR Policy
  • Privacy Policy
  • Disclaimer
  • Terms Of Use

More Information

  • Home
  • About
  • Contact
  • Appetizers
  • Dessert
  • Dinner
  • Drinks
©2025, tastymomrecipes About Back To Top