Skip to content
DisclaimerTerms Of UseGDPR PolicyCookie Policy

tastymomrecipes

  • Home
  • Drinks
  • Appetizers
  • Dinner
  • Dessert
  • About
  • Contact
  • Privacy Policy
DisclaimerTerms Of UseGDPR PolicyCookie Policy

Olivia

- Large shrimp - Olive oil - Chili powder - Cumin - Garlic powder - Limes - Quinoa - Cherry tomatoes - Avocado - Corn - Cilantro To make chili lime shrimp bowls, you need fresh and vibrant ingredients. Start with one pound of large shrimp. They should be peeled and deveined for easy cooking. Next, grab some extra virgin olive oil. This will help your shrimp stay juicy and add flavor. Chili powder gives your dish a nice kick. Use one tablespoon for a balanced spice. Ground cumin adds warmth, so you only need one teaspoon. Garlic powder brings depth, and one teaspoon works well. Limes are key for that zesty flavor. You'll need the juice and zest of two fresh limes. Add salt and black pepper to taste. These enhance all the other flavors. For the base, cook one cup of quinoa. This grain adds protein and fiber. It pairs well with the shrimp. Use one cup of halved cherry tomatoes for sweetness. A ripe avocado, sliced, adds creaminess. One cup of corn, either fresh or frozen, adds a pop of color and texture. Finally, fresh cilantro leaves provide a burst of freshness. Together, these ingredients create a colorful and tasty meal. - Calories per serving: Approximately 350 - Protein content: About 25 grams - Carbohydrates: 45 grams - Fats: 10 grams This meal is not only delicious but also healthy. Each serving has about 350 calories. You get around 25 grams of protein from the shrimp and quinoa. The total carbohydrates are about 45 grams, providing energy. The healthy fats from the avocado and olive oil add richness without being heavy. Enjoy this balanced dish that nourishes your body and pleases your taste buds! {{ingredient_image_2}} To make the marinade, start with a mixing bowl. Whisk together 2 tablespoons of olive oil, 1 tablespoon of chili powder, 1 teaspoon of cumin, and 1 teaspoon of garlic powder. Add the juice and zest of 2 fresh limes. Season with salt and pepper to taste. This mix packs a punch! Next, gently add 1 pound of peeled and deveined shrimp into the marinade. Make sure each shrimp gets a good coat. Let them marinate at room temperature for at least 15 minutes. This soaking time helps the shrimp absorb all the tasty flavors. For the quinoa, measure 1 cup of cooked quinoa, which is about 1/3 cup dry. Follow the package instructions for cooking. Usually, you will need a pot with water and a pinch of salt. Bring it to a boil, add quinoa, and cover it. Once the quinoa is done, fluff it with a fork. This step makes it light and airy. Keep it warm until you are ready to assemble your bowls. Now, it's time to cook the shrimp. Heat a non-stick skillet over medium-high heat. Once hot, add the marinated shrimp in a single layer. Avoid overcrowding the pan. If your skillet is small, cook the shrimp in batches. Sauté the shrimp for about 2-3 minutes on each side. Look for them to turn pink and opaque. This means they are done! Once cooked, remove from the skillet and set aside. To build your bowls, start with a generous layer of warm quinoa at the bottom. Next, add halved cherry tomatoes, corn, and sliced avocado on top. Finally, place the sautéed chili lime shrimp right over the veggies. For a beautiful presentation, arrange the ingredients in sections. Finish with fresh cilantro and a squeeze of lime juice. This adds a zesty touch and makes your dish pop! To make the marinade even better, try adding fresh herbs. Chopped cilantro or parsley adds a nice touch. You can also mix in some lime zest for extra zing. The best limes for juicing are the ones that feel heavy for their size. They should have a slight give when squeezed. This means they are juicy and fresh. When serving the shrimp bowls, think about adding a side of black beans. They pair well with shrimp and add protein. You can also serve with tortilla chips for some crunch. For garnishing, fresh cilantro is a must. You can also add lime wedges for guests to squeeze over their bowls. To save time, you can pre-marinate the shrimp. Just place them in the marinade and store in the fridge for up to 2 hours. This gives the shrimp a stronger flavor. For storing pre-cooked quinoa, let it cool first. Then, place it in an airtight container. It will last in the fridge for up to five days. Pro Tips Marinate Longer for Depth: For an even richer flavor, consider marinating the shrimp for 30 minutes to 1 hour in the refrigerator. This allows the spices to penetrate deeper into the shrimp. Use Fresh Ingredients: Fresh limes and ripe avocados can make a significant difference in flavor. Always opt for fresh over bottled lime juice and ensure your avocado is perfectly ripe for the best texture. Customize Your Bowl: Feel free to add other ingredients like black beans, bell peppers, or leafy greens to your bowl for added nutrition and flavor variety. Perfect Cooking Technique: When cooking shrimp, avoid overcooking by watching closely. Once they turn pink and opaque, remove them from heat to maintain tenderness. {{image_4}} You can easily swap shrimp for chicken or tofu. If you use chicken, choose boneless, skinless breasts. Cut them into bite-sized pieces and marinate as you would the shrimp. Cook them until they reach 165°F (74°C). For tofu lovers, opt for firm or extra-firm tofu. Press it to remove excess water, then cut it into cubes. Marinate and cook until golden brown. Both options offer great flavor and texture. Feel free to mix up the veggies in your bowl. Bell peppers, zucchini, or spinach can add crunch and color. Use what's in season or what you have on hand. You can also switch the quinoa for grains like rice or farro. Each grain brings a different texture and taste, adding variety to your meal. Try brown rice for a nutty flavor or farro for a chewy bite. To elevate the dish, consider adding spices or sauces. A pinch of smoked paprika can enhance the smoky flavor. You could also drizzle some sriracha for heat or a tangy sauce for zest. Adjust the spice levels based on your taste. If you prefer mild dishes, reduce the chili powder. For a kick, add extra lime juice or hot sauce. Experiment and make it your own! To keep your chili lime shrimp bowls fresh, use airtight containers. Glass or BPA-free plastic containers work best. Store your shrimp bowls in the fridge for up to three days. If you want to save them longer, freeze the shrimp separately from the other ingredients. You can freeze the shrimp for up to two months. Just make sure to let them cool before sealing. When you're ready to eat, reheating is simple. For best results, use the stovetop. Heat a skillet over medium heat and add a splash of olive oil. Once hot, add the shrimp and cook until heated through, about 2-3 minutes. You can also use a microwave, but be sure to heat in short bursts to avoid overcooking. Always check that the shrimp is warmed evenly. You can store leftover shrimp bowls in the fridge for up to three days. Make sure to keep them in an airtight container. The shrimp may lose some texture over time. However, the flavors will still be tasty. Reheat them gently to enjoy the meal again. Yes, you can prepare many parts ahead of time. Marinate the shrimp and cook the quinoa a day before. Just keep them in the fridge. When you’re ready to eat, quickly sauté the shrimp and assemble your bowl. This saves time when you’re hungry. Chili lime shrimp bowls pair well with fresh sides. You can serve them with a simple green salad or tortilla chips. A dollop of sour cream or a fresh salsa adds a nice touch too. Pairing with grilled veggies can boost the nutrition and flavor. Yes, this recipe is gluten-free. All the ingredients, like shrimp and quinoa, do not contain gluten. Always check labels for any sauces or extras you might add. This helps ensure a safe meal for anyone with gluten sensitivities. Absolutely! You can use frozen shrimp. Just make sure to thaw them before marinating. Place the shrimp in cold water for about 15 minutes. This gives you fresh flavor and keeps the meal quick and easy. This blog post covered how to create delicious chili lime shrimp bowls. We detailed the ingredients, marination process, and cooking methods. Nutrition facts help you track your meals, too. I shared tips to enhance flavors and provided meal prep advice. You can even swap ingredients to suit your taste. Whether you're a fan of shrimp or looking to try other proteins, these bowls are fun and easy to make. Enjoy bright flavors and healthy ingredients all in one dish!

Chili Lime Shrimp Bowls Flavorful and Fresh Delight

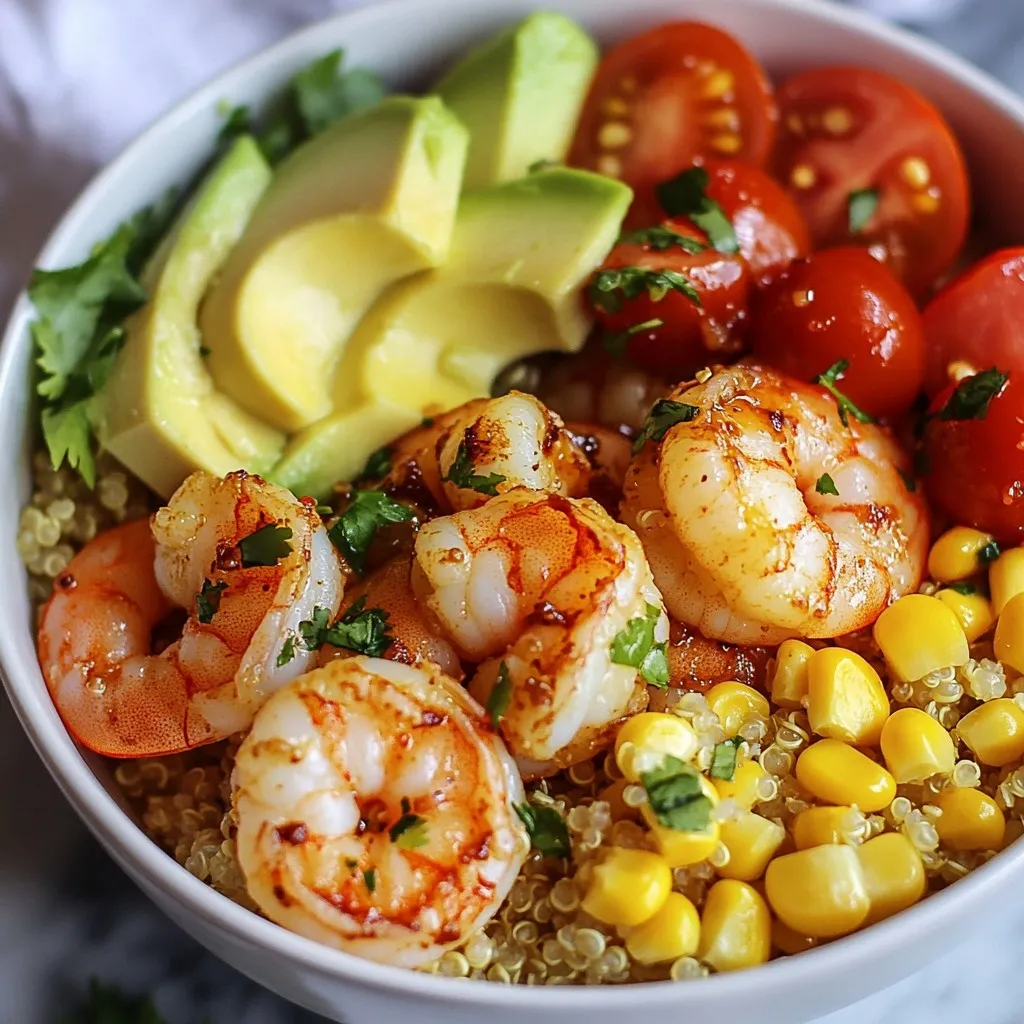
If you’re looking for a fresh and zesty meal, try my Chili Lime Shrimp Bowls! Bursting with flavor, this dish

To make Cranberry Almond Energy Bites, you need simple, wholesome ingredients. Here’s what you’ll need: - 1 cup rolled oats - 1/2 cup almond butter - 1/3 cup honey or maple syrup (sweeten to taste) - 1/2 cup dried cranberries, finely chopped - 1/4 cup almond slices or chopped almonds - 1 tablespoon chia seeds - 1 teaspoon pure vanilla extract - A pinch of salt These ingredients combine to create a tasty snack that packs a punch of energy. You can customize your energy bites with optional add-ins. Here are some ideas: - Dark chocolate chips for a sweet touch - Flax seeds for extra fiber - Coconut flakes for a tropical twist - Pumpkin seeds for crunch and nutrition Feel free to mix and match these add-ins. They can make your bites even more exciting. Cranberry Almond Energy Bites offer great nutrition. Here’s a quick look: - Rolled oats provide fiber and keep you full. - Almond butter adds healthy fats and protein. - Dried cranberries give natural sweetness and antioxidants. - Chia seeds are high in omega-3 fatty acids. - Almonds contribute vitamins and minerals. In each bite, you get energy, nutrients, and flavor. Enjoy these bites as a healthy snack during your day! {{ingredient_image_2}} To start, gather your ingredients. You need rolled oats, almond butter, honey, dried cranberries, almond slices, chia seeds, vanilla extract, and salt. In a large mixing bowl, add 1 cup of rolled oats, 1/2 cup of almond butter, and 1/3 cup of honey or maple syrup. Use a sturdy spatula to mix them well. Keep mixing until the mixture is sticky and holds together. Next, chop your 1/2 cup of dried cranberries finely. Add them to the bowl, along with 1/4 cup of almond slices, 1 tablespoon of chia seeds, 1 teaspoon of pure vanilla extract, and a pinch of salt. Stir everything together until it is well combined. Once your mixture is ready, cover the bowl with plastic wrap or a clean kitchen towel. Place it in the refrigerator for about 30 minutes. Chilling helps the mixture firm up. This makes it easier to shape later. After chilling, take the mixture out of the fridge. Use a tablespoon or a cookie scoop to portion out small amounts, about 1 tablespoon each. With clean hands, roll each scoop into a tight ball. You should make about 12 to 15 energy bites. Arrange the energy bites on a parchment-lined baking sheet or a large plate. For extra crunch, you can roll some of them in additional almond slices. This adds a nice texture and makes them look great. Store your energy bites in an airtight container in the refrigerator. They will stay fresh for up to a week. If you want to keep them longer, freeze them for future snacks. To get the right texture for your energy bites, start with fresh ingredients. Rolled oats should be soft but not too fine. Almond butter must be creamy but not runny. If the mixture feels too dry, add a little more honey or almond butter. If it’s too wet, add a few more oats. Make sure to chill the mixture before shaping. This step helps the bites hold their shape better. When you mix the ingredients, use a large bowl. Combine the rolled oats, almond butter, and honey first. Stir until you see no dry oats. Then, add the cranberries, almonds, chia seeds, and vanilla. Mix well to ensure every bite has a little bit of everything. Don't rush this step; a good mix means a great taste. For a fun display, serve the energy bites in a small bowl or mason jar. You can sprinkle a few extra cranberries or almond slices around them. This adds color and makes the bites look more inviting. If you're sharing with friends, consider stacking them on a plate. It’s a simple way to make your snack look gourmet! Pro Tips Use Fresh Ingredients: Always opt for fresh, high-quality dried cranberries and almonds to enhance the flavor of your energy bites. Experiment with Sweeteners: Feel free to substitute honey with agave syrup or coconut nectar for a different flavor profile tailored to your taste. Customize Your Mix-ins: Add other ingredients like chocolate chips, flaxseeds, or shredded coconut to personalize your energy bites even more. Chill for Best Results: Allow the mixture to chill longer if you prefer firmer bites, as this makes them easier to handle and shape. {{image_4}} You can switch almond butter with other nut butters. Peanut butter gives a rich taste. Cashew butter adds a smooth texture. Sunflower seed butter works well for nut-free diets. Each nut butter brings its own flavor. This allows you to keep your energy bites interesting. Feel free to mix in different dried fruits. Dried cherries or apricots add a fun twist. Raisins or figs can also work well. Each fruit changes the taste and texture. Experiment to find your favorite combination. You can even try using a mix of dried fruits for a burst of flavor. Adjust the sweetness to your liking. Start with less honey or maple syrup. Taste the mixture and add more if needed. You can also use mashed bananas or unsweetened applesauce. These options can provide natural sweetness. This way, you can control how sweet your snacks are. To keep your cranberry almond energy bites fresh, use an airtight container. This will prevent air from drying them out. Place a piece of parchment paper between layers if you stack them. This helps keep them from sticking together. You can store energy bites in the fridge or freezer. In the fridge, they stay fresh for up to a week. If you want to keep them longer, freezing is best. Just make sure to wrap them well in plastic wrap or a freezer bag. They can last up to three months in the freezer. Check your energy bites before eating. If they smell off or look dry, it’s best to toss them. To keep them fresh, only take out what you need. Avoid leaving them at room temperature for long. This helps maintain their taste and texture. Yes, you can use other sweeteners. Agave syrup or brown rice syrup work well too. Just choose a sweetener that fits your taste and diet. Each option will change the flavor a bit, but they all blend nicely with the other ingredients in the recipe. These energy bites last up to a week in the fridge. If you want them to last longer, freeze them. They can stay fresh for about three months in the freezer. Just thaw them in the fridge before eating. Absolutely! These bites are perfect for meal prep. You can make a big batch and store them for quick snacks. They are easy to grab and pack for on-the-go lunches or after-school snacks. Enjoy them anytime you need a healthy boost! This blog post covered everything about making Cranberry Almond Energy Bites. We discussed key ingredients, step-by-step instructions, and useful tips. You learned how to customize flavors and store your treats for lasting freshness. In closing, making these bites is simple and fun. They are healthy snacks that fit your needs. I hope you feel inspired to try this recipe and share it with friends! Enjoy your tasty treats!

Cranberry Almond Energy Bites Healthy Snack Idea

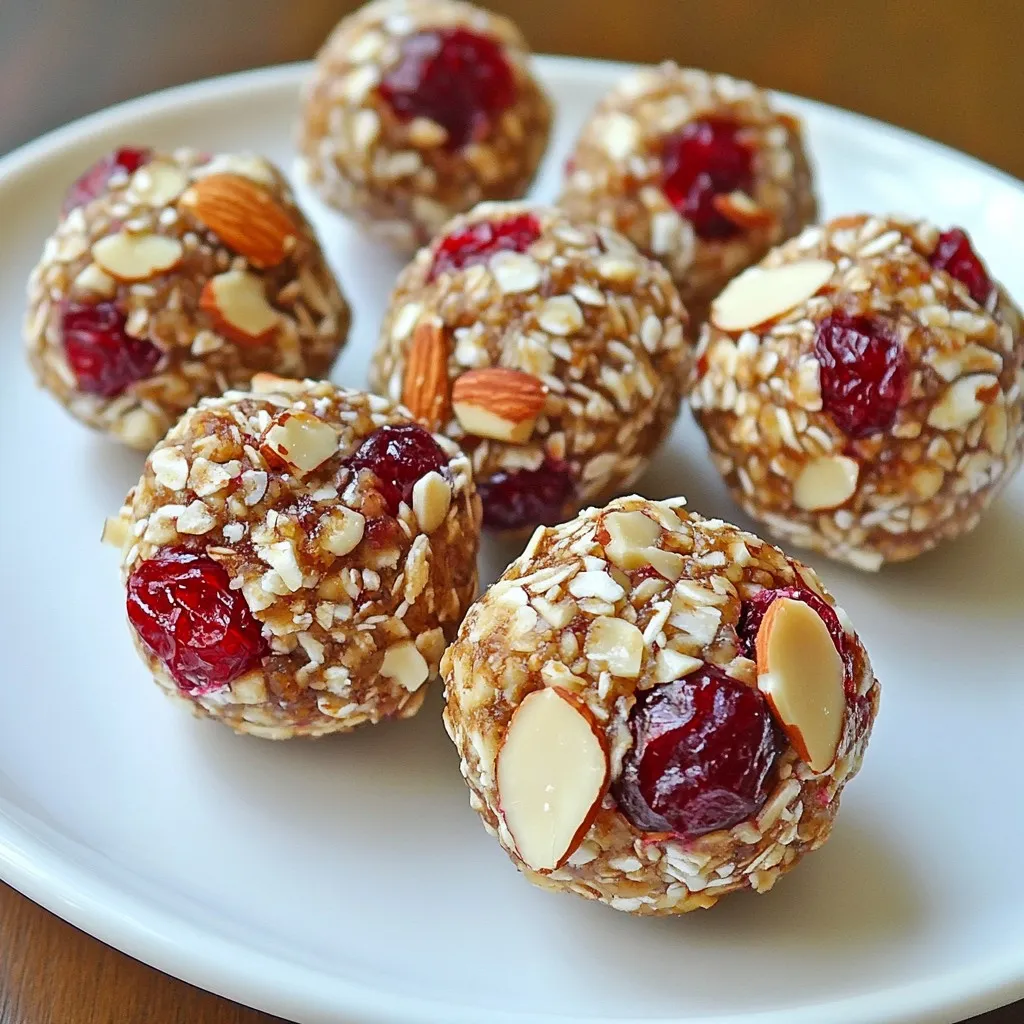
Looking for a quick and healthy snack? Cranberry Almond Energy Bites pack energy and flavor. These bites combine tart cranberries

- 1 lb chicken breast, thinly sliced - 1 cup cooked quinoa or rice - 1 cup cucumber, finely diced - 1 cup cherry tomatoes, cut in half - 1/2 red onion, thinly sliced - 1/2 cup Kalamata olives, pitted and halved - 2 tablespoons extra virgin olive oil - 2 teaspoons dried oregano (preferably Greek) - 1 teaspoon garlic powder - 1 teaspoon onion powder - Salt and freshly cracked black pepper, to taste - 1 cup plain Greek yogurt - 2 tablespoons fresh lemon juice - Seasoning (salt and pepper to taste) Gather all these ingredients before you start. This makes cooking smooth and fun. Using fresh veggies and quality chicken gives the best flavor. The olive oil and Greek oregano add a nice touch to the chicken. You can adjust seasoning based on your taste. The yogurt sauce brings it all together with its creamy texture and tangy flavor. {{ingredient_image_2}} 1. Start by marinating the chicken breast. In a large bowl, add 1 lb of thinly sliced chicken. Pour in 2 tablespoons of extra virgin olive oil. Add 2 teaspoons of dried oregano, 1 teaspoon of garlic powder, 1 teaspoon of onion powder, and a healthy pinch of salt and black pepper. Mix well until the chicken is fully coated with the marinade. 2. Next, cook the chicken in a skillet or grill pan. Preheat your non-stick skillet over medium-high heat. Place the marinated chicken in the pan in a single layer. Cook for about 6-7 minutes, turning halfway through. Look for nice grill marks and ensure the chicken is cooked through. Once done, remove it from the heat and let it rest. 1. Now, let's make the tzatziki sauce. In a small mixing bowl, whisk together 1 cup of plain Greek yogurt and 2 tablespoons of fresh lemon juice. Season with a pinch of salt and a dash of pepper. Whisk until the mixture is smooth and creamy. This sauce will add a tangy touch to your gyro bowls. 1. To assemble your gyro bowls, start with the base. Place a generous scoop of cooked quinoa or rice in each bowl. This will give you a hearty foundation. 2. Next, layer the warm, cooked chicken over the grains. Then, add your fresh vegetables: 1 cup of finely diced cucumber, 1 cup of halved cherry tomatoes, thinly sliced 1/2 red onion, and 1/2 cup of pitted and halved Kalamata olives. 3. Drizzle the tzatziki sauce over everything. Let it cascade over the chicken and veggies for added flavor. 4. Finally, garnish each bowl with a sprinkle of chopped fresh parsley. This adds color and a burst of fresh flavor. 5. If you like, serve with warmed pita bread on the side for extra enjoyment. Enjoy your fresh and flavorful Greek Chicken Gyro Bowls! To make the best Greek chicken, cook it for about 6-7 minutes. Use medium-high heat. Make sure the chicken is thinly sliced. It should have a nice char and be white inside. If it's still pink, it needs more time. To avoid overcooking, take it off the heat as soon as it’s done. Let it rest for a few minutes before serving. This keeps the juices inside and makes it tender. For a tasty tzatziki sauce, use plain Greek yogurt. Mix it with fresh lemon juice, salt, and pepper. If you want to change it up, add minced garlic or chopped dill. You can also mix in grated cucumber for a refreshing twist. Adjust the salt and pepper to taste. The sauce should be creamy and smooth. If it’s too thick, add a little water or more lemon juice. Pair your Greek chicken gyro bowls with warm pita bread. This adds a nice touch and is fun to scoop with. You can also serve it with a side of fresh salad or roasted veggies. Consider a mix of greens, like spinach or arugula. These additions will enhance the meal and provide extra crunch. Enjoy your bowls with friends or family for a perfect meal experience! Pro Tips Marinate Longer: For even more flavor, marinate the chicken for at least 30 minutes or up to overnight in the refrigerator. Use Fresh Herbs: Fresh oregano can elevate the dish significantly; consider using it instead of dried for a bright, aromatic flavor. Customize Your Toppings: Feel free to add other toppings like feta cheese, bell peppers, or avocado for a personalized touch. Make It Ahead: Prep the components in advance and store separately in the fridge for a quick assembly during busy weeknights. {{image_4}} You can easily make a vegetarian gyro bowl. Instead of chicken, use falafel. Falafel adds a nice crunch and flavor. You can also grill vegetables like zucchini and bell peppers. Both choices give great taste and texture. They keep the bowl colorful and fun. If you need a gluten-free option, skip the pita. Use quinoa instead of rice. Quinoa is a superfood that boosts protein. It also has a great nutty flavor. You can enjoy all the other toppings without worry. To make your dish even tastier, add spices to the marinade. Try smoked paprika or cumin for a warm touch. Fresh herbs like dill or mint can also brighten the flavors. These small changes can make a big difference. They take your gyro bowl from good to great! To keep your Greek Chicken Gyro Bowls fresh, store leftovers in an airtight container. Place the chicken and veggies in separate containers to maintain their texture. The chicken stays juicy, and the veggies stay crisp. Keep them in the fridge for up to three days. For best results, consume within two days for optimal taste. You can freeze components of your gyro bowl to enjoy later. First, let the chicken cool completely. Then, place it in a freezer-safe bag, removing excess air. You can also freeze the cooked quinoa or rice. Store them in separate bags for easy meals later. Use within three months for the best flavor. Reheat your chicken and grains gently. For chicken, use a skillet over low heat. Add a splash of water to keep it moist. For quinoa or rice, warm them in the microwave or on the stove with a little water. Stir occasionally until hot. This method helps maintain their texture and flavor. Yes, you can make Greek Chicken Gyro Bowls ahead of time. Meal prep is a great way to save time. Prepare the chicken and veggies in advance. Store each ingredient separately in airtight containers. You can cook the chicken and let it cool. Then, place it in the fridge for up to three days. When you're ready to eat, just assemble your bowls. This way, you enjoy fresh meals all week. If you don't have Greek yogurt, there are good substitutes. You can use regular yogurt or sour cream. For a non-dairy option, try cashew cream or coconut yogurt. These options still give you a creamy texture. Each substitute will change the flavor slightly, but they will still taste great. To add heat to your Greek Chicken Gyro Bowls, try a few simple ideas. Add crushed red pepper flakes to the chicken marinade. You can also mix hot sauce into the yogurt sauce. If you love fresh heat, chop jalapeños or add sliced spicy peppers. These small changes will give your bowls a nice kick. Enjoy the extra flavor! In this post, we explored how to make Greek Chicken Gyro Bowls. We discussed the key ingredients, including marinated chicken, quinoa or rice, and fresh veggies. I shared step-by-step instructions for cooking and assembling your bowls. You also learned tips for perfect chicken, delicious sauces, and meal variations. Enjoying these bowls at home is easy and fun. Experiment with flavors to make it your own!

Greek Chicken Gyro Bowls Fresh and Flavorful Delight

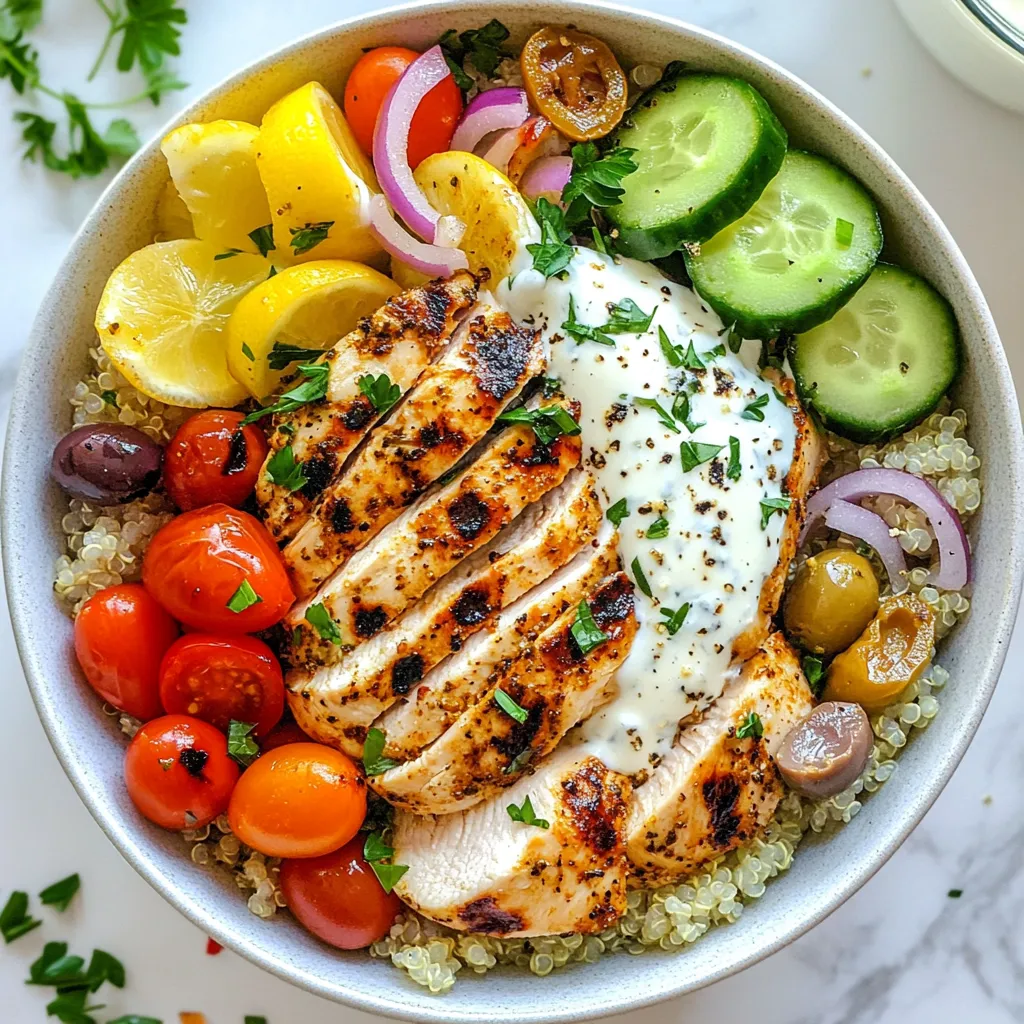
Get ready to taste the vibrant flavors of Greece with my Greek Chicken Gyro Bowls! This dish combines juicy marinated

To make honey roasted sweet potato rounds, gather these items: - 2 large sweet potatoes, sliced into 1/2-inch thick rounds - 4 tablespoons honey, preferably raw or local - 3 tablespoons extra virgin olive oil - 1 teaspoon ground cinnamon - 1/2 teaspoon ground nutmeg - Salt and freshly cracked black pepper to taste - Fresh parsley, finely chopped, for garnish You can add flavor by using: - A pinch of cayenne pepper for heat - Maple syrup instead of honey for a different taste - Chopped pecans or walnuts for crunch To prepare this dish, you will need: - A large mixing bowl - A baking sheet - Parchment paper for easy cleanup - A sharp knife for slicing - A spoon for tossing the potatoes {{ingredient_image_2}} Start by washing the sweet potatoes well. This step removes dirt and grit. Then, slice them into 1/2-inch thick rounds. Thick slices give a nice texture when roasted. In a large bowl, place the sweet potato rounds. Add 4 tablespoons of honey and 3 tablespoons of extra virgin olive oil. Next, sprinkle in 1 teaspoon of ground cinnamon, 1/2 teaspoon of nutmeg, and salt and pepper to taste. Mix everything well. Use your hands or a spoon. Each round should be coated in the sticky mixture for great flavor. Preheat your oven to 400°F (200°C). This is the perfect heat for roasting. Line a baking sheet with parchment paper. Spread the sweet potato rounds in a single layer. Make sure they are not crowded. Roast for about 25-30 minutes. Flip them halfway through to ensure even cooking. They should be tender and caramelized when done. Let them cool for a few minutes before serving. This will enhance their flavor and texture. To get the best roasted sweet potatoes, start with even slices. Cut the sweet potatoes into 1/2-inch rounds. This size helps them cook evenly. Preheat your oven to 400°F. This high heat makes them tender and golden. Toss the sweet potatoes well with honey and olive oil. Make sure every round gets coated. Space them out on the baking sheet. This helps them roast instead of steam. Flip them halfway through cooking for even browning. I love serving these sweet potato rounds warm. They look great on a platter. You can add a sprinkle of fresh parsley for color. Pair them with grilled meats for a tasty meal. They also work well as a side dish for salads. Try serving them with yogurt or sour cream for dipping. These sweet potato rounds are very flexible in taste. They pair well with cinnamon and nutmeg for warmth. If you want a spicy kick, add cayenne pepper. For a sweet touch, drizzle more honey on top before serving. You can also sprinkle nuts for crunch. Pecans or walnuts add a nice texture. Don't be afraid to experiment with flavors! Pro Tips Choose the Right Sweet Potatoes: Opt for firm, unblemished sweet potatoes for the best flavor and texture. Honey Variation: Experiment with different types of honey, such as clover or wildflower, to find your preferred sweetness. Spice It Up: Add a pinch of cayenne pepper or chili powder for a hint of heat that complements the sweetness. Storage Tips: Store any leftovers in an airtight container in the refrigerator for up to 3 days; reheat in the oven for the best texture. {{image_4}} If you want a different taste, try using maple syrup or agave nectar. Both give a nice sweetness. You can even use coconut sugar for a richer flavor. Just make sure to adjust the amount to your taste. Each sweetener adds its own twist. Experiment and find what you like best! Spices can change the whole vibe of your dish. Instead of cinnamon, try using pumpkin pie spice. It adds warmth and a hint of nutmeg. You can also use ginger for a spicy kick. If you want a fresh twist, add a bit of chili powder. It gives a nice heat that pairs well with the sweetness. This recipe is already vegetarian, but it can be vegan too! Simply stick with honey or switch to a plant-based sweetener. If you're avoiding oil, use vegetable broth instead. This will keep the sweet potatoes moist. You can also top them with nuts or seeds for extra crunch. To store your honey roasted sweet potato rounds, let them cool first. Place them in an airtight container. Keep them in the fridge for up to five days. This way, they stay fresh and tasty for your next meal. When you're ready to enjoy leftovers, preheat your oven to 350°F (175°C). Spread the sweet potato rounds on a baking sheet. Heat them for about 10-15 minutes until they are warm. You can also use a microwave for quicker reheating. Just heat them for 1-2 minutes, but they may not be as crispy. If you want to freeze these rounds, first let them cool completely. Arrange the rounds on a baking sheet in a single layer. Freeze them for about 1-2 hours until firm. Then, transfer them to a freezer bag. They can last up to three months in the freezer. To reheat, bake them directly from frozen, adding a few extra minutes to the cooking time. Yes, you can use other potatoes. Regular white or red potatoes work well. They will taste different but still be good. Keep in mind that sweet potatoes have a natural sweetness. So, if you swap them, you may want to add a bit more honey or sugar. Sweet potatoes are very nutritious. They are high in fiber and vitamins. They have vitamin A, which is good for your eyes. They also provide vitamin C for your immune system. Plus, they are low in calories and have healthy carbs. Eating sweet potatoes can help you feel full and satisfied. You can tell when sweet potatoes are done by checking their texture. They should be tender when you poke them with a fork. If they are soft and slightly caramelized, they are ready. The tops will also look golden brown. Make sure to flip them halfway for even cooking! In this post, we explored how to make delicious roasted sweet potatoes. We covered the key ingredients, useful tools, and simple steps to prepare them. Tips for roasting and flavor pairings added extra value. Variations help you customize the recipe, while storage info ensures freshness. Sweet potatoes are versatile and healthy. With this guide, you can enjoy tasty sweet potatoes anytime. Dive into cooking with confidence, knowing you have all the tools you need for success. Enjoy your next meal!

Honey Roasted Sweet Potato Rounds Easy and Delicious

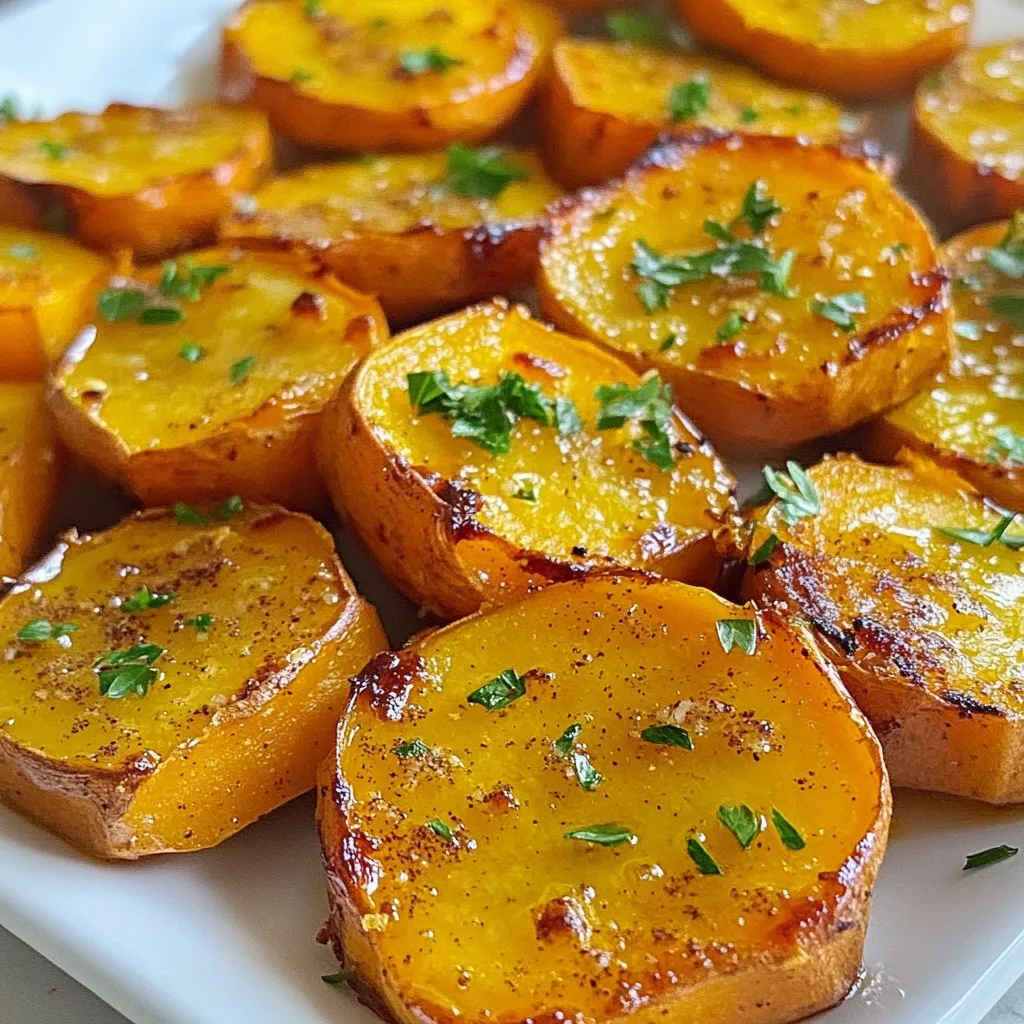
If you’re craving a tasty side dish, look no further than honey roasted sweet potato rounds. They’re easy to make

- 1 can (15 oz) chickpeas, thoroughly drained and rinsed - 1 cup sweet cherry tomatoes, halved for bursts of flavor - 1 crisp cucumber, diced into bite-sized pieces - 1 vibrant red bell pepper, diced for crunch - 1/4 red onion, finely chopped to add a zesty kick - 1/2 cup Kalamata olives, pitted and sliced for a briny contrast - 1/4 cup feta cheese, crumbled (optional for a vegan-friendly version) - 1/4 cup fresh parsley, roughly chopped for a fresh note - 3 tablespoons extra virgin olive oil - 2 tablespoons freshly squeezed lemon juice - 1 teaspoon dried oregano for an aromatic touch - Salt and pepper to taste You can add more ingredients based on your taste. Here are some ideas: - Avocado for creaminess - Spinach or arugula for more greens - Canned tuna or grilled chicken for protein - Fresh herbs like mint or basil for extra flavor This salad is packed with nutrients. Here’s a quick look: - Calories: Approximately 250 per serving - Protein: About 10g - Carbohydrates: Roughly 30g - Fat: Around 12g - Fiber: Approximately 8g - Sodium: Varies based on added salt and olives This salad not only tastes great, but it also provides a balanced mix of nutrients. Enjoy making it your own! {{ingredient_image_2}} Start by gathering your ingredients. In a large bowl, add one can of chickpeas. Be sure to drain and rinse them well. Next, add one cup of halved sweet cherry tomatoes. These will give your salad a burst of flavor. Then, chop one crisp cucumber into bite-sized pieces and add it to the bowl. Now, dice one vibrant red bell pepper and toss it in. For a zesty kick, finely chop a quarter of a red onion and mix it in. Don’t forget about the Kalamata olives! Slice half a cup of these olives and add them for a briny taste. If you like, crumble a quarter cup of feta cheese on top for creaminess. Finally, add a quarter cup of fresh parsley, roughly chopped, for a fresh note. Use a spatula or large spoon to gently combine all the ingredients. In a small bowl, whisk together three tablespoons of extra virgin olive oil. Add two tablespoons of freshly squeezed lemon juice for tang. Then, mix in one teaspoon of dried oregano for aroma. Season with salt and pepper to taste. Whisk until the dressing is smooth and well combined. Now, drizzle the dressing over the salad base. Carefully toss everything together. Make sure each piece gets coated well. After mixing, taste the salad. Adjust the seasoning if needed. You might want more salt or lemon juice for extra brightness. Cover the bowl with plastic wrap or use an airtight container. Chill the salad in the fridge for at least 30 minutes. This step is key! It allows the flavors to meld together beautifully. When you’re ready to serve, enjoy the salad chilled or at room temperature. It’s perfect for any occasion! To make your Mediterranean chickpea salad even better, use fresh herbs. Fresh parsley adds a bright taste. You can also try basil or mint for a twist. Add more lemon juice for a zesty kick. A splash of red wine vinegar can also boost the flavor. If you want more heat, try adding a pinch of crushed red pepper. This gives a nice kick to your dish. Remember, taste as you go. Adjust the salt and pepper to suit your taste. For a stunning look, use a large, colorful bowl. A white bowl makes the colors pop. Before serving, add extra parsley on top for a fresh touch. You can also sprinkle more feta cheese for a nice finish. Serve with lemon wedges on the side. This adds a nice touch and lets guests add more lemon if they like. Keep it simple, yet beautiful. A well-presented salad makes it even more appetizing. One common mistake is using dry chickpeas. Always use canned chickpeas that are drained and rinsed. This saves time and keeps the salad light. Avoid over-mixing the salad. This can mash the ingredients and make it soggy. Chilling the salad is important, too. It helps the flavors blend well. Don’t skip this step. Lastly, be careful with the salt. The olives and feta can be salty, so taste before adding more. Pro Tips Chill for Best Flavor: Allowing the salad to chill for at least 30 minutes helps the flavors meld beautifully, resulting in a more delicious dish. Fresh Ingredients Matter: Use the freshest vegetables and herbs possible to elevate the taste and nutrition of your salad. Customize Your Olives: Experiment with different types of olives, such as green or Castelvetrano, for a unique flavor profile. Make It a Meal: To turn this salad into a heartier dish, consider adding grilled chicken, quinoa, or avocado for added protein and richness. {{image_4}} This salad is great with creamy avocado. Just add one ripe avocado, diced. It makes the salad richer and adds healthy fats. The avocado also gives a smooth texture. Combine it with the chickpeas for a filling meal. You can enjoy the salad as a side dish or a lunch. Want a vegan version? Simply skip the feta cheese. The salad still tastes amazing without it. The olives and herbs add lots of flavor. You can use more parsley for a fresh touch. This way, everyone can enjoy the salad, no matter their diet. You can change the veggies based on the season. In spring, try adding peas or radishes. In summer, sliced bell peppers or zucchini work well. Fall brings great options like roasted butternut squash. In winter, think about adding shredded carrots or beets. This keeps the salad fresh and exciting year-round. To store leftovers, place the salad in an airtight container. This helps keep it fresh. You can keep it in the fridge for up to three days. If you notice any liquid, just drain it before serving. This salad tastes best when fresh, but storing works well. I do not recommend freezing this salad. Freezing can change the texture of the veggies. The tomatoes, cucumbers, and bell peppers may become mushy. If you want to save ingredients, consider freezing just the chickpeas instead. To refresh the salad, add a splash of olive oil and more lemon juice. Mixing in a bit of fresh parsley can also brighten the flavor. Toss everything well to combine. If the salad seems dry, you can add a little water or extra dressing to enhance the taste. Enjoy it chilled for the best experience! Yes, you can use canned chickpeas. They save time and are easy to find. Just drain and rinse them well to remove extra salt and preservatives. This step helps keep your salad fresh and tasty. Canned chickpeas are also soft and ready to eat. They make this salad quick and simple to prepare. You can store the salad in the fridge for up to three days. Keep it in an airtight container to keep it fresh. The flavors will blend even more over time. However, if you added feta, it may not last as long. It’s best to eat it within two days if you use cheese. If you don’t have lemon juice, you can use lime juice. It gives a similar tangy flavor. You can also try apple cider vinegar for a different twist. Just remember to use a bit less, as vinegar is more potent. These substitutes keep your salad bright and fresh without missing a beat. In this blog post, we covered how to make a tasty chickpea salad. You learned about the key ingredients, step-by-step instructions, and helpful tips. We shared ideas for variations, like vegan options and seasonal adds. Lastly, we discussed how to store your salad for later use. Enjoying this dish is easy and fun. Remember, you can customize it to fit your taste. Happy cooking!

Mediterranean Chickpea Salad Fresh and Flavorful Meal

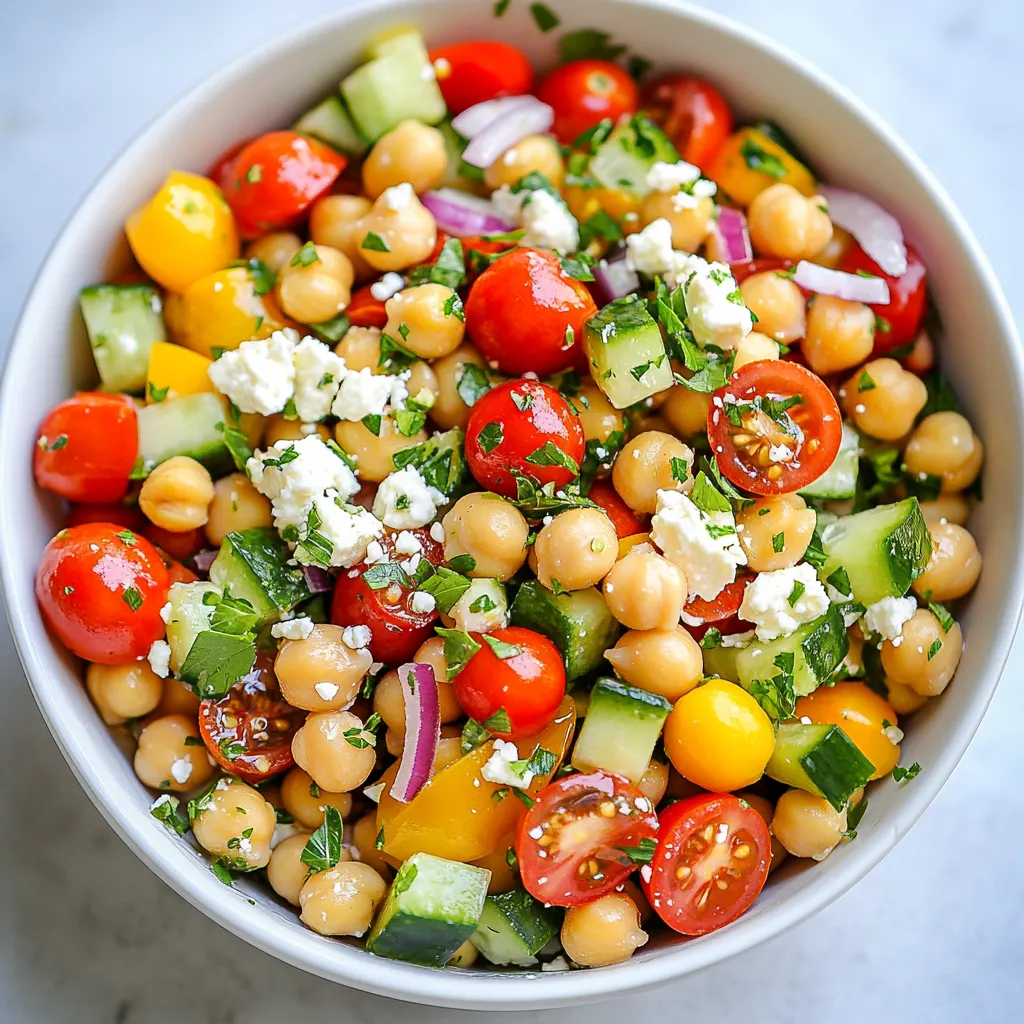
Looking for a fresh and tasty meal that’s easy to make? Try my Mediterranean Chickpea Salad! Packed with vibrant flavors

- 1 lb ground beef or chicken - 1/4 cup breadcrumbs - 1/4 cup green onions, finely chopped (plus extra for garnish) - 1 large egg, lightly beaten - 2 cloves garlic, minced - 1 tablespoon fresh ginger, grated - 1/4 cup low-sodium soy sauce - 1/4 cup packed brown sugar - 2 tablespoons rice vinegar - 1 tablespoon sesame oil - 2 cups jasmine rice, cooked according to package instructions - 1 cup broccoli florets, rinsed - 1 medium carrot, julienned - Sesame seeds, for garnish To make Teriyaki Meatball Rice Bowls, you need simple and tasty ingredients. The main part is ground beef or chicken. You can use either, depending on your taste. Breadcrumbs help bind the meatballs and keep them moist. Fresh green onions add a mild taste and a pop of color. The egg holds everything together while garlic and ginger give that classic Asian flavor. For the sauce, low-sodium soy sauce is key. It gives the right saltiness without being too strong. Brown sugar adds sweetness and balance. Rice vinegar contributes a slight tang, while sesame oil adds a nutty depth to the sauce. For the bowls, jasmine rice is the best choice. It is fragrant and fluffy. Steamed broccoli and julienned carrots add nutrition and crunch. Sesame seeds make a lovely garnish, giving a little extra flavor and a nice look. {{ingredient_image_2}} - Preheat your oven to 400°F (200°C). This step ensures even cooking. - In a large bowl, mix the ground beef or chicken, breadcrumbs, green onions, egg, garlic, and ginger. Use your hands or a spoon to blend everything well. - Shape the mixture into small meatballs, about 1 inch wide. Make sure they are uniform. - Place the meatballs on a parchment-lined baking sheet. Leave some space between them. - Bake for 15-20 minutes. Look for a nice brown color and check they are cooked through. - In a small saucepan, mix soy sauce, brown sugar, rice vinegar, and sesame oil. Heat over medium heat. Stir until the sugar dissolves. - Once dissolved, lower the heat and let it simmer for a few minutes to thicken. - In another pot, steam or boil broccoli and carrots for about 5-7 minutes. They should be tender but still crisp. - Start with a scoop of jasmine rice in each bowl. Use a generous portion. - Add the baked meatballs on top of the rice. - Layer the steamed broccoli and carrots over the meatballs. - Drizzle extra teriyaki sauce on top for added flavor. To make the best meatballs, you need the right texture. Aim for a mix that is moist but not too wet. A mix of ground beef and ground chicken works well. If you want, you can also use turkey or even plant-based meat. These options all give great flavor. Use breadcrumbs to bind the meat. They help keep the meatballs soft and tender. You can use regular or panko breadcrumbs. Panko gives a nice crunch if you bake them right. Adjusting the sweetness and saltiness of your teriyaki sauce is simple. Start with the base recipe, then taste it. If it’s too salty, add a bit more brown sugar. If it’s too sweet, add more soy sauce. You can also add flavor variations to your sauce. Try adding a splash of orange juice for a sweet twist. A bit of chili paste can add heat if you like spice! For side dishes, you can serve your meatball rice bowls with extra veggies or a simple salad. Sliced cucumbers with rice vinegar make a refreshing side. When presenting your bowls, think about color. Layer the rice on the bottom, then add the meatballs and vegetables. Drizzle sauce over the top and sprinkle sesame seeds. This makes the dish look great and taste even better! Pro Tips Use Fresh Ingredients: Fresh ginger and garlic will enhance the flavor of your meatballs and teriyaki sauce. Opt for fresh over powdered ingredients whenever possible. Customize Your Meatballs: Feel free to add other herbs and spices to the meatball mixture, such as cilantro or red pepper flakes, to personalize the flavor to your liking. Perfectly Cooked Vegetables: For the best texture, steam your broccoli and carrots until they're bright in color and tender-crisp. This ensures they maintain some crunch and nutrients. Make Extra Sauce: If you love teriyaki sauce, consider doubling the sauce recipe. You can use the extra for dipping or drizzling over leftovers for added flavor. {{image_4}} You can switch up the protein in your teriyaki meatball rice bowls for fun. - Turkey: Ground turkey is lean and works great. It keeps the bowls light while still being tasty. - Plant-Based Options: Try using lentils or chickpeas for a veggie twist. These are healthy and fill you up. - Seafood: Shrimp or salmon can add a fresh flavor. Just remember to adjust cooking times. Rice is yummy, but you can explore different options too. - Quinoa: This grain adds a nutty taste. It’s high in protein and very filling. - Cauliflower Rice: This is a low-carb choice. It’s light and helps balance the meal. - Other Grains: Barley or farro can add a unique texture. They also bring extra nutrients to your dish. Adding more veggies can make your meal colorful and fun. - Bell Peppers: These add sweetness and crunch. Use red, yellow, or green for a bright look. - Snap Peas: They give a nice snap and fresh taste. Toss them in for a quick cook time. - Zucchini: This veggie works well when sliced thin. It absorbs flavors beautifully. Feel free to get creative with these choices! Each variation opens the door to new flavors and experiences. Enjoy experimenting! To keep your teriyaki meatballs fresh, follow these steps. First, let the dish cool down to room temperature. This helps avoid condensation in the container. Place the meatballs, rice, and veggies in an airtight container. You can store leftovers in the fridge for up to three days. Use a separate container for the sauce if you want. This way, you can keep the flavors intact. You can easily freeze your meatballs and rice. First, let them cool completely. Then, place meatballs in a single layer on a baking sheet. Freeze them for about an hour until firm. Once frozen, transfer them to a freezer bag. Press out any air and seal tightly. You can freeze the rice too. Just pack it in a separate bag. Frozen meatballs and rice can last for up to three months. When you are ready to eat, reheating is key. For meatballs, place them in a pan over medium heat. Add a splash of water to keep them moist. Cover the pan to trap steam, which helps heat them evenly. For rice, reheat in the microwave with a damp paper towel over it. This will keep the rice fluffy. Heat until everything is warm. Enjoy your meal just like the first time! Yes, you can use store-bought teriyaki sauce. It saves time and effort. Many brands offer great flavors. However, some sauces can be too sweet or salty. Check the label for low-sodium options. You can also add extra ginger or garlic for more flavor. This can help make it taste closer to homemade. To make this recipe gluten-free, substitute the soy sauce. Use tamari or coconut aminos instead. Both options provide a similar taste without gluten. Ensure the breadcrumbs are gluten-free as well. You can also use crushed rice cakes or oats as a substitute. Always check labels to be safe. These rice bowls pair well with many sides. You might enjoy a light salad with sesame dressing. Steamed edamame adds a nice touch too. For drinks, green tea or sparkling water are refreshing options. If you want a sweet dessert, try mochi or fresh fruit. These will balance the meal nicely. This blog post covered how to make tasty Teriyaki Meatball Rice Bowls. We started with key ingredients like ground beef, breadcrumbs, and fresh veggies. Next, we walked through easy steps for mixing, baking, and cooking. I shared tips for perfect meatballs and teriyaki sauce. Finally, we explored fun variations and storage options. You can create a delicious meal that fits your taste. Enjoy trying different ingredients to make this dish your own!

Teriyaki Meatball Rice Bowls Flavorful and Easy Dish

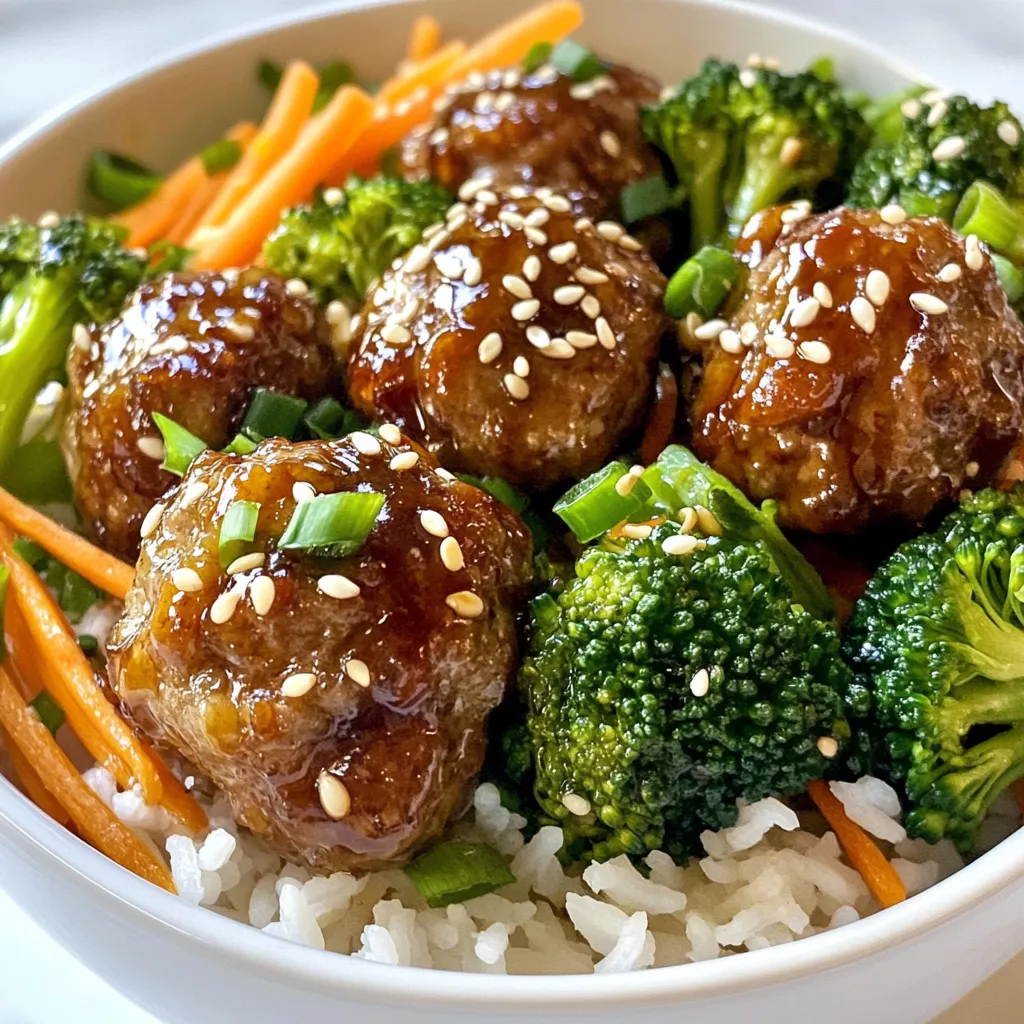
Looking for a quick and tasty dinner? Teriyaki Meatball Rice Bowls are the answer! This dish is super easy to

- 4 medium potatoes, diced - 3 large carrots, sliced - 2 medium zucchinis, sliced - 4 cloves of garlic, minced - 3 tablespoons extra virgin olive oil - 1 teaspoon dried oregano - 1 teaspoon dried thyme - 1 teaspoon smoked paprika - Salt and pepper to taste - Fresh parsley for garnish When I prepare Garlic Herb Potatoes, Carrots, and Zucchini, I love using fresh, vibrant ingredients. Each one adds its own charm. The potatoes provide a hearty base, while carrots bring sweetness. Zucchini adds a lovely texture. Garlic gives this dish a bold flavor. I prefer using minced garlic for a punch. Extra virgin olive oil is key for roasting. It helps all the flavors meld together. The dried oregano and thyme offer a warm, earthy taste. Smoked paprika adds a hint of smokiness that enhances the dish. Don’t forget the salt and pepper! They elevate all the other flavors. Lastly, fresh parsley is a must for garnish. It adds a pop of color and freshness. When you see that bright green, you know your dish is ready to shine! {{ingredient_image_2}} First, set your oven temperature to 425°F (220°C). This step is key for great roasting. A hot oven helps the veggies brown and crisp nicely. Next, combine 4 medium diced potatoes, 3 sliced large carrots, and 2 sliced medium zucchinis in a mixing bowl. Mixing these three will create a colorful and tasty medley. Each vegetable adds a different texture and flavor. Now, add 4 minced cloves of garlic, 3 tablespoons of extra virgin olive oil, 1 teaspoon of dried oregano, 1 teaspoon of dried thyme, and 1 teaspoon of smoked paprika to the bowl. Also, sprinkle in some salt and pepper to taste. Toss everything together well. This step lets the veggies soak up all the flavors, making every bite delicious. Transfer your vegetable mix onto a large baking sheet. Spread them out in a single layer to ensure even cooking. Roast in the preheated oven for 25-30 minutes. Remember to stir the veggies halfway through. This helps them cook evenly and develop a nice caramelization. Keep an eye on the vegetables. They are done when they turn golden brown and are tender. When finished, carefully take them out of the oven. Just before serving, sprinkle with fresh chopped parsley. This adds a nice pop of color and freshness to the dish. Enjoy your Garlic Herb Potatoes, Carrots, and Zucchini! For even cooking, cut all your veggies to the same size. I recommend using 1-inch cubes for potatoes and thick rounds for carrots. Slice zucchini into half-moons. This way, everything roasts at the same rate. If some pieces are bigger, they may not cook through. A sharp knife helps you achieve uniform sizes quickly. To add more depth to this dish, try fresh herbs like rosemary or basil. You can also use spices like cumin or chili powder for a kick. If you want a tangy flavor, add lemon zest or juice before roasting. A touch of cheese, like Parmesan, can elevate the taste as well. This Garlic Herb Veggie Medley works great with grilled chicken or fish. It can also be a filling main dish with crusty bread. For a light meal, serve it with a fresh salad on the side. The flavors blend well with almost any dish, making it a perfect go-to option. Pro Tips Choose Fresh Vegetables: Opt for the freshest vegetables you can find. Seasonal produce will enhance the flavor and texture of your medley significantly. Uniform Cutting: Ensure all vegetables are cut into similar sizes for even roasting. This prevents some pieces from becoming overcooked while others remain undercooked. Experiment with Herbs: Feel free to switch up the herbs according to your preference. Fresh herbs can elevate the dish even further if you have them on hand. Serve Immediately: For the best flavor and texture, serve the veggie medley right after roasting. It’s when they are at their most delicious and vibrant! {{image_4}} You can switch up the veggies in this dish. Feel free to add or replace any of the following: - Sweet potatoes for a sweeter taste - Bell peppers for vibrant color and crunch - Broccoli for a green boost - Asparagus for a fresh, spring flavor These options keep the dish exciting and allow you to use what you have at home. Explore new flavors by changing the herbs and spices. Here are some ideas: - Basil and rosemary offer a fragrant twist. - Italian seasoning can add a bold, familiar taste. - Curry powder brings warmth and depth. - Lemon zest brightens the dish and adds zest. Mix and match different herbs to suit your taste. This dish is easy to adapt for various diets: - For a vegan option, confirm that the olive oil is pure and use all plant-based ingredients. - To make it gluten-free, simply ensure all ingredients are labeled as gluten-free. These small changes make the Garlic Herb Potatoes Carrots Zucchini fit for everyone. Enjoy experimenting! To keep your Garlic Herb Potatoes, Carrots, and Zucchini fresh, let them cool first. Place the leftovers in an airtight container. Store them in the fridge for up to four days. This keeps the flavors intact while preventing spoilage. When you’re ready to enjoy your dish again, reheat it gently. You can use the oven or a skillet. If using the oven, preheat to 350°F (175°C). Spread the veggies on a baking sheet and heat for about 10-15 minutes. This method keeps the veggies crispy. If using a skillet, add a splash of water to keep them moist. Stir occasionally to heat evenly. If you want to save some for later, freezing is a great option. Allow the medley to cool completely. Then, place it in a freezer-safe bag or container. Squeeze out any excess air before sealing. This helps prevent freezer burn. You can freeze the veggie mix for up to three months. When ready to eat, thaw it overnight in the fridge. Reheat as mentioned above for the best taste. Yes, you can use fresh herbs instead of dried ones. Fresh herbs add a bright flavor to the dish. For this recipe, use three times the amount of fresh herbs. For example, if the recipe calls for 1 teaspoon of dried oregano, use 1 tablespoon of fresh oregano. Chop the fresh herbs finely and add them at the end of cooking. This gives a fresh taste and aroma. Roasting time can vary. The cooking time is usually around 25-30 minutes. Factors that affect the time include the size of the vegetable pieces and your oven's heat. Cut the veggies into even sizes for the best results. Stir the vegetables halfway through to ensure they cook evenly. Keep an eye on them; they should be golden and tender when done. This dish pairs well with many foods. Grilled meats like chicken, steak, or fish work great. It can also be a hearty vegetarian main dish. Serve it warm with a slice of crusty bread. The bread soaks up the flavors nicely, making every bite enjoyable. You can also serve it alongside a fresh salad for a balanced meal. This blog post shared a simple and tasty veggie roast recipe. You learned to prepare potatoes, carrots, and zucchini with herbs and spices. Roasting brings out their natural flavors. Tips for storage and variations help keep meals exciting. Remember, you can tweak ingredients to fit your taste or diet. Using this guide, you can create a healthy and delicious dish any time. Enjoy your cooking and savor every bite!

Garlic Herb Potatoes Carrots Zucchini Tasty Dish

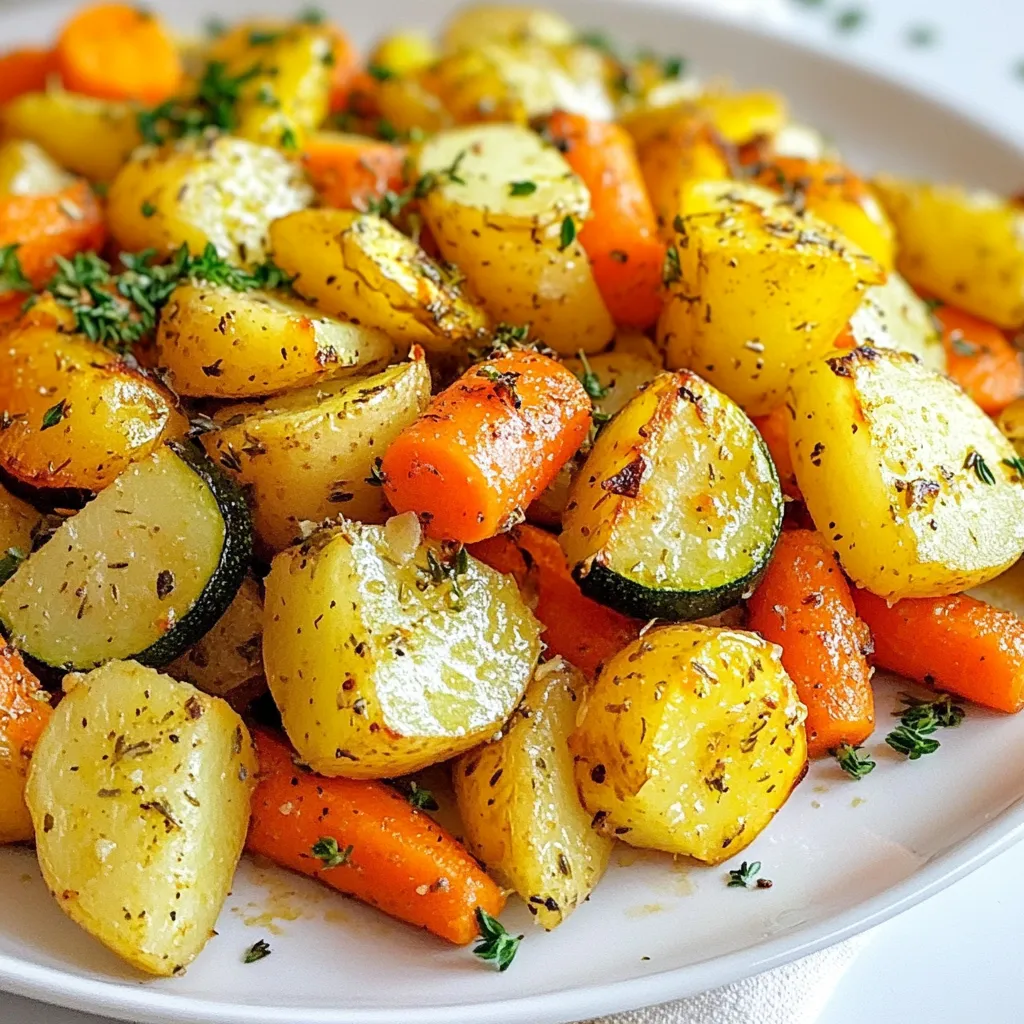
Ready to bring vibrant flavors to your table? My Garlic Herb Potatoes, Carrots, and Zucchini dish is the perfect way

- 1 pound ground beef or turkey - 4 medium potatoes, diced into small cubes - 1 cup onion, finely diced - 2 cups shredded cheddar cheese (preferably sharp) - 1 teaspoon garlic powder - 1 teaspoon smoked paprika - 1 cup beef broth (low-sodium preferred) - 2 tablespoons olive oil - Salt and pepper, to taste - Fresh parsley, chopped This cheesy meat and potato skillet packs a punch with its main ingredients. You can choose between ground beef or turkey, depending on your taste. The diced potatoes give the dish a hearty feel. Onions add sweetness and depth, while sharp cheddar cheese melts beautifully over everything. For seasonings, garlic powder provides a lovely aroma. Smoked paprika adds a hint of warmth and color. Using low-sodium beef broth keeps the dish rich without being too salty. Olive oil helps the onions cook to perfection. Don’t forget salt and pepper; they are key to bringing out the flavors. Finally, fresh parsley gives a pop of green and freshness. It makes the dish look vibrant and inviting. Enjoy creating this easy and hearty meal with these simple yet essential ingredients! {{ingredient_image_2}} First, heat 2 tablespoons of olive oil in a large skillet over medium heat. Once the oil is hot, add 1 cup of finely diced onion. Cook the onions for about 3-4 minutes. They should become soft and translucent. Stir them often to avoid burning. This step builds a great base for our dish. Next, add 1 pound of ground beef or turkey to the skillet. Use a spatula to break the meat apart as it cooks. Stir frequently for about 5-7 minutes. You want the meat to be browned all over. If there is extra fat, drain it. This keeps the dish from being too greasy. Now, stir in 4 medium diced potatoes. Add 1 teaspoon of garlic powder, 1 teaspoon of smoked paprika, and a pinch of salt and pepper. Mix everything well so the potatoes are coated with the seasonings. Then, pour in 1 cup of low-sodium beef broth. Bring the mixture to a gentle simmer. Lower the heat, cover the skillet, and let it cook for 15-20 minutes. Stir occasionally until the potatoes are tender. Once the potatoes are soft, remove the lid. Evenly sprinkle 2 cups of shredded cheddar cheese over the mixture. Cover the skillet again for about 3-5 minutes. This allows the cheese to melt nicely. You want it to be gooey and delicious. After the cheese has melted, take the skillet off the heat. Garnish the dish with freshly chopped parsley for a pop of color. Serve the Cheesy Meat and Potato Skillet hot, straight from the skillet. Enjoy this hearty meal with a side of crusty bread to soak up those tasty juices. - How to achieve perfectly browned meat: Start with a hot skillet. This helps the meat sear well. Break it apart with a spatula as it cooks. Stir often for even browning. If you see too much fat, drain it away. - Ensuring potatoes are tender: Cut your potatoes into small cubes. This helps them cook faster. Add them to the skillet with the seasonings. Cover the skillet while they cook. This traps steam and speeds up the cooking. - Adding spices for extra depth: Use smoked paprika for a unique taste. Garlic powder brings warmth and flavor. Feel free to add your favorite spices. Experiment to find what you like best. - Cheese alternatives: While cheddar cheese is great, other cheeses work too. Try Monterey Jack for a creamy twist. Or use pepper jack for a spicy kick. Mix different cheeses for a fun flavor blend. - Best skillets for one-pan meals: A large cast-iron skillet works wonders. It heats evenly and holds heat well. Non-stick skillets are great for easy cleanup. Choose one that is sturdy and safe for high heat. - Useful utensils for preparation: A good spatula helps break apart the meat. A sharp knife makes dicing potatoes easy. Use a cutting board to keep your counters clean. Keep a lid handy for simmering dishes. Pro Tips Choose the Right Meat: For a leaner option, use ground turkey. If you prefer a richer flavor, stick with ground beef, preferably 80/20 for the best balance of taste and juiciness. Prep Potatoes Ahead: To save time, peel and dice the potatoes the night before and store them in water in the fridge to prevent browning. Customize the Cheese: Experiment with different cheeses like Monterey Jack or Pepper Jack for a unique flavor twist. Mixing cheeses can also enhance the creaminess. Garnish for Freshness: Always finish with freshly chopped herbs like parsley or chives to brighten the dish and add a pop of color before serving. {{image_4}} You can switch the ground beef or turkey for chicken or sausage. Chicken gives a lighter taste. Sausage adds a nice kick of flavor. If you want a vegetarian option, try mushrooms or lentils instead. Both options offer a hearty feel without meat. Mushrooms bring umami, while lentils add protein and fiber. If you want a low-carb meal, use cauliflower instead of potatoes. Cauliflower has a similar texture and absorbs flavors well. For a dairy-free version, skip the cheddar cheese. You can use nutritional yeast or cashew cheese for a cheesy taste without dairy. Both options keep the dish creamy and satisfying. Adding vegetables can elevate your dish. Bell peppers or broccoli bring color and nutrition. You can mix them in when you add the potatoes. For extra flavor, try spices like cumin or chili powder. These spices can give your skillet a regional twist. Experimenting with different ingredients allows you to make this dish your own! To store leftovers, let the skillet cool first. Then, scoop the dish into a container. I recommend using an airtight glass or plastic container. These keep the food fresh and tasty. Leftovers can last in the fridge for about three to four days. Always label the container with the date to keep track. If you want to freeze the skillet, let it cool completely. Then, place the cooled dish in a freezer-safe container. You can also use freezer bags for easy storage. Just make sure to squeeze out all the air. For best taste, eat the frozen meal within two to three months. When you're ready to eat, thaw the dish overnight in the fridge. This helps maintain the flavor and texture. To reheat the skillet, use the stovetop or oven. If using the stovetop, heat it in a pan over low heat. Stir often to ensure even warming. If using the oven, preheat to 350°F (175°C) and bake until hot. To avoid soggy potatoes, do not add extra liquid. If the dish seems dry, add a little broth or water. This keeps the potatoes firm and tasty. Enjoy your meal just like when it was fresh! To add some heat, try adding a teaspoon of cayenne pepper. You can also use hot sauce or diced jalapeños. If you love spice, think about adding crushed red pepper flakes or chili powder. Adjust the amount based on how much heat you like. Remember to taste as you go! Yes, you can prep this dish ahead of time. Cook the meat and potatoes, then cool them down. Store in the fridge for up to three days. When you're ready, just reheat it on the stove. Add a splash of broth to keep it moist. Stir in the cheese before serving. This dish pairs well with a fresh side salad or steamed veggies. You might also enjoy crusty bread to soak up all the cheesy goodness. For a fun twist, serve it with pickles or a tangy slaw on the side. They add crunch and balance the richness. Absolutely! While cheddar is great, you can mix it up. Try mozzarella for a stretchy melt or gouda for a smoky flavor. A blend of cheeses can add depth. Just remember to use cheese that melts well for the best results! This blog post covered a tasty Cheesy Meat and Potato Skillet. You learned about the main ingredients like ground beef, potatoes, and cheddar cheese. I shared step-by-step instructions so you can easily make it. We also discussed tips for flavor and health adjustments. Using different proteins or vegetables makes this dish flexible. You can add your twist! Remember, leftovers store well for quick meals. Enjoy your cooking and feel free to experiment with flavors. A delicious, warm meal awaits you!

Cheesy Meat and Potato Skillet Easy and Hearty Meal

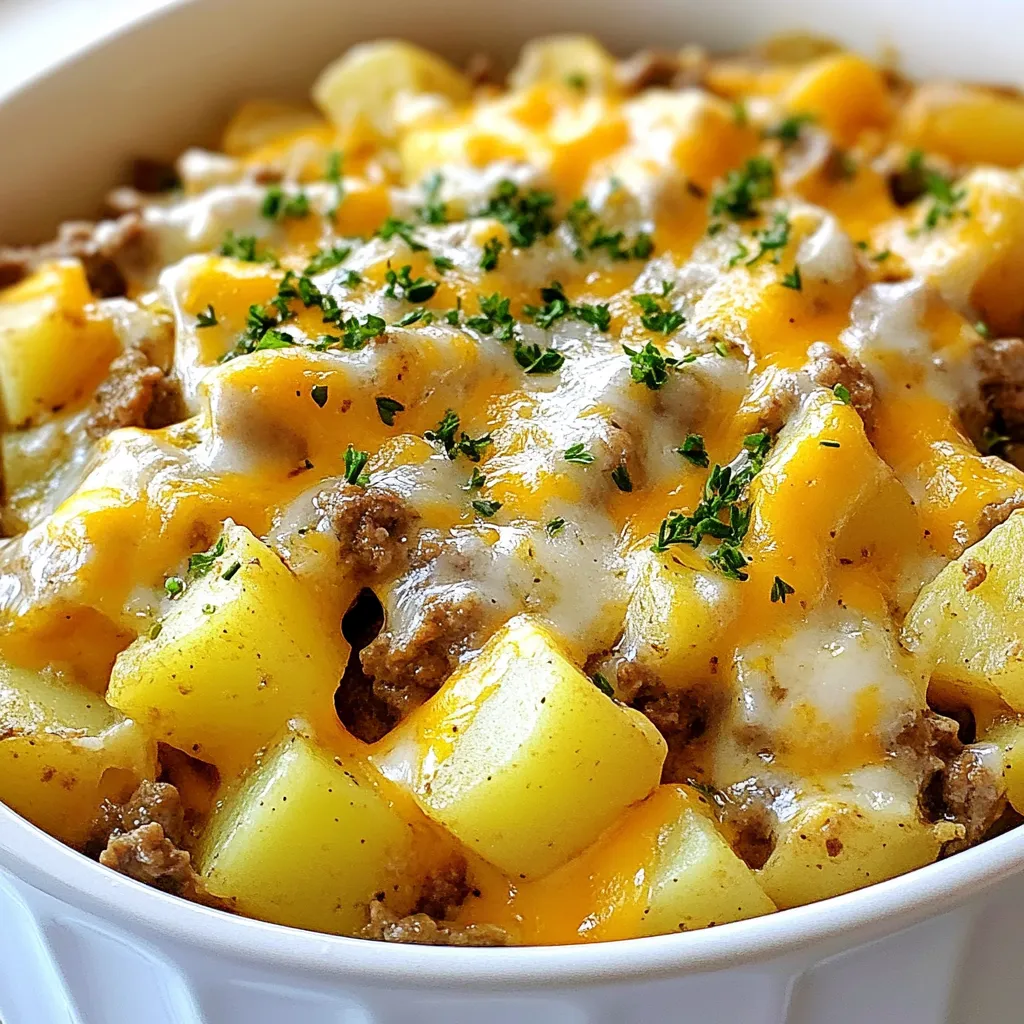
Looking for a quick, filling meal? This Cheesy Meat and Potato Skillet is just what you need! It’s hearty, cheesy,

- 2 pounds chicken wings - 1 cup pineapple juice - 1/2 cup soy sauce - 1/4 cup packed brown sugar - 2 tablespoons honey - 2 cloves garlic, finely minced - 1 tablespoon fresh ginger, finely grated - 1 tablespoon sesame oil - 1 tablespoon cornstarch (optional, for thickening) - 1/4 teaspoon freshly ground black pepper - 1 teaspoon sesame seeds (for garnish) - 2 green onions, finely chopped (for garnish) To make Sticky Pineapple Teriyaki Chicken Wings, gather these ingredients. The chicken wings are the star. They soak up all the great flavors. The marinade ingredients add sweetness and depth. Pineapple juice brings a fruity tang. Soy sauce adds salty umami. Brown sugar sweetens the mix. Honey gives a nice shine. Garlic and ginger offer warmth and spice. Sesame oil adds a nutty flavor. If you want a thicker glaze, grab cornstarch. Use it to make the sauce stick to the wings. The black pepper adds a touch of heat. For garnishing, sesame seeds and green onions add color and crunch. They make your dish look and taste amazing. These simple ingredients create a mouth-watering meal that impresses everyone. {{ingredient_image_2}} To make the marinade, start with a large bowl. Add 1 cup of pineapple juice, 1/2 cup of soy sauce, and 1/4 cup of brown sugar. Next, mix in 2 tablespoons of honey, 2 minced garlic cloves, 1 tablespoon of grated ginger, and 1 tablespoon of sesame oil. Finally, add 1/4 teaspoon of black pepper. Whisk until the sugar dissolves. Good ratios of these ingredients create a balanced flavor. After mixing the marinade, add 2 pounds of chicken wings. Make sure every wing is coated well. Cover the bowl with plastic wrap and refrigerate it. For the best taste, let the wings marinate for at least 1 hour. If you have time, marinate them overnight. This step is key for flavor absorption. First, preheat your oven to 400°F (200°C). Line a baking sheet with parchment paper for easy cleanup. Once ready, place the wings in a single layer on the sheet. Bake them for 30 minutes. Flip the wings halfway through cooking. This helps achieve that perfect crispness everyone loves. While the wings bake, grab the leftover marinade. Pour it into a medium saucepan. To thicken the sauce, mix 1 tablespoon of cornstarch with a tablespoon of cold water. Add this slurry to the marinade. Heat the mixture over medium heat. Stir it occasionally until it simmers and thickens for about 5-7 minutes. After baking, take the wings out of the oven. Brush half of the thickened glaze over the wings. Return them to the oven for another 10-15 minutes. This step makes the wings crispy and caramelized. When the wings are done, toss them in the remaining glaze. This ensures each wing is fully coated. Transfer the wings to a serving platter for presentation. For a colorful touch, sprinkle sesame seeds and chopped green onions on top. Serve them with extra glaze on the side for dipping. To get a nice glaze on your wings, focus on caramelization. When you bake the wings, the heat helps sugars in the marinade turn golden. Flip them halfway to ensure all sides get crispy. If you want a thicker glaze, use cornstarch. Mix one tablespoon of cornstarch with cold water to make a slurry. This will help the glaze stick and look shiny. You can add extra spices or sauces to boost flavor. Try adding a pinch of cayenne for heat or a dash of rice vinegar for tang. You can also mix in some hoisin sauce for a richer taste. Experimenting with these options can make each batch unique. For baking, use a rimmed baking sheet. Line it with parchment paper to prevent sticking. This makes clean-up easy. A good brush helps apply the glaze evenly. Use a medium saucepan for heating the marinade. This way, you can control the heat and stir it easily. Pro Tips Marination Time: For the best flavor, marinate the chicken wings overnight. This allows the flavors to penetrate deeply, resulting in juicier and more flavorful wings. Thickening the Sauce: If you prefer a thicker glaze, mix cornstarch with cold water to create a slurry before adding it to the sauce. This will give your glaze a nice, rich texture. Flipping the Wings: Remember to flip the wings halfway through baking. This ensures they cook evenly and get that perfect crispy texture on both sides. Serving Suggestions: Serve the wings with extra glaze on the side for dipping. This not only adds flavor but also allows your guests to customize their wings to their liking. {{image_4}} You can switch chicken wings for other meats. Try using chicken thighs or drumsticks. These cuts are juicy and flavorful. For a leaner option, use turkey wings. They work well with this recipe too. Adjust cooking times based on the meat you choose. Thighs or drumsticks may need extra time. Always check for doneness with a meat thermometer. The internal temperature should reach 165°F (74°C). Mix up the marinade for a new taste. Use orange juice instead of pineapple juice for a citrus twist. You can also add soy sauce with a touch of chili paste for heat. If you like it sweet, add more honey or brown sugar. For a spicy kick, try adding hot sauce or crushed red pepper flakes. The balance between sweet and spicy can change the whole dish. Grilling adds a smoky flavor to your wings. Use a medium heat and cook them for about 20 minutes. Turn them often to avoid burning. For a crispy finish without a grill, try an air fryer. Preheat the air fryer to 375°F (190°C). Cook the wings for 25-30 minutes, shaking the basket halfway. This keeps them crispy and delicious. You can keep the Sticky Pineapple Teriyaki Chicken Wings in the fridge for about three to four days. For best taste, place them in an airtight container. This keeps them fresh and safe to eat. If you want to enjoy them later, make sure they cool down before putting them away. To freeze the wings, first let them cool completely. Then, place them in a freezer-safe bag or container. Be sure to remove as much air as possible to prevent freezer burn. You can also freeze the marinade separately if you want to use it later. For reheating, move the wings to the fridge a day before. This helps them thaw gradually. To reheat and keep the wings crispy, use your oven. Preheat it to 350°F (175°C). Arrange the wings on a baking sheet and heat for about 10 to 15 minutes. This method keeps them crunchy. You can also use an air fryer for a few minutes. Avoid using a microwave, as it makes the wings soggy. I recommend marinating chicken wings for at least one hour. If you have time, marinate them overnight. This allows the flavors to soak in better. Longer marination enhances the taste, making the wings juicier and more flavorful. Yes, you can use store-bought teriyaki sauce. It saves time and is convenient. However, homemade sauce tastes fresher and allows you to control the flavors. Store-bought sauces may have added sugars or preservatives. Check the label for quality. To achieve crispy wings, bake them at a high temperature. I suggest 400°F (200°C). Flip the wings halfway through baking to ensure even cooking. For extra crunch, apply the glaze toward the end of baking. This caramelizes the sauce nicely. Yes, you can make this recipe ahead of time. Prepare the marinade and marinate the wings the night before. Bake the wings when you're ready to serve. You can also prepare the glaze earlier, then reheat it before applying. This makes meal time easier. This blog post covered everything you need for tasty chicken wings. We looked at the ingredients, from the marinade to garnishes. You learned how to prepare and bake wings for perfect crispness. I shared tips for a great glaze and ways to serve them well. We explored variations, storage tips, and common questions too. Now, you can make amazing wings that everyone will love. Enjoy the cooking process and have fun experimenting with flavors!

Sticky Pineapple Teriyaki Chicken Wings Delight

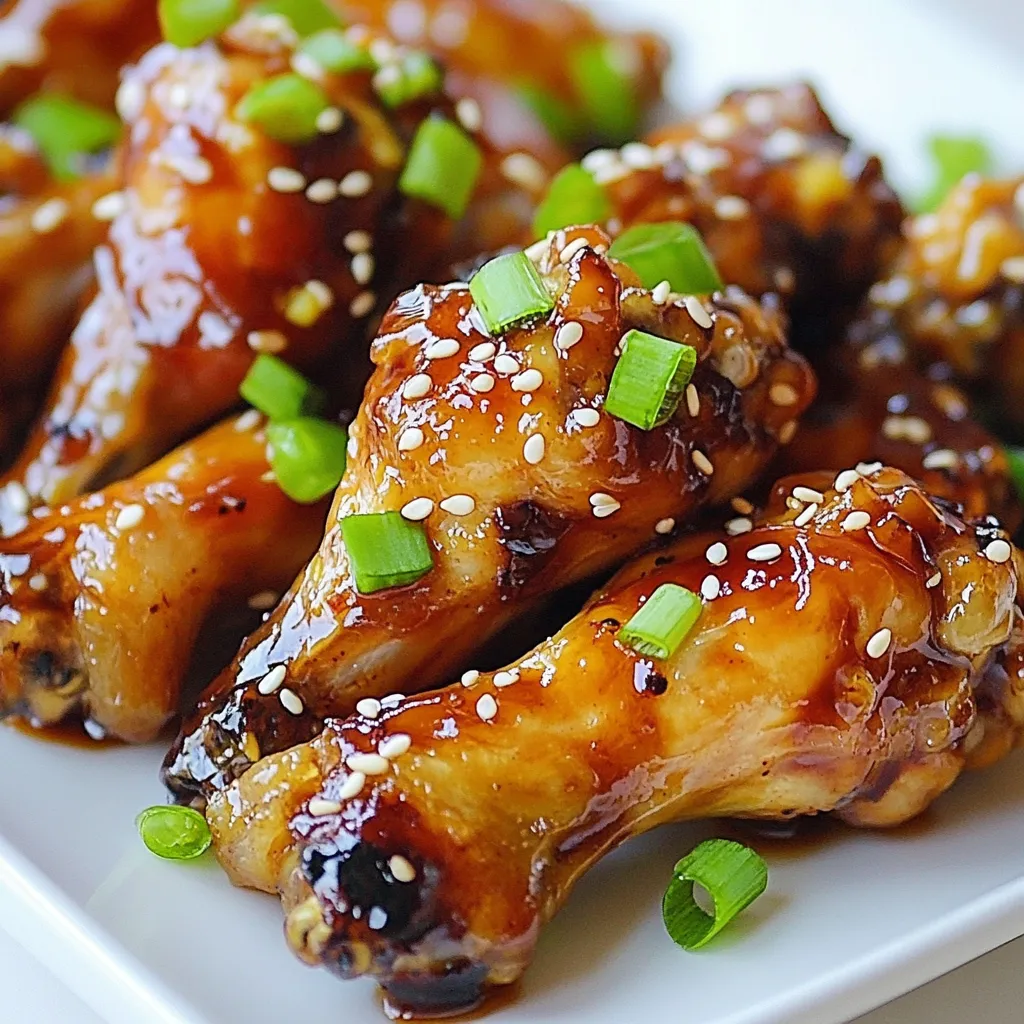
Get ready to impress your taste buds with Sticky Pineapple Teriyaki Chicken Wings Delight! This recipe combines juicy chicken wings

To make a great Nigerian beef stew, you need some key ingredients. Here’s what you will need: - 2 lbs beef, cut into 1-inch cubes - 4 large ripe tomatoes, blended into a smooth puree - 1 large onion, finely chopped - 2 red bell peppers, blended into a smooth consistency - 1 scotch bonnet pepper, blended (adjust according to your spice preference) - 4 cloves garlic, minced - 1-inch piece of ginger, minced - 1/4 cup vegetable oil - 2 cups beef broth or water - 1 teaspoon dried thyme - 1 teaspoon curry powder - Salt to taste - Fresh parsley or cilantro, chopped, for garnish These ingredients create a rich and flavorful base for your stew. The tomatoes and peppers add a vibrant color, while the beef provides a hearty taste. To take your stew to the next level, consider these optional ingredients: - 2 tablespoons ground crayfish (for extra depth of flavor) Ground crayfish gives your stew a unique taste that many love. It's a common ingredient in Nigerian cooking and adds a special touch. If you want to change the number of servings, adjust the ingredients. Here’s a simple guide: - For 4 servings: Cut beef to 1.5 lbs, tomatoes to 3, and use 1.5 cups broth. - For 8 servings: Increase beef to 3 lbs, tomatoes to 5, and use 3 cups broth. This way, you can enjoy this delicious dish with friends or family, no matter the size of your gathering. {{ingredient_image_2}} For this stew, you need to gather all your ingredients first. This makes cooking easier and faster. Here’s what you will need: - 2 lbs beef, cut into 1-inch cubes - 4 large ripe tomatoes, blended into a smooth puree - 1 large onion, finely chopped - 2 red bell peppers, blended into a smooth consistency - 1 scotch bonnet pepper, blended (adjust according to your spice preference) - 4 cloves garlic, minced - 1-inch piece of ginger, minced - 1/4 cup vegetable oil - 2 cups beef broth or water - 1 teaspoon dried thyme - 1 teaspoon curry powder - 2 tablespoons ground crayfish (optional for extra depth of flavor) - Salt to taste - Fresh parsley or cilantro, chopped, for garnish Start by heating the vegetable oil in a large pot over medium heat. When it shimmers, add the chopped onion. Sauté it for about 5 minutes until it turns translucent. Next, stir in the minced garlic and ginger. Cook for 2 more minutes. This will make your kitchen smell great! Now, pour in the blended tomatoes, red bell peppers, and scotch bonnet pepper. Stir everything well and let it cook for 10-15 minutes. Make sure to stir occasionally. The sauce should thicken, and you will see oil separating from it. This means your base is ready! Once your base sauce is ready, add the beef cubes. Make sure to stir well so every piece gets coated with the sauce. Sauté the beef for about 5 minutes. This step helps to start browning the beef, adding a nice flavor to your stew. Now, season your mixture with dried thyme, curry powder, and salt. Stir everything well. Carefully pour in the beef broth or water and bring it to a boil. When it starts boiling, reduce the heat to low. Cover the pot and let it simmer for 1 to 1.5 hours. Stir occasionally to keep it from sticking. You want the beef to become tender and flavorful. If you choose to use ground crayfish, add it during the last 10 minutes of cooking. This gives your stew a unique taste. After the beef is tender, taste the stew. Adjust the seasoning with more salt if needed. Finally, just before serving, garnish your stew with freshly chopped parsley or cilantro. This adds a nice touch and freshness to your dish! To achieve tender beef, choose the right cut. Chuck or brisket works best. These cuts have enough fat and connective tissue. Browning the beef before simmering adds flavor. Sear the beef cubes in hot oil until golden. This step locks in juices and enhances taste. Remember, low and slow is key. Simmer for at least one hour. This allows the meat to break down and become fork-tender. Spice levels can vary based on your taste. Start with the blended scotch bonnet pepper. Add just one for mild heat. If you want more spice, you can add another. Always taste as you go. You can also balance heat with sweet or creamy sides. Consider serving with coconut rice or cooling yogurt. This helps if the stew is too spicy. The right stew consistency matters for a great dish. After blending your base sauce, cook it down. Aim for a thick sauce that coats the beef. If your stew is too thick, add beef broth or water. If it’s too thin, simmer it longer. Stir often to prevent sticking. You want a rich, hearty stew that clings to rice. Adjust the final texture before serving. This ensures each bite is delicious and satisfying. Pro Tips Marinating the Beef: For enhanced flavor, consider marinating the beef cubes in a mixture of salt, thyme, and a bit of the blended pepper mixture for at least an hour before cooking. Balancing Spice Levels: If you prefer a milder stew, remove the seeds from the scotch bonnet pepper before blending, as this will reduce its heat significantly. Thickening the Stew: If you desire a thicker stew, you can blend a small portion of the cooked stew and stir it back in towards the end of cooking. Serving Suggestions: Pair your stew with a side of fried plantains or steamed vegetables for a colorful and nutritious meal that complements the rich flavors of the stew. {{image_4}} To make this stew vegetarian, swap the beef for hearty vegetables. Use mushrooms, eggplant, or even lentils. These ingredients add depth and texture. Blend the same base sauce with tomatoes, peppers, and spices. Cook until the veggies are tender. This version remains rich and flavorful. If you want to switch meats, try chicken or goat. Chicken cooks faster, so reduce the cooking time. Goat adds a unique flavor but may take longer to tenderize. Keep the base sauce the same. Adjust spices to suit the meat you choose. Each option gives you a new taste experience. To lower sodium, use low-sodium broth or water. You can cut back on added salt. Focus on fresh herbs and spices for flavor. Fresh ginger and garlic will boost taste without salt. Taste your stew as it cooks, adjusting flavors to meet your needs. To keep your Nigerian beef stew fresh, let it cool down first. Once cool, store it in an airtight container. It’s best to eat your leftovers within three to four days. Always label the container with the date. This helps you know when to eat it. Avoid leaving it out at room temperature for more than two hours. Freezing is a great way to save extra stew. First, let the stew cool completely. Then, pour it into freezer-safe bags or containers. Make sure to leave some space for expansion. You can freeze it for up to three months. When you’re ready to eat it, just thaw it in the fridge overnight. This keeps the flavors intact. When reheating, do it slowly. You can use a pot on low heat or a microwave. If using a pot, add a splash of water or broth. This helps keep it moist. Stir often to ensure even heating. Taste it before serving, and adjust the seasoning if needed. Enjoy the rich flavors just like when it was fresh! Nigerian beef stew comes from Nigeria, a country in West Africa. This dish reflects the rich culture of Nigeria. It features local spices and fresh ingredients. Many families have their own recipes, passed down through generations. The stew is often served at events and celebrations. Yes, you can make Nigerian beef stew ahead of time. In fact, the flavors deepen when it sits. Prepare it a day in advance for the best taste. Store it in the fridge in an airtight container. Just reheat it on the stove before serving. You can serve Nigerian beef stew with several sides. Here are some popular options: - Fluffy white rice - Fried plantains - Boiled yam - Pounded yam - Nigerian jollof rice These sides complement the stew's rich flavors and spices. You can definitely use a slow cooker or Instant Pot for this stew. For the slow cooker, follow these steps: 1. Sauté onions, garlic, and ginger in a pan first. 2. Add all ingredients to the slow cooker. 3. Cook on low for 6-8 hours or high for 3-4 hours. For the Instant Pot: 1. Use the sauté function for the onions, garlic, and ginger. 2. Add the beef and other ingredients. 3. Seal the lid and cook on high pressure for 35 minutes. 4. Allow for natural release before opening. Both methods save time and keep the beef tender. In this blog post, I covered how to make Nigerian beef stew. We looked at key and optional ingredients, plus helpful measurements. Next, I shared step-by-step instructions for preparing and cooking the stew. I also included tips for tender meat and spice adjustments. You learned about variations, storage tips, and answered common questions. Nigerian beef stew is a dish that warms the heart and gathers people. Enjoy your cooking journey and the delicious results!

Nigerian Beef Stew Flavorful and Hearty Recipe Guide

Are you ready to dive into the rich flavors of Nigerian Beef Stew? This hearty dish is more than just

Older posts
Newer posts
← Previous Page1 … Page73 Page74 Page75 Next →

dsad

© 2025 tastymomrecipes • Built with GeneratePress

Our Policies

  • Copyright Policy
  • Cookie Policy
  • GDPR Policy
  • Privacy Policy
  • Disclaimer
  • Terms Of Use

More Information

  • Home
  • About
  • Contact
  • Appetizers
  • Dessert
  • Dinner
  • Drinks
©2025, tastymomrecipes About Back To Top