Skip to content
DisclaimerTerms Of UseGDPR PolicyCookie Policy

tastymomrecipes

  • Home
  • Drinks
  • Appetizers
  • Dinner
  • Dessert
  • About
  • Contact
  • Privacy Policy
DisclaimerTerms Of UseGDPR PolicyCookie Policy

Olivia

To make the perfect garlic butter steak bites, you'll need a few key ingredients. Here is what you need: - 1 lb sirloin steak, trimmed and cut into bite-sized cubes - 1/4 cup unsalted butter, divided - 4 cloves garlic, finely minced - 2 tablespoons fresh parsley, finely chopped - 1 teaspoon smoked paprika - Salt and freshly ground black pepper, to taste - 1 tablespoon extra virgin olive oil These ingredients work together to create a rich, savory dish full of flavor. For tender steak bites, I recommend using sirloin steak. Sirloin offers a good balance of flavor and tenderness. It cooks well and has just the right amount of fat. This fat helps keep the steak juicy and enhances its taste. If you prefer another cut, look for ribeye or tenderloin. Both cuts are excellent choices for steak bites. You can add more flavor to your garlic butter steak bites with some optional ingredients. Consider adding: - A splash of Worcestershire sauce to deepen the flavor. - Red pepper flakes for a spicy kick. - Fresh herbs like thyme or rosemary for a fragrant touch. These add-ins can elevate your dish and make it even more delicious. Feel free to experiment and find what you like best! {{ingredient_image_2}} First, take your sirloin steak and trim off any extra fat. Cut the steak into bite-sized cubes. In a mixing bowl, season the meat with salt, black pepper, and smoked paprika. Make sure every piece is well coated. Toss gently to mix the spices evenly. This step adds flavor and makes the bites taste great. Next, grab a large skillet and place it over medium-high heat. Pour in the extra virgin olive oil. Heat the oil until it shimmers. Carefully add the seasoned steak cubes in a single layer. Let them sear for about 2-3 minutes without moving them. This helps create a nice brown crust. Flip the steak bites and sear the other side for another 2-3 minutes. If your skillet gets crowded, cook in batches. Once done, remove the steak from the skillet and set it aside on a plate. Lower the heat to medium-low and add half of the unsalted butter to the skillet. Next, add the finely minced garlic. Stir continuously for 1-2 minutes until the butter melts and the garlic smells amazing. Be careful not to let the garlic brown. Return the seared steak bites to the skillet, letting them soak up the garlic butter. Cook for an additional 2-3 minutes to reach your desired doneness. Stir occasionally for even flavor. Finally, fold in the chopped fresh parsley, mixing well to combine everything. Remove the skillet from heat and let it rest for one minute before serving. To keep your steak bites juicy, start with a hot skillet. This helps sear the meat quickly. Make sure to let the steak rest after cooking. This helps the juices stay inside. Avoid overcrowding the skillet. This ensures each piece gets a nice crust. You want that great texture! Use a heavy skillet for best results. A cast-iron skillet holds heat well. This helps cook the steak evenly. A good pair of tongs is helpful too. They let you flip the steak without losing juices. A meat thermometer is also handy. It helps check the steak’s doneness without cutting it. Garlic and butter are key in this dish. They bring rich flavors to the steak. Fresh parsley adds a nice touch too. For a twist, try adding rosemary or thyme. These herbs pair well with steak. Just remember, less is more! A sprinkle of smoked paprika gives a warm, smoky flavor. It balances well with the garlic. Pro Tips Choose the Right Cut: Opt for sirloin steak for a balance of flavor and tenderness, but feel free to experiment with ribeye or tenderloin for a richer taste. Don’t Overcrowd the Pan: Cook the steak bites in batches if necessary to ensure they sear properly and develop a nice crust. Rest the Meat: Allow the steak bites to rest after cooking; this helps retain the juices and enhances the overall flavor. Use Fresh Herbs: Fresh parsley adds a vibrant flavor and color, but you can also try thyme or rosemary for a different twist. {{image_4}} You can add heat to your steak bites. Mix in red pepper flakes or cayenne pepper. This gives the dish a nice kick. Start with half a teaspoon and adjust to your taste. The spicy notes will dance with the garlic butter, making each bite exciting. Adding vegetables makes this dish more colorful and healthy. Try bell peppers or zucchini. Cut them into bite-sized pieces and add them to the skillet with the steak. They will cook quickly and soak up the garlic butter. This way, you get tasty bites of steak and a pop of veggies. You can switch up the sauce for variety. Try a soy sauce mix for an Asian twist. Combine soy sauce, honey, and a splash of lime juice. Or, use chimichurri for a fresh, herby flavor. Both options work great with garlic butter. Just pour the sauce over the cooked steak bites and enjoy a new taste. To keep your garlic butter steak bites fresh, store them in an airtight container. Let the steak cool to room temperature before sealing. This helps prevent moisture buildup, which can make the steak soggy. You can keep the leftovers in the fridge for up to 3 days. For best results, use glass containers. They do not absorb odors and keep the flavor intact. When you are ready to enjoy your leftovers, reheating is key. The best way to reheat steak bites is in a skillet. Heat the skillet over medium heat and add a small amount of olive oil. Add the steak bites and cook for about 3-4 minutes. Stir them occasionally to heat evenly. This method helps keep the steak juicy and flavorful. Avoid using the microwave, as it can make the steak tough. If you want to keep your steak bites longer, freezing is a good option. Place the cooled steak bites in a freezer-safe bag or container. Make sure to remove as much air as possible. This prevents freezer burn. You can freeze them for up to 3 months. To thaw, place the steak in the fridge overnight. Then, reheat them in a skillet for best taste. Yes, you can use other cuts of steak. Some good options are ribeye, filet mignon, or flank steak. Each cut has its own flavor and texture. Ribeye is very tender and juicy. Filet mignon is lean but very soft. Flank steak has a nice beefy taste but is less tender. Just remember to cut the steak into small pieces for even cooking. To check if the steak is done, use a meat thermometer. For medium-rare, aim for 130°F. For medium, go for 140°F. Pressing the steak with your finger helps, too. If it feels soft, it’s rare. If it’s firm, it’s well done. Remember, steak continues to cook after you take it off the heat, so remove it a bit early! Many side dishes work well. Here are a few ideas: - Garlic mashed potatoes - Roasted vegetables - Creamy coleslaw - Grilled asparagus - A fresh garden salad These sides add color and flavor. They also balance the rich taste of the steak bites. Enjoy mixing and matching! Garlic butter steak bites are easy and fun to make. You learned about the best ingredients, like steak cuts, and optional add-ins. The step-by-step guide showed how to prepare, sear, and sauce the steak perfectly. Remember the tips for juiciness and flavor. You can also try variations or store leftovers safely. Enjoying these bites can bring joy to any meal. Dive into this recipe and impress your friends and family. Happy cooking!

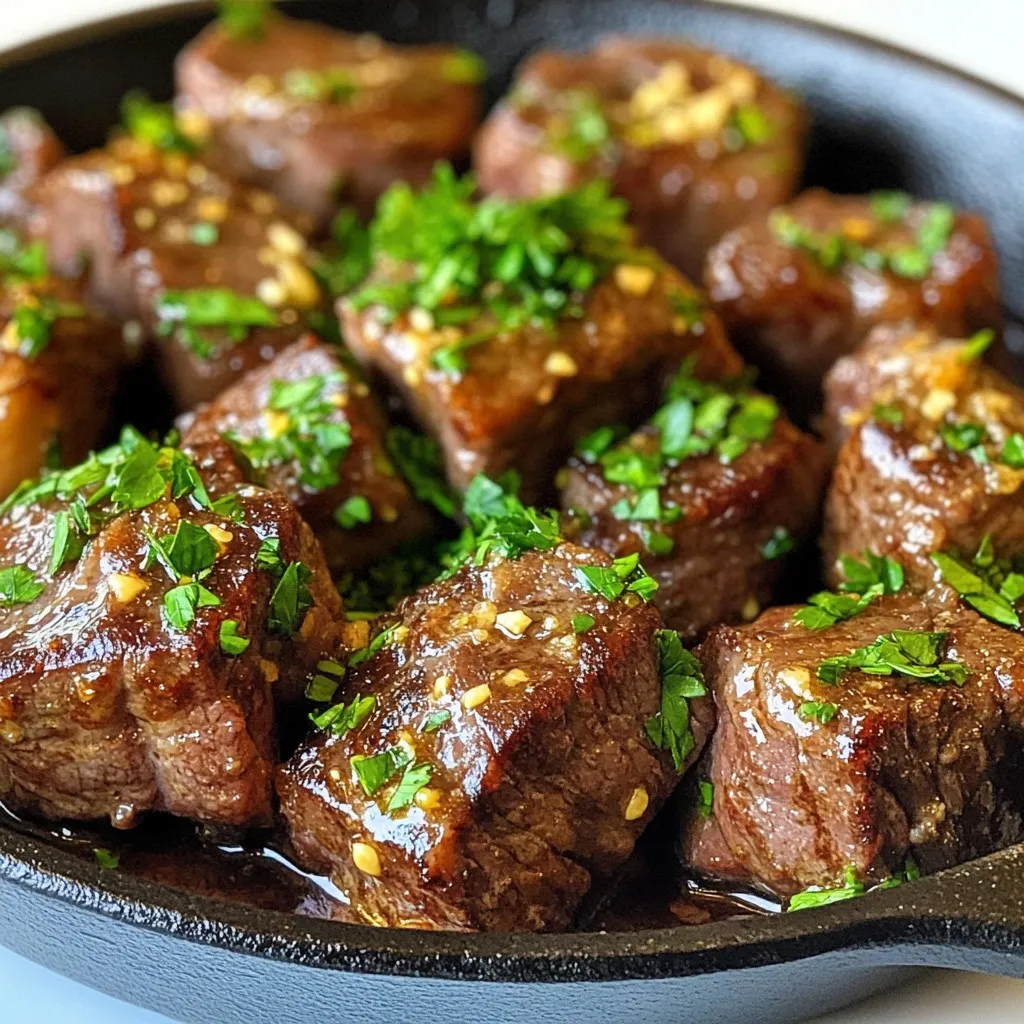
Garlic Butter Steak Bites Tender and Tasty Treat

If you love steak, you’ll adore these Garlic Butter Steak Bites! They are packed with flavor and super easy to

- 1 can chickpeas, drained and rinsed - Roasted red bell pepper, peeled and chopped - 2 tablespoons tahini - 2 tablespoons extra virgin olive oil - 2 tablespoons freshly squeezed lemon juice - 1 clove garlic, minced - 1 teaspoon ground cumin - Salt and freshly cracked black pepper to taste - Fresh parsley for garnish - Smoked paprika for garnish 1. Preheat your oven to 475°F (245°C). 2. Place the red bell pepper on a baking sheet. 3. Roast for about 25-30 minutes. 4. Turn the pepper often to char it evenly. 5. Once the skin is blistered, take it out. 6. Cover it with aluminum foil for 10 minutes. 7. Let it cool, then peel the charred skin. 8. Remove the seeds and set aside. 1. Add the drained chickpeas to your food processor. 2. Include the roasted red pepper, tahini, and olive oil. 3. Pour in the lemon juice and add garlic. 4. Add ground cumin for depth. 5. Blend on high speed until smooth and creamy. 1. If the hummus is too thick, add water slowly. 2. Start with one tablespoon at a time. 3. Blend until you reach a creamy texture. 4. Season with salt and pepper. 5. Taste and adjust seasoning as needed. This hummus is rich in flavor and perfect for dipping! {{ingredient_image_2}} To get the best hummus, you need to focus on texture. If your hummus is too thick, add water. Use one tablespoon at a time. Blend it well after each addition. Keep adding until you get a creamy and smooth mix. This step is key for enjoying the dip. Seasoning is also very important. Start with salt and freshly cracked black pepper. Blend it well after adding. Taste your hummus and adjust the seasoning. Don’t be shy—good flavor makes a big difference! Roasting peppers can be simple. Set your oven to 475°F (245°C) and place the red bell pepper on a baking sheet. Roast it for 25-30 minutes. Make sure to turn it often. This helps to char all sides evenly. Once done, cover it with foil to trap steam. This makes peeling easier. You can also roast peppers in different ways. Try grilling them for a smoky flavor. You can use a stovetop method too. Just place the pepper directly on the flame. This method gives a nice char as well. Pair your hummus with tasty sides. Vegetable sticks work great! Carrots, cucumbers, and bell peppers add crunch. Warm pita bread is another excellent choice. It complements the creamy hummus well. For garnishing, drizzle some olive oil on top. This adds richness. Sprinkle smoked paprika and chopped parsley for color and flavor. It not only looks good but also tastes amazing! You can make roasted red pepper hummus even more exciting. Adding spices can change the taste. Try smoked paprika for a smoky kick. A pinch of chili flakes can add heat. Both spices make your hummus zing with flavor. You can also mix in fresh herbs. Basil brings a sweet touch, while cilantro gives a fresh taste. Chop them finely and fold them in for a burst of flavor. If you want a lighter hummus, there are great swaps. Use low-fat tahini or olive oil. These choices keep the flavor but cut down on fat. Another option is Greek yogurt. It adds creaminess and protein without the extra calories. Mix it in for a healthy twist on your favorite dip. You can explore global flavors with your hummus. For a Mediterranean twist, add chopped olives. They bring a briny, savory note that pairs well with the sweet peppers. For a Middle Eastern style, use sumac. This spice adds a lemony taste and a hint of tartness. It brightens up your hummus and makes it stand out. Pro Tips Roasting Technique: For an even char on the red pepper, turn it every 5-10 minutes to ensure all sides get that delicious smoky flavor. Chickpeas Choice: While canned chickpeas are convenient, using dried chickpeas that you've soaked and cooked can enhance the flavor and texture of your hummus. Texture Preference: For a creamier hummus, blend for a longer time and add more water gradually until you reach your desired smoothness. Flavor Enhancements: Experiment with additional spices such as smoked paprika or chili powder for a unique twist on the classic hummus flavor. {{image_4}} Chickpeas are the star of this dish. They pack a protein punch. One can gives you about 12 grams of protein. This helps build muscles and keeps you full longer. Chickpeas also contain fiber, which is great for digestion. Roasted red peppers add a splash of color and health. They are rich in antioxidants. These help fight free radicals in your body. A single large red pepper has vitamins A and C. These vitamins support your immune system and skin health. Each serving of roasted red pepper hummus has about 150 calories. This makes it a great snack choice. The hummus contains: - Protein: 6 grams - Fat: 7 grams - Carbohydrates: 15 grams This balance keeps your energy up without weighing you down. This recipe fits many diets. It is vegetarian and vegan friendly. No animal products are used. You can enjoy it without worry. Also, the hummus is gluten-free. It works well for those avoiding gluten. Serve it with veggies or gluten-free crackers for a tasty treat! To keep your hummus fresh, use an airtight container. Glass jars work well. Store it in the fridge. Homemade hummus lasts about 4 to 5 days. Make sure to press plastic wrap against the hummus surface to limit air exposure. You can freeze hummus for later use. Place it in a freezer-safe container. Leave some space at the top for expansion. It stays good in the freezer for up to 3 months. When you're ready to use it, thaw it in the fridge overnight. Stir well before serving to blend the texture. Store-bought hummus has a clear expiration date on the label. It usually lasts 7 to 10 days after opening. Check for signs of spoilage like mold or an off smell. If you see any discoloration or separation, it's best to toss it. To roast a red bell pepper, follow these steps: 1. Preheat your oven to 475°F (245°C). 2. Place the red bell pepper on a baking sheet. 3. Roast for about 25-30 minutes. 4. Turn the pepper occasionally for even charring. 5. When the skin is blackened, take it out of the oven. 6. Cover the pepper with aluminum foil for 10 minutes. This traps steam. 7. Once cooled, peel off the skin and remove the seeds. You can also roast peppers on a grill or stovetop. Just place them over direct heat until charred. This method adds a smoky flavor. Yes, you can use canned chickpeas. They save time and are easy to use. Just drain and rinse them before blending. However, dried chickpeas can be better. They have a firmer texture and a richer taste. If you choose dried, soak them overnight and cook until tender. If you don’t have tahini, you can use peanut butter or sunflower seed butter. These will change the flavor a bit but still taste great. You can also skip tahini altogether. Just add a bit more olive oil or a splash of water to keep the hummus smooth. This will alter the taste but keep it creamy. We covered how to make hummus from scratch using simple ingredients like chickpeas and roasted red pepper. I shared step-by-step instructions to ensure your hummus is smooth and flavorful. Remember to taste and adjust your seasonings as you go. With these tips and variations, you can make this dish your own. Enjoy pairing it with vegetables or pita bread. Homemade hummus is not just tasty; it’s also healthy and easy to store. Get creative and have fun with this versatile recipe!

Roasted Red Pepper Hummus Tasty and Easy Recipe

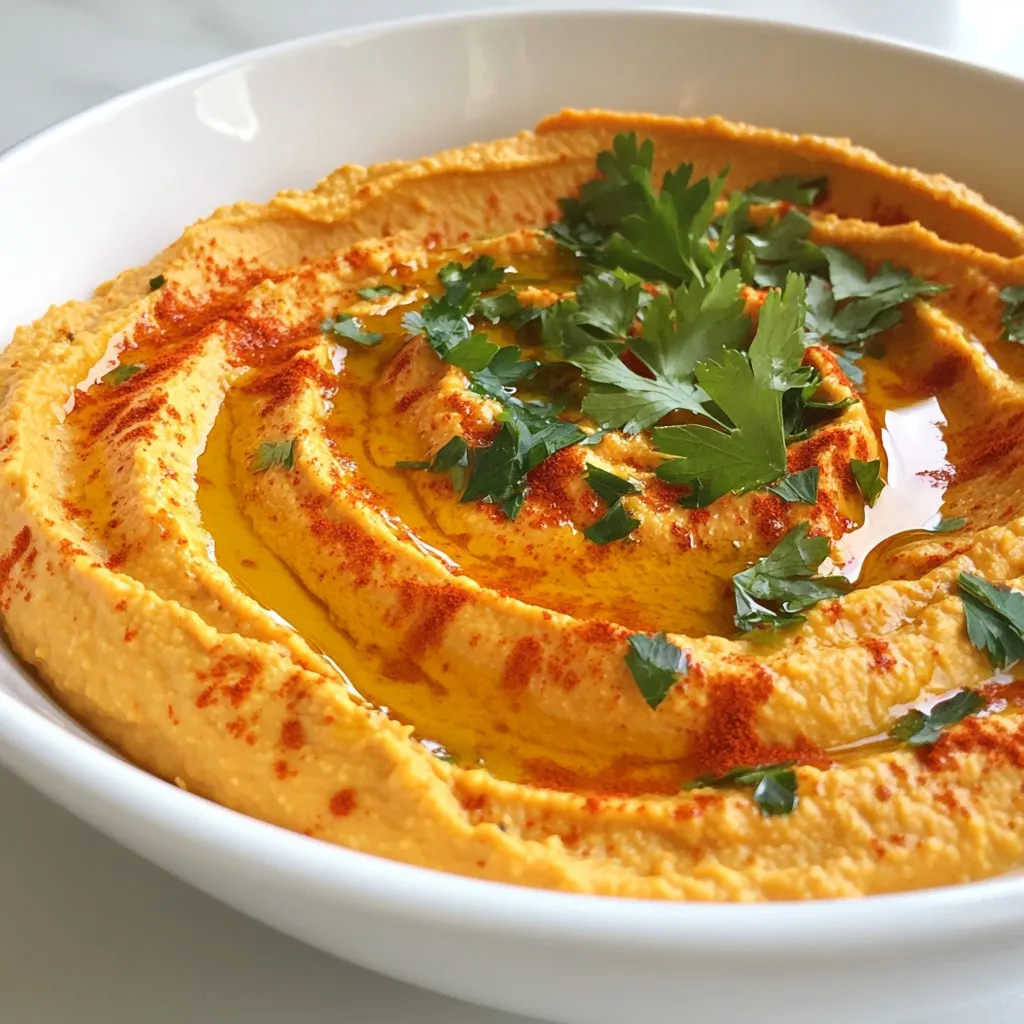
Looking for a delicious and easy dip that impresses? This Roasted Red Pepper Hummus recipe is packed with flavor and

To make Garlic Butter Chicken and Rice Casserole, gather these simple ingredients: - 2 cups cooked white rice - 1 pound boneless, skinless chicken thighs, diced into bite-sized pieces - 4 tablespoons unsalted butter, divided - 4 cloves fresh garlic, minced - 1 medium onion, finely diced - 1 cup low-sodium chicken broth - 1 cup heavy cream - 1 cup frozen peas and carrots mix - 1 teaspoon dried thyme - 1 teaspoon dried parsley - Salt and freshly ground black pepper to taste - 1 cup shredded mozzarella cheese - 1/2 cup grated Parmesan cheese You will need two cups of cooked rice. The rice gives a soft base to the dish. Next, use one pound of diced chicken thighs. Chicken thighs stay juicy and add flavor. You will need four tablespoons of butter. It adds richness and helps with cooking. Four cloves of minced garlic bring out a strong flavor. Use one medium onion, diced fine, to add sweetness. One cup of low-sodium chicken broth keeps the dish moist. One cup of heavy cream makes the sauce creamy and rich. Toss in one cup of frozen peas and carrots for color and nutrition. One teaspoon each of dried thyme and parsley adds depth. Use salt and black pepper to taste for flavor. Lastly, one cup of shredded mozzarella cheese and half a cup of grated Parmesan cheese give a cheesy topping. With these ingredients, you will create a hearty and tasty casserole. {{ingredient_image_2}} - Preheat oven to 375°F (190°C). - Grease a 9x13-inch casserole dish. - Melt 2 tablespoons of butter in a skillet. - Cook diced chicken seasoned with salt and pepper until golden. - Sauté onion and garlic in remaining butter until soft. - Add chicken broth, heavy cream, and frozen vegetables. - Combine cooked rice, chicken, and sauce in a large bowl. - Mix until well combined and everything is coated. - Pour the mixture into the casserole dish evenly. - Top with mozzarella and Parmesan cheese. - Bake for 25-30 minutes until cheese is bubbly and golden. - Always cook chicken until it is golden brown. This step adds great flavor. - Let the casserole cool for a few minutes before serving. This lets the flavors settle. - You can use boneless chicken breast if you prefer. It cooks well and is leaner. - Replace heavy cream with half-and-half for a lighter dish. It still tastes rich. - Feel free to swap in other veggies based on what you have. Broccoli or bell peppers work great. - Top the casserole with freshly chopped parsley. It adds a nice touch and color. - Serve with a green salad or warm, crusty bread. Both complement the dish well. Pro Tips Perfectly Cooked Chicken: To ensure your chicken thighs are juicy and tender, avoid overcooking them in the skillet. They should be cooked just until golden brown and no longer pink in the center. Flavor Boost: For an extra layer of flavor, consider adding a splash of white wine to the skillet after sautéing the onion and garlic, allowing it to reduce before adding the broth and cream. Cheese Variation: Feel free to experiment with different cheeses. Adding a blend of cheddar or gouda can give a unique twist to the flavor profile of your casserole. Make-Ahead Tips: This casserole can be prepared a day in advance. Simply assemble it, cover, and refrigerate. Bake it fresh the next day for a convenient meal! {{image_4}} You can make this dish healthier easily. Here are two simple changes: - Use brown rice instead of white rice for more fiber. - Opt for low-fat cheese options to cut calories. You can also boost the flavor with some fun spices and herbs: - Add spices like paprika or cayenne pepper for heat. This gives your dish a kick. - Mix in fresh herbs like basil or oregano for a different taste. They add freshness and depth. If you want a vegetarian version, you can swap out the chicken: - Substitute chicken with chickpeas or tofu. These options are protein-rich and filling. - Increase the quantity of vegetables for more texture and flavor. Consider bell peppers, broccoli, or spinach to brighten the dish. Refrigerate leftovers in an airtight container for up to 3-4 days. This keeps the dish fresh. Make sure the container seals tightly. You can enjoy the flavors of garlic butter chicken and rice again! You can freeze the unbaked casserole for up to 2 months. This is great for meal prep! Just wrap it well in plastic wrap, then foil. When you’re ready to eat, you have two options to reheat. You can bake from frozen or thaw it overnight in the fridge. For the best texture, reheat in the oven. Preheat to 350°F (175°C) and cover with foil to avoid burning. If you're in a hurry, microwaving works too. Just note that it may change the dish’s texture a bit. Enjoy your tasty leftovers! Yes, you can prepare it in advance. Just make the casserole, cover it, and refrigerate until you are ready to bake. This makes it easy for busy nights. When you are ready, simply bake it in the oven as directed. The flavors will blend nicely while it sits. This dish pairs well with simple salads or steamed vegetables. A fresh green salad adds a nice crunch. You can also serve it with roasted veggies for more color and taste. Both options balance the creamy casserole well. Yes, you can make a dairy-free version. Just swap out the butter, cream, and cheese for non-dairy substitutes. Use olive oil instead of butter, coconut milk or almond milk for cream, and vegan cheese for the cheeses. The dish will still taste great! To wrap up, this Garlic Butter Chicken and Rice Casserole is a tasty and easy dish. You need just a few simple ingredients and clear steps to make it. Remember, you can adjust flavors and ingredients to match your taste. Store any leftovers properly, and the casserole can even be frozen for later. Enjoy making this dish, and be creative with it!

Garlic Butter Chicken and Rice Casserole Delight

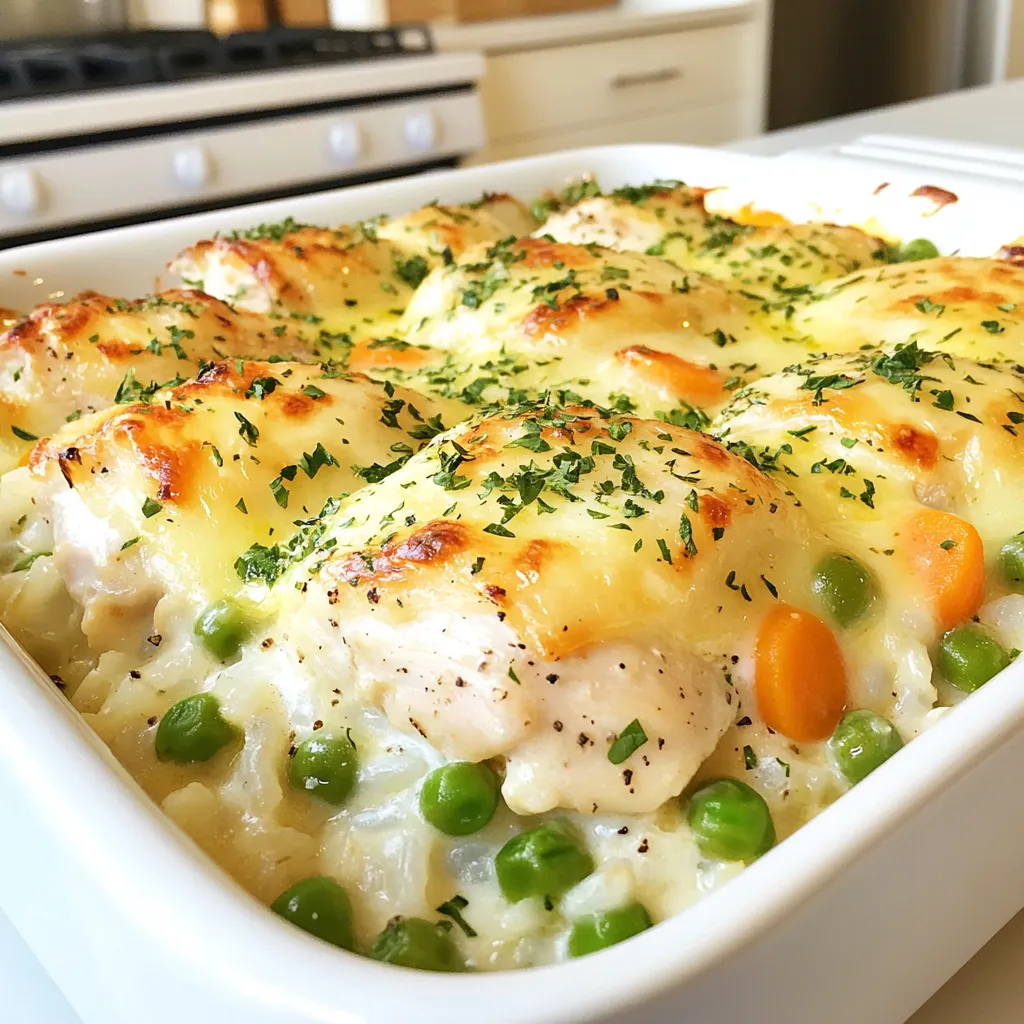
Get ready for a cozy family dinner with my Garlic Butter Chicken and Rice Casserole Delight! This recipe is simple,

- 2 boneless, skinless chicken breasts - 1 cup cooked quinoa or fluffy rice - 1 cup cherry tomatoes, halved - 1 cucumber, diced - 1 red onion, thinly sliced - 1 cup fresh lettuce or baby spinach - 2 tablespoons extra virgin olive oil - 2 teaspoons dried oregano - 1 teaspoon garlic powder - 1 teaspoon onion powder - Sea salt and freshly ground black pepper, to taste - 1/2 cup crumbled feta cheese - 1/4 cup kalamata olives, pitted and sliced - Tzatziki sauce, for a refreshing drizzle When making Greek Chicken Gyro Bowls, I focus on using fresh and vibrant ingredients. The chicken serves as the star of this dish. I always choose boneless, skinless chicken breasts for their tenderness. The quinoa or rice acts as a hearty base. It provides texture and absorbs all the delicious flavors. Fresh vegetables are key. I love the burst of flavor from cherry tomatoes, the crunch of cucumber, and the bite from red onion. They add color and freshness to each bowl. For greens, I often use fresh lettuce or baby spinach. They not only look great but also add nutrition. The seasoning is where the magic happens. I blend olive oil, oregano, garlic powder, and onion powder to create a simple marinade. This mix brings out the best in the chicken. I always add sea salt and black pepper to taste. It enhances the overall flavor. For toppings, I can’t resist crumbled feta cheese. It adds a creamy and salty contrast to the other ingredients. Kalamata olives provide a briny kick that rounds out the dish. Lastly, I drizzle tzatziki sauce on top. It adds a cool, creamy element that ties everything together. Using these ingredients makes my Greek Chicken Gyro Bowls flavorful and satisfying. Each bite is a delightful mix of textures and tastes that everyone loves. {{ingredient_image_2}} To start, make a simple marinade. In a medium bowl, mix together 2 tablespoons of extra virgin olive oil, 2 teaspoons of dried oregano, 1 teaspoon of garlic powder, and 1 teaspoon of onion powder. Season with sea salt and black pepper to taste. Next, add the 2 boneless, skinless chicken breasts to the bowl. Make sure each piece is well coated. Cover the bowl with plastic wrap. Place it in the fridge for at least 30 minutes. This step helps the chicken absorb all the tasty flavors. Now it’s time to cook the chicken. Preheat your grill or skillet to medium-high heat. Once hot, take the chicken from the marinade and let any excess drip off. Cook each piece for about 6 to 7 minutes on each side. You want the internal temperature to reach 165°F (75°C). The chicken should be golden brown and juicy. After cooking, allow it to rest for 5 minutes before slicing it into thin strips. Let’s build those bowls! Start by placing a scoop of cooked quinoa or fluffy rice in four serving bowls. This will be the base layer. Next, add the sliced grilled chicken on top. Then, layer on halved cherry tomatoes, diced cucumber, and thinly sliced red onion. Finish with a handful of fresh lettuce or baby spinach. This colorful mix makes your bowl look amazing. To add richness, sprinkle crumbled feta cheese and sliced kalamata olives on top. Finally, drizzle some tzatziki sauce over each bowl. This creamy sauce adds a refreshing touch. Enjoy your Greek Chicken Gyro Bowls! To ensure juicy chicken, start with marinating. Mix olive oil, oregano, garlic powder, onion powder, sea salt, and black pepper. Let the chicken soak in this mixture for at least 30 minutes. This step adds flavor and moisture. When it comes to cooking methods, I love grilling the chicken. It gives a nice char and adds depth. If you don’t have a grill, a skillet works well too. Just make sure it’s hot before you add the chicken. Cook it for about 6-7 minutes on each side until it reaches 165°F. This keeps the chicken tender and juicy. Garnishing options for your gyro bowls can elevate the dish. I suggest fresh herbs like dill or parsley for added color and aroma. A squeeze of lemon adds a bright touch too. Pair your gyro bowl with a light drink. A glass of sparkling water with lemon or a light white wine complements the flavors well. You can also serve a simple side salad to balance the meal. To store leftovers, place them in an airtight container. This keeps the chicken and toppings fresh. You can store them in the fridge for up to three days. For reheating, use the microwave or a skillet. If using a skillet, heat it on low to avoid drying out the chicken. Add a splash of water to help keep the moisture. Enjoy your delicious gyro bowls again! Pro Tips Marinate Longer for Flavor: If time allows, marinating the chicken for several hours or overnight will enhance the flavor even further, making it more succulent and tasty. Use Fresh Ingredients: Opt for fresh vegetables and herbs to elevate the freshness of your gyro bowl. Fresh cucumbers and tomatoes can make a significant difference in taste. Cook Chicken Evenly: For evenly cooked chicken, try pounding the chicken breasts to a uniform thickness before marinating. This ensures they cook at the same rate and stay juicy. Experiment with Toppings: Feel free to add other toppings such as roasted red peppers, artichokes, or even avocado to customize your gyro bowl to your liking. {{image_4}} You can change grains in your gyro bowl. Couscous or farro work great instead of quinoa or rice. This swap adds different textures and flavors. If you want to try other proteins, consider lamb or tofu. Lamb gives a rich taste, while tofu is a good plant-based choice. Both can be seasoned like the chicken. To kick up the flavor, add spices like paprika or cumin. These spices give your dish more depth and warmth. You can also try fresh herbs like dill or mint for a bright touch. For toppings, think outside the box. Avocado adds creaminess and healthy fats. Bell peppers can add a sweet crunch. Both choices enhance the overall taste and nutrition. To make your gyro bowl gluten-free, swap quinoa or rice for gluten-free grains. Options like millet or buckwheat work well. If you prefer a vegetarian meal, replace chicken with grilled mushrooms or chickpeas. This change keeps the meal hearty while providing plant-based protein. Enjoy the same great flavors, but in a new way! Each serving of Greek Chicken Gyro Bowls has about 450 calories. The breakdown is roughly: - Protein: 30 grams - Carbohydrates: 40 grams - Fat: 20 grams This meal packs a balanced mix of nutrients to fuel your day. Chicken is a great source of protein. It helps build muscles and keep you strong. Fresh veggies like tomatoes and cucumbers are full of vitamins. They keep your immune system healthy. Quinoa or rice adds fiber. Fiber helps with digestion and keeps you full longer. I suggest one bowl per person for a balanced meal. If you are active, you may need more. For a lighter meal, share a bowl or use smaller portions. Adjusting servings can help fit your dietary needs. Enjoy this tasty meal any way you like! To make tzatziki, you need simple ingredients. Start with: - 1 cup plain Greek yogurt - 1 small cucumber, grated and drained - 2 cloves garlic, minced - 1 tablespoon olive oil - 1 tablespoon vinegar or lemon juice - Salt and pepper to taste - Fresh dill or mint, chopped (optional) Mix all the ingredients in a bowl. Adjust salt and pepper to your liking. Let it chill for 30 minutes to blend the flavors. This sauce is cool and creamy, perfect for your gyro bowls. Yes, you can prepare Greek Chicken Gyro Bowls ahead of time. Here are some tips: - Marinate the chicken: You can marinate chicken breasts the night before. This helps the flavors soak in well. - Cook and store: Cook the chicken and let it cool. Store it in an airtight container in the fridge for up to 3 days. - Prep veggies: Chop your veggies and store them in separate containers. They stay fresh this way. - Assemble before serving: When you're ready to eat, just assemble the bowls. This keeps everything fresh and tasty. You have many options for sides. Here are a few that work well: - Greek salad: Fresh and light, it complements the gyro bowls nicely. - Pita bread: Soft pita is great for scooping up tzatziki or other toppings. - Roasted vegetables: Try roasted zucchini, bell peppers, or eggplant for added flavor. - Hummus: This creamy dip pairs well and adds extra protein. - Lemon rice: A bright, zesty side that adds a nice touch. Feel free to mix and match! Enjoy your meal! This blog post covered how to create delicious Greek Chicken Gyro Bowls from scratch. You learned about the main ingredients, how to marinate and cook the chicken, and assemble your dish for a vibrant presentation. I shared cooking tips to ensure your chicken stays juicy and storage methods for any leftovers. Consider trying variations with different grains or proteins. These bowls are flexible, nutritious, and easy to adapt. Enjoy crafting your own healthy meals that suit your taste!

Greek Chicken Gyro Bowls Flavorful and Satisfying Meal

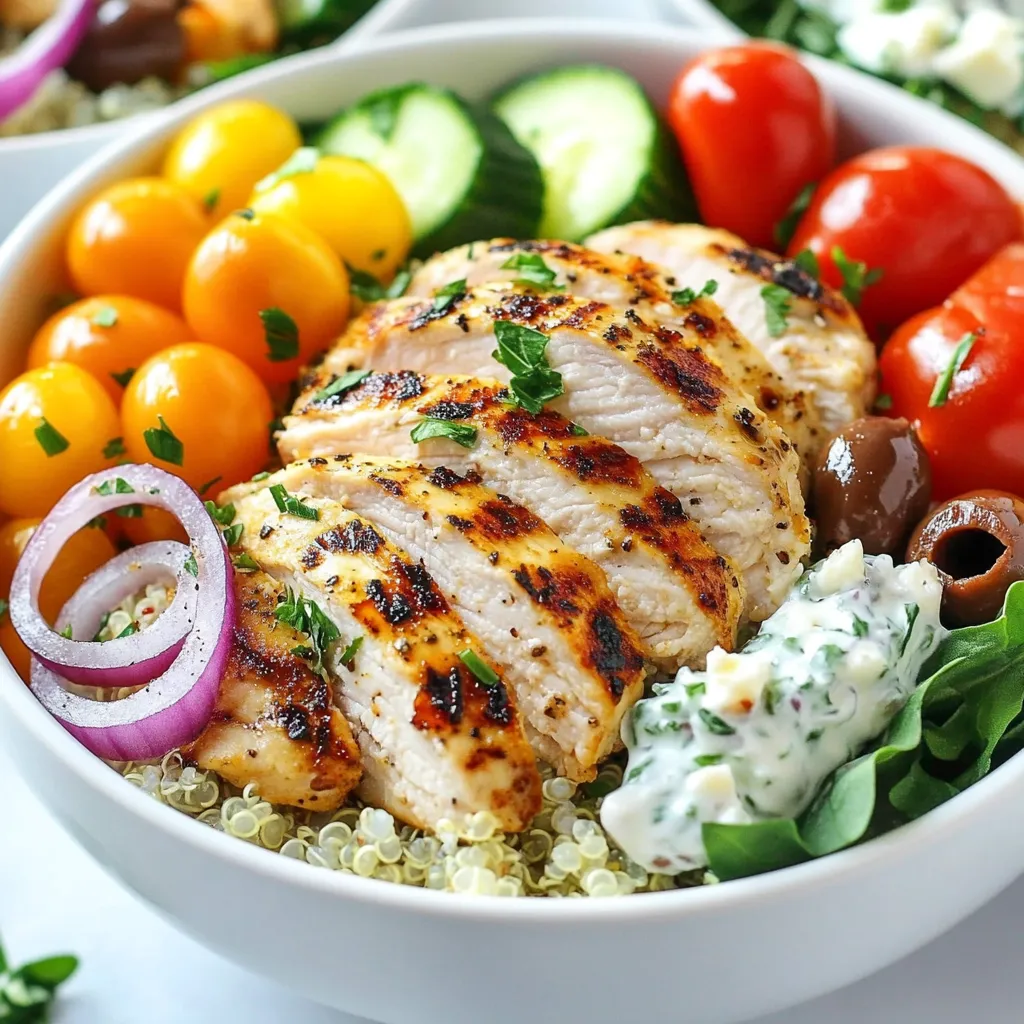
Are you craving a meal that’s both flavorful and easy to make? Greek Chicken Gyro Bowls are the answer! This

For the base of your chickpea fritters, you will need: - 1 can (15 oz) chickpeas, drained and rinsed - 1/2 cup finely diced red bell pepper - 1/4 cup sliced green onions - 1/4 cup freshly chopped cilantro - 2 cloves garlic, finely minced - 1 teaspoon ground cumin - 1/2 teaspoon smoked paprika - 1/2 teaspoon baking powder - 1/4 cup chickpea flour (besan) - Salt and freshly ground black pepper, to taste - Olive oil, for frying These ingredients create a tasty, crunchy, and healthy snack. Chickpeas are rich in protein and fiber. The red bell pepper adds sweetness, while green onions give a fresh bite. Fresh herbs like cilantro bring a bright flavor. To make your fritters even better, consider these optional ingredients: - Yogurt sauce, for a creamy dip - Lemon wedges, to add a zesty kick You can also adapt the recipe for different diets. For vegan options, use plant-based yogurt. If you want to avoid gluten, substitute chickpea flour with your favorite gluten-free flour. Each change can give your fritters a unique twist. {{ingredient_image_2}} To start, you need to mash the chickpeas. Take one can of chickpeas, drain and rinse them. In a large bowl, use a fork or potato masher. Mash them until they are mostly smooth, but keep some texture. This gives the fritters a nice bite. Next, incorporate veggies and spices into the chickpeas. Add half a cup of finely diced red bell pepper, a quarter cup of sliced green onions, and a quarter cup of freshly chopped cilantro. Don’t forget two cloves of finely minced garlic! Mix in one teaspoon of ground cumin and half a teaspoon of smoked paprika for a flavor boost. Add half a teaspoon of baking powder and a quarter cup of chickpea flour. Finally, season with salt and freshly ground black pepper to taste. Stir everything until it is well combined. Now, it’s time to shape the patties. With slightly damp hands, take some of the chickpea mixture and shape small patties. Aim for about two to three inches in diameter. Heat a skillet over medium heat and drizzle in some olive oil. Once the oil is warm, carefully place your fritters into the skillet. Be sure not to overcrowd the skillet. This helps them cook evenly. Fry the fritters for about four to five minutes on each side. You want them to turn golden brown and crispy. When the fritters are done, transfer them to a plate lined with paper towels. This will help drain any excess oil. For serving, arrange the fritters warm on a platter. Add some fresh lemon wedges and a tangy yogurt sauce on the side. This adds a zesty kick that pairs perfectly with the fritters. Enjoy your delicious snack! To get the best texture, balance your mixture well. You want it slightly chunky. This keeps the fritters from becoming too mushy. If you mash the chickpeas too much, you lose that nice bite. Avoid overcrowding in the skillet. When you add too many fritters at once, they steam instead of fry. This can lead to soft fritters instead of crispy ones. Cook them in batches to ensure even cooking. Adding spices or herbs can really boost the flavor. I love using garlic, cumin, and smoked paprika. Fresh herbs like cilantro or parsley add a nice pop. Feel free to experiment with your favorites. For the extra mixture, store it in a sealed container in the fridge. You can use it within a few days. This way, you always have a quick snack ready to fry. Pro Tips Use Fresh Ingredients: Always opt for fresh herbs and vegetables to enhance the flavor profile of your fritters. Adjust the Spice Level: Feel free to add more spices or chili flakes if you prefer a spicier kick in your fritters. Chill the Mixture: For firmer fritters, refrigerate the chickpea mixture for about 30 minutes before shaping and frying. Explore Dipping Sauces: Experiment with different dipping sauces like tahini or spicy aioli for a unique twist. {{image_4}} You can mix up the flavor of chickpea fritters by adding different veggies or legumes. For example, try adding grated zucchini or shredded carrots. They boost nutrition and add a nice crunch. You can also swap in black beans or lentils for a new twist. Want to spice things up? Incorporate cheese into your fritters. Feta or mozzarella works well. You can also add spicy elements like chopped jalapeños or a dash of hot sauce. These simple changes can create exciting new tastes. Chickpea fritters are great for many diets. They are naturally vegan, as they use chickpeas and veggies. You can also make them gluten-free. Just use alternative flours like almond or coconut flour instead of chickpea flour. This keeps the fritters light and tasty. Feel free to experiment with your own ideas. The base recipe is very flexible. With a few tweaks, you can make these fritters fit any diet while keeping them delicious. To keep your fritters fresh, let them cool first. Place them in an airtight container. They will stay good in the fridge for 3 to 4 days. If you want to keep them longer, freezing is a great option. Wrap each fritter in plastic wrap, then place them in a freezer bag. They can last for up to 3 months in the freezer. To reheat, the oven is the best choice. Preheat the oven to 375°F (190°C). Place the fritters on a baking sheet. Heat them for about 10 to 15 minutes. This method keeps them crispy. If you use a microwave, it can make them soft. To avoid this, heat them for just a short time. You can also use a skillet over medium heat to bring back their crunch. Just a minute or two on each side will do the trick! Chickpea fritters stay fresh for about 3 to 4 days in the fridge. To keep them tasty, store them in an airtight container. This helps lock in their flavor and keeps them from drying out. If you want them to last longer, consider freezing them. They can last for up to 3 months in the freezer. Just remember to thaw them before reheating. Yes, you can bake chickpea fritters for a lighter option. Preheat your oven to 400°F (200°C). Place the shaped fritters on a lined baking sheet. Brush or spray them lightly with olive oil. Bake for about 20-25 minutes, flipping halfway through. This method gives you crispy fritters without all the oil. Baking is a great way to enjoy them in a healthier way. Chickpea fritters pair well with various sides and sauces. Here are some great options to try: - Yogurt sauce: A tangy yogurt sauce adds creaminess. - Lemon wedges: Fresh lemon juice brightens the flavors. - Salad: A simple salad can add crunch and freshness. - Dipping sauces: Try tahini or a spicy salsa for extra zest. These sides make your meal more enjoyable and tasty! Chickpea fritters are a simple and tasty dish. You learned how to make them using chickpeas, fresh veggies, and herbs. I also shared tips for cooking and achieving the right texture. Feel free to try different flavors or follow dietary needs. Remember to store leftovers properly and reheat them for the best taste. These fritters are enjoyable and versatile. You can serve them with yogurt sauce or other dips. Enjoy making and sharing this fun recipe with others!

Chickpea Fritters Crunchy and Flavorful Snack

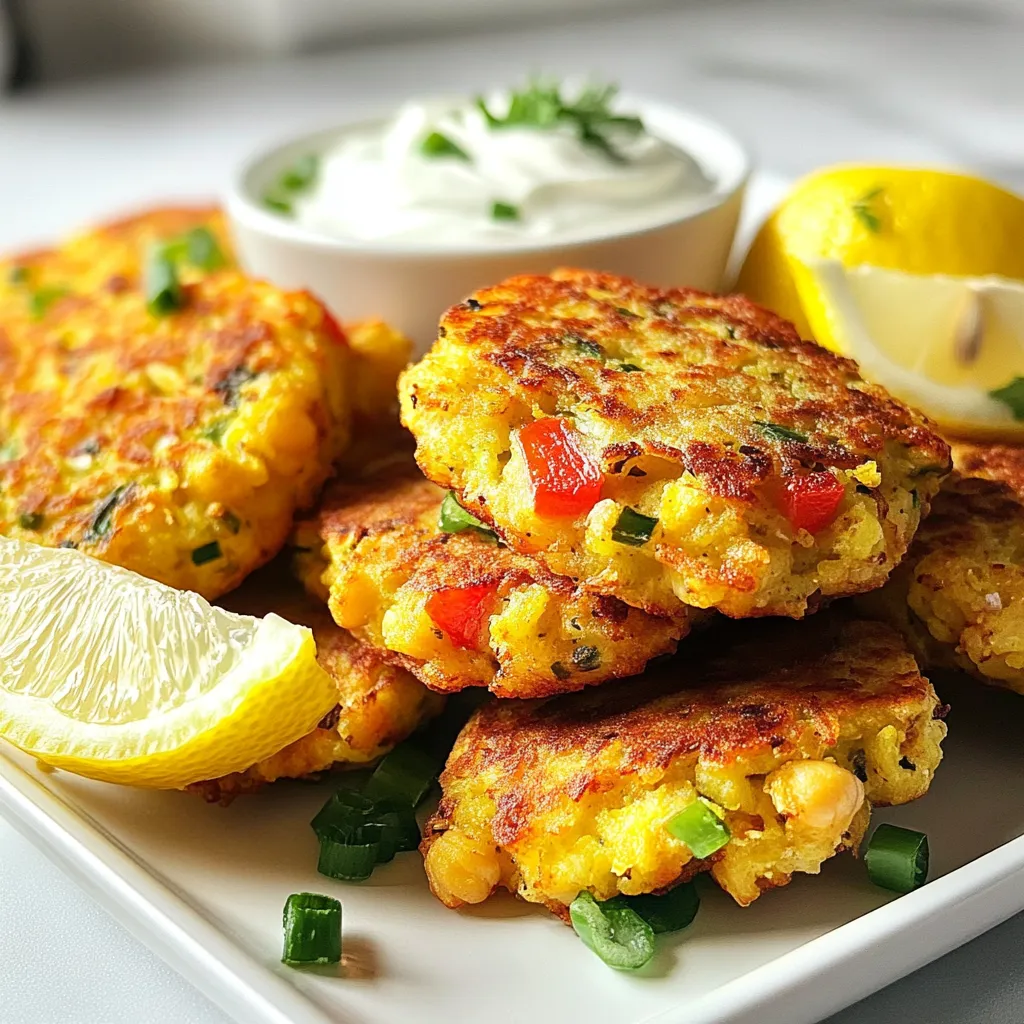
Do you crave a crunchy, tasty snack that’s also good for you? Chickpea fritters are your answer! These flavorful bites

To make Lemon Blueberry Overnight Oats, gather these key items: - 1 cup rolled oats - 1 cup almond milk (or any milk type you prefer) - 1/2 cup Greek yogurt (or your favorite plant-based yogurt) - 1 tablespoon honey or maple syrup (adjust sweetness according to your taste) - Zest from 1 lemon - 2 tablespoons freshly squeezed lemon juice - 1/2 cup fresh blueberries (reserve extra for topping) - 1 tablespoon chia seeds - A pinch of salt These ingredients create a tasty and healthy breakfast. The oats provide fiber and energy. The yogurt adds protein and creaminess. The blueberries give a sweet burst and antioxidants. Lemon zest brightens the flavor and adds freshness. You can customize the sweetness with honey or maple syrup. If you want it less sweet, use less. For dairy-free options, try coconut milk or oat milk. You can also use almond yogurt or cashew yogurt if you prefer plant-based dairy. Each ingredient brings health perks: - Rolled oats: Great for digestion and heart health. - Chia seeds: Packed with fiber and omega-3 fatty acids. - Blueberries: Low in calories, high in vitamins and antioxidants. - Greek yogurt: Supports gut health with probiotics and adds protein. - Lemon juice: Boosts vitamin C and aids digestion. These ingredients come together to make a balanced meal. It's tasty, filling, and good for you. Enjoy your Lemon Blueberry Overnight Oats knowing they fuel your day! {{ingredient_image_2}} Start by grabbing a medium mixing bowl. Add 1 cup of rolled oats, 1 tablespoon of chia seeds, and a pinch of salt. Stir them well. This helps the chia seeds mix evenly with the oats. Make sure you break up any lumps as you mix. It only takes a minute, but it sets the base for creamy oats. In a separate bowl, combine 1 cup of almond milk, 1/2 cup of Greek yogurt, and 1 tablespoon of honey or maple syrup. Add the zest from 1 lemon and 2 tablespoons of lemon juice. Whisk everything together until smooth. This mixture gives your oats a sweet and tangy flavor. The lemon adds a bright taste that wakes up your senses. Now it's time to combine the wet and dry mixtures. Slowly pour the wet mixture over the oats. Stir gently but thoroughly to coat all the oats. Make sure there are no dry bits left. Next, fold in 1/2 cup of fresh blueberries, saving some for later. Scoop the oat mixture into jars or airtight containers. Seal them up tight and place them in the fridge for at least 4 hours, or overnight if you can wait. The next morning, stir your oats well. If they are too thick, add a splash of almond milk. Top with reserved blueberries and a sprinkle of lemon zest for a tasty finish. Enjoy! To make your oats creamy, choose rolled oats. They absorb the liquid well. Mix the oats with chia seeds and a pinch of salt first. This helps with texture. Use enough liquid, like almond milk, to coat each oat. If your oats are too thick, add a splash of milk before serving. Stir them well for a smooth finish. You can easily customize your oats. Try different fruits like strawberries or raspberries. Use flavored yogurt for an extra twist. If you like it sweeter, add more honey or maple syrup. You can swap almond milk for coconut milk for a tropical vibe. Don’t forget to experiment with spices, like cinnamon or nutmeg, for more flavor. Serve your oats in clear glass jars. This shows off the bright colors of the blueberries and lemon zest. For a fresh touch, add a mint sprig on top. You can layer the oats with extra fruit for a fun look. Just before eating, sprinkle some lemon zest on top for added flavor. This makes your meal look as good as it tastes! Pro Tips Use Fresh Ingredients: Always opt for fresh blueberries and high-quality yogurt to enhance the flavor and texture of your overnight oats. Adjust Sweetness: Feel free to taste the mixture before refrigerating. Adjust the sweetness by adding more honey or maple syrup according to your preference. Experiment with Milk Alternatives: Try different milk alternatives like coconut milk or oat milk to find your favorite flavor combination. Make It Ahead: These overnight oats can be made in bulk for the week. Just portion them into jars and store them in the fridge for a quick, nutritious breakfast. {{image_4}} You can switch up the blueberries for other fruits. Strawberries, raspberries, or blackberries work well. These fruits add their own unique flavors. You can also try sliced bananas or peaches for a different twist. Each fruit brings a special taste to the oats. If you want to avoid dairy, choose plant-based yogurt. Coconut, almond, or soy yogurt all taste great. Each type of yogurt has a different flavor and texture. This lets you customize the oats to your liking. Just make sure it is unsweetened for the best taste. Want to spice it up? Add a dash of cinnamon or vanilla extract. You can also mix in nut butter for creaminess. Almond or peanut butter can give a rich taste. For a zesty kick, try adding some grated ginger. These twists can make your overnight oats even more exciting. For storing lemon blueberry overnight oats, use airtight containers. Glass jars work great. They keep the oats fresh and let you see the colorful layers. Make sure the lids fit tightly to avoid spills in your fridge. You can keep your lemon blueberry overnight oats in the fridge for up to five days. After that, the texture may change. If you see any signs of spoilage, like off-smells or mold, it’s best to toss them. You can freeze the oats if you want to save them for later. Use freezer-safe containers or bags. They can last for up to three months in the freezer. To eat, just move them to the fridge overnight to thaw. They might be a bit watery, so stir well before serving. Enjoy your tasty oats any time! You can use steel-cut oats, but the texture will change. Steel-cut oats need more liquid and time to soften. I suggest using double the liquid and letting them soak overnight. This will help them soften up. Rolled oats work best for a creamy, smooth texture. To make this recipe vegan, simply swap out the yogurt and honey. Use a plant-based yogurt, like coconut or almond yogurt. For sweetening, choose maple syrup instead of honey. These simple swaps keep the flavor while making it vegan-friendly. You can add many toppings to your Lemon Blueberry Overnight Oats. Here are some ideas: - Sliced almonds for crunch - Shredded coconut for sweetness - Chia seeds for extra fiber - A drizzle of nut butter for richness - Fresh mint leaves for a burst of freshness These toppings will add flavor and fun to your oats. Lemon blueberry overnight oats are fun, easy, and healthy. We covered the key ingredients, step-by-step instructions, and helpful tips. You can mix in your favorite fruits and customize flavors. Storing them is simple, and you have options for freezing. This means tasty breakfasts all week long. Enjoy your creamy oats each morning, and feel free to get creative! Healthy eating can be exciting, and these oats are a great way to start.

Lemon Blueberry Overnight Oats Tasty and Easy Recipe

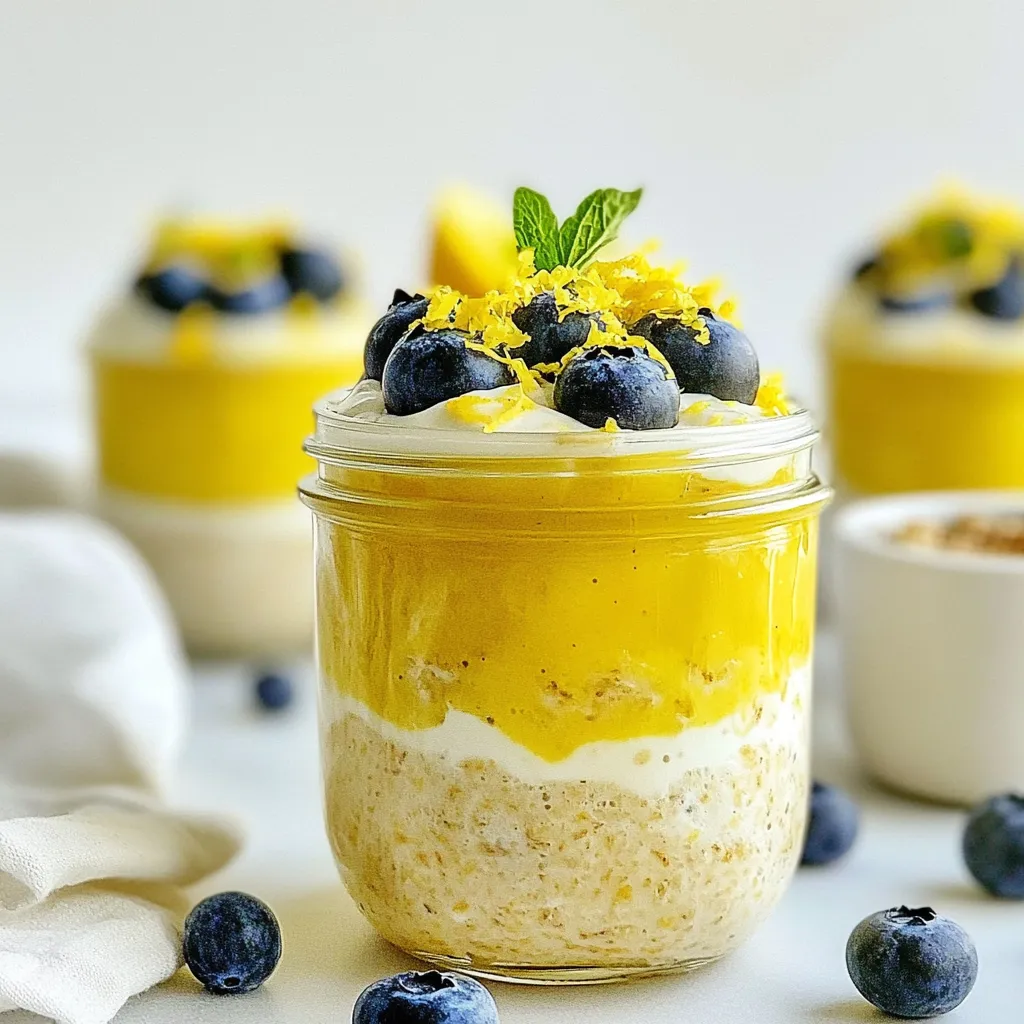
Start your mornings with a burst of flavor and energy! My Lemon Blueberry Overnight Oats are both tasty and easy

Newer posts
← Previous Page1 … Page74 Page75

dsad

© 2025 tastymomrecipes • Built with GeneratePress

Our Policies

  • Copyright Policy
  • Cookie Policy
  • GDPR Policy
  • Privacy Policy
  • Disclaimer
  • Terms Of Use

More Information

  • Home
  • About
  • Contact
  • Appetizers
  • Dessert
  • Dinner
  • Drinks
©2025, tastymomrecipes About Back To Top