Bakery-Style Pumpkin Chocolate Chip Scones Delight

WANT TO SAVE THIS RECIPE?

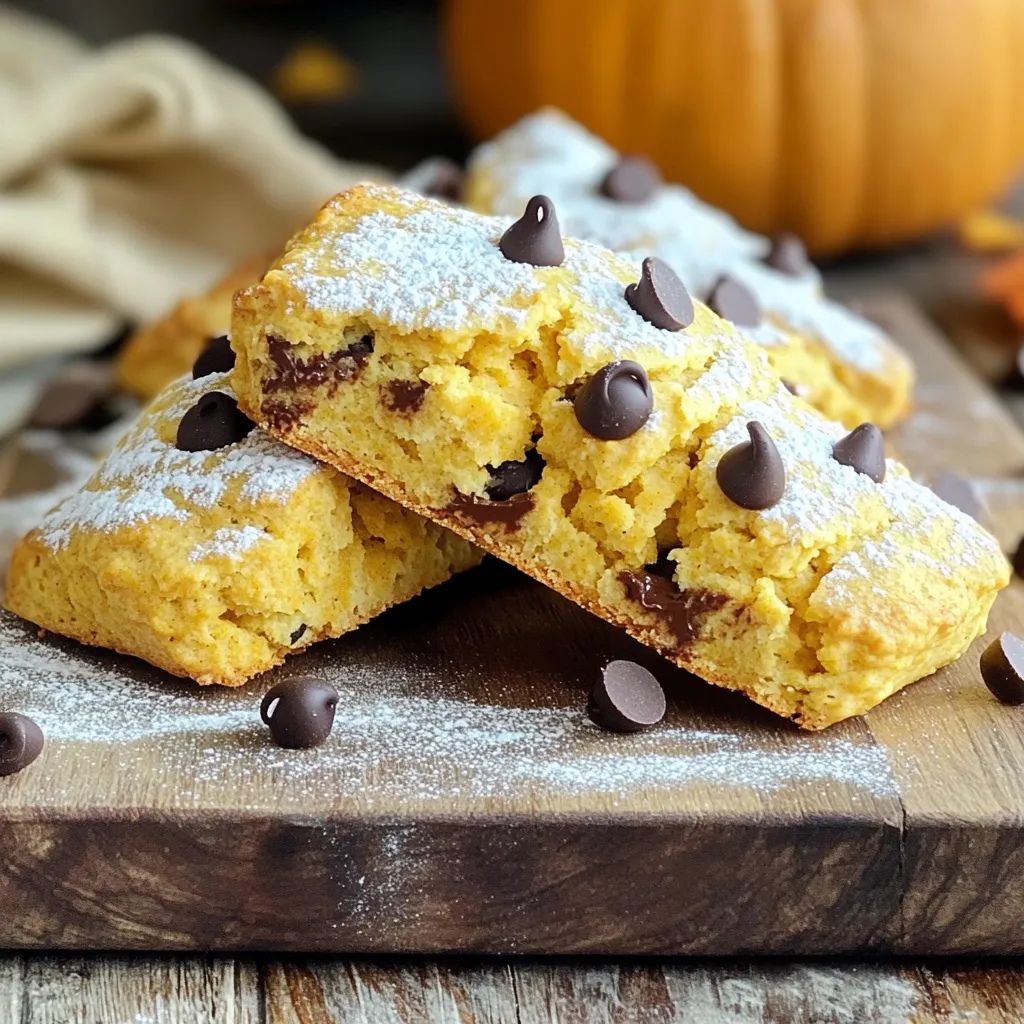
Get ready to fill your kitchen with the warm, sweet scent of fall! In this article, I’ll show you how to make Bakery-Style Pumpkin Chocolate Chip Scones that are sure to impress. With simple ingredients and easy steps, you can create soft, tender scones that taste like they came from a high-end bakery. Whether for breakfast or a cozy snack, these treats are perfect for any occasion. Let’s dive in!

Ingredients

List of Ingredients

– 2 cups all-purpose flour

– 1/4 cup granulated sugar

– 1 tablespoon baking powder

– 1/2 teaspoon baking soda

– 1/2 teaspoon salt

– 1 tablespoon pumpkin spice

– 1/2 cup cold unsalted butter, cut into small cubes

– 3/4 cup canned pumpkin puree

– 1/4 cup heavy cream

– 1 large egg

– 1 teaspoon vanilla extract

– 3/4 cup semi-sweet chocolate chips

– Extra granulated sugar for sprinkling (optional)

Equipment Needed

You will need a few tools to make these scones. Here’s what I recommend:

– Large mixing bowl

– Whisk

– Pastry cutter or fork

– Spatula or wooden spoon

– Sharp knife or bench scraper

– Baking sheet

– Parchment paper

– Wire rack

Tips for Choosing Quality Ingredients

Choosing the right ingredients is key to perfect scones. Here are my tips:

Flour: Use high-quality all-purpose flour. It gives the scones structure.

Butter: Opt for unsalted butter. Cold butter creates flaky layers.

Pumpkin Puree: Go for canned pumpkin puree. It’s consistent and easy to use.

Chocolate Chips: Use semi-sweet chocolate chips for the best balance of sweetness.

Spices: Fresh pumpkin spice can add a nice kick. Check the date to ensure freshness.

With these tips, you can ensure your scones taste amazing!

Step-by-Step Instructions

Preheating the Oven

First, preheat your oven to 400°F (200°C). This step is key for great scones. While the oven warms up, prepare a baking sheet. Line it with parchment paper. This helps prevent the scones from sticking.

Mixing Dry Ingredients

Next, grab a large mixing bowl. In it, whisk together the dry ingredients. Combine 2 cups of all-purpose flour, 1/4 cup of granulated sugar, 1 tablespoon of baking powder, 1/2 teaspoon of baking soda, 1/2 teaspoon of salt, and 1 tablespoon of pumpkin spice. Mix until everything is well combined, with no lumps remaining.

Incorporating the Butter

Now, let’s add the butter. Take 1/2 cup of cold unsalted butter and cut it into small cubes. Add the butter to your dry mixture. Use a pastry cutter or your fingers to blend it in. You want the mixture to look like coarse crumbs, with some pea-sized pieces of butter still visible.

Combining Wet Ingredients

In a separate bowl, combine the wet ingredients. Whisk 3/4 cup of canned pumpkin puree, 1/4 cup of heavy cream, 1 large egg, and 1 teaspoon of vanilla extract. Mix until smooth. This blend is what gives the scones their rich flavor and moist texture.

Mixing Dry and Wet Ingredients

Carefully pour the wet mixture into the dry ingredients. Use a spatula or wooden spoon to stir gently. Mix until just combined. Be careful not to overmix; this could make your scones tough.

Shaping and Cutting the Scones

Once mixed, turn the dough onto a lightly floured surface. Pat it down into a circle about 1-inch thick. Use a sharp knife to cut the dough into 8 wedges. If you prefer, you can use a round cutter to make individual scones.

Baking and Serving Suggestions

Transfer the scones to your prepared baking sheet. For a nice finish, brush the tops with a bit of extra cream. You can sprinkle some granulated sugar on top as well. Bake in your preheated oven for 15-18 minutes. They should be golden brown and firm. Let them cool on a wire rack for a few minutes before serving. Enjoy them warm for the best taste!

Tips & Tricks

Achieving the Perfect Scone Texture

To get the best scone texture, start with cold butter. This helps create flaky layers. Cut the butter into small cubes before mixing. Use your fingers or a pastry cutter to blend it into the flour. Stop when it looks like coarse crumbs. This keeps the scones light and airy.

Common Mistakes to Avoid

One big mistake is overmixing the dough. When you combine wet and dry ingredients, mix gently. You want to see some dry flour. Overmixing makes scones tough. Another mistake is skipping the cold butter. Warm butter leads to dense scones. Always keep it cold for the best results.

Enhancing Flavor with Spices

Using pumpkin spice is key for flavor. It adds warmth and depth. Feel free to adjust the amount to fit your taste. You can also add cinnamon or nutmeg for a twist. If you want more chocolate flavor, try dark chocolate chips instead. This small change can make a big difference in taste.

Variations

Substituting Ingredients

You can change some ingredients to make these scones fit your needs. If you want a dairy-free option, use coconut cream instead of heavy cream. You can also swap all-purpose flour for whole wheat flour for a healthier choice. If you don’t have pumpkin spice, mix cinnamon, nutmeg, and ginger. These changes will still give you tasty scones.

Different Flavor Additions

Adding different flavors can make your scones unique. Nuts like pecans or walnuts add a nice crunch. You can also add dried fruits like cranberries or raisins for a sweet twist. If you love spices, try adding cardamom or cloves. Each choice will change the taste and fun of your scones.

Gluten-Free Version

To make gluten-free scones, use a gluten-free flour blend. Look for a mix that has xanthan gum for binding. Replace the baking powder with gluten-free baking powder. This will help your scones rise well. You might want to add a bit more pumpkin puree to keep them moist. With these swaps, you can enjoy scones without gluten.

Storage Info

Best Practices for Storing Scones

To keep your bakery-style pumpkin chocolate chip scones fresh, store them in an airtight container. This helps to keep them soft and moist. If you want to maintain maximum flavor, place a piece of bread in the container. The bread will absorb any excess moisture and keep your scones chewy. You can store them at room temperature for up to three days. If you want to keep them longer, refrigeration is a good option, but it may dry them out.

Reheating Tips

When you want to enjoy your scones again, reheating is key. Preheat your oven to 350°F (175°C). Wrap each scone in aluminum foil to help retain moisture. Place them in the oven for about 10 minutes. If you prefer a quicker method, you can microwave them for 20-30 seconds. Just be careful not to overheat, or they may become tough.

Freezing for Future Enjoyment

Freezing your scones is a great way to save some for later. First, allow them to cool completely. Then, wrap each scone tightly in plastic wrap and place them in a freezer-safe bag. They can stay in the freezer for up to three months. When you’re ready to eat one, just thaw it in the fridge overnight, then reheat as described above. This way, you can enjoy fresh-tasting scones whenever you like!

FAQs

Can I make these scones ahead of time?

Yes, you can make these scones ahead of time. You can prepare the dough and shape it into wedges. Then wrap it in plastic wrap and store it in the fridge for up to 24 hours. When you are ready to bake, just preheat the oven and bake them straight from the fridge. They will still taste fresh and delicious.

What can I substitute for heavy cream?

You can use milk or a plant-based milk if you want a lighter option. If you need a richer flavor, mix equal parts of milk and melted butter. This will give you a similar texture to heavy cream. Yogurt can also work, but it may change the taste slightly.

How do I know when the scones are done baking?

The scones are done when they turn a golden brown color. They should feel firm to the touch. You can insert a toothpick into the center; if it comes out clean, they are ready. The smell will also be a good clue. They should smell warm and inviting.

Can I use fresh pumpkin instead of canned?

Yes, you can use fresh pumpkin. You will need to cook the pumpkin first. Cut it into pieces, steam or roast it until soft, and then mash it. Make sure to drain any excess water. Fresh pumpkin will add a nice flavor and texture to your scones.

You learned the key ingredients and steps for making perfect scones. I shared tips for choosing quality ingredients and common mistakes to avoid. You can explore fun variations and how to store and freeze scones. Remember, achieving the right texture takes practice. Don’t be afraid to experiment with flavors. Enjoy baking your scones, and make them your own. Happy baking!

- 2 cups all-purpose flour - 1/4 cup granulated sugar - 1 tablespoon baking powder - 1/2 teaspoon baking soda - 1/2 teaspoon salt - 1 tablespoon pumpkin spice - 1/2 cup cold unsalted butter, cut into small cubes - 3/4 cup canned pumpkin puree - 1/4 cup heavy cream - 1 large egg - 1 teaspoon vanilla extract - 3/4 cup semi-sweet chocolate chips - Extra granulated sugar for sprinkling (optional) You will need a few tools to make these scones. Here’s what I recommend: - Large mixing bowl - Whisk - Pastry cutter or fork - Spatula or wooden spoon - Sharp knife or bench scraper - Baking sheet - Parchment paper - Wire rack Choosing the right ingredients is key to perfect scones. Here are my tips: - Flour: Use high-quality all-purpose flour. It gives the scones structure. - Butter: Opt for unsalted butter. Cold butter creates flaky layers. - Pumpkin Puree: Go for canned pumpkin puree. It’s consistent and easy to use. - Chocolate Chips: Use semi-sweet chocolate chips for the best balance of sweetness. - Spices: Fresh pumpkin spice can add a nice kick. Check the date to ensure freshness. With these tips, you can ensure your scones taste amazing! First, preheat your oven to 400°F (200°C). This step is key for great scones. While the oven warms up, prepare a baking sheet. Line it with parchment paper. This helps prevent the scones from sticking. Next, grab a large mixing bowl. In it, whisk together the dry ingredients. Combine 2 cups of all-purpose flour, 1/4 cup of granulated sugar, 1 tablespoon of baking powder, 1/2 teaspoon of baking soda, 1/2 teaspoon of salt, and 1 tablespoon of pumpkin spice. Mix until everything is well combined, with no lumps remaining. Now, let’s add the butter. Take 1/2 cup of cold unsalted butter and cut it into small cubes. Add the butter to your dry mixture. Use a pastry cutter or your fingers to blend it in. You want the mixture to look like coarse crumbs, with some pea-sized pieces of butter still visible. In a separate bowl, combine the wet ingredients. Whisk 3/4 cup of canned pumpkin puree, 1/4 cup of heavy cream, 1 large egg, and 1 teaspoon of vanilla extract. Mix until smooth. This blend is what gives the scones their rich flavor and moist texture. Carefully pour the wet mixture into the dry ingredients. Use a spatula or wooden spoon to stir gently. Mix until just combined. Be careful not to overmix; this could make your scones tough. Once mixed, turn the dough onto a lightly floured surface. Pat it down into a circle about 1-inch thick. Use a sharp knife to cut the dough into 8 wedges. If you prefer, you can use a round cutter to make individual scones. Transfer the scones to your prepared baking sheet. For a nice finish, brush the tops with a bit of extra cream. You can sprinkle some granulated sugar on top as well. Bake in your preheated oven for 15-18 minutes. They should be golden brown and firm. Let them cool on a wire rack for a few minutes before serving. Enjoy them warm for the best taste! To get the best scone texture, start with cold butter. This helps create flaky layers. Cut the butter into small cubes before mixing. Use your fingers or a pastry cutter to blend it into the flour. Stop when it looks like coarse crumbs. This keeps the scones light and airy. One big mistake is overmixing the dough. When you combine wet and dry ingredients, mix gently. You want to see some dry flour. Overmixing makes scones tough. Another mistake is skipping the cold butter. Warm butter leads to dense scones. Always keep it cold for the best results. Using pumpkin spice is key for flavor. It adds warmth and depth. Feel free to adjust the amount to fit your taste. You can also add cinnamon or nutmeg for a twist. If you want more chocolate flavor, try dark chocolate chips instead. This small change can make a big difference in taste. {{image_4}} You can change some ingredients to make these scones fit your needs. If you want a dairy-free option, use coconut cream instead of heavy cream. You can also swap all-purpose flour for whole wheat flour for a healthier choice. If you don't have pumpkin spice, mix cinnamon, nutmeg, and ginger. These changes will still give you tasty scones. Adding different flavors can make your scones unique. Nuts like pecans or walnuts add a nice crunch. You can also add dried fruits like cranberries or raisins for a sweet twist. If you love spices, try adding cardamom or cloves. Each choice will change the taste and fun of your scones. To make gluten-free scones, use a gluten-free flour blend. Look for a mix that has xanthan gum for binding. Replace the baking powder with gluten-free baking powder. This will help your scones rise well. You might want to add a bit more pumpkin puree to keep them moist. With these swaps, you can enjoy scones without gluten. To keep your bakery-style pumpkin chocolate chip scones fresh, store them in an airtight container. This helps to keep them soft and moist. If you want to maintain maximum flavor, place a piece of bread in the container. The bread will absorb any excess moisture and keep your scones chewy. You can store them at room temperature for up to three days. If you want to keep them longer, refrigeration is a good option, but it may dry them out. When you want to enjoy your scones again, reheating is key. Preheat your oven to 350°F (175°C). Wrap each scone in aluminum foil to help retain moisture. Place them in the oven for about 10 minutes. If you prefer a quicker method, you can microwave them for 20-30 seconds. Just be careful not to overheat, or they may become tough. Freezing your scones is a great way to save some for later. First, allow them to cool completely. Then, wrap each scone tightly in plastic wrap and place them in a freezer-safe bag. They can stay in the freezer for up to three months. When you’re ready to eat one, just thaw it in the fridge overnight, then reheat as described above. This way, you can enjoy fresh-tasting scones whenever you like! Yes, you can make these scones ahead of time. You can prepare the dough and shape it into wedges. Then wrap it in plastic wrap and store it in the fridge for up to 24 hours. When you are ready to bake, just preheat the oven and bake them straight from the fridge. They will still taste fresh and delicious. You can use milk or a plant-based milk if you want a lighter option. If you need a richer flavor, mix equal parts of milk and melted butter. This will give you a similar texture to heavy cream. Yogurt can also work, but it may change the taste slightly. The scones are done when they turn a golden brown color. They should feel firm to the touch. You can insert a toothpick into the center; if it comes out clean, they are ready. The smell will also be a good clue. They should smell warm and inviting. Yes, you can use fresh pumpkin. You will need to cook the pumpkin first. Cut it into pieces, steam or roast it until soft, and then mash it. Make sure to drain any excess water. Fresh pumpkin will add a nice flavor and texture to your scones. You learned the key ingredients and steps for making perfect scones. I shared tips for choosing quality ingredients and common mistakes to avoid. You can explore fun variations and how to store and freeze scones. Remember, achieving the right texture takes practice. Don't be afraid to experiment with flavors. Enjoy baking your scones, and make them your own. Happy baking!

Bakery-Style Pumpkin Chocolate Chip Scones

Indulge in the deliciousness of Bakery-Style Pumpkin Chocolate Chip Scones! This easy recipe guides you through creating soft, flaky scones packed with pumpkin flavor and chocolate chips, perfect for any fall gathering or cozy morning. With simple ingredients and straightforward steps, you'll have these mouthwatering treats ready in no time. Click through to discover the full recipe and elevate your baking game today!

Ingredients
  

2 cups all-purpose flour

1/4 cup granulated sugar

1 tablespoon baking powder

1/2 teaspoon baking soda

1/2 teaspoon salt

1 tablespoon pumpkin spice (or more for extra flavor)

1/2 cup cold unsalted butter, cut into small cubes

3/4 cup canned pumpkin puree

1/4 cup heavy cream

1 large egg

1 teaspoon vanilla extract

3/4 cup semi-sweet chocolate chips

Extra granulated sugar for a sprinkle on top (optional)

Instructions
 

Preheat the Oven: Preheat your oven to 400°F (200°C). Prepare a baking sheet by lining it with parchment paper to prevent sticking.

    Mix Dry Ingredients: In a large mixing bowl, whisk together the flour, granulated sugar, baking powder, baking soda, salt, and pumpkin spice until all ingredients are well combined and no lumps remain.

      Incorporate Butter: Add the cold, cubed butter into the dry mixture. Use a pastry cutter, fork, or your fingertips to blend the butter into the flour mixture until it resembles coarse crumbs with some small pea-sized pieces remaining.

        Combine Wet Ingredients: In another bowl, whisk the pumpkin puree, heavy cream, egg, and vanilla extract together until smooth and well mixed. This ensures a rich and creamy texture in the scones.

          Combine Wet and Dry: Carefully pour the wet mixture into the dry ingredients. Using a spatula or wooden spoon, stir gently until just combined. Be cautious not to overmix, as this could result in tough scones.

            Fold in Chocolate Chips: Gently fold in the semi-sweet chocolate chips, distributing them evenly throughout the dough without overworking it.

              Shape the Scones: Turn the dough out onto a lightly floured surface. Pat it into a circle about 1-inch thick. Use a sharp knife or a bench scraper to cut the dough into 8 even wedges, or use a round cutter for individual scones.

                Transfer to Baking Sheet: Carefully place the scones onto the prepared baking sheet. To enhance their look and crunch, brush the tops lightly with some extra cream and sprinkle with granulated sugar, if desired.

                  Bake: Bake in the preheated oven for 15-18 minutes, or until the scones are golden brown and firm to the touch. They should smell heavenly!

                    Cool and Serve: Remove the scones from the oven and allow them to cool on a wire rack for a few minutes. Serve them warm for the best texture and flavor.

                      Prep Time: 15 mins | Total Time: 35 mins | Servings: 8 scones

                        - Presentation Tips: Serve the scones warm, optionally drizzling with melted chocolate or adding a dollop of whipped cream alongside. Dusting them with powdered sugar before serving adds a lovely decorative touch. Enjoy your delightful treat!

                          WANT TO SAVE THIS RECIPE?

                          Leave a Comment

                          Recipe Rating