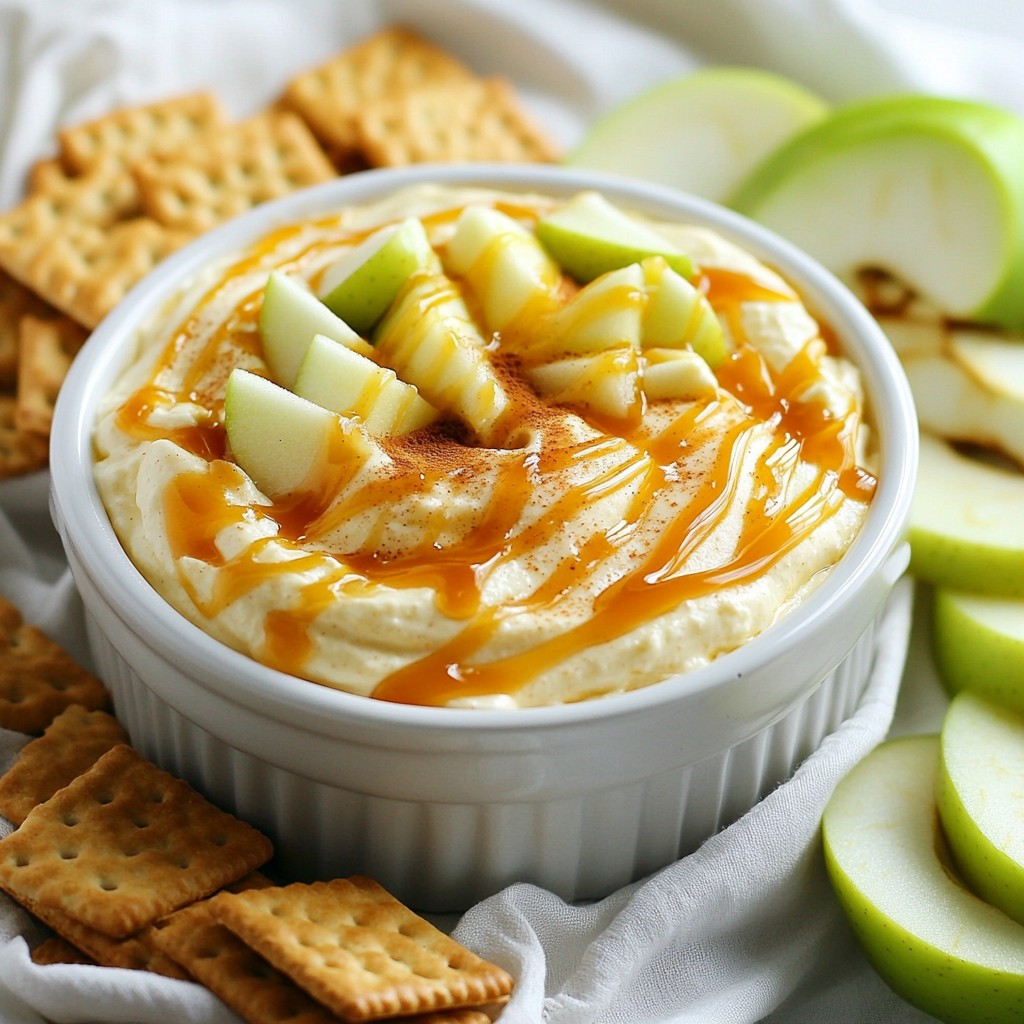
Get ready to impress your friends at your next gathering with this easy and delicious Caramel Apple Cheesecake Dip! I’ll walk you through the simple steps to create a creamy, sweet dip that pairs perfectly with crunchy apples. With a few easy ingredients and tips, you’ll have a dessert that feels special without the stress. Let’s dive into this fun recipe that everyone will love!
Why I Love This Recipe
- Delicious Flavor Combination: The mix of creamy cheesecake, tart apples, and sweet caramel creates a delightful balance that is irresistible.
- Easy to Prepare: This dip comes together quickly, making it a perfect choice for last-minute gatherings or parties.
- Versatile Serving Options: Serve it with graham crackers or fresh apple slices, allowing guests to customize their dipping experience.
- Perfect for Any Occasion: Whether it’s a fall get-together or a casual snack, this dip is sure to impress and satisfy everyone.
Ingredients
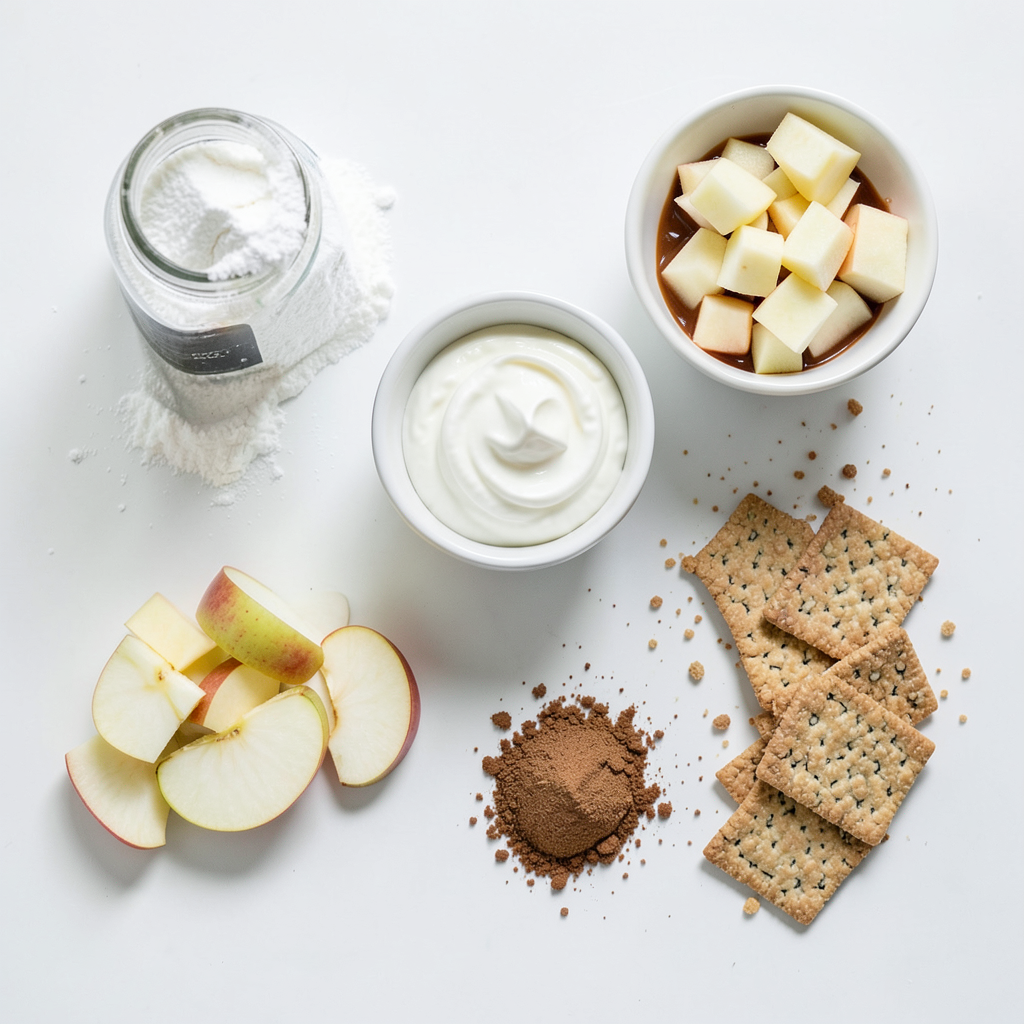
List of Required Ingredients
To make this tasty caramel apple cheesecake dip, you need the following items:
- 8 oz cream cheese, softened to room temperature
- 1/2 cup powdered sugar
- 1 teaspoon pure vanilla extract
- 1/2 cup sour cream
- 1/2 cup caramel sauce, plus extra for drizzling
- 1 cup finely diced apples
- 1/2 teaspoon ground cinnamon
- Graham crackers or fresh apple slices for dipping
Substitutions for Ingredients
You can swap some ingredients if needed. Here are my suggestions:
- Use Greek yogurt instead of sour cream for a lighter dip.
- If you don’t have powdered sugar, granulated sugar works too. Just blend it well.
- For a dairy-free version, try vegan cream cheese.
Recommended Apples for Best Flavor
The type of apple you choose makes a big difference. I recommend using:
- Granny Smith apples for their tart and crunchy flavor.
- Honeycrisp apples give a sweet twist and good texture.
- Fuji apples are also sweet and crisp, perfect for this dip.
Choosing the right apple enhances the taste and makes it even more delicious. Enjoy creating this dip with these wonderful ingredients!
Step-by-Step Instructions
Preparation of Cream Cheese Mixture
Start by taking your cream cheese out of the fridge. Let it sit until it is soft. This helps it mix well. In a large bowl, use an electric mixer. Beat the cream cheese on medium speed. Do this for about 2-3 minutes. The goal is to make it smooth and fluffy. Next, sprinkle in the powdered sugar. Mix until it blends into a creamy texture. After that, add the vanilla extract and sour cream. Mix on low speed for 1-2 minutes. You want everything to be smooth and well-blended.
Incorporating Caramel and Apples
Now it's time to add the star ingredients. Carefully pour in the caramel sauce. Mix until it is fully combined with the cream cheese mixture. This will give your dip a sweet and rich flavor. Once mixed, gently fold in the finely diced apples. Use a spatula to do this. Make sure the apples are coated well. Add the ground cinnamon for a warm touch. Be gentle to avoid breaking the apples.
Serving and Chilling Method
Spoon the dip into a beautiful serving bowl. Drizzle some extra caramel sauce on top for a nice look. For the best taste, chill the dip in the fridge for at least 30 minutes. This helps all the flavors blend nicely. When ready to serve, place graham crackers or fresh apple slices around the bowl. This makes it fun and easy to dip. Enjoy your creamy, sweet, and tart treat!
Tips & Tricks
How to Achieve the Best Texture
To get the best texture for your dip, start with room temperature cream cheese. This makes mixing easier. Beat the cream cheese until it is smooth and fluffy. Take about 2-3 minutes. Add powdered sugar slowly, mixing well. This ensures a creamy dip. When you add sour cream, mix on low speed for a smooth blend. After adding caramel, fold in the apples gently. This keeps them intact and crunchy.
Presentation Ideas for Serving
For a beautiful presentation, choose a fun bowl. A clear glass bowl shows off the dip's creamy layers. Add a light sprinkle of cinnamon on top. Place extra diced apples around the bowl. This adds color and makes it inviting. For dipping, arrange graham crackers and apple slices neatly. This makes your spread look delightful and ready to enjoy.
Storing Leftovers or Making Ahead
You can make this dip a day ahead. Simply store it in the fridge. This lets the flavors blend well. If you have leftovers, keep them in an airtight container. The dip stays fresh for up to three days. Always stir before serving again for a smooth texture.
Pro Tips
- Use Room Temperature Cream Cheese: Allowing the cream cheese to soften at room temperature ensures a smoother, creamier dip without lumps.
- Choose the Right Apples: Granny Smith apples are recommended for a tart contrast against the sweetness of the caramel and cream cheese.
- Chill Before Serving: Chilling the dip for at least 30 minutes enhances the flavors and makes it easier to scoop.
- Presentation Matters: Garnish with extra caramel and a sprinkle of cinnamon for a beautiful and inviting presentation that will entice guests.
Variations
Adding Nuts or Spices
You can easily change the flavor of your dip. Adding nuts can give it a nice crunch. Try chopped walnuts or pecans. They add a rich taste and texture. You can also sprinkle in some spices. A dash of nutmeg or extra cinnamon can boost the flavor. Simply mix them in when you fold in the apples. This way, you can make your dip unique and tasty.
Alternative Dipping Options
The fun part of this dip is how you serve it. While graham crackers are great, try using pretzels for a salty twist. Fresh apple slices are also a perfect match. You can use pear slices too. If you want something sweet, use cookies like vanilla wafers. Each dipper brings a different taste, making it more enjoyable. This lets everyone find their favorite way to enjoy the dip.
Healthier Versions of the Dip
You can make this dip healthier without losing flavor. Swap the cream cheese for Greek yogurt. It’s lower in fat and adds protein. You can also use honey instead of powdered sugar. This adds sweetness while being a bit more natural. For a lower-calorie caramel sauce, look for sugar-free options. These changes keep the dip delicious while being better for you. Enjoy a guilt-free treat that still tastes great!
Storage Info
Proper Storage Techniques
To keep your caramel apple cheesecake dip fresh, store it in an airtight container. This helps prevent it from drying out or absorbing other flavors from your fridge. Make sure to cover the dip tightly. If you have leftovers, you can keep them in the fridge for easy snacking later.
Freezing Guidelines
You can freeze this dip, but the texture may change. To freeze, place the dip in a freezer-safe container. Leave some space at the top for expansion. When you want to enjoy it again, thaw it in the fridge overnight. After thawing, give it a good stir before serving.
Shelf Life and Quality Tips
The dip lasts about 3-5 days in the fridge. For the best taste, eat it within the first couple of days. Keep an eye on the apples; they may brown over time. If you notice any off smells or changes in texture, it’s best to toss it out. Enjoy your dip while it’s fresh for the best flavor!
FAQs
Can I make it vegan?
Yes, you can make this dip vegan! Use vegan cream cheese instead of regular cream cheese. For the sour cream, pick a plant-based option or use coconut cream. Swap the caramel sauce for a vegan version too. These changes keep the dip creamy and sweet without dairy.
What can I substitute for cream cheese?
If you don’t have cream cheese, try using Greek yogurt or silken tofu. Both give a nice texture. For a sweeter taste, use mascarpone cheese. Each of these options keeps the dip smooth and tasty.
How do I prevent the apples from browning?
To stop the apples from browning, soak them in lemon juice or a mix of water and vinegar. You can also toss them in a bit of saltwater for a quick fix. This keeps the apples fresh and bright in your dip.
This blog post guides you through making a delicious apple dip. You learned about essential ingredients, tasty substitutions, and the best apples for flavor. I provided clear steps for preparation, mixing, and serving. You also discovered useful tips for texture and presentation, plus storage info to keep your dip fresh.
In the end, enjoy experimenting with variations to tailor the dip to your taste. There's no right or wrong way to make it. Get creative, have fun, and enjoy sharing it with friends and family!