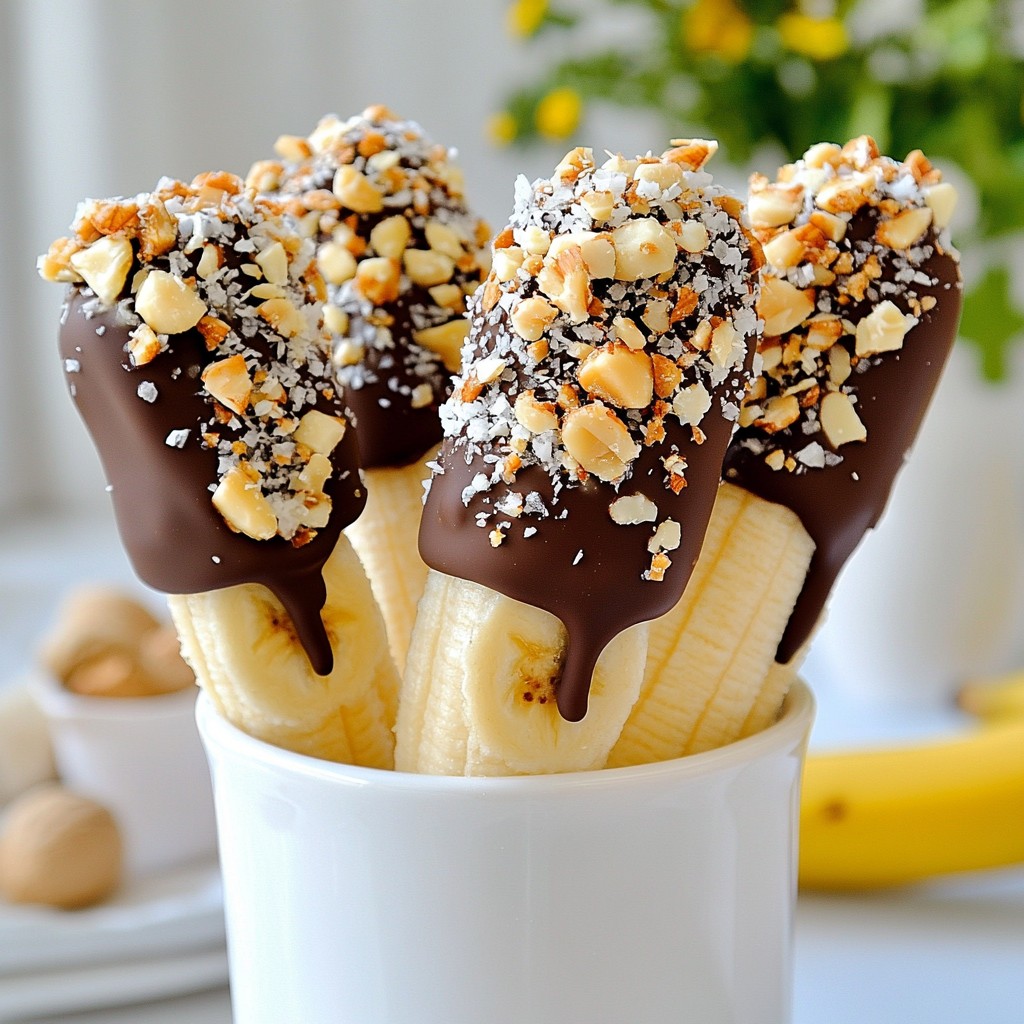
Want a fun and easy treat? Chocolate Covered Banana Pops are your answer! These tasty delights are simple to make and perfect for any occasion. I’ll guide you through every step, from choosing ingredients to tips for the best chocolate coating. Whether you're looking for a sweet snack or a party hit, these pops will impress everyone. Let’s dive into this deliciously easy recipe that you and your family will love!
Error: Error code: 429 - {'error': {'message': 'You exceeded your current quota, please check your plan and billing details. For more information on this error, read the docs: https://platform.openai.com/docs/guides/error-codes/api-errors.', 'type': 'insufficient_quota', 'param': None, 'code': 'insufficient_quota'}}
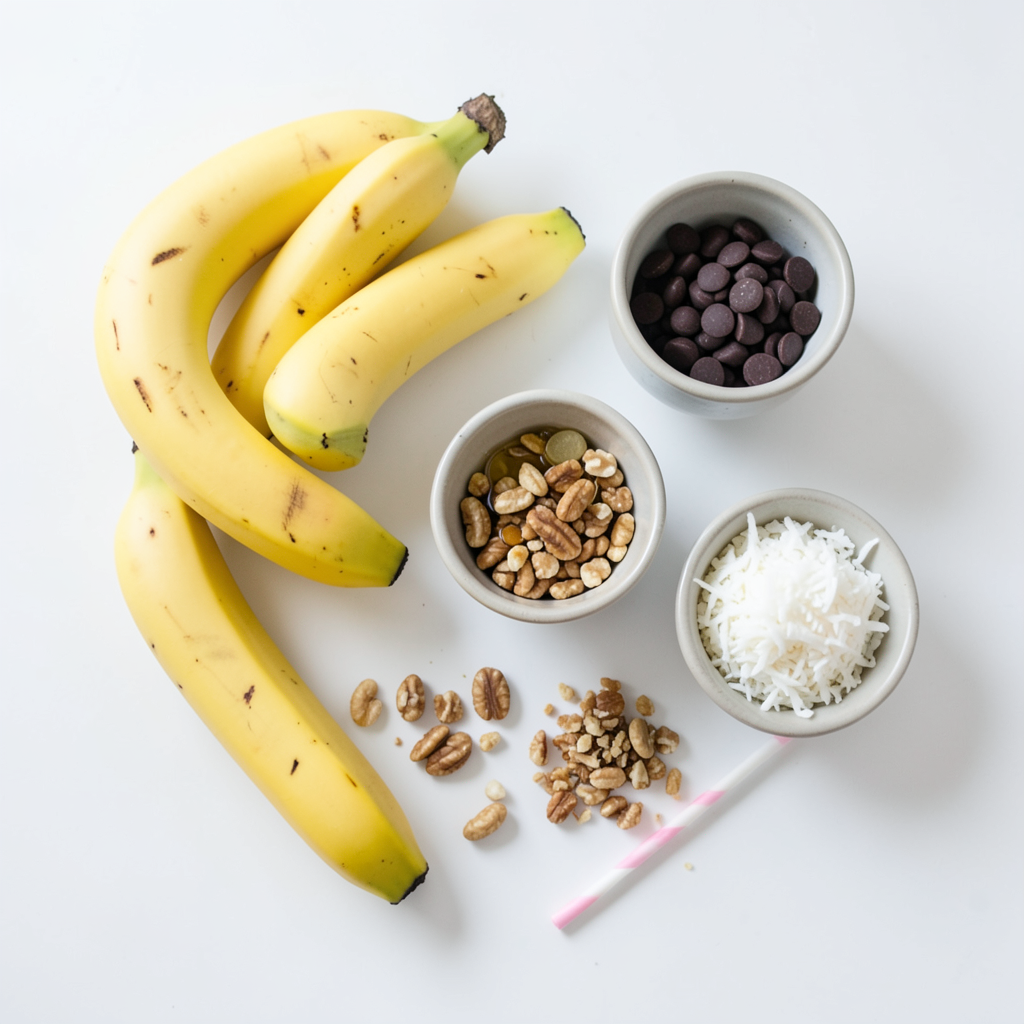
Ingredients
Complete Ingredient List
To make chocolate covered banana pops, you need the following ingredients:
- 2 ripe bananas
- 1 cup dark chocolate chips
- 1 tablespoon coconut oil
- 1/2 cup crushed nuts (almonds or peanuts work beautifully)
- 1/2 cup shredded coconut (optional but adds a tropical flair)
- 4 lollipop sticks or wooden skewers
Ingredient Substitutions
You can swap some ingredients if needed. Use milk chocolate chips instead of dark chocolate. This makes the pops sweeter and creamier. If you don’t have coconut oil, any neutral oil works too. You may also skip the nuts and coconut if you prefer a simple treat.
Optional Add-ins for Customization
Make your banana pops more fun! Try adding peanut butter or Nutella before coating them in chocolate. You can also sprinkle sea salt on top for a sweet and salty mix. Want a fruity twist? Dip in melted white chocolate and roll in crushed freeze-dried strawberries.
Step-by-Step Instructions
Detailed Preparation Instructions
First, peel the bananas. Slice them into 1-inch thick discs. These pieces will be your banana pops. Next, take your lollipop sticks or wooden skewers. Gently insert them into each banana slice halfway. This step helps the bananas stay on the sticks.
Tips for Melting Chocolate Perfectly
To melt the chocolate, use a microwave-safe bowl. Combine the dark chocolate chips with the coconut oil. Microwave this mixture in 30-second bursts. Stir well after each time to keep it smooth. The chocolate should be fully melted and glossy when done.
Assembly and Freezing Instructions
Now it's time to dip your banana slices. Take each slice and dip it into the melted chocolate. Make sure to coat each piece well. Let any extra chocolate drip back into the bowl. You can then roll your chocolate-covered banana in crushed nuts or shredded coconut. This adds a nice crunch.
Place the coated banana pops on a lined baking sheet. Once all slices are coated, put the sheet in the freezer. Let them chill for at least one hour. This step makes the chocolate harden. After that, enjoy your tasty treats right away! You can store extras in an airtight container in the freezer for later.
Tips & Tricks
How to Make Smooth Chocolate Coating
To achieve a smooth chocolate coating, start with high-quality chocolate chips. I prefer dark chocolate, but you can choose your favorite. Mix in a tablespoon of coconut oil. This oil makes the chocolate silky and shiny. Melt the chocolate gently in the microwave. Use short bursts, about 30 seconds each. Stir after every round. When it’s smooth, you can dip your banana slices. Make sure they are fully covered. This method helps the chocolate to stick well.
Best Practices for Storing Leftovers
If you have extra banana pops, store them in an airtight container. Use wax paper to separate layers. This way, they won’t stick together. Keep the container in the freezer. They stay fresh for up to two weeks. To enjoy them later, take a pop out and let it sit for a minute. This softens the chocolate just enough to bite into.
Serving Suggestions for Maximum Enjoyment
For a fun presentation, stand the pops in a tall glass. You can also arrange them on a nice plate. Add a small bowl of extra toppings like crushed nuts or shredded coconut. This gives your guests a chance to customize their pops. Sharing is more fun when everyone can dip and enjoy their way!
Error: Error code: 429 - {'error': {'message': 'You exceeded your current quota, please check your plan and billing details. For more information on this error, read the docs: https://platform.openai.com/docs/guides/error-codes/api-errors.', 'type': 'insufficient_quota', 'param': None, 'code': 'insufficient_quota'}}
Variations
Flavor Combinations (Peanut Butter, White Chocolate)
You can switch up the flavor of your banana pops easily. For a nutty twist, add peanut butter. Just mix some peanut butter into the melted chocolate. This gives a creamy texture and a rich taste. You can also try white chocolate. It adds a sweet and smooth flavor that pairs well with bananas.
Different Toppings for Unique Twists
Toppings can change the game for your banana pops. Try using crushed graham crackers for a s'mores vibe. You can also use sprinkles for a fun and colorful touch. For a healthy option, opt for chia seeds or hemp hearts. Each topping gives a unique crunch and flavor, making them fun to eat.
Adaptations for Dietary Preferences (Vegan, Gluten-Free)
This recipe is easy to adapt for different diets. For vegan options, choose dairy-free chocolate chips. They work just as well and keep the pops tasty. If you need gluten-free options, all the toppings can be gluten-free. Just check labels to be safe. This way, everyone can enjoy chocolate-covered banana pops!
Storage Info
How to Store Banana Pops for Freshness
To keep your chocolate covered banana pops fresh, store them in an airtight container. This helps prevent freezer burn and keeps them tasty. You can layer parchment paper between pops to avoid sticking. Make sure to seal the container well before putting it in the freezer.
Freezer Storage Tips
For best results, freeze your banana pops right after making them. Place them on a baking sheet and freeze for at least one hour. Once set, transfer them to the airtight container. They can last up to three months in the freezer. Just remember to keep them away from strong odors, as bananas can soak up smells.
Shelf Life and Signs of Spoilage
When stored correctly, these banana pops can last for several weeks. However, watch for signs of spoilage. If you see frost or ice crystals, the pops may not taste as good. You should also check for any off smells. If they smell funny or look discolored, it’s best to toss them. Always trust your senses when it comes to food!
FAQs
Can I use milk chocolate instead of dark chocolate?
Yes, you can use milk chocolate. It will taste sweeter. Just melt it like dark chocolate. The method stays the same. Milk chocolate adds a nice creaminess. If you love sweet treats, this is a great choice.
How long do chocolate covered banana pops last in the freezer?
Chocolate covered banana pops last about two months in the freezer. Make sure to store them in an airtight container. This keeps them fresh and tasty. You can enjoy them anytime you crave a sweet snack. Just remember to eat them before they lose their flavor!
Can I use different fruits for this recipe?
Absolutely! You can use strawberries, apples, or even pineapple. Just cut them into bite-sized pieces. The method for dipping and freezing stays the same. This way, you can make a fun fruit assortment! Each fruit will give a new taste and texture.
In this post, we covered the ingredients, instructions, and tips for making chocolate-covered banana pops. You learned about ingredient substitutions and fun add-ins. We also shared how to store your delicious treats and explored tasty variations.
Remember, the choices you make can change the flavor and fun. Try different toppings or fruits for a new experience each time. Enjoy creating your pops and sharing them with friends and family.