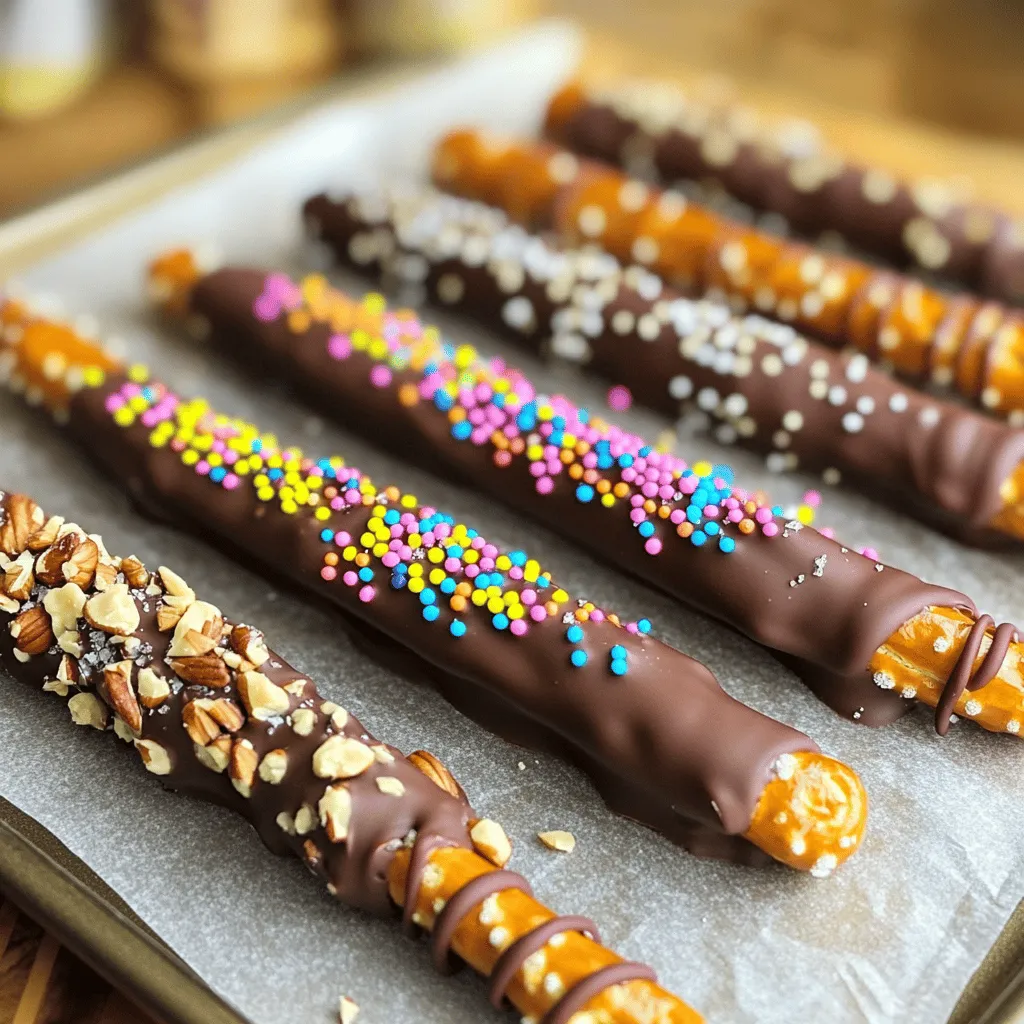
Looking to impress guests or enjoy a tasty treat? You’ll love making chocolate-dipped pretzel rods! This easy and fun recipe gives you sweet and salty goodness in each bite. With just a few simple steps and ingredients, you can create these delightful snacks that are perfect for any occasion. Get ready to dive into this delicious world of chocolate and pretzels! Let’s get started!
Ingredients
List of Ingredients
– 1 cup pretzel rods
– 1 cup semi-sweet chocolate chips
– 1 tablespoon coconut oil
– 1/2 cup crushed nuts (almonds, peanuts, or hazelnuts)
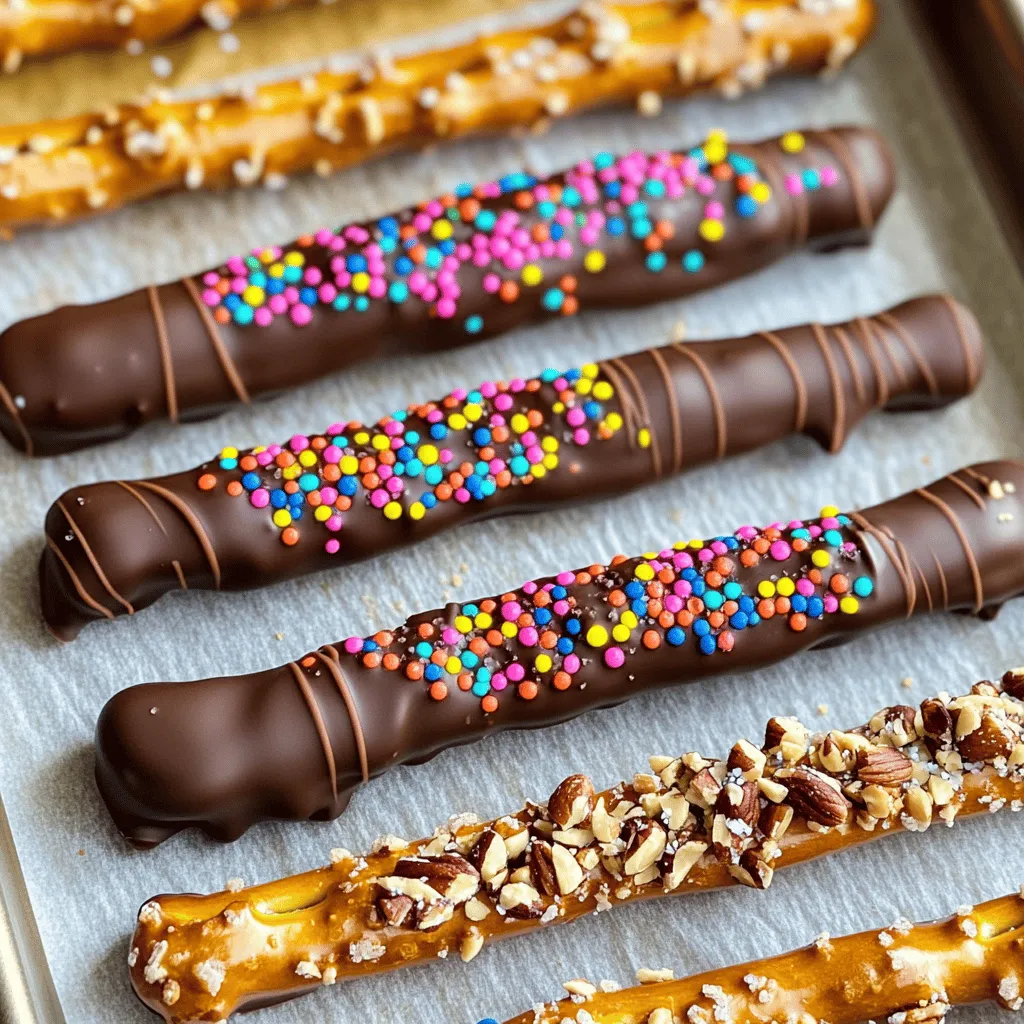
– 1/2 cup colorful sprinkles
– Sea salt
When making chocolate dipped pretzel rods, gather all your ingredients first. This will help you stay organized. You need pretzel rods as your base. The chocolate is the star, so use semi-sweet chips for a rich taste.
Adding coconut oil makes the chocolate smooth and shiny. Crushed nuts give a nice crunch and flavor. Colorful sprinkles add fun and excitement to the look. Finally, a sprinkle of sea salt enhances the sweetness.
Recommended Tools
– Microwave-safe bowl
– Baking sheet
– Parchment paper
– Spoon for dipping
Having the right tools is key to success. Use a microwave-safe bowl to melt your chocolate. A baking sheet is needed for setting your pretzel rods. Parchment paper helps prevent sticking and makes cleanup easy.
A simple spoon works best for dipping the pretzels. It helps you coat them evenly without a mess. With these ingredients and tools ready, you are set to create a tasty treat.
Step-by-Step Instructions
Preparing the Workspace
Start by preparing your workspace. First, line a baking sheet with parchment paper. This step is key for easy removal later. The parchment paper keeps the pretzel rods from sticking. You will thank yourself during cleanup!
Melting the Chocolate
Next, you need to melt the chocolate. Combine the chocolate chips and coconut oil in a microwave-safe bowl. This mix helps the chocolate stay smooth. Heat it in the microwave using 30-second intervals. Stir well after each interval. Keep going until the chocolate is silky and fully melted.
Dipping the Pretzel Rods
Now for the fun part—dipping the pretzel rods! Take each pretzel rod and dip it into the melted chocolate. Make sure it’s fully coated. If you have trouble coating it evenly, use a spoon to help out. This will give a nice, thick coat of chocolate.
Decorating the Rods
After dipping, it’s time to decorate! You can roll half of the chocolate-covered pretzel in crushed nuts. Roll the other half in colorful sprinkles. This makes for a fun and tasty look. If you want, you can also sprinkle a little sea salt on top. It adds a nice touch.
Setting the Chocolate
Once all the pretzel rods are dipped and decorated, place them on the lined baking sheet. Now, it’s time to let the chocolate set. Put the baking sheet in the refrigerator for about 30 minutes. This step helps the chocolate harden perfectly. When it’s done, you will have a tasty treat ready to enjoy!
Tips & Tricks
Ensuring a Smooth Dip
To get a smooth dip, you need the right chocolate consistency. Melt the chocolate chips with coconut oil. The oil helps the chocolate stay smooth and shiny. Heat it in short bursts, like 30 seconds at a time. Stir after each burst. The chocolate should be silky, not clumpy.
Avoiding Chocolate Seizing
Chocolate can seize up if it gets too hot or if water touches it. Always keep your bowl dry. Make sure no steam escapes from the microwave. If your chocolate starts to clump, don’t panic! Add a splash of coconut oil and stir until it softens again.
Enhancing Visual Appeal
Make your pretzel rods stand out! Use colorful sprinkles or crushed nuts for a fun look. You can serve them in a jar with a ribbon or on a fancy stand. This adds charm to your snack. The more colorful, the better!
Variations
Flavor Combinations
You can change the chocolate type to mix things up. Use white chocolate for a sweet twist. Dark chocolate gives a rich flavor. Milk chocolate is a classic favorite. Each type brings its own taste. You can also add flavor extracts. Try peppermint or orange zest for fun!
Toppings Options
Think about different toppings to add texture and taste. Chopped nuts like almonds or peanuts work well. You can also use crushed pretzels for crunch. Sprinkles add color and fun. Don’t forget about mini chocolate chips! They can add extra sweetness.
Themed Pretzel Rods
Make your pretzel rods fit any occasion. Use red and green sprinkles for Christmas. For Halloween, dip them in orange chocolate! Use pastel colors for Easter. Birthday parties can have colorful sprinkles. Themed pretzel rods can be a great gift or snack!
Storage Info
Best Storage Practices
To keep your chocolate dipped pretzel rods fresh, store them in an airtight container. Use a container that allows enough space so they don’t touch each other. If they are stacked, use parchment paper between layers to prevent sticking. This simple step helps maintain their crispness and keeps the chocolate intact.
Shelf Life
Chocolate dipped pretzel rods stay fresh for about 1 to 2 weeks. After that, they may lose some crunch and flavor. Make sure to check for any signs of moisture or off smells. If stored properly, you can enjoy them for days!
Freezing Options
You can freeze these treats for longer storage. To do this, wrap each pretzel rod individually in plastic wrap. Place them in a freezer-safe bag or container. When you want to enjoy them, simply take out the desired number and let them thaw at room temperature. This method keeps the chocolate and pretzels tasty for later enjoyment.
FAQs
How do I make chocolate-dipped pretzel rods?
To make chocolate-dipped pretzel rods, follow these simple steps:
1. Prepare your workspace. Line a baking sheet with parchment paper.
2. Melt chocolate. In a microwave-safe bowl, combine chocolate chips and coconut oil. Heat in 30-second intervals until smooth.
3. Dip pretzels. Carefully dip each pretzel rod into the melted chocolate. Use a spoon if needed.
4. Add toppings. Roll half of the chocolate-dipped pretzel in crushed nuts and the other half in sprinkles.
5. Sprinkle sea salt. Before the chocolate sets, sprinkle a pinch of sea salt on top.
6. Chill to set. Place the baking sheet in the fridge for about 30 minutes until the chocolate hardens.
This method yields delicious treats.
Can I use different types of chocolate?
Yes, you can use various types of chocolate. Milk chocolate, dark chocolate, and white chocolate all work well. Each type offers a unique flavor. Dark chocolate adds a rich taste, while milk chocolate is sweeter. White chocolate brings a creamy touch. You can mix and match for fun flavor combinations. Just remember to adjust your melting method as needed.
Where can I buy pre-made chocolate-dipped pretzel rods?
You can find pre-made chocolate-dipped pretzel rods at many stores. Look in the snack aisle or the bakery section. Specialty candy shops often sell them too. Online retailers like Amazon have a variety of options. Local bakeries may offer fresh, made-to-order versions. These options save time and are great for gifts or parties.
We explored how to make delicious chocolate-dipped pretzel rods. You learned the ingredients, tools, and steps needed for this fun treat. We shared tips for a smooth dip and some tasty variations too. Remember, you can use different chocolates and toppings to make them unique. Storage tips ensure they stay fresh for your enjoyment. Now, grab your ingredients and get started. Your tasty treats await!