Chocolate Peppermint Whoopie Pies Irresistible Treat

WANT TO SAVE THIS RECIPE?

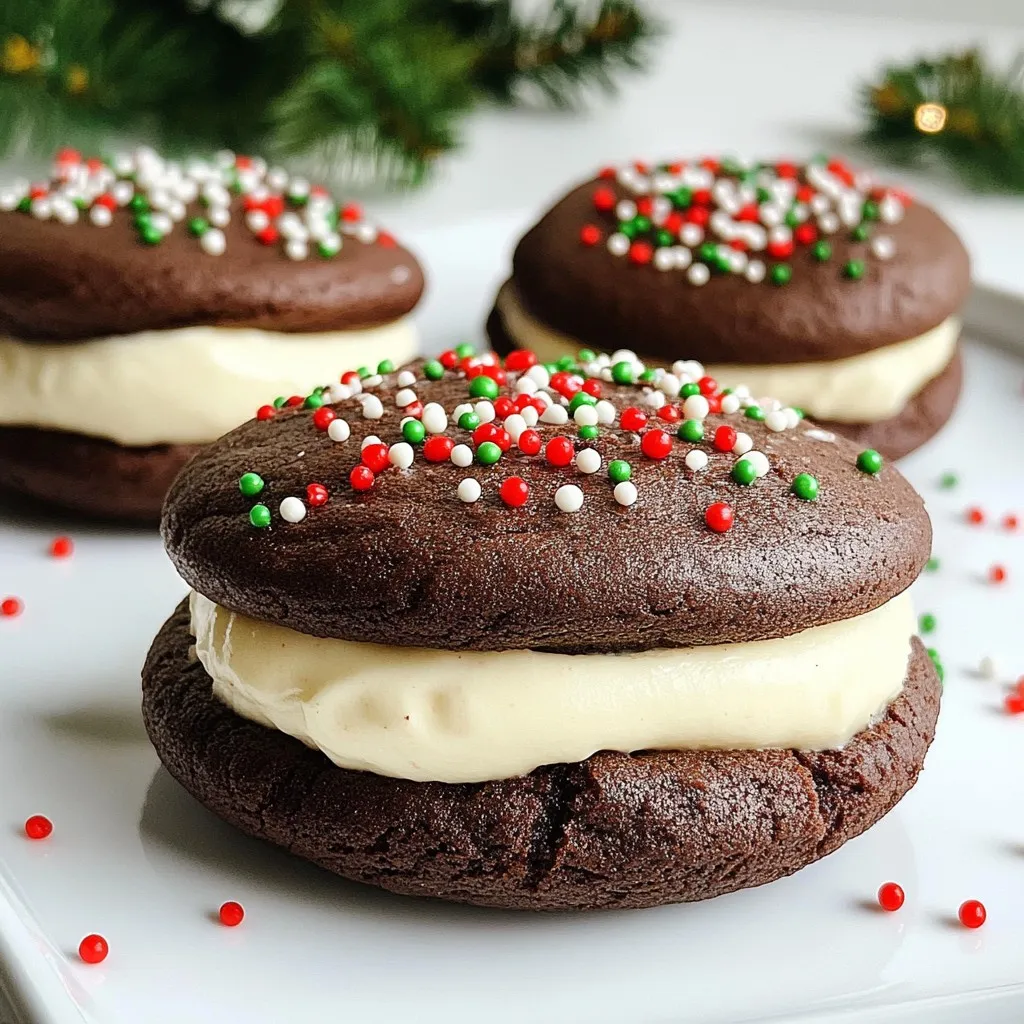
Get ready to indulge in a chocolate lover’s dream! Chocolate Peppermint Whoopie Pies are a delightful treat that combines rich chocolate cookies with a creamy peppermint filling. This fun twist will brighten your dessert table, especially during the holidays. Whether you’re a baking pro or a beginner, I’ll guide you through every step. Let’s unlock the secrets to this tasty dessert that’ll leave everyone asking for more!

Why I Love This Recipe

  1. Delicious Flavor Combination: The rich chocolate paired with refreshing peppermint creates a delightful balance that’s perfect for any holiday celebration.
  2. Fun to Make: Assembling these whoopie pies is a fun activity, especially if you involve kids or friends in the process!
  3. Festive Appearance: With their vibrant colors and sprinkles, these whoopie pies are visually appealing and sure to impress your guests.
  4. Great for Sharing: These treats are perfect for parties, gatherings, or as homemade gifts, and they stay fresh in the fridge for a week!
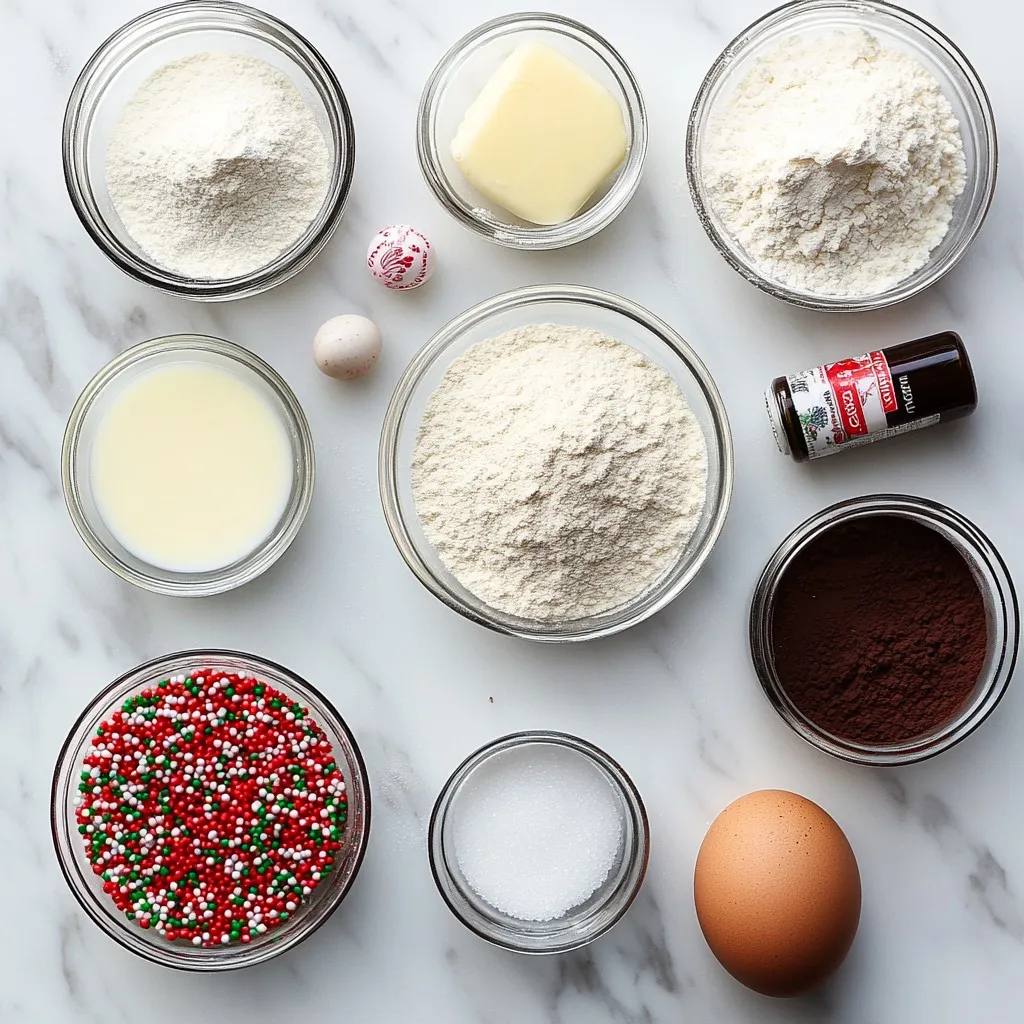
Ingredients

List of Ingredients

– 1 cup all-purpose flour

– 1/3 cup unsweetened cocoa powder

– 1 teaspoon baking soda

– 1/2 teaspoon salt

– 1/2 cup unsalted butter, softened to room temperature

– 1 cup granulated sugar

– 1 large egg

– 1 teaspoon vanilla extract

– 1/2 cup buttermilk

– 1/2 teaspoon peppermint extract

– 1 cup powdered sugar

– 1/4 cup cream cheese, softened

– 2 tablespoons unsalted butter, softened

– 1 teaspoon peppermint extract (for frosting)

– Red and green sprinkles for decoration (optional)

Key Ingredient Notes

The flour gives the whoopie pies their structure. Use all-purpose flour for best results. The cocoa powder adds a rich chocolate flavor. Unsweetened cocoa is key; sweetened may make them too sweet. Butter must be softened. This helps mix easily with sugar.

The egg binds everything together. Use a large egg for the right moisture. Buttermilk makes the cookies soft and tender. The peppermint extract adds that festive flavor we all love.

For the frosting, cream cheese gives a tangy taste. It pairs well with the rich chocolate. Red and green sprinkles add a fun touch. They make your treats stand out!

Substitutions and Alternatives

If you want to make the cookies gluten-free, use a gluten-free flour blend. For a dairy-free version, choose a plant-based butter and milk. You can use vanilla extract instead of peppermint if you prefer a different flavor.

If you don’t have buttermilk, mix regular milk with a bit of vinegar. Let it sit for five minutes to create a buttermilk substitute. For the frosting, you can swap cream cheese with a dairy-free cream cheese alternative.

These swaps keep the joy of whoopie pies while fitting your needs!

Step-by-Step Instructions

Prepping Your Equipment

Start by preheating your oven to 350°F (175°C). This step is key for good baking. Line two baking sheets with parchment paper. This will stop the cookies from sticking. Make sure you have a medium and a large mixing bowl ready. An electric mixer will help you mix better, but a whisk works too.

Mixing the Batter

In your medium bowl, whisk together the dry ingredients. This includes flour, cocoa powder, baking soda, and salt. Make sure it’s well mixed. In the large bowl, cream the softened butter and granulated sugar with your mixer. Beat until it’s light and fluffy. This takes about 2-3 minutes. Next, add in the egg, vanilla extract, and peppermint extract. Mix until everything is well combined.

Now, take the dry ingredients and add them to the wet mix. Do this in parts. Alternate with the buttermilk. Start and end with the dry mix. Stop mixing as soon as it is smooth.

Baking the Cookies

Use a cookie scoop to drop big spoonfuls of the batter onto your baking sheets. Leave space between each scoop. The cookies will spread out while baking. Place them in the oven and bake for 10-12 minutes. The tops should spring back when you touch them. Once baked, let them cool on wire racks.

Making the Frosting

While the cookies cool, let’s make the frosting. In a clean medium bowl, beat the cream cheese and softened butter. Add powdered sugar and peppermint extract. Mix until it’s smooth and creamy. This frosting will be rich and tasty, perfect for your whoopie pies.

Assembling the Whoopie Pies

Once your cookies are cool, flip half of them upside down. Take your frosting and either pipe or spread it on the flat side of each cookie. Then, place another cookie on top, flat side down. This creates a sandwich. If you want, sprinkle red and green sprinkles around the edges for a fun look. Enjoy these tasty treats!

Tips & Tricks

Achieving the Perfect Cookie Texture

To get the right texture in your whoopie pies, mix the butter and sugar well. Cream them for 2-3 minutes until light and fluffy. This step adds air to your dough. Use room-temperature butter for the best result. It helps create a smooth batter. When you combine the wet and dry ingredients, mix just until combined. Overmixing can lead to tough cookies.

Common Baking Mistakes to Avoid

One common mistake is not measuring flour correctly. Too much flour can dry out your cookies. Use the spoon-and-level method to measure flour. Another mistake is underbaking. Make sure the cookies spring back when touched. If they feel soft, they need more time in the oven. Lastly, don’t forget to cool them fully before frosting. Warm cookies can melt your frosting.

How to Ensure Even Baking

For even baking, space your cookies well on the baking sheet. Leave at least 2 inches between each scoop. If your oven has hot spots, rotate the baking sheets halfway through baking. This helps all cookies bake evenly. Use parchment paper to prevent sticking and promote even heat distribution. Always preheat your oven to 350°F. A hot oven is key for perfect whoopie pies.

Pro Tips

  1. Chill the Dough: For a thicker whoopie pie, chill the batter for about 30 minutes before scooping. This helps prevent the cookies from spreading too much while baking.
  2. Use Room Temperature Ingredients: Make sure your butter and cream cheese are at room temperature for easier mixing and a smoother frosting.
  3. Test for Doneness: To check if the cookies are done, gently press the tops; they should spring back. Overbaking can lead to dry whoopie pies.
  4. Experiment with Fillings: Feel free to get creative with the filling! Swap out the cream cheese frosting for a different flavor, like chocolate or vanilla, for a unique twist.

Variations

Flavor Combinations (Mint Chocolate, Vanilla)

You can play with flavors in your whoopie pies. Mint chocolate is a classic choice. The rich chocolate pairs well with the cool taste of peppermint. I suggest adding extra peppermint extract for a stronger mint kick. Another fun option is vanilla. Swap some cocoa powder for extra flour. This makes a lighter cookie. Then, use vanilla extract instead of peppermint for a smoother taste.

Gluten-Free Options

If you need a gluten-free treat, I’ve got you covered. You can use a gluten-free flour blend in place of all-purpose flour. Look for one that has xanthan gum. This helps the cookies hold their shape. The cocoa powder remains the same. The taste stays delicious and rich. Just ensure all other ingredients are gluten-free too.

Vegan Adaptations

Want to make these vegan? It’s easy! Replace butter with coconut oil or a vegan butter substitute. Use a flax egg instead of a large egg. To make a flax egg, mix one tablespoon of flaxseed meal with three tablespoons of water. Let it sit for a few minutes until it thickens. For the frosting, use vegan cream cheese. This keeps the creamy texture while making it plant-based. Enjoy your vegan whoopie pies guilt-free!

Storage Info

How to Store Whoopie Pies

To keep your whoopie pies fresh, store them in an airtight container. This helps lock in moisture. Place parchment paper between the layers if you stack them. It prevents sticking and keeps the frosting intact. You can keep them in the fridge for up to one week. If you want to savor them longer, freezing is the way to go!

Freezing Tips

To freeze whoopie pies, let them cool completely first. Wrap each pie in plastic wrap tightly. Then, place them in a freezer-safe bag or container. Remember to label the bag with the date. These treats can last for up to three months in the freezer. When you’re ready to enjoy, let them thaw in the fridge overnight.

Freshness Timeline

Room Temperature: 2-3 days

Refrigerator: Up to 1 week

Freezer: Up to 3 months

This timeline ensures you enjoy your chocolate peppermint whoopie pies at their best!

FAQs

Can I make these whoopie pies ahead of time?

Yes, you can make these whoopie pies ahead of time. Bake the cookies and let them cool completely. Store them in an airtight container. You can also make the frosting ahead. Just keep it in the fridge until you are ready to assemble. This way, you save time on the day you want to serve them.

What’s the best way to soften cream cheese?

To soften cream cheese, take it out of the fridge. Let it sit at room temperature for about 30 minutes. You can also cut it into small cubes for faster softening. If you need it even quicker, microwave it for about 10 seconds. Just be careful not to melt it.

Can I use milk instead of buttermilk?

Yes, you can use milk instead of buttermilk. If you have regular milk, add a bit of vinegar or lemon juice to it. Use one tablespoon of vinegar or lemon juice for each cup of milk. Let it sit for about five minutes. This will mimic buttermilk’s tangy flavor.

How do I prevent the cookies from sticking?

To prevent the cookies from sticking, always line your baking sheets with parchment paper. This creates a non-stick surface. You can also lightly grease the parchment paper with butter or cooking spray. This extra step helps ensure easy removal after baking.

What can I use instead of peppermint extract?

If you don’t have peppermint extract, you can use mint extract. It gives a similar flavor. You could also use crushed mint candies for a fun twist. Just make sure to chop them finely so they blend well in the frosting.

In this article, we covered making delicious whoopie pies. We discussed ingredients, step-by-step instructions, and helpful tips. You learned about flavor variations and how to store your treats. Remember, baking is fun! Avoid common mistakes and try new combinations. Store your whoopie pies well for the best taste. Keep experimenting and enjoy your baking journey. Happy bakin

- 1 cup all-purpose flour - 1/3 cup unsweetened cocoa powder - 1 teaspoon baking soda - 1/2 teaspoon salt - 1/2 cup unsalted butter, softened to room temperature - 1 cup granulated sugar - 1 large egg - 1 teaspoon vanilla extract - 1/2 cup buttermilk - 1/2 teaspoon peppermint extract - 1 cup powdered sugar - 1/4 cup cream cheese, softened - 2 tablespoons unsalted butter, softened - 1 teaspoon peppermint extract (for frosting) - Red and green sprinkles for decoration (optional) The flour gives the whoopie pies their structure. Use all-purpose flour for best results. The cocoa powder adds a rich chocolate flavor. Unsweetened cocoa is key; sweetened may make them too sweet. Butter must be softened. This helps mix easily with sugar. The egg binds everything together. Use a large egg for the right moisture. Buttermilk makes the cookies soft and tender. The peppermint extract adds that festive flavor we all love. For the frosting, cream cheese gives a tangy taste. It pairs well with the rich chocolate. Red and green sprinkles add a fun touch. They make your treats stand out! If you want to make the cookies gluten-free, use a gluten-free flour blend. For a dairy-free version, choose a plant-based butter and milk. You can use vanilla extract instead of peppermint if you prefer a different flavor. If you don’t have buttermilk, mix regular milk with a bit of vinegar. Let it sit for five minutes to create a buttermilk substitute. For the frosting, you can swap cream cheese with a dairy-free cream cheese alternative. These swaps keep the joy of whoopie pies while fitting your needs! {{ingredient_image_2}} Start by preheating your oven to 350°F (175°C). This step is key for good baking. Line two baking sheets with parchment paper. This will stop the cookies from sticking. Make sure you have a medium and a large mixing bowl ready. An electric mixer will help you mix better, but a whisk works too. In your medium bowl, whisk together the dry ingredients. This includes flour, cocoa powder, baking soda, and salt. Make sure it’s well mixed. In the large bowl, cream the softened butter and granulated sugar with your mixer. Beat until it’s light and fluffy. This takes about 2-3 minutes. Next, add in the egg, vanilla extract, and peppermint extract. Mix until everything is well combined. Now, take the dry ingredients and add them to the wet mix. Do this in parts. Alternate with the buttermilk. Start and end with the dry mix. Stop mixing as soon as it is smooth. Use a cookie scoop to drop big spoonfuls of the batter onto your baking sheets. Leave space between each scoop. The cookies will spread out while baking. Place them in the oven and bake for 10-12 minutes. The tops should spring back when you touch them. Once baked, let them cool on wire racks. While the cookies cool, let’s make the frosting. In a clean medium bowl, beat the cream cheese and softened butter. Add powdered sugar and peppermint extract. Mix until it’s smooth and creamy. This frosting will be rich and tasty, perfect for your whoopie pies. Once your cookies are cool, flip half of them upside down. Take your frosting and either pipe or spread it on the flat side of each cookie. Then, place another cookie on top, flat side down. This creates a sandwich. If you want, sprinkle red and green sprinkles around the edges for a fun look. Enjoy these tasty treats! To get the right texture in your whoopie pies, mix the butter and sugar well. Cream them for 2-3 minutes until light and fluffy. This step adds air to your dough. Use room-temperature butter for the best result. It helps create a smooth batter. When you combine the wet and dry ingredients, mix just until combined. Overmixing can lead to tough cookies. One common mistake is not measuring flour correctly. Too much flour can dry out your cookies. Use the spoon-and-level method to measure flour. Another mistake is underbaking. Make sure the cookies spring back when touched. If they feel soft, they need more time in the oven. Lastly, don’t forget to cool them fully before frosting. Warm cookies can melt your frosting. For even baking, space your cookies well on the baking sheet. Leave at least 2 inches between each scoop. If your oven has hot spots, rotate the baking sheets halfway through baking. This helps all cookies bake evenly. Use parchment paper to prevent sticking and promote even heat distribution. Always preheat your oven to 350°F. A hot oven is key for perfect whoopie pies. Pro Tips Chill the Dough: For a thicker whoopie pie, chill the batter for about 30 minutes before scooping. This helps prevent the cookies from spreading too much while baking. Use Room Temperature Ingredients: Make sure your butter and cream cheese are at room temperature for easier mixing and a smoother frosting. Test for Doneness: To check if the cookies are done, gently press the tops; they should spring back. Overbaking can lead to dry whoopie pies. Experiment with Fillings: Feel free to get creative with the filling! Swap out the cream cheese frosting for a different flavor, like chocolate or vanilla, for a unique twist. {{image_4}} You can play with flavors in your whoopie pies. Mint chocolate is a classic choice. The rich chocolate pairs well with the cool taste of peppermint. I suggest adding extra peppermint extract for a stronger mint kick. Another fun option is vanilla. Swap some cocoa powder for extra flour. This makes a lighter cookie. Then, use vanilla extract instead of peppermint for a smoother taste. If you need a gluten-free treat, I've got you covered. You can use a gluten-free flour blend in place of all-purpose flour. Look for one that has xanthan gum. This helps the cookies hold their shape. The cocoa powder remains the same. The taste stays delicious and rich. Just ensure all other ingredients are gluten-free too. Want to make these vegan? It's easy! Replace butter with coconut oil or a vegan butter substitute. Use a flax egg instead of a large egg. To make a flax egg, mix one tablespoon of flaxseed meal with three tablespoons of water. Let it sit for a few minutes until it thickens. For the frosting, use vegan cream cheese. This keeps the creamy texture while making it plant-based. Enjoy your vegan whoopie pies guilt-free! To keep your whoopie pies fresh, store them in an airtight container. This helps lock in moisture. Place parchment paper between the layers if you stack them. It prevents sticking and keeps the frosting intact. You can keep them in the fridge for up to one week. If you want to savor them longer, freezing is the way to go! To freeze whoopie pies, let them cool completely first. Wrap each pie in plastic wrap tightly. Then, place them in a freezer-safe bag or container. Remember to label the bag with the date. These treats can last for up to three months in the freezer. When you're ready to enjoy, let them thaw in the fridge overnight. - Room Temperature: 2-3 days - Refrigerator: Up to 1 week - Freezer: Up to 3 months This timeline ensures you enjoy your chocolate peppermint whoopie pies at their best! Yes, you can make these whoopie pies ahead of time. Bake the cookies and let them cool completely. Store them in an airtight container. You can also make the frosting ahead. Just keep it in the fridge until you are ready to assemble. This way, you save time on the day you want to serve them. To soften cream cheese, take it out of the fridge. Let it sit at room temperature for about 30 minutes. You can also cut it into small cubes for faster softening. If you need it even quicker, microwave it for about 10 seconds. Just be careful not to melt it. Yes, you can use milk instead of buttermilk. If you have regular milk, add a bit of vinegar or lemon juice to it. Use one tablespoon of vinegar or lemon juice for each cup of milk. Let it sit for about five minutes. This will mimic buttermilk’s tangy flavor. To prevent the cookies from sticking, always line your baking sheets with parchment paper. This creates a non-stick surface. You can also lightly grease the parchment paper with butter or cooking spray. This extra step helps ensure easy removal after baking. If you don’t have peppermint extract, you can use mint extract. It gives a similar flavor. You could also use crushed mint candies for a fun twist. Just make sure to chop them finely so they blend well in the frosting. In this article, we covered making delicious whoopie pies. We discussed ingredients, step-by-step instructions, and helpful tips. You learned about flavor variations and how to store your treats. Remember, baking is fun! Avoid common mistakes and try new combinations. Store your whoopie pies well for the best taste. Keep experimenting and enjoy your baking journey. Happy baking!

Chocolate Peppermint Whoopie Pies

Delicious chocolate whoopie pies with a creamy peppermint frosting, perfect for the holiday season.
Prep Time 20 minutes
Cook Time 12 minutes
Total Time 1 hour
Course Dessert
Cuisine American
Servings 12
Calories 200 kcal

Ingredients
  

  • 1 cup all-purpose flour
  • 1/3 cup unsweetened cocoa powder
  • 1 teaspoon baking soda
  • 1/2 teaspoon salt
  • 1/2 cup unsalted butter, softened to room temperature
  • 1 cup granulated sugar
  • 1 large egg
  • 1 teaspoon vanilla extract
  • 1/2 cup buttermilk
  • 1/2 teaspoon peppermint extract
  • 1 cup powdered sugar
  • 1/4 cup cream cheese, softened
  • 2 tablespoons unsalted butter, softened
  • 1 teaspoon peppermint extract (for frosting)
  • to taste red and green sprinkles for decoration (optional)

Instructions
 

  • Preheat Oven: Begin by preheating your oven to 350°F (175°C). While it warms up, line two baking sheets with parchment paper to prevent sticking.
  • Mix Dry Ingredients: In a medium-sized mixing bowl, whisk together the all-purpose flour, cocoa powder, baking soda, and salt. Ensure that everything is well combined and set this bowl aside for now.
  • Cream Butter and Sugar: In a large mixing bowl, use an electric mixer to cream together the softened butter and granulated sugar. Beat this mixture for about 2-3 minutes until it becomes light and fluffy, which helps to incorporate air for a better texture.
  • Add Egg and Extracts: Once creamed, add in the large egg, vanilla extract, and peppermint extract to the butter and sugar mixture. Mix until all ingredients are thoroughly combined.
  • Combine Mixtures: Begin adding the previously prepared dry flour mixture to the wet ingredients in increments, alternating with the buttermilk. Start and end with the flour mixture, mixing until just combined and the batter is smooth without overmixing.
  • Scoop and Bake: Use a cookie scoop to drop heaping tablespoons of the batter onto the prepared baking sheets, leaving sufficient space between each scoop as they will spread slightly while baking. Bake in the preheated oven for 10-12 minutes, or until the tops spring back lightly when pressed. Allow the cookies to cool completely on wire racks after baking.
  • Prepare Frosting: In a separate medium bowl, beat together the softened cream cheese, softened butter, powdered sugar, and the additional peppermint extract using an electric mixer until the mixture is smooth and creamy, creating a luscious frosting.
  • Assemble the Whoopie Pies: Once the cookies are fully cooled, take half of them and turn them upside down. Pipe or spread a generous dollop of the prepared frosting onto the flat side of each of these cookies and then place another cookie flat side down on top to create a delicious sandwich.
  • Decorate: For a festive touch, if desired, sprinkle red and green sprinkles around the edges of the frosting-filled whoopie pies for a cheerful holiday appearance.
  • Serve and Enjoy: These delightful whoopie pies can be served right away or stored in an airtight container in the refrigerator, where they will stay fresh for up to one week.

Notes

Store in an airtight container in the refrigerator for up to one week.
Keyword chocolate, dessert, holiday, peppermint, whoopie pies

WANT TO SAVE THIS RECIPE?

Leave a Comment

Recipe Rating