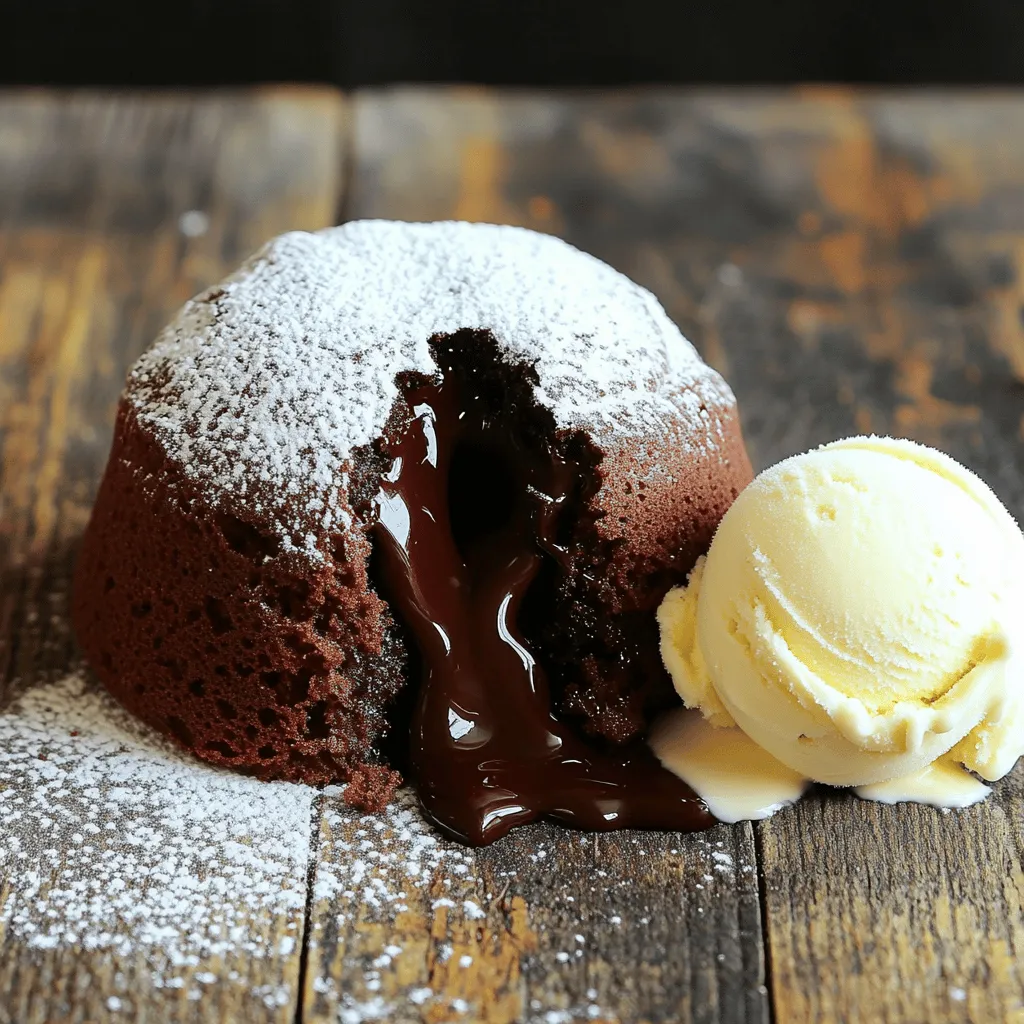
Welcome to your new favorite dessert! This Easiest Chocolate Lava Cake is a simple, rich treat that anyone can make. With just a few ingredients and straightforward steps, you’ll be serving warm, gooey goodness in no time. Whether you’re a beginner in baking or a seasoned chef, this recipe will impress. Let’s dive into how to create this delicious dessert that melts in your mouth!
Ingredients
Here are the ingredients you need for the easiest chocolate lava cake. Each item adds to the rich flavor and gooey center we all love.
– 1/2 cup unsalted butter (plus extra for greasing)
– 1 cup semi-sweet chocolate chips
– 2 large eggs
– 2 large egg yolks
– 1/4 cup granulated sugar
– 1 teaspoon vanilla extract
– 1/4 cup all-purpose flour
– A pinch of kosher salt
– Powdered sugar for dusting
– Optional: creamy vanilla ice cream for serving
Gather these ingredients before you start. Each one plays a role in making this treat so special. The butter and chocolate create that luscious base, while the eggs give it a fluffy texture. The sugar adds sweetness, and the flour helps to form the cake. Don’t forget the optional ice cream; it makes this dessert even more delightful.
Step-by-Step Instructions
Preheat and Prepare
– Preheat oven to 425°F (220°C)
– Grease and flour ramekins
Start by preheating your oven to 425°F (220°C). This temperature ensures the cakes bake perfectly. While the oven heats, take four ramekins and grease them with some unsalted butter. Then, dust the insides with flour. This helps the cakes come out easily after baking.
Melt Chocolate & Butter
– Combine butter and chocolate chips
– Heat in microwave and stir until smooth
In a microwave-safe bowl, add 1/2 cup of unsalted butter and 1 cup of semi-sweet chocolate chips. Place the bowl in the microwave. Heat in 30-second bursts, stirring well between each. Continue until the mix is melted and smooth. This step gives our lava cake its rich flavor.
Mix Eggs and Sugar
– Whisk together eggs, egg yolks, and sugar
– Incorporate vanilla extract
Next, take a medium-sized bowl and add 2 large eggs, 2 large egg yolks, and 1/4 cup of granulated sugar. Use a whisk to mix them until they look pale and frothy. Then, add 1 teaspoon of vanilla extract, stirring until it blends well. This adds a lovely aroma.
Combine Chocolate with Eggs
– Gradually mix melted chocolate into egg mixture
Now, slowly pour the melted chocolate mixture into the egg mix. Stir continuously while you pour. This keeps the eggs from cooking too fast. You want a smooth blend for the best cake texture.
Incorporate Dry Ingredients
– Sift flour and salt over batter
– Gently fold in until just combined
Next, sift 1/4 cup of all-purpose flour and a pinch of kosher salt over the batter. Use a spatula to gently fold the dry mix into the wet ingredients. Be careful not to overmix. You want to keep the batter light and airy.
Fill Ramekins and Bake
– Pour batter into ramekins
– Bake for 12-14 minutes until edges firm and centers soft
Now it’s time to fill your prepared ramekins. Pour the batter in, filling each about two-thirds full. This allows them to rise while baking. Place the ramekins on a baking tray and bake for 12-14 minutes. The edges should be firm, while the centers stay soft and jiggly.
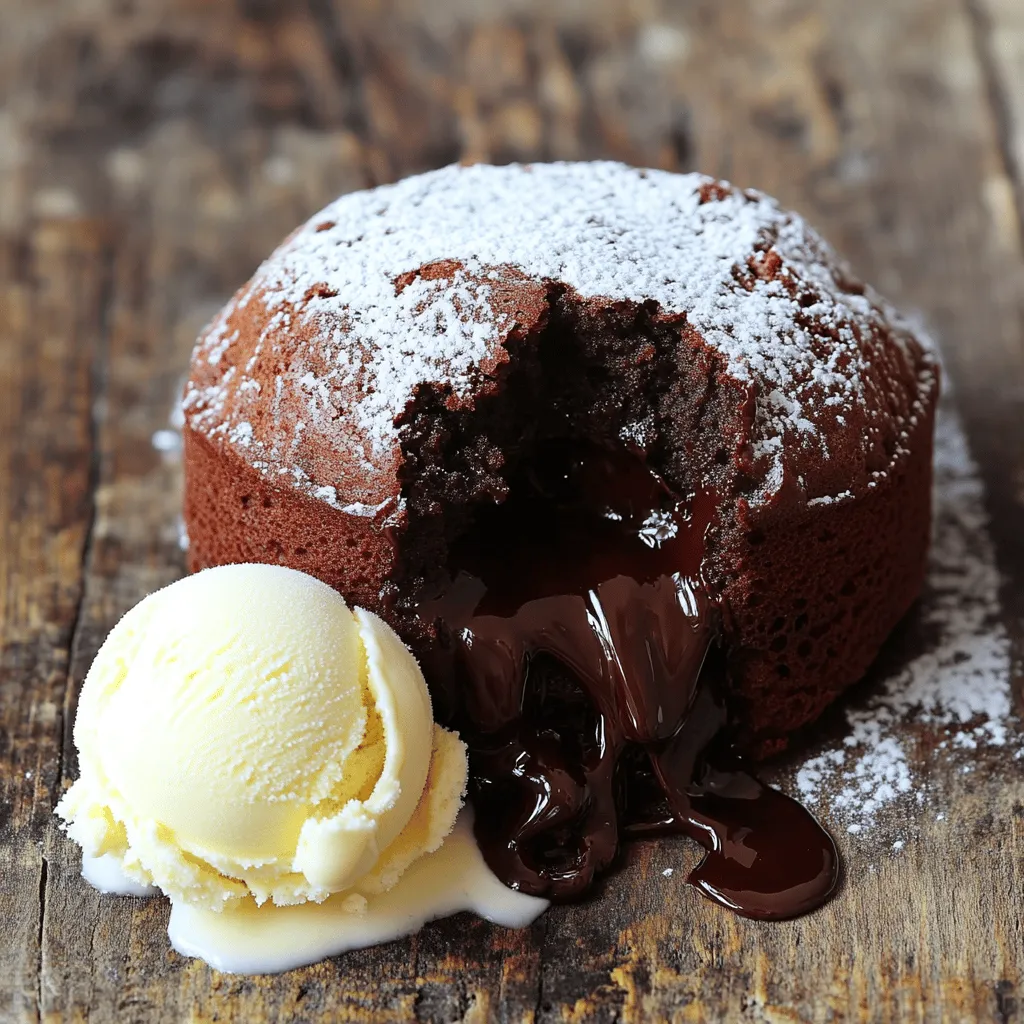
Cool, Release & Serve
– Cool for 1 minute before inverting
– Dust with powdered sugar and serve warm
Once baked, take the ramekins out and let them cool for 1 minute. Use a small knife to run around the edge of each cake, loosening them. Then, invert each ramekin onto a plate. If needed, give a gentle tap to release the cakes. Dust with powdered sugar for a sweet touch, and serve warm. Enjoy your delicious treat!
Tips & Tricks
Ensuring Perfect Molten Center
To get that gooey center, avoid overbaking. Bake the cakes for only 12-14 minutes. Check them when the edges are firm but the middle is soft. Use high-quality chocolate. It melts better and tastes richer. I recommend semi-sweet chocolate chips for the best flavor.
Serving Suggestions
You can make this treat even better. Pair the lava cake with ice cream or fresh berries. The cold ice cream contrasts nicely with the warm cake. Try adding a sprig of mint for color. It adds a fresh touch to your plate.
Troubleshooting Common Issues
Sometimes, cakes stick to the ramekins. To prevent this, grease and flour them well. If your center is overcooked, it might be due to baking too long. You can adjust the baking time next time. Just keep an eye on those cakes while they bake.
Variations
Flavor Enhancements
You can make small tweaks to boost the flavor of your chocolate lava cake.
– Add espresso powder for a mocha twist: Just a teaspoon can add depth and richness.
– Incorporate orange zest for a citrus hint: This brightens the flavor and gives a fresh taste.
Gluten-Free Option
If you need a gluten-free version, it’s easy.
– Substitute all-purpose flour with almond flour: This keeps the cake rich and moist.
Different Serving Styles
You can get creative with how you serve your cakes.
– Serve in a larger cake format: Just pour the batter into a cake pan and bake longer.
– Use silicone molds for varied shapes: This adds fun and flair to your dessert.
These variations let you customize your chocolate lava cake. You can mix and match to find your favorite.
Storage Info
Storing Leftovers
After enjoying your chocolate lava cake, you might have some left. Refrigerate cooked cakes for up to 2 days. Place them in an airtight container to keep them fresh. If you want to save space, you can also wrap them tightly in plastic wrap.
Reheating Instructions
When it’s time to enjoy your leftovers, you can reheat them. Use a microwave or an oven for this. If using a microwave, heat in short bursts. Start with 10-15 seconds, then check. For the oven, preheat to 350°F (175°C) and warm for about 5-7 minutes.
To keep that gooey center, avoid overheating. If you use the microwave, check often. If you prefer the oven, remove the cake just as the center starts to warm. This way, you preserve that delicious molten core.
For the best experience, serve warm with a sprinkle of powdered sugar. You can also add a scoop of creamy vanilla ice cream on the side. Enjoy every bite!
FAQs
Can I make chocolate lava cake in advance?
Yes, you can prepare chocolate lava cake in advance. To do this, follow these steps:
– Prepare the batter: Make the batter and pour it into greased ramekins.
– Chill the ramekins: Cover them with plastic wrap and chill in the fridge.
– Bake when ready: When you are ready to bake, remove the ramekins from the fridge. Bake them for a few extra minutes. This helps keep the molten center.
What’s the secret to the molten center?
The key to a gooey center is perfect timing and temperature.
– Bake at the right heat: Set your oven to 425°F (220°C).
– Watch the time: Bake for 12 to 14 minutes. The edges should be firm, but the center should jiggle slightly.
By keeping a close eye on the baking time, you will enjoy that rich, molten center.
Can I double the recipe for a larger gathering?
Absolutely! Doubling the recipe is easy. Just follow these tips:
– Adjust ingredients: Use double the amount for each ingredient.
– Baking time: If you use larger ramekins or a different pan, you may need to bake longer. Check for doneness like before.
This way, you can share the joy of chocolate lava cake with more friends!
How do I know when it’s done baking?
To check if your cake is done, look for these signs:
– Firm edges: The edges should look set and firm.
– Soft center: The center should still be soft and jiggle when you shake it.
– Use a toothpick: Insert a toothpick into the edge. If it comes out clean, but the center is soft, it’s ready.
These tips will help you avoid spoiling the gooey center while ensuring a perfect bake.
This chocolate lava cake recipe is both simple and rewarding. You’ve learned the key ingredients, step-by-step instructions, and helpful tips to bake the perfect dessert. Remember to watch the baking time and use quality chocolate for a gooey center. If you want to mix things up, try the flavor variations or serving ideas. Store leftovers well, and enjoy your delicious creations for days. Happy baking!