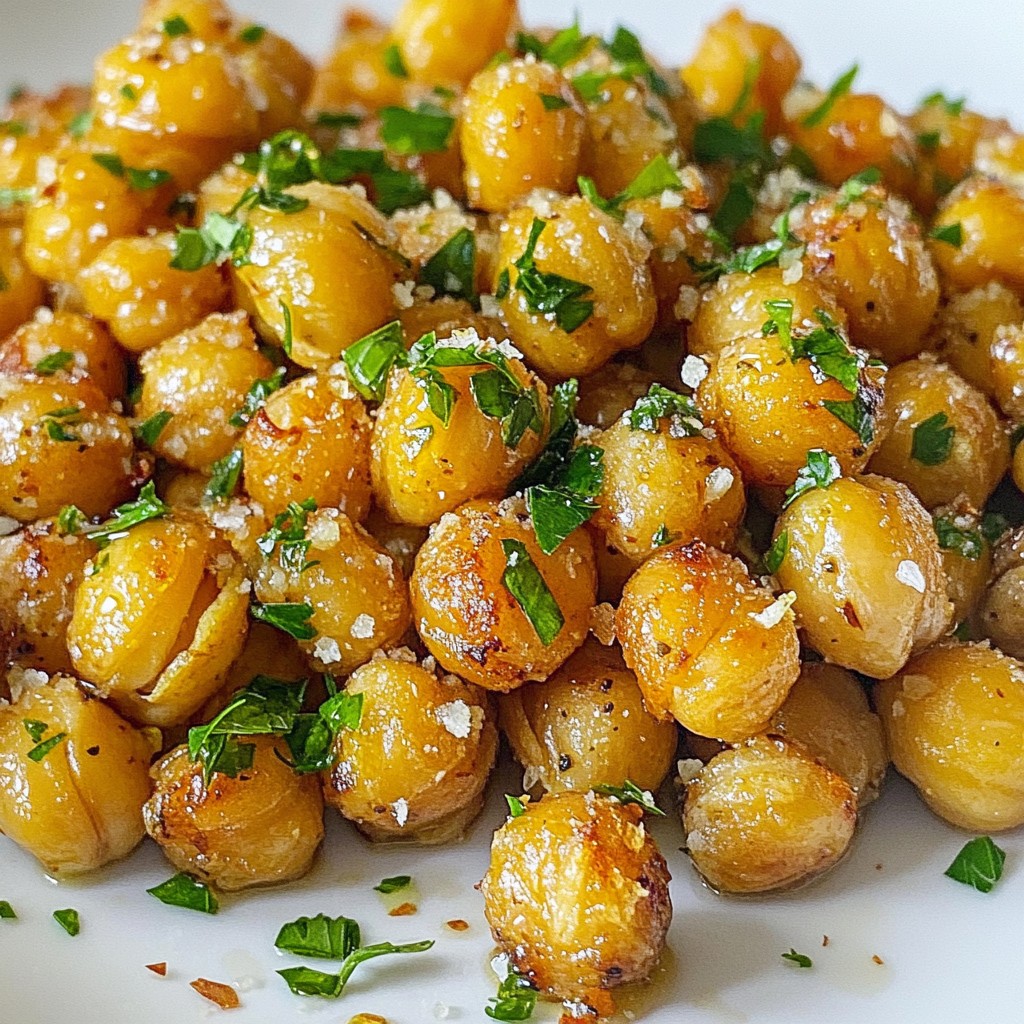
Are you ready to discover the perfect snack? Garlic Herb Roasted Chickpeas offer a crunchy and flavorful treat that's both healthy and satisfying. With just a few simple ingredients, you're on your way to a delicious munching experience. I’ll guide you through the steps to achieve the perfect crispiness and enhance the flavor. Don’t miss out on this easy recipe that will become your new go-to snack!
Why I Love This Recipe
- Crispy Texture: The roasting process gives the chickpeas a delightful crunch that makes them incredibly satisfying to eat.
- Flavorful Seasoning: The combination of garlic, herbs, and lemon zest creates a vibrant and aromatic flavor profile that elevates the simple chickpea.
- Versatile Snack: These roasted chickpeas can be enjoyed on their own or used to enhance salads, bowls, and soups, making them a versatile addition to any meal.
- Healthy Alternative: Packed with protein and fiber, this recipe offers a nutritious snack option that satisfies cravings without the guilt.
Ingredients
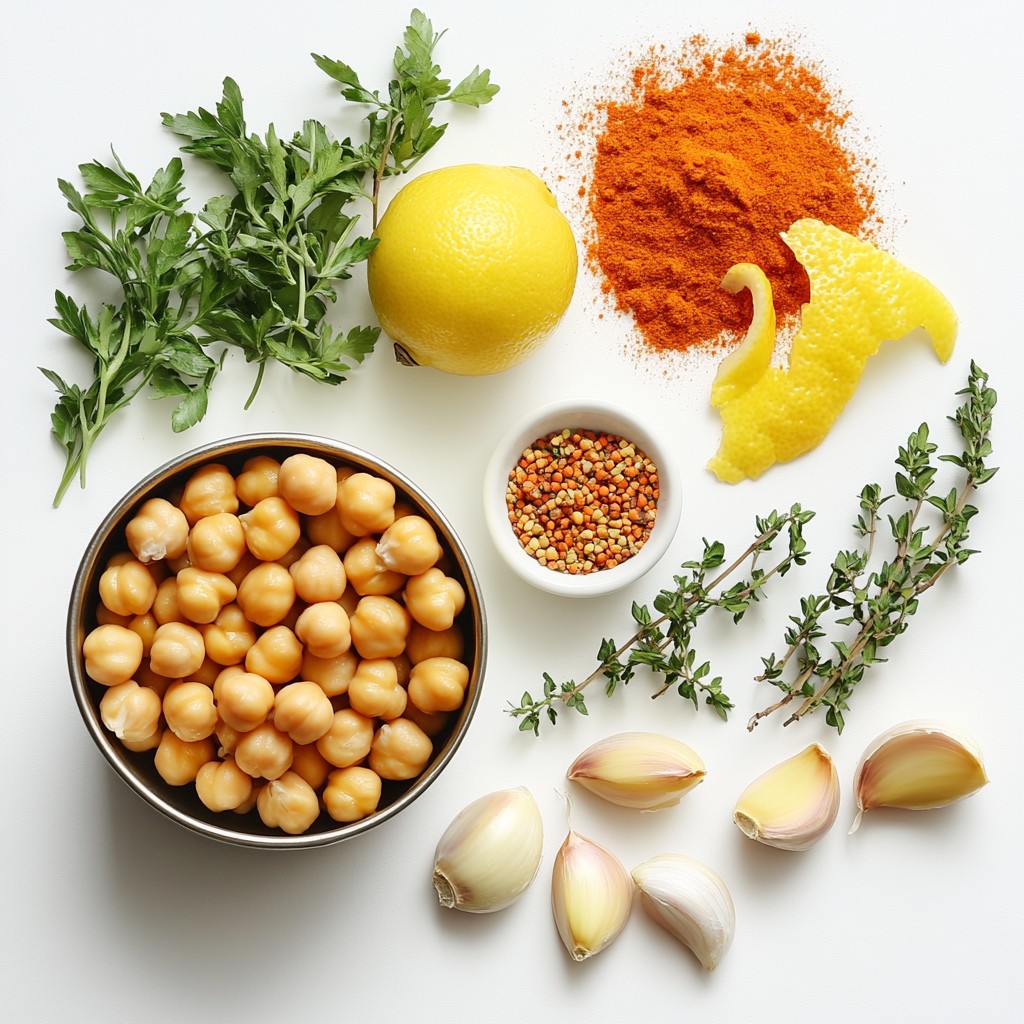
List of Ingredients
- 1 can (15 oz) chickpeas, rinsed and thoroughly drained
- 2 tablespoons extra virgin olive oil
- 3 cloves garlic, finely minced
- 1 teaspoon dried oregano
- 1 teaspoon dried thyme
- 1 teaspoon smoked paprika
- ½ teaspoon fine sea salt
- ¼ teaspoon freshly ground black pepper
- Zest of 1 lemon
- Fresh parsley, finely chopped (for garnish)
Chickpeas are the star of this recipe. They are high in protein and fiber. This makes them a great snack. You can find them in any store. I love using canned chickpeas for ease. Just rinse and drain them well.
Next, we add the olive oil. It helps the chickpeas crisp up as they roast. Then comes minced garlic. Garlic adds a strong flavor that blends perfectly with herbs.
Dried oregano and thyme give a fresh taste. Smoked paprika adds a hint of smokiness. Salt and black pepper bring out the flavors. Lastly, lemon zest brightens the dish. It adds a zesty kick that balances everything.
Don’t forget the parsley! It’s not just for looks. Fresh parsley adds a pop of color and freshness. These ingredients come together to create a crunchy, tasty snack.
Step-by-Step Instructions
Prepping the Oven and Baking Sheet
1. Preheat your oven to 400°F (200°C). This helps cook the chickpeas evenly.
2. Line a baking sheet with parchment paper. The paper makes cleanup simple.
Preparing the Chickpeas
1. Rinse the chickpeas well and dry them thoroughly. Use a clean towel or paper towels.
2. In a large bowl, mix the chickpeas with olive oil, minced garlic, oregano, thyme, smoked paprika, salt, black pepper, and lemon zest. Toss until every chickpea gets coated.
Roasting the Chickpeas
1. Spread the seasoned chickpeas on the baking sheet. Make sure they are in a single layer.
2. Roast the chickpeas in the oven for 25 to 30 minutes. Stir them halfway through so they cook evenly. They should turn golden and crunchy.
Tips & Tricks
Ensuring Crispiness
To get the perfect crunch, you must pat the chickpeas dry. Use a clean kitchen towel or paper towels. This step helps remove moisture, which can make them soggy.
Next, space the chickpeas on the baking sheet. Spread them out in one even layer. If they are too close together, they will steam instead of roast. This limits their crispiness.
Flavor Enhancements
You can adjust the seasoning to your taste. If you like it spicy, add more smoked paprika or a pinch of cayenne pepper.
When it comes to herbs, using fresh herbs can make a big difference. They add a bright flavor that dried herbs can't match. However, dried herbs are great for convenience. They still add a lot of flavor. Choose what works for you and your recipe needs.
Pro Tips
- Dry Chickpeas are Key: Patting the chickpeas dry before roasting is crucial for achieving that perfect crispy texture.
- Spice it Up: Feel free to adjust the spices according to your taste preferences. Add chili powder for heat or nutritional yeast for a cheesy flavor.
- Storage Tips: Store any leftovers in an airtight container at room temperature to maintain their crunchiness. They can last for up to 3 days.
- Serving Suggestions: Try these roasted chickpeas as a topping on your favorite salad or grain bowl for an added crunch and protein boost!
Variations
Spice Variations
You can make garlic herb roasted chickpeas even more exciting by adding some spice. If you like heat, try adding cayenne pepper to the mix. Just a pinch can give your snack a nice kick. Start with 1/4 teaspoon and adjust to your taste.
You can also play with herbs. Instead of oregano and thyme, try rosemary or basil. Fresh herbs can bring a different flavor to the dish. Dried herbs work well too. They add a nice touch without extra prep time.
Flavor Infusions
When it comes to flavor, you can switch things up. Instead of garlic powder, you can use onion powder. This will give your chickpeas a different taste while keeping them savory.
Zest is another way to enhance flavor. Try adding lime or orange zest instead of lemon. This can brighten the dish and surprise your taste buds. Experimenting with these variations can make your garlic herb roasted chickpeas unique and fun to enjoy!
Storage Info
Best Practices for Storage
To keep your leftover roasted chickpeas fresh, store them in an airtight container. This helps keep them crispy and tasty. You can use glass jars or plastic containers with tight lids. Avoid open bowls or bags, as they let air in and make the chickpeas soft.
Make sure the chickpeas are completely cool before sealing the container. This prevents condensation, which can lead to sogginess. If you have leftover chickpeas, try to eat them within three days for the best taste and crunch.
Reheating Instructions
To reheat your chickpeas and keep them crispy, use the oven. Preheat the oven to 375°F (190°C). Spread the chickpeas on a baking sheet and heat them for about 10 minutes. This will restore their crunchiness. You can also use an air fryer if you have one. Just a few minutes at a high temperature will do the trick.
Leftover chickpeas are not just for snacking! You can toss them in salads for a tasty crunch. They also make a great topping for soups or grain bowls. This way, you can enjoy the flavors in more meals!
FAQs
How do I make my roasted chickpeas extra crispy?
To get extra crispy roasted chickpeas, start with a few simple tips:
- Dry them well: Pat the chickpeas dry with a towel. This step removes excess moisture.
- Use high heat: Roast at 400°F (200°C) for the best crunch.
- Spread evenly: Lay the chickpeas in a single layer on the pan. This helps them cook evenly.
- Stir halfway: Turn the chickpeas halfway through cooking. This ensures all sides get nice and crispy.
These steps help create a great texture. Crispy chickpeas make a perfect snack.
Can I make garlic herb roasted chickpeas in an air fryer?
Yes, you can use an air fryer! Here’s how:
1. Preheat your air fryer to 400°F (200°C).
2. Prepare the chickpeas as in the recipe. Make sure they are dry.
3. Add the chickpeas to the air fryer basket in a single layer.
4. Cook for 15 to 20 minutes. Shake the basket halfway through for even cooking.
Air frying gives you a crunchy snack in less time. Plus, it uses less oil.
What are the nutritional benefits of chickpeas?
Chickpeas are packed with nutrition. Here’s a quick overview:
- High in protein: They offer a good source of plant-based protein.
- Rich in fiber: This aids digestion and keeps you full longer.
- Vitamins and minerals: Chickpeas contain iron, magnesium, and B vitamins. These nutrients support overall health.
Each serving provides about 120 calories, making them a healthy snack choice. Enjoying chickpeas can benefit your diet and health.
Roasted chickpeas can be a simple and healthy snack. We discussed the key ingredients and how to prepare them. I shared tips for crispiness and flavor, plus variations to keep things interesting. Proper storage ensures you enjoy your snacks later. Remember, you can be creative with spices and herbs. These chickpeas are not just tasty; they're also full of nutrients. Experiment and make them your own. Enjoy your cooking adventure!