Irresistible Apple Cider Cake with Maple Glaze Recipe

WANT TO SAVE THIS RECIPE?

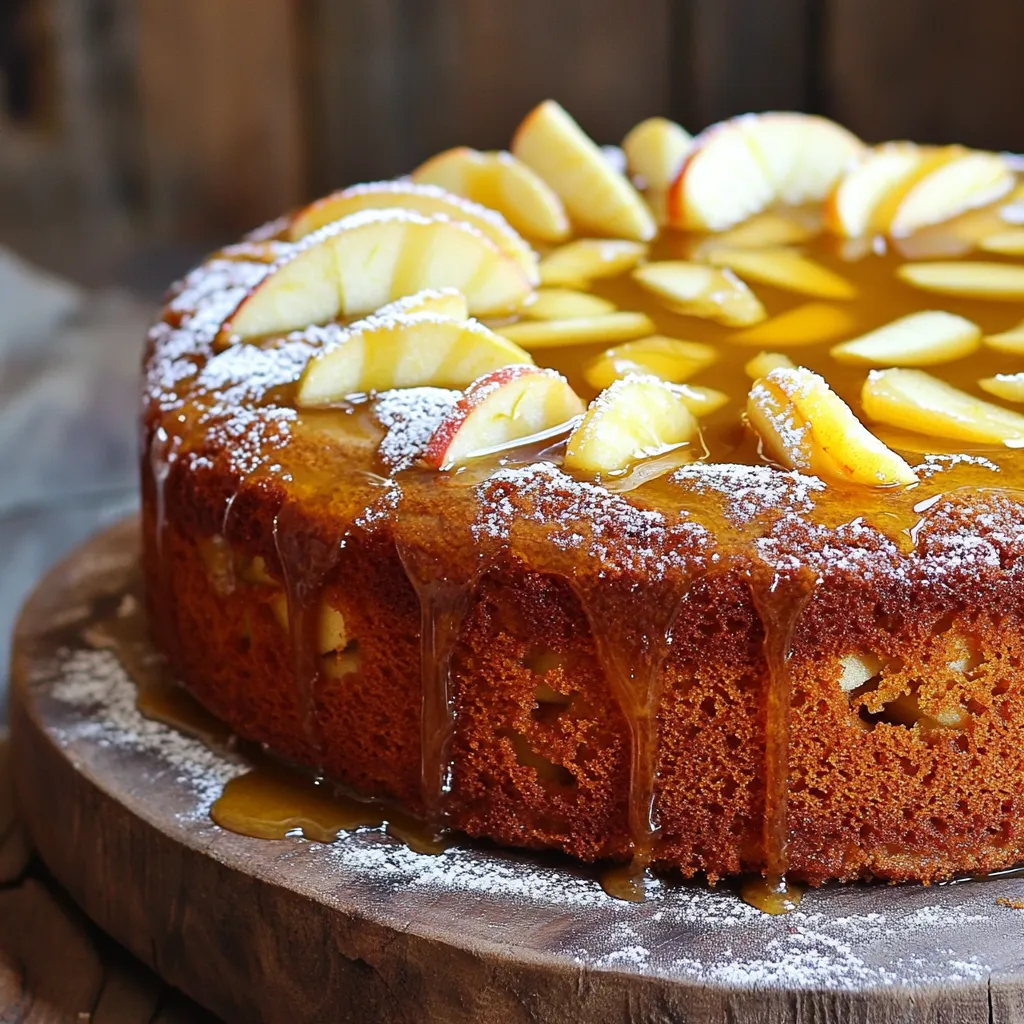
Get ready to warm your kitchen with my Irresistible Apple Cider Cake with Maple Glaze recipe! This cake bursts with the flavors of fresh apples and sweet cider, all topped with a smooth maple glaze. I’ll guide you step-by-step to create a moist, rich cake that’s perfect for any occasion. Whether you want to impress guests or treat yourself, this recipe will do the trick. Let’s dive into the delicious details!

Ingredients

Main Ingredients for Apple Cider Cake

For the Apple Cider Cake, you will need:

– 2 cups apple cider

– 2 ½ cups all-purpose flour

– 1 cup granulated sugar

– ½ cup packed brown sugar

– 1 cup unsalted butter, softened to room temperature

– 3 large eggs

– 1 teaspoon pure vanilla extract

– 1 tablespoon baking powder

– 1 teaspoon baking soda

– 1 teaspoon ground cinnamon

– ½ teaspoon ground nutmeg

– ½ teaspoon salt

– 1 cup apples, peeled, cored, and diced

These ingredients work together to bring out the sweet and spicy flavors of fall. The apple cider gives the cake moisture and a rich apple taste.

Ingredients for the Maple Glaze

To make the maple glaze, gather:

– 1 cup powdered sugar

– 2 tablespoons pure maple syrup

– 1 tablespoon milk (adjust for desired glaze thickness)

This glaze adds a sweet touch on top of the cake. It pairs perfectly with the warm spices in the cake.

Optional Garnishes

For a lovely touch, consider these garnishes:

– Thinly sliced apples

– A light dusting of powdered sugar

These garnishes not only make the cake look pretty but also add extra flavor. You can serve the cake on a rustic plate for a cozy presentation.

Step-by-Step Instructions

Preparing the Oven and Baking Pan

First, you need to preheat your oven to 350°F (175°C). This step is key for even baking. Next, grab a 9×13-inch baking pan or two 9-inch round cake pans. Grease them with unsalted butter. Then, sprinkle flour on top of the butter to coat the pans. This will help the cake come out easily after baking.

Reducing the Apple Cider

Take 2 cups of apple cider and pour it into a medium saucepan. Heat it over medium heat. Bring the cider to a rolling boil. Once it boils, lower the heat to let it simmer. This simmering should last about 15-20 minutes. You want to reduce the cider to about 1 cup. This step concentrates the apple flavor. After reducing, remove the saucepan from the heat. Let the cider cool slightly before adding it to your batter.

Mixing the Batter

In a large mixing bowl, cream together 1 cup of softened butter, 1 cup of granulated sugar, and ½ cup of packed brown sugar. Use an electric mixer on medium speed until it looks light and fluffy. Next, add 3 large eggs. Add them one at a time, mixing well after each one. This helps your batter be smooth. Now, stir in 1 teaspoon of pure vanilla extract.

In another bowl, mix 2½ cups of all-purpose flour, 1 tablespoon of baking powder, 1 teaspoon of baking soda, 1 teaspoon of ground cinnamon, ½ teaspoon of ground nutmeg, and ½ teaspoon of salt. Use a whisk to blend it well.

Now, it’s time to combine your wet and dry ingredients. Add the dry mix to the butter mix. Do this slowly and alternate with the reduced apple cider. Start and end with the dry mix. Mix until just combined. A few lumps are okay; don’t overmix. Finally, fold in 1 cup of diced apples gently. This adds a nice texture and flavor to your cake!

Now you are ready to bake!

Tips & Tricks

How to Ensure Moisture in the Cake

To keep your cake moist, use fresh apple cider. Reducing it down adds rich flavor and keeps the cake tender. Make sure to add the cider at room temperature. Mixing in diced apples also helps with moisture. This gives you juicy bites throughout the cake.

Best Practices for Mixing and Folding Ingredients

When mixing the batter, start with a light hand. Cream the butter and sugars until fluffy. Add eggs one at a time, mixing well after each. When it’s time to add dry ingredients, alternate with the cider. Do not overmix; a few lumps are okay. Gently fold in the apples. This helps keep the cake light and airy.

Techniques for Perfecting the Maple Glaze

For the glaze, whisk powdered sugar, maple syrup, and milk together until smooth. Adjust the milk for your desired thickness. If you want a runny glaze, add more milk. Drizzle it over the cooled cake. Let it set before slicing. This gives a beautiful finish and adds sweet flavor.

Variations

Incorporating Nuts or Other Fruits

You can add nuts or other fruits to make this cake even better. Chopped walnuts or pecans add a nice crunch. You can also use dried fruits, like cranberries or raisins, for a sweet twist. Fold in about a cup of your choice into the batter. This will enhance the flavor and texture, making each bite exciting.

Modifying the Glaze with Flavors

The maple glaze is delicious, but you can change it up! Add a splash of vanilla or a hint of cinnamon for extra flavor. You can even mix in a little orange zest for a fresh twist. Adjust the milk to get the glaze just right. The key is to keep it smooth and pourable.

Gluten-Free Adaptations

If you need a gluten-free version, swap the all-purpose flour for a gluten-free blend. Make sure it has xanthan gum for the best texture. You can also use almond flour for a nutty taste. Just remember that baking times may change, so keep an eye on your cake while it bakes. Enjoy the same great flavor without the gluten!

Storage Info

How to Store Leftover Cake

To keep your apple cider cake fresh, store it in an airtight container. This helps prevent it from drying out. Place a piece of parchment paper between the cake and the lid for added protection. You can also wrap the cake tightly in plastic wrap. Store it at room temperature for up to three days. If you want to keep it longer, move it to the fridge.

Freezing the Apple Cider Cake

Freezing is a great option if you have extra cake. First, let the cake cool completely. Then, slice it into individual servings. Wrap each slice in plastic wrap tightly. After that, place the wrapped slices in a freezer-safe bag or container. Label the bags with a date. The cake can stay in the freezer for up to three months. To enjoy later, just thaw it in the fridge overnight.

Reheating Instructions

To reheat your apple cider cake, preheat your oven to 350°F (175°C). Place the slice on a baking sheet. Heat it for about 10-15 minutes. You can also microwave it for a quick treat. Heat each slice for about 20-30 seconds, checking to avoid overheating. Serve it warm and enjoy the cozy flavors!

FAQs

How can I tell when the cake is done?

You can tell the cake is done by checking it with a toothpick. Insert the toothpick into the center of the cake. If it comes out clean, the cake is ready. For round cakes, this usually takes about 30-35 minutes. If you bake a sheet cake, it may take 40-45 minutes. The edges will look golden brown, and the cake will spring back when lightly pressed.

Can I make the cake ahead of time?

Yes, you can make the cake ahead of time. Bake it a day before you plan to serve it. Once it cools, wrap it tightly in plastic wrap and keep it at room temperature. If you want to keep it longer, you can refrigerate it. Just be sure to glaze it just before serving for the best taste and look.

Is it possible to use store-bought apple cider?

Absolutely! Store-bought apple cider works great in this recipe. Just make sure to choose a quality cider for the best flavor. You can skip the step of reducing it if you use a concentrated version. However, reducing fresh cider adds a sweet depth to the cake. Either way, your cake will still taste delicious!

This blog post shared everything you need to make a great apple cider cake. You learned about the main ingredients, how to prepare the batter, and tips for keeping it moist. Variations let you customize the recipe, and storage tips help with leftovers.

In the end, making this cake can be fun and satisfying. Enjoy this tasty treat any time of the year. Happy baking!

For the Apple Cider Cake, you will need: - 2 cups apple cider - 2 ½ cups all-purpose flour - 1 cup granulated sugar - ½ cup packed brown sugar - 1 cup unsalted butter, softened to room temperature - 3 large eggs - 1 teaspoon pure vanilla extract - 1 tablespoon baking powder - 1 teaspoon baking soda - 1 teaspoon ground cinnamon - ½ teaspoon ground nutmeg - ½ teaspoon salt - 1 cup apples, peeled, cored, and diced These ingredients work together to bring out the sweet and spicy flavors of fall. The apple cider gives the cake moisture and a rich apple taste. To make the maple glaze, gather: - 1 cup powdered sugar - 2 tablespoons pure maple syrup - 1 tablespoon milk (adjust for desired glaze thickness) This glaze adds a sweet touch on top of the cake. It pairs perfectly with the warm spices in the cake. For a lovely touch, consider these garnishes: - Thinly sliced apples - A light dusting of powdered sugar These garnishes not only make the cake look pretty but also add extra flavor. You can serve the cake on a rustic plate for a cozy presentation. First, you need to preheat your oven to 350°F (175°C). This step is key for even baking. Next, grab a 9x13-inch baking pan or two 9-inch round cake pans. Grease them with unsalted butter. Then, sprinkle flour on top of the butter to coat the pans. This will help the cake come out easily after baking. Take 2 cups of apple cider and pour it into a medium saucepan. Heat it over medium heat. Bring the cider to a rolling boil. Once it boils, lower the heat to let it simmer. This simmering should last about 15-20 minutes. You want to reduce the cider to about 1 cup. This step concentrates the apple flavor. After reducing, remove the saucepan from the heat. Let the cider cool slightly before adding it to your batter. In a large mixing bowl, cream together 1 cup of softened butter, 1 cup of granulated sugar, and ½ cup of packed brown sugar. Use an electric mixer on medium speed until it looks light and fluffy. Next, add 3 large eggs. Add them one at a time, mixing well after each one. This helps your batter be smooth. Now, stir in 1 teaspoon of pure vanilla extract. In another bowl, mix 2½ cups of all-purpose flour, 1 tablespoon of baking powder, 1 teaspoon of baking soda, 1 teaspoon of ground cinnamon, ½ teaspoon of ground nutmeg, and ½ teaspoon of salt. Use a whisk to blend it well. Now, it’s time to combine your wet and dry ingredients. Add the dry mix to the butter mix. Do this slowly and alternate with the reduced apple cider. Start and end with the dry mix. Mix until just combined. A few lumps are okay; don’t overmix. Finally, fold in 1 cup of diced apples gently. This adds a nice texture and flavor to your cake! Now you are ready to bake! To keep your cake moist, use fresh apple cider. Reducing it down adds rich flavor and keeps the cake tender. Make sure to add the cider at room temperature. Mixing in diced apples also helps with moisture. This gives you juicy bites throughout the cake. When mixing the batter, start with a light hand. Cream the butter and sugars until fluffy. Add eggs one at a time, mixing well after each. When it’s time to add dry ingredients, alternate with the cider. Do not overmix; a few lumps are okay. Gently fold in the apples. This helps keep the cake light and airy. For the glaze, whisk powdered sugar, maple syrup, and milk together until smooth. Adjust the milk for your desired thickness. If you want a runny glaze, add more milk. Drizzle it over the cooled cake. Let it set before slicing. This gives a beautiful finish and adds sweet flavor. {{image_4}} You can add nuts or other fruits to make this cake even better. Chopped walnuts or pecans add a nice crunch. You can also use dried fruits, like cranberries or raisins, for a sweet twist. Fold in about a cup of your choice into the batter. This will enhance the flavor and texture, making each bite exciting. The maple glaze is delicious, but you can change it up! Add a splash of vanilla or a hint of cinnamon for extra flavor. You can even mix in a little orange zest for a fresh twist. Adjust the milk to get the glaze just right. The key is to keep it smooth and pourable. If you need a gluten-free version, swap the all-purpose flour for a gluten-free blend. Make sure it has xanthan gum for the best texture. You can also use almond flour for a nutty taste. Just remember that baking times may change, so keep an eye on your cake while it bakes. Enjoy the same great flavor without the gluten! To keep your apple cider cake fresh, store it in an airtight container. This helps prevent it from drying out. Place a piece of parchment paper between the cake and the lid for added protection. You can also wrap the cake tightly in plastic wrap. Store it at room temperature for up to three days. If you want to keep it longer, move it to the fridge. Freezing is a great option if you have extra cake. First, let the cake cool completely. Then, slice it into individual servings. Wrap each slice in plastic wrap tightly. After that, place the wrapped slices in a freezer-safe bag or container. Label the bags with a date. The cake can stay in the freezer for up to three months. To enjoy later, just thaw it in the fridge overnight. To reheat your apple cider cake, preheat your oven to 350°F (175°C). Place the slice on a baking sheet. Heat it for about 10-15 minutes. You can also microwave it for a quick treat. Heat each slice for about 20-30 seconds, checking to avoid overheating. Serve it warm and enjoy the cozy flavors! You can tell the cake is done by checking it with a toothpick. Insert the toothpick into the center of the cake. If it comes out clean, the cake is ready. For round cakes, this usually takes about 30-35 minutes. If you bake a sheet cake, it may take 40-45 minutes. The edges will look golden brown, and the cake will spring back when lightly pressed. Yes, you can make the cake ahead of time. Bake it a day before you plan to serve it. Once it cools, wrap it tightly in plastic wrap and keep it at room temperature. If you want to keep it longer, you can refrigerate it. Just be sure to glaze it just before serving for the best taste and look. Absolutely! Store-bought apple cider works great in this recipe. Just make sure to choose a quality cider for the best flavor. You can skip the step of reducing it if you use a concentrated version. However, reducing fresh cider adds a sweet depth to the cake. Either way, your cake will still taste delicious! This blog post shared everything you need to make a great apple cider cake. You learned about the main ingredients, how to prepare the batter, and tips for keeping it moist. Variations let you customize the recipe, and storage tips help with leftovers. In the end, making this cake can be fun and satisfying. Enjoy this tasty treat any time of the year. Happy baking!

Apple Cider Cake with Maple Glaze

Indulge in the flavors of fall with this delightful Autumn Apple Cider Cake with Maple Glaze! This moist and sweet cake combines rich apple cider and fresh apples, topped with a luscious maple glaze that brings warmth to any table. Perfect for gatherings or a cozy night in, this easy recipe will be your new favorite dessert. Click through to bake your own slice of autumn magic and impress your guests!

Ingredients
  

2 cups apple cider

2 ½ cups all-purpose flour

1 cup granulated sugar

½ cup packed brown sugar

1 cup unsalted butter, softened to room temperature

3 large eggs

1 teaspoon pure vanilla extract

1 tablespoon baking powder

1 teaspoon baking soda

1 teaspoon ground cinnamon

½ teaspoon ground nutmeg

½ teaspoon salt

1 cup apples, peeled, cored, and diced

1 cup powdered sugar (for the glaze)

2 tablespoons pure maple syrup

1 tablespoon milk (adjust for desired glaze thickness)

Instructions
 

Preheat the Oven: Begin by preheating your oven to 350°F (175°C). Prepare a 9x13-inch baking pan or two 9-inch round cake pans by greasing them with butter and sprinkling with flour.

    Reduce the Apple Cider: In a medium saucepan, pour in the apple cider and bring it to a rolling boil over medium heat. Once boiling, reduce the heat and let it simmer for approximately 15-20 minutes until the liquid is reduced to about 1 cup. Remove from heat and let it cool slightly.

      Prepare the Cake Batter: In a large mixing bowl, cream the softened butter, granulated sugar, and packed brown sugar together using an electric mixer on medium speed. Mix until the mixture is light and fluffy. Add the eggs, one at a time, ensuring each egg is thoroughly incorporated before adding the next. Finally, stir in the vanilla extract.

        Combine the Dry Ingredients: In a separate bowl, carefully whisk together the all-purpose flour, baking powder, baking soda, ground cinnamon, ground nutmeg, and salt until evenly combined.

          Combine Wet and Dry Ingredients: Gradually add the dry ingredients to the butter mixture, alternating with the reduced apple cider. Start and end with the dry ingredients, mixing until just combined. Do not overmix; a few lumps are okay.

            Incorporate the Apples: Gently fold in the diced apples, ensuring they are evenly distributed throughout the batter without breaking them apart.

              Bake: Pour the batter into the prepared baking pan(s). For round cakes, bake for 30-35 minutes; for the sheet cake, bake for 40-45 minutes. The cake is done when a toothpick inserted into the center comes out clean.

                Cool the Cake: Once baked, allow the cake(s) to cool in the pans for about 10 minutes. After that, transfer them to a wire rack to cool completely.

                  Make the Maple Glaze: In a small mixing bowl, whisk together the powdered sugar, maple syrup, and milk until the mixture is smooth and free of lumps. You can add more milk if you prefer a thinner glaze.

                    Glaze the Cake: Once the cake has cooled completely, drizzle the maple glaze over the top, allowing it to cascade over the edges. Let the glaze set for about 10-15 minutes before slicing the cake.

                      Prep Time, Total Time, Servings: 20 mins | 1 hr 15 mins | 12 servings

                        - Presentation Tips: For a beautiful presentation, serve slices of the cake on a rustic wooden board or plate. Garnish with thinly sliced apples and a light dusting of powdered sugar for an elegant and inviting appearance.

                          WANT TO SAVE THIS RECIPE?

                          Leave a Comment

                          Recipe Rating