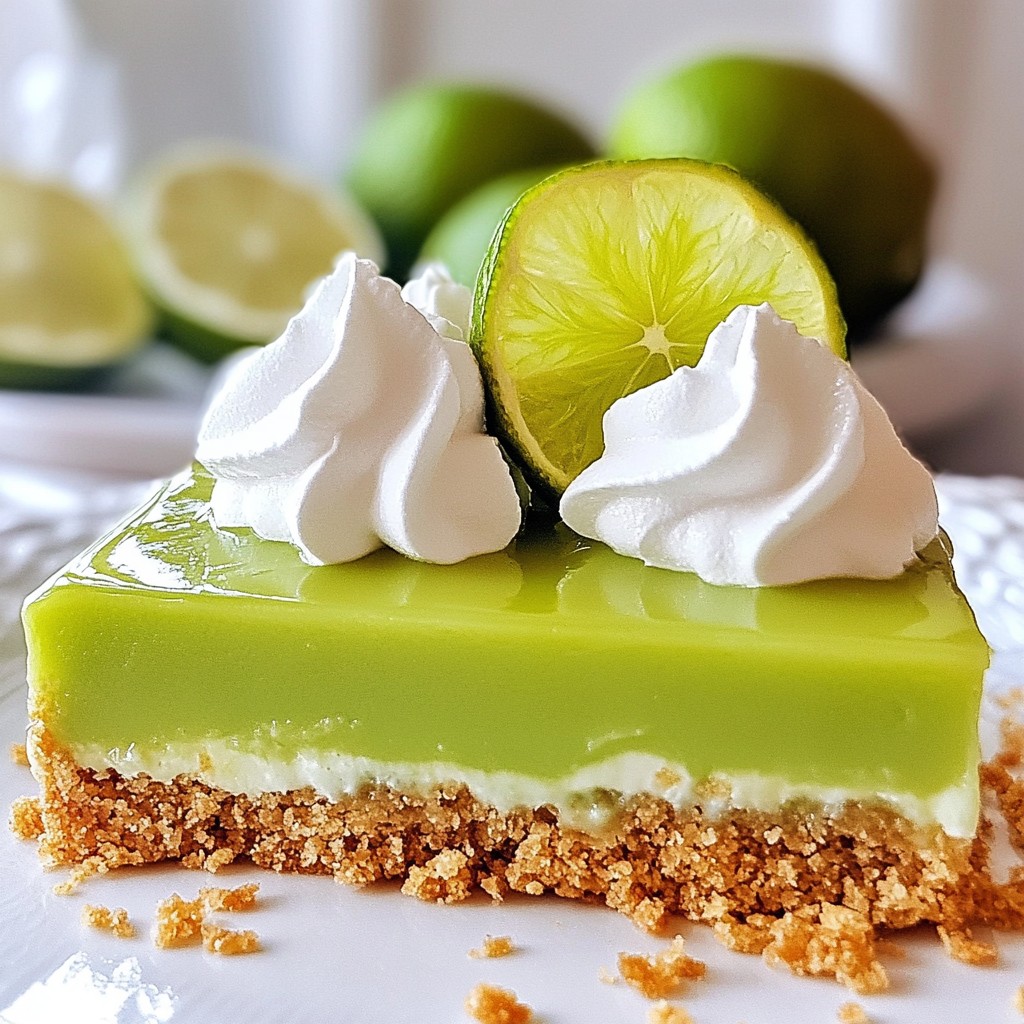
Are you ready to whip up a delicious treat? These Key Lime Pie Bars are both easy and delightful. They offer a taste of sunshine with their tart and sweet flavors. In this post, I’ll guide you through simple steps to create these fun bars in no time. So grab your apron, and let’s dive into this easy dessert recipe that everyone will love!
Why I Love This Recipe
- Bright and Refreshing Flavor: The combination of key lime juice and zest delivers a tangy burst that is perfect for any occasion.
- Easy to Make: With simple ingredients and straightforward steps, these bars can be whipped up quickly, making them great for both novice and experienced bakers.
- Perfect for Sharing: Cut into squares, these bars are easy to serve at parties or gatherings, leaving your guests wanting more.
- Deliciously Versatile: While they shine with key lime, you can easily substitute with regular lime juice for a classic twist!
Ingredients
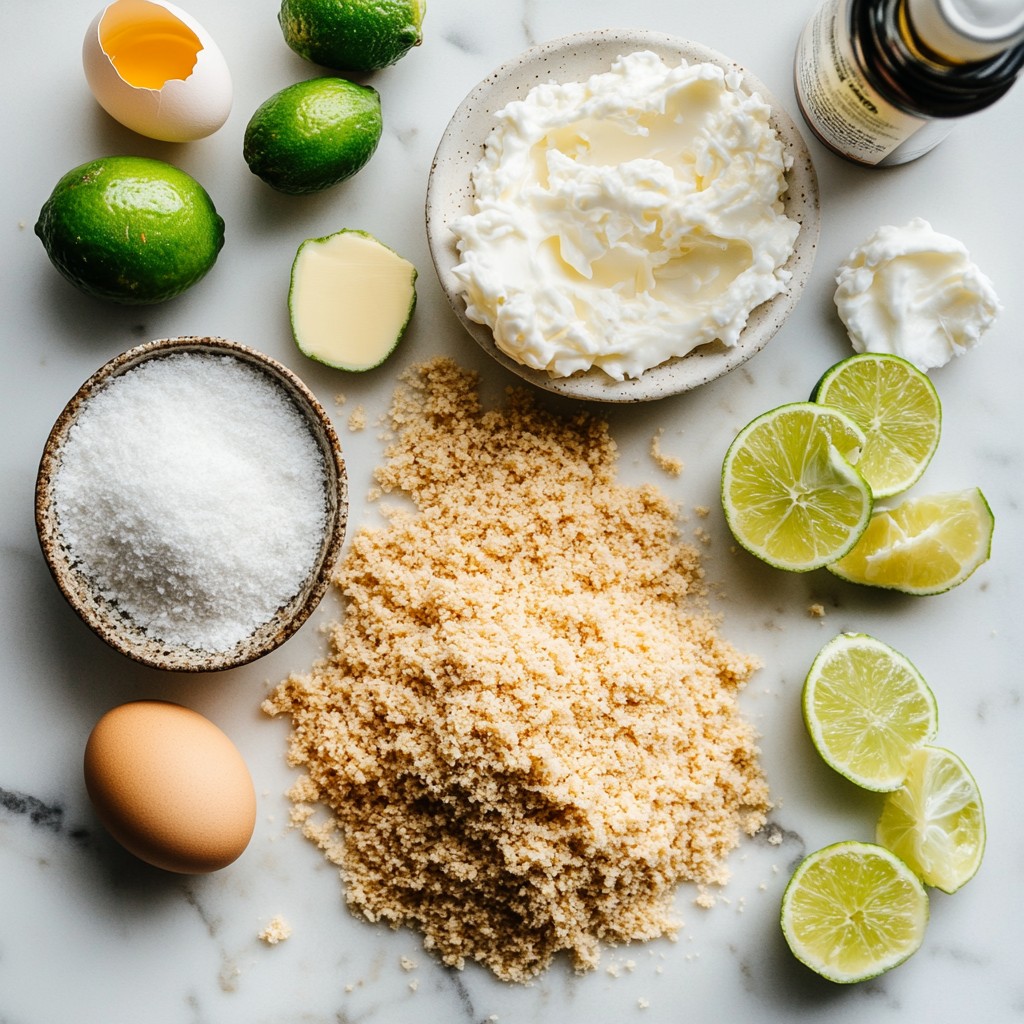
List of Ingredients
Key Ingredients for the Crust
- 1 ½ cups graham cracker crumbs
- ½ cup unsweetened coconut flakes
- ½ cup granulated sugar
- ½ cup unsalted butter, melted
Ingredients for the Filling
- 2 large eggs
- 1 can (14 oz) sweetened condensed milk
- ½ cup fresh key lime juice (or substitute with regular lime juice)
- Zest from 2 key limes
- ½ teaspoon pure vanilla extract
Toppings and Garnishes
- Whipped cream for topping
- Lime slices for garnish
I love how simple the ingredients are for these Key Lime Pie Bars. The crust brings a sweet crunch with graham crackers and coconut. It sets a great base for the tangy, creamy filling. The sweetened condensed milk adds richness, while the fresh lime juice gives that zesty kick. Don't forget the lime zest! It boosts the flavor even more. Lastly, a dollop of whipped cream and a lime slice on top make each bar look stunning. These ingredients come together to create a delicious treat that everyone will enjoy.
Step-by-Step Instructions
Prepping the Ingredients
Preheating the Oven First, preheat your oven to 350°F (175°C). This step warms the oven for the crust and filling. A hot oven helps the bars cook evenly.
Mixing the Crust Ingredients Next, grab a large mixing bowl. Combine 1 ½ cups of graham cracker crumbs, ½ cup of unsweetened coconut flakes, ½ cup of granulated sugar, and ½ cup of melted butter. Stir until everything is coated in butter. This mixture will give your bars a tasty base.
Preparing the Filling In a separate bowl, whisk 2 large eggs until frothy. Make sure to mix in air for a light texture. Then, add 1 can of sweetened condensed milk, ½ cup of fresh key lime juice, zest from 2 key limes, and ½ teaspoon of pure vanilla extract. Whisk until smooth. This filling is where the zesty flavor shines.
Baking the Bars
Forming the Crust and Baking Take the crumb mixture and press it into a greased 9x9 inch baking dish. Use your fingers or a measuring cup to make it even. Bake the crust for about 10 minutes until it turns lightly golden. Let it cool fully before adding the filling.
Completing the Filling and Baking Carefully pour the lime filling over the cooled crust. Spread it out evenly. Bake in the oven for 15-18 minutes. Look for the center to be set with a slight jiggle. This shows it is ready.
Cooling and Chilling Process Let the baked bars cool to room temperature. After that, cover and place them in the fridge for at least 2 hours. This chilling time helps the flavors develop and the texture improve.
Now, you're ready to slice and serve these delightful key lime pie bars!
Tips & Tricks
Perfecting the Texture
Tips for a Flaky Crust To make a flaky crust, use cold butter. Cut the butter into the crumbs until it looks like wet sand. Press the mixture firmly into the pan. This helps it hold together better when baked. Bake the crust just until it turns golden. This gives it a great flavor and texture.
Whisking Techniques for Smooth Filling For a smooth filling, whisk the eggs until frothy. This adds air, making the filling light. Add the sweetened condensed milk slowly while whisking. Mix in key lime juice, zest, and vanilla until smooth. This ensures no lumps and a creamy texture.
Serving Suggestions
How to Present Key Lime Pie Bars To present the bars, cut them into neat squares. Place them on a rustic serving board. Add lime zest shavings around the bars for color. Top each bar with whipped cream and a lime slice. This makes your dessert look fresh and inviting.
Pairing Suggestions with Beverages These bars pair well with iced tea or sparkling water. A cold glass of lemonade also enhances the flavors. If you prefer wine, a sweet white wine works nicely. Each drink complements the zesty taste of the bars.
Pro Tips
- Use Fresh Limes: For the best flavor, always opt for fresh key limes instead of bottled juice. Fresh limes provide a vibrant taste that enhances the overall dessert.
- Chill Thoroughly: After baking, let the bars cool to room temperature before refrigerating. This helps in setting the bars properly and intensifies the flavors.
- Perfect Whipped Cream: For a stable whipped cream topping, consider adding a bit of powdered sugar and cornstarch while whipping. This will help it hold its shape longer.
- Garnish Creatively: Elevate the presentation by adding lime zest curls or mint leaves along with the lime slices for a pop of color and freshness.
Variations
Gluten-Free Option
To make key lime pie bars gluten-free, you can swap graham crackers for gluten-free options. Here are a few good substitutes:
- Almond flour: Use 1 ½ cups of almond flour for a nutty base.
- Coconut flour: Replace graham crackers with 1 cup of coconut flour.
- Gluten-free graham cracker crumbs: Many brands offer gluten-free versions that work well.
These options keep the great taste while making them safe for those with gluten issues.
Vegan Modifications
To create vegan key lime pie bars, you can easily replace eggs and dairy. Use these ingredients:
- Flax eggs: Mix 2 tablespoons of ground flaxseed with 6 tablespoons of water. Let it sit for 5 minutes to thicken.
- Coconut cream: Swap sweetened condensed milk with 1 can of coconut cream.
- Plant-based butter: Use vegan butter instead of unsalted butter for the crust.
These changes ensure the bars remain creamy and delicious without any animal products.
Storage Info
Best Practices for Storing
To keep your Key Lime Pie Bars fresh, follow these tips:
- Refrigeration Recommendations: Store the bars in an airtight container. Place them in the fridge for up to one week. The cool temperature keeps them firm and tasty.
- Freezing Tips for Long-Term Storage: You can freeze the bars for longer storage. Cut them into squares first. Wrap each piece tightly in plastic wrap. Then, place them in a freezer-safe bag. They can last up to three months in the freezer. When you want to eat them, thaw in the fridge overnight.
Reheating or Reserving Leftovers
If you have leftovers, here's how to safely reheat the bars:
- How to Safely Reheat Bars: To warm the bars, place them on a microwave-safe plate. Heat in the microwave for about 10-15 seconds. Check to see if they are warm enough. You want them soft but not too hot. Enjoy them fresh again!
FAQs
Common Questions
How to Substitute Key Limes? You can use regular limes in place of key limes. The taste will change slightly. Regular limes are more tart, but they still work well. Just make sure to use the same amount of juice and zest. This keeps the flavor strong and fresh.
Can I Use Regular Lime Juice? Yes, you can use bottled regular lime juice. It is convenient and still gives a nice flavor. However, fresh juice always tastes better. If you can, squeeze fresh limes for the best taste. The zest of fresh limes also adds a nice touch.
What if I Don’t Have Graham Crackers? No worries! You can use other cookies like digestive biscuits or vanilla wafers. Just crush them up like you would graham crackers. You can also make a crust with oats and nuts for a different flavor. This keeps your dessert tasty and fun.
Making Key Lime Pie Bars is fun and easy. We covered all the steps, from the crust to the filling and toppings. You learned tips for a flaky texture and how to present your bars nicely. We also shared vegan and gluten-free options, ensuring everyone can enjoy this treat.
Now, you have the tools and knowledge to impress your friends and family with delicious bars. Enjoy baking and sharing your tasty creations!