No Bake S’mores Bars Simple and Tasty Treat

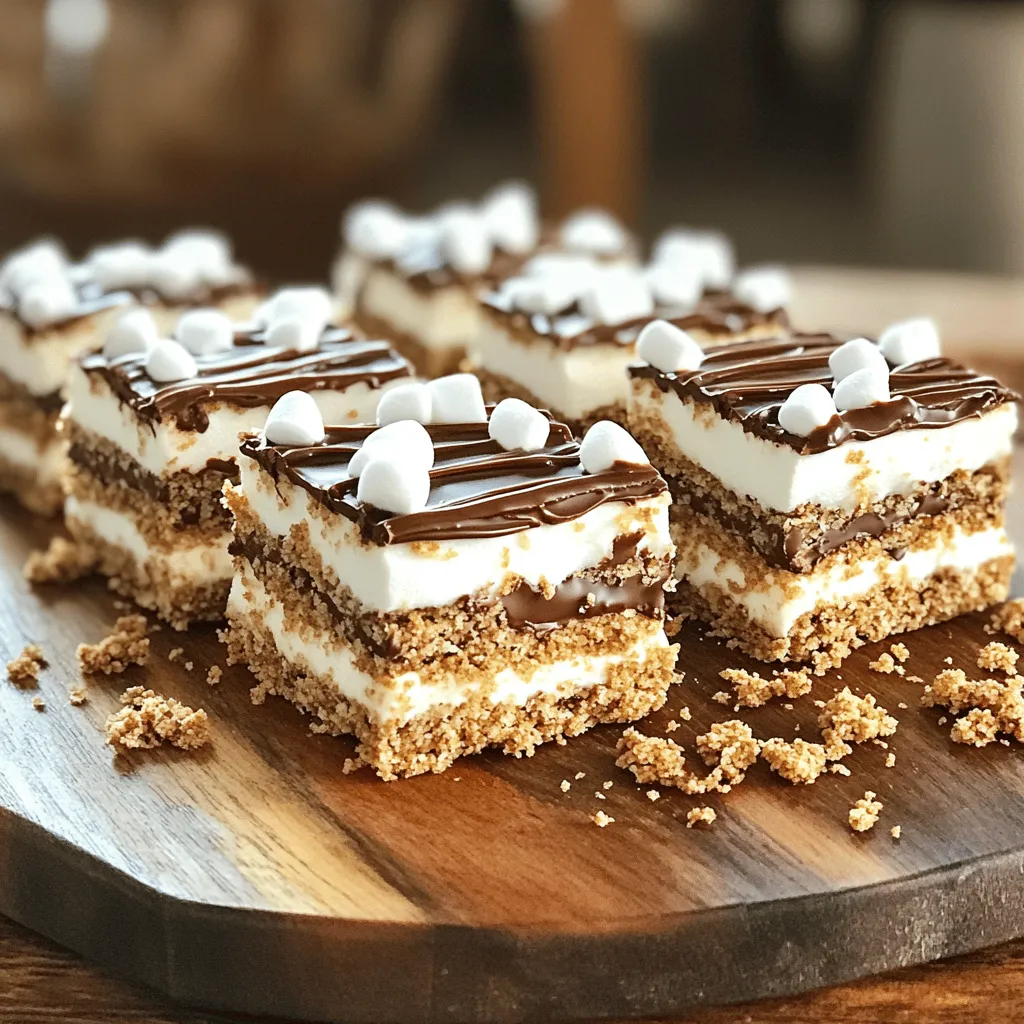
Craving a sweet treat that’s easy to make? Look no further! My No Bake S’mores Bars offer all the gooey, chocolatey goodness you’ve been wishing for without the hassle of an oven. Just gather simple ingredients, follow straightforward steps, and enjoy a delicious dessert ideal for any occasion. Ready to dive into this tasty adventure? Let’s get started on satisfying that sweet tooth!

Ingredients

Complete List of Ingredients

– 1 ½ cups graham cracker crumbs

– ½ cup unsweetened cocoa powder

– ½ cup granulated sugar

– ½ cup unsalted butter, melted

– 2 cups miniature marshmallows

– 1 cup milk chocolate chips

– 1 teaspoon vanilla extract

– ½ cup semi-sweet chocolate chips (for drizzling)

Gather these ingredients before you start. Each one plays a role in making these No Bake S’mores Bars a hit. The graham cracker crumbs give a sweet crunch. Cocoa powder adds rich flavor. Granulated sugar sweetens the mix. Unsalted butter binds it all together. Miniature marshmallows create that classic s’mores taste. Milk chocolate chips and vanilla extract bring a creamy finish. The semi-sweet chocolate drizzle is the perfect touch.

Ingredient Substitutions

You can swap out ingredients if needed. For a sweeter taste, use honey or maple syrup. Use 1/3 cup of either as a substitute for granulated sugar. If you want dairy-free bars, try coconut oil instead of butter. For the chocolate, opt for dairy-free chocolate chips. These swaps keep the bars tasty while meeting your needs.

Tools and Equipment Needed

To make these bars, you need a few tools. Having the right equipment makes the process easy.

– Measuring cups and spoons

– Mixing bowls

– Baking pan (8×8 inch)

– Microwave-safe bowls for melting chocolate

These tools help you measure, mix, and melt with ease. The baking pan shapes your bars perfectly. A microwave-safe bowl allows you to melt chocolate quickly. With these tools, you are all set to create a delicious treat. For the full recipe, check out the complete instructions above.

Step-by-Step Instructions

Preparing the Base

– In a large mixing bowl, combine the graham cracker crumbs, cocoa powder, and sugar. Mix well until everything is even.

– Pour in the melted butter and vanilla extract. Stir until the mixture looks like damp crumbs.

Assembling the S’mores Bars

– Line an 8×8 inch baking pan with parchment paper. Let some paper hang over the edges.

– Press the graham cracker mix firmly into the bottom of the pan. Chill in the fridge for about 15 minutes.

– In a microwave-safe bowl, add the milk chocolate chips and 1 cup of miniature marshmallows. Heat in 20-second intervals, stirring in between. Stop when the mix is smooth.

Final Touches

– Take the chilled crust out of the fridge. Spread the melted chocolate and marshmallow mix evenly on top.

– Sprinkle the remaining miniature marshmallows over the chocolate layer. Press them down gently.

– In another bowl, melt the semi-sweet chocolate chips as before. Drizzle this melted chocolate over the marshmallows.

– Return the pan to the fridge and chill for at least 2 hours. The bars should feel firm when set.

– Once set, use the parchment paper to lift the bars from the pan. Cut them into squares and enjoy this tasty treat!

You can find the Full Recipe for more detailed steps and serving suggestions.

Tips & Tricks

Achieving the Perfect Texture

To get a firm yet chewy bar, make sure you measure your ingredients right. Use the right amount of butter; too much can make the bars greasy. When mixing the graham cracker crumbs and cocoa, stir until every crumb is coated with butter. Press the mixture firmly into the pan, but don’t overdo it. This helps keep a nice texture.

Cutting the bars can be tricky. To prevent sticking, use a sharp knife. Dip the knife in hot water, then wipe it dry before making each cut. This keeps the edges clean and helps the bars hold their shape.

Storing and Serving Tips

To store leftover bars, place them in an airtight container. Keep them in the fridge to maintain freshness. They can last up to a week, but they are best when fresh. If you want to serve them warm, zap them in the microwave for a few seconds.

For a fun twist, serve the bars with ice cream or whipped cream. You can also add a sprinkle of crushed graham crackers on top for added crunch.

Common Mistakes to Avoid

One common mistake is melting chocolate too fast. If you heat it too long, it can burn. Always melt chocolate in short bursts and stir in between. This keeps it smooth and creamy.

Another mistake is over-pressing the graham cracker base. While it should be firm, pressing too hard can make it tough. Aim for a good balance to keep the bars light and easy to enjoy.

Variations

Flavor Customizations

You can easily change the flavor of your no bake s’mores bars. Adding peanut butter or any nut butter brings a creamy texture. Mix in about half a cup for a rich taste. You can also try different types of chocolates. Swap milk chocolate for dark or white chocolate for a new twist. Each choice gives a different flavor, making your bars unique.

Dietary Variations

If you need gluten-free options, use almond flour or gluten-free graham cracker crumbs. You can also try a nut-based crust for a tasty base. For a low-sugar version, use natural sweeteners like honey or maple syrup. These choices keep the flavor while meeting dietary needs.

Seasonal Variants

Seasonal flavors can make your bars even more exciting. For fall, add pumpkin spice to the chocolate layer. In winter, use peppermint extract for a refreshing taste. You can also create themed bars for holidays. Use orange food coloring for Halloween or mix in red and green sprinkles for Christmas. These fun ideas keep your treats festive and fun!

For the full recipe, check out the ingredients and instructions provided.

Storage Info

Best Practices for Storage

To keep your no bake s’mores bars fresh, use airtight containers. This helps to lock in moisture and flavor. Store them in the fridge for best results. They will stay good for up to a week. If you want to save them longer, you can freeze them. Wrap each bar in plastic wrap. Place wrapped bars in a freezer-safe bag or container. They can last for up to three months in the freezer.

Reheating and Refreshing Leftovers

If your bars feel hard after chilling, you can refresh them. Let them sit at room temperature for a few minutes. This makes them softer and easier to eat. If you want to drizzle more chocolate, melt it again. Use the microwave in short bursts, stirring in between. This keeps the chocolate smooth and easy to pour.

Signs the Bars Have Gone Bad

Check for changes in color or smell. If the bars look dry or crumbly, they may be spoiled. You might also notice an off smell. If you see mold, it’s best to throw them away. Always dispose of spoiled food properly to avoid any health risks.

FAQs

How long do no bake S’mores bars last?

No bake S’mores bars can last up to a week in the refrigerator. If you store them in the freezer, they can last for about three months. Just remember to wrap them well in plastic wrap or foil to keep them fresh.

Can I make these bars in advance?

Yes, you can make these bars a day or two ahead of time. This gives them time to chill and set properly. Just store them in the fridge until you’re ready to serve.

What can I use instead of graham cracker crumbs?

You can use crushed cookies like digestive biscuits or vanilla wafers. For a gluten-free option, try almond flour or crushed gluten-free cookies. These will give you a similar flavor and texture.

How can I ensure my chocolate melts smoothly?

To melt chocolate smoothly, use a microwave-safe bowl. Heat in short bursts of 20 seconds. Stir between each burst to avoid hot spots. This method helps prevent the chocolate from seizing up.

Are there vegan options for this recipe?

Yes, you can use coconut oil instead of butter. For chocolate, choose dairy-free chips. Use vegan marshmallows to keep it plant-based. These swaps work well without losing flavor.

For the full recipe, check out the detailed instructions above.

In this post, we covered how to make delicious no-bake S’mores bars. You learned about the key ingredients, important tools, and step-by-step instructions. I also shared tips for perfect texture and common mistakes to avoid.

These treats are easy to customize and perfect for any season. Enjoy your time making these bars, and do not forget to store them well. With the right care, they’ll last longer and taste even better. Happy cooking!

- 1 ½ cups graham cracker crumbs - ½ cup unsweetened cocoa powder - ½ cup granulated sugar - ½ cup unsalted butter, melted - 2 cups miniature marshmallows - 1 cup milk chocolate chips - 1 teaspoon vanilla extract - ½ cup semi-sweet chocolate chips (for drizzling) Gather these ingredients before you start. Each one plays a role in making these No Bake S’mores Bars a hit. The graham cracker crumbs give a sweet crunch. Cocoa powder adds rich flavor. Granulated sugar sweetens the mix. Unsalted butter binds it all together. Miniature marshmallows create that classic s’mores taste. Milk chocolate chips and vanilla extract bring a creamy finish. The semi-sweet chocolate drizzle is the perfect touch. You can swap out ingredients if needed. For a sweeter taste, use honey or maple syrup. Use 1/3 cup of either as a substitute for granulated sugar. If you want dairy-free bars, try coconut oil instead of butter. For the chocolate, opt for dairy-free chocolate chips. These swaps keep the bars tasty while meeting your needs. To make these bars, you need a few tools. Having the right equipment makes the process easy. - Measuring cups and spoons - Mixing bowls - Baking pan (8x8 inch) - Microwave-safe bowls for melting chocolate These tools help you measure, mix, and melt with ease. The baking pan shapes your bars perfectly. A microwave-safe bowl allows you to melt chocolate quickly. With these tools, you are all set to create a delicious treat. For the full recipe, check out the complete instructions above. - In a large mixing bowl, combine the graham cracker crumbs, cocoa powder, and sugar. Mix well until everything is even. - Pour in the melted butter and vanilla extract. Stir until the mixture looks like damp crumbs. - Line an 8x8 inch baking pan with parchment paper. Let some paper hang over the edges. - Press the graham cracker mix firmly into the bottom of the pan. Chill in the fridge for about 15 minutes. - In a microwave-safe bowl, add the milk chocolate chips and 1 cup of miniature marshmallows. Heat in 20-second intervals, stirring in between. Stop when the mix is smooth. - Take the chilled crust out of the fridge. Spread the melted chocolate and marshmallow mix evenly on top. - Sprinkle the remaining miniature marshmallows over the chocolate layer. Press them down gently. - In another bowl, melt the semi-sweet chocolate chips as before. Drizzle this melted chocolate over the marshmallows. - Return the pan to the fridge and chill for at least 2 hours. The bars should feel firm when set. - Once set, use the parchment paper to lift the bars from the pan. Cut them into squares and enjoy this tasty treat! You can find the Full Recipe for more detailed steps and serving suggestions. To get a firm yet chewy bar, make sure you measure your ingredients right. Use the right amount of butter; too much can make the bars greasy. When mixing the graham cracker crumbs and cocoa, stir until every crumb is coated with butter. Press the mixture firmly into the pan, but don’t overdo it. This helps keep a nice texture. Cutting the bars can be tricky. To prevent sticking, use a sharp knife. Dip the knife in hot water, then wipe it dry before making each cut. This keeps the edges clean and helps the bars hold their shape. To store leftover bars, place them in an airtight container. Keep them in the fridge to maintain freshness. They can last up to a week, but they are best when fresh. If you want to serve them warm, zap them in the microwave for a few seconds. For a fun twist, serve the bars with ice cream or whipped cream. You can also add a sprinkle of crushed graham crackers on top for added crunch. One common mistake is melting chocolate too fast. If you heat it too long, it can burn. Always melt chocolate in short bursts and stir in between. This keeps it smooth and creamy. Another mistake is over-pressing the graham cracker base. While it should be firm, pressing too hard can make it tough. Aim for a good balance to keep the bars light and easy to enjoy. {{image_4}} You can easily change the flavor of your no bake s'mores bars. Adding peanut butter or any nut butter brings a creamy texture. Mix in about half a cup for a rich taste. You can also try different types of chocolates. Swap milk chocolate for dark or white chocolate for a new twist. Each choice gives a different flavor, making your bars unique. If you need gluten-free options, use almond flour or gluten-free graham cracker crumbs. You can also try a nut-based crust for a tasty base. For a low-sugar version, use natural sweeteners like honey or maple syrup. These choices keep the flavor while meeting dietary needs. Seasonal flavors can make your bars even more exciting. For fall, add pumpkin spice to the chocolate layer. In winter, use peppermint extract for a refreshing taste. You can also create themed bars for holidays. Use orange food coloring for Halloween or mix in red and green sprinkles for Christmas. These fun ideas keep your treats festive and fun! For the full recipe, check out the ingredients and instructions provided. To keep your no bake s’mores bars fresh, use airtight containers. This helps to lock in moisture and flavor. Store them in the fridge for best results. They will stay good for up to a week. If you want to save them longer, you can freeze them. Wrap each bar in plastic wrap. Place wrapped bars in a freezer-safe bag or container. They can last for up to three months in the freezer. If your bars feel hard after chilling, you can refresh them. Let them sit at room temperature for a few minutes. This makes them softer and easier to eat. If you want to drizzle more chocolate, melt it again. Use the microwave in short bursts, stirring in between. This keeps the chocolate smooth and easy to pour. Check for changes in color or smell. If the bars look dry or crumbly, they may be spoiled. You might also notice an off smell. If you see mold, it's best to throw them away. Always dispose of spoiled food properly to avoid any health risks. No bake S’mores bars can last up to a week in the refrigerator. If you store them in the freezer, they can last for about three months. Just remember to wrap them well in plastic wrap or foil to keep them fresh. Yes, you can make these bars a day or two ahead of time. This gives them time to chill and set properly. Just store them in the fridge until you're ready to serve. You can use crushed cookies like digestive biscuits or vanilla wafers. For a gluten-free option, try almond flour or crushed gluten-free cookies. These will give you a similar flavor and texture. To melt chocolate smoothly, use a microwave-safe bowl. Heat in short bursts of 20 seconds. Stir between each burst to avoid hot spots. This method helps prevent the chocolate from seizing up. Yes, you can use coconut oil instead of butter. For chocolate, choose dairy-free chips. Use vegan marshmallows to keep it plant-based. These swaps work well without losing flavor. For the full recipe, check out the detailed instructions above. In this post, we covered how to make delicious no-bake S’mores bars. You learned about the key ingredients, important tools, and step-by-step instructions. I also shared tips for perfect texture and common mistakes to avoid. These treats are easy to customize and perfect for any season. Enjoy your time making these bars, and do not forget to store them well. With the right care, they'll last longer and taste even better. Happy cooking!

No Bake S’mores Bars

Indulge in the ultimate dessert with these No Bake S’mores Bars! Packed with graham cracker crumbs, rich chocolate, and fluffy marshmallows, this no-bake treat is a chocolate lover’s dream. Follow our simple steps to create this easy recipe that’s perfect for any occasion. Chill, slice, and enjoy a delicious taste of summer anytime. Click through for the full recipe and bring the campfire experience to your kitchen!

Ingredients
  

1 ½ cups graham cracker crumbs

½ cup unsweetened cocoa powder

½ cup granulated sugar

½ cup unsalted butter, melted

2 cups miniature marshmallows

1 cup milk chocolate chips

1 teaspoon vanilla extract

½ cup semi-sweet chocolate chips (for drizzling)

Instructions
 

Prepare the Base: In a large mixing bowl, thoroughly combine the graham cracker crumbs, cocoa powder, and granulated sugar. Ensure the mixture is uniform to provide a balanced flavor.

    Incorporate the Butter: Add the melted unsalted butter and vanilla extract to the dry mixture. Stir until every breadcrumb is fully moistened and the mixture resembles a damp crumble.

      Chill the Mixture: Line an 8x8 inch square baking pan with parchment paper, allowing some excess paper to hang over the edges for easy lifting later. Firmly press the graham cracker mixture into the bottom of the prepared pan, creating an even layer. Refrigerate for around 15 minutes to help it set.

        Melt the Chocolate: In a microwave-safe bowl, combine the milk chocolate chips with 1 cup of the miniature marshmallows. Heat in the microwave in 20-second intervals, stirring well between each session, until the chocolate is melted and smooth (this should take about 1 minute total).

          Combine and Set: Retrieve the chilled crust from the fridge. Evenly spread the melted chocolate and marshmallow mixture over the set graham cracker crust. Sprinkle the remaining miniature marshmallows on top, gently pressing them into the chocolate layer for better adhesion.

            Melt the Drizzle: In a separate microwave-safe bowl, melt the semi-sweet chocolate chips as you did before. Once melted, drizzle this chocolate over the marshmallow layer using a spoon or a piping bag for finesse.

              Chill Again: Return the assembled pan to the fridge and let it chill for at least 2 hours, or until the bars have fully set and are firm to the touch.

                Serve: Once set, use the parchment paper overhang to lift the bars from the pan. Cut into squares for easy serving and enjoy the delectable treat!

                  Prep Time: 25 minutes | Total Time: 2 hours 25 minutes | Servings: 16

                    - Presentation Tips: For an inviting presentation, stack the bars on a rustic wooden platter and sprinkle additional graham cracker crumbs on top for a classic s’mores touch. Consider garnishing with whole marshmallows or small chocolate squares alongside for an extra visual appeal and a delightful treat!

                      Leave a Comment

                      Recipe Rating