Looking for a quick and easy way to make soft and fluffy dinner buns without yeast? You’ve come to the right place! In this guide, I’ll show you how to whip up delightful no yeast dinner buns that will impress anyone at your table. With simple ingredients and straightforward steps, you’ll have warm, delicious buns ready in no time. Let’s dive into this easy recipe that anyone can master!
Why I Love This Recipe
- Quick Preparation: This recipe takes only 10 minutes of prep time, making it perfect for last-minute dinners or unexpected guests.
- No Yeast Needed: Say goodbye to waiting for dough to rise! These buns are yeast-free, which means you can enjoy them in no time.
- Fluffy and Delicious: Thanks to the yogurt and baking powder, these buns turn out incredibly fluffy and soft, making them irresistible.
- Customizable Flavor: Add your favorite herbs or spices to make these buns your own. Garlic powder or dried herbs elevate the taste effortlessly.
Ingredients
List of Ingredients for No Yeast Dinner Buns
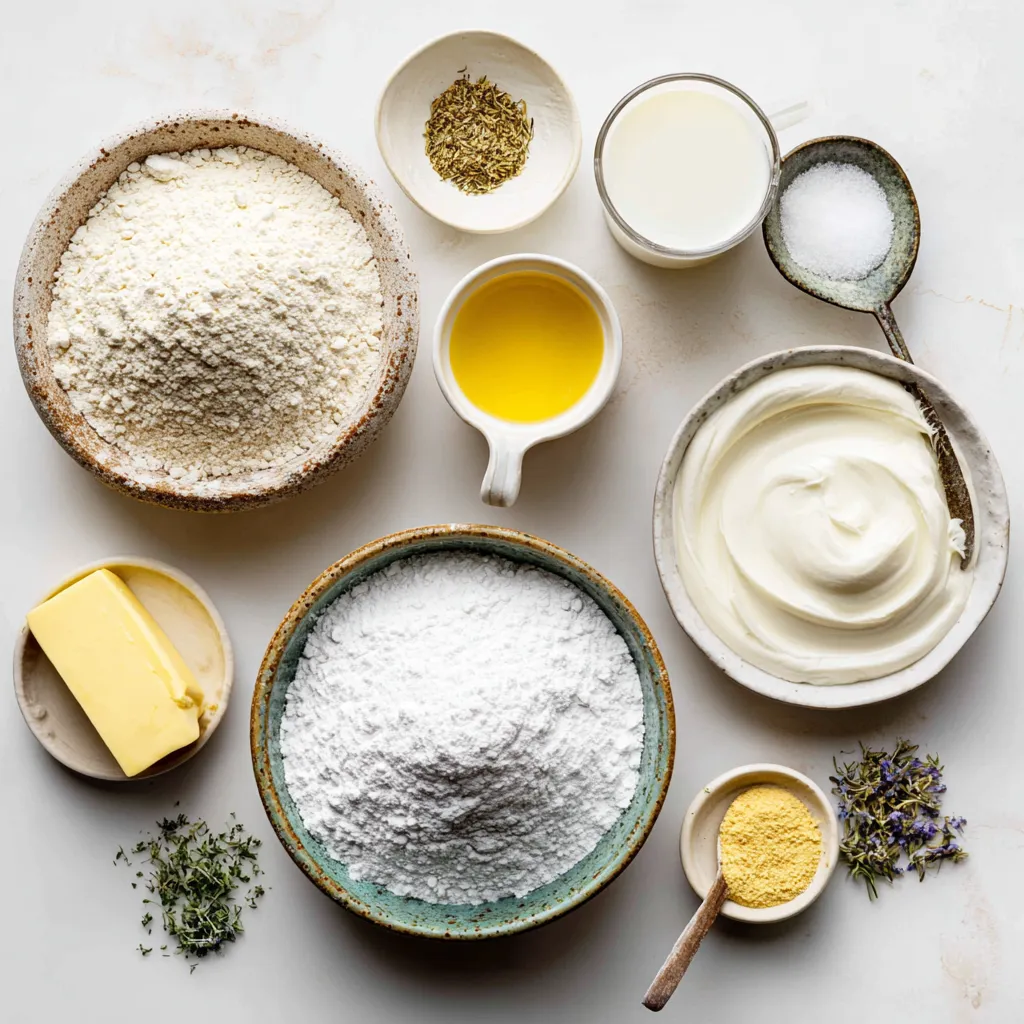
To make the no yeast dinner buns, gather these ingredients:
– 2 cups all-purpose flour
– 1 tablespoon baking powder
– ½ teaspoon salt
– 2 tablespoons granulated sugar
– 1 cup plain yogurt
– ¼ cup milk
– 4 tablespoons unsalted butter, melted
Alternative Ingredients and Substitutes
You can swap some ingredients if needed:
– Use whole wheat flour for a heartier bun.
– Substitute yogurt with sour cream or buttermilk for a different taste.
– Try almond milk or oat milk instead of regular milk for a dairy-free option.
– Honey can replace granulated sugar for a natural sweetener.
Optional Flavor Enhancements
Want to spice up your buns? Here are fun options:
– Add 1 teaspoon of garlic powder for a savory kick.
– Mix in dried herbs like rosemary, thyme, or oregano for more flavor.
– Cheese lovers can add shredded cheese to the dough for a cheesy twist.
Step-by-Step Instructions
Prepping the Oven and Baking Sheet
Start by preheating your oven to 375°F (190°C). This step is key for even baking. Line a baking sheet with parchment paper. This helps the buns not stick. It also makes clean-up easier.
Mixing Dry Ingredients
In a large mixing bowl, combine the following dry ingredients:
– 2 cups all-purpose flour
– 1 tablespoon baking powder
– ½ teaspoon salt
– 2 tablespoons granulated sugar
Whisk these dry ingredients together well. This ensures they mix evenly. It also helps prevent clumps that may ruin your buns.
Combining Wet Ingredients and Forming Dough
In a second bowl, mix these wet ingredients:
– 1 cup plain yogurt
– ¼ cup milk
– 4 tablespoons melted unsalted butter
Whisk them to make a smooth mixture. Now, pour this wet mix into the dry ingredients. Stir gently with a spoon or spatula. Stop when a soft dough forms. If you want, fold in 1 teaspoon garlic powder or dried herbs for flavor.
Shaping the Buns
Transfer the dough to a lightly floured surface. Knead it gently for about 1 minute. You want it smooth but not over-kneaded. Over-kneading makes the buns tough.
Divide the dough into 8 equal pieces. Roll each piece into a round bun. Make sure they are similar in size for even baking.
Baking Instructions
Place the shaped buns on your prepared baking sheet. Leave space between them so they can rise. Bake in the preheated oven for 15-20 minutes. They are done when golden brown. A toothpick should come out clean when inserted.
Once baked, take them out and let them cool slightly. Enjoy warm, plain, or with butter!
Tips & Tricks
Achieving the Perfect Texture
To get soft and fluffy dinner buns, focus on the dough. Use fresh baking powder for rise. Don’t over-knead the dough; just a minute is enough. This keeps your buns light. Make sure to shape them evenly. Uniform size helps them bake well.
Common Mistakes to Avoid
One common mistake is using old baking powder. Always check the date. Over-kneading can lead to tough buns. Avoid mixing the wet and dry ingredients too harshly. You want a soft dough, not a brick. Also, don’t skip the parchment paper; it keeps buns from sticking.
Serving Suggestions for Dinner Buns
These buns shine when served warm. Try them with butter or olive oil. For a twist, add some garlic powder or herbs to the dough. Serve them in a warm basket, lined with a cloth. This keeps them cozy and inviting. You can also pair them with soups or salads for a complete meal.
Pro Tips
- Use Fresh Ingredients: Fresh baking powder is crucial for achieving the best rise in your buns. Check the expiration date before using.
- Add Texture: For a crunchier exterior, sprinkle sesame seeds or poppy seeds on top of the buns before baking.
- Experiment with Flavors: Don’t hesitate to customize your buns with different herbs and spices. Try adding cheese, jalapeños, or olives for a savory twist.
- Storage Tips: Store any leftover buns in an airtight container at room temperature for up to 2 days, or freeze them for longer storage. Reheat in the oven for the best texture.
Variations
Cheese-Stuffed Dinner Buns
You can add cheese to your dinner buns for a tasty twist. Use your favorite cheese, like cheddar or mozzarella. After shaping the dough, flatten each piece. Place a small chunk of cheese in the center. Fold the dough around the cheese and shape it back into a bun. This method keeps the cheese melted and gooey inside the bun. When you bite in, you get a warm, cheesy surprise.
Herb and Garlic Variations
For a herb and garlic flavor, mix in garlic powder and dried herbs. Rosemary, thyme, or oregano work well. Add about one teaspoon of each for a burst of flavor. You can mix these into the dry ingredients before adding the wet ones. This will give your buns a fragrant, savory taste that pairs nicely with soups or salads.
Sweet Dinner Bun Options
If you want sweet buns, try adding a bit of sugar and cinnamon. Mix two tablespoons of sugar and one teaspoon of cinnamon into the dry ingredients. You can also fold in chocolate chips or dried fruit. These sweet buns make a great breakfast or dessert. Serve them warm with butter or a drizzle of honey for an extra treat.
Storage Info
Best Practices for Storing Leftover Buns
To keep your leftover buns fresh, store them in an airtight container. You can also wrap them in plastic wrap. This will keep them soft and fluffy for up to 2 days at room temperature. If you want to keep them longer, storing in the fridge can dry them out, so avoid that. Instead, consider freezing them if you have extras.
Reheating Techniques
When you want to enjoy your leftover buns, the best way to reheat them is in the oven. Preheat your oven to 350°F (175°C). Place the buns on a baking sheet and cover them with foil. Heat for about 10 minutes, or until warm. If you like a bit of crispness, remove the foil for the last 2 minutes. You can also use a microwave, but this may make them softer. Heat them for about 15-20 seconds, checking to avoid overdoing it.
Freezing and Thawing Instructions
If you want to freeze your buns, let them cool completely first. Then, wrap each bun tightly in plastic wrap. Place them in a freezer bag, removing as much air as possible. These buns can last up to 3 months in the freezer. When you’re ready to enjoy them, thaw them overnight in the fridge. Reheat them in the oven or microwave to bring back their soft texture. Enjoy every bite!
FAQs
Can I use whole wheat flour instead of all-purpose flour?
Yes, you can use whole wheat flour. The buns will taste nuttier and denser. You may need to add a bit more liquid to keep the dough moist. Start with an extra tablespoon of milk or yogurt. Adjust as needed for the right texture.
How can I make these buns dairy-free?
To make the buns dairy-free, swap the yogurt and milk with plant-based options. Use almond milk or oat milk. For yogurt, try coconut yogurt or soy yogurt. These choices work well without changing the flavor much.
What can I use if I don’t have yogurt?
If you lack yogurt, you can use sour cream, buttermilk, or even silken tofu. Mix these options well to achieve a similar creamy texture. Each choice will alter the taste slightly, but they will still work great.
How do I know when the buns are done baking?
You know the buns are done when they turn golden brown on top. Insert a toothpick in the center. If it comes out clean, your buns are ready. They should feel firm yet soft when you touch them.
Can I double or halve this recipe?
Yes, you can easily double or halve this recipe. Just keep the same ratios of ingredients. For example, if you double, use 4 cups of flour and adjust the other ingredients accordingly. Enjoy making as many buns as you need!
You’ve learned how to make no yeast dinner buns from start to finish. We covered ingredients, clear steps, and tips for success. You now know about fun variations and how to store leftovers.
Think of these buns as a simple, tasty addition to any meal. With a few easy swaps, you can customize them to fit your needs. Enjoy baking, experimenting, and sharing these delightful buns with other