Looking for a treat that's quick, easy, and delicious? Peanut Butter Banana Nice Cream is your answer! This creamy, flavorful dessert will satisfy your sweet tooth without guilt. Made with just a few simple ingredients, you’ll whip up a delightful snack in minutes. Let’s dive into the amazing world of nice cream and discover how you can make this healthy alternative to ice cream today!
Why I Love This Recipe
- Healthier Dessert Option: This nice cream is a guilt-free treat made primarily from frozen bananas, making it naturally sweet and creamy.
- Quick and Easy Preparation: With minimal ingredients and just a few simple steps, you can whip up this refreshing dessert in no time.
- Customizable Flavors: You can easily adjust the sweetness or add different toppings like nuts or chocolate to suit your taste.
- Perfect for Hot Days: This peanut butter banana nice cream is a delicious way to cool down on warm days, making it a fantastic summer treat.
Ingredients
Overview of Required Ingredients
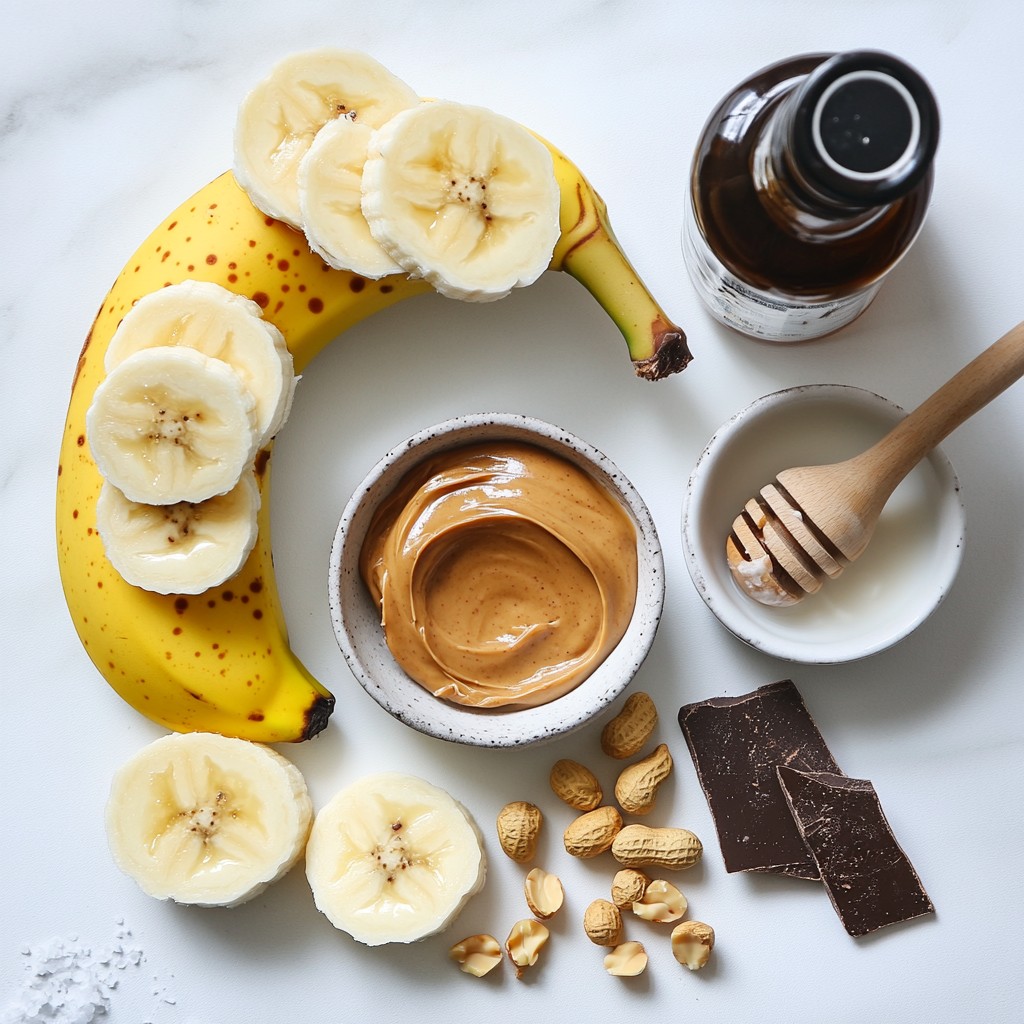
To make Peanut Butter Banana Nice Cream, you need a few simple items:
- 4 ripe bananas, sliced and frozen
- 1/4 cup creamy peanut butter
- 1 tablespoon honey or maple syrup (optional)
- 1/2 teaspoon pure vanilla extract
- 1/4 cup unsweetened almond milk (or any milk you like)
- A pinch of sea salt
These ingredients blend together to create a creamy, delicious treat. The frozen bananas give it the nice cream texture. Peanut butter adds rich flavor and a nutty taste. The optional honey or maple syrup can sweeten the mix if you prefer.
Substitutions and Alternatives
If you don't have ripe bananas, you can use fresh ones. Just slice and freeze them first. For peanut butter, you can try almond butter or cashew butter. They will change the flavor but still taste great. If you're avoiding dairy, almond milk works well, but you can also use oat milk or coconut milk. If you're allergic to nuts, skip the nut butter altogether and use sunflower seed butter instead.
Optional Toppings and Add-ins
You can get creative with toppings. Here are some tasty options:
- Chopped peanuts
- Dark chocolate shavings
- Shredded coconut
- Fresh berries
These add extra flavor and texture to your nice cream. Feel free to mix in things like chocolate chips or swirl in some caramel for a fun twist. Enjoy your delicious creation!
Step-by-Step Instructions
Preparing the Bananas
First, peel the ripe bananas. Slice them into 1-inch pieces. Lay the banana slices on a baking sheet. Make sure they do not touch each other. Line the sheet with parchment paper for easy removal. Freeze the banana slices for at least 2 hours. This helps them get nice and hard, which is key for the best texture.
Blending the Ingredients
Once your bananas are frozen, grab your food processor. Add the frozen banana slices into the bowl. Next, scoop in 1/4 cup of creamy peanut butter. If you want it sweeter, add a tablespoon of honey or maple syrup. Pour in 1/4 cup of unsweetened almond milk. Don’t forget a pinch of sea salt! Blend everything on high speed. Stop to scrape down the sides with a spatula as needed. Keep blending until the mix is smooth and creamy. It should look like soft serve ice cream.
Adjusting Sweetness and Consistency
After blending, taste your nice cream. If you want it sweeter, add a bit more honey or maple syrup. Blend again briefly to mix in the sweetener. If you like a firmer texture, put the nice cream in an airtight container. Freeze it for another 1-2 hours. This will thicken it up even more. When you’re ready to serve, scoop it into bowls. You can top it with chopped peanuts or dark chocolate shavings if you like. Enjoy your treat!
Tips & Tricks
Achieving the Perfect Creamy Texture
To get that perfect creamy texture in your nice cream, use fully ripe bananas. They should be sweet and soft. Freezing the banana slices is key. Make sure they freeze for at least two hours. This ensures they blend smoothly. When you blend, pause to scrape down the sides. This helps mix everything well. Adding almond milk helps too, but don’t add too much. Just enough to help it blend is best.
Storage Tips for Leftovers
If you have leftover nice cream, store it in an airtight container. This keeps it fresh and prevents ice crystals. It can last in the freezer for up to two weeks. When you want to enjoy it again, let it sit at room temperature for a few minutes. This makes it easier to scoop. If it feels too hard, blend it again with a splash of milk to get that creamy texture back.
Serving Suggestions and Presentation Ideas
Serve your nice cream in fun bowls or waffle cones to make it special. You can top it with chopped peanuts for crunch. A drizzle of peanut butter adds more flavor. Try adding some dark chocolate shavings for a sweet touch. You can also mix in fresh fruit or sprinkles. These simple touches make your nice cream look and taste gourmet!
Pro Tips
- Use Ripe Bananas: The riper the bananas, the sweeter and creamier your nice cream will be. Look for bananas with brown spots for the best flavor.
- Experiment with Nut Butters: While peanut butter is delicious, feel free to try almond butter or cashew butter for a different flavor profile in your nice cream.
- Make it Vegan: For a completely plant-based option, use maple syrup instead of honey and ensure your nut butter is also vegan-friendly.
- Customize Your Toppings: Get creative with toppings! Try adding sliced strawberries, coconut flakes, or even a sprinkle of cinnamon for a unique twist.
Variations
Flavor Additions (e.g., chocolate, berries)
You can make your nice cream even better by adding flavors. Try mixing in a few tablespoons of cocoa powder for a rich chocolate taste. You can also blend in fresh or frozen berries like strawberries or blueberries. These fruits add natural sweetness and a pop of color to your treat. For a tropical twist, add a spoonful of coconut or mango puree.
Using Different Nut Butters
Peanut butter is great, but feel free to switch it up. Almond butter or cashew butter works well too. Each nut butter brings its own flavor and texture. You might even try sunflower seed butter for a nut-free option. This keeps your nice cream tasty and fun to explore.
Vegan and Gluten-Free Options
The base of this nice cream is already vegan and gluten-free. Just skip the honey if you want it fully plant-based. Use maple syrup instead for added sweetness. If you want to make it nut-free, swap almond milk for oat or soy milk. This way, everyone can enjoy this cool treat!
Storage Info
Best Practices for Freezing Nice Cream
To keep your Peanut Butter Banana Nice Cream fresh, store it in an airtight container. This will prevent ice crystals from forming. If you want to scoop it easily later, freeze it in smaller portions. Use ice cube trays or muffin tins for this. Just pop out a few pieces when you want a treat.
How Long Does It Last?
When stored properly, nice cream lasts about one month in the freezer. After that, it may lose flavor and texture. Always check for any signs of freezer burn before eating. It’s best to enjoy it fresh, but knowing it can last helps if you have leftovers.
Signs of Spoilage
Look for changes in color or texture. If the nice cream has ice crystals or looks dry, it's best to toss it. Also, if you smell anything off, that’s a sign to throw it out. Trust your senses; they are your best tools for safe eating.
FAQs
Can I make this nice cream without a food processor?
Yes, you can make nice cream without a food processor. Use a blender instead. Just ensure your blender is strong enough to handle frozen bananas. You might need to stop and stir the mix often. If it gets too thick, add a splash of almond milk to help it blend.
What is the difference between nice cream and regular ice cream?
Nice cream is different from regular ice cream because it uses bananas as the main base. This makes it dairy-free and vegan. Regular ice cream contains cream and sugar, which makes it higher in calories. Nice cream is also easier to make at home, with fewer ingredients.
How can I make this recipe lower in calories?
To lower the calories in this recipe, you can skip the honey or maple syrup. The ripe bananas add natural sweetness. You could also reduce the amount of peanut butter. Use about two tablespoons instead of a quarter cup. This keeps the flavor but cuts some calories.
You learned how to make delicious nice cream. We covered the ingredients, step-by-step instructions, and helpful tips. I shared fun variations and how to store your nice cream.
Making this treat is easy and fun. You can enjoy it with different flavors and toppings. Try the ideas in this post to create your best batch. Get creative and have a great time with your nice cream!