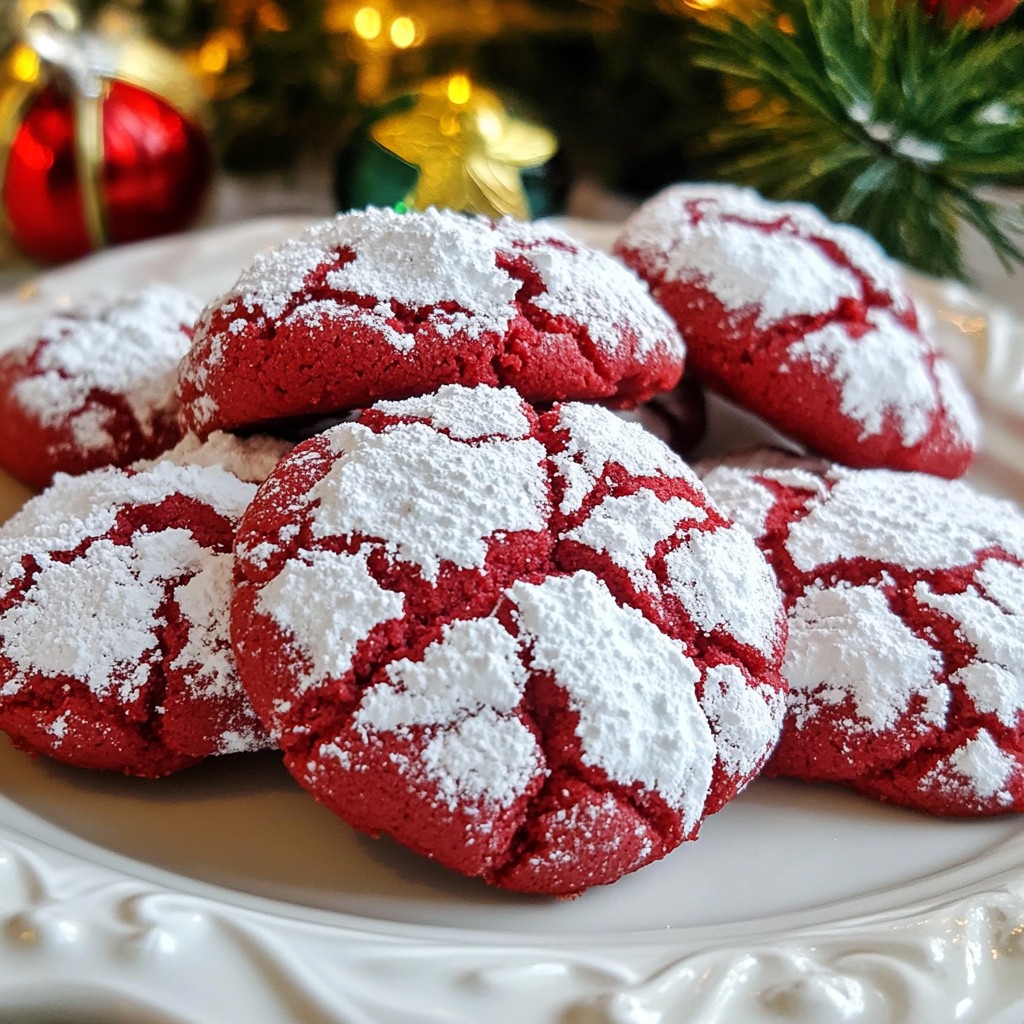
Craving a sweet treat that’s both soft and scrumptious? Look no further! Red velvet crinkle cookies are the perfect choice for any occasion. With their bright color and powdery sugar coating, these cookies catch the eye and delight the taste buds. In this post, I’ll guide you through each step to create these delectable treats, ensuring you impress friends and family alike. Let’s dive into making these delicious cookies!
Why I Love This Recipe
- Beautiful Color: The vibrant red color of these cookies makes them visually stunning and perfect for any occasion.
- Soft and Chewy Texture: These cookies strike the perfect balance between softness and chewiness, making each bite delightful.
- Easy to Make: This recipe is straightforward, allowing even novice bakers to create impressive treats with minimal effort.
- Perfect for Sharing: With about 24 cookies, they are ideal for gatherings, parties, or simply to enjoy with friends and family.
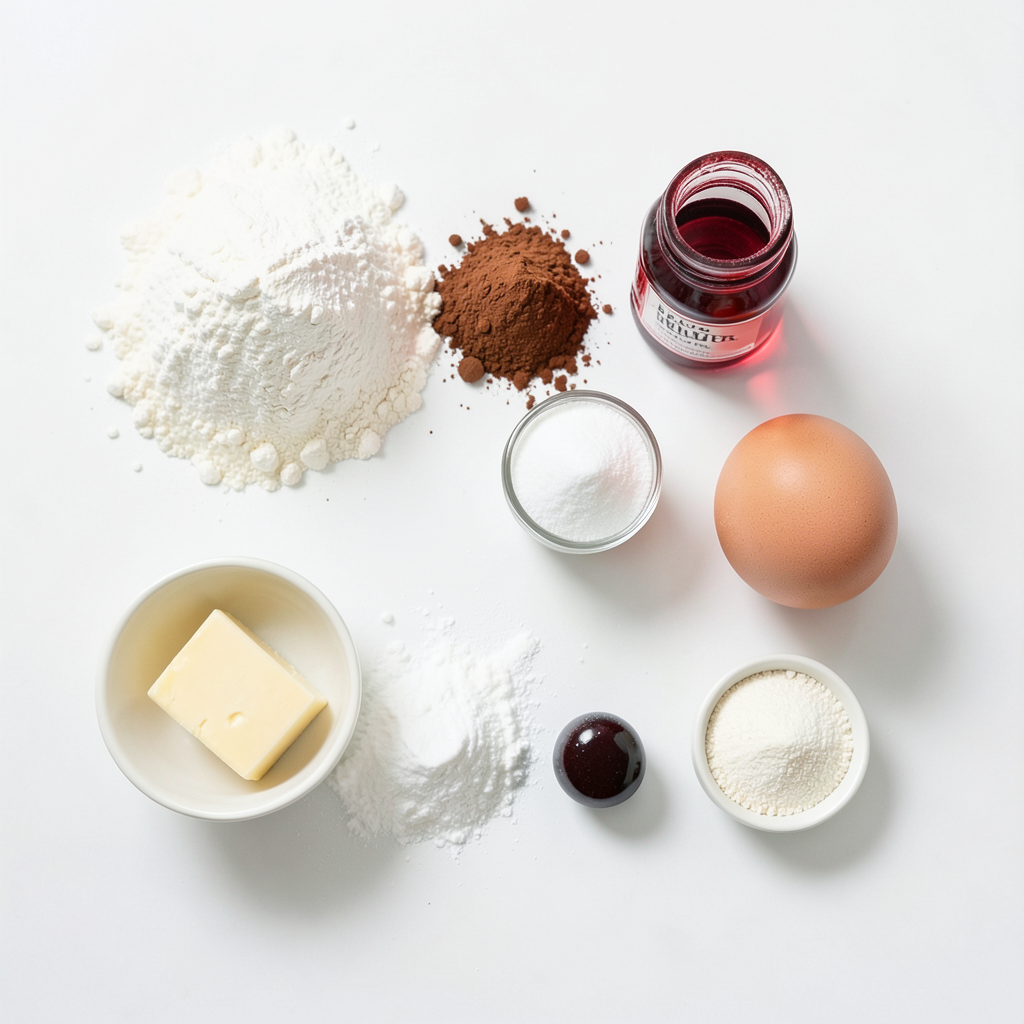
Ingredients
Dry Ingredients
- 1 1/2 cups all-purpose flour
- 1/2 cup unsweetened cocoa powder
- 1 teaspoon baking powder
- 1/2 teaspoon baking soda
- 1/4 teaspoon salt
The dry ingredients form the base of our cookies. The all-purpose flour gives structure. Cocoa powder adds rich flavor. Baking powder and baking soda help the cookies rise. Salt balances the sweetness and enhances all flavors.
Wet Ingredients
- 1/2 cup unsalted butter, softened at room temperature
- 1 cup granulated sugar
- 1 large egg
- 2 teaspoons pure vanilla extract
- 1 tablespoon red food coloring
The wet ingredients create the cookie's rich taste and texture. Softened butter blends smoothly with sugar, making it fluffy. Adding an egg helps bind the dough. Vanilla extract boosts flavor, while red food coloring gives that iconic look.
Additional Ingredient
- 1/2 cup powdered sugar for rolling
Powdered sugar is key for the crinkle effect. It coats the dough balls, creating a beautiful, snowy finish. This step adds a touch of sweetness, making each bite even more delightful.
These ingredients combine to create soft, chewy cookies that are perfect for any occasion.
Step-by-Step Instructions
Prepare the Oven and Baking Sheets
First, preheat your oven to 350°F (175°C). This step is key for even baking. While the oven warms, line two baking sheets with parchment paper. This keeps your cookies from sticking and helps with cleanup.
Mix Dry and Wet Ingredients
In a medium bowl, whisk together the dry ingredients. Combine the all-purpose flour, unsweetened cocoa powder, baking powder, baking soda, and salt. Mix them well, then set this bowl aside.
In a large mixing bowl, cream the softened unsalted butter and granulated sugar. Use an electric mixer on medium speed for about 3-4 minutes. The mixture should look light and fluffy when you're done.
Combine Dough and Chill
Now, it’s time to add the egg, pure vanilla extract, and red food coloring to the butter mix. Blend on medium speed until it looks smooth and the color is even. Gradually add the dry ingredients to this mix. Stir until just combined. Your cookie dough will be soft and a bit sticky.
Cover the bowl with plastic wrap and chill the dough in the refrigerator for about 30 minutes. This makes it easier to handle when you shape the cookies.
Shape and Bake Cookies
Once the dough is chilled, take it out. Use a tablespoon to scoop out dough portions. Roll them into balls using your hands.
Next, roll each ball in powdered sugar until fully coated. This gives the cookies their lovely crinkle look. Place the balls on the prepared baking sheets, leaving about 2 inches between each one.
Bake the cookies in the preheated oven for 10-12 minutes. They should be set at the edges and have crackle patterns on top. After baking, let them cool on the sheets for about 5 minutes. Then move them to a wire rack to cool completely. Enjoy the sweet aroma and get ready for a delicious treat!
Tips & Tricks
Perfecting the Dough
Chilling the dough is key to great cookies. When you chill the dough, it firms up. This makes it easier to handle. It also helps the cookies keep their shape. If you skip this step, your cookies may spread too much.
Avoid overmixing your dough. When you mix too long, the cookies can turn tough. Mix just until you see no dry flour. This keeps them soft and chewy.
Baking Techniques
Always check your oven temperature. An oven thermometer can help. If your oven runs hot, cookies may bake too fast. This can make them dry. Set your oven to 350°F (175°C) for best results.
To check for doneness, look for set edges. The tops should have cracks. If they still look wet, give them a minute more. Take them out when the edges are firm but the center is soft.
Serving Suggestions
Presentation matters! Arrange the cookies on a pretty plate. A decorative tin also makes a nice gift. For an extra touch, dust them with more powdered sugar.
Pair these cookies with cold milk for a classic treat. They also go well with coffee or a warm cup of tea. Enjoying them fresh from the oven is a must.
Pro Tips
- Use Quality Food Coloring: For the best color, opt for gel food coloring instead of liquid. Gel coloring provides a richer hue without adding extra moisture to the dough.
- Chill the Dough: Chilling the dough not only makes it easier to handle but also helps the cookies maintain their shape while baking, resulting in a beautiful crinkle effect.
- Don't Overbake: Keep an eye on the cookies in the oven; they should be soft in the center when you take them out. They will continue to firm up as they cool on the baking sheet.
- Experiment with Flavors: Feel free to add a pinch of espresso powder to enhance the chocolate flavor or mix in white chocolate chips for a delightful twist on the classic red velvet taste.
Variations
Flavor Twists
You can easily change the taste of red velvet crinkle cookies. One fun way is to add white chocolate chips. The sweet, creamy flavor pairs well with the cocoa. Just fold in about a cup of chips after mixing your dough.
Another option is to incorporate nuts or coconut. Chopped walnuts or pecans add a nice crunch. If you prefer coconut, try shredded coconut for a tropical twist. Mix in about half a cup of your choice.
Dietary Adjustments
If you need gluten-free cookies, use a gluten-free flour blend instead of all-purpose flour. Many brands work well in this recipe. Make sure to check the label for the right baking properties.
For vegan options, replace the egg with a flax egg. Mix one tablespoon of flaxseed meal with three tablespoons of water. Let it sit for a few minutes until it thickens. Use a plant-based butter to keep the texture smooth.
Seasonal Themes
You can make these cookies fit any holiday. For a Christmas theme, add peppermint extract or crushed candy canes. This gives a festive flavor and look.
For Valentine's Day, roll the cookies in pink or red sugar instead of powdered sugar. You can also shape the cookies into hearts for a special touch. These small changes make the cookies perfect for any occasion.
Storage Info
Short-term Storage
Store your red velvet crinkle cookies at room temperature. Place them in an airtight container. This helps keep them fresh. You can stack them in layers with parchment paper in between. This prevents sticking. They will stay soft for about five days.
Long-term Storage
If you want to keep cookies longer, freeze them. First, let the cookies cool completely. Then, place them in a freezer-safe bag or container. Make sure to remove as much air as possible. They will stay good for up to three months. When you are ready to eat them, thaw them at room temperature. You can also warm them in the oven for a few minutes. This brings back the soft texture.
Freshness Tips
To keep your cookies soft, store them with a slice of bread in the container. The bread adds moisture. Another tip is to avoid exposing them to air. Keep the container sealed tight. This way, you can enjoy your cookies fresh and moist every time.
FAQs
What makes red velvet cookies different from regular chocolate cookies?
Red velvet cookies stand out for their vibrant color and subtle flavor. They use cocoa powder like chocolate cookies, but they also include red food coloring. This gives them their signature hue. The texture is soft and chewy, thanks to the butter and egg. You can taste a hint of vanilla that adds depth. The overall experience is both unique and delightful.
Can I use gel food coloring instead of liquid?
Yes, you can use gel food coloring. Gel food coloring is thicker and more concentrated. It gives a richer color without adding extra liquid to the dough. Just use a small amount, as a little goes a long way. Mix it well into your wet ingredients to ensure even color.
How do I know when the cookies are done baking?
To check if your cookies are done, look at the edges. They should be set and not too soft. You should see cracks on top, which is a nice sign. If the cookies look puffy in the middle, they need a little more time. Bake them for 10-12 minutes for the best outcome.
What's the best way to serve red velvet crinkle cookies?
These cookies shine when served warm. Place them on a beautiful plate or in a decorative tin. For a fun touch, dust them with extra powdered sugar. Pair them with a glass of cold milk for a classic combo. You can also serve them at parties or as gifts for special occasions.
Can these cookies be made ahead of time?
Yes, you can make these cookies ahead. Prepare the dough and chill it in the fridge for up to three days before baking. You can also bake them and store the cookies in an airtight container for up to a week. This way, you can enjoy fresh cookies anytime you want!
Red velvet cookies are a delightful treat with rich flavor and soft texture. We covered key ingredients, simple steps, and handy tips to make them perfect. Remember to chill your dough and watch for doneness while baking. You can try fun variations and adjustments to suit your taste. Storing cookies properly keeps them fresh and tasty. Enjoy baking and sharing these delicious cookies for any occasion!