Roasted Garlic Hummus Flavorful and Healthy Dip

If you’re looking for a dip that’s as tasty as it is healthy, you’ve found it! Roasted garlic hummus brings rich flavor and creamy texture to the table, perfect for snacking or as a party treat. In this post, I’ll guide you step-by-step through making your own batch, including tips for perfecting it. Let’s discover how to create this delicious dip that everyone will love!

Ingredients

Main Ingredients for Roasted Garlic Hummus

To make this tasty dip, you need:

– 1 cup canned chickpeas, drained and rinsed

– 4 cloves roasted garlic

– 3 tablespoons tahini

– 2 tablespoons freshly squeezed lemon juice

– 2 tablespoons extra virgin olive oil, plus more for drizzling

– 1/2 teaspoon ground cumin

– Salt to taste

– Water, as needed for desired texture

Optional Garnishes

For added flair and flavor, consider these garnishes:

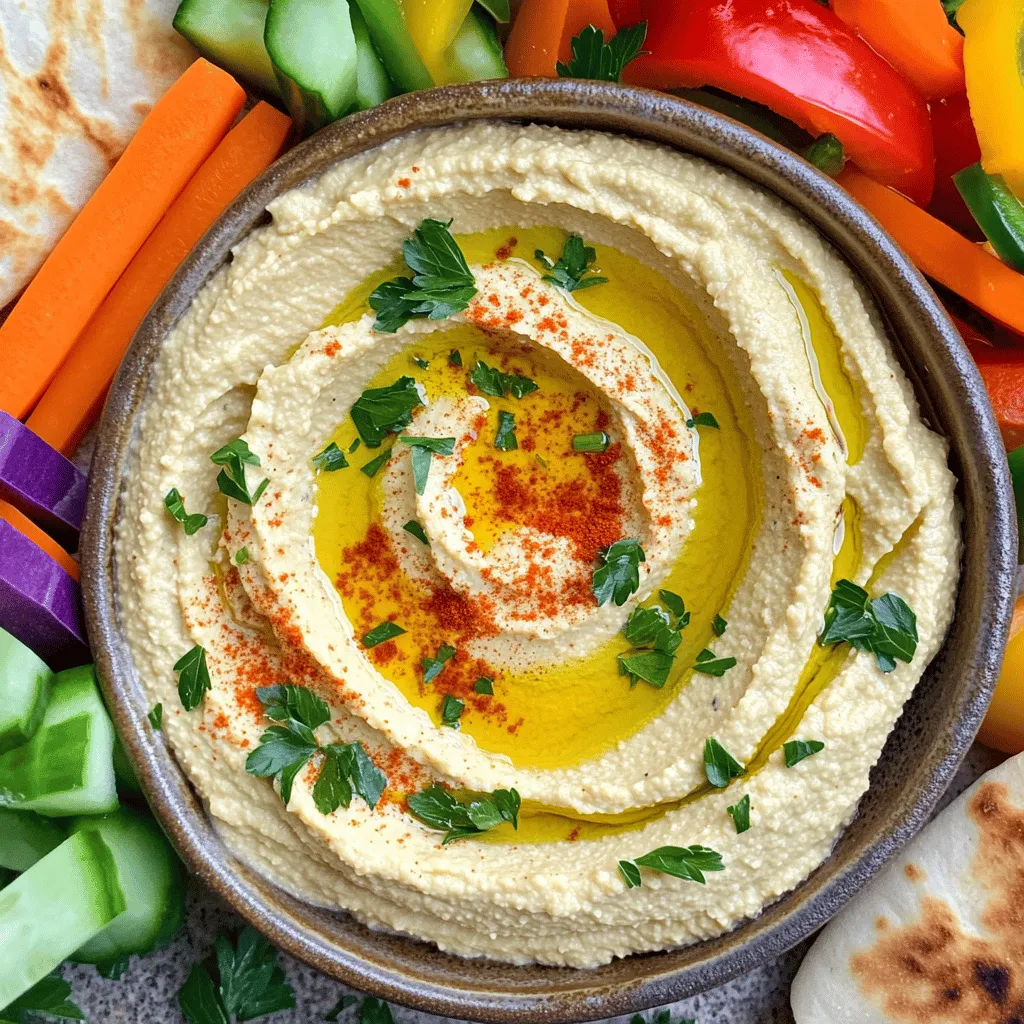
– Fresh parsley, chopped

– Smoked paprika

Equipment Needed

You will need a few tools to whip up this hummus:

– A powerful food processor

– A mixing bowl

– A sharp knife

– Aluminum foil for roasting garlic

– A shallow serving bowl for presentation

Gather these ingredients and tools before you start. This way, you can focus on creating your amazing roasted garlic hummus. For the full recipe, refer to the earlier section.

Step-by-Step Instructions

Preparing the Roasted Garlic

To start, preheat your oven to 400°F (200°C). Take a whole head of garlic and slice off the top. This exposes the cloves. Drizzle the garlic with a good amount of olive oil. Wrap it in aluminum foil. Place the wrapped garlic in the oven and roast for 30-35 minutes. The cloves should become soft and smell great. Let it cool a bit, then squeeze the soft, caramelized cloves into a bowl.

Blending the Hummus

In a powerful food processor, combine the drained chickpeas, roasted garlic, tahini, lemon juice, olive oil, ground cumin, and salt. Pulse the mixture until it turns smooth. You may need to scrape down the sides to mix evenly. The goal is a silky texture that is easy to spread.

Adjusting Flavor and Texture

Taste your hummus. If it’s too thick, add water slowly, one tablespoon at a time. Blend after each addition until you reach the creaminess you want. If the flavor needs a boost, add more salt or a splash of lemon juice. Blend again to mix any changes. Enjoy the deliciousness of your roasted garlic hummus! For the complete recipe, check out the Full Recipe section.

Tips & Tricks

How to Achieve the Perfect Creamy Texture

To make your hummus creamy, use a powerful food processor. Start with well-drained chickpeas for a smooth base. Add roasted garlic to bring rich flavor. If your hummus is too thick, add cold water slowly. Blend and check the texture until it feels just right. You want it silky, not chunky.

Flavor Enhancements and Adjustments

Taste is key! After blending, give your hummus a taste. You might want more salt or lemon juice. A pinch of cayenne can add a nice kick. Fresh herbs like cilantro or basil can brighten the flavor. Experiment until you find a balance that you love.

Storage and Reheating Advice

Store leftover hummus in an airtight container. It keeps well in the fridge for about a week. If it thickens, add a bit of water when you serve it again. For reheating, gently warm it in the microwave. Always add a drizzle of olive oil before serving for freshness.

For a complete guide, check out the Full Recipe.

Variations

Spicy Roasted Garlic Hummus

To spice things up, you can easily add heat to your roasted garlic hummus. Start by adding fresh jalapeños or red pepper flakes to the mix. You can also blend in a teaspoon of harissa for a North African twist. This will give your hummus a nice kick without losing its creamy texture. Adjust the spice to your taste, and enjoy the warmth it brings!

Herb-Infused Hummus Ideas

Herbs can elevate your hummus to new heights. Try adding fresh basil, cilantro, or dill to the mix. Each herb will give your hummus a unique flavor profile. A sprinkle of fresh chives or thyme can also add a nice touch. Blend these herbs in at the end for a fresh burst of flavor. This way, you keep the vibrant green color and enjoy the aroma.

Alternative Ingredients and Substitutions

If you want to switch things up, consider using different beans. White beans or black beans can create a new taste. Instead of tahini, you can use Greek yogurt for a creamy texture and tang. For a nut-free option, sunflower seed butter works well too. You can also replace lemon juice with lime juice for a zesty twist. The key is to experiment and find what you love!

For the full recipe, check out the instructions on how to make this delicious dip.

Health Benefits of Hummus

Hummus is not just a tasty dip; it is also packed with health benefits. This creamy delight is full of nutrients that support your body. Let’s explore why hummus, especially roasted garlic hummus, is a smart choice.

Nutritional Breakdown

Roasted garlic hummus is rich in protein and fiber. A serving typically contains:

– 1 cup canned chickpeas, drained and rinsed

– 4 cloves roasted garlic

– 3 tablespoons tahini

– 2 tablespoons lemon juice

– 2 tablespoons extra virgin olive oil

These ingredients provide essential vitamins and minerals. The fiber helps with digestion, while the protein keeps you full. Healthy fats from olive oil support heart health.

Advantages of Including Chickpeas in Your Diet

Chickpeas are a fantastic food choice. They are high in protein and fiber. This helps you feel satisfied longer. Plus, they are low in fat. Eating chickpeas may also lower your risk of heart disease. They contain vitamins like B6 and folate, which support energy and mood.

Benefits of Roasted Garlic

Roasted garlic adds a unique flavor and many health perks. It has antioxidants that help fight disease. Roasting makes garlic sweeter and milder, making it easy to enjoy. It may also boost your immune system and lower blood pressure. Plus, roasted garlic gives your hummus a rich, savory taste that everyone loves.

For the full recipe, check out the Roasted Garlic Hummus section. It’s an easy way to make a healthy and flavorful dip.

FAQs

How to make roasted garlic hummus from scratch?

To make roasted garlic hummus, first, roast garlic by cutting off the top of a head and drizzling it with olive oil. Wrap it in foil and bake at 400°F for 30-35 minutes. After it cools, squeeze the soft cloves into a bowl. In a food processor, add 1 cup of chickpeas, the roasted garlic, 3 tablespoons of tahini, 2 tablespoons of lemon juice, and 2 tablespoons of olive oil. Blend until smooth. If it’s too thick, add water slowly. Taste for salt and lemon juice. Transfer it to a bowl and garnish. For the full recipe, check the detailed instructions above.

Can I use raw garlic instead of roasted?

You can use raw garlic, but the flavor changes. Raw garlic tastes sharp and spicy. Roasted garlic is sweet and creamy. If you choose raw garlic, use less. Start with one clove and taste. Adjust as needed. The taste will be different, so I recommend sticking to roasted garlic for the best hummus.

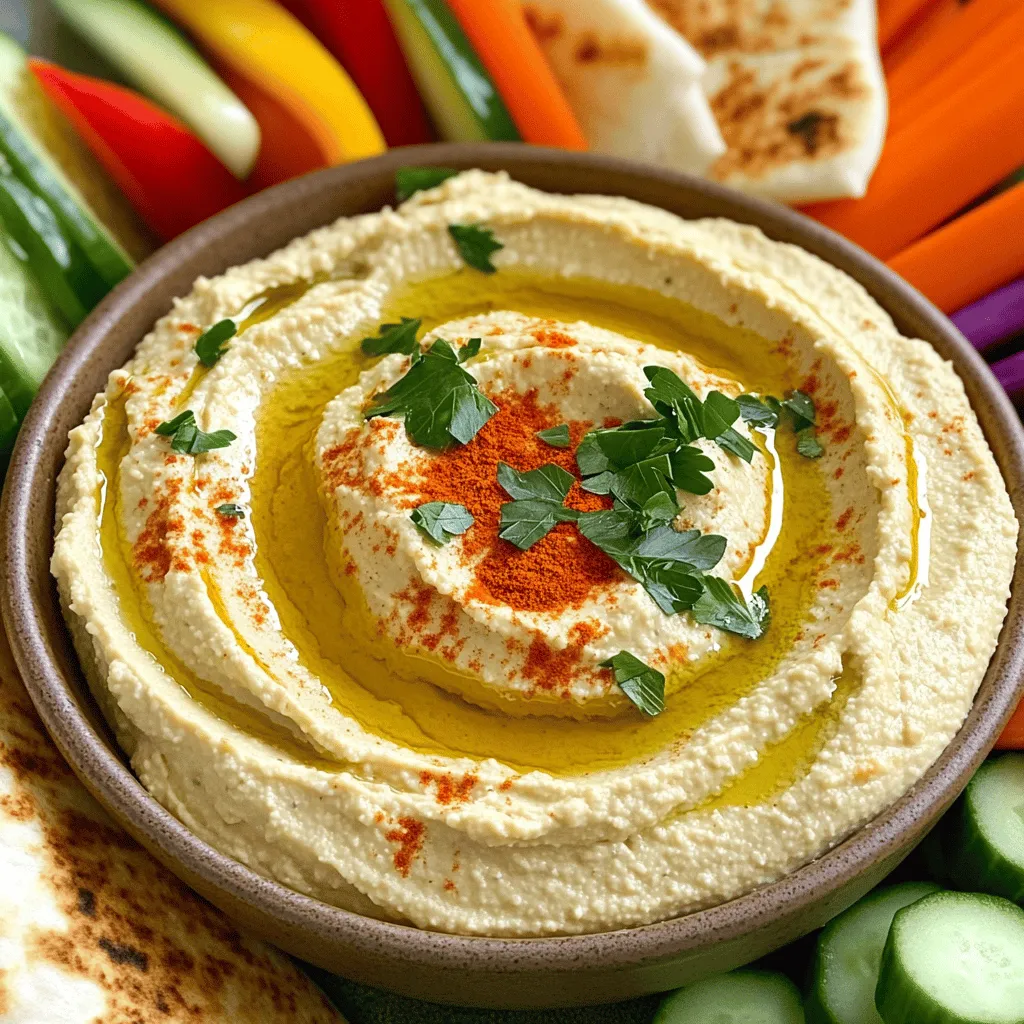
What can I serve with roasted garlic hummus?

Roasted garlic hummus pairs well with many foods. Here are some great options:

– Warm pita bread

– Crisp veggie sticks (carrots, cucumbers, bell peppers)

– Whole-grain crackers

– Grilled chicken or shrimp

– Stuffed grape leaves

These choices add color and crunch. They make your hummus dish more fun and tasty. Enjoy experimenting with different pairings!

Roasted garlic hummus is simple to make and tasty. You learned about key ingredients and how to prepare them. I shared tips for perfecting your hummus and exploring fun variations. Plus, we discussed health benefits that come with this dish. Enjoy making your own hummus, and don’t be afraid to try new flavors. Each batch is a chance to learn and create. Happy cooking!

To make this tasty dip, you need: - 1 cup canned chickpeas, drained and rinsed - 4 cloves roasted garlic - 3 tablespoons tahini - 2 tablespoons freshly squeezed lemon juice - 2 tablespoons extra virgin olive oil, plus more for drizzling - 1/2 teaspoon ground cumin - Salt to taste - Water, as needed for desired texture For added flair and flavor, consider these garnishes: - Fresh parsley, chopped - Smoked paprika You will need a few tools to whip up this hummus: - A powerful food processor - A mixing bowl - A sharp knife - Aluminum foil for roasting garlic - A shallow serving bowl for presentation Gather these ingredients and tools before you start. This way, you can focus on creating your amazing roasted garlic hummus. For the full recipe, refer to the earlier section. To start, preheat your oven to 400°F (200°C). Take a whole head of garlic and slice off the top. This exposes the cloves. Drizzle the garlic with a good amount of olive oil. Wrap it in aluminum foil. Place the wrapped garlic in the oven and roast for 30-35 minutes. The cloves should become soft and smell great. Let it cool a bit, then squeeze the soft, caramelized cloves into a bowl. In a powerful food processor, combine the drained chickpeas, roasted garlic, tahini, lemon juice, olive oil, ground cumin, and salt. Pulse the mixture until it turns smooth. You may need to scrape down the sides to mix evenly. The goal is a silky texture that is easy to spread. Taste your hummus. If it’s too thick, add water slowly, one tablespoon at a time. Blend after each addition until you reach the creaminess you want. If the flavor needs a boost, add more salt or a splash of lemon juice. Blend again to mix any changes. Enjoy the deliciousness of your roasted garlic hummus! For the complete recipe, check out the Full Recipe section. To make your hummus creamy, use a powerful food processor. Start with well-drained chickpeas for a smooth base. Add roasted garlic to bring rich flavor. If your hummus is too thick, add cold water slowly. Blend and check the texture until it feels just right. You want it silky, not chunky. Taste is key! After blending, give your hummus a taste. You might want more salt or lemon juice. A pinch of cayenne can add a nice kick. Fresh herbs like cilantro or basil can brighten the flavor. Experiment until you find a balance that you love. Store leftover hummus in an airtight container. It keeps well in the fridge for about a week. If it thickens, add a bit of water when you serve it again. For reheating, gently warm it in the microwave. Always add a drizzle of olive oil before serving for freshness. For a complete guide, check out the Full Recipe. {{image_4}} To spice things up, you can easily add heat to your roasted garlic hummus. Start by adding fresh jalapeños or red pepper flakes to the mix. You can also blend in a teaspoon of harissa for a North African twist. This will give your hummus a nice kick without losing its creamy texture. Adjust the spice to your taste, and enjoy the warmth it brings! Herbs can elevate your hummus to new heights. Try adding fresh basil, cilantro, or dill to the mix. Each herb will give your hummus a unique flavor profile. A sprinkle of fresh chives or thyme can also add a nice touch. Blend these herbs in at the end for a fresh burst of flavor. This way, you keep the vibrant green color and enjoy the aroma. If you want to switch things up, consider using different beans. White beans or black beans can create a new taste. Instead of tahini, you can use Greek yogurt for a creamy texture and tang. For a nut-free option, sunflower seed butter works well too. You can also replace lemon juice with lime juice for a zesty twist. The key is to experiment and find what you love! For the full recipe, check out the instructions on how to make this delicious dip. Hummus is not just a tasty dip; it is also packed with health benefits. This creamy delight is full of nutrients that support your body. Let's explore why hummus, especially roasted garlic hummus, is a smart choice. Roasted garlic hummus is rich in protein and fiber. A serving typically contains: - 1 cup canned chickpeas, drained and rinsed - 4 cloves roasted garlic - 3 tablespoons tahini - 2 tablespoons lemon juice - 2 tablespoons extra virgin olive oil These ingredients provide essential vitamins and minerals. The fiber helps with digestion, while the protein keeps you full. Healthy fats from olive oil support heart health. Chickpeas are a fantastic food choice. They are high in protein and fiber. This helps you feel satisfied longer. Plus, they are low in fat. Eating chickpeas may also lower your risk of heart disease. They contain vitamins like B6 and folate, which support energy and mood. Roasted garlic adds a unique flavor and many health perks. It has antioxidants that help fight disease. Roasting makes garlic sweeter and milder, making it easy to enjoy. It may also boost your immune system and lower blood pressure. Plus, roasted garlic gives your hummus a rich, savory taste that everyone loves. For the full recipe, check out the Roasted Garlic Hummus section. It's an easy way to make a healthy and flavorful dip. To make roasted garlic hummus, first, roast garlic by cutting off the top of a head and drizzling it with olive oil. Wrap it in foil and bake at 400°F for 30-35 minutes. After it cools, squeeze the soft cloves into a bowl. In a food processor, add 1 cup of chickpeas, the roasted garlic, 3 tablespoons of tahini, 2 tablespoons of lemon juice, and 2 tablespoons of olive oil. Blend until smooth. If it’s too thick, add water slowly. Taste for salt and lemon juice. Transfer it to a bowl and garnish. For the full recipe, check the detailed instructions above. You can use raw garlic, but the flavor changes. Raw garlic tastes sharp and spicy. Roasted garlic is sweet and creamy. If you choose raw garlic, use less. Start with one clove and taste. Adjust as needed. The taste will be different, so I recommend sticking to roasted garlic for the best hummus. Roasted garlic hummus pairs well with many foods. Here are some great options: - Warm pita bread - Crisp veggie sticks (carrots, cucumbers, bell peppers) - Whole-grain crackers - Grilled chicken or shrimp - Stuffed grape leaves These choices add color and crunch. They make your hummus dish more fun and tasty. Enjoy experimenting with different pairings! Roasted garlic hummus is simple to make and tasty. You learned about key ingredients and how to prepare them. I shared tips for perfecting your hummus and exploring fun variations. Plus, we discussed health benefits that come with this dish. Enjoy making your own hummus, and don't be afraid to try new flavors. Each batch is a chance to learn and create. Happy cooking!

Roasted Garlic Hummus

Discover the rich flavors of homemade roasted garlic hummus with this easy-to-follow recipe! Perfect for parties or a tasty snack, this creamy dip combines chickpeas, roasted garlic, tahini, and a hint of lemon for a delightful treat. Learn how to achieve the perfect texture and presentation to impress your guests. Click through to explore this delicious recipe and elevate your appetizer game today!

Ingredients
  

1 cup canned chickpeas, drained and rinsed

4 cloves roasted garlic (see instructions for roasting)

3 tablespoons tahini

2 tablespoons freshly squeezed lemon juice

2 tablespoons extra virgin olive oil, plus more for drizzling

1/2 teaspoon ground cumin

Salt to taste

Water, as needed for desired texture

Fresh parsley, chopped, for garnish

Smoked paprika, for garnish

Instructions
 

Roast the Garlic: Begin by preheating your oven to 400°F (200°C). Take a whole head of garlic and slice off the top, exposing the cloves. Drizzle it generously with olive oil, ensuring the cloves are well-coated. Wrap the garlic tightly in aluminum foil and place it in the oven. Roast for approximately 30-35 minutes until the cloves are soft and fragrant. Once roasted, allow the garlic to cool slightly before squeezing the soft, caramelized cloves into a mixing bowl.

    Blend Ingredients: In a powerful food processor, combine the drained chickpeas, the roasted garlic cloves, tahini, lemon juice, olive oil, ground cumin, and a generous pinch of salt. Pulse the mixture until it becomes silky smooth, scraping down the sides of the bowl as necessary.

      Adjust Consistency: If the hummus appears too thick for your liking, slowly add water—one tablespoon at a time—while blending until you reach a creamy and spreadable consistency.

        Taste and Adjust: Take a moment to taste your hummus. If needed, adjust with additional salt or a splash more lemon juice to enhance the flavor. Blend again briefly to incorporate any modifications.

          Serve: Transfer the creamy hummus to a shallow serving bowl. Drizzle olive oil generously over the top and generously sprinkle with smoked paprika and fresh chopped parsley for a pop of color and flavor.

            Prep Time: 10 minutes | Total Time: 45 minutes | Servings: 4-6

              - Presentation Tips: For an inviting presentation, serve the hummus alongside warm, fluffy pita bread and an array of vibrant veggie sticks such as crunchy carrots, refreshing cucumbers, and sweet bell peppers. Consider using a shallow bowl for the hummus, allowing the olive oil drizzle to create a lovely visual effect that will entice your guests.

                Leave a Comment

                Recipe Rating