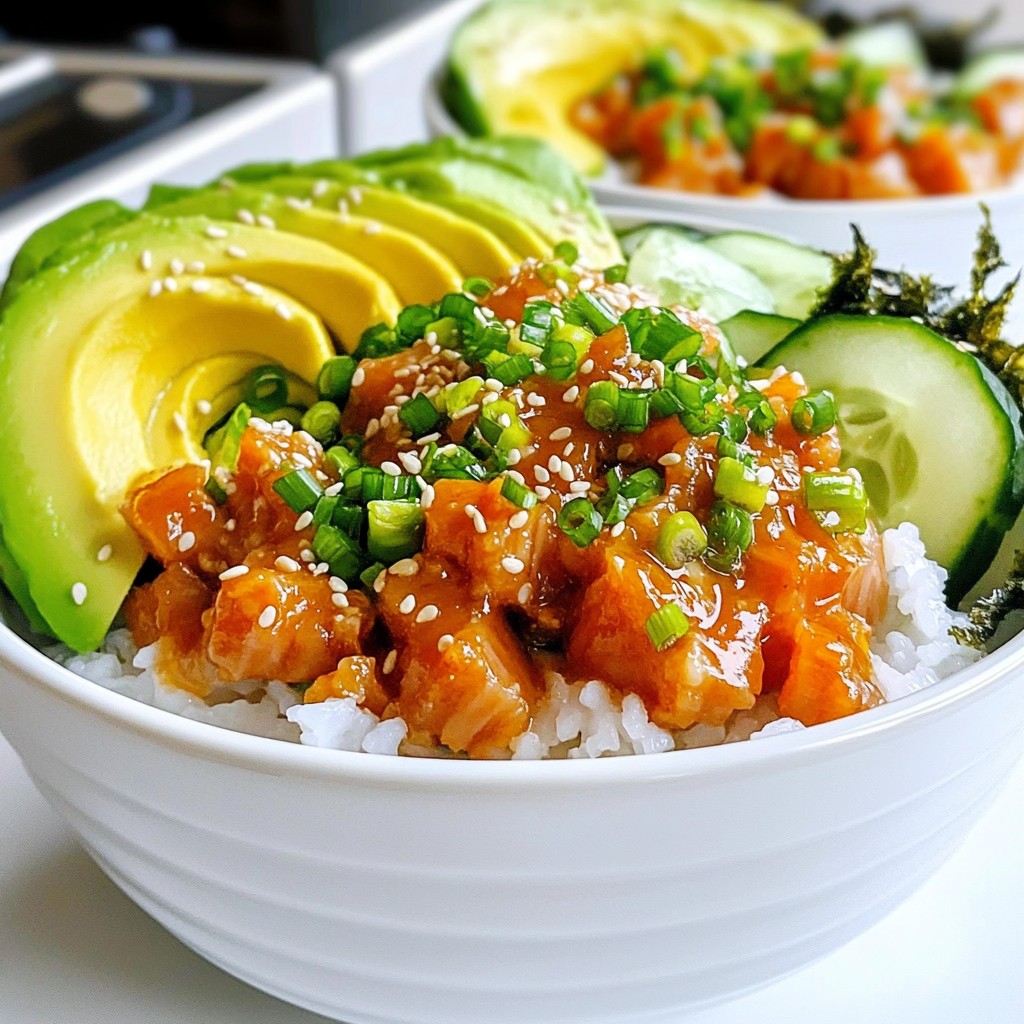
Are you ready to spice up your dinner routine? My Spicy Tuna Sushi Bowls are both flavorful and easy to make! In just a few steps, you’ll learn how to create a delicious meal with fresh ingredients. Whether you are a sushi lover or a novice cook, this recipe is for you. Let’s dive into the world of sushi bowls and impress your taste buds!
Why I Love This Recipe
- Fresh Ingredients: This recipe uses sushi-grade fresh tuna and vibrant vegetables, ensuring a delicious and healthy meal.
- Customizable Spice Level: With adjustable sriracha, you can tailor the heat to suit your taste preferences.
- Quick Preparation: In just 40 minutes, you can prepare a gourmet sushi experience right at home.
- Beautiful Presentation: Layering colorful ingredients creates a visually stunning dish that impresses at any gathering.
Ingredients
List of Required Ingredients
- Sushi Rice and Seasoning
- 1 cup sushi rice
- 1 1/4 cups water
- 1 tablespoon rice vinegar
- 1 tablespoon sugar
- 1 teaspoon salt
- Fresh Tuna and Sauces
- 8 ounces sushi-grade fresh tuna, diced
- 2 tablespoons mayonnaise (preferably Japanese Kewpie mayo)
- 1 tablespoon sriracha (adjust according to your spice preference)
- Fresh Vegetables and Toppings
- 1 avocado, thinly sliced
- 1 cucumber, thinly sliced
- 1/4 cup seaweed salad
- 2 green onions, finely sliced
- Sesame seeds for garnish
- Nori sheets, cut into strips (optional for added crunch)
Gathering the right ingredients is key for great flavor. Sushi rice forms the base of our bowl. The right ratio of water is crucial to get it just right. The seasoning adds a tangy touch with rice vinegar, sugar, and salt.
Fresh tuna is a star here. Choose sushi-grade tuna for safety and taste. Mayonnaise and sriracha create a creamy and spicy mix. Adjust the sriracha to your liking.
Fresh veggies bring color and crunch. Avocado adds creaminess. Cucumber keeps it fresh. Seaweed salad adds umami. Green onions and sesame seeds are perfect for topping. Nori strips add extra crunch if you like.

Step-by-Step Instructions
Detailed Cooking Process
Rinse and Cook Sushi Rice Start by rinsing 1 cup of sushi rice under cold water. Rinse until the water runs clear. This helps remove extra starch. Next, add the rinsed rice to a medium saucepan with 1 1/4 cups of water. Heat it over medium-high until it boils. Once boiling, reduce the heat to low, cover, and let it cook for 18 to 20 minutes. The rice should be tender, and all the water will be absorbed.
Prepare Sushi Seasoning While the rice cooks, mix 1 tablespoon of rice vinegar, 1 tablespoon of sugar, and 1 teaspoon of salt in a small bowl. Heat this mix in the microwave for about 20 seconds. Stir until the sugar and salt dissolve completely.
Combine Tuna Mixture and Assemble Bowls After the rice is done, let it sit covered for 10 minutes. Then, transfer the rice to a large bowl. Fold the sushi seasoning into the rice gently with a wooden spatula. Be careful not to crush the grains.
In a separate bowl, mix 8 ounces of diced sushi-grade tuna with 2 tablespoons of mayonnaise and 1 tablespoon of sriracha. Adjust the spice to your taste.
To build your bowls, scoop sushi rice into each bowl as a base. Add the spicy tuna mix on top. Layer with sliced avocado, cucumber, and a dollop of seaweed salad. Finish with sliced green onions and sesame seeds. If you like, add nori strips for extra crunch. Enjoy your colorful and tasty sushi bowls!
Tips & Tricks
Perfecting Your Spicy Tuna Sushi Bowls
Achieving the Right Rice Texture Start by rinsing the sushi rice. Wash it under cold water until the water runs clear. This step helps remove excess starch. Cook the rice in a medium saucepan with 1 1/4 cups of water. Bring it to a boil, then lower the heat. Cover and let it simmer for 18-20 minutes. This method gives you tender rice. Let it rest for 10 minutes after cooking. Gently fold in the sushi seasoning to avoid crushing the rice.
Adjusting Spice Levels I recommend using 1 tablespoon of sriracha in your tuna mix. If you like it spicier, add more sriracha. Taste your mixture as you go. You can always add more, but you can’t take it out. Use Japanese Kewpie mayo for a creamier texture. It adds depth to the flavor and balances the heat.
Presentation Tips for Serving Use wide, shallow bowls for serving. This creates an elegant look. Scoop a generous amount of rice as the base. Layer the spicy tuna on top, then add avocado and cucumber. Arrange these toppings artfully for an eye-catching dish. Don’t forget to sprinkle sesame seeds and sliced green onions on top. If you like crunch, add nori strips. For a visual pop, drizzle extra sriracha over the bowl.
Pro Tips
- Rinse Your Rice: Thoroughly rinsing the sushi rice is essential for achieving the perfect texture. It removes excess starch, preventing the rice from becoming gummy and allowing it to be fluffy and stick together just right.
- Quality Tuna Matters: Using sushi-grade tuna is crucial for both safety and flavor. Always purchase from a reputable source to ensure the freshest quality that is safe for raw consumption.
- Customize the Spice: Feel free to adjust the amount of sriracha in the spicy tuna mixture according to your heat preference. You can also add other spices or sauces for a unique flavor profile!
- Artful Presentation: Take your time to arrange the toppings artfully. A well-presented dish not only looks appealing but also enhances the overall dining experience, making your sushi bowls even more enjoyable!
Variations
Creative Alternatives
Different Proteins to Use If you want to switch things up, try different proteins. Here are a few tasty options:
- Salmon: Use sushi-grade salmon for a rich flavor.
- Tofu: Firm tofu works well for a plant-based choice.
- Shrimp: Cooked shrimp can add a sweet touch.
- Crab: Imitation crab can provide a nice texture and flavor.
Substitute Ingredients for Dietary Needs You can easily adjust the recipe to fit your diet. Consider these substitutes:
- Gluten-free: Use tamari instead of soy sauce in the recipe.
- Vegan mayo: Swap out regular mayo for a plant-based option.
- Brown rice: For more fiber, replace sushi rice with brown rice.
- Low-carb: Cauliflower rice can serve as a great base.
Flavor Additions for a Unique Twist Give your bowl a unique flair by adding new flavors:
- Mango: Diced mango adds a sweet and fruity flavor.
- Spicy mayo: Combine mayo with more sriracha for extra heat.
- Pickled vegetables: Add pickled ginger or radishes for a tangy crunch.
- Sesame oil: A drizzle brings a nutty taste to the mix.
These variations let you customize your spicy tuna sushi bowls. Enjoy experimenting with flavors and textures!
Storage Info
Best Practices for Storage
How to Store Leftovers To store leftovers, let the sushi bowls cool down first. Place them in an airtight container. This keeps the tuna fresh and the rice from drying out. You can keep the bowls in the fridge for up to two days.
Reheating Instructions When you’re ready to eat, take the rice out of the fridge. For best results, microwave the rice in short bursts. Heat it for about 15 seconds at a time. Check the temperature after each burst. The tuna should not be reheated. Enjoy it cold for the best taste.
Shelf Life Considerations The sushi rice can last in the fridge for about two days. However, the fresh tuna is best when eaten right away. After 24 hours, the quality may drop. If you notice any off smells or changes in color, it’s best to toss it out. Always trust your senses when it comes to food safety.
FAQs
What Type of Tuna is Best for Sushi?
Sushi-grade tuna is best. Look for Ahi or Yellowfin tuna. These types have a nice texture and flavor. Always buy from a trusted source. Freshness is key for safety and taste.
Can I Make Sushi Rice Ahead of Time?
Yes, you can make sushi rice ahead of time. Cook it and let it cool. Store it in the fridge for up to two days. When ready to use, reheat gently. This keeps the rice from becoming too dry.
How to Adjust for Vegetarian Options?
For a vegetarian version, swap tuna with marinated tofu or avocado. You can also add more veggies like carrots or bell peppers. Use a plant-based mayo instead of Kewpie mayo. This keeps the flavor while making it meat-free.
This blog post covered how to make spicy tuna sushi bowls. We discussed key ingredients like sushi rice, fresh tuna, and tasty toppings. You learned simple steps for cooking and mixing the flavors. Tips helped perfect the dish, while variations showed creative options. Lastly, I shared storage advice and answered common questions.
Now you’re ready to make your own delicious sushi bowls. Experiment with flavors and enjoy your meal!