If you crave a simple yet delicious dessert, you’re in the right place! My Peach Cobbler Dump Cake is the answer to your sweet tooth. With just a few easy steps and basic ingredients, you can create a warm, comforting treat that’s perfect for gatherings or a cozy night in. Get ready to impress your friends and family with a dessert that looks great and tastes even better! Let’s dive into this delightful recipe.
Ingredients
Complete Ingredient List
To make the Peach Cobbler Dump Cake, gather these simple ingredients:
– 2 cans (15 oz each) sliced peaches in syrup, thoroughly drained
– 1 cup fresh or frozen peach slices
– 1 box (15.25 oz) yellow cake mix
– 1 cup unsalted butter (2 sticks), melted
– 1 teaspoon ground cinnamon
– 1/2 teaspoon fresh nutmeg, grated (or ground nutmeg if unavailable)
– 1 cup chopped pecans (optional, for added crunch)
– Vanilla ice cream (for serving, optional but recommended)
Optional Ingredients for Enhanced Flavor
You can boost the taste of your dump cake with a few extras:
– A splash of almond extract adds a nice touch.
– Use brown sugar instead of white sugar for a richer flavor.
– Add a handful of blueberries or raspberries for a mixed berry twist.
Suggested Serving Accompaniments
To make your dessert even better, consider these serving ideas:
– Serve warm with a scoop of vanilla ice cream on top.
– Drizzle caramel sauce for an extra sweet touch.
– Top with whipped cream for a light, fluffy finish.
This recipe is easy and fun to make. Enjoy the delightful flavors!
Step-by-Step Instructions
Preparation Steps
Start with your ingredients ready. Gather all you need to make this cake. You will need:
– 2 cans (15 oz each) sliced peaches in syrup, thoroughly drained
– 1 cup fresh or frozen peach slices
– 1 box (15.25 oz) yellow cake mix
– 1 cup unsalted butter (2 sticks), melted
– 1 teaspoon ground cinnamon
– 1/2 teaspoon fresh nutmeg, grated (or ground nutmeg if unavailable)
– 1 cup chopped pecans (optional, for added crunch)
– Vanilla ice cream (for serving, optional but recommended)
Preheat your oven to 350°F (175°C). This step gets your oven hot and ready for baking. Next, take a 9×13 inch baking dish. Layer the drained canned peaches and fresh or frozen peach slices. Spread them evenly over the bottom. This helps them bake just right.
Now, sprinkle ground cinnamon and nutmeg over the peach layer. This adds warmth and flavor to the fruit. Then, pour the dry yellow cake mix over the peaches. Spread it out to cover all the peaches completely. This step is key for texture.
Baking Process
Drizzle the melted butter evenly over the cake mix. It’s important to saturate every inch without stirring. The butter creates a crisp crust as your cake bakes. If you want extra crunch, add chopped pecans on top. Sprinkle them evenly over the buttered cake mix.
Place the baking dish in your preheated oven. Bake for 45-50 minutes. Keep an eye on it! Look for a golden brown top with bubbling edges. This is a sign it’s ready.
Cooling and Serving Suggestions
After baking, take the cake out of the oven. Let it cool for about 10 minutes. This cooling time helps the flavors come together.
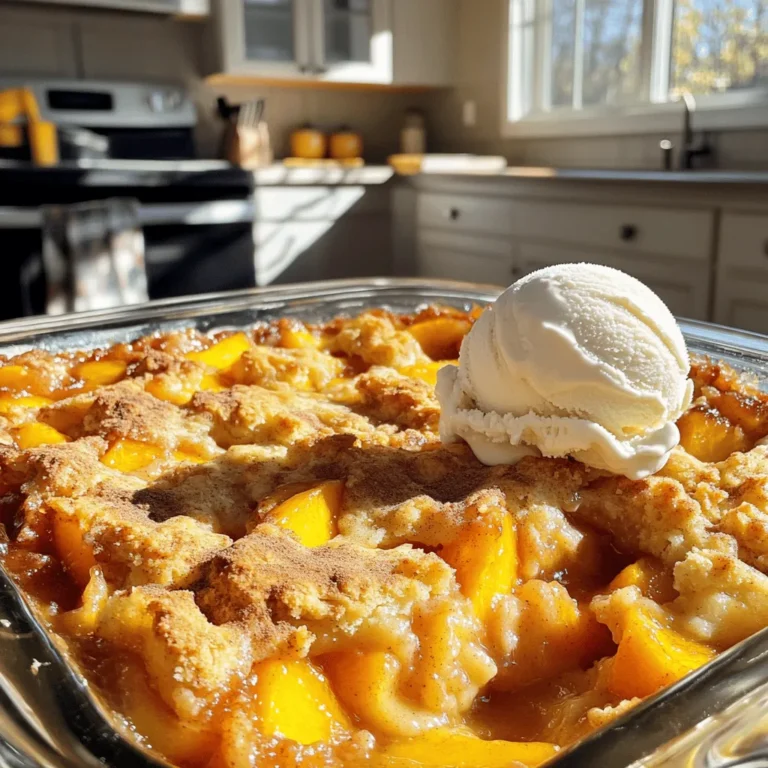
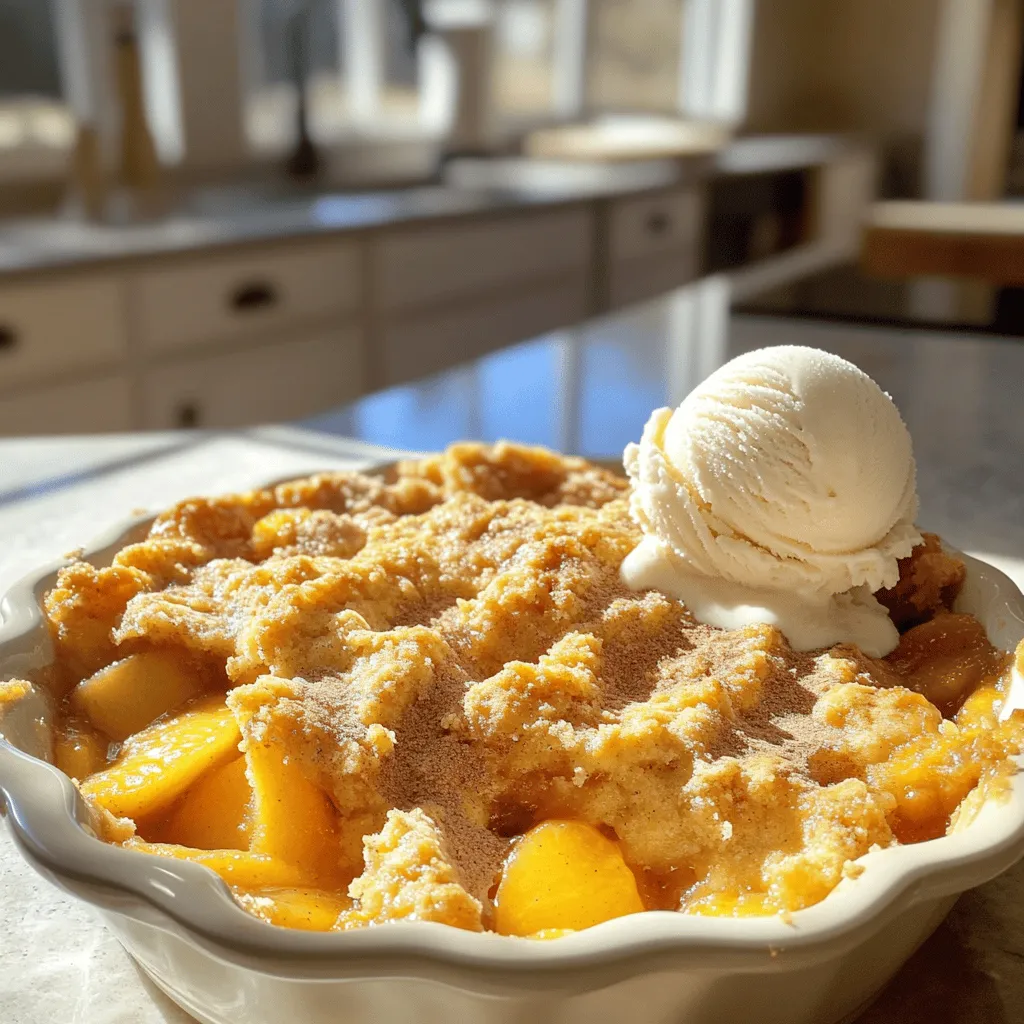
Serve the dump cake warm. Top it with a scoop of vanilla ice cream. For a nice touch, dust a bit of cinnamon on top. The warm cake with cold ice cream is a perfect combo. Enjoy every delightful bite!
Tips & Tricks
Key Baking Tips for Success
To make the best peach cobbler dump cake, start with quality ingredients. Use ripe, juicy peaches for the best flavor. If you use canned peaches, choose a brand with no added sugar. Always drain the peaches well. This prevents the cake from becoming too soggy. Preheat your oven to the right temperature. This step is key to even baking.
How to Achieve the Perfect Texture
For a crispy top, pour the melted butter evenly over the dry cake mix. Do not stir the mix into the peaches; leave it layered. This ensures a delightful contrast between the soft peaches and the crispy crust. Bake until the top is golden brown and bubbling. Check for a firm texture before removing it from the oven.
Flavor Enhancements
To boost the flavor, add spices like nutmeg and cinnamon. They pair perfectly with peaches. If you want more crunch, sprinkle chopped pecans on top. You can also drizzle a bit of honey over the warm cake for extra sweetness. Consider serving it with vanilla ice cream. The cold ice cream melts into the warm cake, making every bite a treat. Enjoy this peach cobbler dump cake delight with your friends and family!
Variations
Fruit Alternatives to Peaches
You can switch up the fruit in this dump cake. Try using apples, berries, or cherries. Each fruit brings its own flavor. For apples, choose tart ones like Granny Smith. Berries offer a sweet and juicy touch. Just remember to adjust the spices to match the fruit. For example, add lemon zest with berries for a fresh twist.
Dietary Adaptations (Gluten-Free, Vegan)
You can make this recipe gluten-free. Use a gluten-free cake mix instead of regular cake mix. Check the label to ensure it is safe. For vegan options, swap the butter for coconut oil or a vegan butter. Use a plant-based cake mix to keep it vegan-friendly. This way, everyone can enjoy the deliciousness without missing out.
Seasonal Variations
Change the fruit based on the season. In summer, use fresh peaches or berries. In fall, try apples or pears. In winter, consider citrus fruits like oranges or lemons. Each season offers unique flavors. You can even mix fruits for a fun twist. A blend of apples and cranberries can be a great winter choice.
Storage Info
How to Store Leftovers
After you enjoy your Peach Cobbler Dump Cake, save any leftovers in an airtight container. Keep it in the fridge. It will stay fresh for up to five days. Make sure to let it cool completely before putting it away. This helps keep the texture nice and moist.
Reheating Instructions
To reheat your slice, use the microwave. Heat it for about 20-30 seconds. Check if it’s warm enough. You want it hot, but not too hot. If you prefer the oven, preheat it to 350°F (175°C). Place your slice in an oven-safe dish and heat for about 10 minutes. This will keep the topping nice and crispy.
Freezing and Thawing Tips
You can freeze Peach Cobbler Dump Cake if you want to save some for later. Cut it into portions first. Wrap each piece in plastic wrap, then place them in a freezer bag. It will stay good for up to three months. To thaw, move a piece from the freezer to the fridge overnight. Reheat it as mentioned before. Enjoying this dessert later is just as great!
FAQs
How do I know when the Peach Cobbler Dump Cake is done?
You can tell when the Peach Cobbler Dump Cake is done by looking at the top. It should be golden brown. The edges may also bubble, showing it is cooked through. A toothpick inserted in the center should come out clean. If it sticks, give it a few more minutes.
Can I use fresh peaches instead of canned?
Yes, you can use fresh peaches! Just slice them and remove the pits. Fresh peaches can add a great flavor. However, make sure they are ripe for the best taste. You can mix them with a little sugar to enhance their sweetness before adding them to the dish.
What toppings go well with Peach Cobbler Dump Cake?
Toppings can make your dump cake even better! Here are some great options:
– Vanilla ice cream
– Whipped cream
– Chopped nuts (like pecans)
– A sprinkle of cinnamon
These toppings add flavor and texture, making each bite special.
Is this recipe suitable for making ahead of time?
Yes, this recipe is great for making ahead! You can prepare it a day before. Just cover it and store it in the fridge. When ready to serve, bake it as usual. This way, you save time and enjoy it fresh and warm. For the best taste, add ice cream just before serving.
This blog post covers all you need for a perfect Peach Cobbler Dump Cake. We explored key ingredients, from must-haves to optional add-ins for extra flavor. You learned the step-by-step process for prep and baking, plus tips for texture and taste. We discussed tasty variations and how to store leftovers. Now, you’re ready to impress with your skills. Enjoy your delicious creation and share it with loved ones!

