Go Back
- 4 large bell peppers (any color you prefer) - 1 cup cooked quinoa - 1 cup black beans, thoroughly rinsed and drained - 1 cup corn kernels (can be fresh, frozen, or canned) - 1 cup diced tomatoes (use either canned or fresh) - 1 teaspoon ground cumin - 1 teaspoon chili powder - ½ teaspoon garlic powder - 1 cup shredded cheddar cheese (plus more for topping) - ¼ cup chopped fresh cilantro (optional, for garnish) - Salt and pepper, to taste - Olive oil, for drizzling When making cheesy stuffed bell peppers, choose fresh peppers. Look for firm peppers with bright colors. You can use red, yellow, or green peppers. Each color has its own unique taste. Quinoa serves as a great base. It's packed with protein and fiber. Black beans add texture and extra protein. Corn brings sweetness and crunch. Diced tomatoes keep the filling juicy. Spices like cumin and chili powder add depth. Garlic powder enhances the flavor without overpowering. Cheddar cheese ties everything together, making it creamy and delicious. Do not forget to season with salt and pepper. A drizzle of olive oil helps the peppers roast well. This recipe is simple yet full of flavor. For the full details, check the Full Recipe. Each serving contains around 300 calories. It has about 12 grams of protein. You'll find around 10 grams of fat and 8 grams of fiber. This makes it a healthy and filling meal choice. - Baking dish - Aluminum foil - Mixing bowl - Cutting board - Chef’s knife Gather these tools before you start. They make the process smoother and more enjoyable. Having everything ready helps you focus on creating a tasty dish. - Preheat the oven to 375°F (190°C). - Cut the tops off and remove the seeds/membranes from the bell peppers. Start by heating the oven. This step gets the cooking process going right. While it warms up, take your bell peppers. I like to use large ones, as they hold more filling. Slice off the tops carefully, like giving them a haircut. Then, scoop out the seeds and membranes. This keeps the stuffing nice and smooth. Brush the outsides with a bit of olive oil. It helps them roast well. Stand them up in a baking dish, ready for the good stuff. - Combine quinoa, black beans, corn, diced tomatoes, spices, and cheese. - Season with salt and pepper. Next, let’s make the filling. In a big bowl, mix cooked quinoa, black beans, corn, and diced tomatoes. I like to use fresh tomatoes when I can, but canned works too. Add in your spices: ground cumin, chili powder, and garlic powder. They give your filling a nice kick. Then, throw in half of the shredded cheddar cheese. Give it a good stir until everything is mixed well. Don’t forget to season with salt and pepper. Taste it; you want it to be just right. - Fill each pepper with the quinoa mixture. - Top with additional cheddar cheese and bake covered, then uncovered. Now for the fun part—stuffing! Take your bowl of filling and fill each pepper. Press down lightly, so it’s packed tight. Once they’re full, sprinkle the remaining cheddar cheese on top. This makes them extra cheesy and delicious. Cover the baking dish with aluminum foil. Bake them in the oven for 25 minutes. After that, remove the foil. Bake for another 10-15 minutes until the peppers are tender and the cheese is bubbly. Enjoy this process; the aroma will fill your kitchen. For the full recipe, you can refer to the original guide. When selecting fresh bell peppers, look for ones that feel firm and heavy. The skin should be smooth and shiny. Colors can vary, and each brings a unique taste. Red, yellow, and orange peppers are sweeter than green ones. Choose peppers without blemishes or soft spots. For meal prepping stuffed peppers, make the filling in advance. You can store it in the fridge for up to three days. Prepped bell peppers can stay in the fridge, too. Just keep them whole until you’re ready to bake. This saves time on busy days. To add some heat, mix in jalapeños or other spicy peppers. You can also change up the cheese. Try pepper jack for more flavor or feta for a tangy touch. Experimenting with different cheeses can make each batch special. For sauces, drizzle homemade salsa or a creamy avocado sauce on top. A fresh chimichurri adds a bright flavor that pairs well with the dish. These extras can elevate your cheesy stuffed peppers to new heights. Pair your cheesy stuffed peppers with a fresh salad. A simple green salad with a light vinaigrette works well. You can also serve them with rice or quinoa for a hearty meal. For a beautiful presentation, use a nice serving platter. Place the peppers upright to show off their colors. A sprinkle of fresh herbs on top adds a nice touch. Consider serving with a dollop of sour cream or a slice of avocado for extra flair. These tips will help you create delicious and visually appealing cheesy stuffed peppers. For the full recipe, check the recipe section above. {{image_4}} You can swap quinoa for rice. Brown rice, white rice, or even farro work well. These grains add a nice texture. You can also use ground meat. Ground turkey, beef, or chicken makes a hearty filling. Just cook the meat before adding it to your mixture. This adds flavor and protein to your stuffed peppers. If you want a meatless meal, try plant-based substitutes. Crumbled tofu or lentils can work great. They add protein and keep the dish healthy. For a vegan version, use dairy-free cheese. There are many types available today. Nutritional yeast also adds a cheesy flavor without dairy. You can mix it into your filling for extra taste. Seasonal ingredients can elevate your stuffed peppers. In summer, add fresh zucchini or corn. In fall, consider using diced apples or squash for a sweet twist. These ingredients bring a unique flavor to your dish. You can also think about holiday themes. For Thanksgiving, try stuffing your peppers with stuffing mix and cranberries. It’s a fun way to celebrate the season! To keep your cheesy stuffed bell peppers fresh, store them in an airtight container. Place them in the fridge within two hours after cooking. They stay good for about three to four days. If you want to save them longer, freeze the stuffed peppers. Wrap each pepper tightly in plastic wrap and then place them in a freezer bag. They will last up to three months in the freezer. When it's time to enjoy your leftovers, you can reheat them in two ways. For the oven, preheat it to 350°F (175°C). Place the peppers in a baking dish, cover with foil, and heat for about 20 minutes. This method keeps the peppers tender. If you're short on time, use the microwave. Place a pepper on a microwave-safe plate and heat for about two to three minutes. To keep the cheese melty, cover it with a damp paper towel. You can prepare stuffed peppers ahead of time for easy meals. Stuff the peppers and place them in the fridge for up to 24 hours before baking. This gives the flavors time to meld. You can also freeze uncooked stuffed peppers. When you're ready to eat, bake them straight from the freezer, adding a few extra minutes to the cooking time. This way, you'll always have a quick and tasty meal on hand. For more details, check out the Full Recipe. Stuffed peppers last about 3 to 5 days in the fridge. Store them in an airtight container. This keeps them fresh. I recommend eating them within this time. Always check for any signs of spoilage, like a bad smell or mold. Yes, you can freeze cooked stuffed peppers. First, let them cool completely. Wrap each pepper tightly in plastic wrap. Then place them in a freezer bag. They will last for about 2 to 3 months in the freezer. To reheat, thaw them in the fridge overnight, then bake at 375°F until hot. You can use many fillings for stuffed peppers. Here are some ideas: - Rice: White or brown rice works well. - Meats: Ground beef, turkey, or chicken add protein. - Lentils: A great option for a vegetarian dish. - Vegetables: Chopped mushrooms, zucchini, or spinach can boost flavor. Each option brings its own taste. Feel free to mix and match! Stuffed peppers are done when they are tender. The cheese should be melted and bubbly. You can check by piercing a pepper with a fork. It should go in easily. Also, look for a nice golden color on top. This means they are ready to eat! Stuffed peppers are a fun and tasty meal. We covered the right ingredients, like bell peppers, quinoa, and beans. You learned how to prepare the filling and bake them perfectly. I shared tips to enhance flavor and variations to fit any diet. Remember, meal prep can save time and make your week easier. Store leftovers and reheat them for quick meals. Enjoy making this dish your own!

- Cheesy Stuffed Bell Peppers

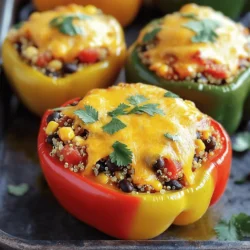
Get ready to impress with these cheesy stuffed bell peppers! This colorful dish combines nutritious quinoa, black beans, and fresh veggies, all topped with melted cheddar for a delightful twist. Ideal for a healthy dinner or a fun family meal, these peppers are not only delicious but also easy to make. Click through to explore the full recipe and learn how to create this mouthwatering dish in just 50 minutes!

Ingredients
  

4 large bell peppers (any color you prefer)

1 cup cooked quinoa

1 cup black beans, thoroughly rinsed and drained

1 cup corn kernels (can be fresh, frozen, or canned)

1 cup diced tomatoes (use either canned or fresh)

1 teaspoon ground cumin

1 teaspoon chili powder

½ teaspoon garlic powder

1 cup shredded cheddar cheese (plus more for topping)

¼ cup chopped fresh cilantro (optional, for garnish)

Salt and pepper, to taste

Olive oil, for drizzling

Instructions
 

Prepare the Oven: Preheat your oven to 375°F (190°C).

    Prep the Peppers: Carefully cut the tops off the bell peppers and remove the seeds and membranes. Lightly brush the outside of each pepper with olive oil to help them roast beautifully. Stand the peppers upright in a baking dish for easy filling.

      Make the Filling: In a large mixing bowl, combine the cooked quinoa, black beans, corn, diced tomatoes, ground cumin, chili powder, garlic powder, and half of the shredded cheddar cheese. If you’re using cilantro, add that now as well. Stir the mixture thoroughly until all ingredients are well incorporated.

        Season: Taste the filling and season generously with salt and pepper to your preference.

          Stuff the Peppers: Take the quinoa mixture and fill each bell pepper generously, pressing down lightly to ensure they are packed tightly.

            Cheesy Topping: Sprinkle the remaining cheddar cheese over the top of each stuffed pepper to create a delicious cheesy layer.

              Bake: Cover the baking dish tightly with aluminum foil and place it in the preheated oven. Bake for 25 minutes.

                Final Browning: After 25 minutes, carefully remove the foil and return the dish to the oven for an additional 10-15 minutes. You're looking for the peppers to be tender and the cheese to be melted and bubbly.

                  Cool and Serve: Once the peppers are done, take them out of the oven and let them cool for a few minutes before serving to avoid burns.

                    Prep Time: 20 minutes | Total Time: 50 minutes | Servings: 4

                      - Presentation Tips: For an eye-catching presentation, serve the stuffed peppers garnished with fresh cilantro or parsley. For added richness and color, you might consider a dollop of sour cream or an avocado slice on top of each pepper.