Go Back
- Tortilla chips - 2 cups cooked chicken, shredded - 1 cup black beans, drained - 1 cup corn, drained - 2 cups shredded cheddar cheese - 1 cup fresh jalapeños, sliced - 1 ripe avocado, diced - 1/2 cup sour cream - 1/2 cup pico de gallo or salsa - 2 tablespoons olive oil - 1 teaspoon ground cumin - 1 teaspoon chili powder - Salt and pepper to taste - Fresh cilantro leaves for garnish For this recipe, you can use about 10-12 ounces of tortilla chips. The cooked chicken can come from a rotisserie chicken, making it easy. You can adjust the amount of cheese to your liking. If you prefer less cheese, try using 1.5 cups instead of 2. For a lighter option, swap sour cream with Greek yogurt. You can use canned corn or frozen corn, just make sure to drain it well. Each serving of these loaded nachos contains around 500 calories. You get protein from the chicken and beans. The cheese adds calcium, while the jalapeños give a kick of vitamin C. If you want a vegetarian option, skip the chicken and add more beans or veggies. This way, you can still enjoy a hearty and tasty dish. 1. Preheat your Oven: First, set your oven to 350°F (175°C). This step is key to getting that perfect melt on your cheese. 2. Prepare the Chicken Mixture: In a large skillet, heat 2 tablespoons of olive oil over medium heat. Add 2 cups of shredded chicken, 1 cup of black beans, and 1 cup of corn. Sprinkle in 1 teaspoon of ground cumin and 1 teaspoon of chili powder, along with a pinch of salt and pepper. Stir well. Cook for about 5-7 minutes, until everything is hot and smells amazing. 3. Layer the Nachos: Grab a large baking sheet. Spread a generous layer of 1 bag of tortilla chips evenly across the surface. 4. Add the Chicken Mixture: Spoon the heated chicken mixture over the chips. Make sure to cover most of the chips for even flavor. 5. Cheesy Goodness: Sprinkle 2 cups of shredded cheddar cheese over the chicken. Aim for full coverage to get that ultimate cheesy experience. 6. Top with Jalapeños: Scatter 1 cup of sliced jalapeños over the cheese. Adjust based on your spice preference. 7. Bake: Place the loaded nachos in the oven. Bake for about 15 minutes, until the cheese is melted, bubbly, and slightly golden. 8. Cool Down: Carefully remove the nachos from the oven using oven mitts. Let them cool for a couple of minutes to avoid burns. 9. Final Touches: After cooling, top with 1 ripe diced avocado, add dollops of 1/2 cup sour cream, and spoon over 1/2 cup pico de gallo or your favorite salsa. 10. Garnish and Serve: Finish by sprinkling fresh cilantro leaves on top for a burst of color and flavor. - Ensuring even distribution of toppings: Spread toppings evenly. This helps every bite taste great. - Baking time and temperature checks: Keep an eye on the nachos. Check around 12 minutes to avoid overcooking. - Creative presentation ideas: Serve nachos on the baking sheet or a colorful platter. Drizzle extra sour cream on top for flair. - Pairing options: Enjoy these nachos with a cold drink. Try a refreshing soda or a light beer for the perfect match. How to achieve the best cheese melt: The key to great nachos is the cheese. Use freshly shredded cheese instead of pre-packaged. Fresh cheese melts better and tastes great. Spread it evenly over your toppings to ensure all parts get that cheesy goodness. Avoiding soggy nachos: To keep your nachos from getting soggy, layer your chips first. Then, add the hot chicken mixture but keep it light. You want some chips exposed to the air. Bake them just long enough to melt the cheese, about 15 minutes at 350°F. Using spices or marinated chicken for extra flavor: For a flavor boost, try marinating your chicken. Use spices like cumin or chili powder before cooking. This makes every bite packed with taste. You can also use chipotle in adobo for a smoky twist. Additional toppings or garnishes to elevate the dish: Don’t stop at the basics! Add sliced olives, diced tomatoes, or pickled red onions. These toppings not only add flavor but also color. Fresh cilantro sprinkled on top gives a nice finish. Tips to avoid overcooking or burning the nachos: Keep an eye on your nachos while they bake. Ovens can vary in heat. If your cheese starts to brown too fast, cover it with foil. This stops burning while letting the cheese melt. Addressing ingredient balance: Make sure not to overload your nachos. Too many toppings can make them hard to eat. Stick to a good balance of chips, cheese, and toppings. This keeps them fun and easy to enjoy. {{image_4}} You can make simple swaps to fit your taste. For a vegetarian version, use beans or veggies instead of chicken. Black beans are a great choice for added protein. You can also mix in corn for sweetness. Try different cheese blends for unique flavors. Pepper jack adds a spicy kick, while mozzarella gives a milder taste. You can adjust the spice level based on your choice of jalapeños. Use fresh jalapeños for heat or jarred ones for a milder flavor. You can also try international twists. For example, BBQ chicken nachos give a sweet and tangy flavor. Use pulled BBQ chicken as a topping for an exciting change. Adjust your recipe for any gathering size. If you have a big crowd, simply double the ingredients. For smaller groups, cut the recipe in half. This way, everyone can enjoy the nachos. You can also use different sizes of serving dishes to fit your needs. Remember, nachos are perfect for sharing! To keep your loaded nachos fresh, store leftovers in an airtight container. This will help prevent them from getting soggy. You can keep them in the fridge for up to three days. The chicken and cheese may lose some texture, but they will still taste good. Reheat your nachos in the oven to maintain that crispy texture. Preheat your oven to 350°F (175°C), then place the nachos on a baking sheet. Heat for about 10 minutes or until warm. If you have extra toppings, like the avocado or sour cream, add those after reheating. For leftover nachos, you can make a nacho casserole. Layer them in a baking dish, add more cheese, and bake until bubbly. You can freeze loaded nachos, but it is best to freeze the components separately. Freeze the chicken mixture and cheese in separate bags. This way, you can thaw and assemble fresh nachos later. To defrost, place the chicken in the fridge overnight. Reassemble the nachos and bake as usual. This method helps keep the taste and texture just right. What type of chicken is best for loaded nachos? I love using rotisserie chicken. It saves time and adds great flavor. You can also use grilled or baked chicken. Just shred it into bite-sized pieces. The key is to keep it moist and tender. Can I make nachos ahead of time? Yes, you can! Prepare the chicken mixture and toppings in advance. Store them separately in the fridge. When ready to eat, just layer everything and bake. This way, you save time and still enjoy hot nachos! Can this recipe be made gluten-free? Absolutely! Just choose gluten-free tortilla chips. Many brands offer tasty options. Check the label to ensure they are certified gluten-free. This way, everyone can enjoy the nachos without worry. Options for low-carb or keto-friendly nachos For a low-carb version, swap chips for sliced bell peppers or zucchini. These veggies hold toppings well. You can also use cheese crisps as a crunchy base. They add flavor without the carbs! What can I use instead of sour cream? You can use Greek yogurt for a healthier twist. It has a similar texture and taste. But if you want something lighter, try mashed avocado. It adds creaminess and healthy fats. Alternatives for cheese for dairy-free diets For dairy-free options, use vegan cheese or nutritional yeast. Vegan cheese melts well and tastes great. Nutritional yeast adds a cheesy flavor without dairy. Both are perfect for those avoiding animal products. In this post, we explored how to create loaded nachos from start to finish. We covered the ideal ingredients, including chicken and tasty toppings. You learned precise measurements and nutritional info for better choices. The step-by-step guide made baking easy, while cooking tips helped avoid mistakes. We also discussed fun variations and storage tips for leftovers. In summary, making nachos is fun and flexible. With the right knowledge, you can impress friends and family at every gathering. Enjoy your nacho journey!

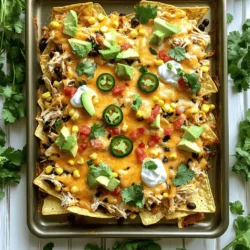
Loaded Nachos with Chicken

Indulge in the ultimate cheesy chicken nachos that are perfect for any occasion! This easy recipe features layers of crispy tortilla chips topped with shredded chicken, black beans, corn, jalapeños, and plenty of gooey cheddar cheese, all baked to perfection. Ready in just 30 minutes, these nachos are a crowd-pleaser. Click through to explore the full recipe and wow your friends with this cheesy delight!

Ingredients
  

1 bag (10-12 oz) of your favorite tortilla chips

2 cups cooked chicken, shredded (rotisserie chicken works great)

1 cup black beans, drained and rinsed

1 cup corn (frozen or canned, drained)

2 cups shredded cheddar cheese (or a blend of your choice)

1 cup fresh jalapeños, sliced (or jarred for convenience)

1 ripe avocado, diced

1/2 cup sour cream (or Greek yogurt for a healthier option)

1/2 cup pico de gallo or your favorite salsa

2 tablespoons olive oil

1 teaspoon ground cumin

1 teaspoon chili powder

Salt and pepper to taste

Fresh cilantro leaves for garnish
Instructions
 

Preheat your Oven: Set your oven to 350°F (175°C) to prepare for baking the nachos.

    Prepare the Chicken Mixture: In a large skillet, heat the olive oil over medium heat. Add in the shredded chicken, black beans, corn, cumin, chili powder, and a pinch of salt and pepper. Stir everything together well, cooking for about 5-7 minutes, or until all ingredients are heated through and aromatic.

      Layer the Nachos: On a large baking sheet, spread a generous layer of tortilla chips evenly across the surface.

        Add the Chicken Mixture: Spoon the heated chicken mixture evenly over the tortilla chips, ensuring it covers most of the chips.

          Cheesy Goodness: Sprinkle the shredded cheddar cheese generously over the chicken mixture, aiming for full coverage for that ultimate cheesy experience.

            Top with Jalapeños: Scatter the sliced jalapeños over the cheese layer, adjusting the amount to your spice preference.

              Bake: Place the loaded nachos in the preheated oven and bake for approximately 15 minutes, or until the cheese is melted, bubbly, and slightly golden.

                Cool Down: Carefully remove the nachos from the oven (it’s hot! Use oven mitts). Allow them to cool for a couple of minutes to prevent burns when you dig in.

                  Final Touches: Once slightly cooled, generously top with diced avocado, add dollops of sour cream, and spoon over the pico de gallo or salsa.

                    Garnish and Serve: Finish by sprinkling fresh cilantro leaves over the top for a burst of color and flavor just before serving.

                      Prep Time: 15 minutes | Total Time: 30 minutes | Servings: 4-6

                        - Presentation Tips: For a festive look, serve the nachos directly on the baking sheet or transfer to a large, brightly colored decorative platter. Drizzle additional sour cream over the top and sprinkle extra cilantro for an eye-catching finish. Enjoy the deliciousness!