Go Back
Making Maple Walnut Granola Clusters is simple. You only need a few key ingredients. Here’s what you will need: - 2 cups rolled oats - 1 cup walnuts, roughly chopped - 1/2 cup almond slices - 1/2 cup unsweetened shredded coconut - 1/3 cup pure maple syrup - 1/4 cup coconut oil, melted - 1/2 teaspoon vanilla extract - 1/2 teaspoon ground cinnamon - 1/4 teaspoon sea salt - 1/2 cup dried cranberries or cherries (optional) Each ingredient plays a big role in flavor and texture. Rolled oats give a nice base. Walnuts add crunch and nutty flavor. Almond slices bring a light taste, while shredded coconut gives a tropical twist. Pure maple syrup sweetens it all naturally. Coconut oil helps everything stick together. Vanilla extract adds warmth. Ground cinnamon gives a hint of spice, and sea salt balances the sweetness. You can add dried fruits for extra flavor if you like. {{ingredient_image_2}} 1. Preheat the oven and prepare the baking sheet: Start by preheating your oven to 325°F (160°C). Line a baking sheet with parchment paper. This step helps your granola not stick. 2. Mix dry ingredients in a bowl: In a large bowl, combine 2 cups of rolled oats, 1 cup of roughly chopped walnuts, 1/2 cup of almond slices, 1/2 cup of shredded coconut, 1/2 teaspoon of ground cinnamon, and 1/4 teaspoon of sea salt. Stir the dry ingredients well to mix them evenly. 3. Combine wet ingredients in a separate bowl: In another bowl, whisk together 1/4 cup of melted coconut oil, 1/3 cup of pure maple syrup, and 1/2 teaspoon of vanilla extract. Mix until smooth. 1. Incorporate the wet mixture into the dry ingredients: Pour the wet mixture over the dry ingredients. Use a spatula to mix them gently. Make sure every dry ingredient gets a good coating of the wet mixture. 2. Form the granola and press it into the baking sheet: Transfer the mixture to your prepared baking sheet. Press it down firmly and evenly into a flat layer. This helps form the clusters when baking. 3. Baking time and temperature details: Place the baking sheet in the oven. Bake for 20 to 25 minutes. Keep an eye on it and rotate the baking sheet halfway through. Look for a golden brown color on the edges. 1. Importance of cooling for cluster formation: Once baked, take the granola out of the oven. Let it cool completely on the baking sheet. This step is key for the granola to harden and form clusters. 2. Breaking into clusters and adding optional ingredients: After it has cooled, use your hands to gently break it into clusters. If you want to add dried cranberries or cherries, fold them in now to distribute evenly. To make the best maple walnut granola clusters, ensure you coat the mixture evenly. This means mixing well so every oat and nut gets that sweet maple flavor. When you pour the wet mixture over the dry, use a spatula to fold it in gently but thoroughly. Press down on the mixture firmly once it is on the baking sheet. This step is crucial. By pressing down, you help the granola stick together. The more compact it is, the better the clusters will form. Keep a close watch while your granola bakes. Set a timer for 20 minutes, but check on it often. Rotate the baking sheet halfway through to help it brown evenly. Look for a golden color on the edges. This means your granola is almost ready. If you see any dark spots, pull it out right away to avoid burning. For serving, you can use a clear glass jar or a rustic bowl. This makes the granola look appealing and shows off those lovely clusters. A dollop of fresh yogurt on top adds creaminess. Drizzle honey over the yogurt for extra sweetness. You can also sprinkle some more walnuts or oats on top for a fun texture. This makes a great breakfast or snack option! Pro Tips Choose Quality Ingredients: Using high-quality nuts and pure maple syrup can significantly enhance the flavor of your granola, making it more delicious and nutritious. Don't Skip the Cooling Step: Allowing the granola to cool completely on the baking sheet is essential for achieving that perfect crunchy cluster texture. Experiment with Mix-Ins: Feel free to add other ingredients like seeds, chocolate chips, or different dried fruits to customize the flavor and texture of your granola. Proper Storage: Store your granola in an airtight container in a cool, dry place to maintain its freshness and crunchiness for up to two weeks. {{image_4}} You can mix up the flavors in your granola easily. Try using different nuts like pecans or hazelnuts. Seeds like pumpkin or sunflower seeds add crunch too. For sweeteners, try honey or agave syrup instead of maple syrup. You can even add flavor extracts like almond or coconut for a fun twist. Each change gives you a new taste to enjoy. You can customize your granola by adding dried fruits like raisins, apricots, or figs. Chocolate chips or cacao nibs can make it extra special. A dash of nutmeg or ginger can bring a warm spice flavor. Feel free to experiment based on what you like. The key is to mix in ingredients that suit your taste buds. If you need gluten-free options, use gluten-free oats. Many brands offer oats that are certified gluten-free. For those who follow a vegan diet, replace honey with maple syrup or agave nectar. You can also use plant-based butter instead of coconut oil. These simple swaps help you enjoy this tasty snack while sticking to your dietary needs. To keep your maple walnut granola clusters fresh, use an airtight container. Glass jars work great. They keep out air and moisture. You can also use plastic containers with tight lids. Make sure the container is clean and dry before adding your granola. This helps it stay crunchy and tasty for longer. To maintain freshness, store the granola in a cool, dry place. Avoid direct sunlight. If you live in a humid area, consider placing a small moisture absorber in the container. This keeps your granola from getting soggy. Homemade granola can last for about two weeks when stored properly. After that, it may lose its crunch and flavor. You can check if your granola has gone stale. If it smells off or tastes bland, it’s time to toss it. Another sign is if it feels soft or chewy instead of crunchy. Batch-making granola saves time. You can prepare a large batch and store it for later use. Make sure to cool the granola completely before storing it. This helps it form clusters and stay fresh. For long-term storage, freeze your granola. Place it in a freezer-safe bag or container. It will last for up to three months. When you’re ready to eat it, just take out what you need. Let it sit at room temperature for a few minutes, and it will be as good as fresh! How long does it take to make granola clusters? Making these tasty granola clusters takes about 35 minutes. This includes 10 minutes of prep time and 25 minutes of baking. You can enjoy homemade granola in no time! Can I use other types of nuts or oats? Yes, you can switch out the nuts and oats. Try pecans or almonds instead of walnuts. You can also use quick oats or steel-cut oats if you prefer. Customize it to fit your taste! Caloric content and serving size details One serving of maple walnut granola clusters is about 1/2 cup. It contains around 200 calories. This makes it a satisfying snack or breakfast option. Health benefits of the ingredients used The oats provide fiber, which helps with digestion. Walnuts are rich in healthy fats and protein. Maple syrup adds sweetness and vitamins. Together, these ingredients make a wholesome snack! What to do if granola doesn’t cluster properly? If your granola won’t cluster, try pressing it down more when forming it. Make sure to bake it until golden brown. Let it cool completely to help it stick together. How to fix overly sweet or bland granola? If your granola is too sweet, reduce the maple syrup next time. To fix bland granola, add a touch more cinnamon or a pinch of salt. You can also mix in more nuts or dried fruits for extra flavor! Making maple walnut granola clusters is simple and fun. We covered the key ingredients, from oats to coconut oil, and went through the preparation and baking steps. You learned tips for making perfect clusters and how to customize flavors. Remember proper storage to keep your granola fresh and crunchy. Granola is a great snack or breakfast choice. With all the options you explored, you can create a delicious recipe that suits your taste. Enjoy making your own tasty treats!

Maple Walnut Granola Clusters

A delicious and crunchy granola made with oats, walnuts, and a touch of maple syrup, perfect for breakfast or snacking.
Prep Time 10 minutes
Cook Time 25 minutes
Total Time 35 minutes
Course Snack
Cuisine American
Servings 8
Calories 200 kcal

Ingredients
  

  • 2 cups rolled oats
  • 1 cup walnuts, roughly chopped
  • 1 2 almond slices
  • 1 2 unsweetened shredded coconut
  • 1 3 pure maple syrup
  • 1 4 coconut oil, melted
  • 1 2 vanilla extract
  • 1 2 ground cinnamon
  • 1 4 sea salt
  • 1 2 dried cranberries or cherries (optional)

Instructions
 

  • Preheat the Oven: Begin by preheating your oven to 325°F (160°C). Prepare a baking sheet by lining it with parchment paper to prevent sticking.
  • Mix Dry Ingredients: In a large mixing bowl, combine the rolled oats, roughly chopped walnuts, almond slices, shredded coconut, ground cinnamon, and sea salt. Stir the mixture well until all dry ingredients are evenly distributed.
  • Combine Wet Ingredients: In a separate bowl, whisk together the melted coconut oil, pure maple syrup, and vanilla extract until the mixture is smooth and fully combined.
  • Incorporate the Wet Mixture: Pour the wet ingredients over the dry mixture and use a spatula or wooden spoon to stir gently but thoroughly, ensuring every dry ingredient is well-coated with the sweet mixture.
  • Form the Granola: Transfer the granola mixture onto the prepared baking sheet. Press it down firmly and evenly into a flat, compact layer—this helps to form the clusters during baking.
  • Bake: Place the baking sheet in the preheated oven and bake for 20-25 minutes. Keep a close eye on it and rotate the baking sheet halfway through to ensure even browning. Look for a golden brown color on the edges as an indicator that it’s ready.
  • Cool Completely: Once baked, take the granola out of the oven and let it cool completely on the baking sheet. This is crucial as it allows the granola to harden and form clusters. Do not rush this process!
  • Break into Clusters: After the granola has cooled, use your hands to gently break it into clusters of your desired size. If you opted for dried cranberries or cherries, fold them into the mixture now, distributing them evenly.
  • Store: Transfer the granola clusters to an airtight container, where they can be stored for up to two weeks while retaining their crunchiness.

Notes

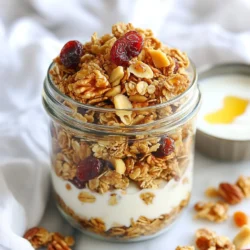
For a delightful presentation, serve the granola in a clear glass jar or a rustic bowl. Top with yogurt and honey for added sweetness.
Keyword breakfast, granola, healthy, snack