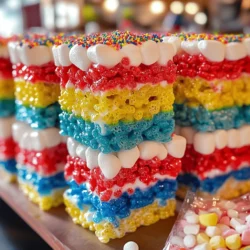
Go Back
- 6 cups Rice Krispies cereal - 4 cups mini marshmallows - 3 tablespoons unsalted butter - 1 teaspoon pure vanilla extract - Food coloring (red, blue, yellow, green) - 1/4 cup rainbow sprinkles (optional) To make Rice Krispie treats, you need simple ingredients. The main ones are Rice Krispies, mini marshmallows, unsalted butter, and vanilla extract. Each of these ingredients plays a key role in the final taste and texture. Rice Krispies give that signature crunch. Mini marshmallows melt to form a gooey base when combined with butter. The butter adds richness, while vanilla gives a nice flavor boost. If you want to add some fun, consider using food coloring. You can create bright layers or swirls. Rainbow sprinkles are a fun touch for decoration. They add a pop of color and a bit of sweetness. Gather these ingredients before you start cooking. You will find the process easy and enjoyable! For the full recipe, check out Crispy Rainbow Rice Krispie Treats. - Prepare the Baking Dish: Start by prepping a 9x13 inch baking dish. Lightly grease it with butter or line it with parchment paper. This helps your treats come out easily. - Melt the Butter: In a large saucepan, set the heat to low and add the unsalted butter. Stir it often as it melts. This takes about 2-3 minutes. - Add Marshmallows: Once the butter melts, add the mini marshmallows to the saucepan. Keep stirring until they melt completely, making a smooth, creamy mix. This process takes about 5-7 minutes. - Incorporate Vanilla: Take the saucepan off the heat. Stir in the pure vanilla extract. This adds a lovely flavor to your marshmallow mix. - Color the Marshmallow Mixture: Divide the melted marshmallow into four bowls. Add a few drops of food coloring to each. Use red, blue, yellow, and green. Mix until the colors are bright and even. - Mix in Rice Krispies: In a large bowl, take 1 cup of Rice Krispies. Pour in one colored marshmallow mix. Use a spatula to fold it gently, coating each piece well. - Press into the Baking Dish: Transfer the colored mix to the baking dish. Press it down firmly with your spatula or greased hands. Make sure it is even and compact. - Layer the Colors: Repeat the mixing with the other colors. Layer each one in the dish to create bright stripes. - Cool the Treats: Let your layered treats cool at room temperature for about 30 minutes. This helps them hold their shape. - Slice and Serve: Once they cool, slice into squares or rectangles. Use a sharp knife for clean cuts. If you like, sprinkle rainbow sprinkles on top for extra fun! Enjoy your delightful and colorful crisp treats! You can find the full recipe to follow along easily. How to Achieve a Chewy Consistency To get that perfect chewy texture, don’t rush the melting process. Heat your butter on low. This keeps it smooth. When adding marshmallows, stir slowly. This helps them melt evenly. Once melted, mix in your Rice Krispies gently. Press them into the baking dish firmly but not too hard. This keeps them soft and chewy. Avoiding Overheating the Butter Overheating the butter can ruin your treats. It may turn brown and change flavor. Keep the heat low and stir often. If the butter bubbles too much, lower the heat. Always remove it from the heat before adding marshmallows. This simple step makes a big difference. Decorating Ideas for Serving Make your treats pop with fun toppings. Try adding rainbow sprinkles for a burst of color. You can also drizzle melted chocolate on top. Use a variety of colors for a festive look. Another idea is to cut them into fun shapes with cookie cutters. Fun Plating Suggestions For a great display, use a colorful platter. Arrange the squares in a rainbow pattern. You can also serve them in colorful paper liners. This adds a special touch and makes them easy to grab. Your guests will love the fun and bright presentation! Be sure to check out the Full Recipe for all the details! {{image_4}} Adding Chocolate You can easily add chocolate to your Rice Krispie treats. Simply melt some chocolate chips in a bowl. Once your marshmallow mixture is smooth, stir in the melted chocolate. This gives your treats a rich, sweet flavor. You can also drizzle melted chocolate on top for a nice finish. Incorporating Peanut Butter Peanut butter adds a creamy twist to the classic treat. Use about 1 cup of creamy peanut butter. Mix it with the melted butter before adding the marshmallows. This change brings a nutty taste that kids and adults love. You can even top your treats with crushed peanuts for extra crunch. Gluten-Free Options For gluten-free Rice Krispie treats, use gluten-free Rice Krispies. They taste the same and work well in this recipe. Ensure your marshmallows are also gluten-free. Most brands are, but it’s always smart to check the label. Vegan Adaptations To make vegan Rice Krispie treats, swap the butter for coconut oil or vegan butter. Use vegan marshmallows instead of regular ones. These simple swaps make a tasty treat everyone can enjoy. You still get that classic flavor without any animal products. Feel free to explore these variations! They keep your Rice Krispie treats fun and exciting. Want to try the full recipe? Check the Full Recipe for all the details! To keep your Rice Krispie treats fresh, store them in an airtight container. This helps prevent them from getting hard or stale. You can also wrap them in plastic wrap before placing them in the container. Make sure to keep them at room temperature. If you put them in the fridge, they may become too firm. I recommend using a glass or plastic container with a tight lid. These containers help maintain softness and moisture. Avoid metal containers, as they can trap moisture and make treats soggy. Can You Freeze Rice Krispie Treats? Yes, you can freeze Rice Krispie treats! Freezing is a great way to save leftovers for later. How to Thaw Properly To thaw, simply take them out of the freezer. Leave them at room temperature for about an hour. This will help them regain their soft texture. If you need them faster, you can use the microwave. Heat them for 10-15 seconds. Just don't overheat them; they can become too warm and sticky. Why Are My Rice Krispie Treats Hard? Your Rice Krispie treats might be hard if you added too many Rice Krispies. Use the right amount to keep them soft. Also, overcooking the marshmallows can make them tough. Always melt them slowly on low heat. Can I Use Different Cereals? Yes, you can use different cereals! Try Corn Pops, Fruity Pebbles, or even Cheerios. These can add new flavors and textures. Just make sure the cereal is crispy to hold the marshmallow mixture well. How Long Do Rice Krispie Treats Last? Rice Krispie treats stay fresh for about three days at room temperature. Keep them in an airtight container. If you want them to last longer, try freezing them for up to six weeks. Can I Make Them Ahead of Time? Yes, you can make them a day ahead. Just store them in an airtight container. They will taste just as good the next day! What Can I Add to Make Them More Fun? You can add many fun things! Try mini chocolate chips, nuts, or even dried fruit. For a colorful twist, mix in some M&M's or colorful marshmallows. You can also top them with sprinkles for a festive look. If you want to recreate this delightful treat, check out the Full Recipe for step-by-step instructions. In this post, we explored how to create classic Rice Krispie treats with tasty variations. I shared key ingredients and steps to make these snacks fun and colorful. You learned tips to get the right texture and keep them fresh. With different flavors and dietary options, there is something for everyone. Enjoy making these treats for any occasion. With a little creativity, you can impress your friends and family with your results. Now, get ready to enjoy the sweet, crunchy goodness!

Rice Krispie Treats

Delight in the colorful fun of Crispy Rainbow Rice Krispie Treats! This easy recipe combines Rice Krispies, marshmallows, and vibrant food coloring for a festive treat that’s perfect for parties or celebrations. With just a few simple steps, you’ll create deliciously layered squares that are as fun to make as they are to eat. Click to explore the full recipe and impress your friends and family with these bright and cheerful treats!

Ingredients
  

6 cups Rice Krispies cereal

4 cups mini marshmallows

3 tablespoons unsalted butter

1 teaspoon pure vanilla extract

Food coloring (red, blue, yellow, green)

1/4 cup rainbow sprinkles (optional)

Instructions
 

Prepare the Baking Dish: Begin by preparing a 9x13 inch baking dish. Lightly grease it with some butter or line it with parchment paper to ensure that your treats can be easily removed later on.

    Melt the Butter: In a large saucepan, set over low heat, add the unsalted butter. Allow it to melt gently, stirring occasionally to prevent it from browning.

      Add Marshmallows: Once the butter is fully melted, add the mini marshmallows to the saucepan. Continuously stir the mixture until the marshmallows are completely melted and the mixture is smooth and creamy. This usually takes about 5-7 minutes.

        Incorporate Vanilla: Remove the saucepan from the heat. Carefully stir in the pure vanilla extract until it is fully incorporated into the melted marshmallow mixture.

          Color the Marshmallow Mixture: Divide the melted marshmallow mixture into four separate bowls. Add a few drops of food coloring to each bowl, using red, blue, yellow, and green to create vibrant shades. Stir each bowl until the color is fully blended into the marshmallow mixture.

            Mix in Rice Krispies: In a large mixing bowl, add 1 cup of the Rice Krispies cereal, then pour in one of the colored marshmallow mixtures. Use a spatula or wooden spoon to gently fold the marshmallow into the cereal, ensuring that each piece is well-coated.

              Press into the Baking Dish: Once mixed, transfer the colored cereal mixture to the prepared baking dish. Press it down firmly with the spatula or with lightly greased hands to compact it evenly into the dish.

                Layer the Colors: Repeat the mixing and pressing steps with the remaining colored marshmallow mixtures, layering each one into the baking dish in order. This will create beautiful stripes of color.

                  Cool the Treats: Allow the layered Rice Krispie treats to cool at room temperature for about 30 minutes. This will help them hold their shape when cutting.

                    Slice and Serve: Once cooled, slice the treats into squares or rectangles using a sharp knife. If desired, sprinkle the top with rainbow sprinkles for an added touch of fun and color before serving.

                      Enjoy your delightful and colorful crisp treats!

                        Prep Time: 15 minutes | Total Time: 45 minutes | Servings: 15-20 squares

                          - Presentation Tips: Arrange the squares on a vibrant platter or serve them in fun, colorful paper liners for a festive touch. Perfect for parties or celebrations!